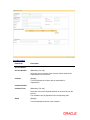
1
Oracle FLEXCUBE Core Banking Collection Transaction User Manual Release 11.6.0.0.0 Part No. E65544-01 October 2015 Collection Transaction User Manual October 2015 Oracle Financial Services Software Limited Oracle Park Off Western Express Highway Goregaon (East) Mumbai, Maharashtra 400 063 India Worldwide Inquiries: Phone: +91 22 6718 3000 Fax: +91 22 6718 3001 www.oracle.com/financialservices/ Copyright © 2015, Oracle and/or its affiliates. All rights reserved. Oracle and Java are registered trademarks of Oracle and/or its affiliates. Other names may be trademarks of their respective owners. U.S. GOVERNMENT END USERS: Oracle programs, including any operating system, integrated software, any programs installed on the hardware, and/or documentation, delivered to U.S. Government end users are “commercial computer software” pursuant to the applicable Federal Acquisition Regulation and agencyspecific supplemental regulations. As such, use, duplication, disclosure, modification, and adaptation of the programs, including any operating system, integrated software, any programs installed on the hardware, and/or documentation, shall be subject to license terms and license restrictions applicable to the programs. No other rights are granted to the U.S. Government. This software or hardware is developed for general use in a variety of information management applications. It is not developed or intended for use in any inherently dangerous applications, including applications that may create a risk of personal injury. If you use this software or hardware in dangerous applications, then you shall be responsible to take all appropriate failsafe, backup, redundancy, and other measures to ensure its safe use. Oracle Corporation and its affiliates disclaim any liability for any damages caused by use of this software or hardware in dangerous applications. This software and related documentation are provided under a license agreement containing restrictions on use and disclosure and are protected by intellectual property laws. Except as expressly permitted in your license agreement or allowed by law, you may not use, copy, reproduce, translate, broadcast, modify, license, transmit, distribute, exhibit, perform, publish or display any part, in any form, or by any means. Reverse engineering, disassembly, or decompilation of this software, unless required by law for interoperability, is prohibited. The information contained herein is subject to change without notice and is not warranted to be error-free. If you find any errors, please report them to us in writing. This software or hardware and documentation may provide access to or information on content, products and services from third parties. Oracle Corporation and its affiliates are not responsible for and expressly disclaim all warranties of any kind with respect to third-party content, products, and services. Oracle Corporation and its affiliates will not be responsible for any loss, costs, or damages incurred due to your access to or use of third-party content, products, or services. Table of Contents Query .............................................................................................................................................. 5 1.1. CLN50 - Search* .................................................................................................................. 5 1.2. CLN55 - Follow-Up Query* .................................................................................................. 7 Follow Up...................................................................................................................................... 10 1.3. CLN26 - Followup By Collector* ......................................................................................... 10 1.4. CLN30 - Group Follow-Up* ................................................................................................ 40 Authorization ................................................................................................................................ 43 1.5. CLN28 - Authorize By Supervisor* ..................................................................................... 43 Repossession .............................................................................................................................. 74 1.6. CLN62 - Initiate Repossession* ......................................................................................... 74 1.7. CLN63 - Collateral Auctioning* .......................................................................................... 78 1.8. CLN64 - Collateral Disposition* .......................................................................................... 80 Customer Sticky Notes ............................................................................................................... 84 1.9. CLN70 - Customer Sticky Notes ........................................................................................ 84 Reallocation ................................................................................................................................. 88 1.10. CLN32 - Collectorwise Re-allocation* .............................................................................. 88 1.11. CLN33 - Reallocation (Queue wise)* ............................................................................... 90 1.12. CLN34 - Reallocation (Individual)* ................................................................................... 93 1.13. CLN35 - Temporary Re-Allocation*.................................................................................. 95 1.14. CLN29 - Exception Case Marking* .................................................................................. 99 Requeue ...................................................................................................................................... 102 1.15. CLN37 - Re-queue* ........................................................................................................ 102 Query CLN50 - Search* Using this option the collector can search the cases on different criteria's. The various search criteria's are customer short name, customer IC and customer ID. The system displays the account number and the name. Using the Follow-Up Query (Fast Path: CLN55) option, the collectors can follow up the accounts which are displayed at different priority level. Definition Prerequisites 8053 - Customer Opening Accounts to be opened for the customers. Modes Available Not Applicable To search the customer 1. Type the fast path CLN50 and click Go or navigate through the menus to Transaction Processing > Collection Transactions > Query > Search. 2. The system displays the Search screen. Search Field Description Field Name Description Search Criteria [Mandatory, Drop-Down] Select the search criteria from the drop-down list. It is the selection criteria for the account to be searched. The options are: Search String Customer Short Name Customer Ic Customer Id [Mandatory, Alphanumeric, 30] Type the value according to the search criteria selected in the corresponding field. Cust ID [Display] This field displays the customer ID. It is ID of the selected customer. Name [Display] This field displays the name of the selected customer. Field Name Description Customer Accounts Account # [Display] This field displays the account number of the customer. Name [Display] This field displays the name of the customer to whom the account belongs. 3. Select the search criteria from the drop down list. 4. Enter the search string and press the <Tab> or <Enter> key. 5. The system displays the records based on the search criteria. Search 6. Select the appropriate record. 7. Click the Close button. CLN55 - Follow-Up Query* Using this option collector can decide on the priority to follow up the cases in this mode. It displays all the cases assigned to a collector. All the accounts of the login collectors are displayed in red, green and yellow color. Red color indicates accounts to be followed up for the day and not yet followed up. Green colour indicates accounts to be followed up for the day and followed up. Yellow color indicates accounts of future dates. Definition Prerequisites Collector should have open cases assigned Modes Available Not Applicable To follow up query 1. Type the fast path CLN55 and click Go or navigate through the menus to Transaction Processing > Collection Transactions > Query > Follow Up Query (List Mode). 2. The system displays the Follow-Up Query screen. Follow-Up Query Field Description Column Name Accounts Description Column Name Description Account # [Display] This column displays the account number of the customer. Name [Display] This column displays the name of the customer to whom the account belongs. Queue code [Display] This column displays the code of the queue to which the account belongs. Action [Display] This column displays the type of the action taken to execute an activity. Action Date [Display] This column displays the date on which the action is taken. Result [Display] This column displays the output of the action. Result Date [Display] This column displays the date of the output action. Next Action [Display] This column displays the next action taken on the basis of the results from the first action. Next Action Date [Display] This column displays the date for the next action. Overdue Amount [Display] This column displays the amount which is due for payment and is not paid till date. Overdue Days [Display] This column displays the number of overdue days for each account. 3. Click the account number whose follow-up is to be taken. 4. The system displays the Followup By Collector screen. 5. Enter the relevant information and click the Follow-Up button. 6. The system displays the Follow-Up Sub screen. 7. Enter the relevant information and click the Ok button. 8. The system displays the "Record successfully modified..Click Ok to continue". Click the Ok button. Follow Up CLN26 - Followup By Collector* Follow up main form displays all the details of the account. Using this option collector can also make the follow-up depending on the status of the account. If the customer has more than one account, the multiple account tab displays all the accounts of the customer. The system displays details on delinquency, collaterals, installments, payments, insurance etc. Definition Prerequisites Account for follow-up Modes Available Not Applicable To view the follow up main form 1. Login as a Collector. 2. Type the fast path CLN26 and click Go or navigate through the menus to Transaction Processing > Collection Transactions > Follow Up > Followup By Collector. 3. The system displays the Followup By Collector screen. Followup By Collector Field Description Field Name Description Filter [Mandatory, Pick List] Select the filter code/name from the pick list. User can choose one of the filters attached to the Collector Group to which he/she belongs to further filter his/her selection criteria for follow-up. Name will be displayed after selecting the filter. If Collector doesn't choose any filter then the first account which is due for today's follow-up will be displayed. Phone (R) [Display] This field displays the residence phone number of the borrower. Phone (O) [Display] This field displays the office phone number of the borrower. Mobile No [Display] This field displays the mobile phone number of the borrower. Field Name Description Account No [Display] This field displays the account number selected by system or by collector for follow-up. Status [Display] This field displays the status of the account number. Customer Id [Display] This field displays the system generated number of the customer. The customer name is displayed in the corresponding field. Address [Display] This field displays the address (includes address1, address2 and address3) of borrower. State [Display] This field displays the state where the borrower stays. Zip [Display] This field displays the zip code. Collector [Display] This field displays the collector code/name to whom the case is allocated. Supervisor [Display] This field displays the supervisor code/name attached to the collector group. Work Flow [Display] This field displays the workflow code/name of the account number. State [Display] This field displays the state code in which the account is lying currently. Queue [Display] This field displays the queue code/name to which the account belongs. Excp Collector [Display] This field displays the exception collector in case the account is marked as exception. Special Code [Display] This field displays the special code attached to the case, if any. 4. Select the filter criteria. 5. Click the Go button. 6. The system displays the details of the selected customer. Multiple A/c s Multiple account tab gets enabled only when the customer has multiple accounts. This tab displays the information about the multiple accounts of the same customer. Field Description Column Name Description Select [Optional, Check Box] Select the check box to follow-up the account. Account No. [Display] This column displays the account number for the customer. Loan Amount [Display] This column displays the loan amount. It is the loan amount disbursed for each account. Column Name Description Overdue Days [Display] This column displays the over due days. It is the number of overdue days for each account. Installment Amount [Display] This column displays the installment amount. It displays the installment amount for each account. Total Overdue Amount [Display] This column displays the total overdue amount. It displays the total overdue amount for each account. Branch [Display] This column displays the branch of the account. Product [Display] This column displays the type of the product. Account Balance [Display] This column displays the balance on the account. Cycle String [Display] This column displays the cycle string. This is the number of times an account falls in the cycle (0-30, 31-60). Delinquency String (For Last 12 Months) [Display] This column displays the delinquency string. Delinquency string for the last 12 months will display whether any installment was overdue that month (value will be 0 – if not overdue, 1- overdue). Account Details Account details tab displays the account details of the delinquent customer. Information available in this section is displayed from the host system and is non editable in collections. This information is used by collectors while they take follow - up actions. Field Description Field Name Description Product Details Product code [Display] This field displays the product code. Product Name [Display] This field displays the product name. CodCcy [Display] This field displays the currency code. It is displayed on the basis of the loan product. Term [Display] This field displays the total number of months in which the loan amount is repaid. Financial Details Loan Amount [Display] This field displays the actual amount disbursed for loan. Total Interest [Display] This field displays the total interest on the loan amount. Field Name Description Penalty [Display] This field displays the over due charges on the loan levied as a penalty. Fee [Display] This field displays the processing fees for the loan. Total Principal [Display] This field displays the total principal as part of the loan amount. Principal Paid [Display] This field displays the total amount of the principal paid. Penalty Paid [Display] This field displays the amount of penalty charges paid. Fee Paid [Display] This field displays the amount of total fee paid. Amount Paid Today [Display] This field displays the amount paid today but not applied to the account. Interest Paid [Display] This field displays the total interest paid. Overdue Amount [Display] This field displays the amount which is due for payment and is not paid till date. Overdue Days [Display] This field displays the number of days after the installment is due. Min. Amount Due [Display] This field displays the minimum amount which is due for payment. Cycle String [Display] This section displays the cycle string. This is the number of times an account falls in the cycle (0-30, 31-60, etc.). Delinquency string(for last 12 months) [Display] This section displays the delinquency string. Delinquency string for the last 12 months will display whether any installment was overdue that month (value will be 0 – if not overdue, 1- overdue). Customer Notes Field Name Description Notes [Display] This field displays the notes. It is the remark for the customer. User [Display] This field displays the name of the user. Last Action/Result (Last 3 Action/Result) Action [Display] This field displays the action taken for the recovery of the loan. For e.g. reminder to a customer. Action Date [Display] This field displays the day on which the action is taken. Result [Display] This field displays the output of the action. Result Date [Display] This field displays the result date. Next Action [Display] This field displays the next action. Next action is taken on the basis of the results from the first action. For e.g. The result for the first action is, customer promised to pay, so the next action will be sending the reminder to the customer for the payment. Next Action Date [Display] This field displays the date for the next action. Collector [Display] This field displays the name of the collector. Notes [Display] This field displays the brief description or the remarks by the collector. Auth Status [Display] This field displays the status of authorisation if the next action needs authorisation. Demo Details Demo details tab displays the demographic details of the customer. Demographic details include Customer's Address details and Customer ID etc. Field Description Field Name Description Borrower Type [Mandatory, Pick List] Select the borrower type from the pick list. It displays the type of borrower based on the relationship of the 1 customer with the loan account. For e.g. SOW . Customer ID [Display] This field displays the customer identification number. Name [Display] This field displays the name of the customer. Marital Status [Display] This field displays the marital status of the customer. Mailing Address Address Line1 [Display] This field displays the first line of the mailing address of the customer. 1 (Sole Owner) Field Name Description Address Line2 [Display] This field displays the second line of the mailing address of the customer. Address Line3 [Display] This field displays the third line of the mailing address of the customer. City [Display] This field displays the city name. State [Display] This field displays the state name. Zip [Display] This field displays the zip code. Permanent Address Address Line1 [Display] This field displays the first line of the permanent address of the customer. Address Line2 [Display] This field displays the second line of the permanent address of the customer. Address Line3 [Display] This field displays the third line of the permanent address of the customer. City [Display] This field displays the city name. State [Display] This field displays the state name. Zip [Display] This field displays the zip code. Phone Details Phone(R) [Display] This field displays the residence phone number of the borrower. Phone(O) [Display] This field displays the office phone number of borrower. Field Name Description Mobile No [Display] This field displays the mobile phone number of borrower. Email ID [Display] This field displays the e-mail ID of the borrower. Collateral Details Asset detail is the detail description of the assets of the customer. These details are available in collection only if the asset details are captured at the time of Loan Application Processing in FCR. Field Description Field Name Description Collateral ID [Display] This field displays the collateral ID. It is the unique identification number assigned to a security. Collateral Code [Display] This field displays the collateral code. Field Name Description Collateral Desc [Display] This field displays the collateral description. Type [Display] This field displays the collateral type. Share % [Display] This field displays the share percentage. Share Value [Display] This field displays the share value. Collateral Value [Display] This field displays the collateral value. Priority [Display] This field displays the priority of the collateral. Details Collateral ID [Display] This field displays the collateral ID. Collateral Code [Display] This field displays the collateral code. Collateral Currency [Display] This field displays the collateral currency. Home Branch [Display] This field displays the home branch. Document Code [Display] This field displays the document code. Non-Standard Coll. Non-Standard Collateral [Display] Description 1 [Display] This field displays the non standard collateral. This field displays the primary description. Description 2 [Display] This field displays the secondary description. Automobile Coll. Field Name Description Chasis # [Display] This field displays the chasis number. Chasis is a framework of an automobile. Engine # [Display] This field displays the engine number. Registration # [Display] This field displays the registration number. Model Name [Display] This field displays the model name. Mfg Year Month (YYYYMM) [Display] Description 1 [Display] This field displays the manufacturing year and month of the automobile. This field displays the primary description. Description 2 [Display] This field displays the secondary description. Financial Securities Financial Security Code [Display] Financial Security Currency [Display] Number of Units [Display] This field displays the financial security code. This field displays the financial security currency. This field displays the number of units. Total Value of Securities [Display] Series Number 1 [Display] This field displays the total value of the security. This field displays the primary series number. Series Number 2 [Display] This field displays the secondary series number. Property Coll. Location [Display] This field displays the location of the property. Field Name Description Cost Price [Display] This field displays the cost of the property. Area Unit [Display] This field displays the area unit. Area unit is the measurement parameter for the property. For e.g. hectares, square feet, etc. Total Area [Display] This field displays the area of the property. Type of Property [Display] This field displays the type of property. The type of property can be of various types. For e.g. apartments, bungalow, penthouse, land/plot, etc. Date of Lease Expiry [Display] Forced Sale Value [Display] This field displays the date of lease expiry. This field displays the forced sale value. Quit Rent Value [Display] This field displays the quit rent value. Description 1 [Display] This field displays the primary description. Description 2 [Display] This field displays the secondary description. Coll. Header Type of Charge [Display] This field displays the type of charge. Name of Lender [Display] This field displays the name of lender. Asset Class [Display] This field displays the asset class. Make [Display] This field displays the make. Model [Display] This field displays the model. Field Name Description Coll. Valuation Data Original Value [Display] This field displays the original value of the collateral. Date of Valuation [Display] This field displays the valuation date of the collateral. Last Value [Display] This field displays the last value. Date of Valuation [Display] This field displays the date of valuation. Market Value [Display] This field displays the market value Valuation Source [Display] This field displays the valuation source. Valuation Edition [Display] This field displays the valuation edition. Valuation Supplement [Display] This field displays the valuation supplement. Account Insurance Insurance Plan Code [Display] Insurance Policy Number [Display] Assured Value [Display] This field displays the insurance plan code. This field displays the insurance policy number. This field displays the assured value. Amount Block Recovery [Display] Maturity Date [Display] This field displays the amount block recovery. This field displays the maturity date. Next Premium Due Date [Display] Insurance Premium Billing [Display] This field displays the next premium due date. This field displays the insurance premium billing. Field Name Description Manual [Display] This field displays the manual. Premium Billing Account [Display] Percentage [Display] This field displays the premium billing account. This field displays the percentage. Insurance Premium Amount [Display] This field displays the insurance premium amount. Coll. Deeds Status of Deeds [Display] This field displays the status of deeds. Name of Custodian [Display] This field displays the name of custodian. Date Deeds Sent [Display] This field displays the date on which the deeds were sent. Expected Return Date [Display] Deed Details [Display] This field displays the expected return date. This field displays the deed details. Registering Authority [Display] This field displays the registering authority. Guarantee Guarantor [Display] This field displays the name of the guarantor of the collateral ID. From Date [Display] This field displays the date from which the guarantee is applicable for the collateral. To Date [Display] This field displays the date till which the guarantee is applicable for the collateral. Status [Display] This field displays the status of the guarantor. Field Name Description Comments [Display] This field displays the comments, if any. Inst Details Installment tab displays the details of the installment like installment schedule, Principal amount, interest amount etc. Field Description Column Name Description Stage No. [Display] This column displays the stage number. If the loan amount is big, then the loan is disbursed in various stages. Each stage of disbursement has unique stage number. Installment No. [Display] This column displays the installment number. The repayment of loan is divided into number of installment. Each installment has a installment number. Column Name Description Installment Date [Display] This column displays the date on which the installment for loan is paid. Principal Amount [Display] This column displays the total amount of the loan. Interest is not included in the principal amount. Interest Amount [Display] This column displays the additional charge on the principal amount. Installment Outstanding [Display] Charges Outstanding [Display] This column displays the installment due for payment. This column displays the outstanding charges. These charges are due for payment. Outstanding Principal [Display] Days [Display] This column displays the principal amount due for payment. This column displays the number of days overdue for an installment. Payment Details Payment details tab displays the information about the payments made by the customer towards his account. Field Description Column Name Description Installment Date [Display] This column displays the due date of the installment. Principal [Display] This column displays the principal. Principal is the total loan amount excluding interest. Principal Paid [Display] This column displays the total amount of the principal that is already paid. Interest [Display] This column displays the interest. Interest is the surplus amount which is charged on the principal amount. Interest Paid [Display] This column displays the actual amount paid as an interest. Column Name Description Penalty And Other Charges [Display] This column displays the penalty and other charges. The penalty and other charges are the extra charges excluding principal and interest. For e.g. processing fees, registration charges, etc. Penalty And Other Charges Paid [Display] Fee [Display] This column displays the amount of penalty and other charges paid if the due amount is not paid on time. This column displays the total fee for processing the loan. Fee Paid [Display] This column displays the total amount of fee that is already paid. Activity Hist Activity history tab displays the list of activities that has been done on an account as part of the follow-up activities. Field Description Column Name Description Activity Date [Display] This column displays the execution date of the activity. Activity [Display] This column displays the type of the activity (system driven or user driven). Activity Details [Display] This column displays the activity details. It is the detail of the activity, whether it is the case of reallocation or reassign. Collector [Display] This column displays the name of the collector who has executed the activity. Action [Display] This column displays the type of the action taken to execute an activity. Result [Display] This column displays the final result of the action taken on the activity. Next Action [Display] This column displays the next action to be taken on the activity. Next action is the future action. It depends on the result of the action taken at the initial stage. Coll Log Collection log tab allows Collector to display history of Action/Result taken place till date. Field Description Column Name Description Collector [Display] This column displays the name of the collector. Collector Group [Display] This column displays the name of the collector group to which the collector belongs. Workflow Code [Display] This column displays the workflow code attached to the account. State Code [Display] This column displays the state code of the workflow presently associated with the account. Action [Display] This column displays the action taken on the account in the workflow state. Action Date [Display] This column displays the date of the action taken. Column Name Description Result [Display] This column displays the result of the action. Result Date [Display] This column displays the date of the result. Overridden Next Action [Display] Next Action [Display] This column displays the automated action which was overridden by another action. This column displays the next action. It is the future action. It depends on the result of the action taken earlier. Next Action Date [Display] This column displays the next action date. It is the future date of the action. Notes By Collector [Display] This column displays the notes by collector. Notes by collector are comments added by collector during follow-up. Authorizer [Display] This column displays the authoriser for that action. PTP History This tab displays the history of the promises received by the collector for an account during the follow-up. Field Description Column Name Description PTP Plan# [Display] This column displays the PTP plan number. A single plan can have multiple PTP. Sr No# [Display] This column displays the serial number displayed in the PTP details. Promise Taken By [Display] This column displays the name of the collector who has received the PTP from the customer. Promise Date [Display] This column displays the date on which the promise was received. Promise Amount [Display] This column displays the promise amount. Column Name Description Status [Display] This column displays the status of the PTP. The different statuses are PTP broken, PTP fulfilled and PTP unused. Promise By [Display] This column displays the customer ID who has promised to pay. Coll Summary Collection summary tab displays the delinquency details of the account. Field Description Field Name Delinquency Details Description Field Name Description Non Starter [Display] This field displays the non starter status of the account. The check box is selected if the account is a non starter account. Non starter accounts are the accounts, wherein customers do not pay the first due installment. Peak OD Days [Display] This field displays the maximum number of overdue days of an account. Peak OD Amount [Display] This field displays the maximum amount overdue for an account. No. Of Times Delinquent [Display] No. Of Times Self Cured [Display] No. Of OD A/C (Self) [Display] Total OD Amount (Self) [Display] This field displays the number of times the account is delinquent. This field displays the number of times the account is delinquent and is cured on its own. This field displays the number of times the account is overdue where the borrower is a account holder. This field displays the total overdue amount. It is the total amount due by the loan account holder. No. Of OD A/C (Group) [Display] This field displays the number of overdue account. It displays the number of accounts, where the customer is a group customer. Total OD Amount (Group) [Display] This field displays the total overdue amount. It displays the total amount due as a group customer. Written Off [Display] This field displays the written off status of the account. The check box is selected if the account is marked as write off. Last Resolution Last resolution displays the details of the resolved account. Date [Display] This field displays the date of the resolution i.e. when the account was last resolved and moved out of collection. Field Name Description Collector Group [Display] This field displays the collector group. Collector [Display] This field displays the name of the collector who was working on it. Action Taken [Display] This field displays the details of the action taken, when the account was resolved. Action Summary Total Attempts [Display] This field displays the number of attempts made to resolve the case. Success Attempts [Display] This field displays the success attempts for the action. For e.g. If the customer promises to pay the amount and the PTP is not breached. No. Of PTPs [Display] This field displays the number of times the PTP is received as result. No. Of PTPs Kept [Display] This field displays the number of times the PTP is fulfilled. No. Of PTPs Broken [Display] Consecutive Broken [Display] This field displays the number of times the PTP is broken. This field displays the number of times the PTP is consecutively breached. Next Bucket Movement Flow Date [Display] This field displays the flow date. Flow Days [Display] This field displays the flow days. Auth/Esc Hist Authorization/escalation tab display the history of authoriszations and escalation that is performed on an account. Field Description Field Name Description Collector Code [Display] This field displays the collector code. It is the unique code of the collector assigned to the account. Authorizer [Display] This field displays the name of authorisation authority for action. Next Action Code [Display] This field displays the future action code. Activity [Display] This field displays the activity performed on the account. The activity is a system activity or a user activity. Next collector [Display] This field displays the name of the next collector to whom the account is transferred. Authorize Date [Display] This field displays the authorise date. Insurance Details Field Description Field Name Description Insurance Type [Display] This field displays the type of insurance. Insurance Code [Display] This field displays the code of the insurance type. Amount Insured [Display] This field displays the amount which is insured. Tot. Prem. Billed [Display] This field displays the total premium which is billed. Tot. Prem. Paid [Display] This field displays the total premium which is paid. Tot. Prem. Remitted [Display] This field displays the total premium which is remitted. 7. Click the Follow-Up button. 8. The system displays the Follow-Up Sub screen. Follow-Up Sub Collector can decide on the actions to be taken on the cases and based on the results decide on the next actions for the same. Field Description Field Name Description Account No [Display] This field displays the account number for the follow-up. Action Code [Display] This field displays the action applicable to the collector group for the case. Action Date [Display] This field displays the process date. Result Code [Display] This field displays the result applicable to the selected action. Result Date [Display] This field displays the process date. Field Name Description Amount [Display] This field displays the PTP amount that is paid in the followup. Next Action Code [Display] This field displays the future action applicable to the selected action/result. Next Action Date [Display] This field displays the future date for the action. Reason Code [Display] This field displays the code assigned to each reason. It gives the reason for delinquency. Person Contacted [Display] This field displays the name of the person contacted in the followup. Notes By Collector [Mandatory, Alphanumeric, 4000] Type the notes by collector. It is the brief description of the follow-up by the collector. 9. 10. Enter the relevant information and click the Ok button. The system displays the Followup By Collector screen. CLN30 - Group Follow-Up* Using this option field collectors can follow up on one or more cases. All the accounts are displayed, the collector can select the number of accounts and can take the appropriate action. On selecting the option Select all, the collector can follow-up all the accounts assigned. Definition Prerequisites Collector should have open cases assigned Modes Available Not Applicable To perform group follow up 1. Type the fast path CLN30 and click Go or navigate through the menus to Transaction Processing > Collection Transactions > Follow Up > Group Follow Up. 2. The system displays the Group Follow-Up screen. Group Follow-Up Field Description Field Name Description Select All [Optional, Check Box] Select the Select All check box to select all the accounts in the list of collector accounts for follow-up. Column Name Description Account No. [Display] This column displays the account number of the customer. Name [Display] This column displays the name of the customer. Queue Code [Display] This column displays the name and code of the queue to which the account belongs. State [Display] This column displays the state in which the account is currently lying. Column Name Description Total Overdue Amount [Display] Last Action Code [Display] This column displays the total overdue amount for each account. This column displays the code of the last action performed on the account. Last Action Date [Display] This column displays the date on which the last action was performed on the account. Last Result Code [Display] This column displays the last result code. Last Result Date [Display] This column displays the last result date. Next Action Code [Display] This column displays the future action code to be performed on the account. Next Action Date [Display] This column displays the future date for the action. Note Collector [Display] This column displays the note for the collector. Select [Optional, Check Box] Select the Select check box to pick a particular account in the list of collector accounts for follow-up. 3. Select the account number(s) by clicking the Select check box. 4. Enter the relevant information and click the Follow-Up button. 5. The system displays the Follow-Up Sub screen. Authorization CLN28 - Authorize By Supervisor* Certain cases need the authorisation by supervisor for the next action chosen by the collector. e.g. VIP cases. Using this option a supervisor can authorise the next action taken by the collector during the follow-up. All the accounts of the customers are displayed in the Multiple Account tab. The system displays details on delinquency, collaterals, installments, payments, insurance etc. Definition Prerequisites Supervisor should have cases assigned to him for authorisation Modes Available Not Applicable To authorize by supervisor 1. Login as a supervisor. 2. Type the fast path CLN28 and click Go or navigate through the menus to Transaction Processing > Collection Transactions > Authorization > By Supervisor. 3. The system displays the Authorize By Supervisor screen. Authorize By Supervisor Field Description Field Name Description Filter [Mandatory, Pick List] Select the appropriate filter/name from the pick list. This is disabled for supervisor authorisation. Phone (R) [Display] This field displays the residence phone number of the borrower. Phone (O) [Display] This field displays the office phone number of the borrower. Mobile No [Display] This field displays the mobile phone number (if available) of the borrower. No. of A/Cs Pending for Authorization [Display] This field displays the number of accounts which are pending for authorisation. Field Name Description Account No [Display] This field displays the account number selected by system or by collector for follow-up. The customer name is displayed in the corresponding field. Status [Display] This field displays the status of the account number. Customer Id [Display] This field displays the customer ID of the borrower. The customer ID is auto-generated by the system. Address [Display] This field displays the address of the borrower. State [Display] This field displays the state. Zip [Display] This field displays the zip code. Collector [Display] This field displays the name and code of collector to whom the case is allocated. Supervisor [Display] This field displays the name and code of the supervisor attached to the collector group. Workflow [Display] This field displays the name and code of the current work flow of the account number. State [Display] This field displays the state in which the account is lying currently. Queue [Display] This field displays the name and code of the queue to which the account belongs. Excp Collector [Display] This field displays the exception collector of the queue to which the case belongs. Special Code [Display] This field displays the special code attached to the case, if any. 4. Select the filter criteria. 5. Click on the Go button. 6. The system displays the first record to be authorized by the supervisor. Multiple A/c s Multiple accounts tab gets enabled only when the customer has multiple accounts. This tab displays the information about the multiple accounts of the same customer. Field Description Column Name Description Select [Optional, Check Box] Select the check box to follow up the account. Account No. [Display] This column displays the account number of the customer. Loan Amount [Display] This column displays the loan amount disbursed for each account. Overdue Days [Display] This column displays the overdue days for each account. Column Name Description Installment Amount [Display] Total Overdue Amount [Display] Branch [Display] This column displays the installment amount for each account. This column displays the total overdue amount for each account. This column displays the branch of the account. Product [Display] This column displays the type of the product. Account Balance [Display] This column displays the balance on the account. Cycle String [Display] This column displays the number of times an account falls in the cycle (0-30, 31-60, etc.). Delinquency String (For Last 12 Months) [Display] This column displays the delinquency string. Delinquency string for the last 12 months will display whether any installment was overdue that month (value will be 0 – if not overdue, 1- overdue). Plan ID [Display] This column displays the plan ID. Account Details Account details tab displays the account details of the delinquent customer. Information available in this section is displayed from the host system and is non editable in collections. This information is used by collectors while they take follow - up actions. Field Description Field Name Description Product Details Product code [Display] This field displays the product code. Product Name [Display] This field displays the product name. CodCcy [Display] This field displays the currency code. It is displayed on the basis of the loan product. Term [Display] This field displays the total number of days in which the loan amount is repaid. Financial Details Loan Amount [Display] This field displays the actual amount disbursed for loan. Field Name Description Total Interest [Display] This field displays the total interest on the loan amount. Penalty [Display] This field displays the over due charges on the loan levied as a penalty. Fee [Display] This field displays the processing fees for the loan. Total Principal [Display] This field displays the total principal as part of the loan amount. Principal Paid [Display] This field displays the total amount of the principal paid. Penalty Paid [Display] This field displays the amount of penalty charges paid. Fee Paid [Display] This field displays the amount of total fee paid. Amount Paid Today [Display] Interest Paid [Display] This field displays the amount paid today but not applied to the account. This field displays the total interest paid. Overdue Amount [Display] This field displays the amount which is due for payment and is not paid till date. Overdue Days [Display] This field displays the number of days the installment is due. Min. Amount Due [Display] This field displays the minimum amount which is due for payment. Cycle String [Display] This section displays the number of times an account falls in the cycle (0-30, 31-60, etc.). Field Name Description Delinquency string (for last 12 months) [Display] This section displays the delinquency string. Delinquency string for the last 12 months will display whether any installment was overdue that month (value will be 0 – if not overdue, 1- overdue). Customer Notes Notes [Display] This field displays the notes. It is the remark for the customer. User [Display] This field displays the user name. Column Name Description Last Action/Result (Last 3 Action/Result) Action [Display] This column displays the action taken for the recovery of the loan. For e.g. reminder to a customer. Action Date [Display] This column displays the day on which the action is taken. Result [Display] This column displays the output of the action. Result Date [Display] This column displays the result date. Next Action [Display] This column displays the next action taken on the basis of the results from the first action. For e.g. The result for the first action is, customer promised to pay, so the next action will be sending the reminder to the customer for the payment. Next Action Date [Display] This column displays the date for the next action. Collector [Display] This column displays the name of the collector. Column Name Description Notes [Display] This column displays the brief description or the remarks by the collector. Auth Status [Display] This column displays the status of authorisation if the next action needs authorisation. Demo Details Demo details tab displays the demographic details of the customer. Demographic details include Customer's Address details, Customer ID etc. Field Description Field Name Description Borrower Type [Mandatory, Pick List] Select the borrower type from the pick list. It displays the type of borrower based on the relationship of the 2 customer with the loan account. For e.g. SOW . Customer ID [Display] This field displays the customer identification number. Name [Display] This field displays the name of the customer. Marital Status [Display] This field displays the marital status of the customer. Mailing Address Address Line1 [Display] This field displays the first line of the mailing address of the customer. Address Line2 [Display] This field displays the second line of the mailing address of the customer. Address Line3 [Display] This field displays the third line of the mailing address of the customer. City [Display] This field displays the city name. State [Display] This field displays the state name. Zip [Display] This field displays the zip code. Permanent Address Address Line1 [Display] This field displays the first line of the permanent address of the customer. Address Line2 [Display] This field displays the second line of the permanent address of the customer. 2 (Sole Owner) Field Name Description Address Line3 [Display] This field displays the third line of the permanent address of the customer. City [Display] This field displays the city name. State [Display] This field displays the state name. Zip [Display] This field displays the zip code. Phone Details Phone (R) [Display] This field displays the residence phone number of the borrower. Phone (O) [Display] This field displays the office phone number of the borrower. Mobile No [Display] This field displays the mobile phone number of the borrower. Email ID [Display] This field displays the e-mail ID of the borrower. Collateral Details Asset detail is the detail description of the assets of the customer. These details are available in collection only if the asset details are captured at the time of Loan Application Processing in FCR. Field Description Field Name Description Collateral ID [Display] This field displays the collateral ID. It is the unique identification number assigned to a security. Collateral Code [Display] This field displays the collateral code. Collateral Desc [Display] This field displays the collateral description. Type [Display] This field displays the type. Share % [Display] This field displays the share percentage. Share Value [Display] This field displays the share value. Collateral Value [Display] This field displays the collateral value. Field Name Description Priority [Display] This field displays the priority of the collateral. Details Collateral ID [Display] This field displays the collateral ID. Collateral Code [Display] This field displays the collateral code. Collateral Currency [Display] This field displays the collateral currency Home Branch [Display] This field displays the home branch. Document Code [Display] This field displays the document code. Non-Standard Coll. Non Standard Collateral [Display] Description 1 [Display] This field displays the non standard collateral. This field displays the primary description. Description 2 [Display] This field displays the secondary description. Automobile Coll Chasis # [Display] This field displays the chasis number. Chasis is a framework of an automobile. Engine # [Display] This field displays the engine number. Registration # [Display] This field displays the registration number. Model Name [Display] This field displays the model name. Field Name Description Mfg Year Month (YYYYMM) [Display] Description 1 [Display] This field displays the manufacturing year and month of the automobile. This field displays the primary description. Description 2 [Display] This field displays the secondary description. Financial Securities Financial Security Code [Display] Financial Security Currency [Display] Number of Units [Display] This field displays the financial security code. This field displays the financial security currency. This field displays the number of units. Total Value of Securities [Display] Series Number 1 [Display] This field displays the total value of the security. This field displays the primary series number. Series Number 2 [Display] This field displays the secondary series number. Property Coll. Location [Display] This field displays the location of the property. Cost Price [Display] This field displays the actual cost of the property. Area Unit [Display] This field displays the measurement parameter for the property. For e.g. hectares, square feet, etc. Total Area [Display] This field displays the actual area of the property. Type of Property [Display] This field displays the type of property. For e.g. apartments, bungalow, penthouse, land/plot, etc. Field Name Description Date of Lease Expiry [Display] Forced Sale Value [Display] This field displays the date of lease expiry. This field displays the forced sale value. Quit Rent Value [Display] This field displays the quit rent value. Description 1 [Display] This field displays the primary description. Description 2 [Display] This field displays the secondary description. Coll. Header Type of Charge [Display] This field displays the type of charge. Name of Lender [Display] This field displays the name of lender. Asset Class [Display] This field displays the asset class. Make [Display] This field displays the make. Model [Display] This field displays the model. Coll Valuation Data Original Value [Display] This field displays the original value of the collateral. Date of Valuation [Display] This field displays the valuation date of the original value of the collateral. Last Value [Display] This field displays the last value. Date of Valuation [Display] This field displays the valuation date of the last value of the collateral. Field Name Description Market Value [Display] This field displays the market value. Valuation Source [Display] This field displays the valuation source. Valuation Edition [Display] This field displays the valuation edition. Valuation Supplement [Display] This field displays the valuation supplement Account Insurance Insurance Plan Code [Display] Insurance Policy Number [Display] Assured Value [Display] This field displays the insurance plan code. This field displays the insurance policy number. This field displays the assured value. Amount Block Recovery [Display] Maturity Date [Display] This field displays the recovery amount block. This field displays the maturity date. Next Premium Due Date [Display] Insurance Premium Billing [Display] Manual [Display] This field displays the next premium due date. This field displays the insurance premium billing. This field displays the manual. Premium Billing Account [Display] Percentage [Display] This field displays the premium billing account. This field displays the percentage. Insurance Premium Amount Coll. Deeds [Display] This field displays the insurance premium amount. Field Name Description Status of Deeds [Display] This field displays the status of deeds. Name of Custodian [Display] This field displays the name of custodian. Date Deeds Sent [Display] This field displays the date on which the deeds were sent. Expected Return Date [Display] Deed Details [Display] This field displays the expected return date. This field displays the deed details. Registering Authority [Display] This field displays the registering authority. Guarantee Guarantor [Display] This field displays the name of the guarantor of the collateral ID. From Date [Display] This field displays the date from which the guarantee is applicable for the collateral. To Date [Display] This field displays the date till which the guarantee is applicable for the collateral. Status [Display] This field displays the status of the guarantor. Comments [Display] This field displays the comments, if any. Inst Details Installment tab displays the details of the installment like installment schedule, Principal amount, interest amount etc. Field Description Column Name Description Stage No. [Display] This column displays the stage number. If the loan amount is big, then the loan is disbursed in various stages. Each stage of disbursement has unique stage number. Installment No. [Display] This column displays the installment number. The repayment of loan is divided into number of installments. Each installment has a installment number. Installment Date [Display] This column displays the date on which the installments for the loan is paid. Principal Amount [Display] This column displays the principal amount. Principal amount is the total amount of the loan. Interest is not included in the principal amount. Column Name Description Interest Amount [Display] This column displays the additional amount charged on the principal amount. Installment Outstanding [Display] Charges Outstanding [Display] Outstanding Principal [Display] Days [Display] This column displays the installment due for payment. This column displays the charges due for payment. This column displays the principal amount due for payment. This column displays the number of days overdue for an installment. Payment Details Payment details tab displays the information about the payments made by the customer towards his account. Field Description Column Name Description Installment Date [Display] This column displays the due date of the installment. Principal [Display] This column displays the principal, which is the total loan amount excluding interest. Principal Paid [Display] This column displays the total amount of the principal that is already paid. Interest [Display] This column displays the interest. Interest is the surplus amount which is charged on the principal amount. Interest Paid [Display] This column displays the amount paid as an interest. Penalty And Other Charges [Display] This column displays the penalty and other charges. The penalty and other charges are the extra charges excluding principal and interest. For e.g. processing fees, registration charges, etc. Penalty And Other Charges Paid [Display] Fee [Display] This column displays the amount of penalty and other charges paid if the due amount is not paid on time. This column displays the total fee for processing the loan. Fee Paid [Display] This column displays the total amount of fee that is already paid. Activity Hist Activity history tab displays the list of activities that has been done on an account as part of the follow-up activities. Field Description Column Name Description Activity Date [Display] This column displays the execution date of the activity. Activity [Display] This column displays the activity. The activity can be system driven or user driven. Activity Details [Display] This column displays the activity details, like whether it is the case of reallocation or reassign. Collector [Display] This column displays the name of the collector who has executed the activity. Action [Display] This column displays the type of the action taken to execute an activity. Column Name Description Result [Display] This column displays the final result of the action taken on the activity. Next Action [Display] This column displays the next action to be performed. It depends on the result of the action taken at the initial stage. Coll Log Collection log tab allows Collector to display history of Action/Result taken place till date. Field Description Column Name Description Collector [Display] This column displays the name of the collector. Collector Group [Display] This column displays the name of the collector group, to which the collector belongs. Column Name Description Workflow Code [Display] This column displays the workflow code attached to the account. State Code [Display] This column displays the state code. It the status of the account in the workflow. There are various stages in recovery of the outstanding money due from the customer. For e.g. Promise to Pay, Customer breaks PTP or call customer on mobile. Action [Display] This column displays the action taken on the account in the workflow state. Action Date [Display] This column displays the day on which the action was taken. Result [Display] This column displays the result of the action. Result Date [Display] This column displays the date of the result. Overridden Next Action [Display] Next Action [Display] This column displays the automated action which was overridden by another action. This column displays the next action. It depends on the result of the action taken earlier. Next Action Date [Display] This column displays the date of the next action. Notes By Collector [Display] This column displays the notes by collector. Notes by collector are comments added by collector during follow-up. PTP History This tab displays the history of the promises received by the collector for an account during the follow-up. Field Description Field Name Description PTP Plan# [Display] This field displays the PTP plan number. A single plan can have multiple PTP. Sr No# [Display] This field displays the serial number. It is the serial number in the PTP details. Promise Taken By [Display] This field displays the name of the collector who has received the PTP from the customer. Promise Date [Display] This field displays the date on which the promise was received. Promise Amount [Display] This field displays the promise amount. Field Name Description Status [Display] This field displays the status. The different statuses are PTP broken, PTP fulfilled and PTP unused. Promise By [Display] This field displays the customer ID who has promised to pay. Coll Summary Collection summary tab displays the delinquency details of the account. Field Description Field Name Description Delinquency Details Non Starter [Display] This field displays whether the account is a non starter account. Non starter accounts are the accounts, wherein customers do not pay the first due installment. Field Name Description Peak OD Days [Display] This field displays the maximum number of overdue days of an account. Peak OD Amount [Display] This field displays the maximum amount overdue for an account. No. Of Times Delinquent [Display] No. Of Times Self Cured [Display] No. Of OD A/C (Self) [Display] Total OD Amount (Self) [Display] No. Of OD A/C (Group) [Display] Total OD Amount (Group) [Display] Written Off [Display] This field displays the number of times the account is delinquent. This field displays the number of times the account is delinquent and is cured on its own. This field displays the number of times the account is overdue where the borrower is an account holder. This field displays the total amount due by the loan account holder. This field displays the number of accounts, where the customer is a group customer. This field displays the total amount due as a group customer. This field displays whether the account is marked as write off. The written off check box is selected if the account is marked as write off. Last Resolution Last resolution displays the details of the resolved account. Date [Display] This field displays the date of the resolution i.e. when the account was last resolved and moved out of collection. Collector Group [Display] This field displays the collector group. Collector [Display] This field displays the name of the collector who was working on it. Field Name Description Action Taken [Display] This field displays the details of the action taken, when the account was resolved. Action Summary Total Attempts [Display] This field displays the number of attempts made to resolve the case. Success Attempts [Display] This field displays the successful result for the action. For e.g. If the customer promises to pay the amount, and the PTP is not breached. No. Of PTPs [Display] This field displays the number of times the PTP is received as result. No. Of PTPs Kept [Display] This field displays the number of times the PTP is successful. No. Of PTPs Broken [Display] Consecutive Broken [Display] This field displays the number of times the PTP is unsuccessful. This field displays the number of times the PTP is consecutively breached. Next Bucket Movement Flow Date [Display] This field displays the flow date of the next bucket movement. Flow Days [Display] This field displays the number of flow days of the next bucket movement. Auth/Esc Hist Authorization/escalation tab display the history of authorisations and escalation that is performed on an account. Field Description Field Name Description Collector Code [Display] This field displays the collector code. It is the unique code of the collector assigned to the account. Authorizer [Display] This field displays the authorisation authority for action. Next Action Code [Display] This field displays the next action code. Activity [Display] This field displays the activity. The activity is a system activity or a user activity. Next collector [Display] This field displays the name of the next collector to whom the account is transferred. Authorize Date [Display] This field displays the authorisation date. Insurance Details Field Description Field Name Description Insurance Type [Display] This field displays the type of insurance. Insurance Code [Display] This field displays the code of the insurance type. Amount Insured [Display] This field displays the amount which is insured. Tot. Prem. Billed [Display] This field displays the total premium which is billed. Tot. Prem. Paid [Display] This field displays the total premium which is paid. Tot. Prem. Remitted 7. [Display] This field displays the total premium which is remitted. Click on the Follow Up button. 8. The Follow Up sub screen will be displayed and all the details entered by the collector during follow up will be displayed. Follow -Up Sub Field Description Field Name Description Account No [Display] This field displays the account number for the follow-up. Action Code [Display] This field displays the action applicable to the collector group for the case. Action Date [Display] This field displays the process date. Result Code [Display] This field displays the result applicable to the selected action. Result Date [Display] This field displays the process date. Field Name Description Amount [Display] This field displays the PTP amount that is paid in the follow-up. Next Action Code [Display] This field displays the future action applicable to the selected action/result. Next Action Date [Display] This field displays the future date for the action. Reason Code [Display] This field displays the unique code assigned to each reason. It is a reason for delinquency. Person Contacted [Display] This field displays the name of the person contacted in the followup. Notes By Collector [Display] This field displays the notes by collector. It is the brief description of the follow-up by the collector. Next Collector [Mandatory, Pick List] Select the next collector from the pick list. Notes By Supervisor [Mandatory, Alphanumeric, 4000] Type the notes by supervisor. It is the brief description of the follow-up by the supervisor. 9. 10. Enter the relevant information and click the Ok button. The system displays the Authorization by Supervisor screen. Repossession CLN62 - Initiate Repossession* Assets have to be repossessed from customers in case of bad loans. Repossession involves ordering the repossession, repossessing the asset, storing it in a warehouse, valuate the asset and finally dispose the asset. Using this option you can initiate the re-possession of the assets of the account of a customer. Definition Prerequisites Accounts assigned to the collectors. Modes Available Not Applicable To initiate repossession 1. Type the fast path CLN62 and click Go or navigate through the menus to Transaction Processing > Collection Transactions > Repossession > Initiate Repossession. 2. The system displays the Initiate Repossession screen. Initiate Repossession Field Description Field Name Description Account Details Account Number [Mandatory, Pick List] Select the account number of the customer whose asset will be repossessed from the pick list.. Collector [Display] This field displays the collector who is responsible for repossession. Collateral Details Collateral Code [Mandatory, Pick List] Select the code of the collateral attached on the account from the pick list. The collateral name is populated in the corresponding field. Status [Display] This field displays the status of the collateral. Field Name Description Manufacturing Date [Display] Engine Number [Display] This field displays the date on which the collateral was manufactured. This field displays the engine number of collateral. Chassis Number [Display] This field displays the chassis number of collateral. Registration Number [Display] Warehouse [Mandatory, Pick List] This field displays the registration number of collateral. Select the warehouse number where the asset will be kept from the pick list. The warehouse name is displayed in the corresponding field. Mileage [Display] This field displays the mileage of collateral. Market Value [Display] This field displays the market value of collateral. Reason [Mandatory, Pick List] Select the reason code as to why the asset is repossessed from the pick list. The reason is populated in the corresponding field. Notes [Mandatory, Alphanumeric, 254] Type the notes by the collector. Column Name Description Collateral Component Details Component [Mandatory, Alphanumeric, 12] Type the details of the components of collateral. Condition [Mandatory, Alphanumeric, 30] Type the condition of collateral. Remark [Optional, Alphanumeric, 100] Type the remark for the collateral. Field Name Description Field Name Description Location Details Address 1 [Mandatory, Alphanumeric, 40] Type the first line of the current address of the asset. Address 2 [Mandatory, Alphanumeric, 40] Type the second line of the current address of the asset. City [Mandatory, Alphanumeric, 40] Type the city of the asset. State [Mandatory, Alphanumeric, 40] Type the state of the asset. Zip Code [Mandatory, Alphanumeric, 30] Type the zip code of the asset. 3. Select the account number of the customer whose asset will be repossessed from the pick list. 4. Enter the collateral details, collateral component details, and location details. Initiate Repossession 5. Click the Ok button. 6. The system displays the message "Record modified successfully. Click Ok to continue". Click the Ok button. CLN63 - Collateral Auctioning* Once the assets are repossessed they need to be disposed by auctioning. Using this option you can maintain the records of the auctioning of the assets of a customer. It also contains the details of the various sales quotes made for the asset. The organization can initiate the sale of the asset based on the quotes entered in the system. This provides a better management and control for asset sale. Definition Prerequisites CLN62 - Initiate Repossession Modes Available Not Applicable To view the collateral auctioning records 1. Type the fast path CLN63 and click Go or navigate through the menus to Transaction Processing > Collection Transactions > Repossession > Collateral Auctioning. 2. The system displays the Collateral Auctioning screen. Collateral Auctioning Field Description Field Name Description Account Number [Mandatory, Pick List] Select the account number of the customer whose asset is repossessed from the pick list. Collateral Code [Mandatory, Pick List] Select the code of the collateral attached on the account from the pick list. The collateral name is populated in the corresponding field. Warehouse [Display] This field displays the warehouse number where the asset will be kept. Column Name Description Quotation Details Sr. No. [Display] This column displays the serial number of the quotation details. This is auto-generated by the system. Date [Mandatory, dd/mm/yyyy] Type the date on which the auctioning of the asset was done. Buyer [Mandatory, Alphanumeric, 256] Type the buyer name who has bid for the auctioned asset. Contact No. [Mandatory, Numeric, 45] Type the contact number of the buyer who has bid for the auctioned asset. Bid Amount [Mandatory, Numeric, 15] Type the bid amount given by the buyer who has bid for the auctioned asset. Notes [Optional, Alphanumeric, 4000] Type the notes entered during auctioning. 3. Select the account number of the customer whose asset will be repossessed from the pick list. 4. Select the collateral code from the pick list. 5. Enter the quotation details. Collateral Auctioning 6. Click the Ok button. 7. The system displays the message "Record modified successfully. Click Ok to continue". Click the Ok button. CLN64 - Collateral Disposition* Using this option you can maintain the sale details of the auctioned assets of a customer and the details of the new buyer to whom the asset will be sold. This is useful to complete the audit trail for the resale process. Once the assets are repossessed they will be disposed by auctioning using the Collateral Auctioning (Fat Path: CLN63) option. After this the auctioned details need to be maintained in the system. Definition Prerequisites CLN63 - Collateral Auctioning Modes Available Not Applicable To select the buyer for the asset 1. Type the fast path CLN64 and click Go or navigate through the menus to Transaction Processing > Collection Transactions > Repossession > Collateral Disposition. 2. The system displays the Collateral Disposition screen. Collateral Disposition Field Description Field Name Description Account Number [Mandatory, Pick List] Select the account number of the customer whose asset is repossessed from the pick list. Collateral Code [Mandatory, Pick List] Select the code of the collateral attached on the account from the pick list. The collateral name is populated in the corresponding field. Warehouse [Display] This field displays the warehouse number where the asset is kept. Column Name Quotation Details Description Column Name Description Sr. No. [Display] This column displays the serial number of the quotation details. This is auto-generated by the system. Date [Mandatory, dd/mm/yyyy] Type the date on which the auctioning of the asset was done. Buyer [Mandatory, Alphanumeric, 256] Type the buyer name who has bid for the auctioned asset. Phone No. [Mandatory, Numeric, 45] Type the contact number of the buyer who has bid for the auctioned asset. Bid Amount [Mandatory, Numeric, 15] Type the bid amount given by the buyer who has bid for the auctioned asset. Sale Amount [Mandatory, Numeric, 22] Type the actual amount for which asset will be sold to the buyer. Notes [Optional, Alphanumeric, 4000] Type the notes entered during auctioning. Select [Optional, Check Box] Select the check box to select a buyer from the list of buyers. 3. Select the account number of the customer whose asset will be repossessed from the pick list. 4. Select the collateral code from the pick list. 5. The list of buyers who have bid for the asset are displayed. 6. Select the check box to select a buyer from the list of buyers. Collateral Disposition 7. Click the Ok button. 8. The system displays the message "Record modified successfully. Click Ok to continue". Click the Ok button. Customer Sticky Notes CLN70 - Customer Sticky Notes Users can add special notes to the customer. These notes are displayed each time the account of the customer is displayed for follow-up. Using this option you can add these notes to the selected customer. Only one note may be added at a time. You can also view the existing notes in a grid. Definition Prerequisites Customer to have accounts Modes Available Not Applicable To add a sticky note 1. Type the fast path CLN70 and click Go or navigate through the menus to Transaction Processing > Collection Transactions > Customer Sticky Notes > Customer Sticky Notes. 2. The system displays the Customer Sticky Notes screen. Customer Sticky Notes Field Description Field Name Description Sticky Notes Search Criteria [Mandatory, Drop-Down] Select the search criteria to search for the customer from the drop-down list. The options are: Customer short name: The short name of the customer. Customer IC: The identification criteria (IC) arrived at by the bank during customer addition. Customer ID: The unique identification given by the bank. Field Name Description Search String [Mandatory, Alphanumeric, 20] Type the search string, to search for a customer, corresponding to the search criteria selected in the Search Criteria field. If the search criterion is specified as customers short name or IC then any of the letter(s) of the short name or IC can be entered. The system displays the pick list of all those customers having those letters in their respective criteria. Choose the appropriate customer from the existing customer list. For example, The customer's short name is George Abraham. One can search the above customer by entering Geo in the Search String field. Cust ID [Display] This field displays the ID of the customer. A customer ID is an identification number, generated by the system after customer addition is completed successfully. This running number, unique to a customer across the system, is generated after the system has identified the customer IC and the customer category combination to be non-existent in the system. This ID is used for searching and tracking the customer in the system. Note [Mandatory, Alphanumeric, 240] Type the special note for the customer. Column Name Description Notes History Sr. No. [Display] This column displays the serial number for the note. It is auto-generated by the system. Notes [Display] This column displays the special note added for the customer. By Collector-Name [Display] This column displays the name of the user who added the note for the customer. Entered On [Display] This column displays the date on which the note was created for the customer. 3. Select the search criteria from the drop-down list. 4. Enter the search string and press the <Tab> or <Enter> key. 5. Select the customer for whom the note is to be added. 6. The system displays the notes history for the selected customer. 7. Enter the new note to be added. Customer Sticky Notes 8. Click the Ok button. 9. The system displays the message "Record successfully added.. Click Ok to continue". Click the OK button. Reallocation CLN32 - Collectorwise Re-allocation* Using this option you can reallocate the open cases to different collectors. The exception cases can not be reallocated. The collectors can follow-up these cases using the Group Follow Up (Fast Path: CLN30) option. Definition Prerequisites Collectors should be defined Modes Available Not Applicable To reallocate cases collectorwise 1. Type the fast path CLN32 and click Go or navigate through the menus to Transaction Processing > Collection Transactions > Reallocation > Collectorwise Re-allocation . 2. The system displays the Collectorwise Re-allocation screen. Collectorwise Re-allocation Field Description Field Name Description From Collector [Mandatory, Pick List] Select the collector whose cases are to be reallocated from the pick list. From Collector Group [Mandatory, Pick List] To Collector [Mandatory, Pick List] Select the group of the collector whose cases have to be reallocated from the pick list. Select the collector to whom cases are to be reallocated from the pick list. To Collector Group [Mandatory, Pick List] Select the group of the collector to whom cases have to be reallocated from the pick list. # of Open Cases [Display] This field displays the total number of open cases of From collector that needs to be reallocated. Field Name Description # of Cases to be Re-allocated [Mandatory, Numeric, Three] Type the actual number of cases to be reallocated. 3. Select the from collector and collector group from the pick list. 4. Select the to collector and collector group from the pick list. 5. Type the number of cases to be reallocated. Collectorwise Re-allocation 6. Click the Ok button. 7. The system displays the message "Record Modified Successfully.. Click Ok to continue". Click the Ok button. CLN33 - Reallocation (Queue wise)* Using htis option you can manually change the collector assigned to a particular open case during reallocation in a particular queue. Definition Prerequisites Queues should be defined Collectors should be defined Modes Available Not Applicable To reallocate cases queuewise 1. Type the fast path CLN33 and click Go or navigate through the menus to Transaction Processing > Collection Transactions > Reallocation > Reallocation (Queue wise). 2. The system displays the Reallocation (Queue wise) screen. Reallocation (Queue wise) Field Description Field Name Description From Queue [Mandatory, Pick List] Select the queue from which cases are to be reallocated from the pick list. From Collector [Mandatory, Pick List] Select the collector to reallocate the cases opened by him from the pick list. Field Name Description From Collector Group [Mandatory, Pick List] Open Cases # [Display] Select the group of the collector whose cases have to be reallocated from the pick list. This field displays the total open cases of the chosen collector. To Collector [Mandatory, Pick List] Select the collector to reallocate the cases to him from the pick list. To Collector Group [Mandatory, Pick List] Select the group of the collector to whom the cases have to be reallocated from the pick list. # of Cases to be Reallocated [Mandatory, Numeric, Three] Type the actual number of cases to be reallocated to the new collector. 3. Select the appropriate from queue, collector, collector group from the pick list. 4. Select the to collector and to collector group from the pick list. 5. Enter the number of cases to be reallocated. Reallocation (Queue wise) 6. Click the Ok button. 7. The system displays the message "Record Modified Successfully. Click Ok to continue". Click the Ok button. CLN34 - Reallocation (Individual)* Using this option you can manually change the collector assigned to a particular open case during reallocation. For the given account number, you have to select the new collector and collector group. Definition Prerequisites Collectors should be defined Modes Available Not Applicable To reallocate cases individually 1. Type the fast path CLN34 and click Go or navigate through the menus to Transaction Processing > Collection Transactions > Reallocation > Reallocation (Individual). 2. The system displays the Reallocation (Individual) screen. Reallocation (Individual) Field Description Field Name Description Account number [Mandatory, Pick List] Select the account number, of the open case to be reallocated, from the pick list. Collector Code [Display] This field displays the code of the collector who is assigned to the account. From Collector Group [Display] New Collector [Mandatory, Pick List] This field displays the current collector group of the collector. Select the new collector from the pick list. The adjoining field displays the name of the selected collector. To Collector Group [Mandatory, Pick List] Select the group of the collector to whom cases have to be reallocated from the pick list. 3. Select the account number from the pick list. 4. Select the new collector code from the pick list. Reallocation (Individual) 5. Click the Ok button. 6. The system displays the message "Record successfully modified. Click Ok to continue". Click the Ok button. CLN35 - Temporary Re-Allocation* A collector is a person who will follow up with the case. Using this option, you can manually change the collector assigned to a particular open case during reallocation. The case will remain reallocated to the new collector till the Till Date. However, a temporary reallocated case cannot be reallocated again until Till date. Definition Prerequisites Collector should be defined Cases should be allotted to the collectors Modes Available Not Applicable To temporary re-allocate a collector 1. Type the fast path CLN35 and click Go or navigate through the menus to Transaction Processing > Collection Transactions > Reallocation > Temporary Re-Allocation. 2. The system displays the Temporary Re-Allocation screen. Temporary Re-Allocation Field Description Field Name Description From Collector [Mandatory, Pick List] Select the ID of the collector who has open cases that can be reallocated from the pick list. The collector name is populated in the corresponding field. From Collector Group [Mandatory, Pick List] Select the group ID of the collector whose cases will be reallocated from the pick list. The collector group name is populated in the corresponding field. To Collector [Mandatory, Pick List] Select the ID of the new collector to whom the cases will be reallocated from the pick list. The collector name is populated in the corresponding field. Field Name Description To Collector Group [Display] This field displays the group of the collector to whom the cases will be reallocated. The group name is displayed in the corresponding field. Till Date [Mandatory, dd/mm/yyyy] Type the date till which the reallocation will be valid. Column Name Description Parameter ( [Display] This column displays the opening bracket for forming a condition. Parameter [Mandatory, Pick List] Select the reallocation parameter from the pick list. Based on the selected parameter, the criterion of reallocation is defined and attached to queue code. Description [Display] This column displays the description of the parameter selected in the adjacent field. Operator [Mandatory, Pick List] Select the arithmetic operators used in the condition from the pick list. The options are: Condition * + - / [Optional, Pick List] Select the condition from the pick list. Condition is a criteria for a queue. User has to enter the condition by selecting the parameter. Column Name Description Value Flag [Mandatory, Pick List] Select the value flag from the pick list. The value flag specifies whether the value evaluated with the operator/ condition selected will be a fixed or variable. The options are: Value F: Fixed Value V: Parameter to be evaluated [Mandatory, Alphanumeric, 40] Type the value. The value is defined based on the condition. Parameter [Conditional, Pick List] Select the queue parameter from the pick list. The criteria of a queue is defined and attached to the queue code on the basis of the selected parameter. Description [Display] This column displays the description of the parameter selected in the adjacent field. Logical Operator [Conditional, Pick List] Select the operator used to join the two conditions/predicates specified with AND/OR from the pick list. ) [Display] This column displays the closing bracket for forming a condition. Formula Expression [Display] This column displays the condition which is created 3. Select the collector and collector group whose cases are to be re-allocated from the pick list. 4. Select the collector and collector group to whom the cases will be reallocated from the pick list. 5. Enter the other relevant information. Temporary Re-Allocation 6. Click the Ok button. 7. The system displays the message "Record modified successfully. Click Ok to continue". Click the Ok button. CLN29 - Exception Case Marking* Using this option the collector can mark a case as a exceptional case if he wants that case to be handled by a exception collector. This is the code which collector can attach to the account based on the type of the customer e.g. special code can be VIP. The cases which are ready for follow-up can be marked/unmarked for exception or the code which collector can attach to the account based on the type of the customer.The cases which are ready for follow-up can be marked/ unmarked for exception or added as a special code by the collector. Definition Prerequisites Collector should be defined Special codes should be defined Modes Available Not Applicable To mark the exception case 1. Type the fast path CLN29 and click Go or navigate through the menus to Transaction Processing > Collection Transactions > Exception Case Marking > Exception Case Marking. 2. The system displays the Exception Case Marking screen. Exception Case Marking Field Description Field Name Description Account No [Mandatory, Pick List] Select the account number to be processed from the pick list. Exception [Mandatory, Radio button] Click the appropriate exception. Exception allows the user to select the case as an exception case. The options are: Mark Unmark SpCode Field Name Description Exception Collector [Conditional, Pick List] Select the branch of the bank that has made the TT from the pick list. This field is mandatory if Mark is selected in the Exception field. Special Code [Conditional, Pick List] Select the special code from the pick list. The special code is attached to the case on the basis of the type of the customer. 3. Select the account number from the pick list. 4. Enter the other relevant information. Exception Case Marking 5. Click the Ok button. 6. The system displays the message "Record modified successfully... Click Ok to continue". Click the Ok button. Requeue CLN37 - Re-queue* Using this option the cases lying in a particular queue can be re-queued again during EOD activity You can select one or more queues to re-queue. At EOD all the cases in the selected queues will be re-queued i.e. will undergo queue creation again. Definition Prerequisites Queries should be defined Modes Available Not Applicable To re-queue a case 1. Type the fast path CLN37 and click Go or navigate through the menus to Transaction Processing > Collection Transactions > Requeue > Re-queue. 2. The system displays the Re-queue screen. Re-queue Field Description Column Name Description Re-queue Queue Code [Display] This column displays the code of the queues which are defined. Queue Description [Display] This column displays the name or description of the queues which are defined in the adjacent field. Select [Optional, Check Box] Select the check box to select the corresponding queue for requeuing. 3. Select the check box corresponding to the cases to be re-queued. Re-queue 4. Click the Ok button. 5. The system displays the message "Record successfully added. Click Ok to continue". Click the OK button.