1
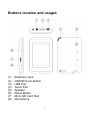
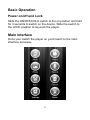
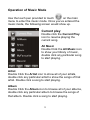
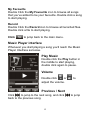
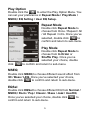
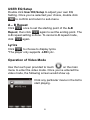
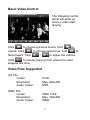
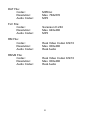
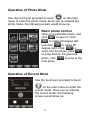
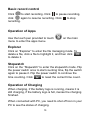
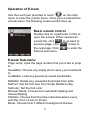
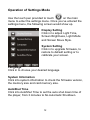
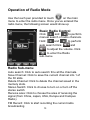
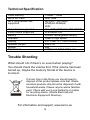
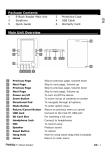
XEMIO-950
User Manual
For information and support, www.lenco.eu
What’s in the box?
Operating Unit
User Manual
USB Cable
Earphone
Installation CD
Content
Buttons location and usages
1
Basic Operation
2
Operation of Music Mode
3-6
Operation of Video Mode
6-8
Operation of Photo Mode
9
Operation of Record Mode
9 - 10
Operation of Apps Mode
10
Operation of Charging
10
Operation of E-Book Mode
11
Operation of Settings Mode
12
Operation of Radio Mode
13
Technical Specification
14
Trouble Shooting
14
Buttons location and usages
(1)
(2)
(3)
(4)
(5)
(6)
(7)
(8)
Earphone Jack
ON/OFF/Lock Button
USB Port
Touch Pen
Speaker
Reset Button
Micro SD Card Slot
Microphone
1
Basic Operation
Power on/off and Lock
Slide the ON/OFF/HOLD switch to the on position and hold
for 3 seconds to switch on the device. Slide the switch to
the LOCK position to key-lock the player.
Main interface
Once your switch the player on you’ll reach to the main
interface as below..
2
Operation of Music Mode
Use the touch pen provided to touch
on the main
menu to enter the music mode. Once you’ve entered the
music mode, the following screen would show up.
Current play
Double click the Current Play
icon to resume playing the
current song.
All Music
Double Click the All Music icon
to show your library of music,
double click any particular song
to start playing.
Artist
Double Click the Artist icon to show all of your artists,
double click any particular artist to show the songs of that
artist. Double click a song to start playing.
Album
Double Click the Album icon to browse all of your albums,
double click any particular album to browse the songs of
that album. Double click a song to start playing.
3
My Favourite
Double Click the My Favourite icon to browse all songs
that you’ve added to be your favourite. Double click a song
to start playing.
Record
Double Click the Record icon to browse all recorded files.
Double click a file to start playing.
Click
to jump back to the main menu.
Music Player interface
Whenever you start playing a song you’ll reach the Music
Player Interface as below.
Play Music
Double click the Play button in
the middle to start playing,
double click again to pause.
Volume
or
Double click
adjust the volume.
to
Previous / Next
Click
to jump to the next song, and click
back to the previous song.
4
to jump
Play Option
to enter the Play Option Menu. You
Double click the
can set your preference in Repeat Mode / Play Mode /
MSEQ / EQ Setting / User EQ Setup.
Repeat Mode
Double click Repeat Mode to
choose from Once / Repeat / All
/ All Repeat / Intro. Once you’ve
to
selected, double click
confirm and return to sub-menu.
Play Mode
click
Double click Repeat Mode to
choose from In Order or
Shuffle Play. Once you’ve
selected your choice, double
to confirm and return to sub-menu.
MSEQ
Double click MSEQ to choose different sound effect from
3D / Bass / LEQ. Once you’ve selected your choice,
to confirm and return to sub-menu.
double click
EQSel
Double click EQSel to choose different EQ from Normal /
MSEQ / Rock / Pop / Classic / Bass / Jazz / UserEQ.
to
Once you’ve selected your choice, double click
confirm and return to sub-menu.
5
USER EQ Setup
Double click User EQ Setup to adjust your own EQ
Setting. Once you’ve selected your choice, double click
to confirm and return to sub-menu.
A – B Repeat
Click
once to set the starting point of the A-B
again to set the ending point. The
Repeat, then click
A-B repeat setting is done. To cancel A-B repeat mode,
again.
click
Lyrics
Click
to choose to display lyrics.
*The player only supports .LRC lyric.
Operation of Video Mode
Use the touch pen provided to touch
on the main
menu to enter the video mode. Once you’ve entered the
video mode, the following screen would show up.
Click any particular movie in the list to
start playing.
6
Basic Video Control
The following control
panel will show up
when a video start
playing.
Click
to choose previous movie, hold
rewind. Click
to
to choose next movie, hold
fast-forward. Click
/
to adjust the volume.
Click
to resume playing from where the video
stopped last time.
Video Files Supported
AVI File:
Codec:
Resolution:
Audio Codec:
XVID
Max. 800x480
MP3
WMV File:
Codec:
Resolution:
Audio Codec:
WMV 7/8/9
Max. 720x480
WMA
7
to
DAT File:
Codec:
Resolution:
Audio Codec:
MPEG-I
Max. 768x576
MP3
FLV File:
Codec:
Resolution:
Audio Codec:
Sorenson H.263
Max. 640x480
MP3
RM File:
Codec:
Resolution:
Audio Codec:
Real Video Codec 8/9/10
Max. 800x480
Real Audio
RMVB File:
Codec:
Resolution:
Audio Codec:
Real Video Codec 8/9/10
Max. 800x480
Real Audio
8
Operation of Photo Mode
Use the touch pen provided to touch
on the main
menu to enter the photo mode. Once you’ve entered the
photo mode, the following screen would show up.
Basic photo control
Click on a particular photo, and
to open it. Click
click
to rotate 90 degree left,
and click
to rotate 90
to
degree right. Click
zoom into the photo. Click
to jump back to the previous
to jump to the
photo, click
next photo
Operation of Record Mode
Use the touch pen provided to touch
on the main menu to enter the
record mode. Once you’ve entered
the record mode, the following
screen would show up.
9
Basic record control
Click
to start recording. Click
to pause recording,
again to resume recording. Click
click
recording.
to stop
Operation of Apps
Use the touch pen provided to touch
menu to enter the apps menu.
on the main
Explorer
Click on “Explorer” to enter the file managing mode. To
delete a file, click a file to highlight it, and then click
to delete it.
Stopwatch
Click on the “Stopwatch” to enter the stopwatch mode. Flip
the power switch once to start counting time, flip the switch
again to pause it. Flip the power switch to continue the
to reset the current time count.
time counting. Click
Operation of Charging
When charging, if the battery logo is running, means it is
still charging, if the battery logo is full, menas the charging
finished.
When connected with PC, you need to shut off icon in your
PC to see the status of charging.
10
Operation of E-book
Use the touch pen provided to touch
on the main
menu to enter the e-book menu. Once you’ve entered the
e-book menu, the following screen would show up.
Basic e-book control
Double click on a particular .txt file to
open the e-book. When opened an
to go back to
e-book file, click
previous page, click
to skip to
to enter the
the next page. Click
E-Book sub-menu.
E-book Sub-menu
Page Jump: Input the page number that you’d like to jump
to.
SaveMark: Choose any empty slot to save your bookmark
to.
LoadMark: Load any previously saved bookmarks.
DelMark: Delete any unwanted bookmark from slots.
SetFont: Set the font size from Small, Middle to Big
SetColor: Set the font color
Browser Mode: Choose from automatic flipping and
manual flipping
FlipTime: Choose from the time interval between every
auto flip, from 10 sec to 30 sec.
Mode: Choose from 3 different background themes
11
Operation of Settings Mode
Use the touch pen provided to touch
on the main
menu to enter the settings menu. Once you’ve entered the
settings menu, the following screen would show up.
Display Setting
Click in to adjust Light Time,
Screen Brightness, Light Mode
and Screen Move Style.
System Setting
Click in to upgrade firmware, to
restore to default setting or to
calibrate your screen.
Language
Click in to choose your desired language
System Information
Click into system information to check the firmware version,
the memory size and card memory size.
AutoShut Time
Click into AutoShut Time to set the auto shut down time of
the player, from 3 minutes to No Automatic Shutdown.
12
Operation of Radio Mode
Use the touch pen provided to touch
on the main
menu to enter the radio menu. Once you’ve entered the
radio menu, the following screen would show up
Basic Radio Control
Click
and
to perform
manual search of radio channels.
Hold
and
to perform
auto search.Click
and
to adjust the volume. Click
to enter the Radio
sub-menu.
Radio Sub-menu
Auto search: Click to auto search thru all the channels.
Save Channel: Click to save the current channel into 1 of
the 30 slots.
Delete Channel: Click to delete the channel saved in the
memory slots.
Stereo Switch: Click to choose to turn on or turn off the
stereo switch
Receive area: Click to choose the area of receiving the
signal (from China, Japan, USA, Europe and Campus
Radio)
FM Record: Click to start recording the current radio
broadcasting
13
Technical Specification
Flash Memory
Micro SD Card
MP3 compressed rate
supported
Video format supported
Photo format supported
Battery
Interface
Display
Speaker Output
Weight
Dimensions
128MB – 16GB
Max. 8GB
MP3(64 – 320 kbps)
WMA(64-384kbps)
WAV
AVI, WMV, DAT, FLV, RM, RMVB
JPEG/BMP/GIF
Lithium rechargeable battery
USB2.0 high speed
2.8” Color TFT Touch Screen
8ohm1W
69g
60(W) * 12.5(D) * 94(H) mm
Trouble Shooting
What should I do if there’s no sound when playing?
You should check the volume first. If the volume has been
turned up, maybe the memory format of the device is
incorrect.
If at any time in the future you should need to
dispose of this product please note that: Waste
electrical products should not be disposed of with
household waste. Please recycle where facilities
exist. Check with your Local Authority or retailer
for recycling advice. (Waste Electrical and
Electronic Equipment Directive)
For information and support, www.lenco.eu
14