1
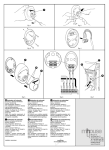
Bedieningen toestel
Veiligheidsinstructies
OPGELET
GEVAAR VAN ELEKTRISCHE SCHOKKEN
NIET OPENEN
Verwittiging: om de gebruiker te verwittigen
van de gevaarlijke spanningen in het toestel.
Verwittiging: teneinde het risico op elektrische schokken te vermijden, het toestel niet
blootstellen aan regen of vocht.
1)Gelieve de gebruiksaanwijzing te lezen en de voorschriften voor een veilig gebruik
van het apparaat te lezen.
2)Gebruik het toestel niet naast water. Plaats op het toestel geen voorwerp dat met een
vloeistof gevuld is.
3)Plaats het toestel niet naast warmtebronnen zoals een radiator, een kachel of andere
apparaten (inclusief een versterker) die warmte produceren.
4)Trek de stekker uit het stopcontact in geval van bliksem, storm of wanneer het toestel
gedurende lange tijd niet gebruikt wordt.
5)Reinigen: trek de stekker uit het stopcontact en gebruik een vochtig doekje op te
reinigen. Gebruik geen vloeibare detergent of spuitbussen.
6)Gebruik alleen de accessoires die door de fabrikant worden aanbevolen.
7)Maak gebruik van gespecialiseerd personeel als service nodig is. Service is nodig als
het toestel beschadigd is, wanneer de stroomkabel of stekker beschadigd is, wanneer
er vloeistof in het toestel gekomen is, wanneer er een object op het toestel gevallen is,
wanneer het aan vocht is blootgesteld of wanneer het niet goed functioneert. Probeer
niet het toestel zelf te herstellen wegens het gevaar van hoge spanningen en
elektrische schokken.
3
4
5
1
6
7
2
8
5.
6. Enter
7. Modus
8. Steun
1. SD kaartaansluiting
2. DC ingang 5 V
3. Hoofdschakelaar (power)
4. Menu
Aansluitingen
Power
Connection
Stroomvoorziening
Voornaamste eigenschappen
Steek een uiteinde van de AC/DC-adapter in de DC ingang van het toestel en
steek het andere uiteinde in het stopcontact. Zie tekening hieronder.
Ondersteunt SD/MMC/MS.
Verpakking
Toestel
1 stuk
AC/DC adapter
1 stuk
Gebruiksaanwijzing
1 stuk
1
2
Gebruik van de SD-kaart
Systeeminstelling
Steek de SD-kaart in de kaartaansluiting met de label naar beneden, totdat u een klik
hoort.
Selecteer de Instel optie en druk op ENTER om in het menu te komen. Gebruik
om
te kiezen tussen 'Photo setting', 'Auto play', Display setup' of 'Custom setup'. Druk op
ENTER
om in het submenu te komen en gebruik om de gewenste optie te kiezen.
Gebruik dan
om de instelling te regelen.
Selecteer 'Photo setting' en het volgende verschijnt op het scherm.
Interval Time
Transition Effect
Show type
Browse
Opmerking: verwijder SD/MMC-kaart terwijl deze gebruikt worden in het toestel. In dit
geval kan er slechte werking ontstaan.
Basisbediening
Hoofdschakelaar: om het toestel in en uit te schakelen.
Instellingen: druk op de MENU toets om het Instelmenu te kiezen; druk op ENTER om te
bevestigen.
: om naar een vorig document te gaan, druk op ENTER voor de weergave
: om naar een volgend document te gaan, druk op ENTER voor de weergave
ENTER: om het beeld in tegenwijzerzin te draaien.
:Select
:Confirm
In dit menu kan de intervaltijd tussen foto's (5s, 10s of 15s) ingesteld worden, het
overgangseffect (geen effect, willekeurig, naar boven, naar onder, naar links, naar rechts)
ingesteld worden, of kies 'browse' (thumbnail of file manager).
Selecteer 'Auto Play' in het instelmenu en het item Photo verschijnt.
Photo
Weergave document
1.Na het toestel op de stroom te hebben aangesloten, druk op POWER om het in te
schakelen.
2.Breng de SD/MMC/MS-kaart in.
3.Gebruik de
toetsen om de optie te kiezen en druk op ENTER om te bevestigen.
Photo
:Select
:Confirm
Als 'Photo' als AAN wordt ingesteld, worden de foto's automatisch weergegeven. Indien
UIT wordt gekozen worden de foto's in thumbnail of file manager weergegeven.
Selecteer 'Display Setup' in het instelmenu, om de helderheid, het contrast en de
saturatie in te stellen.
Setup
TFT Brightness
TFT Contrast
TFT Saturation
Weergave JPEG (foto's)
Selecteer 'Foto' in het hoofdmenu en druk op ENTER om in het menu te komen. In
deze modus kunnen alleen JPEG documenten weergegeven worden. Als JPEG als
automatische weergave is ingesteld in het instelmenu, schakelt het toestel
automatisch over naar JPEG. Om foto's te zien SD/MMC/MS-kaart, druk op VIEW
om de huidige foto naar het toestel te sturen. In het hoofdmenu, druk op VIEW om
de opgeslagen foto's te zien. Druk opnieuw om de huidige foto te annuleren.
3
:Confirm
Selecteer 'Custom Setup' en er worden vijf items getoond.
4
Als het toestel vroeg of laat verwijderd moet worden, noteer dan dat
elektrische toestellen niet verwijderd mogen worden met ander
huishoudelijk afval. Zie uit naar de beschikbare recycling faciliteiten.
Informeer bij uw plaatselijke autoriteiten of bij uw dealer (richtlijn
betreffende Afval van Elektrische en Elektronische Apparatuur).
OSD Language
Media
Style
Repeat Mode
Default
:Select
:Select
:Confirm
Wegens constante verbetering wordt geen voorafgaande verwittiging
gegeven bij wijzigingen van eigenschappen en specificaties.
'OSD taal': kies de gewenste taal voor het OSD-scherm
'Media': kies de bron (SD/MMC/MS) voor weergave
'Style' : kies de stijl van het OSD-menu
'Repeat mode': selecteer de herhalingsmodus (één document, folder, alle documenten,
of herhaling uit).
'Default': om naar de standaardinstellingen te gaan.
Specificaties
Compabiliteit: JPG
Schermgrootte: 7”
Schermresolutie: 480 (RGB) x 234
Frequentiebereik: 20 Hz 20 kHz
Video uitgang: 1Vp-p/75 Ohm, ongebalanceerd
Dynamisch bereik: beter dan 85 dB
Maximum pixels: 7 miljoen
Maximum kaartcapaciteit: 2 GB
Voeding: DC 5 V
Verbruik: 8 W
Werkingstemperatuur: 5-40°C
Gewicht: 0.43 kg
Afmetingen (b x d x h): 233 x 164 x 35 mm
Hulp bij problemen
OPLOSSING
PROBLEEM
Dit symbool
verschijnt op het scherm
Vervormd beeld
De gewenste actie kan niet uitgevoerd worden, omdat:
1.de software het verbiedt;
2.de software de actie niet ondersteunt;
3.de actie op het ogenblik niet beschikbaar is.
Het document kan beschadigd zijn. Probeer een ander.
Bij voorwaarts of achterwaarts zoeken is vervorming
normaal
5
6
Safety Precautions
Main Unit Controls
CAUTION
Warning: To alert the user to dangerous
voltage inside the unit
RISK OF ELECTRIC SHOCK
DO NOT OPEN
3
4
Warning: To reduce the risk of fire or electric shock, do not expose this apparatus to rain
or moisture.
1) Please read the instruction manual carefully and follow all the requirements of safe
operation to operate the device.
2) Do not use this unit near water. Do not place over the unit any container with liquid inside.
3) Do not install near any heat sources such as radiators, heat registers, stoves, or other
apparatus (including amplifiers) that produce heat.
4) Unplug this unit during lightning, storms or when not use for long.
5) About Cleaning: Unplug the system, use only wet cloth to clean. Do not use liquid
detergent or aerosol.
6) Only use accessories specified by the manufacturer.
7) Refer all servicing to qualified service personnel, servicing is required when the unit has
been damaged in any way, such as power supply cord or plug is damaged, liquid has
been spilled or objects have fallen into the unit, exposed to moisture, does not operate
normally. Don't try to repair the machine by yourself because of the danger of high voltage
and electric shock.
Main Features
5
1
6
7
2
8
1.SD card sort
2.DC in 5V
3.power switch
4.menu
5.
6.Enter
7.Mode
8.support stand
Power Connection
Support SD/MMC/MS card.
Plug one end of the supplied AC/DC power adaptor into the DC input jack of the
machine, then plug the other end into the AC power receptacle. Please refer to the
following illustration:
Package
Main unit
1PCS
AC/DC Power Adapter
1PCS
Instruction Manual
1PCS
1
2
System Setup
Using Your SD Card
Upon using an SD card, insert it to the corresponding slot flatly with the label side backward
until you hear a click.
Select " Setup" option and press" ENTER" to enter the setup menu. Press " / " to select
"Photo Setting" or Auto-play" or "Display setup" or Custom Setup". Press"ENTER" button
to enter the submenu, press '' / " to choose the option you desire to operate, then press
" / " to adjust the setting.
Select "Photo setting" on Setup menu, the following page will be displayed.
Interval Time
Transition Effect
Show type
Browse
Note: Please do not plug out SD/MMC cards while they are working with the unit.
Functional failure may occur in case of wrong operations.
:Select
Basic Operation
POWER button : To turn on or turn off the power
Setup: press MENU button to select Setup Menu; press ENTER to confirm.
: To go to previous file and press ENTER to play
: To go to next file and press ENTER to play
ENTER: to rotate the picture in the counter clockwise
:Confirm
In photo setting menu, user can set " interval time " of picture display (5s,10s,
15) or " transition effect " (no effect, random, cover up, cover down, cover left,
cover right ) or set "browse" mode (thumbnail or file manage ).
Select "Auto-play" on setup menu, two item ("photo")will be displayed.
Photo
Playing File
1. After connecting power to the unit, turn on the unit with the POWER button.
2. Insert SD/MMC/ MS card.
3. Use
button to select the option, press “ENTER” button to confirm.
:Select
Photo
:Confirm
If setting “Photo” to ON, pictures will be set to play automatically, If setting“ photo”
to OFF, pictures will be set to play in “thumbnail” mode or “File manager” mode.
Select “Display Setup” on setup menu, user can select TFT screen brightness,
contrast and saturation.
Setup
TFT Brightness
TFT Contrast
TFT Saturation
Playing JPEG file(photos)
Select “ Photo” option on main menu, press “ENTER” button to enter the menu. Under this
mode, only JPEG file is available to play. If JPEG file is set to automatically play in Setup
Menu, the unit will automatically play JPEG when entering this mode. When playing pictures
in SD/MMC/MS card, press “ VIEW ” button to copy current picture into the
unit; At main menu, press “ VIEW ” button to playback the stored pictures; Press it again
to delete the current picture.
3
:Select
:Confirm
Select “Custom Setup” on setup menu, five items will be displayed.
4
If at any time in the future you should need to dispose of this product
please note that waste electrical products should not be disposed of
with household waste. Please recycle where facilities exist. Check
with your Local Authority or retailer for recycling advice.(Waste
Electrical and Electronic equipment Directive)
OSD Language
Media
Style
Repeat Mode
Default
Owing to continuous improvement, no prior notice will be given regarding changes on above
feature and spec.
:Select
:Confirm
“OSD language”: select desired on-screen-display language;
“Media”: select source(SD/MMC/MS) for playback;
“Style”: select style of on-screen-display menu page;
“Repeat Mode”: select repeat mode(repeat one file, repeat the folder,
repeat all files or repeat off);
“Default”: return to the default.
Specification
Compatibility: JPG
Panel size: 7 inch
Panel Resolution: 480 (RGB) X 234
Frequency response: 20 Hz to 20KHz
Video output: 1Vp-p/75 Ohm, unbalanced
Dynamic range: Better than 85 dB
Maximum pixel: 7 million
Card maximum handling capacity: 2 GB
Power source: DC 5V
Power consumption:8W
Operating temperature:5~40
Weight: 0.43 kgs
Dimension (WxDxH): 233x 164x 35MM
Troubleshooting
PROBLEM
SOLUTION
The icon
appears on
screen
The feature or action cannot be completed at this time because:
1. The file's software restricts it.
2. The file's software doesn't support the feature (e.g., angles)
3. The feature is not available at the moment.
Picture is distorted
The file might be damaged. Try another file;
It is normal for some distortion to appear during forward or
reverse scan.
5
6
Commandes
Instructions de sécurité
ATTENTION
RISQUE DES CHOCS ELECTRIQUES
NE PAS OUVRIR
Attention : pour prévenir l'utilisateur que des hautes
tensions se trouvent à l'intérieur de l'appareil.
Attention : afin d'éviter l'incendie et le risque des chocs électriques, ne pas exposer
l'appareil à la pluie ou à l'humidité.
1)Lisez le manuel d'utilisation et suivez les instructions pour une bonne utilisation de
l'appareil.
2)Ne pas utiliser l'appareil à côté de l'eau. Ne pas placer des objets remplis avec des
liquides au-dessus de l'appareil.
3)Ne pas placer l'appareil à côté d'une source de chaleur, telle que radiateur ou autres
appareils produisant du chaleur (y compris un amplifiateur).
4)Déconnectez le courant secteur en cas d'éclairs, orages ou quand vous n'utilisez pas
l'appareil pendant un certain temps.
5)Nettoyage : utilisez un chiffon légèrement humide. Ne pas utiliser les détergents ou
aérosols.
6)Utilisez uniquement les accessoires recommandées par le fabricant.
7)Consultez un spécialiste quand il est nécessaire. Le service est nécessaire quand
l'appareil est endommagé, quand le câble et la prise courant secteur est endommagé,
quand une liquide a pénétré l'appareil, quand un objet est tombé sur l'appareil, quand
l'appareil a été exposé à l'humidité ou quand il ne fonctionne pas bien. N'essayez pas
de réparer vous-même l'appareil à cause du danger des chocs électriques.
3
4
5
1
6
7
2
8
1. Connexion carte
2. Entrée DC 5V
3. Bouton power
4. Menu
5.
6. Enter
7. Mode
8. Support
Connexions
Caractéristiques principales
Power
Connection
Connexion
alimentation
Prévu pour cartes SD/MMC/MS.
Connectez l'adaptateur AC :DC à l'entrée DC de l'appareil et le prise courant secteur.
Voyez le dessin ci-dessous.
Emballage
Appareil
1 pièce
Adaptateur AC/DC
1 pièce
Manuel d'utilisation
1 pièce
1
2
Utilisation de la carte SD
Réglage système
Insérez la carte SD dans l'appareil avec le label vers le bas, jusqu'au moment où vous
entendez un click.
Sélectionnez 'Setup' et poussez ENTER pour entrer dans le menu des réglages. Utilisez
pour choisir entre 'photo setting', 'auto play', 'display setup' et 'custom setup'.
Poussez ENTER pour entrer dans le sous-menu et utilisez
pour choisir l'option voulue.
Poussez
pour effectuer les réglages.
Sélectionnez 'photo setting' et l'écran suivant apparaît.
Interval Time
Transition Effect
Show type
Browse
Remarque : ne ou la carte SD/MMC pendant qu'elles sont en fonction. ceci peut
causer des mal fonctionnements.
:Select
Opération de base
Bouton POWER : pour mettre l'appareil en et hors fonction.
Réglage : poussez MENU pour sélectionner le menu de réglage. Poussez ENTER pour
confirmer.
: pour aller vers le document précédent ; poussez ENTER pour lecture
: pour aller vers le document suivant ; poussez ENTER pour lecture
ENTER : pour tourner l'image en contresens d'une montre
:Confirm
Dans ce menu vous pouvez le temps d'intervalle entre les photos (5s, 10s et 15s) et le
mode de transition entre les photos (pas d'effet, aléatoire, vers le haut, vers le bas, vers
la gauche, vers la droite) ou choisir le mode browse (thumbnail ou file manager).
Sélectionnez 'auto play' et le menu photo apparaît.
Photo
Lecture d'un document
1.Après connexion au courant secteur, poussez le bouton POWER.
2.Insérez ou la carte SD/MMC/MS.
3.Utilisez
pour sélectionner l'option, poussez ENTER pour confirmer.
Photo
:Select
:Confirm
Si vous mettez Photo en position ON, les photos sont reproduites automatiquement. Si
vous mettez en position OFF, les photos sont reproduites en format thumbnail ou file
manager.
Sélectionnez 'display setup' et vous pouvez régler la luminosité, le contraste et la
saturation.
Setup
TFT Brightness
TFT Contrast
TFT Saturation
Lecture JPEG (photos)
Sélectionnez 'Photo' dans le menu principal, poussez ENTER pour entrer dans le
menu. Dans ce mode, seulement les documents JPEG peuvent être lus. Si dans
le menu Setup JPEG a été choisi pour lecture automatique, l'unité lit
automatiquement les documents JPEG. Pour la lecture des photos ou carte
SD/MMC/MS, poussez VIEW pour copier la photo actuelle vers l'appareil.
Repoussez le bouton pour annuler la photo.
3
:Confirm
Sélectionnez 'custom setup'. Cinq items sont affichés.
4
Si votre appareil arrive à la fin de sa vie, il ne peut pas être jeté avec
les autres déchets domestiques. Adressez vous chez un centre de
recyclage. Contactez les autorités locaux ou votre revendeur.
(directive Déchets d'Equipement Electrique et Electronique).
OSD Language
Media
Style
Repeat Mode
Default
:Select
:Select
:Confirm
A cause d'améliorations, les changements des caractéristiques et
des spécifications sont possibles sans préavis.
'OSD Language' : langue de l'écran OSD
'Media' : sélection de la source (SD/MMC/MS) pour lecture
'Style' : pour déterminer le style du OSD
'Repeat mode' : pour choisir la répétition (un document, un folder, tout ou hors fonction)
'Default' : pour revenir au réglages d'origine.
Spécifications
Compacité : JPG
Format écran : 7 pouces
Résolution écran : 480 (RGB) x 234
Réponse en fréquences : 20 Hz 20 kHz
Sortie vidéo : 1 Vp-p/75 ohms, non balancé
Plage dynamique : mieux que 85 dB
Nombre maximal pixels : 7 million
Capacité maximale carte : 2 GB
Alimentation : DC 5 V
Consommation : 8 W
Température d'utilisation : 5-40° C
Poids : 0.43 kg
Dimensions (l x p x h) : 233 x 164 x 35 mm
En cas de problèmes
PROBLEME
Le symbole
apparaît sur l'écran
Distorsion dans l'image
SOLUTION
L'action voulue ne peut pas être réalisé parce que :
1.le software ne l'autorise pas
2.le software ne supporte pas l'action
3.l'action n'est pas disponible à l'instant
Le document est endommagé. Essayez un autre.
La distorsion est normale pendant la recherche en
avant ou en arrière
5
6