1
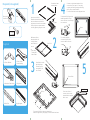
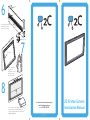
Required (not supplied) Level Electric drill Screw Driver 1 See detail on frame assembly below Lay each section of the frame face down as shown. Insert both short frame sections into the long frame sections with corner stakes. Ensure all joints are square and then lock off by tightening the grub screws. Tighten Supplied 2 Fabric Roll *Take note of “Viewing Side” label on fabric 4 x Corner Brackets 4 x Aluminium Frame Section 1 x Fabric Cutter 1 x 4mm Allen Key 3 To release the Ezy-Grip push the handle forward then lift up to remove. The fabric is now ready to be re-tensioned. 3 x Screws to suit Wall With frame still face down place fabric roll on edge of frame and roll fabric off the roll. 4 If creases or ripples have developed in the screen surface, don’t panic. You can easily re-tension the fabric by pressing and holding the Ezy-Grip to release the fabric. To re-tension the fabric see the diagrams below. Crease To re-tension the fabric, re-insert the Ezy-Grip and secure the fabric once more. n e re Sc Stretch fabric over the back of the frame. Push the Ezy-Grip through fabric into the v-channel. Excess Fabric 5 1 x Ezy Mount 8 3 Ezy-Grip 7 4 2 1x Fabric Roll Not here 5 1 6 Ezy-Grip lengths Start here Tip: Insert the Ezy-Grip in the order shown above. Start at the edge of a Ezy-Grip length, but in the middle of the frame. Once screen is free of creases, trim the excess material with the supplied fabric cutter. Fabric Cutter