1
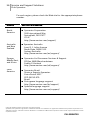
Norton Utilities TM User Guide We protect more people from more online threats than anyone in the world. Care for our Environment, ‘It’s the right thing to do’. Symantec has removed the cover from this manual to reduce the Environmental Footprint of our products. Norton Utilities User Guide TM The software described in this book is furnished under a license agreement and may be used only in accordance with the terms of the agreement. Documentation version 14.0 Copyright © 2009 Symantec Corporation. All rights reserved. Symantec, the Symantec Logo, Norton and Norton Utilities are trademarks or registered trademarks of Symantec Corporation or its affiliates in the U.S. and other countries. Windows is a trademark of Microsoft Corporation. Other names may be trademarks of their respective owners. The product described in this document is distributed under licenses restricting its use, copying, distribution, and decompilation/reverse engineering. No part of this document may be reproduced in any form by any means without prior written authorization of Symantec Corporation and its licensors, if any. OR IMPLIED CONDITIONS, REPRESENTATIONS AND WARRANTIES, INCLUDING ANY IMPLIEDWARRANTY OF MERCHANTABILITY, FITNESS FOR A PARTICULAR PURPOSE OR NON-INFRINGEMENT, ARE DISCLAIMED, EXCEPT TO THE EXTENT THAT SUCH DISCLAIMERS ARE HELD TO BE LEGALLY INVALID. SYMANTEC CORPORATION SHALL NOT BE LIABLE FOR INCIDENTAL OR CONSEQUENTIAL DAMAGES IN CONNECTION WITH THE FURNISHING, PERFORMANCE, OR USE OF THIS DOCUMENTATION. THE INFORMATION CONTAINED IN THIS DOCUMENTATION IS SUBJECT TO CHANGE WITHOUT NOTICE. The Licensed Software and Documentation are deemed to be commercial computer software as defined in FAR 12.212 and subject to restricted rights as defined in FAR Section 52.227Computer Software and any successor regulations. Any use, modification, reproduction release, performance, display or disclosure of the Licensed Software Documentation by the U.S. Government shall be solely in accordance with the terms of this Agreement. Symantec Corporation 20330 Stevens Creek Blvd. Cupertino, CA 95014 http://www.symantec.com Printed in the United States of America. 10 9 8 7 6 5 4 3 2 1 Contents Chapter 1 Installation Installation and activation of Norton Utilities……......... 5 Chapter 2 Getting Started Starting Norton Utilities…………………………………..... 7 Exploring the Main Window............................................ 8 Chapter 3 Optimization Registry Cleaning............................................................ Manage your Startup...................................................... Manage your Services.................................................... Defragment Registry....................................................... Clean your Disks.............................................................. Windows Defragmenter.................................................. 9 11 11 12 13 17 Chapter 4 Monitor Monitor Your System...................................................... 19 Monitor Your Registry..................................................... 21 Chapter 5 Windows Tools............................................................... 23 Chapter 6 Administer Settings…………………………………………………………. 25 Restore ……………………………………………………….… 29 Smart Update…………………………………….................. 31 About .............…………………………………….….............. 31 Chapter 7 Service and Support Solutions ………..…… 33 4 Contents Installation 1 This chapter includes the following topics: Installing Norton Utilities Uninstalling Norton Utilities Running and Activating Norton Utilities Installing Norton Utilities: 1. 2. Exit all programs. Insert the CD into the CD-ROM drive. The installation window opens automatically if Autorun is enabled on your system. If you have disabled Autorun on your computer, choose Run from the Start Menu to open the Run dialog box. Type D:\Setup.exe and click OK. 3. with the correct letter. 4. Follow the instructions on the Setup Wizard to complete installation. Uninstalling Norton Utilities: 1. Choose Settings from Start menu, then Control Panel from Settings. 2. Double-click on Add/Remove Programs. Select Norton Utilities 14 and click on the Add or Remove button. Click Yes to confirm. 6 Installation Installing Norton Utilities Running and Activating Norton Utilities: 1. To run Norton Utilities, choose Start > Programs > Norton Utilities 14. You can also double-click on the Norton Utilities icon on your desktop or Quick Launch bar if you have configured this option during setup. 2. Click Activate Now when prompted to activate your copy of Norton Utilities. 3. Enter enter your name, e-mail address, and the activation code found on the back of the Quick Start Card. You need to enter this information for necessary product updates. Subscription updates will not be available until Norton Utilities is activated. 4. Click Activate Now to complete the process. Getting Started 2 This chapter includes the following topics: Starting Norton Utilities Exploring the Main Window To start Norton Utilities do one of the following: In the Windows notification area, double-click the Norton Utilities icon. On the Windows taskbar, click Start > All Programs > Norton Utilities 14 > Norton Utilities 14. 8 Getting Started Exploring the Main Window Exploring the Main Window: Norton Utilities is an application suite that integrates registry scanning, privacy cleaning and computer management. Using Norton Utilities, you can safely repair the Windows registry, permanently erase all traces of your online and computer activities, as well as monitor and tune your system for optimal performance. Launching Norton Utilities displays the Main Status screen. From here you can access the immediate functions of Norton Utilities: Optimize Clean Your Registry Manage Your Startup Manage Your Services Defragment Your Registry Clean Your Disks Windows Defragmenter Monitor Monitor Your System Monitor Your Registry Performance Test (on activation only) Process Viewer (on activation only) Windows Tools Links to Windows functions Administer Settings Restore About Smart Update Optimization 3 This chapter includes the following topics: Registry Cleaning Manage your Startup Manage your Services Defragment Registry Clean your Disks Windows Defragmenter To access the options under the Optimize section, click Optimize in the left navigation panel. Registry Cleaning To begin scanning your Registry: 1. Click Optimize in the left navigation panel. 2. Click the Clean Your Registry button. During a registry scan, Norton Utilities will search your Windows registry for invalid entries. The scan results are displayed at the end of the scan. From here, you can safely repair the invalid entries to improve your system's performance stability. The action properties of each problem can be modified here before you implement any repairs and changes into the Windows registry using the Repair function. Norton Utilities will automatically create registry backups each time you repair problems so it is easy to restore backups if you need to do so at a later point in time. 10 Optimization Registry Cleaning The panel on the left lists the sections that were scanned along with the number of problems found in each section. Click on a section in the section panel to view the problems under that section. Double-click on a problem for the expanded view of the problem with more information. Click All Sections to view all problems found in the scan. The details of each problem displayed on the Scan Results screen include: Priority level of the problem Location in the registry where the problem was found. Name of the problematic value and the data it contains. When a problem is selected, its value and data are displayed in the Search field. Modifying problems To modify a problem, select a problem and right-click to display the action menu. This menu lists all actions that can be performed on problems before repairing. Select the appropriate action. Note: For some problems, not all actions may be available. Keep Item: To prevent a problem from being deleted clear the item's check box on the scan results screen or just select Keep Item from the Action menu. Delete Item: To delete an item upon executing the Repair function, select Delete Item from the Action menu. Add value/subkey to ignore list: To prevent a registry entry's value or subkey being repaired when the Repair function is executed and from being detected in future scans, add the value or subkey to -your personalized Ignore Lists. Keep All: In addition to keeping specific problems, all problems within a selected section of the scan results screen can be kept. Delete All: In addition to repairing specific problems, all problems within a selected section of the scan results screen can be repaired. To repair all problems within a section, select the section on the left of the Scan results screen and then select Delete All from the Action menu. When this is done, the check boxes of all problems belonging to the selected section are selected. Specific items can then be kept using the Keep Item action. Close: Select Close to close the pop-up menu. Optimization 11 Registry Cleaning Repairing Problems When you are satisfied with the actions and modifications to all problems listed on the scan results screen, you are ready to execute the Repair function. Clicking this button applies all actions and modifications on the scan results screen to the relevant entries in the registry, including additions to Ignore Lists. To go back to the Optimize screen, click the Continue button. Manage Your Startup The Startup Manager allows you to view and manage your bootup, system startup and all entry points. To access the Startup Manager screen: 1. Click Optimize in the left navigation panel. 2. Click the Manage Your Startup button. 3. Select an entry and right-click to enable, disable or delete programs that are automatically loaded. Click Apply to save your changes. Manage Your Services The Services Manager provides different configuration options to improve the performance and setup of your Windows services. To access the Services Manager screen: 1. Click Optimize in the left navigation panel. 2. Click the Manage Your Services button. Recommended Services: A combination of performance and functionality, this option will enable all core services and a selection of services to provide balance between features and speed. Minimal Services: For raw performance and faster boot times, select Minimal Services. This option will enable core Windows Services. Restore Services: To restore your services to a last known good setup select Restore Services. Your services will be reset to their original running states. 12 Optimization Manage Your Startup Defragment Your Registry Registry compacting removes gaps, wasted space and corrupt keys from the registry, and performs physical defragmentation of the Windows registry files. To access the Defragment Your Registry screen: 1. Click Optimize in the left navigation panel. 2. Click the Defragment Your Registry button. 3. Analyse your registry - during this stage, Norton Utilities analyses your registry for gaps, free space and corrupt keys. 4. Preview Results - this screen allows you to view details on the compacting optimizations found. 5. Backup, compact and optimize your registry - During this stage, you will implement the compacting process. 6. The Create System Restore Point field allows you to create a Windows Restore point if you are running Windows XP. 7. Click Yes to proceed with registry analysis. Once this is complete, the Preview Results screen is displayed. 8. Click on the More Info link to see the analysis in detail. Click Compact Now to begin compacting the registry. You will need to restart the system to finalize compacting. Optimization 13 Defragment Your Registry Clean Your Disks Norton Utilities allows you to clean your computer to securely remove internet tracks, History information and other sensitive data. To access the Clean Your Disks screen: Click Optimize in the left navigation panel. Click the Clean Your Disks button. The sections available for cleaning include: Windows Settings Browser Settings Plugins Custom Items You can also Free Space from here. Clean Windows Settings This section allows selective cleaning of areas of the Windows operating system where various computer activities are recorded. These include: Recent Document Folder history Find/Search Folder history Scan Disk temporary files Clipboard content Run history Temporary Files directory Windows Recycle Bin Microsoft Office applications - this section allows selective cleaning of areas of the Microsoft Office Suite where history information is recorded: Access Excel Photo Editor PowerPoint Outlook Word To access the Clean Windows Settings screen: 1. Click Optimize in the left navigation panel. 14 Optimization Clean Your Disks Clean Browser Settings 2. Click the Clean Your Disks button. 3. Select the Windows tab. 4. Check the box beside Clean Windows Settings. 5. Select the sections you want to clean by checking the appropriate boxes and click Clean to begin cleaning. Select Save to save your settings for subsequent sessions. This section allows selective cleaning of areas of different browsers where history information is recorded. Currently the browsers supported include Internet Explorer, Firefox, Mozilla, Netscape, and Opera To access the Clean Browser Settings screen: 1. 2. 3. 4. 5. 6. 7. 8. Click Optimize in the left navigation panel. Click the CleanYour Disks button. Select the Browsers tab. Check the box beside Clean Browser Settings. Select a browser from the browsers list. Under the settings view, select the items you want to clean To prevent specific cookies from being cleaned, you will need to save them as Cookies to Keep. Note: This is only available for Internet Explorer, Firefox and Netscape. Click Clean. During cleaning, the progress bar will indicate the extent of progress and the items being cleaned. Once the cleaning is completed, the summary screen will display the total sections selected and the total number of items cleaned. Click on the View Log link to see the log of items cleaned. To prevent specific cookies in these browsers from being cleaned: 1. 2. 3. Select a browser from the list and then click Select Cookies to Keep at the bottom of the screen. This will open up a dialog box. Select Cookies to Keep - In the list of available cookies, select the check boxes next to the cookies that you wish to keep. Click the Save button to save your selection. Optimization 15 Clean Your Disks Clean Plugins The Plugins section allows selective cleaning of history information contained by third party softwares. Norton Utilities allows for cleaning of over 70 third party applications. To access the Clean Plugins screen: 1. 2. 3. 4. 5. 6. Click Optimize in the left navigation panel. Click the Clean Your Disks button. Select the Plugins tab. Check the box beside Third Party Software to enable cleaning. Select the third party softwares you want to clean from the list displayed. Click Save to save your selection for subsequent sessions. Click Clean to begin cleaning. During cleaning, the progress bar will indicate the extent of progress and the items being cleaned. Once the cleaning is completed, the summary screen will display the total sections selected and the total number of items cleaned. Click on the View Log link to see the log of items cleaned. Clean Custom Items The Clean Custom Items section allows for selective cleaning of customized files, folders and Windows Registry keys or values. To selectively clean specific files, folders and Windows Registry keys or values, you will need to add them to the custom items list through the Custom Clean Wizard feature in this section. To access the Clean Custom Items screen: 1. Click Optimize in the left navigation panel. 2. Click the Clean Your Disks button. 3. Select the Clean Custom Items tab. 4. Check the box beside Clean Customs Items. 5. Click the link to start the Custom Wizard at the bottom of the screen. This will launch the Custom Wizard. 6. To add a new custom item, select Create New Clean Custom item and enter a name for the new item in the name field. 16 Optimization Clean Your Disks 7. To edit an existing Custom Item, select Edit an Existing Item and select the item from the drop-down list. 8. Click Next to add the sections to be cleaned or edited. You may select one or more sections. These include: 9. Individual files Folders Registry keys or values Click Next to proceed. Depending on the sections you chose, the following screens may be displayed: 10. Select files for cleaning Step 1 - Browse target folder: browse to select the target folder containing the items you wish to clean. Step 2 - Select files: Check the boxes to select the files you wish to add to the custom item. Step 3 - Add files: Click the Add button to add the files as components to be cleaned as part of this custom item. These will appear in the lower box of this screen. Click Next to continue. 11. Select folders for cleaning Step 1 - Browse target folder: browse to select the target folder you wish to clean. To include its sub folders, check the Include Subfolders box located on the right. Step 2 - Additional Settings: If the root folder is empty then delete the folder - select this check box to delete the added folder if it contains no other files and subfolders. Include subfolders - select this check box to delete all subfolders and files within the added folder. Change default mask - select this check box to use the mask indicated in the default mask field. Any valid text string can be entered into this field, including 'wild-card' characters such as '*'. Optimization 17 Clean Your Disks Step 3 - Add Folder: Click the Add button to add the folder. Note: Click the Add button only when you have completely configured your settings. Click Next to continue. 12. Select registry entries you would like to clean: Step 1 - Browse Target Key : browse to select the target Key you wish to clean, including any SubKeys it may contain that you also wish to clean. 13. Select registry entries you would like to clean: Step 1 - Browse Target Key : browse to select the target Key you wish to clean, including any SubKeys it may contain that you also wish to clean. Step 2 - Additional Options: Delete entire SubKey - select this option to delete the selected target Key in Step 1 and all SubKeys contained within it. Delete a SubKey Value - select this option to delete the SubKey Value entered into the SubKey Value field of the selected target Key in Step 1. If the entered value is not found at the selected target Key, nothing is cleaned in this target Key item. Note: This option does not delete equivalent values that may be present in any nested SubKeys within the selected target Key. Step 3 - Click the Add button to add the target Key or target Key value. 14. Click the Finish button when done. Now select the items for cleaning and click Clean. Click Save to save the settings for subsequent sessions. Free Space The Free Space option allows the bleaching of free space on selected drives or partitions. To access the Free Space screen: 1. 2. 3. 4. 5. 6. Click Optimize in the left navigation panel. Click the Clean Your Disks button. Select the Free Space tab. Select the check box besides Bleach Free Space at the top of the screen. Select the drives on which you want to bleach space from the list displayed. Click Clean. 18 Optimization Clean Your Disks During cleaning, Norton Utilities will clean all selected sections you have chosen under the Privacy Guardian feature and delete relevant data files and data. During the bleaching process, the cleaned data is rendered unrecoverable using standard file recovery methods. Note: This function also renders deleted data remnants occupying free drive space unrecoverable using standard file recovery methods. Note: sections or subsections marked with a '*' can only be accessed after registering your downloaded version of Norton Utilities. To save your selection for use in subsequent sessions, click the Save button. Windows Defragmenter The built-in defragmentation tool provides a streamlined interface to the Windows Disk Defragmenter which will optimize and order the data on your hard disk drive for faster file access. To access the Defragmentation screens: 1. 2. Click Optimize in the left navigation panel. Click the Windows Defragmenter button. 4 Monitor This chapter includes the following topics: Monitor Your System Monitor Your Registry Monitor Your System To access the Monitor Your System screen: 1. 2. Click Monitor in the left navigation panel. Click the Monitor Your System button. System Optimizer tabs : The System Optmizer tabs on the top panel of this screen allow you to actively monitor: Processes System performance Drives/space usage System information Optimize your system: When you click this button from the Optimization screen, Norton Utilities implements a system optimization function which applies a set of tweaks and patches directly into the Windows Registry that are designed to improve system performance. Defragmentation : The built-in defragmentation tool provides a streamlined interface to the Windows Disk Defragmenter which will optimize the files on your disk for faster file access. 20 Monitor Monitor Your System Processes The Processes section provides an alternative task manager that simplifies process activity by showing each process; CPU usage, activity and priority. To access the Processes screen: 1. Click Monitor in the left navigation panel. 2. Click the Monitor Your System button. 3. Select the Processes tab. Under this simplified view, the number of processes running are listed and organized according to Image Name, the CPU usage for the process, priority and the process ID (PID). This allows users to immediately identify process activity and examine the amount of CPU each process uses. Non idle processes are highlighted, marked with a yellow icon and sorted by CPU usage. This allows user to see which processes are actively in use. Click on the heading of the column to sort the column by that attribute. Menu Right click on a process and select: End Process : terminate the selected process Set Priority : Change the priority to; Real Time, High, Normal or Idle. Drives/Space This section monitors the physical disks and provides information on the total size, free space available and space used. To access the Drives/Space screen: 1. Click Monitor in the left navigation panel. 2. Click the Monitor Your System button. 3. Select the Drives/Space tab. Along with the size and space calculations for each physical drive, collective sums are also provided for the drives. Monitor 21 Monitor Your Registry System Information To access the System Information screen: 1. Click Monitor in the left navigation panel. 2. Click the Monitor Your System button. 3. Select the System Information tab. The System Information section provides a listing of key system variables for quick reference such as: Computer Name User Name OS System Drive Windows Directory OS Info Registered Organization Registered Owner Product ID CPU Make CPU Speed RAM Number of Processors Printer locations Monitor Your Registry The Registry Monitor is designed to assist in keeping your system free of Windows registry errors. Registry Monitor observes your Windows registry and alerts you when a specified number of changes have been made to key areas of the registry. When alerted, you have the option to run a silent scan. This optional feature can begin monitoring your registry as soon as Windows starts up. 22 Monitor To enable the Registry Monitor: 1. Click Monitor in the left navigation panel. 2. Click the Monitor Your Registry button. 3. Popup Notification will appear after - Enter the number of events after which you wish to receive a popup notification. By default, this is 50. 4. Enable Registry Monitor - Select this to enable the Registry Monitor. The monitor becomes active when Norton Utilities is minimized to the system tray. Windows Tools 5 To access the options under the Windows Tools section, click Windows Tools in the left navigation panel. Computer Management Windows Update System Restore System Properties System Information Control Panel Local Security Settings Local Users and Groups Group Policy Editor Windows Security Centre Device Manager Disk Management Event Viewer Performance Monitor 24 Windows Tools Administration 6 This chapter includes the following topics: Settings Restore About Smart Update Settings Displays the Settings screen from where you can customize the overall behaviour of Norton Utilities such as settings for scans, whitelists and other features. General settings To access the General Settings screen: 1. Click Administer in the left navigation panel. 2. Click the Settings button. 3. Click General under Options. The general settings category allows you to configure the following options for Norton Utilities. 26 Administer Settings Scan and Repair Create a System Restore Point before repair (XP) - Select this check box to create a System Restore point prior to making registry changes whenever the Repair function is executed. Please note:If the Windows System Restore function is deactivated, when you select this option, a Windows message will notify you that the Windows System Restore function is turned off. Click Yes to display the Windows System Properties property sheet where you can activate Windows System Restore. Warning: Currently, in Vista, you will not see a prompt message if System Restore is turned off. As a precaution, ensure that it is turned on to enable this option. If this option is cleared, Norton Utilities will not create Windows System Restore points when the repair function executed. Note that Norton Utilities will continue to make automatic registry backups when repairs are made. Notes: The "Create a Restore Point before repair" feature is available on Windows XP and Vista versions only. Creating a Restore Point is a separate function from the registry backup that is automatically created by Norton Utilities prior to changes being implemented in the registry upon executing the Repair function. Remove All Problems Automatically - Select this check box to make the repair function run automatically after the scan results screen is displayed and after a period of 10 seconds. A 10 second countdown is displayed on the scan results screen when this option is selected. During the countdown, the automatic repair can be terminated by clicking the Close button. Log Scanning - Select this check box to create log files that record the state of your system following a scan. These informative log files do not consume substantial disk space and it is recommended that this option remain selected for support purposes. Open Log Folder button - Click this button to open Norton Utilities's log file directory. The files in this directory are used for support purposes only and should not be edited. Administer 27 Settings Startup and Language 1. Automatic Startup - Configure Norton Utilities to do one of the following actions when Windows starts up. o o o o 2. Custom Scan Privacy Clean and Full Scan Send to System Tray Disabled - Does not conduct a scan Language - Select a language from the list to change the language of the text in Norton Utilities's GUI. Custom Scan Settings To access the Custom Scan Settings screen: 1. Click Administer in the left navigation panel. 2. Click the Settings button. 3. Click Custom Scan under Options. A Custom Scan allows you to select the sections to be included within the scan. Configuring Settings for a Custom Scan 1. Click the Settings button in the left navigation panel, then click Custom Scan. 2. Select the sections of the registry that you wish to scan by selecting the appropriate check boxes. 3. Click Save to save your settings for subsequent scan sessions. 4. Click Start Scan to run the custom scan. 28 Administer Settings Scanning Path Settings To access the Scanning Paths Settings screen: 1. Click Administer in the left navigation panel. 2. Click the Settings button. 3. Click Scanning Paths under Options. The Scanning Paths screen allows you to set the directories, hard drives or partitions on your system that are to be scanned for orphaned shortcuts when the Temp Files / Shortcuts section of Norton Utilities is scanned. When Norton Utilities is installed, the following paths are provided in the "Which locations do you wish to include while scanning?" list box: The root directories of all hard drives and partitions available on your system, for example, 'C:\'. The Start Menu paths for both logged on and All Users. The My Documents and Desktop paths for logged on users. To ensure that a path is scanned for Program Shortcuts, select its check box. To add a path to the list, click on the Add button, browse to the selected folder and click the OK button. The path will be reflected in the list of paths. To delete a path from the list, select the path and click the Delete button. Ignore Lists Settings To access the Ignore Lists screen: 1. Click Administer in the left navigation panel. 2. Click the Settings button. 3. Click Ignore Lists under Options. The Ignore List screen lists the values or subkeys that have been added to your Ignore Lists from the scan results screen. Any values you have added can be viewed and accessed by clicking the Values tab. Likewise, any subkeys added can be accessed by clicking on the Keys tab. Administer 29 Settings .The Ignore List manager screen has three buttons below the lists used for modifying items within your Value or Keys Ignore Lists. These functions only affect items within the selected list. Add - allows you to create a new value or subkey from scratch and add it to your list. Remove - allows you to remove specific items from your Ignore Lists. To remove items from this list, select their check boxes and click the Remove button. You can remove single items by highlighting them and clicking this button. Note: Norton Utilities also contains an Internal Ignore List, which is different from this Ignore List. Updates to this list are released periodically and can be obtained via Smart Update. Monitor Settings To access the Registry Monitor Settings screen: 1. Click Administer in the left navigation panel. 2. Click the Settings button. 3. Click Monitor under Options. Enable Registry Monitor - Select to enable the Registry Monitor Popup Notification will appear after Enter the number of events after which you wish to receive a popup notification. By default, this is 50. Enable Registry Monitor - Select this to enable the Registry Monitor. The monitor becomes active when Norton Utilities is minimized to the system tray. 30 Administer Settings Privacy Settings To access the Privacy Settings screen: 1. Click Administer in the left navigation panel. 2. Click the Settings button. 3. Click Privacy under Options. 4. Globally clean Internet Explorer tracks - select this check box to allow Norton Utilities to clear Internet Explorer tracks for all users as opposed to the current, logged in user account. Selecting this option allows global cleaning of the following Internet Explorer tracks: History, Cookies and the Temporary Internet Files folder. 5. Hide low disk space warning - select this check box to suppress the automatic warning message regarding low hard disk space, which Windows may display towards the end of the bleaching process on a given drive or partition. This message may display as the bleaching process fills up free space on a selected drive or partition with garbage data before deleting it. Restore Norton Utilities automatically creates a backup of the entries it changes in the Windows registry when the repair function is executed. These backups allow you to undo any of these changes and can be accessed through the Restore Registry Backup screen. To undo any changes made by Norton Utilities: 1. Click Administer in the left navigation panel. 2. Click on the Restore button. From the list of automatic backups available listed with their creation dates, select the one you want to restore. Select a backup and double click to view all repairs made in that backup. This screen allows you to select specific items to restore. 3. Click Restore at the bottom of the screen. Administer 31 Settings Smart Update The easiest way to keep your installation of Norton Utilities up to date is to use the Smart Update feature. This allows for updates to Norton Utilities's Internal Ignore list, main application files for upgraded functionality, and updates to help files. Smart Update is available to all registered users of Norton Utilities. Running Smart Update Click the Smart Update link on the product screen. This will initiate the Smart Update Wizard. Follow the prompts to download all available enhancements. If no updates are available, Smart Update indicates that Norton Utilities is already updated. A green tick mark indicates that the update is successfully downloaded and installed. About To access the About screen: 1. Click Administer in the left navigation panel. 2. Click the About button. The About screen provides detailed information about your installation of Norton Utilities 32 Administer Settings Support 7 About Support To help you find an answer to your query or issue, we have two support options available. Details of each option are explained in the relevant section: Self Help Contact Support Support offerings may vary based on the language or product. Self Help The Symantec Web site contains answers to the most common customer questions. From our Web site you can: Find help with your subscription, download, product activation, or other nontechnical issues. Search our knowledge base for help with technical issues, such as installing, configuring, or troubleshooting errors with your Symantec product. Find information about the latest virus threats and removal tools. You can access the Symantec support Web site at: www.symantec.com/globalsupport 34 Service and Support Solutions Contact Support Contact Support: In addition to using our Self Help options, you can also contact a support representative by chat, email, or phone. Support offerings may vary based on the language or product. Following is an overview of our support offerings: Chat Chat in real time with a support representative.For more complex technical issues, chat offers the option to allow a support representative to connect remotely to your computer and resolve the problem for you. Chat support is free, with the exception of our Virus and Spyware Solution service. Web Submit your question on our Web site and receive a response by email. Email support has a slower response time when compared to chat or phone. Email support is free. Phone Speak to a support representative in real time. To contact a support representative, please visit the Symantec support Web site at the following URL: www.symantec.com/globalsupport The online support option is displayed first, followed by the contact options where you can select the type of support you prefer. Administer 35 Settings Support Policy When Symantec announces that a product will no longer be marketed or old, telephone support is discontinued six months after the termination announcement. Technical information on these products may still be available through the support Web site at the following address: www.symantec.com/globalsupport Symantec reserves the right to change its support policies at any time without notice. You can view the latest version of the support policy at the following URL: www.symantec.com/supportpolicy Worldwide service and support Support solutions vary by country. For the Symantec and International Partner locations that are outside of the United States, contact one of the service and support offices that are listed in this section. You can also go to the following Web site and select your language: www.symantec.com/globalsupport Club Symantec Join Club Symantec and sign up for your free monthly newsletter to receive the latest security articles, tips, and promotions! For more information, go to the following URL and select your country in the drop-down menu: www.clubsymantec.com 36 Service and Support Solutions Club Symantec For each region, please check the Web site for the appropriate phone number. Region Contact Information North America ■ Symantec Corporation Australia and New Zealand ■ Symantec Australia Europe, Middle East, and Africa ■ Symantec Ltd Consumer Services & Support Latin America ■ Symantec Brasil 555 International Way Springfield, OR 97477 U.S.A. http://www.norton.com/support/ Level 2, 1 Julius Avenue North Ryde, NSW 2113 Sydney Australia http://www.norton.com/au/support/ PO Box 5689 Blanchardstown Dublin 15 Ireland http://www.norton.com/uk/support/ Sevico e Suporte Symantec Caixa Postal 3037 CEP 06210-970 Brasil ■ Portuguese language support: http://www.norton.com/br/support/ ■ Spanish language support: http://www.norton.com.mx/support/ Copyright 2009 Symantec Corporation. All rights reserved Symantec, the Symantec Logo, Norton and Norton Utilities are trademarks or registered trademarks of Symantec Corporation or its affiliates in the U.S. and other countries. Windows is a trademark of Microsoft Corporation. Other names may be trademarks of their respective owners. PN: 20006703