1
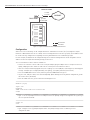
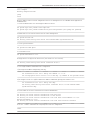
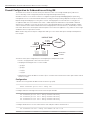
APPLICATION NOTE
QUICKSTART GUIDE FOR BRANCH SRX SERIES
SERVICES GATEWAYS
Configuring Basic Security and Connectivity on Branch SRX Series Services Gateways
Copyright © 2009, Juniper Networks, Inc.
APPLICATION NOTE - Quickstart Guide for Branch SRX Series Services Gateways
Table of Contents
Introduction. . . . . . . . . . . . . . . . . . . . . . . . . . . . . . . . . . . . . . . . . . . . . . . . . . . . . . . . . . . . . . . . . . . . . . . . . . . . . . . . . . . . . . . . . 1
Scope. . . . . . . . . . . . . . . . . . . . . . . . . . . . . . . . . . . . . . . . . . . . . . . . . . . . . . . . . . . . . . . . . . . . . . . . . . . . . . . . . . . . . . . . . . . . . . . 1
Design Considerations. . . . . . . . . . . . . . . . . . . . . . . . . . . . . . . . . . . . . . . . . . . . . . . . . . . . . . . . . . . . . . . . . . . . . . . . . . . . . . . . 1
Hardware Requirements . . . . . . . . . . . . . . . . . . . . . . . . . . . . . . . . . . . . . . . . . . . . . . . . . . . . . . . . . . . . . . . . . . . . . . 1
Software Requirements . . . . . . . . . . . . . . . . . . . . . . . . . . . . . . . . . . . . . . . . . . . . . . . . . . . . . . . . . . . . . . . . . . . . . . . 1
Description and Deployment Scenario. . . . . . . . . . . . . . . . . . . . . . . . . . . . . . . . . . . . . . . . . . . . . . . . . . . . . . . . . . . . . . . . . . . 1
Default Firewall Configuration . . . . . . . . . . . . . . . . . . . . . . . . . . . . . . . . . . . . . . . . . . . . . . . . . . . . . . . . . . . . . . . . . . . . . . . . . 1
Configuration . . . . . . . . . . . . . . . . . . . . . . . . . . . . . . . . . . . . . . . . . . . . . . . . . . . . . . . . . . . . . . . . . . . . . . . . . . . . . . . . . . . 2
Firewall Configuration for Outbound Access Using IRB . . . . . . . . . . . . . . . . . . . . . . . . . . . . . . . . . . . . . . . . . . . . . . . . . . . . 4
Configuration . . . . . . . . . . . . . . . . . . . . . . . . . . . . . . . . . . . . . . . . . . . . . . . . . . . . . . . . . . . . . . . . . . . . . . . . . . . . . . . . . . . 4
IPsec VPN Configuration . . . . . . . . . . . . . . . . . . . . . . . . . . . . . . . . . . . . . . . . . . . . . . . . . . . . . . . . . . . . . . . . . . . . . . . . . . . . . . 5
Configuration . . . . . . . . . . . . . . . . . . . . . . . . . . . . . . . . . . . . . . . . . . . . . . . . . . . . . . . . . . . . . . . . . . . . . . . . . . . . . . . . . . . 6
UTM Configuration . . . . . . . . . . . . . . . . . . . . . . . . . . . . . . . . . . . . . . . . . . . . . . . . . . . . . . . . . . . . . . . . . . . . . . . . . . . . . . . . . . . 7
Antivirus Configuration . . . . . . . . . . . . . . . . . . . . . . . . . . . . . . . . . . . . . . . . . . . . . . . . . . . . . . . . . . . . . . . . . . . . . . . . . . . 7
Web Filtering Configuration . . . . . . . . . . . . . . . . . . . . . . . . . . . . . . . . . . . . . . . . . . . . . . . . . . . . . . . . . . . . . . . . . . . . . . . 8
IDP Configuration . . . . . . . . . . . . . . . . . . . . . . . . . . . . . . . . . . . . . . . . . . . . . . . . . . . . . . . . . . . . . . . . . . . . . . . . . . . . . . . . 8
Summary . . . . . . . . . . . . . . . . . . . . . . . . . . . . . . . . . . . . . . . . . . . . . . . . . . . . . . . . . . . . . . . . . . . . . . . . . . . . . . . . . . . . . . . . . . . 9
About Juniper Networks. . . . . . . . . . . . . . . . . . . . . . . . . . . . . . . . . . . . . . . . . . . . . . . . . . . . . . . . . . . . . . . . . . . . . . . . . . . . . . . 9
Table of Figures
Figure 1: Corporate and branch-office network infrastructure. . . . . . . . . . . . . . . . . . . . . . . . . . . . . . . . . . . . . . . . . . . . . . 2
Figure 2: Corporate and branch-office network infrastructure. . . . . . . . . . . . . . . . . . . . . . . . . . . . . . . . . . . . . . . . . . . . . . 5
ii
Copyright © 2009, Juniper Networks, Inc.
APPLICATION NOTE - Quickstart Guide for Branch SRX Series Services Gateways
Introduction
The purpose of this application note is to walk the reader through the steps necessary to configure Juniper
Networks® SRX Series Services Gateways out of the box to provide secure connectivity to the Internet and remote
sites. The example configurations can be leveraged to build more complicated configurations that will meet the
security requirements of modern branch and remote offices.
After reading this document, you should be able to configure branch SRX Series Services Gateways to pass traffic
and provide several common security services.
Scope
This paper introduces the Juniper Networks JUNOS® Software CLI and will help the reader configure SRX Series
Services Gateways for the first time and provide a building block for more advanced configurations. It does not
include advanced security configuration examples or network design guidelines. Additional Juniper Networks
documentation is available for readers at www.juniper.net/techpubs/software/junos/index.html#srx.
Design Considerations
Hardware Requirements
Juniper Networks SRX Series Services Gateways (Certain features described in this document are not available
across the entire SRX Series product line. Readers should consult Juniper Networks product-specific literature for
more details.)
Software Requirements
JUNOS Release 9.5 or later for all branch SRX Series Services Gateways
Description and Deployment Scenario
The included examples are not intended to be Juniper recommended configurations as they only meet the security
requirements of the simplest deployments such as a small home office. However, with some modification, they can
be used to connect and secure larger remote and branch offices to a larger central site.
The approach of this document is to begin with an SRX Series as it ships from the factory and progressively work
through the steps necessary to build a usable base configuration.
Default Firewall Configuration
The first configuration is often associated with default firewall behavior. All outbound traffic from a private network is
allowed and uses source NAT, while inbound traffic from the Internet not matching an established session is blocked.
The first time that branch SRX Series Services Gateways are powered on, they will boot using the factory default
configuration as follows:
• A trust and untrust zone will be created.
• Interface ge-0/0/0 will be assigned the IP address 192.168.1.1 and will be bound to the trust zone.
• A DHCP server instance will be enabled on interface ge-0/0/0.
• Three security policies, one inter-zone and two intra-zone, will be created:
-- trust zone to trust zone (intra-zone)—default permit policy
-- trust zone to untrust zone (inter-zone)—default permit policy
-- untrust zone to trust zone (inter-zone)—default deny policy
To illustrate a common default firewall configuration, a Juniper Networks SRX210 Services Gateway will be used and
the following design assumptions will be made:
• The protected network is connected to interface ge-0/0/0 in the trust zone.
• Connectivity to the Internet is through interface fe-0/0/7 in the untrust zone.
• The IP address of interface fe-0/0/7 is either statically configured or assigned via DHCP.
Copyright © 2009, Juniper Networks, Inc.
1
APPLICATION NOTE - Quickstart Guide for Branch SRX Series Services Gateways
UNTRUST ZONE
fe-0/0/7
1.1.1.1/30
TRUST ZONE
INTERNET
ge-0/0/0
192.168.1.0/24
Untrust Zone
Trust Zone
Figure 1: Corporate and branch-office network infrastructure
Configuration
SRX Series Services Gateways can be configured from the command-line interface (CLI) or through the Juniper
Networks J-Web Software GUI. To use J-Web, connect a management PC to interface ge-0/0/0. The IP address of the
PC can be statically configured or assigned by the factory default DHCP server enabled on ge-0/0/0.
For this example, an SRX210 will be configured using the CLI and the management PC will be assigned a static IP
address of 192.168.1.10/24 with a default gateway of 192.168.1.1.
To access an SRX Series device with the JUNOS CLI:
• Connect one end of the console cable to the serial port adapter, plug the adapter into a serial port on the PC or
laptop, and plug the other end of the cable into the console port on the SRX Series device.
• Start the terminal emulation program on the PC or laptop, select the COM port, and configure the following port
settings: 9600 (bits per second), 8 (data bits), none (parity), 1 (stop bits), and none (flow control)
• Press the POWER button on the router, and verify that the POWER LED turns green.
• Log in as root, and press Enter at the Password prompt. (When booting the factory default configuration, you do
not need to enter a password.)
• Enter the UNIX shell after you are authenticated through the CLI:
Amnesiac (ttyu0)
login: root
Password:
JUNOS 9.4B3 built 2008-12-19 00:28:15 UTC
root@%
• Type “cli” at the % prompt to start the CLI and press Enter. The prompt changes to an angle bracket (>) when you
enter CLI operational mode.
root@% cli
root>
• Type “configure” at the (>) prompt and press Enter. The prompt changes from > to # when you enter
configuration mode.
2
Copyright © 2009, Juniper Networks, Inc.
APPLICATION NOTE - Quickstart Guide for Branch SRX Series Services Gateways
root> configure
Entering configuration mode
[edit]
root#
Next, the SRX Series device will be configured to allow secure management access and NAT will be applied to all
outbound traffic.
1. Create an administrative user to manage the SRX Series device.
set system login user johndoe class super-user
set system login user johndoe authentication plain-text-password (will prompt for password)
2. Enable SSH services from the untrust zone for remote management.
set system services ssh
set security zones security-zone untrust host-inbound-traffic system-services ssh
3. Set the system hostname.
set system host-name mysrx
4. Set the DNS servers.
set system name-server 4.2.2.2
5. Assign interface fe-0/0/7 to the untrust zone (zone names are case sensitive).
set security zones security-zone untrust interfaces fe-0/0/7
6. Set fe-0/0/7 IP address and default route configuration.
a) To assign the IP address and gateway statically:
set interfaces fe-0/0/7 unit 0 family inet address 1.1.1.1/30
set routing-options static route 0.0.0.0/0 next-hop < ip address of the upstream router>
b) To configure interfaces fe-0/0/7 to obtain an IP address and default gateway from a DHCP server:
set interfaces fe-0/0/7 unit 0 family inet dhcp
set security zones security-zone untrust interfaces fe-0/0/7.0 host-inbound-traffic
system-services dhcp
7. Create a NAT rule for source translation of all Internet-bound traffic.
set security nat source rule-set
set security nat source rule-set
set security nat source rule-set
destination-address 0.0.0.0/0
set security nat source rule-set
interface-nat from zone trust
interface-nat to zone untrust
interface-nat rule rule1 match source-address 0.0.0.0/0
interface-nat rule rule1 then source-nat interface
8. Use the “commit” command at the CLI prompt to activate the configuration.
commit
Copyright © 2009, Juniper Networks, Inc.
3
APPLICATION NOTE - Quickstart Guide for Branch SRX Series Services Gateways
Firewall Configuration for Outbound Access Using IRB
To eliminate the need for an external switch (if the SRX Series device has enough available ports), SRX Series
Services Gateways can be configured to provide switching and routing simultaneously.
An SRX Series device uses virtual L3 interfaces to support integrated routing and bridging (IRB) or equivalently,
routing between a set of switched and routed interfaces. Today, this design is widely adopted on enterprise switches.
Implementing route bridging in a security device is more challenging than in a switch because security policies
are applied to both inter-zone and intra-zone traffic. JUNOS implements IRB with the help of VLANs combined
with interfaces. A VLAN is a collection of interfaces that can be grouped together into a broadcast domain. JUNOS
switches Ethernet frames within a VLAN rather than routing IP packets. A virtual interface, called VLAN, is used to
route traffic between the switched ports and routed ports. This architectural approach is very similar to connecting a
standalone switch to a port on the firewall.
Note: Readers may want to skip this configuration and try it at the end as subsequent examples build upon the
first example.
UNTRUST ZONE
fe-0/0/7
1.1.1.1/30
vlan i/f
192.168.1.1/24
INTERNET
TRUST ZONE
Untrust Zone
Trust Zone
To illustrate this firewall configuration, the following design assumptions are made:
• Interface fe-0/0/7 provides connection to the Internet.
• Grouping the following interfaces creates a VLAN.
-- ge-0/0/0
-- ge-0/0/1
-- fe-0/0/2
-- fe-/0/0/3
• VLAN interface with an IP address 192.168.1.1/24 is created to route traffic between switch ports and the routed
interface fe-0/0/7.
Configuration
1. Remove the factory default IP address from the interface ge-0/0/0.
delete interfaces ge-0/0/0 unit 0 family inet
2. Configure Ethernet switching on the interfaces that are part of VLAN.
set
set
set
set
interfaces
interfaces
interfaces
interfaces
ge-0/0/0
ge-0/0/1
fe-0/0/2
fe-0/0/3
unit
unit
unit
unit
0
0
0
0
family
family
family
family
ethernet-switching
ethernet-switching
ethernet-switching
ethernet-switching
3. Configure VLAN interface to route traffic between switched ports and the routed interface.
set interfaces vlan unit 0 family inet address 192.168.1.1/24
4
Copyright © 2009, Juniper Networks, Inc.
APPLICATION NOTE - Quickstart Guide for Branch SRX Series Services Gateways
4. Assign VLAN interface to the default VLAN.
set vlans default l3-interface vlan.0
Note: SRX Series Services Gateways are preconfigured with a system-defined VLAN with name “default” and
VLAN-ID “1.”
5. Assign the VLAN interface to trust security zone.
set security zones security-zone trust interfaces vlan.0
IPsec VPN Configuration
To illustrate the configuration of a site-to-site IPsec tunnel, VPN configuration details will be added to the first
example according to the following design assumptions:
• A route-based IPsec VPN with preshared keys is specified between sites.
• The protected network is connected to interface ge-0/0/0 in the trust zone.
• Connectivity to the Internet is through fe-0/0/7 in the untrust zone.
• The remote IPsec endpoint IP address is 1.1.1.2, and the protected subnet at the remote site is 10.1.1.0/24.
• All traffic to the subnet 10.1.1.0/24 is encrypted.
UNTRUST ZONE
fe-0/0/7
1.1.1.1/30
TRUST ZONE
1.1.1.2/30
10.1.1.0/24
ge-0/0/0
192.168.1.0/24
Untrust Zone
Trust Zone
Figure 2: Corporate and branch-office network infrastructure
Copyright © 2009, Juniper Networks, Inc.
5
APPLICATION NOTE - Quickstart Guide for Branch SRX Series Services Gateways
Configuration
To illustrate the simplicity of setting up IPsec tunnels, the command sequence is divided into four repeatable steps.
Readers should refer to standard Juniper Networks documentation to further understand the various IKE/IPsec
configuration options.
1. Create a secure tunnel interface.
set interfaces st0 unit 0 family inet
set security zones security-zone trust interfaces st0.0
2. Configure routing.
set routing-options static route 10.1.1.0/24 next-hop st0.0
3. Configure IKE Phase 1 parameters.
set
set
set
set
security
security
security
security
ike
ike
ike
ike
proposal
proposal
proposal
proposal
P1-AES
P1-AES
P1-AES
P1-AES
authentication-method pre-shared-keys
dh-group group2
authentication-algorithm sha1
encryption-algorithm aes-128-cbc
set
set
set
set
set
set
security
security
security
security
security
security
ike
ike
ike
ike
ike
ike
policy ike-policy-1 mode main
policy ike-policy-1 proposals P1-AES
policy ike-policy-1 pre-shared-key ascii-text juniper
gateway gw1 address 1.1.1.2
gateway gw1 external-interface fe-0/0/7.0
gateway gw1 ike-policy ike-policy-1
4. Configure IPsec Phase 2 parameters.
set security ipsec proposal P2-AES protocol esp
set security ipsec proposal P2-AES authentication-algorithm hmac-sha1-96
set security ipsec proposal P2-AES encryption-algorithm aes-128-cbc
set
set
set
set
set
set
security
security
security
security
security
security
ipsec
ipsec
ipsec
ipsec
ipsec
ipsec
policy ipsec-policy-1 proposals P2-AES
policy ipsec-policy-1 perfect-forward-secrecy keys group2
vpn vpn1 ike gateway gw1
vpn vpn1 ike ipsec-policy ipsec-policy-1
vpn vpn1 establish-tunnels immediately
vpn vpn1 bind-interface st0.0
5. Use the “commit” command at the CLI prompt in the configuration mode to activate the configuration.
commit
6
Copyright © 2009, Juniper Networks, Inc.
APPLICATION NOTE - Quickstart Guide for Branch SRX Series Services Gateways
UTM Configuration
The example continues with the addition of several common unified threat management (UTM) features to the
configuration. Before configuring any UTM features, the UTM feature license must be installed on the device.
The license keys can be installed using one of the two following methods. These commands are operational mode
commands.
1. Download from LMS server directly. (This method is recommended, but Internet access is required.)
request system license update
2. Install manually. (This process is used when the license keys are available as a text file.)
request system license add terminal
You can now verify that the license was installed using the operational mode command “show system license.”
Antivirus Configuration
Having an SRX Series Services Gateway use the express antivirus engine to scan HTTP traffic is also very easy.
1. Configure the SRX Series device to use the express antivirus engine.
set security utm feature-profile anti-virus type juniper-express-engine
2. Configure a UTM policy to use the predefined antivirus profile http-profile “junos-eav-defaults.”
set security utm utm-policy custom-utm-policy anti-virus http-profile junos-eav-defaults
3. Apply the UTM policy to the existing trust to untrust security policy.
set security policies from-zone trust to-zone untrust policy default-permit then permit
application-services utm-policy custom-utm-policy
4. Use the “commit” command at the CLI prompt in the configuration mode to activate the configuration.
commit
Note: The predefined profile “junos-eav-defaults” is preconfigured with antivirus engine fallback options, scanning
options, and notification messages. The defaults can be viewed by using the operational mode command:
show configuration groups junos-defaults security utm feature-profile anti-virus juniper-expressengine profile junos-eav-defaults
Copyright © 2009, Juniper Networks, Inc.
7
APPLICATION NOTE - Quickstart Guide for Branch SRX Series Services Gateways
Web Filtering Configuration
Using the SRX Series Services Gateways to filter Web traffic is also very straightforward.
1. Configure the SRX Series device to use the integrated Web filtering engine.
set security utm feature-profile web-filtering type surf-control-integrated
2. Configure the predefined Web filtering profile “junos-wf-cpa-default” to use the utm-policy configured earlier.
set security utm utm-policy custom-utm-policy web-filtering http-profile junos-wf-cpa-default
3. Use the “commit” command at the CLI prompt in the configuration mode to activate the configuration.
commit
Note: The predefined profile “junos-wf-cpa-default” is configured to use the SurfControl CPA URL category
database hosted by Websense that contains over 26 million Web sites classified into 40 easy-to-use categories.
IDP Configuration
The SRX Series Services Gateways offer the same set of IDP signatures that are available on Juniper Networks
IDP Series Intrusion Detection and Prevention Appliances to secure networks against attacks. In this example
configuration, the SRX Series device is configured to use a predefined IDP policy to secure the network.
1. Download and install the latest security package.
request security idp security-package download
request security idp security-package install
2. Download and install the IDP security policy templates.
request security idp security-package download policy-templates
request security idp security-package install policy-templates
3. Enable the templates.xsl scripts file. At commit time, the JUNOS management process (mgd) searches the /var/
db/scripts/commit directory for scripts and runs the script against the candidate configuration database to ensure
the configuration conforms to the rules dictated by the scripts.
set system scripts commit file templates.xsl
4. Commit the configuration.
commit
5. Configure an active IDP policy.
set security idp active-policy Recommended
Note: A predefined IDP policy is recommended. To view the list of IDP policies, use “set security idp active-policy ?”
6. Enable IDP detection on the existing firewall security policy from trust zone to untrust zone.
set security policies from-zone trust to-zone untrust policy default-permit then permit
application-services idp
8
Copyright © 2009, Juniper Networks, Inc.
APPLICATION NOTE - Quickstart Guide for Branch SRX Series Services Gateways
Summary
Juniper Networks SRX Series Services Gateways provide all the features required to securely connect modern
remote and branch offices in a one-box solution. JUNOS Software offers users unparalleled flexibility designed to
meet the most demanding network requirements. After reading this document, you will be able to configure a branch
SRX Series device to securely pass traffic. With a little practice, you will be able to create advanced configurations
required for more complex deployments.
About Juniper Networks
Juniper Networks, Inc. is the leader in high-performance networking. Juniper offers a high-performance network
infrastructure that creates a responsive and trusted environment for accelerating the deployment of services and
applications over a single network. This fuels high-performance businesses. Additional information can be found at
www.juniper.net.
Corporate and Sales Headquarters
Juniper Networks, Inc.
1194 North Mathilda Avenue
Sunnyvale, CA 94089 USA
Phone: 888.JUNIPER
(888.586.4737)
or 408.745.2000
Fax: 408.745.2100
APAC Headquarters
Juniper Networks (Hong Kong)
26/F, Cityplaza One
1111 King’s Road
Taikoo Shing, Hong Kong
Phone: 852.2332.3636
Fax: 852.2574.7803
To purchase Juniper Networks solutions, please
contact your Juniper Networks representative
at 1-866-298-6428 or authorized reseller.
3500153-001-EN Apr 2009
EMEA Headquarters
Juniper Networks Ireland
Airside Business Park
Swords, County Dublin,
Ireland
Phone: 35.31.8903.600
Fax: 35.31.8903.601
Copyright 2009 Juniper Networks, Inc.
All rights reserved. Juniper Networks, the
Juniper Networks logo, JUNOS, NetScreen,
and ScreenOS are registered trademarks of
Juniper Networks, Inc. in the United States
and other countries. JUNOSe is a trademark of
Juniper Networks, Inc. All other trademarks,
service marks, registered marks, or registered
service marks are the property of their
respective owners. Juniper Networks assumes
no responsibility for any inaccuracies in this
document. Juniper Networks reserves the right
to change, modify, transfer, or otherwise revise
this publication without notice.
Printed on recycled paper.
9