1
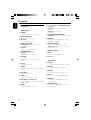
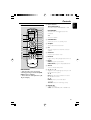
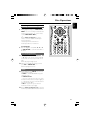
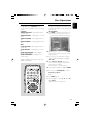
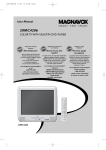
AJL 700
DVD Kitchen Radio
with LCD-TV
THANK YOU FOR CHOOSING PHILIPS!
NEED HELP FAST?
Read your Quick-Start guide and/or owner's manual first for quick tips
that make using your Philips product more enjoyable. If you have read
your instructions and still need assistance,
you may access our online help at
www.p4c.philips.com
or call 1-888-PHILIPS(744-5477) while with your
product.
Note : This equipment has been tested and found to comply with the limits for a Class B digital device,
pursuant to part 15 of the FCC Rules. These limits are designed to provide reasonable protection against
harmful interference in a residential installation. This equipment generates, uses, and can radiate radio
frequency energy and, if not installed and used in accordance with the instruction manual, may cause
harmful interference to radio communications. However, there is no guarantee that interference will not
occur in a particular installation. If this equipment does cause harmful interference to radio or television
reception, which can be determined by turning the equipment off and on, the user is encouraged to try to
correct the interference by one or more of the following measures :
– Relocate the receiving antenna.
– Increase the separation between the equipment and receiver
– Connect the equipment into an outlet on a circuit different from that to which the receiver is connected.
– Consult the dealer or an experienced radio/TV technician for help.
IMPORTANT !
modifications not authorized by the manufacturer may void users authority to operate this device.
Remarque : Cet équipement a été testé et a été certifié conforme aux limites imposées pour un
appareil numérique de Classe B, conformément à la partie 15 des réglements FCC. Ces limites sont
définies aux fins d'assurer une protection raisonnable contre les interférences nuisibles dans une
installation résidentielle. Cet équipement génère, utilise et émet des fréquences radio qui, en cas d'une
mauvaise installation ou d'une utilisation non-conforme aux instructions de ce manuel d'utilisation
peuvent causer des interférences nuisibles aux communications radio. Il n'y a toutefois aucune garantie
que des interférences nuisibles ne se produiront pas dans une installation donnée. Si cet équipement
cause des interférences nuisibles avec votre poste radio ou de télévision, ce que vous pouvez déterminer
en éteignant et en rallumant votre équipement, il est conseillé à l'utilisateur d'essayer de pallier à ces
interférences nuisibles en prenant l'une ou l'autre des mesures suivantes:
– Changez la position de l'antenne de réception.
– Augmentez la séparation entre l'équipement et le récepteur.
– Branchez l'équipement sur une source d'alimentation différente de celle sur laquelle le récepteur est
branché.
– Consultez votre distributeur ou un technicien qualifié en la matière pour assistance.
IMPORTANTE !
las modificaciones no autorizadas por el fabricante pueden anular la autoridad de los usuarios para
utilizar este aparato.
Nota : Este aparato ha sido probado y cumple con los límites correspondientes a un aparato digital de Clase
B, según la parte 15 de las Normas. FCC. Estos límites han sido diseñados para facilitar suficiente protección
frente a interferencias perjudiciales en una instalación residencial. Este aparato genera, utiliza y puede emitir
energía de frecuencias de radio y, si no se instala y utiliza según el manual de instrucciones, puede provocar
interferencias perjudiciales en las comunicaciones de radio. Sin embargo, no existe garantía de que las
interferencias no ocurrirán en una instalación particular. Si este aparato provoca interferencias perjudiciales en
la recepción de radio o television, que se puede identificar encendiendo y apagando el aparato,
recomendamos al usuario que intente solucionar las interferencias siguiendo una o más de las siguientes
medidas:
– Cambie la posición de la antena receptora.
– Aumente la separación entre el aparato y el receptor.
– Conecte el aparato a una toma de un circuito diferente al que está conectado el receptor.
– Consulte con el distribuidor o un técnico de radio/TV con experiencia para que le ayuden.
¡IMPORTANTE!
modificações não autorizadas pelo fabricante, podem causar danos na operação deste aparelho.
2
1
2 3
5 6 7
4
8
9
TIMER
1ALL SHUFFLE PROG.
TV
PLAY / PAUSE
STOP
PREV
NEXT
EJECT
TUNING/CLOCK
FM
AM
CLK/DISP
TIMER
PRESET
MEM
VOL.
MHZ
kHZ
PRESS TO
START/STOP
AJL700 KITCHEN DVD PLAYER
REMOTE
SENSOR
AUTO PROG/
RADIO PROG
SOURCE
PRESET - /
CH. DOWN
PRESET+ /
CH. UP
BAND
DSC
MUTE
VOLUME
POWER
0
& ^
% $ #
@!
*
*
PUSH
(
) ¡ ™
FM ANT
£
AM ANT
TV ANT
DC-12V
R AUDIO IN L
VIDEO IN
≤ ∞
3
Return your Product Registration Card today
to get the very most from your purchase.
Registering your model with PHILIPS makes you eligible for all of the valuable benefits listed below, so
don't miss out. Complete and return your Product Registration Card at once to ensure:
*Proof of
Purchase
*Product Safety *Additional
Benefits of
Notification
Product
Ownership
Returning the enclosed card
By registering your product, you'll
Registering your product
guarantees that your date of
receive notification - directly from
guarantees that you'll receive
purchase will be on file, so no
the manufacturer - in the rare
all of the privileges to which
additional paperwork will be
case of a product recall or safety
you're entitled, including special
required from you to obtain
defect.
money-saving offers.
warranty service.
Know these
safetysymbols
CAUTION
RISK OF ELECTRIC SHOCK
DO NOT OPEN
CAUTION: TO REDUCE THE RISK OF ELECTRIC SHOCK, DO NOT
REMOVE COVER (OR BACK). NO USER-SERVICEABLE PARTS
INSIDE. REFER SERVICING TO QUALIFIED SERVICE PERSONNEL.
This “bolt of lightning” indicates
uninsulated material within your
unit may cause an electrical
shock. For the safety of everyone in your
household, please do not remove
product covering.
The “exclamation point” calls
attention to features for which
you should read the enclosed
literature closely to prevent operating
and maintenance problems.
4
For Customer Use
Enter below the Serial No. which is
located on the rear of the cabinet.
Retain this information for future
reference.
Model No. ______________________
Serial No. ______________________
WARNING: To reduce the risk of fire
or electric shock, this apparatus should
not be exposed to rain or moisture, and
objects filled with liquids, such as vases,
should not be placed on this apparatus.
CAUTION: To prevent electric shock,
match wide blade of plug to wide slot,
fully insert.
Visit our World Wide Web Site at http://www.philips.com
Congratulations on your purchase,
and welcome to the “family!”
Dear PHILIPS product owner:
Thank you for your confidence in PHILIPS.You’ve selected one of the bestbuilt, best-backed products available today.We’ll do everything in our
power to keep you happy with your purchase for many years to come.
As a member of the PHILIPS “family,” you’re entitled to protection by one
of the most comprehensive warranties and outstanding service networks
in the industry.What’s more, your purchase guarantees you’ll receive all the
information and special offers for which you qualify, plus easy access to
accessories from our convenient home shopping network.
Most importantly, you can count on our uncompromising commitment to
your total satisfaction.
All of this is our way of saying welcome - and thanks for investing in a
PHILIPS product.
P.S.To get the most from your PHILIPS purchase,
be sure to complete and return your Product
Registration Card at once.
5
IMPORTANT SAFETY INSTRUCTIONS
1. Read these instructions.
2. Keep these instructions.
3. Heed all warnings.
4. Follow all instructions.
5. Do not use this apparatus near
water.
6. Clean only with dry cloth.
7. Do not block any ventilation
openings. Install in accordance with
the manufacturer´s instructions.
8. Do not install near any heat sources
such as radiators, heat registers, stoves, or
other apparatus (including amplifiers) that
produce heat.
9. Do not defeat the
safety purpose of the
polarized or
grounding-type plug.
A polarized plug has two blades with one
wider than the other. A grounding type plug
has two blades and a third grounding prong.
The wide blade or the third prong are
provided for your safety. If the provided plug
does not fit into your outlet, consult an
electrician for replacement of the obsolete
outlet.
10. Protect the power cord from being
walked on or pinched, particularly at plugs,
convenience receptacles, and the point
where they exit from the apparatus.
11.Only use attachments/accessories
specified by the manufacturer.
12.
6
Use only with the cart, stand,
tripod, bracket, or table specified
by the manufacturer or sold with
the apparatus.When a cart is
used, use caution when moving
the cart/apparatus combination
to avoid injury from tip-over.
13. Unplug this apparatus during lightning
storms or when unused for long periods of
time.
14. Refer all servicing to qualified service
personnel. Servicing is required when the
apparatus has been damaged in any way,
such as power-supply cord or plug is
damaged, liquid has been spilled or objects
have fallen into the apparatus, the apparatus
has been exposed to rain or moisture, does
not operate normally, or has been dropped.
15.Battery usage CAUTION To
prevent battery leakage which may result in
bodily injury, property damage, or damage
to the remote control:
Install all batteries correctly, + and - as
marked on the remote control.
Do not mix batteries (old and new or
carbon and alkaline, etc.).
Remove batteries when the unit is not used
for a long time.
16.Apparatus shall not be exposed to
dripping or splashing.
17.Do not place any sources of danger
on the apparatus (e.g. liquid filled
objects, lighted candles).
18.This product may contain lead and mercury.
Disposal of these material may be regulated
due to environment considerations.
For disposal or recycling information,
please contact your local authorities
or the Electronic Industries Alliance :
www.eiae.org.
EL 6475-E004: 03/12
Français -------------------------------------------- 32
Español --------------------------------------------- 59
CAUTION
Use of controls or adjustments or
performance of procedures other
than herein may result in hazardous
radiation exposure or other unsafe
operation.
ATTENTION
L’utilisation des commandes ou
réglages ou le non respect des
procédures ci-incluses peuvent se
traduire par une exposition
dangereuse à l’irradiation.
ATENCIÓN
El uso de mando o ajustes o la
ejecucción de métodos que no sean
los aquí descritos puede ocasionar
peligro de exposición a radiación.
7
Español
Français
English ------------------------------------------------ 8
English
Index
Contents
English
General Information
Supplied accessories ............................................
Environmental information ................................
Maintenance ..........................................................
Safety information ................................................
Disc Operations
9
9
9
9
Mounting the Set under a
Cabinet
Preparation .......................................................... 10
Mounting the set ................................................ 10
Installation
Rear connections ............................................... 11
Connecting FM/AM antennas
Connecting TV antenna/CATV
Connecting an additional appliance
Power supply ....................................................... 12
Inserting batteries into the remote control . 12
Setting the clock ................................................. 13
Using the TV screen ........................................... 13
Controls
Playable discs ....................................................... 20
Region codes
Playing discs ......................................................... 20
Selecting and searching ..................................... 21
Selecting a different track/chapter
Fast rewinding/forwarding
GOTO
Different play modes:REPEAT, SHUFFLE and
REPEAT A< >B .................................................... 22
REPEAT
SHUFFLE
REPEAT A< >B
Display information ............................................ 23
Programming tracks/chapters .......................... 23
DVD/VCD Features
INTRO .................................................................. 24
Playing in slow motion ...................................... 24
ZOOM .................................................................. 24
AUDIO ................................................................. 24
SUBTITLE ............................................................. 24
Using the DISC MENU ..................................... 24
Controls on the set ........................................... 14
Remote control ........................................... 15~16
DVD Setup Menu
Basic Functions
To navigate setup options ................................. 25
GENERAL SETUP PAGE .................................. 25
Switching on/ to standby mode and
selecting functions ............................................ 17
Adjusting volume and sound ............................ 17
Adjusting volume
DSC
Mute ...................................................................... 17
Display information ............................................ 17
Adjusting picture ................................................ 17
TV DISPLAY
ANGLE MARK
OSD LANG
Screen Saver
PREFERENCE PAGE .......................................... 26
PARENTAL
DEFAULT
PASSWORD SETUP PAGE .............................. 26
Timer
TV
................................................................................ 27
Watching TV ........................................................ 18
External AV Source
Radio
Tuning to radio stations .................................... 19
Storing preset radio stations ........................... 19
Manual programming
Autostore: Automatic programming
To listen to a preset station
................................................................................ 27
Specifications
................................................................................ 28
Troubleshooting
................................................................................ 29
Glossary
................................................................................ 30
8
This set complies with the FCC rules,
Part 15 and with 21 CFR 1040.10.
Operation is subject to the following two
conditions:
– This device may not cause harmful
interference, and
– This device must accept any interference
received, including interference that may
cause undesired operation.
Supplied accessories
–
–
–
–
–
–
DC 12V adapter with bracket
L-shape adapter (for TV ANT connector)
remote control with 2 x AA batteries
AM antenna
FM antenna
Mounting kit: template, 4 spacers, 8 screws
Environmental information
All unnecessary packaging has been omitted.
We have tried to make the packaging easy to
separate into three materials: cardboard (box),
polystyrene and polyethylene (bags, protective
foam sheet).
Your system consists of materials which can be
recycled and reused if disassembled by a
specialized company. Please observe the local
regulations regarding the disposal of packaging
materials, exhausted batteries and old
equipment.
English
General Information
Cleaning the disc lens
● After prolonged use, dirt or dust may
accumulate at the disc lens. To ensure good
playback quality, clean the disc lens with any
commercially available cleaner. Follow the
instructions supplied with cleaner.
Safety information
● Place the system on a flat, hard and stable
surface.
● Do not expose the system, batteries or discs to
excessive moisture, rain, sand or heat sources
caused by heating equipment or direct sunlight.
● Place the system in a location with adequate
ventilation to prevent internal heat build-up in
your system.
● The ventilation should not be impeded by
covering the ventilation openings with items,
such as newspapers table-cloths, curtains, etc.
● The apparatus shall not be exposed to dripping
or splashing.
● No objects filled with liquids, such as vases, shall
be placed on the apparatus.
● No naked flame sources, such as lighted candles,
should be placed on the apparatus.
● The mechanical parts of the set contain selflubricating bearings and must not be oiled or
lubricated.
Maintenance
Cleaning the Cabinet
● Use a soft cloth slightly moistened with a mild
detergent solution. Do not use a solution
containing alcohol, spirits, ammonia or abrasives.
Cleaning Discs
● When a disc becomes dirty,
clean it with a cleaning cloth.
Wipe the disc from the center
out.
● Do not use solvents such as
benzene, thinner, commercially
available cleaners, or antistatic spray intended for
analog records.
9
Mounting the Set under a Cabinet
English
Mounting the Set
Preparation
● Ask a friend to help out. An extra hand to hold
the set makes mounting easier and quicker.
● You may install the unit in the kitchen with or
without spacers.
a
For full details on how to use the Mounting kit,
please refer to the printed instructions in the
Quick Start Guide and Template.
Find a mounting location near a wall outlet.
Mount it
DC
VIDEO AUDIO
IN
L
IN
R
FM
Ask a friend to help you mount the unit as it is quite heavy.
TV
ANT
Recommended depth of cabinet
at the rear to allow for connections
A
• Cut the template to fit inside the cabinet.
• Align the template border marked "FRONT"
A
Template
along the front edge of your cabinet.
•
•
Drill 1/4 inch holes (size X.X mm diameter, X
•
Remove the template when you finish drilling.
Use adhesive tape to fix the template.
inch), as marked X on the template.
AM
Tip
– Use a nail to start each drill hole.
– Hold your drill firmly at 90o with the cabinet bottom and drill holes at
low speed.
– Clear wood shavings.
Use 1/4"
drill
Template
B
Using the spacers
On the spacers, there are 4 pairs of notch length
options. Depending on the thickness of you cabinet bottom (with/ without an overhang), these
notch lengths correspond to the 4 notch height in
the space holders, and allow you to adjust to the
best height to help you mount the unit.
•
B
Spacer
L (Low)
Arrow
L••H (4 heights)
H
L
Measure the height of the cabinet bottom
and/overhang.
•
Turn the spacer counterclockwise to determine
which of the 4 heights is most suitable: High • •
Low
a
•
Inser t the spacers accordingly.
C
• Manually
fasten the 4 screws down into the
spacer holder holes to mount your set. If the
overhang is more than 1 1/4 inch, use longer
screws (not included).
FRONT
C
Tip
To prevent damage to your set, do not use an electric drill
to secure screws when mounting!
– Hold the unit horizontally when installing it, since the CD tray may
open if the unit is shaken.
– Use the cable manager to manage excess power cord length.
b
b
Use the mounting template to test the design
and thickness of your kitchen cabinet bottom.
c
Decide whether you want to connect the set
with other audio/ video equipment.
IMPORTANT!
– Never plug in the AC power cord to
the power outlet before installation is
completed.
– Mount the set so that its AC power
cord can be plugged directly into a wall
outlet.
– Do not use a converter or extension
cord.
- Install the set as far as possible from
sources of interference, such as a
refrigerator, microwave oven, fluorescent
lamp, etc.
– There should be at least 2.5" distance
between the unit and the wall.
– To reduce the risk of fire, do
not place any heating or cooking
appliance beneath the set, especially
while the LCD screen is open or on
view.
10
Connecting TV antenna/CATV
Rear connections
Warning:
Never make or change connections with
the mains supply switched on.
● As shown, plug the supplied L-shape adapter into
TV ANT , and then connect a TV antenna/
CATV cable (not supplied).
Connecting FM/AM antennas
FM ANT
Connect the supplied AM/FM antennas to listen
to radio programs.
AM ANT
TV ANT
R
AUDIO IN L
VID EO IN
Supplied AM
loop antenna
Supplied FM antenna
Connecting an additional
appliance
FM ANT
AM ANT
TV ANT
It is possible to use an additional appliance, e.g.
VCR, video game player, with the set.
DC-12V
R AUDIO IN L
VIDEO IN
AM Antenna
FM ANT
AM ANT
TV ANT
DC-12V
R AUDIO IN L
AUDIO
Fix the claw
to the slot
● Position the antenna as far as possible from a TV,
VCR or radiation source. If necessary, use 2
small screws (supplied) to fix the antenna to a
flat, hard and stable place.
FM antenna:
FM ANT
1
2
3
OUT
VIDEO IN
VIDEO OUT
External AV source
1
Insert the red plug of the red/white audio cables
(not supplied) to the red socket AUDIO IN R
and the white plug to the white socket AUDIO
IN L.
2
Connect the other end of the audio cables to
the AUDIO OUT terminals of the additional
appliance.
Helpful hints:
– If the connected device has only a single audio
out terminal, connect it to the AUDIO IN L
terminal. Alternatively, you can use a “single to
double” cinch cable, but the output sound will
remain mono.
– Always refer to the owner’s manual of other
equipment for complete connection.
Fully extend the FM antenna.
Keep the FM antenna as horizontal as possible
(as far away as possible from the AC adapter,
VCR or other radiation sources).
Fix the antenna’s end to the wall.
11
English
Installation
Installation
English
Power supply
The type plate is located on the bottom
panel.
FM ANT
AM ANT
TV ANT
DC-12V
R AUDIO IN L
VIDEO IN
DC-12V
Inserting batteries into the
remote control
Insert two batteries (type R6 or AA) into the
remote control with the correct polarity as
indicated by the "+" and "-" symbols inside
the battery compartment.
AC120V~
Using the adapter bracket
Find a suitable place to mount the adapter
bracket.
1
Use 2 small screws (supplied) to mount the
bracket.
2
Insert the adapter into the bracket as shown.
1
2
3
3
Use the adapter bracket to wrap and secure the
power cord so that excess cord does not hang
down.
4
Make sure all connections have been been made
before switching on the power supply.
12
CAUTION!
– Remove batteries if they are
exhausted or will not be used for a long
time.
– Do not use old and new or different
types of batteries in combination.
– Batteries contain chemical substances,
so they should be disposed off properly.
Helpful hints:
– First, select the source you wish to
control by pressing a source button(DVD,
RADIO or TV for example).
– Then, select the desired functions ( í,
ë, for example).
Using the TV screen
Setting the clock
The time is displayed using the 12-hour clock.
1
Check the set is switched to standby mode.
(see Basic Functions, Switch on/to
standby)
➜--:-- flashes by default if the clock is not set..
2
On the set, press CLK/DISP (or
CLOCKSET on the remote control)
➜ The hour digits start flashing (AM 12: 00 by
default).
Hold down or press TUNING/CLOCK + or
- repeatedly to set the hour. Release
TUNING/CLOCK + or - when you have
reached the correct setting.
3
4
Press CLK/DISP to confirm the setting.
➜ The minute digits start flashing.
5
6
Repeat step 3 to set the minute.
The set is equipped with a 7” TFT LCD
monitor. You can watch TV on it. If you insert a
disc, it will serve as an additional display for
messages (e.g. PLAY, STOP), and information
stored on the disc.
1,2
115 maximum
PUSH
3
270 maximum
4
Press CLK/DISP to confirm the setting.
➜ The clock shows the set time.
1 Press PUSH at the bottom of the set to release
Helpful hints:
– You may lose your clock setting when the power
cord is disconnected or power failure occurs.
2 Pull the down the panel (maximum 1150).
3Turn around the panel to find the screen.
4Adjust the screen to a suitable angle (maximum
TV panel.
2700).
CLOCKSET
PICTURE
VOL
DSC
13
English
Installation
Controls
English
Controls on the set (illustrations
on page 3)
$3
–
Front panel
–
1 POWER
–
switches the set on or to standby mode
2 ÉÅ PLAY/PAUSE
%
–
, 4 PRESET - / CH.DOWN, PRESET
+ / CH.UP
RADIO: selects a preset radio station
(down, up)
TV/CATV: selects a TV channel
(down, up)
AUTO PROG/ RADIO PROG
RADIO/TV: programs preset stations/channels
– starts or pauses disc playback.
^ SOURCE
3Ç
–
–
4
–
5
–
STOP
stops or pauses disc playback
PREV à / á NEXT
DVD/VCD/CD: skips tracks or chapters
backward/forward
0 EJECT
ejects a disc from the slot loader.
6 TUNING/CLOCK -, +
–
–
RADIO: tunes to radio stations
CLOCK: adjusts the hour/minute
7 CLK/DISP
–
–
–
shows status of the set.
9 TIMER
–
alarm timer with setting options from 1 to 180
minutes
0 VOLUME +/–
adjusts the volume level
! MUTE
–
switches the sound off temporarily
@ DSC (Digital Sound Control)
–
selects predefined sound settings: CLASSIC, POP,
MOVIE, SPEECH
# BAND
–
14
& REMOTE SENSOR
–
selects wavebands, FM or AM
sensor for the infrared remote control
Helpful hints: Always point the remote control
towards this sensor.
Bottom panel
* PUSH
–
push here to release LCD monitor
( TV screen
set clock time
toggles clock (or timer) display and status
of the set
8 Display
selects functions: DVD (VCD, CD or MP3),
RADIO, AV or TV/ CATV
Rear panel
) TV ANT
–
connects to the external TV antenna or CATV
¡ FM ANT
–
connects the supplied wire antenna here.
™ AM ANT
–
connects the supplied loop antenna here.
£ DC 12V
–
socket for the supplied 12V AC/DC adapter
≤ VIDEO IN
–
connects to the VIDEO OUT jack on the
external appliance
∞ AUDIO IN (L/R)
–
connects to the AUDIO OUT jack on the
external appliance
1 Source buttons
Remote control
–
2
– selects the radio and toggles between the
3
¤
wavebands
AV
⁄
4
5
6
7
º
8
SHUFFLE
ERASE/WRITE
PROG
TV
– selects TV or CATV
2 STANDBY-ON
–
30
0
–
@
CLOCKSET
PICTURE
VOL
§
∞
DSC
¡
$
%
^
&
*
(
)
EJECT
ejects a disc from the slot loader.
4 AV
–
#
≥
switches the set on or to standby mode
9
!
ª
≤
£
™
DVD (VCD/CD/MP3)
selects disc functions: DVD, VCD, CD or MP3
RADIO/BAND
1
DVD
•
English
Controls
selects the input from an external connected
appliance
5 SHUFFLE
–
plays the disc in random order
6 DISPLAY
–
toggles clock (or timer) display/ status of the set
7 PROG
–
–
RADIO: programs preset stations
DVD/VCD/CD: programs chapters/titles/tracks
8 SETUP
–
IMPORTANT!
– First, select the source you wish to
control by pressing a source button(DVD,
RADIO or TV for example).
– Then, select the desired functions ( í,
ë, for example).
enters or exits the Setup menu.
91
–
–
–
–
/ 2 / 3 / 4
navigation controls (left, right, up, down) to scroll
through disc/menu options
1 / 2
DISC: starts fast search backward or forward
2X, 4X, 8X, 16X or 32X
3 / 4
RADIO: selects a preset radio station
(up, down)
TV/CATV: selects a TV channel (up, down)
0 ENTER/ OK
–
–
confirms selection
CATV: selects HRC, IRC, STD or AUTO mode
15
Controls
English
! ÉÅ PLAY/PAUSE
–
starts/ pause disc playback
@ REW, FWD à /
–
–
á
starts fast search backward or forward 2X, 4X,
8X, 16X or 32X
PREV, NEXT O P
DVD/VCD/CD: skips tracks or chapters
backward/forward
£ A< >B Repeat
–
≤ REPEAT
–
CONTRAST, COLOR, TINT
selects repeat modes
∞ SUBTITLE
–
selects a subtitle language
§ AUDIO
– selects audio channels or selects a sound track
language in a DVD
# PICTURE
– toggle to select picture setting options: BRIGHT,
repeats a section on a disc
≥ TUNING/CLOCK -, +
–
RADIO: tunes to radio stations
$ VOL +/-
– CLOCK: ajusts the hour/minute
– adjusts the volume level
– adjusts the picture values.
• CLOCK SET
% ANGLE
ª9
–
views picture from different recorded camera
angles (if available on your disc)
^ ZOOM
–
enlarges or reduces the video image during
playback.
& GOTO
–
goes directly to desired title, chapter, time or
track.
* INTRO
–
(
–
DVD/VCD: gives you an overview of your disc
contents: in digest or at 10-minute intervals
MUTE
turns on/off the speaker output.
) OSD
–
Enables or disables on-screen display
¡ SLOW
–
DVD/VCD: plays in slow motion: 1/2, 1/4, 1/8 or
1/16.
™ DSC (Digital Sound Control)
–
16
selects predefined sound settings: CLASSIC, POP,
MOVIE, SPEECH
– sets clock time.
–
STOP
stops playback/ cancels program function.
º DISC MENU
–
enters or exits the disc content menu
⁄ ERASE/ WRITE
–
TV/CATV: deletes/adds a programmed channel
¤ Numeric Keypad (0-9)
–
–
DVD/VCD/CD: selects a track/title/chapter
number
TV/CATV: selects a TV channel number
Switching on/ to standby and
selecting functions
1
Press POWER to switch on (or B on the
remote control).
2
To select your function, press SOURCE once
or more (or DVD, RADIO/BAND,TV or AV
on the remote control).
3
Press POWER to switch the set to standby (or
B on the remote control).
Helpful hints:
– In the standby mode, the tone, sound settings,
tuner presets, and the volume level (up to a
maximum volume level of 20) will be retained in
the set’s memory.
Display information
● During playback, press CLK/DISP to switch
between the clock/timer display and the status of
the set (or on the remote control, DISPLAY).
TIMER
1ALL SHUFFLE PROG.
TV FM AM TIMER
CLOCK/TUNING
CLK/DISP
PRESET
MEM
VOL.
MHZ
kHZ
PRESS TO
START/STOP
AJL700 KITCHEN DVD PLAYER
Adjusting picture
On the TV screen, you can adjust your picture
settings: Brightness, Contrast, Color and Tint.
DVD
AV
SHUFFLE
Adjusting volume and sound
Adjusting Volume
● Press VOL +/- to adjust the volume.
➜ Display shows VOLUME and. a number from
00 to 32.
1
On the remote control, press PICTURE once
or more to select BRIGHTNESS, CONTRAST,
COLOR and TINT.
2
Press VOL +/- to adjust the value between 00
and 100.
DSC
CLOCKSET
Digital Sound Control enables you to select
predefined sound settings.
● Press DSC repeatedly to select your desired
sound setting:
➜ CLASSIC, POP, MOVIE or SPEECH is
displayed.
● Press OSD to check your DSC setting.
PICTURE
VOL
DSC
MUTE
During playback, you can temporarily switch off
the sound without switching off the set.
1
2
Press MUTE to switch off the sound.
➜ MUTE appears on the TV screen .
Playback continues without sound.
To switch on the sound, press MUTE again or
adjust the volume with VOL controls.
17
English
Basic functions
TV
English
5
Watching TV
1
2
3
Check your TV set has been properly connected
and placed. (see Installation, Connecting TV
antenna/CATV and Using the TV Screen)
On the remote control, press B to on, then
press TV once or more to select TV or CATV
mode (or on the set, POWER and SOURCE).
In CATV, press ENTER on the remote control
to select HRC, IRC, STD or AUTO mode.
1
2
DVD
AV
SHUFFLE
ERASE/WRITE
4
PROG
The first time you use the TV, press AUTO
PROG /RADIO PROG on the set.
➜ Channel number starts running.
➜ Available channels are programmed.
➜ After all channels are stored, the first
autostore channel will then automatically play.
TIMER
1ALL SHUFFLE PROG.
TV
EJECT
CLOCK/TUNING
FM
AM
CLK/DISP
TIMER
PRESET
MEM
VOL.
MHZ
kHZ
PRESS TO
START/STOP
AJL700 KITCHEN DVD PLAYER
AUTO PROG/
RADIO PROG
PRESET - /
CH. DOWN
PRESET+ /
CH. UP
BAND
DSC
MUTE
VOLUME
18
3
4
Press PRESET - / CH.DOWN, PRESET + /
CH.UP to select your desired channel (on the
remote control, 3 , 4)
or
Use the Numeric Keypad (0-9) on the
remote control to select the channel number
directly. e.g.
Channel 2: Press 0 and then, 2
Channel 10, Press 1 and then, 0
To erase/ overwrite current presets
You can erase a preset channel by storing
another channel in its place.
Select the channel you want to erase.
On the remote control, press ERASE/ WRITE
once or more until ERASE appears
➜The erased channel number appears in red.
Press ERASE/ WRITE again until ADD
appears.
Use the Numeric Keypad (0-9) on the
remote control to enter your desired channel
number
➜ The stored channel number appears in green.
Tuning to radio stations
1 Press POWER to on, then press SOURCE
once or more to select RADIO mode.(or on the
remote control, B and RADIO/BAND).
➜Display: The waveband, radio station
frequency and if programmed, a preset number
are shown.
2
Press BAND once or more to select your
waveband: FM or AM (or RADIO/BAND on
the remote control)
3
Press and hold TUNING/CLOCK -, + until
the frequency in the display starts running.
➜ The radio automatically tunes to a station of
sufficient reception. Display shows Srch during
automatic tuning.
4 Repeat step 3 if necessary until you find the
desired radio station.
● To tune to a weak station, press TUNING/
CLOCK -, + briefly and repeatedly until optimal
reception is found.
English
Radio
Autostore: automatic programming
Autostore automatically starts programming
radio stations from preset 1. Any previous
presets e.g. manually programmed will be
erased.
● Press and hold AUTO PROG /RADIO
PROG until AUtO appears.
➜ Available stations are programmed (20FM
and 10 AM).
➜ After all stations are stored, the first
autostore preset station automatically plays.
To listen to a preset station
● Press PRESET - / CH.DOWN, PRESET +
/ CH.UP until the desired preset station is
displayed (or on the remote control 3, 4 ).
DVD
Storing preset radio stations
You can store up to 30 preset radio stations in
the memory (20 FM and 10AM).
AV
SHUFFLE
Manual programming
1
Tune to your desired radio station (see “Tuning
to radio stations”).
2
Press AUTO PROG/ RADIO PROG to
activate programming. (or PROG on the
remote control).
➜ Display shows: current radio frequency and
PROG flashes.
Press PRESET - / CH.DOWN, PRESET + /
CH.UP to select a preset number. (on the
remote control, 3 , 4)
3
4
5
Press AUTO PROG/ RADIO PROG to
confirm.
➜ Display: PROG disappears.
Repeat steps 1-4 to store other stations.
ERASE/WRITE
CLOCKSET
PICTURE
VOL
Helpful hints:
– You can erase a preset station by storing
another frequency in its place.
19
Disc Operations
English
IMPORTANT!
– Use 12cm discs only!
– The set is designed for regular discs.
Therefore, do not use any accessories
such as disc stabilizer rings or disc
treatment sheets, etc.
– Depending on the format of DVDs or
VCDs, some operations may be different
or restricted.
– If the inhibit icon appears on the TV
screen when a button is pressed, it
means the function is not available on
the current disc or at the current time.
– CDs encoded with copyright
protection technologies by some record
companies may be unplayable on this
system.
Playing discs
1
Press POWER to on, then press SOURCE
once or more to select DVD mode.(or on the
remote control, B and DVD).
2
Insert a 12cm disc into the slot loader.
● Insert a disc in DVD mode. Make sure you
have removed any other disc fromthe loader.
● Make sure the label side is facing up. For
double-sided discs, load the side you want to
play facing down.
Insert a
12 cm disc
Playable discs
Your DVD Player will play:
– Digital Video Discs (DVDs).
– Video CDs (VCDs).
– Super Video CDs (SVCDs).
– Digital Video Discs + Recordable
(DVD+R).
– Digital Video Discs + Rewritable
(DVD+RW).
– Compact Discs (CDs).
– MP3 disc on CD-R (W).
– Maximum 16 characters display.
– Supported sampling frequencies: 32 kHz, 44.1
kHz, 48 kHz.
– Supported Bit-rates: 32~192 kbps, variable
bitrates.
– Picture (JPEG) files on CD-R(W).
– JPEG/ISO 9660 format.
Region Codes
To play on this DVD player, DVDs must be
labelled for ALL regions or Region 1. You
cannot play discs that are labeled for other
regions.
Note:
– If you are having trouble playing a certain disc,
remove the disc and try a different one. Improper
formatted discs will not play on this DVD Player.
20
3
Playback will start automatically (depending on
the disc type).
➜ If a disc menu appears on the screen, use the
navigation controls 1 / 2 / 3 / 4 and
ENTER /OK to select your playback options.
➜ If the disc is locked by parental control, see
DVD Setup Menu, PREFERENCE PAGE.
4
5
To pause playback., press 9 STOP .
Press ÉÅ to resume playback from the last
position.
To stop playback, press 9 STOP again.
To remove the disc, press 0 EJECT .
6
7
English
Disc Operations
Selecting and searching
Selecting a different track / chapter
For DVD/VCD/CD:
● During playback, briefly press PREV à / á
NEXT once or more until your desired track/
chapter number appears (or on the remote
control, PREV, NEXT O P)
or
Use the Numeric Keypad (0-9) on the
remote control to select the track/chapter
number directly. e.g.
Track/chapter 2: Press 0 and then, 2
Track/chapter10, Press 1 and then, 0
For MP3/JPEG:
● Use the navigation controls 1 / 2 / 3 / 4
and ENTER /OK to select the desired file or
file folder.
CLOCKSET
PICTURE
VOL
DSC
Fast rewinding/fowarding
1
2
During playback, press REW, FWD à / á
or 1 / 2 on the remote control repeatedly
to select fast search speed (x2, x4, x8 , x16 or
x32).
➜ The disc plays at a high speed.
When you recognize the passage you want,
pressÉÅ or ENTER /OK
➜ Normal playback resumes.
GOTO
1
During playback, press GOTO once or more
on the remote control.
➜ DVDs: A TITLE & CHAPTER bar appears
on the TV screen.
➜ VCD/Audio CD:
--:-- appears on the TV screen for you to enter
the desired minutes and seconds (in 2 digits), or
T: --/ XX appears for you to enter the desired
track number (in 2 digits)
➜ MP3: --- appears for you to enter the
desired track number (in 3 digits)
2
Use the Numeric Keypad (0-9) to enter the
desired chapter/title / track time/ track number.
21
Disc Operations
English
Repeat A<>B
Different play modes: REPEAT,
SHUFFLE and REPEAT A<>B
REPEAT
DVDs:
CHAPTER: Repeats current chapter
TITLE: Repeats current title
ALL: Repeats the entire disc
REPEAT OFF: cancels repeat options
Audio CDs:
TRACK: plays current track repeatedly.
ALL: plays all the tracks repeatedly.
REPEAT OFF: cancels repeat options
1
2
MP3/JPEG:
SINGLE: plays a selected file
REPEAT ONE: plays an MP3 file repeatedly or
keep a JPEG image still on the screen.
REPEAT FOLDER: plays all files in the
selected folder repeatedly.
FOLDER: plays a selected file folder
During playback, press REPEAT once or more
to select play modes.
To return to normal playback, press REPEAT
repeatedly until REPEAT OFF appears.
➜ You can also press Ç to cancel your play
modes
1
2
3
You can play a certain scene or passage
repeatedly.
During playback , press A<>B on the remote
control to mark the start point of the chosen
scene or passage.
A appears in the TV screen.
➜
Press A<>B again at your chosen end point.
AB appears .
➜
To return to normal playback, press A<>B
A or
B disappears .
repeatedly until
➜ You can also press Ç to cancel your play
modes.
ERASE/WRITE
PROG
CLOCKSET
PICTURE
VOL
SHUFFLE
You can play the contents in a disc in a random
order.
● During playback, press SHUFFLE once or
more to select or cancel SHUFFLE mode
➜ You can also press Ç to cancel your play
modes.
1
2
22
MP3 only:
SHUFFLE: plays all files in the selected folder
in random order.
FOLDER: plays a selected file folder
Press SHUFFLE once or more to select play
modes.
To return to normal playback, press Çand then,
ÉÅ.
DSC
**The REPEAT A-B function can only be set
within the same chapter or track.
Display information
Programming tracks/chapters
During playback, press DISPLAY on the
remote control repeatedly to select your display
options:
CDs/VCDs:
SINGLE ELAPSED - elapsed playback time
of current track.
SINGLE REMAIN - remaining time of current
track.
TOTAL ELAPSED - elapsed playback time of
disc.
TOTAL REMAIN - remaining playback time of
disc.
You can select and program 20 tracks/ chapters
for playback. If you like, store any track/chapter
more than once.
CDs/VCDs/DVDs:
Press PROG to activate programming mode.
➜ The program pop-up appears for you to
enter the desired track/chapter numbers.
DVDs:
TITLE ELAPSED - elapsed playback time of
current title.
TITLE REMAIN - remaining time of current
title.
CHAPTER ELAPSED - elapsed playback
time of current chapter.
CHAPTER REMAIN - remaining time of
current chapter.
**Options available subject to type of disc. Not
available for MP3-CDs.
1
2
● If you need to go the next /previous page to
continue programming, navigate to highlight
4 / ¢.
3 Use the Numeric Keypad (0-9) on the
remote control to enter your desired track/
chapter number (in 2 digits)
E.g. Track/chapter 7, press 0 and then, 7.
4
DVD
Use the navigation controls 1 / 2 / 3 / 4
on the remote control to select your desired
program position.
To start playback, navigate to highlight START.
● If necessary, press ENTER/ OK to confirm.
AV
SHUFFLE
ERASE/WRITE
Erasing the program
Either:
● Press PROG again, or
● Use the navigation controls 1 / 2 / 3 / 4 to
highlight EXIT.
➜ The program pop-up disappears.
23
English
Disc Operations
DVD/VCD Features
English
INTRO
Playing in slow motion
This feature gives you an overview of the disc
contents.
DVDs:
TITLE DIGEST: A thumbnail picture appears
for each title in current chapter
CHAPTER DIGEST: A thumbnail picture
appears for each chapter in the disc
TITLE INTERVAL: Thumbnail pictures appear
for current title at 10-minute interval.
DISC INTERVAL: Thumbnail pictures appear
for the disc at 10-minute interval.
VCDs:
TRACK DIGEST: A thumbnail picture
appears for each track in the disc
DISC INTERVAL: Thumbnail pictures appear
for the disc at 10-minute interval.
TRACK INTERVAL: Thumbnail pictures
appear for current track at 10-minute interval.
1
2
On the remote control, press INTRO to go to
the SELECT DIGEST TYPE page.
Use the navigation controls 1 / 2 / 3 / 4 to
select your option.
3
Press ENTER /OK to confirm.
➜ Thumbnail pictures appear in the selected
mode.
4
To return to normal playback, press INTRO.
1
Press SLOW repeatedly on the remote control
during playback to select the desired speed: 1/2,
1/4, 1/8 or 1/16
➜ Sound will be muted.
2
To return to normal speed, pressÉÅ PLAY/
PAUSE (or Press SLOW repeatedly until the
speed number disappears).
ZOOM
Zooming allows you to enlarge or reduce the
video/ JPEG image during playback.
● Press ZOOM repeatedly to zoom in and out on
the playback video image.
➜ Image size enlarges at 2X, 3 X, 4 X or
reduces at 1/2, 1/3, 1/4 .
● To return to normal playback, press ZOOM
repeatedly until the numbers disappear
AUDIO
●
DVDs:
On the remote control, press AUDIO
repeatedly to select the desired language for
sound track
VCDs/CDs:
● Press AUDIO repeatedly to select the audio
channel for sound output:
MONO LEFT - MONO RIGHT - MIX MONO
- STEREO
SUBTITLE (DVD only)
CLOCKSET
PICTURE
● Press SUBTITLE on the remote control
repeatedly to select different subtitle languages.
VOL
1
DSC
2
3
4
24
Using the DISC MENU (DVD
only)
During playback, press DISC MENU on the
remote control to enter the disc menu.
Use the navigation controls 1 / 2 / 3 / 4 to
select your playback options.
Press ENTER /OK to confirm.
Press DISC MENU to exit.
** DISC MENU available subject to format of
disc.
To navigate setup options
English
DVD Setup Menu
GENERAL SETUP PAGE
In the stop mode of DVD, use the remote
control to select the setup options.
1
2
3
Press SETUP to enter SETUP mode
Press 1 / 2 to select the desired SETUP page:
GENERAL SETUP PAGE, PREFERENCE
PAGE and PASSWORD SETUP PAGE
Press 3 / 4 to highlight an option.
4
Enter its submenu by pressing 2.
5
Move the cursor by pressing 3 / 4 to highlight
the selected item.
6
Press ENTER/OK to confirm.
TV DISPLAY (default WIDE)
ERASE/WRITE
PROG
● Select PS (Pan and Scan) for TV display at 4:3
aspect ratio if your DVD is not formatted for
widescreen viewing
● Select LB (Letterbox) for TV display at 4:3
aspect ratio if your DVD is formatted for
widescreen viewing.
● Select WIDE for TV display at 16:9 aspect ratio.
ANGLE MARK (default OFF)
Views picture from different recorded camera
angles (if available on your disc).
● Select ON or OFF.
OSD LANG (default English)
There are three different OSD languages for
selection.
● Select English, French or Spanish.
Screen Saver (default ON)
The screen saver appears after 3 minutes in the
pause/ stop mode.
● Select ON or OFF.
25
DVD Setup Menu
English
PREFERENCE PAGE
DEFAULT
PARENTAL
You can use this function to reset all settings
except for your PARENTAL password.
The rating of DVD discs equipped with the child
lock function is content-based and varies with
different discs. Depending on the particular disc,
you can lock out selected scenes or playback of
the entire disc.
1
Use the navigation controls to select
DEFAULT.
2
Press 2 to select RESET.
3
Press OK to confirm.
➜ The rating options are shown onscreen in
descending order of suitability for children.
For example, setting a rating at PG will lock out
playback of scenes rated PG-13 onwards.
PASSWORD SETUP PAGE
To set your parental rating
You can change the PARENTAL password
(3308 by default).
1
In PREFERENCE PAGE, Press 4 to select
PARENTAL.
To change your password
2
Press 2 to enter the options:
KID SAFE
G
PG
PG - 13
PGR
R
NC - 17
ADULT
Press 3 / 4 to select your option.
3
1
In PASSWORD SETUP PAGE. Press 4 to
select PASSWORD.
2
Press 2 to select CHANGE.
➜ The Password pop-up appears.
3
Use Numeric Keypad (0-9) on the remote
control to enter your old and new passwords
in the 3 boxes.
4
Press OK to confirm.
4
Press OK to confirm.
➜ The password pop-up appears
5 Use the Numeric Keypad (0-9) on the
remote control to enter your 4-digit password
(3308 by default)
● To change the password, see PASSWORD
SETUP PAGE
26
1
2
3
External AV Source
English
Timer
TIMER
External AV source
Set the timer period to activate a beeper alarm.
It is possible to use an additional appliance, e.g.
VCR, video game player, with the set.
Check the external appliance has been properly
connected (see Installation, Connecting an
additional appliance).
Setting the timer
1
On the set, press TIMER to activate.
➜ Display shows TIMER and the 000 digits
flashes.
2
Turn the TIMER control counter-/clockwise to
adjust your timer period (from 001 to 180
minutes.)
Press POWER to on, then press SOURCE to
select AV source (or on the remote control, B
and AV).
3
To avoid noise distortion, turn down the volume
on your external device.
4
Press the PLAY key on the connected appliance
to start playback.
5
To adjust the sound and volume, use the sound
controls on your external equipment and the
AJL700.
Press TIMER again (within 90 seconds) to
confirm.
➜ Timer period starts to count down.
To cancel the timer
Press TIMER during the countdown.
➜ Clock time appears.
TIMER
G.
R
PRESET
MEM
VOL.
MHZ
kHZ
PRESS TO
START/STOP
PLAYER
MUTE
VOLUME
27
Specifications
English
DISC PLAYER
LCD screen size ................................................... 7 inches
Laser wavelength ...................................................................
................. (CD) 790 + 20nm /(DVD) 655+ 15nm
Video system ............................................................. NTSC
Video resolution ......................................... > 250 lines
Video signal-to-noise ............................................... 60dB
Frequency response .............................. 20Hz~20kHz
Audio signal-to-noise .......................................... ≥ 60dB
Audio distortion + noise ............... ≤ 65 dB (1kHz)
Channel separation ............................. ≥ 45dB (1kHz)
Dynamic range ........................................................... 70dB
Radio
System ................................................................................. PLL
Frequency range
AM ........................................................... 530~1700 kHz
FM ............................................................ 87.5~108 MHz
GENERAL
Power ................................... AC100V~240V, 50/60Hz
Power consumption ............................................ ∼ 30W
Dimension .... 370mmx270mmx75mm (W/H/D)
........................................... 14.6” x 10.6” x 3” (W/H/D)
Weight .............................................................. About 6lb
Philips reserves the right to make design
and specification changes for product
improvement without prior notice.
28
English
Troubleshooting
WARNING
Under no circumstances should you try to repair the system yourself, as this will
invalidate the warranty. Do not open the system as there is a risk of electric shock.
If a fault occurs, first check the points listed below before taking the system for repair. If
you are unable to remedy a problem by following these hints, consult your dealer or
PHILIPS for help.
Problem
Solution
Disc cannot play
✔
✔
✔
✔
No sound
✔ Check whether the set is connected securely.
✔ Make sure the set is not in the MUTE mode. If it
Make sure a disc is loaded.
Make sure a disc is loaded with the label side up.
Disc dirty or damaged. Clean the disc.
Make sure the region code of the player is the
same as that of the DVD disc loaded.
✔ Moisture has condensed in the player. Remove
the disc and leave the player power-on until the
moisture evaporates.
is, press MUTE to turn on the speaker.
✔ Check whether the volume on the set has been
set to the lowest level. If it has, turn up the
volume.
No picture
Remote control does not work
Radio reception is poor.
✔ Check whether the set is connected securely.
✔ First, select the source you wish to control by
pressing a source button (DVD, RADIO or TV
for example). Then, select the desired functions
(í, ë, for example).
✔ Remove obstacles between the remote control
and the player, and point directly instead of at a
wide angle at the infrared sensor on the player.
✔ Make sure the battery has been inserted
properly (check polarity).
✔ Battery maybe exhausted. Replace the battery
with a new one.
✔ If the signal is too weak, adjust the antenna or
connect an external antenna for better
reception.
✔ Increase the distance between the set and a TV,
VCR or radiation source.
The Clock setting is erased.
✔ Power has been interrupted or the power cord
has been disconnected. Reset the clock.
29
Glossary
English
Aspect ratio: The ratio of vertical and
horizontal sizes of a displayed image. The
horizontal vs. vertical ratio of conventional TVs. is
4:3, and that of wide-screens is 16:9.
Bit Rate: The amount of data used to hold a
given length of music; measured in kilobits per
second, or kbps. Or, the speed at which you
record. Generally, the higher the bit rate better
the sound quality. However, higher bit rates use
more space on a Disc.
Chapter: Sections of a picture or a music
piece on a DVD that are smaller than titles. A
title is composed of several chapters. Each
chapter is assigned a chapter number enabling
you to locate the chapter you want.
Disc menu: A screen display prepared for the
selection of images, sound, subtitles, multi-angles,
etc recorded on a DVD.
JPEG: A still-picture data compression system
proposed by the Joint Photographic Expert
Group, which features small decrease in image
quality in spite of its high compression ratio.
MP3: A file format with a sound data
compression system, “MPE” is the abbreviation of
Motion Picture Experts Group 1 (or MPEG-1)
Audio Layer 3. Through the MP3 format, one
CD-R or CD-RW can contain about 10 times as
much data volume as a regular CD can.
Parental control: A function of the DVD to
limit playback of the disc by the age of the users
according to the limitation level in each country.
The limitation varies from disc to disc; when it is
activated, playback will be prohibited if the
software’s level is higher than the user-set level.
30
Region code: A system allowing discs to be
played only in preset regions. This unit will only
play discs that have compatible region codes. You
can find the region code of your unit from the
product label. Some discs are compatible with
more than one region (or ALL regions).
Title: The longest section of a picture or music
feature on DVD, music, etc., in video software, or
the entire album in audio software. Each title is
assigned a title number enabling you to locate
the title you want.
PHILIPS LIMITED WARRANTY
90 Days Free Product Exchange
PHILIPS CONSUMER ELECTRONICS warrants this
product against defect in material or workmanship, subject to
any conditions set forth as follows:
PROOF OF PURCHASE:
You must have proof of the date of purchase to exchange the
product.A sales receipt or other document showing the product and the date that you purchased the product as well as the
authorized retailer included, is considered such proof.
COVERAGE:
Warranty coverage begins the day you buy your product. For a
period of ninety (90) days from the date of purchase, if the
product is determined to be defective, Philips will exchange the
defective product with a new or renewed product, at its option,
at no charge.The replacement product is covered only for the
warranty period of the original product.When the warranty on
the original product expires, the warranty on all replaced products also expires.When it is necessary for you to ship the product to Philips for exchange, you will pay the shipping cost for
shipment to Philips. Philips will pay the shipping costs when
returning a product to you.
Note:The exchange model supplied will be the most compatible
one in Philips current inventory. Shipping of your product to
Philips implies intent to follow the specified requirements of the
warranty and exchange program. Product received by Philips
cannot be returned. Replacement product can only be sent if all
warranty requirements are met. Failure to follow all requirements can result in delay of exchange process.
EXCLUDED FROM WARRANTY COVERAGE
Your warranty does not cover:
• Shipping charges to return defective product.
• Labor charges for installation or setup of the product, adjustment of customer controls on the product, and installation
or repair of antenna systems outside of the product.
• Product repair and/or part replacement because of improper
installation, connections to improper voltage supply, abuse,
neglect, misuse, accident, unauthorized repair or other cause
not within the control of Philips.
• Damage occurring to product during shipping when improperly packaged or cost associated with packaging.
• A product that requires modification or adaptation to enable
it to operate in any country other than the country for
which it was designed, manufactured, approved and/or authorized, or repair of products damaged by these modifications.
• A product used for commercial or institutional purposes
(including but not limited to rental purposes).
• Products lost in shipment & no signature verification of
receipt can be provided.
• Product sold AS IS or RENEWED.
WHERE WARRANTY EXCHANGE IS AVAILABLE:
Exchange is available in all countries where Philips officially distributes the product. In countries where Philips does not distribute the product, the local Philips organization will attempt to
exchange the product, although there may be a delay if the
appropriate product is not readily available, or special customs
processes are implied.
FOR EXCHANGE IN THE U.S.A., PUERTO RICO, OR
U.S.VIRGIN ISLANDS…
Contact Philips Customer Care Center at:
1-888-PHILIPS (1-888-744-5477)
FOR EXCHANGE IN CANADA…
1-800-661-6162 (French Speaking)
1-888-PHILIPS (1-888-744-5477) - (English or Spanish
Speaking)
REPLACEMENT AS PROVIDED UNDER THIS WARRANTY IS
THE EXCLUSIVE REMEDY FOR THE CONSUMER. PHILIPS
SHALL NOT BE LIABLE FOR ANY INCIDENTAL OR CONSEQUENTIAL DAMAGES FOR BREACH OF ANY EXPRESS OR
IMPLIED WARRANTY ON THIS PRODUCT. EXCEPT TO THE
EXTENT PROHIBITED BY APPLICABLE LAW,ANY IMPLIED
WARRANTY OF MERCHANTABILITY OR FITNESS FOR A
PARTICULAR PURPOSE ON THIS PRODUCT IS LIMITED IN
DURATION TO THE DURATION OF THIS WARRANTY.
Some states do not allow the exclusions or limitation of incidental or consequential damages, or allow limitations on how
long an implied warranty lasts, so the above limitations or exclusions may not apply to you. In addition, if you enter into a service contract agreement with the PHILIPS partnership within
ninety (90) days of the date of sale, the limitation on how long
an implied warranty lasts does not apply.
This warranty gives you specific legal rights. You may have other rights which vary from state/province to state/province.
Philips, P.O. Box 671539, Marietta, GA. 30006-0026
(Warranty: 4835 710 27550)
31