1
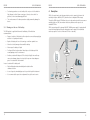
Possio SVEA
GSM Connector
User Manual
POSSIO
1.
SVEA USER MANUAL
Foreword
Before setting up and using the SVEA GSM Connector we kindly ask you to carefully read
this user manual.
1.1
Declaration of Conformity
SVEA GSM Connector (Art.-Nr: QEQU 00040/01) complies with the regulations in force
with reference to the R&RRE 99/5/CE directive and, in particular, with the following
standards:
EN 60950
Health and Safety
EN 301 489-1/7
EMC
EN 301 511, EN 300 607-1
RF Spectrum Efficiency
1.2
Copyright
© 2006 Possio AB. This user manual contains or refers to proprietary information that is
protected by copyright. All rights are reserved. POSSIO is a registered trademark of Possio AB.
This guide may not be copied, photocopied, reproduced, translated, or converted to any
electronic or machine-readable form in whole or in part without prior written approval
from Possio.
Improvements and changes to this guide necessitated by typographical errors, inaccuracies
of current information, or improvements and changes of programs and/or equipment may
be made by Possio at any time and without notice. Such improvements and changes will
however be incorporated into new editions of this booklet available on the Internet at
www.possio.com.
Possio AB
P.O. Box 1236
164 28 Kista
Sweden
First edition, May 2006.
3
POSSIO
SVEA USER MANUAL
POSSIO
2.
Content
2.1
1.
Foreword
3
6.
Operating Modes
16
1.1
Declaration of Conformity
3
6.1
Voice Calls
16
1.2
Copyright
3
6.1.1
SVEA is connected to a phone
To make a voice call
To receive a voice call
16
16
16
6.2
Fax Calls
16
6.2.1
SVEA: analogue fax
16
To send a fax
17
Receiving a fax
17
DAY function
18
To disable all fax reception 18
Store & Forward vs. Pass thr... 18
2.
Technical Specification
5
2.1
Physical Description
5
2.2
External Connections
5
2.3
Consumption
5
2.4
PSTN Connection Point
5
2.5
Modem Data Service
6
2.6
Fax Service
6
2.7
GSM Performance
6
3.
Warnings and Precautions
7
6.3
3.1
Safety Rules
7
6.3.1
3.2
Precautions
7
3.3
Warnings: Battery
8
4.
Description
9
4.1
Description of connectors
10
4.2
LED Status Report
11
5.
Get started
12
5.1
Contents of the box
12
5.2
Installation Guide
12
5.2.1
Unscrew bottom
12
5.2.2
Insert SIM card
12
5.2.3
Backup Battery arrangement
13
5.2.4
Antenna
14
5.2.5
Wall mounting
14
5.2.6
Plug in the RJ11
15
5.2.7
Power up unit
15
4
Data Calls
19
SVEA: analogue modem
Printing Reports
Data Call
Establish a data call
To receive a data call
19
19
20
20
20
7.
Troubleshooting
21
7.1
Setup
21
7.2
SIM card
21
7.3
Printing a test page
21
7.4
Cannot send a fax
21
7.5
Cannot receive a fax
22
7.6
Cannot receive faxes: ISDN 22
7.7
Cannot establish a data...
22
SVEA USER MANUAL
Technical Specification
Physical Description
Size
Weight (battery included)
Operating temperature
Humidity
2.2
External Connections
Telephony (PSTN connection)
GSM antenna
Power supply input
2.3
RJ-11 connector
SMA female connector (50Ω)
230V AC 50/60Hz or 12V DC, 1A
Consumption
Average power consumption
2.4
220mm x 170mm x 50mm
1400g
From -20°C to +55°C
From 0 to 95% not condensed
85mA stand-by; 350mA call mode
(@12V DC)
PSTN Connection Point (AU) Features
Interface
Call mode
Input dialling
Compliance
Call current level (ring)
Call current frequency
Call current modulation
Local tone frequency
Local tone modulation accuracy (emission/
silence)
RJ-11 4/6 connector & 2-pole terminal
Originated call (MOC); terminated call
(MTC)
Decadic or DTMF
ETSI EG 201 185
35Vrms ±10% + 38Voffset
25Hz ± 5%
1,0s emission: 4,0s silent
425hz ± 1%
±1%
Loop current
PSTN connection point characteristic
impendence
≤26mA with 0Ω of line resistance
Maximum telephone line length
500 metres (depending on the number
of units connected)
750Ω // 150nF + 270Ω
5
POSSIO
2.5
SVEA USER MANUAL
Modem Data Service (via AU Interface)
Transmission speed
2.6
3.
Group 3
ITU-T T.4 and T.30
GSM Performance
Band
RF power
Voice and emergency calls
Voice
Fax
Data transmission
GSM dual band
Class 4 (2W) for EGSM900; Class 1 (1W)
for GSM 1800
TCH/FS
Half Rate (HR), Full Rate (FR), Enhanced
Full Rate (EFR)
Automatic Group 3 (Class 1, 2)
GSM (9.6kbps uplink and downlink), CSD
up to 14.4kbps, USSD, non-transparent
mode, V.110
Safety Rules
•
The passage from a cold room to a warm room may cause condensation to build
up inside the device. In these cases, it is recommended to wait at least 1 hour
before using the product in order to avoid any malfunction.
•
ATTENTION: Connect the device with an outlet installed in the immediate
proximity and easily accessible for the operator. Under no circumstance, is it
permitted to cut the mains plug to connect the equipment securely.
•
ATTENTION: Electrical shock risk. The power supply used for this device can
cause lethal voltage levels.
•
The case includes a connection compartment and arrangement. You may have
access to it after removing the cover by means of a tool.
•
If any object or liquid should enter the device, immediately remove the device
from its power supply. Before reusing the device, have it checked by an
authorised technician.
•
In case of intervention, always make sure that the device is completely and
properly disconnected.
•
In case of fire, avoid using water as an extinguisher.
Since the GSM system is a radiofrequency technology (RF), it may interfere with the
operation of other phone sets or electronic equipment that is not properly protected
against radio frequency radiation.
•
Never put your hands on the antenna when the device is in use.
•
Never use the device if the antenna is visually damaged. In this case, ask for a
replacement antenna through your service center.
•
During device operation you should keep a minimum distance of 20cm from the
antenna.
•
People with auxiliary systems such as pacemakers and electro acoustic hearing
aides should keep at a safe distance.
3.2
6
SVEA USER MANUAL
Warnings and Precautions
3.1
Fax Service (via AU Interface)
Transmission and reception
Compliant with
2.7
9.6kbps (SVEA modem local connection up
to V.90)
POSSIO
Precautions
•
ATTENTION: Many of the components used in this device are sensitive to
electrostatic discharge.
•
If you should handle connection cables, make sure the device is unplugged and
avoid direct contact with the conductor terminals.
7
POSSIO
•
•
3.3
SVEA USER MANUAL
POSSIO
SVEA USER MANUAL
For cleaning operations use a soft and dry cloth or a piece of cloth soaked in a
light detergent solution. Never use any type of solvent, such as alcohol or
gasoline, in order to avoid damaging the finish.
4.
The non-observance of the above precautions might permanently damage the
device.
Through the GSM network, SVEA allows the user to make and receive calls from a common
analogue telephone, PBX, fax or modem without any difference with respect to the
standard PSTN line.
Warnings on the use of the battery
The SVEA product is supplied with a hermetic lead battery. Follow the below
recommendations:
•
Danger of explosion if the battery is either replaced or connected improperly (pay
attention to its polarity and features).
•
Replace the battery with one of the same type or with an equivalent one.
•
Never short circuit, damage or disassemble the battery.
•
Never expose the battery to liquids.
•
For disposal follow local procedures. Never dispose of the battery with the
normal garbage or into the environment.
•
Avoid any contact with battery acid. The electrolyte is highly toxic and it may
cause serious damage by way of contact only. It may even release dangerous
gases if in contact with other materials.
Description
SVEA is the easiest way to get telecommunication services to premises that cannot be
reached by telephone landlines (PSTN), but where there is adequate GSM coverage.
SVEA is powered up with the primary 230V AC, 50/60Hz power supply. It is equipped with
an optional internal battery that works during any power shortage, with an estimated
autonomy equal to 6 hours of call time and 13 hours of stand-by.
In case of contact with the battery acid:
8
•
Wash with abundant water immediately and neutralise with a
soda-based solution.
•
In case of ingestion, immediately proceed to your local hospital for treatment.
•
It is recommended to request for a replacement through the service centre.
9
POSSIO
4.1
SVEA USER MANUAL
POSSIO
4.2
Description of connectors
SVEA is arranged in a plastic case that shall be fastened to a wall.
Connectors and light signals are arranged on two sides: at the bottom and
on the front.
4
3
1
2
The following connectors are shown on the bottom:
SVEA USER MANUAL
LED Status Report
GREEN LED STATUS
RED LED STATUS
SVEA STATUS
Off
Off
No power supply
Very quick flashing
(60 ms ON / 60 ms OFF)
Off
SIM absent and
GSM Network absent or
SIM PIN required
Very quick flashing
(60ms ON / 60 ms OFF)
Fixed light
SIM absent and
GSM Network present or
SIM PIN required
3 cycles of 5 quick
flashing2
(100ms ON / 100ms OFF)
3 cycles of 5 quick
flashing2
(100ms ON / 100ms OFF)
Boot phase
Fixed light
Fixed light
Full power, full signal
Fixed light
Off
No signal
1)
Power supply: primary power supply cable 230V AC, 50/60Hz.
Fixed light
2)
Slots: bottom-breakable slots for running through connection cables for any
external power supply source (photovoltaic system) and/or phone duplex cable.
Slow flashing
(100ms ON 7 2s Off)
SVEA ready
Handset hung up
Off
3)
PSTN connection: RJ-11 analogue port for connecting analogue devices (fixed
phone sets, PBX, fax or modems).
Slow flashing
(100ms ON 7 2s Off)
SVEA ready
Handset lifted
Reset key: used to reset and/or power off the device. Always reset the device
when switching SIM card.
1 Quick flashing 1
(200ms ON / 200ms OFF)
Send / Receive Fax
4)
1 Quick flashing 1
(200ms ON / 200ms OFF)
2 Quick flashing 1
(200ms ON / 200ms OFF
/ 200ms ON / 200ms OFF)
2 Quick flashing 1
(200ms ON / 200ms OFF
/ 200ms ON / 200ms OFF)
Send / Receive Data
1 Slow flashing 2
(100ms ON / 2s OFF)
1 Slow flashing 2
(100ms ON / 2s OFF)
Faxes avaliable
in SVEA memory
1 Quick flashing 2
(200ms ON / 200ms OFF)
1 Quick flashing 2
(200ms ON / 200ms OFF)
Memory nearly full
6
7
5
1
Green and red LED flashing on and off alternating
2
Green and red LED flashing on and off simultaneously
8
The following are shown on the front:
10
5)
Antenna: GSM dual band antenna.
6)
GSM LED (red): it shows the GSM operation status of the device.
7)
Power supply LED (green): it shows the power supply status of the device.
8)
Terminal compartment
11
POSSIO
5.
SVEA USER MANUAL
Get Started
5.1
• Before inserting and removing the SIM card, power off the device and unplug it.
• SVEA unit
• Antenna
• Battery
• Wall mount
• AC cord
• User Guide
• For data and fax calls make sure that the SIM card is properly enabled with the numbers
relative to the data and fax service (in addition to the voice number).
• Make sure that the PIN code on the SIM card has been disabled before inserting the SIM
into the device.
5.2.3
Installation Guide
You need the following items and tools to perform the installation
a) Phillips screwdriver
b) SIM card + fax number subscription
Unscrew bottom
To have access to the SIM card compartment, it is necessary to remove the plastic cover of
the device completely by following the below steps:
a)
Remove the terminal compartment and the second transparent protection by
unscrewing the two fastening screws
b)
Unscrew the four screws on the back of the device
c)
Remove the upper plastic cover
a
5.2.2
b
Backup Battery arrangement (with 230V AC power supply only!)
The backup battery must be arranged inside SVEA only if you use the 230V AC primary
network as a power supply source. If you use photovoltaic panels or 12V DC, the backup
battery shall not be used.
IMPORTANT: if you handle or transport SVEA, for mechanical and electrical safety
reasons, the backup battery shall not be arranged inside the product. The insertion of the
battery inside the product and the connection of its electrical terminals must only occur at
the time of commissioning at the end user’s premises.
c) Fax / phone
5.2.1
SVEA USER MANUAL
IMPORTANT:
Contents of the box
5.2
POSSIO
c
To arrange and connect the backup battery, remove the SVEA plastic cover as it has
already been described for the SIM card insertion. Then follow the below steps:
• Make sure the stripped terminals cables intended to connect to the backup battery
are securely fixed to the 3-pole terminal; the red cable should be fixed into the +BAT
position and the black cable into the GND position.
• Insert the fast-on connectors into the
battery terminals. Pay attention to correct
polarity.
Insert SIM card
Lift the SIM-reader (of a SIM lock type) and insert the SIM card. Make sure that the
contacts are turned downwards. Then close the SIM reader again by pushing the slide
downwards until you lock it into place completely.
• Arrange the battery in the compartment
available in the printed circuit and make
sure that the terminals are turned to the
right.
IMPORTANT:
Red Cable / Terminal +
Black Cable / Terminal -
12
13
POSSIO
SVEA USER MANUAL
POSSIO
SVEA USER MANUAL
• Place the battery in the area as shown in
the picture to the left.
• Once completed close SVEA again.
Reinsert the upper plastic cover and fasten
the screws.
To power on the device simply plug the
230V AC connection into a wall plug.
NOTE: If you plan to mount SVEA to
the wall keep the cover off and continue
reading at section 5.2.5
For wall fastening follow the steps here below:
1. Insert the two screw anchors into the wall according to the specified distance
between the centres.
2. Fasten the screw with the mounting washer into the upper screw anchors.
3. Hang the device onto the mounting washer.
4. Fasten the device to the lower anchor screw by means of the second screw by using
the slot arranged in the terminal compartment.
ATTENTION: After having powered up the product, if you detach it from the electrical
network, the battery will keep it running until it runs empty. To power off the device
completely detach the battery or press the reset key.
ATTENTION: SVEA shall always be installed vertically. Avoid installing it in any
other position.
5.2.4
5.2.6
Antenna
The monopole antenna supplied with
the product might fail to provide for an
optimum reception of the RF signal in
well-defined operating conditions. An
external Omni directional antenna can be
purchased as an accessory.
5.2.5
Plug in the RJ11 cable to phone or fax
Use the supplied phone cable to connect the RJ-11 connector, called “PSTN connection
point (AU)”, of the SVEA with a phone exchange (PABX), a type-approved phone set, a G3
fax terminal or an analogue modem.
Wall mounting
IMPORTANT: Before choosing the position for installation of the device, evaluate the
coverage of the GSM signal by using the functionality of the red LED or a mobile phone.
5.2.7 Power up unit
The backside of SVEA shows two holes properly shaped (distance between the centres =
185mm) and arranged for wall fastening by using the screw anchors supplied.
Connect the power supply cable with a 230V mains socket.
The SVEA GSM Connector is now ready to use.
14
15
POSSIO
6.
SVEA USER MANUAL
Operating Modes
Analogue devices must be connected to SVEA by means of the AU connector either
individually or in parallel, up to three devices at the same time.
6.1
Voice Calls
Make sure that a fixed phone set or the 2-wire analogue line port of a phone exchange is
connected with SVEA by means of the AU connector.
6.1.1
SVEA is connected to a phone
When the phone is directly connected to SVEA by means of the AU connector, all
conversation will be made by means of the GSM network.
To make a voice call
A voice call is originated by following the below procedure:
POSSIO
SVEA USER MANUAL
When establishing a call, most of the faxes available on the market can communicate with
SVEA to a make a fax call. Communication occurs by means of a special dial tone called
calling tone (also known as tone dialling or touch tone).
According to whether this function is available on you fax or not, follow the instructions
listed below to send a fax.
To send a fax (only for faxes complete with the Calling Tone function)
Connect the analogue fax to SVEA. Make sure that the device is on and running. Insert
the document you wish to transmit into the fax and type the fax number.
To send a fax (only for faxes not complete with the Calling Tone function)
To be able to communicate SVEA the intention of sending a fax, type the user defined
digit before the receiver’s fax number (the default value is
•
Lift the phone handset and check the presence of a dial tone.
The presence of a congestion or engaged tone may mean that there is no field
or that SVEA is already engaged in another call.
•
Wait no longer than 14 sec. to dial the number you want to call on the phone
keypad and wait for the connection. Wait no longer than 4 sec. between digits
(timeout set by factory). After the above periods, SVEA will send the
digits you have dialled.
•
When you wish to terminate the call, hang up the phone handset.
ATTENTION: at the end of a voice call wait about 2 seconds before the next call.
To receive a voice call
When you receive a voice call, your attached phone will ring. To answer, just lift the
handset or press the phones answer button.
You can display the number of the caller on your phone if the Call Line Identity (CLI)
service is enabled.
6.2
Fax Calls
Make sure that an analogue fax (Group 3) is connected with SVEA by means of the AU
connector.
6.2.1
SVEA is connected to an analogue fax
You can send / receive faxes by simply connecting an analogue fax (G3) with the SVEA AU
connector.
16
).
In order to change the digit, type the following command from the phone / fax connected
to SVEA:
fax-digit
where “fax-digit” is the digit that shall be used before each fax number.
Valid value range is from
to
,
and
If the value you entered is valid, it will be confirmed by a double confirmation tone.
Connect the analogue fax with SVEA. Make sure that the device is switched on. Insert the
document you wish to send into the fax and type the fax number. Remember to type the
“fax-digit” above before the fax number.
Example: if you wish to send a fax to 555 123456, type: *555123456.
NOTE: if the fax is not complete with Calling Tone function and the preset digit
entered, the call you establish will be a voice call.
is not
Receiving a FAX (DAY function disabled )
Receiving a fax is the same as if your analogue FAX was connected to a PSTN line, but
with a difference: when receiving a fax, SVEA automatically replies and stores the fax into
its internal memory. At the end of the connection it rings to the FAX connected to the
PSTN connection point LINE in order to transfer the document. After that, SVEA erases the
stored fax.
The fax storage capability allows SVEA to transfer the received document to the connected
FAX up to 3 times in case of a printing error.
NOTE: In case of problems receiving faxes originated from ISDN devices refer to Chapter
7, Troubleshooting.
17
POSSIO
SVEA USER MANUAL
POSSIO
SVEA USER MANUAL
In the Store & Forward mode SVEA first stores all incoming fax pages in its memory and
then delivers them to the attached fax.
DAY function
The DAY function is intended to enable the operator to store incoming faxes into SVEAs
internal memory (without printing them). The number of fax pages that can be stored
varies, depending upon the amount of text on each page and the type of resolution used.
25-30 pages and 50-60 pages are respectively estimated for high and low resolution.
Use the following command to enable the Store & Forward function (it disables the pass
through mode)
NOTE: DAY function only works in Store & Forward mode. Refer to page 19.
Use the following command to reactivate the Pass through function
Use the following command to set up the function.
n Command to enable / disable the DAY function, where
NOTE: If Store & Forward mode is disabled, the functions “Printing report” and “Day
function” for SVEA will be disabled.
“n” may be:
1
To enable the DAY function
0
To disable the DAY function
NOTE: as soon as the function is disabled, all stored faxes will be automatically printed.
Command to delete all stored faxes and to free the
Printing Reports
Fax report printing can be set by typing the following command from your phone set/fax
connected to the PSTN connection point (Line) of SVEA.
NOTE: Printing Reports only works in Store & Forward mode. See above.
internal memory.
2
n where “n” value is:
DISABLE report printing IN EACH SITUATION (transmission occured with success
or failed).
ENABLE report printing IN EACH SITUATION
(transmission occured with success or failed).
ENABLE report printing ONLY if fax tranmission FAILS.
3
ENABLE report printing (first fax page) ONLY if the fax transmission FAILED.
0
Command to force the printout of the faxes that have
been stored in SVEA without having to disable the DAY function.
1
To disable all fax reception
You can disable all fax reception (e.g. because no fax is connected to SVEA) by typing the
following command:
y
where “y” can be the following parameter values:
6.3
Data Calls
Make sure that an analogue modem (up to V.90) is connected to SVEA via the AU
connector.
0
Enable fax reception
1
Disable fax reception
6.3.1
2
Verify command status (double tone every 2 sec indicates the service is enabled,
single tone every second indicates the service is disabled)
You can establish a data / Internet connection by simply connecting an analogue modem
with SVEA’s AU connector.
Pass through operation mode vs. Store & Forward
In the pass through mode SVEA operates in a transparent mode, connecting the GSM
network directly with the attached fax. (default setting)
18
If the entered value is valid, SVEA will generate a double tone as confirmation.
SVEA is connected with an analogue modem
When establishing a call, some of the modems available on the market can communicate
SVEA the intention to make a data call. Communication occurs by means of a special dial
tone called Calling Tone.
According to whether this function is available on your modem or not, follow the
instructions listed below to make a data call.
19
POSSIO
SVEA USER MANUAL
POSSIO
7.
Data call (without forcing the Calling Tone function)
SVEA USER MANUAL
Troubleshooting
To be able to communicate SVEA the intention of making a data call, type the user-
7.1
defined digit before the addressee’s modem number (the default value is
Please ensure that all connections are securely attached and that the unit is powered on.
Make sure that you have inserted a SIM card and that you have activated your fax number
with your operator.
).
In order to change the digit, type the following command from the phone connected to SVEA:
data-digit
7.2
where “data-digit” is the digit that shall be used before the modem number.
Valid value range is from
to
,
Setup
SIM card
Make sure that you disabled the PIN number on your SIM card before inserting it into
SVEA. SVEA will also indicate that the PIN has not been disabled by the red LED flashing
on/off while the green LED is lit permanently. You can disable the PIN number with a
standard mobile phone.
and
If the value you entered is valid, it will be confirmed by a double confirmation tone.
Data Call (forcing the Calling Tone function)
7.3
In order to force the Calling Tone function for the modem and obtain as a result to
communicate SVEA the intention to make a data call, it is necessary to end the called
modem number with the ^ character.
Printing a test page
You can check whether the fax is correctly setup by printing a test page from the phone/
fax connected to the PSTN connection point (Line) of SVEA (a test page will be printed)
if the entered value is valid, SVEA will generate a double
tone as confirmation.
Establish a data call
Connect the analogue modem with SVEA. Make sure that the device is on and running.
Internet connection: to establish an internet connection using your PC’s browser, you shall
define a remote access configuration including the parameters relative to the connection
by means of your provider.
20
).
where “fax-digit” is the digit that shall be used before each fax number.
Example: to establish a data connection with the number 555 123456, forcing the Calling
Tone function, type ATD555123456^
Connect the analogue modem to SVEA. Make sure that the device is up and running.
Use a terminal emulation programme (e.g. HyperTerminal) on the PC connected with
a modem. In case of an incoming data call, the ring message will appear on screen. To
establish a connection, just type the ATA command.
(the default value is
fax-digit
Example: to establish a data connection with the number 555 123456, without forcing the
Calling Tone function, type ATD#555123456
To receive a data call
Cannot send a fax
To be able to send a fax, try typing the user-defined digit before the receiver’s fax number
In order to change the digit, type the following command from the phone / fax connected
to SVEA or the home phone plug:
Digits / characters mentioned above should be put before / after the provider number.
Data connection: by using a terminal emulation programme (such as HyperTerminal), type
the ATD command followed by the phone number from the PC connected with the
modem. Never forget to type the digits / characters mentioned above before / after the
modem number.
NOTE: if the modem is not forced to produce the Calling Tone and the preset digit
not entered, the call you establish will be a voice call.
7.4
is
Valid value range is from
to
,
and
If the value you entered is valid, it will be confirmed by a double confirmation tone.
Connect the analogue fax with SVEA or the home telephone plug. Make sure that the
device is switched on. Insert the document you wish to send into the fax and type the fax
number. Remember to type the “fax-digit” above before the fax number.
Example: if you wish to send a fax to 555 123456, type: *555123456.
NOTE: if the fax is not complete with Calling Tone function and the preset digit
entered, the call you establish will be a voice call.
is not
21
POSSIO
7.5
SVEA USER MANUAL
Cannot receive a fax
In order to receive faxes over the GSM network you require a separate fax number to your
voice number. This can be requested from you operator.
7.6
Cannot receive faxes originated from ISDN devices
When unable to receive faxes from ISDN devices it is possible that the problem is caused
by the Network Termination (NT) setting. In order to check this, run a terminal emulation
software (e.g. HyperTerminal) on a PC connected to the seriel port of SVEA. Then type
the command AT+CRC=1. Wait for a fax originating from the ISDN device (make sure it
is send to the fax number on your SIM card). If the HyperTerminal displays “ring voice”,
it is necessary to inform the fax sender that its Network Termnination (NT) requires an
upgrade.
7.7
Cannot establish a data call or an Internet connection
To be able to establish a data call, try typing the user-defined digit before the addressee’s
modem number (the default value is
).
In order to change the digit, type the following command from the phone connected to
SVEA or the home telephone system:
data-digit
where “data-digit” is the digit that shall be used before the modem number.
Valid value range is from
to
,
and
If the value you entered is valid, it will be confirmed by a double confirmation tone.
The alternative in establishing a data call is to force the Calling Tone function for your
modem (if predisposed), by ending the called modem number with the ^ character.
NOTE: if the modem is not forced to produce the Calling Tone and the preset digit
not entered, the call you establish will be a voice call.
NOTE: Also try setting the SVEA in Store & Forward mode. Refer to page 19.
22
is
QPRM 00205/01 rev B