1
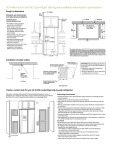
1) Please refer to "Compatible CPUs" on page 3 to confirm that your CPU is compatible with
the CNPS7000C before installing.
2) Check the components list and condition of the product before installation. If any problem is
found, contact the retailer.
3) Excessive force exerted on the fan may damage the fan, resulting in damage to the system.
4) Avoid inserting any objects into the fan while it is in operation.
5) Use and keep the product away from the reach of children.
6) Do not ingest the Thermal Grease and avoid its contact with eyes and skin. In case of bodily
contact wash off with water, and if ingested, seek the advice of a doctor.
7) To prevent possible injuries or accidents please wear gloves while handling this product.
Disclaimer) ZalmanTech Co., Ltd. is not responsible for any damages due to external causes,
including but not limited to, improper use, problems with electrical power, accident,
neglect, alteration, repair, improper installation, or improper testing.
1) Does not generate noise or vibration in Silent Mode.
2) Pure copper and/or pure aluminum base materials ensure excellent heat dissipation.
3) Compatible with single and dual core CPUs for Intel Socket 775 and AMD Sockets
AM2/754/939/940.
4) 92mm fan inside the heatsink maximizes airflow.
5) Adjustable fan speed controller(Fan Mate 2) enables control of noise and fan
performance.
1) Cooler
2) Fan Mate 2
- Output Voltage : 5V ~ 11V ±2 %
- Power Consumption : 6W or lower
Note 1) The maximum weight for a cooler is specified as 450g for Intel Socket 775 and
AMD Socket AM2/754/939/940. Special care should be taken when moving a
computer equipped with a cooler which exceeds the relevant weight limit. Zalman
is not responsible for any damage that occur while moving a computer.
Note 2) The fan operates at 2,650rpm(27.5dBA±10%) if directly connected to the
motherboard’s power connector without the use of Fan Mate 2.
Note 3) Measured 1m distance away from source.
① Cooler (CNPS7000C-Cu/AlCu)
② Thermal Grease
③ Clip Support for Socket 775
④ Backplate for Socket 775
⑤ Clip Support Fixing Bolt (4 bolts)
⑥ Clip A
⑦ Installation Bolt (4 bolts)
⑧ Clip B
⑨ Clip Lever
⑩ Fan Speed Controller (Fan Mate 2)
⑪ Cable for Fan Mate 2
⑫ Double-Sided Tape (for Fan Mate 2 Attachment)
⑬ User’s Manual (in English and Korean)
1) Intel Socket 775 CPUs
2) AMD Socket AM2/754/939/940 CPUs
Caution)
No motherboard components with a height greater than
39mm, as well as the PSU, disk drives, VGA card, and
RAM should be present within a 55mm radius from the
center of the CPU.
1) Clip Installation
Clip A(⑥) is installed in the factory so INTEL socket
users DO NOT have to exchange the Clip. To reinstall Clip A(⑥), adhere to the following instructions.
A. Unfasten the Fan Support Fixing Screws and disassemble the Fan Support
from the Heatsink.
B. Insert Clip A(⑥) in the direction of the Fan Support’s * Fan Lead Wire. Make
sure the Clip is inserted under the ** Protruded Part of the Fan Support.
C. After installing the Fan Support onto the Heatsink, please secure with the
Fan Support Fixing Screws(refer to the diagram below).
※ Please make sure that Clip A/B is installed correctly.
※ Do not exert excessive force on the fan during the installation for it may damage the fan.
2) Clip Support Installation
Align the Clip Support for Socket 775 (③) and the Backplate for Socket 775 (④) with the
mounting holes on the motherboard and fasten them together with the Clip Support Fixing
Bolts (⑤). The Lever Slot on the Clip Support for Socket 775 should be properly oriented
on the hinged side of the Socket Lever when installing.
※If the Lug of the Clip Support for Socket 775 interferes with any motherboard
components, install the Clip Support for Socket 775 with the Lug facing a different
direction to avoid interference.
3) Thermal Grease Application
Clear off particles and any residue from
the top of the CPU then spread an
adequate amount of the included
Thermal Grease (②) on the CPU surface
thoroughly.
4) Cooler Installation
Set the Cooler at the center of the CPU. Screw the Installation bolts in slightly, then
tighten each bolt a few turns at a time while alternating between the two until the clip
support is completely pressed against the Clip.
5) Power Connection (Fan Mate 2 Connection)
◆ Please refer to Fan Mate 2 Installation and Usage on page 6.
1) Clip Installation
Clip A(⑥) is installed in the factory so AMD socket users MUST remove
⑧). Adhere to the following instructions to change the clip.
Clip A and install Clip B(⑧
A. Unfasten the Fan Support Fixing Screws and disassemble the Fan Support from the
Heatsink.
B. Insert Clip B(⑧) in the direction of the Fan Suppor’s *Fan Lead Wire. Make sure the
Clip is inserted under the **Protruded Part of the Fan Support.
C. After installing the Fan Support to the Heatsink, please secure with the Fan Support
Fixing Screws(refer to the diagram below).
※ Please make sure that Clip A/B is installed correctly.
※ Do not exert excessive force on the fan during the installation for it may damage the fan.
2) Thermal Grease Application
Clear off particles or any residue from the top of the
CPU then spread a thin layer of the included
Thermal Grease thoroughly on top of the CPU.
3) Cooler Installation
Insert the Clip Lever(⑨) into the Clip B(⑧). Connect the Clip's Lug Slot with a Lug of the
Retention Frame on the motherboard. Press onto the Clip Lever(⑨) when aligning the
Lever's Lug Slot and the other Lug.
※Using a flat-head screwdriver is recommended for easier installation
and removal.
4) Power Connection (Fan Mate 2 Connection)
◆ Please refer to Fan Mate 2 Installation and Usage on page 6.
1) Fan Mate 2 Installation on the Inside of a System
Connect the two 3-pin connectors of the cable to
the motherboard and to the CNPS7000C’s Fan
Connector as shown in the diagram.
2) Fan Mate 2 Installation on the Outside of a System
Pull the 6-Pin Connector(⑬) out of the
system through the back and connect it to
Fan Mate 2(⑪), which should be installed
on the case using the included DoubleSided Tape(⑩).
◆ When the Speed Control Knob on Fan Mate 2 is turned counter-clockwise, fan speed is
lowered. Turned clockwise, it is increased. Thus, you can select the desired fan speed by
turning the knob.
Please adjust the fan speed to a desired setting. For CPU temperature specifications,
please inquire to the CPU manufacturer.
Note) Fan Mate 2 has been specifically designed for the fan of this product.
ZalmanTech Co., Ltd. is not responsible for any damages to the system or CPU
resulting from its use with other types of fans.
1) Caution During Booting
The computer system may automatically shut down when booting the computer after the
system monitoring program outputs a warning stating that the CPU fan is rotating slowly.
In such a case, fully turn the Speed Control Knob in the clockwise direction before
rebooting to disable the 'CPU Fan Detected' option in BIOS, or set the CPU fan's
rotational speed to 1,350rpm or lower in the system monitoring program.
Note) Some motherboards fail to boot if the rotational speed of the CPU fan is below a
certain rpm. However, booting can be possible even at low fan rpm if the BIOS
settings are updated. For more information on updating the BIOS, please refer to the
website of the motherboard's manufacturer. There are motherboards which fail to
detect the rpm while operating the cooler in Silent Mode, but this does not affect
computing performance.
2) Overclocking
ZalmanTech Co., Ltd. is not responsible for any damages resulting from CPU
Overclocking.
Zalman's Ultra Quiet Power Supplies, Fanless Northbridge Coolers, Heatpipe HDD Cooler,
Ultra Quiet Case Fans, VGA Coolers, and Multi Fan Controllers facilitate stable performance
and a noiseless computing environment.
TRIMON series monitors are capable of fine 2D imaging
and ultra clear stereoscopic 3D imaging, making it ideal
for 3D games, movies, design, scientific research, and
presentations.
For more information, please visit our website.
The GS1000 enclosure features E-ATX / Standard ATX /
microATX compatibility, up to 6 Hot Swap HDD Bays,
tool-free HDD installation, airflow optimized design, the
world’s first roller rails for smooth & easy PSU
installation, cable compartment behind the motherboard
for cable management, dedicated fan compartment for
fanless PSU users, and up to 8 HDD bays.
For more information, please visit our website.