1
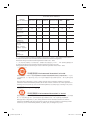
Digital AV Receiver System User Manual HTR5205 6 使用手册(简体) 28 使用手冊(繁體) 52 Manual Pengguna 76 welcome. 1_htr5205-98_EN.indd 1 2007-03-30 11:53:44 AM ᳝↦᳝ᆇ⠽䋼ܗ㋴ +D]DUGRXV7R[LF6XEVWDQFH 䚼ӊৡ⿄ 䪙 1DPHRIWKH3DUWV 3E/HDG 䬝&G ∲+J 0HUFXU\ &DGPLXP ݁Ӌ䫀 ⒈㘨㣃 &KURPLXP 3%% ⒈Ѡ㣃䝮 3%'(˅ +RXVLQJ O O O O O O '9'ORDGHU '9'Ⲧܝ 6XEZRRIHU 䍙䞡Ԣ䷇ㆅ X O O O O O X O O O O O /RXGVSHDNHUV ুऩܗ O O O O O O 3:%V ⬉䏃ᵓ㒘ӊ X O O O O O $FFHVVRULHV 5HPRWHFRQWURO FDEOHV 䰘ӊ˄䘹఼ˈ ⬉⑤㒓ˈ䖲㒓˅ X O O O O O %DWWHULHVLQ 5HPRWH&RQWURO =Q& 䘹఼⬉∴ X O O O O O ƻ˖㸼⼎䆹᳝↦᳝ᆇ⠽䋼䆹䚼ӊ᠔᳝ഛ䋼ᴤ᭭Ёⱘ䞣ഛ6-7ᷛޚ㾘ᅮⱘ䰤䞣㽕∖ҹϟDŽ O: Indicates that this toxic or hazardous substance contained in all of the homogeneous materials for this part is below the limit requirement in SJ/T11363 – 2006. h˖㸼⼎䆹᳝↦᳝ᆇ⠽䋼㟇ᇥ䆹䚼ӊⱘᶤϔഛ䋼ᴤ᭭Ёⱘ䞣䍙ߎ6-7̢ᷛޚ㾘ᅮⱘ䰤䞣㽕∖DŽ X: Indicates that this toxic or hazardous substance contained in at least one of the homogeneous materials used for this part is above the limit requirement in SJ/T11363 - 2006. ⦃ֱՓ⫼ᳳ䰤Environmental Protection Use Period ℸᷛ䆚ᣛᳳ䰤˄कᑈ˅ˈ⬉ᄤֵᙃѻકЁ᳝ⱘ᳝↦᳝ᆇ⠽䋼ܗ㋴ℷᐌՓ⫼ⱘᴵӊϟϡӮথ ⫳⊘さবˈ⫼᠋Փ⫼䆹⬉ᄤֵᙃѻકϡӮᇍ⦃๗䗴៤Ϲ䞡∵ᶧᇍ݊Ҏ䑿ǃ䋶ѻ䗴៤Ϲ䞡ᤳᆇ ⱘᳳ䰤DŽ This logo refers to the period ( 10 years ) during which the toxic or hazardous substances or elements contained in electronic information products will not leak or mutate so that the use of these [substances or elements] will not result in any severe environmental pollution, any bodily injury or damage to any assets. ⬉∴ᷛ䆚Battery labeling logo ⦃ֱՓ⫼ᳳ䰤Environmental Protection Use Period ℸᷛ䆚ᣛᳳ䰤˄Ѩᑈ˅ˈ⬉∴Ё᳝ⱘ᳝↦᳝ᆇ⠽䋼ܗ㋴ℷᐌՓ⫼ⱘᴵӊϟϡӮথ⫳⊘さ বˈ⫼᠋Փ⫼䆹⬉∴ѻકϡӮᇍ⦃๗䗴៤Ϲ䞡∵ᶧᇍ݊Ҏ䑿ǃ䋶ѻ䗴៤Ϲ䞡ᤳᆇⱘᳳ䰤DŽ This logo refers to the period ( 5 years ) during which the toxic or hazardous substances or elements contained in the battery will not leak or mutate so that the use of these [substances or elements] will not result in any severe environmental pollution, any bodily injury or damage to any assets. 2 1_htr5205-98_EN.indd 2 2007-03-30 11:53:48 AM English ------------------------------------------4 Manufactured under license from Dolby Laboratories, ‘Dolby’, ‘Pro Logic’ and the double-D symbol are trademarks of Dolby Laboratories. English Index 中文(简体) ----------------------------- 28 中文(繁體) ----------------------------- 52 Bahasa Melayu------------------------------- 76 CAUTION Use of controls or adjustments or performance of procedures other than herein may result in hazardous radiation exposure or other unsafe operation. Bahasa Melayu Manufactured under license from one or more of the following DTS, Inc. U.S. Pat. No’s: 5,451,942; 5,956,674; 5,974,380; 5,978,762; 6,226,616; 6,487,535 and other U.S. and world-wide patents issued and pending. ”DTS” and “DTS Digital Surround” are registered trademarks of DTS, Inc. Copyright 1996, 2002-2006, DTS, Inc. All Rights Reserved. For Customer Use: ‘CONSUMERS SHOULD NOTE THAT NOT ALL HIGH DEFINITION TELEVISION SETS ARE FULLY COMPATIBLE WITH THIS PRODUCT AND MAY CAUSE ARTIFACTS TO BE DISPLAYED IN THE PICTURE. IN CASE OF 525 OR 625 PROGRESSIVE SCAN PICTURE PROBLEMS, IT IS RECOMMENDED THAT THE USER SWITCH THE CONNECTION TO THE ‘STANDARD DEFINITION’ OUTPUT. IF THERE ARE QUESTIONS REGARDING OUR TV SET COMPATIBILITY WITH THIS MODEL 525p AND 625p DVD PLAYER, PLEASE CONTACT OUR CUSTOMER SERVICE CENTER.’ Read carefully the information located at the bottom or rear of your Receiver and enter below the Serial No. Retain this information for future reference. Model No. HTR5205 Serial No. _______________ 3 1_htr5205-98_EN.indd 3 2007-03-30 11:53:48 AM Table of Contents English General Care and Safety Information .......................................................................................... 5 Setup precautions.................................................................................................................................................5 Accessories supplied ...........................................................................................................................................5 About recycling .....................................................................................................................................................5 Product Overview Remote Control ................................................................................................................ 6 Using the remote control ..................................................................................................................................8 Main Unit ........................................................................................................................... 9 Connections Basic Connections .......................................................................................................... 10 Step 1: Placing the speakers and subwoofer ...............................................................................................10 Step 2: Connecting speakers and subwoofer .............................................................................................11 Step 3: Connecting the FM and AM/MW antennas ..................................................................................12 Step 4: Connecting the power cord..............................................................................................................12 Optional Connections .................................................................................................... 13 Connecting audio from TV ..............................................................................................................................13 Connecting audio from an audio/video device ...........................................................................................13 Basic Setup Getting Started ............................................................................................................... 16 Step 1: Turning on the system ........................................................................................................................16 Step 2: Setting the speakers ............................................................................................................................16 Volume Controls and Playback on Connected Device Sound and Volume Controls ......................................................................................... 18 Selecting surround sound.................................................................................................................................18 Selecting digital sound effects .........................................................................................................................18 Adjusting the Bass/ Treble level ................................................................................................................18 Adjusting volume control .................................................................................................................................19 Adjusting for ‘Lip Sync’ delays ........................................................................................................................19 Playback - Other Audio Player .....................................................................................20 Playing from another portable audio player .............................................................................................. 20 Radio Tuning Tuner Operations ........................................................................................................... 21 Tuning to radio stations....................................................................................................................................21 Changing tuning grid ..........................................................................................................................................21 Presetting radio stations ..................................................................................................................................21 Selecting a preset radio station ..................................................................................................................... 22 Deleting a preset radio station...................................................................................................................... 22 Others Other Features................................................................................................................ 23 Setting the Sleep Timer ....................................................................................................................................23 Specifications .................................................................................................................. 24 Troubleshooting ..............................................................................................................25 Glossary............................................................................................................................ 26 4 1_htr5205-98_EN.indd 4 2007-03-30 11:53:48 AM WARNING! This unit does not contain any userserviceable parts. Please leave all maintenance work to qualified personnel. Setup precautions Finding a suitable location – Place this unit on a flat, hard and stable surface. Never place the unit on a carpet. – Never place this unit on top of other equipment that might heat it up (e.g., receiver or amplifier). – Never put anything under this unit (e.g., CDs, magazines). – Install this unit near the AC outlet where the AC power plug can be easily reached. Space for ventilation – Place this unit in a location with adequate ventilation to prevent internal heat build up. Allow at least 10 cm (4”) clearance from the rear and the top of this unit and 5cm (2”) from the left and right to prevent overheating. Avoid high temperature, moisture, water and dust – This unit must not be exposed to dripping or splashing. – Never place any object or items that can damage this unit (e.g., liquid filled objects, lighted candles). English Care and Safety Information Accessories supplied – – – – – – – – – – – 1 AV receiver system 1 subwoofer 2 front speakers 2 rear speakers 1 centre speaker 1 remote control with batteries 1 audio cable (red/white) 1 coaxial cable 1 FM wire antenna 1 AM/MW loop antenna 1 MP3 Line In cable (for connecting portable audio player) – 1 power cable – Quick Start Guide About recycling These operating instructions have been printed on non-polluting paper. The electronic equipment contains a large number of materials that can be recycled. If you are disposing of an old machine, please take it to a recycling centre. Please observe the local regulations regarding disposal of packaging materials, exhausted batteries and old equipment. 5 1_htr5205-98_EN.indd 5 2007-03-30 11:53:49 AM Remote Control English a 2 – Switches to standby mode or turns on the system. 1 b Source buttons 2 – DISC/DI: toggles between DISC 6CH, COAX IN and OPTI IN. RADIO: toggles between FM and AM/MW band. TV: switches to TV mode. AUX: switches to the external device connected to the AUDIO IN-AUX socket. MP3 Line in: switches to the MP3 device connected to the MP3 Line in socket on the front panel. 3 4 5 c PROGRAM 6 7 8 9 – RADIO: starts automatic manual preset programmining. d ST – RADIO: press up or down to tune the radio frequency. b (à) B(á) – RADIO: press to start auto search. e OK q; – Confirms an entry or selection. f PREVí / NEXT ë – RADIO: selects a preset radio station. g STOP – RADIO: press and hold this button to erase the current preset radio station. h TV VOL +/– Adjusts the volume of the TV (for Philips TVs or compatible brands only). i SURROUND – Toggles between multi-channel surround or stereo mode. j AUDIO SYNC – Sets the audio output delay times if the video playback is slower than the audio output. 6 1_htr5205-98_EN.indd 6 2007-03-30 11:53:49 AM Remote Control (continued) English k SLEEP Sets the sleep timer function. l PLAY/PAUSE u – RADIO: starts auto radio installation for first time setup. m MUTE % – Mutes or restores the volume. qa n VOL +/– Adjusts the volume level. o Numeric keypad 0-9 – Enters a number of a preset radio station. p SOUND – Selects a predefined sound effect. q BASS qs qd – Select for low tone sound mode. – Use the VOL +/-keys to change the tone level. qf r TREBLE – Select for high tone sound mode. – Use the VOL +/-keys to change the tone level. qg qh s SPEAKER/ SELECT – Selects the speakers’ level. – Use the VOL +/-keys to change the tone level. qj qk ql Note: If you have connected a Philips DVD player to this receiver, the following keys can be used: – ZOOM – SETUP – DISPLAY – SUBTITLE – DISC MENU – vV – TITLE 2 For details, see the accompanying user manual of your Philips DVD player. 7 1_htr5205-98_EN.indd 7 2007-03-30 11:53:50 AM Remote Control (continued) English Using the remote control C A CAUTION! – Remove batteries if they are exhausted or if the remote control is not to be used for a long time. – Never mix batteries (old and new or carbon and alkaline, etc). – Batteries contain chemical substances, they should be disposed of properly. B A Open the battery compartment. B Insert two batteries type R03 or AAA, following the indications (+-) inside the compartment. C Close the cover. D Point the remote control directly at the remote sensor (iR) on the front panel. VOL STANDBY-ON SURROUND SOUND TREBLE BASS PROGRAM TUNING SOURCE PHONES MP3 LINE-IN E Select the source you wish to control by pressing the DISC/DI, RADIO, TV, AUX or MP3 LINE IN button on the remote control. F Then select the desired function (for example í, ë). 8 1_htr5205-98_EN.indd 8 2007-03-30 11:53:50 AM English Main Unit VOL STANDBY-ON SURROUND SOUND TREBLE BASS PROGRAM SOURCE TUNING PHONES MP3 LINE-IN 1 2 3 4 5 6 7 a STANDBY ON – Turns on this unit or turns off to normal mode. b SURROUND – Toggles between multi-channel surround or stereo mode. c SOUND – Selects a predefined sound effect. d TREBLE – Select for high tone sound mode. – Use the VOL control to change the tone level. e BASS – Select for low tone sound mode. – Use the VOL control to change the tone level. 8 9 0 h Display Panel i SOURCE – Selects the relevant active source mode: DISC 6CH/COAX IN/OPTI IN, MP3 MODE, RADIO (FM/AM/MW), AUX or TV. j VOL – Adjusts the volume level. – Selects a setting in receiver setup menu. k PHONES – Plug in the headphones socket. l MP3 LINE IN – Phono input for connecting to the headphone out socket on your portable audio player. f PROGRAM – Enters receiver setup menu. – RADIO: starts automatic/manual preset programming. g .TUNING > – Selects a preset radio station. – Press and hold to start auto search. 9 1_htr5205-98_EN.indd 9 2007-03-30 11:53:50 AM Basic Connections English A B C A D C Step 1: Placing the speakers and subwoofer For optimum surround sound, all the speakers (except subwoofer) should be placed at the same distance from the listening position. A Place the front left and right speakers at equal distances from the TV and at an angle of approximately 45 degrees from the listening position. Helpful Hints: – The placement diagram shown here is only a guideline that will provide great system performance. You may find other placement choices that are more suitable for your room layout that provide the sound experience you enjoy. – To avoid magnetic interference, never position the front speakers too close to your TV. – Allow adequate ventilation space around the AV receiver. B Place the centre speaker above the TV or the main unit such that the centre channel’s sound is localised. C Place the rear speakers at normal listening ear level or hang on the wall. D Place the subwoofer at the corner of the room. Keep it at least one metre away from the TV. 10 1_htr5205-98_EN.indd 10 2007-03-30 11:53:51 AM FRONT RIGHT FRONT LEFT English Basic Connections (continued) FRONT CENTER REAR LEFT REAR RIGHT SUBWOOFER AM/ Step 2: Connecting speakers and subwoofer Connect all the speakers to the speaker sockets at the rear of the main unit, Make sure that the colours of the plugs and sockets are matched. Helpful Hints: – Ensure that the speaker cables are correctly connected. Improper connections may damage the system due to short-circuit. – Do not connect speakers with an impedance lower than the speakers supplied. See the chapter “Specifications”. 11 1_htr5205-98_EN.indd 11 2007-03-30 11:53:51 AM Basic Connections (continued) English fix the claw into the slot FM antenna 1 AM/MW antenna 2 AM/ Step 3: Connecting the FM and AM/MW antennas A Connect the supplied AM/MW loop antenna to the AM/MW socket. Place the AM/MW loop antenna on a shelf, or attach it to a stand or wall. B Connect the supplied FM antenna to the FM 75 Ω socket. Extend the FM antenna and fix its ends to the wall. Step 4: Connecting the power cord Notes: – For power supply rating, refer to the rear or bottom of the main unit. – Turning off to standby mode does not disconnect the unit from mains. A When completing all the connections, set the voltage selector to the local power line voltage. For better FM stereo reception, connect an external FM antenna (not supplied). Helpful Hints: – Adjust the position of the antennas for optimal reception. – Position the antennas as far away as possible from your TV, VCR or other radiation source to prevent any unwanted interference. B Connect the AC power cord to the power outlet. The standby LED on the main unit lights up. Helpful Hint: – Before making or changing any connections, make sure that all the devices are disconnected from the power outlet. 12 1_htr5205-98_EN.indd 12 2007-03-30 11:53:51 AM English Optional Connections Audio/ Video device AUDIO OUT S-VIDEO IN AUDIO OUT L SCART IN R VIDEO IN OR Option 1 AM/ Connecting audio from TV This connection enables you to hear the TV audio output from this unit. You will hear the sound of the TV output on all the speakers. Connect the supplied audio cable (red/ white) to the TV AUDIO IN sockets on this unit to the AUDIO OUT sockets on the TV. To hear the sound, press TV on the remote control as the sound source that you want to play. Connecting audio from an audio/video device This connection allows you to hear the audio output from a connected audio/ video device (e.g. DVD Player, Recorder VCR or Cable/Satellite Box). You only need to choose from one of the options below. Option 1: Using the analogue audio sockets Connect the supplied audio cable (red/ white) to the AUX AUDIO IN sockets on this unit to the AUDIO OUT sockets on the audio/video device. To hear the sound, press AUX on the remote control as the sound source that you want to play. 13 1_htr5205-98_EN.indd 13 2007-03-30 11:53:52 AM Optional Connections (continued) English Audio/Video device (Example only) Option 3 OR OR Option 2 Option 4 AM/ Option 2: Using the 6 Channel In sockets If your audio/video device supports 6-channel (multichannel) output. Connect the audio cables (not supplied) to the 6 CHANNEL IN sockets on the receiver to the corresponding audio output sockets on the audio/video device. To hear playback from the device, A Start playback on the connected audio/ video device. B Press DISC/DI on the remote control Option 3: Using the Coaxial In socket Connect the supplied coaxial cable to the COAXIAL IN socket on the receiver to the COAXIAL OUT socket on the audio/video device. To hear playback from the device, A Start playback on the connected audio/ video device. B Press DISC/DI on the remote control to select ‘COAX IN’ to activate the audio input source. repeatedly until ‘DISC 6CH’ appears on the display panel to activate the audio input source. Helpful Hint: – The audio signals produced through the 6 Channel are multi-channel surround sound. Switching to Stereo mode will not have any effect. 14 1_htr5205-98_EN.indd 14 2007-03-30 11:53:52 AM Optional Connections (continued) English Option 4: Using the Optical In socket Connect a fibre optic cable (not supplied) to the OPTICAL IN socket on the receiver to the OPTICAL OUTPUT socket on the audio/video device. To hear playback from the device, A Start playback on the connected audio/ video device. B Press DISC/DI on the remote control repeatedly until ‘OPTI IN’ appears on the display panel to activate the audio input source. 15 1_htr5205-98_EN.indd 15 2007-03-30 11:53:52 AM Getting Started English Step 1:Turning on the system Step 2: Setting the speakers Before you start... Make sure you have completed all the necessary connections before proceeding. You can adjust the delay times (centre and rear only) and volume level for individual speakers. These adjustments allow you to optimise the sound according to your surroundings and setup. Press the SOURCE button on the front panel repeatedly to select: DISC 6CH ¤ COAX IN ¤ OPTI IN ¤ MP3 MODE ¤ FM ¤ AM/MW ¤ AUX ¤ TV ¤ DISC 6CH.... OR Press DISC/DI, RADIO, TV, AUX or MP3 LINE-IN on the remote control. Press DISC/DI to toggle between to DISC 6CH, COAX IN or OPTI IN mode. Press RADIO to toggle between FM and AM/MW band. If the audio input on this unit is connected to your TV, press TV to hear the TVs sound output through this unit. Press AUX to switch to the external device that is connected to the AUDIO IN-AUX socket on this unit. Press MP3 LINE-IN to switch to the external device that is connected to the MP3 Line-In socket on the front panel. Before you start... Press SURROUND on the remote control to select Multi-channel surround mode before you adjust the speaker settings. Adjust the speaker delay times (Not available in STEREO mode) A Press STANDBY-ON (2) to turn on the unit. B Press and hold PROGRAM on the front panel for five seconds to access the system setup. To adjust the audio delay for the centre speaker Press . or > until ‘CENTER DELAY’ appears. Press PROGRAM on the front panel. Turn off to standby mode Press STANDBY-ON (2). The display screen turns off. Rotate the VOL control to change the delay time. Select from : 5ms, 3ms, 2ms, 1ms or OFF (default setting). To remain with the previous setting, do not rotate the VOL control in the next five seconds. 16 1_htr5205-98_EN.indd 16 2007-03-30 11:53:52 AM To adjust the audio delay for the rear speaker Press . or > until ‘REAR DELAY’ appears. Press PROGRAM on the front panel. Adjust the speaker trim level (Only available in DOLBY DIGITAL, DTS, PRO LOGIC, MOVIE, MUSIC modes) You can adjust the speakers trim level within the range of –10dB to +10dB. The default setting is 0dB. Rotate the VOL control to change the delay time. Select from : 15ms, 12ms, 9ms, 6ms, 3ms or OFF (default setting). A Press and hold PROGRAM on the front To remain with the previous setting, do not rotate the VOL control in the next five seconds. B Press . or > until ‘TEST TONE’ C To confirm your settings, press PROGRAM on the front panel. D To exit from the setup menu, press . or > to select ‘EXIT’. Helpful Hints: – Use longer delay time settings when the rear speakers are closer to the listener than the front speakers. – In DISC 6CH and RADIO mode, the SETUP MENU is not available. – In STEREO mode, when CENTER DELAY, REAR DELAY or TEST TONE is selected, the display panel will show “UNAVAILABLE FOR STEREO MODE.”. Press SURROUND button to select another surround mode. – AUTO PROGRAM is only available RADIO mode only. English Getting Started (continued) panel for five seconds to access the system setup. appears. C Press PROGRAM on the front panel. Each speaker will be tested automatically. Sound will output from each speaker for two seconds. To adjust the trim level, rotate the VOL control. D Once complete, press PROGRAM on the front panel. E To exit from the setup menu, press . or > to select ‘EXIT’. Helpful Hint: – To remain with the previous setting, do not rotate the VOL control whilst the individual speaker is tested. After two seconds, the next speaker will be tested, adjust the VOL control if necessary. Adjust the speaker output levels (Not available in STEREO mode) You can adjust the rear speakers, centre speaker and subwoofer output levels by comparing the sound from the front speakers. A In ‘DISC 6CH’ mode, press SPEAKER SELECT button on the remote control to view each individual channel trim value. B To adjust its level, press the VOL+buttons on the remote control. 17 1_htr5205-98_EN.indd 17 2007-03-30 11:53:52 AM Sound and Volume Controls English Before you start... Ensure the speakers and subwoofer are connected. See the chapter “Basic connections”. Selecting surround sound In ‘COAX IN’ or ‘OPTI IN’ mode, press SURROUND button to select: DOLBY DIGITAL / DTS or STEREO. (Available only if the audio signal received is in Dolby Digital or DTS). OR Press SURROUND button to select: MOVIE, MUSIC, PRO LOGIC or STEREO. The availability of the various surround sound modes depends on the sound available on the disc. The available output modes for Multi-channel include: Dolby Digital, DTS (Digital Theatre Systems) Surround, Dolby Pro Logic II and Dolby Pro Logic. Stereo broadcasts or recordings will produce some surround channel effects when played in a surround mode. Helpful Hints: – The surround sound feature is not available in DISC 6CH mode. – The centre and rear speakers operate only in multichannel surround mode. Selecting digital sound effects Select a preset digital sound effect that matches your disc’s content or that optimises the sound of the musical style you are playing. Press SOUND on the remote to select the available sound effect. When audio playback is in Dolby Digital, DTS, PRO LOGIC or MOVIE surround mode, you can select: CONCERT, ACTION, DRAMA, SCI–FI (default setting) or NIGHT. When audio playback is in MUSIC surround mode or in RADIO source, you can select: CLASSIC, ROCK, JAZZ, DIGITAL (default setting) or NIGHT. Helpful Hint: – For flat sound output, select CONCERT or CLASSIC. Adjusting the Bass/ Treble level The BASS (low tone) and TREBLE (high tone) features enable you to define the sound–processor settings. A Press BASS or TREBLE on the remote control. B Within two seconds, use the VOL+control to adjust the Bass or Treble level (–10dB ~ 10dB, default setting – 0dB). If the volume control is not used within two seconds, it will resume its normal volume control function. 18 1_htr5205-98_EN.indd 18 2007-03-30 11:53:52 AM Adjusting volume control Adjusting for ‘Lip Sync’ delays Press VOL +-on the remote control to increase or decrease the volume level. ‘VOL MIN’ is the minimum volume level and ‘VOL MAX’ is the maximum volume level. This feature allows you to adjust the audio delay times if the video playback is slower than the audio output streams (also known as ‘Lip-sync’). To correct ‘Lip-sync’ error caused by the delayed video, delay audio output time by an equal amount. To listen through the headphones Plug the headphones to the PHONE socket on the front of the receiver. The speakers will be muted. The current surround sound will change to stereo mode. To restore playback through the speakers, unplug the headphones. To turn off the volume temporarily Press MUTE on the remote. Playback will continue without sound and ‘MUTE ON’ appears on display panel. To restore the volume, press MUTE again or increase the volume level. English Sound and Volume Controls (continued) A Press AUDIO SYNC on the remote control. B Within five seconds, use the VOL+to set the audio output delay times (0 ~ 200 ms). If the volume control is not used within five seconds, it will resume its normal volume control function. 19 1_htr5205-98_EN.indd 19 2007-03-30 11:53:53 AM Playback - Other Audio Player English Playing from another portable audio player When you connect your portable audio player to this unit to get the best immersion sound experience through the speaker system. However, controlling of playback is only possible on the portable audio player. A Connect the MP3 LINE-IN socket on this receiver with the supplied MP3 Linein cable to the ‘headphone’ output socket on your portable audio player. B Press MP3 LINE-IN on the remote control. C Start playback on your portable audio player. The music will be heard through the speakers. D To stop playback, press the STOP button on the portable audio player. Helpful Hint: – If you change the input source by pressing any of the source buttons (e.g. DISC/DI, RADIO) press the STOP button on the portable audio player to stop its playback. 20 1_htr5205-98_EN.indd 20 2007-03-30 11:53:53 AM Before you start... Please make sure the FM and AM/MW antennas are connected. Tuning to radio stations A Press SOURCE repeatedly until ‘FM’ or ‘AM/MW’ appears on the display panel. (or press RADIO on the remote control). B Press W or X on the remote control to start tuning. The display panel will show ‘SEARCH’ change until a radio station with sufficient signal strength is found. C Repeat step B if necessary until you find the desired radio station D To fine-tune the reception of a weak station, press S or T briefly and repeatedly until an optimal reception is found. Changing tuning grid (only applicable for certain regions) In some countries, the frequency step between adjacent channels in the (AM/MW)/ FM band is 9 kHz/ 50 kHz (10 kHz/100 kHz in some areas). Note: Changing the tuning grid erases all previously stored preset radio stations. A Press SOURCE repeatedly until ‘FM’ or ‘AM/MW’ appears B Press and hold u until ‘GRID 9’ or Presetting radio stations You can store up to 40 preset radio stations in the memory. There are three different ways to program the radio stations: – Using auto install (for first time setup only) – Using automatic preset – Using manual preset English Tuner Operations Helpful Hint: – If no stereo signal is detected or less than 5 (five) stations are detected during radio installation, ‘PLEASE CHECK ANT’ appears. Using auto install When you access the ‘RADIO’ mode for the first time, you will be prompted to install the radio stations. With this feature, you can install all the available radio station automatically with one touch of button. A Press RADIO on the remote control ‘AUTO INSTALL ... PRESS PLAY’ appears. B Press u until ‘START... SEARCH’ appears on the display panel. The system will start searching from the FM band followed by the AM/MW band. All available radio stations with strong signal will be stored. Once complete, the first tuned radio station will be played back. To stop the tuner installation, press STOPÇ on the remote control. ‘GRID 10’ appears. 21 1_htr5205-98_EN.indd 21 2007-03-30 11:53:53 AM Tuner Operations (continued) English Using automatic preset Use automatic presetting to store or reinstall all the preset radio stations. A Press RADIO to select ‘FM’ or ‘AM/MW’ band. B Press and hold PROGRAM until ‘START...SEARCH’ appears on the display panel. All previously stored radio stations will be replaced. Once 40 radio stations presets have been stored, searching will stop. The first tuned radio station will be played back. Using manual preset Use manual presetting to store your favourite radio stations. A Tune to your desired radio station (see “Tuning to radio stations”). B Press PROGRAM on the remote control C Use PREVí or NEXTë keys to select a preset number that you want to store the current radio station. OR Use the numeric keypad 0-9 to enter the preferred preset number. Selecting a preset radio station A Press RADIO to select ‘FM’ or ‘AM/ MW’ band. B Use PREVí or NEXTë keys to select a preset radio station (or use the numeric keypad on the remote control). The preset number and radio frequency appear on the display panel. Deleting a preset radio station A In radio mode, use PREVí or NEXTë keys to select a preset radio station. OR Use the numeric keypad 0-9 to enter the preferred preset number. B Press and hold STOP x until ‘DELETED’ appears. The radio station is deleted from the preset list. The next preset radio station will play. D Press PROGRAM to store. 22 1_htr5205-98_EN.indd 22 2007-03-30 11:53:53 AM English Other Features Setting the Sleep Timer The sleep timer enables the system to switch to standby mode automatically at a preset time. Press SLEEP on the remote repeatedly until it reaches the desired preset turn– off time. The selections are as follows (time in minutes): OFF 120 90 60 45 30 15 OFF To check or change the setting Press SLEEP once to show the remaining time before switching off. If you continue to press the SLEEP button, the next Sleep Timer option will appear. To cancel the sleep timer Press SLEEP repeatedly until ‘OFF’ appears or press the STANDBY ON button. 23 1_htr5205-98_EN.indd 23 2007-03-30 11:53:53 AM Specifications English • • • • • • • • AMPLIFIER FRONT AND REAR SPEAKERS Total MAX Output Power Home Theater Mode: 600W Front :75 W x 2 / Channel Centre :150 W / Channel Surround :75 W x 2 / Channel Subwoofer :150 W / Channel Frequency Response: 150 Hz –18 kHz / ±3 dB Signal–to–Noise Ratio:> 60 dB (A–weighted) Input Sensitivity: – TV In: 500 mV – AUX In: 500 mV System Full range satellite Impedance: 4Ω Speaker drivers: 3” full–range speaker, Frequency response:150 Hz – 20 kHz Dimensions :95.6 x 198.3 x 75 mm (w x h x d) Weight :0.675 kg /each • • • • • CENTRE SPEAKER • • RADIO • Tuning Range • Sensitivity: • • Signal–to–Noise Ratio :FM 55 dB, AM/MW 40 dB Harmonic Distortion :FM Mono 3% FM Stereo 3% AM/MW 5% Frequency Response: FM 180 Hz – 9 kHz / ±6 dB Stereo Threshold: FM 23.5dB • Power Supply Rating • • :FM 87.5 –108 MHz (50 kHz) AM/MW 531 –1602 kHz (9 kHz) 26 dB Quieting FM 22 dBf, AM/MW 5000 μV/m • • • System Full range satellite Impedance: 8Ω Speaker drivers: 2 x 2.5” woofer, 1 x 2” tweeter Frequency response:150Hz – 20 kHz Dimensions : 435 x 93.5 x 67 mm (w x h x d) Weight :1.45 kg PASSIVE SUBWOOFER • • • • • Frequency response:40 Hz – 150 Hz Impedance :8 Ω Subwoofer driver:8” sub–woofer, Dimensions :159.5 x 355.5 x 370 mm (w x h x d) Weight :4.712kg Specifications subject to change without prior notice. MAIN UNIT • • • • :110 – 127 V/ 220 – 240 V; 50/60 Hz Power Consumption : 100 W Standby Power Consumption: < 1 W Dimensions :435 x 56 x 325 mm (w x h x d) Weight :3.2kg 24 1_htr5205-98_EN.indd 24 2007-03-30 11:53:53 AM WARNING Under no circumstances should you try to repair the system yourself, as this will invalidate the warranty. Never open the system as there is a risk of electric shock. If a fault occurs, first check the points listed below before taking the system for repair. If you are unable to solve a problem by following these instructions, consult your dealer or Philips for help. Problem (General) English Troubleshooting Solution No power. – Press STANDBY-ON on the unit to turn on the power. – Make sure the mains cord is properly connected and the AC outlet has power. No sound or distorted sound. – Adjust the volume. – Check the speaker connections and settings. – Make sure that the audio cables are connected and press SOURCE to select the correct input source (for example, TV or AUX) to choose the device that you want to hear through this unit. No surround sound effect from the speakers. – Press VOL +- to adjust the volume level. – Make sure the centre and rear speakers are connected correctly. – Press SURROUND button to select a correct surround sound setting. – Make sure the source you are playing is recorded or broadcast in surround sound (DTS, Dolby Digital, etc.). Radio reception is poor. – If the signal is too weak, adjust the antenna or connect an external antenna for better reception. – Increase the distance between this unit and your TV or VCR. – Tune in to the correct frequency. – Place the antenna further away from any equipment that may be causing the interference. The remote control does not function properly. – Select the source you want to play (for example, DISC/DI or RADIO) before pressing the function button [W(.) / X (>)]. – Reduce the distance between the remote control and this unit. – Batteries are weak, replace the batteries. – Point the remote control directly toward the IR sensor. – Check that the batteries are inserted correctly. Low hum or buzz sound – Place the receiver as far away from any electrical devices that may be causing the interference. 25 1_htr5205-98_EN.indd 25 2007-03-30 11:53:53 AM Glossary English Analogue: Sound that has not been switched into numbers. Analogue sound varies, while digital sound has specific numerical values. These sockets send audio through two channels, the left and right. AUDIO OUT sockets: Red and white sockets on the back of the unit that send audio to another system (TV, Stereo, etc.). Dolby Digital: A surround sound system developed by Dolby Laboratories containing up to six channels of digital audio (front left and right, surround left and right, centre and subwoofer). Dolby Surround Pro Logic II: It is an improved matrix decoding technology that provides better spatiality and directionality on Dolby Surround program material, provides a convincing three dimensional sound field on conventional stereo music recordings and is ideally suited to bring the surround experience to automotive sound. While conventional surround programming is fully compatible with Dolby Surround Pro Logic II decoders, soundtracks will be able to be encoded specifically to take full advantage of Pro Logic II playback, including separate left and right surround channels. (Such material is also compatible with conventional Pro Logic decoders.) MP3: A file format with a sound data compression system. “MP3” is the abbreviation of Motion Picture Experts Group 1 (or MPEG-1) Audio Layer3. By using the MP3 format, one CD-R or CD-RW can contain about 10 times more data than a regular CD. Multi-channel: DVDs are formatted to have each sound track constitute one sound field. Multi-channel refers to a structure of sound tracks having three or more channels. Super Audio CD (SACD): This audio format is based upon the current CD standards but includes a greater amount of information that provides higher quality sound. There are three types of discs: single layer, double layer and hybrid discs. The hybrid disc contains both standard audio CD and Super Audio CD information. Surround: A system for creating realistic three dimensional sound fields full of realism by arranging multiple speakers around the listener. DTS: Digital Theater Systems. This is a surround sound system, but it is different from the Dolby Digital. The formats were developed by different companies. 26 1_htr5205-98_EN.indd 26 2007-03-30 11:53:53 AM 27 1_htr5205-98_EN.indd 27 2007-03-30 11:53:53 AM