1
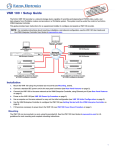
VN-Matrix® 325 Codecs • Setup Guide
The Extron VN-Matrix 325 encoders/decoders (codecs) distribute digital SD, HD-SDI, or 3G-SDI
video using the Extron PURE3® codec. Video signals that are connected to a VNC 325 device
configured as an encoder are compressed into a TCP or RTP data stream for transport across a
local area or wide area network. At the far end of the network, one or more VNC 325 codecs
configured as decoders convert the compressed stream back
IP address: 192.168.0.101
into the original video signal format.
Subnet mask: 255.255.255.
255.255.255.0
.0
NOTE: For full installation, configuration, and operation
details, see the VN-Matrix 325 User Guide, available
at www.extron.com.
Connections
NOTES:• See “Initial Setup — Before You Connect to a
Network,” step 2 for the RS-232 protocol for the
Remote port (a).
• The protocol for the RS-232 Over LAN port (b) is
configurable and beyond the scope of this guide.
LAN-1
LAN-2
STATUS
ALARM
IP addre
address:
ess: 192.168.0.102
Subnet m
mask: 255.255.255.0
LAN-1
LAN-2
STATUS
ALARM
TEST
TEST
VN-MATRIX
ATRIX 325 SERIES
VN-MATRIX 325 SERIES
SERIAL
AL DIGITAL VIDEO OVER IP
SERIAL DIGITAL VIDEO OVER IP
Controller
IP address: 192.168.0.103
Subnet mask: 255.255.255.0
LAN-1
LAN-2
STATUS
ALARM
IP addre
ess: 192.168.0.104
address:
Subnet mask: 255.255.255.0
LAN-1
LAN-2
STATUS
ALARM
TEST
TEST
VN-MATRIX
ATRIX 325 SERIES
VN-MATRIX 325 SERIES
SERIAL
L DIGITAL VIDEO OVER IP
SERIAL DIGITAL VIDEO OVER IP
Figure 1. Typical VN-Matrix 325 Application
1
REMOTE
Connections — Either Configuration
NOTE: The VNC 325 products use male connectors for
ports a and b. You may need an adapter.
a Remote 1 port — Use this male 9-pin port to configure
the connected VN-Matrix 325 unit only.
2
POWER
12V DC
3A MAX
5
RS-232
OVER LAN
OPTICAL
1
3
LAN
SDI
IN
SDI
OUT
2
4
7
6
8
Figure 2. VN-Matrix Connections
b RS-232 Over LAN port — Use this male 9-pin port to transmit and receive data across a network.
NOTE: Do NOT connect VN-Matrix units to an existing network until each is correctly configured. Incorrect configuration may
cause disruption to other network users. See “Initial Setup — Before You Connect to a Network“ to configure the units.
c LAN port 1 (RJ-45 port) — Use either this port or the fiber optic network port (d) to stream video and audio data across a
network, to control the VN-Matrix system, or both.
d LAN port 2 (fiber optic port) — Use either this port or the RJ-45 network port (c) to stream video and audio data across a
network, to control the VN-Matrix system, or both.
NOTE: Extron does not supply the the plug-in SFP module for the optical Network port.
e Power Connector — Connect the included 12 V power supply between this connector
and a 100 VAC/240 VAC, 50-60 Hz source.
3
Network
REMOTE
Video Connections — Encoder Configuration
f SDI In BNC connector — Connect a digital video input for encoding and streaming to
POWER
12V DC
3A MAX
RS-232
OVER LAN
OPTICAL
1
LAN
SDI
IN
SDI
OUT
2
Encoder Configuration
6
8
one or more decoders.
g Out BNC connector (optional) — This connector provides a loop through of the original source
with or without an optional text overlay.
h Loop BNC connector (optional) — This connector provides a buffered loop through of the
Camera
Monitor
original source.
Video Connections — Decoder Configuration
f SDI In BNC connector (optional) — If desired, connect a digital genlock signal to synchronize
the decoder to a genlock signal.
g SDI Out BNC connector — Connect a digital video display to receive the streamed digital video
Network
3
REMOTE
POWER
12V DC
3A MAX
1
LAN
SDI
OUT
2
Decoder Configuration 7
output. When no video streams are being decoded, this output can provide either a frozen
image of the last received frame or a splash screen that masks the output.
h Loop BNC connector — Not used.
RS-232
OVER LAN
OPTICAL
Monitor
SDI
IN
Decoded
Video
VN-Matrix 325 Codecs • Setup Guide (Continued)
Initial Setup — Before You Connect to a Network
NOTE: You need to manually assign a known IP address for the controller into each VN-Matrix 325 unit. Extron recommends that
you use a static IP address scheme rather than DHCP.
Before connecting each VN-Matrix 325 unit to the network (connectors c and d), change the network settings of the units.
zz
zz
For an open network, contact the system administrator for a range of IP addresses.
For a network dedicated exclusively to the VN-Matrix 325 (preferred), Extron recommends that you use addresses in the range
of 192.168.0.1 through 192.168.0.254, with a subnet mask (netmask) of 255.255.255.0.
One VN-Matrix unit must be designated as a controller. All normal system configuration and control is via the network interface for
which the controller functions as a network server. The controller can be any unit in the system, whether configured as an encoder
or decoder. In figure 1 on page 1, the VN-Matrix 325 unit at 192.168.0.101 is designated as the controller. Each VN-Matrix 325 device
in the system should be set to recognize the IP address of the device controller.
Change the network settings for all units as follows:
1. Connect a PC to the Remote port (a) on the unit to be set.
2. To initiate communication between the computer and the VN-Matrix 325 unit, run HyperTerminal or DataViewer from the PC.
Set the communications settings as follows:
Baud rate:115200
Stop bits:1
Data bits:8
Flow control:None
Parity:None
3. Connect the power supply to the VN-Matrix 325 unit (e). When the boot up is completed, a message similar to as shown below
appears:
eth1: IBM EMAC: link up, Unknown speed/duplex.
eth1: IBM EMAC: MAC 00:e0:aa:11:00:38.
4. Press <Enter>. The connected unit responds with the prompt login:.
5. Type the default login config and press <Enter>. The connected unit responds with the prompt password:.
6. Type the default password config and press <Enter>. The connected unit downloads the configuration menu.
LAN Port 1 (RJ-45 Port, 3 )
0.
1.
2.
3.
4.
5.
6.
7.
8.
9.
LAN Port 2 (Optical Port, 4 )
Network Port 1
Network Port 2
==============
==============
Speed/Duplex: auto_10_100_1000
Boot method: static [dhcp]
address:
192.168.0.104
netmask:
255.255.255.0
gateway:
broadcast:
mtu:
1500
controller ip:
192.168.0.101
controller port: 5432
Exit
10.
11.
12.
13.
14.
15.
16.
17.
18.
Speed/Duplex: fibre_fixed_1000F
Boot method:
static [dhcp]
address:
192.168.1.2
netmask:
255.255.255.0
gateway:
broadcast:
192.168.1.255
mtu:
1500
ip forwarding: 0
webserver port: 80
Please select an option:
NOTE: Many menu selections are not available if DHCP is selected. Select 1 or 11 to toggle DHCP on and off.
7. Change the settings as needed as follows:
NOTES: • Do not include leading zeros when typing IP addresses. For example, type 192.168.0.104; do not type 192.168.000.104.
• Settings that you may need to change are:
�
Address (selection 2 or 12)
�
Netmask (selection 3 or 13)
�
Controller IP (selection 7)
a. Type the option number and <Enter>.
b. Type the new setting and <Enter>.
c. Once all the changes have been made, type 9 and <Enter> to save the settings and exit the menu.
8. Repeat steps 1 through 7 for each VN-Matrix 325 unit in the system.
2
Initial Setup — After You Connect to a Network
After the low-level configuration described on page 2, system configuration and operation is via the network interface of the unit
designated as the controller. Built-in HTML pages, which can be viewed by any web browser, such as Mozilla® Firefox®, version 1.3 or
newer (preferred), or Microsoft® Internet Explorer®, version 6.0 or newer, provide access to various system parameters.
NOTE: Whichever browser you use, it must be configured to accept cookies and be JavaScript-enabled.
Startup and Login
1. After you have made all network connections, cycle power on each VN-Matrix 325 unit to ensure that the other network
components, such as hubs and switches recognize the power up of the units and begin exchanging data with them.
2. Connect a computer to the same network as the VN-Matix 325 device that is configured as the controller.
NOTE: The computer must be on the same subnet as the VN-Matrix 325 units
3. In the web browser, enter the IP address of the VN-Matrix 325 unit that is configured as the
controller into the address bar of the web browser (c in the figure at right).
3
4. Press <Enter>. The login screen appears.
|
5
5. Enter the Username and Password (e in the figure at right).
NOTES:• The VN-Matrix 325 devices have two user accounts (usernames):
zz
zz
6
admin — allows full read/write access to all setup parameters,
public — allows read-only access to setup parameters.
• As shipped from the factory, the password for both accounts is the same as the user name (the password is
“admin” for the admin user account and “public” for the public account).
• The username and password are case sensitive.
• For the initial setup, use the admin username.
6. Click the Login button (f, above right) or press <Enter>. The VN-Matrix 325 web page opens to the Device List tab, shown
below. This page lists all VN-Matrix devices that are connected to the system controller.
Encoded Video and Control
Configure the Units as Encoders or Decoders
A typical VN-Matrix 325 network includes an encoder
(source), a decoder (display), and a controlling PC.
The Mode column on the Device List tab shows how
each VN-Matrix 325 unit is configured using the
following icons:
= Encoder
= Recorder
= Decoder
= Undefined
Network
REMOTE
POWER
12V DC
3A MAX
Encoded Video
RS-232
OVER LAN
OPTICAL
1
LAN
2
SDI
OUT
SDI
IN
REMOTE
POWER
12V DC
3A MAX
Encoder Configuration
RS-232
OVER LAN
OPTICAL
1
LAN
2
Decoder Configuration
SDI
OUT
SDI
IN
Decoded
Video
Optionall
L
Locall
Monitor
NOTES:• The VNM Recorder is not documented
Camera
Control and
in this guide. Inclusion in this list is for
Monitor
Monitoring
reference only.
• The device list may show more devices than are in your system. This is because the controller maintains a list of devices
that have been used in the past and are not currently available. In this case, the IP address entry for that device is blank.
3
VN-Matrix 325 Codecs • Setup Guide (Continued)
Configure the devices as encoders or decoders as follows.
1. On the Device List tab, click anywhere on the row (except the Delete column) for the device to be configured (a in the image
below). This selects that device and displays the device page.
1
2. In the Device Setup box, click the Data Interface drop-down box and
select either Cat6 (network port 1, item c on page 1) or SFP/Fibre
(network port 2, item d on page 1) as the cable to output or receive the
video signal (b on the figure at right).
3
3. In the Device Setup box, click the create source button to configure
the device as an encoder (c in the figure at right). Proceed to step 6.
— or —
In the Device Setup box, click the create display button to configure
the device as a decoder (c in the figure at right). A display icon
(
) appears in the Configuration box. Proceed to step 4.
2
NOTE: If a device is already configured, the device type is identified
and the only button available is change device type.
Click the button to display the create source and create
display buttons, and then perform step 3.
If the device reports “Device is streaming data”, log on to
all decoders that are connected to this encoder, one at at time, and
clear the connection (click Please select a source on the
display page (see the figure below step 4, below).
4. For a decoder, click the display icon (
) that is in the configuration box after you have created a display in step 3 (c in
the figure above right). The source configuration screen appears (below).
5
5. Click the Video Source drop-down box and then select the video source (e in the figure above).
NOTE:Choose rtp for unicast RTP streaming or tcp for unicast TCP streaming. See the VN-Matrix 325 User Guide for more
information about these data transport methods.
6. Click the Save All button to save the configuration changes.
Front Panel Indications
zz
Power ( ) LED — Lights green when receiving power. The LED flashes green when an over temperature, overload, or
underload condition occurs — cycle the power on and off to reset the unit.
zz
LAN-1 and LAN-2 LEDs — Light or flash when the associated Ethernet connection is active.
zz
Status LED — Lights when video is present but encoder is not streaming it. The unit may also be disabled or in standby
mode. The LED flashes when the unit is streaming or receiving video.
zz
Alarm LED — Lights when a user-defined critical alarm has occurred. (See the VN-Matrix 325 User Guide to set critical alarms).
Extron Headquarters
+1.800.633.9876 (Inside USA/Canada Only)
Extron USA - West
Extron USA - East
+1.714.491.1500+1.919.863.1794
+1.714.491.1517 FAX
+1.919.863.1797 FAX
4
Extron Europe
+800.3987.6673
(Inside Europe Only)
+31.33.453.4040
+31.33.453.4050 FAX
Extron Asia
+800.7339.8766
(Inside Asia Only)
+65.6383.4400
+65.6383.4664 FAX
Extron Japan
+81.3.3511.7655
+81.3.3511.7656 FAX
Extron China
+4000.398766
Inside China Only
+86.21.3760.1568
+86.21.3760.1566 FAX
© 2011 Extron Electronics All rights reserved.
Extron Middle East
+971.4.2991800
+971.4.2991880 FAX
www.extron.com
Extron Korea
+82.2.3444.1571
+82.2.3444.1575 FAX
LAN-1
LAN-2
STATUS
ALARM
Extron India
1800.3070.3777
Inside India Only
+91-80-3055.3777
+91 80 3055 3737 FAX
68-2122-50 Rev. A 12 11