1
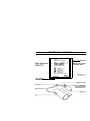
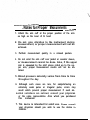
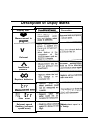
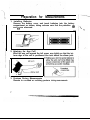
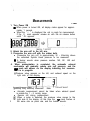
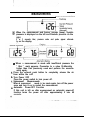
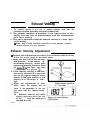
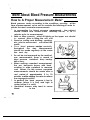
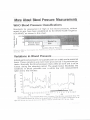
-
Instruction Manual
Table of Contents
Identification of Parts . . . . . . .. . . . . . . . . . . . . . . . . . . . . . . . . . . . . . . . . . . . . . . . . . . . . . . 1
Notes for Proper Measurements . . . . . . . . . . . 3
Description of Display Marks . . . . . . . . . . . . . . . . . . . . . . . . . . . . . . . . . . . . . . . . . . . . . . . . . . . . . . . .5. . . . . . . .
Preparation for Measurements ,............................................................ 7
Measurements . .. . . . . . . . . . . . . . . . . . . . . . . . . . . .. . . . . . 19, 11
Exhaust Velocity . . . . . . . . . . . . . . . . . . . . . . . . . . . . . . . . . . . . . . . . . . . . . . . . . . 13
More about Blood Pressure Measurements . . . . . . . . . . . . . . . . . . . . . . . . . . . .15,17,19
Precautions . . . . . . . . . . . . . . . . . . . . . . . . . . . . . . . . . . . . . . . . . . . . . . . . . . . . . . . . . .. . . . . . . . 21
Specifications . ..
.
.
.
.
.
.
.
.
.
. 21
Identification of Parts
--._--.-..--
. Notes for Proper Measurements____
1. Attach the arm cuff at the proper position of the arm
as high as the level of th heart.
2. Do not. give vibration to the instrument during
measurement, or proper measurement will not be
achieved.
3. Perform measurement quietly in a relaxed posture.
4 . Do not wind the arm cuff over jacket or sweater sleeve,
or measurement cannot be done. Also, if the upper
arm is squeezed by the shirt sleeve rolled up to the upper arm, proper measurement results will not be obtained.
5. Blood pressure naturally varies from time to time
throughout the day.
6. Although such cases are rare, for subjectshaving an
extremely weak pulse or irregular pulse, errors may
result which prevent proper measurement. If such abnormal variations are noticed, consult your physician
or the sales representative -from which you purchased
this instrument.
7. This device is intended for adult use. Please consult
your physician should you wish to use the device On
children.
3
Description of Display Marks
Display mark
Corrective action
v
Measurement in
V
Exhaust
A
Insufficient
pressure
#
Replace batteries
PUL Err
Pulse
error
Exhaust speed
flashing (exhaust
speed error)
Adjust exhaust speed to 2
to 5mmHg/s
Preparation for Measurements
I
1. Installing Batteries
Remove the battery cover and insert batteries into the battery
compartment as shown, taking extreme care that the polarities @
and 8 are observed.
2. Attaching the Arm Cuff
Wind the arm cuff around the left upper arm tightly so that the bottom edge of the cuff is positioned one inch above the elbow joint.
3. Postures During Measurements
Remain in a seated or reclining posture during measurements.
7
Measurements
1. Turn Power ON
0 When power is turned ON, all display marks appear for approximately 1 second.
l When the " 0 " is displayed the unit is ready for measurement.
If the V mark appears, release air with the air release button
until " 0 : appears.
2. Attach the arm cuff to the left arm.
3. Pressurize the arm cuff with the rubber bulb.
l Pressurize the arm cuff to approximately 30 - 40mmHg above
the estimated Systolic blood pressure to be measured.
0 A buzzer sounds when pressure reaches 160, 200 240 and
280mmHg.
4. When pressurization is completed, the automatic exhaust
mechanism will gradually reduce arm cuff pressure, and the
- mark wilt appear on the display indicating that measurement is in progress.
@Pressure value appears on the left, and exhaust speed on the
right side of the display.
-7
(gradually being reduced) Measurement Mark
l Accurate measurement cannot be taken when exhaust speed
is outside the 1 - 5 mmHg range.
l Remain still during measurement.
@ When a pulse is detected, the pressure value moves to the
right side of the display. At this time the *, mark flashes at
9
the same rate as pulse rate, and the buzzer sounds.
. .
Measurements
-_--11
@ When the measurement and buzzer sounds (beep), Systolic
pressure is displayed on the left and Diastolic pressure on the
right.
2 or 3 seconds later, pressure value and pulse appear alternately on the display.
Flashing
0 When a measurement is made with insufficient pressure the
" Err " mark appears. Pressurize to a value 30-40mmHg
higher than that previously used and perform the measurement again.
Press tbe exhaust push button to completely release the air
from within the cuff.
Turn Power OFF
Press the power switch to turn power off.
Subsequent
Measurements
When a measurement
needs to be made again, turn off the power
once and turn it on to restart the measurement.
Automatic Power-OFF Funciion
If this unit is left on after measurement an automatic power-off
function turns the power off after approximately 2 min. 40
seconds.
Exhaust Velocity
1. The exhaust velocity is the rate of gradual pressure drop from the
pressure applied manually using the rubber bulb.
2. The exhaust condition is displayed in the right portion of the
display from the time of pressurization until the measurement
mark starts flashing.
3. This unit is adjusted so that the exhaust velocity is l -5mm Hg/s
at 150 mmHg.
0 Note that if this exhaust velocity is not proper, correct
measurements are not possible.
Exhaust Velocity Adjustment
0 Perform this adjustment procedure if the exhaust velocity is not
within the proper range as described above.
1. Apply the arm cuff to the left arm
and pressurize to the pressure approximately 60mmHg above your
suspected systolic pressure. Hold
the area@in the figure, and insert
a screwdriver into groove 61
2. If the exhaust velocity is too fast,
turn to the left and if it is too slow,
turn to the right so that the value
shown in the right portion of the
display is in the range 2 5mmHg/s.
When the adjustment is completed, reduce the pressure and recheck. If the adjustment is not proper after one try, repeat several
times.
l Exhaust velocity will differ
slightly depending upon the size
of the arm and the method of
windlng the cuff.
More About Blood Pressure Measurements
How Is A Proper Measurement Made?
Blood pressure varies according to the conditions prevailing at the
time of measurement, so be sure to consider the following in order to
obtain the most accurate measurements.
1 . In preparation for blood pressure measurement, the subject
should urinate and should remain relatively stilt for 10 to 15
minutes prior to measurement.
2 . Shirts or other garments which fit tightly on the upper arm should
b e removed prior to fitting the arm cuff
3 . Exercise, eating and drinking, smoking,
etc., prior to measurement can affect the
results.
4 . T h e blood pressure var ies constantly
throughout the day. Measurement
should be made regularly at the same
time each day.
5 . Do not be too impressed by the results of
one measurement. Keep a record of
blood pressure variations. Many readings
tell a story.
6 . When making repeated measurement,
the arm becomes heavy with blood,
resulting in wide variations in measure
ment values. For this reason, repeated
measurements should be made after a
rest period of approximately 5 t o 1 0
minutes or af ter raising the arm to relieve
the engorged condition.
7 . In general, the blood pressure is low in
summer (when it is hot) and high in
winter (when it is cold).
6 . Emotional stresses may tend to cause
blood pressure to rise.
More About Blood Pressure Measurements
What is Blood Pressure?
The blood pressure will reach its highest levels in the large arteries
near the heart and drop off toward the peripheral areas of the circulatory system.
The blood pressure varies in accordance with the beating of the
heart, and when the heart contracts, squeezing the blood out, the
pressure inside the blood vessels is said to be systolic, and when the
heart expands, sucking the blood back in, the pressure of the blood
inside the blood vessels is said to be diastolic.
Hypertension, which is most common among adults and the old, if
left unattended, can cause many health problems including stroke,
heart attack, etc. It is therefore necessary to control the blood
pressure to prevent it from becoming high, by reducing salt, dietary
regimens, and by controlling thesubject’s activities. Even people who
are born with high blood pressure can prevent the progress of high
blood pressure by means of adequate control.
Why Is It a Good Thing to Measure
Blood Pressure at Home?
Having one’s blood pressure measured by a doctor in a hospital or a
clinic, and group health checks, tend to stimulate nervousness
in the
subject and may even create sufferers of high blood pressure. Also
blood pressures varies in accordance with a variety of conditions, and
so judgement is not possible on the basis of a single measurement.
The blood pressure measured first thing in the morning after getting up, before taking any food, and with the subject still, is known as
the fundamental blood pressure. In practice it is rather difficult to
record the fundamental blood pressure, but to come as near as possible to measuring the blood pressure in an environment that is close
to this, it is useful to be able to take the measurement at home.
Further, you could carry out your own blood pressure control with
your own blood pressure monitor at home to take blood pressure
readings on a regular basis.
17
__~~_..
Precautions
1. This instrument is constructed of precision components, and should not be sub.
jected to extremes in temperature,
humidity, direct sunlight, shock or dust.
2. Use a dry, soft cloth to clean the instrument Do not use the thinner, alcohol,
benzene, or wet dusters for the cleaning.
3. Avoid tightly folding the cuff or storing the hose in the folded
stage for long periods, as such treatment may shorten the life of
the components.
Specifications
Model
Type
Display
Measurement range
7620
Accuracy
Pressurization
Depressurization
Deflation
Power Sources
Battery life
Operating environment
Storage
environment
Dimensions
Weight
Origin:
Release Exhaust Value System
Manual push button
Type AA batteries (4)
Approx. 2 years with 3 mm usage per day
+ 10x - + 4o(o”c. less than 85% RH
- 2o*c - + .55OC, less than 05% RH
t44Cwx 7Wb 3qH)mrn
APProx 200g
Made in Japan for Hanson Scale Company Division of Sunbeam Carp Highway
45 North Shubuta, MS 39360
F U L L ONE YEAR W A R R A N T Y
This product is warranted for one year from the date of purchase
against defects in material and workmanship. If the product fails to
operate during this period, return it prepaid to Hanson Scale Service
Center 117 Central Industrial Row, Purvis, MS 39475,for repair or replace.
ment without charge at the manufacturer’s option. This warranty
gives you specific legal rights, and you may have other rights which
vary. from state to state.
warrantor.
Hanson Scale Company
Division of Sunbeam Corporation, Purvis,MS 39475
If purchased in Canada, Return prepaid to:
Sunbeam Corporation (Canada) Limited.
1040 Islington Avenue
Toronto. Ontario M8Z 4R5
A Member Company of Allegherry International
Made in Japan.
CUSTOMER
SERVICE HELP L I N E
We want to be sure you are completely satisfied with your new purchase. If you have any questions or experience any problems, please
call our toll free help line.
In U.S.A. only: phone: 1-800-621-8854
between 8 : 0 0 a.m.- 12 p.m. and
1:00 p.m. - 4:00 p.m. Central Standard Time, Monday through Friday.
In CANADA only: phone 1-800-268-2743 (112-800-268-2743 in B.C. only)
between 8:30 a.m. 12:30 p.m. and 1:30 p.m. - 4:30 p.m. (Monday
through Thursday) or 8:30 a.m. 12:00 p.m. (Friday) Eastern Standard
Time.
We will give you prompt assistance in resolving only questions or
problems. It is very important that you follow the instructions then.
CALL BEFORE R ETURNING
URNING THE PRODUCT FOR REPAIR.
Notes/Notas
31