1
Important Notices
The Syspine A50 Plus Phone System offers many features, including the ability
to manage individual user preferences. Users should understand how various
issues affect privacy and the security of the phone system.
This section describes basic information to consider before using the
Syspine A50 Plus Phone System. All recommendations are based on a general
configuration of the phone system. However, every small business is unique.
Evaluate the specific configurations of the office setup when using the
Syspine A50 Plus Phone System. Use discretion when following the guidelines
discussed in these topics.
Emergency Considerations
•
Power, network, or telephone service outages: If there is an outage, disruption, or other degradation of the power, network, or telephone services
at your location, Syspine A50 Plus will not work.
•
How to dial an emergency number: Please inform all of your employees,
visitors, and Syspine A50 Plus users that they need to dial the 9 plus the
emergency number to access emergency service:
Region
Emergency
Numbers
Australia
000
Canada
911
New Zealand
111
Singapore
South Africa
995, 999
10111, 10177, 112
United Kingdom 112, 999
United States
•
911
Maintain an alternative means of calling emergency services: You
should maintain a backup means of calling emergency services (for example, by using a phone plugged into a standard telephone line or a mobile
phone) in case of a power failure, telephone service outage, or other problem that may inhibit you from using Syspine A50 Plus.
•
Calling emergency services using a VoIP service provider: Please note
that not all VoIP service providers enable users to call emergency services.
Such requirements vary by country. If you have questions about this capability, please contact your VoIP service provider.
•
811 feature: By dialing 811 on the Syspine A50 Plus Phone System, you
can call back the last phone that was used to dial an emergency number.
This information will be stored for only 24-48 hours after an emergency
number is dialed.
NOTE: This feature may not work if the phone has not been registered with the
Syspine A50 Plus Phone System by your phone system administrator.
•
Emergency-number location obligations that may apply to certain
owners of Syspine A50 Plus: Your telephone company or voice/VoIP service provider may be required under applicable law to provide a telephone
number and address associated with that telephone number to emergency
services when a caller dials an emergency number. Further, certain countries' laws may require the owner/operator of a multi-line telephone system
(MLTS), such as Syspine A50 Plus, to provide emergency services with the
physical location/address of the phone that was used to call an emergency
number, in addition to the caller's telephone number. In such cases, compliance with such MLTS laws is your responsibility. Please note that Syspine
A50 Plus does not provide to emergency services with the physical location/address of a phone that is used to call an emergency number.
Privacy Considerations
The following information describes privacy issues related to the Syspine A50
Plus Phone System.
Privacy of Calls
Various components of the Syspine A50 Plus Phone System must exchange
data so that calls can be placed and received. Similar to many traditional phone
systems, where people with access to the office phone network may be able to
listen to phone calls, people with access to the office LAN may also be able to
listen to phone calls placed using the Syspine A50 Plus Phone System.
Calls—which are comprised of data packets that pass between Syspine A50
Plus, phone line adapters, and phones—travel over the office LAN and are not
encrypted. For example, the caller ID information that is exchanged between
the phones and Syspine A50 Plus is not encrypted. Likewise, a conversation
that is transmitted from one phone to another phone is not encrypted.
However, data that is exchanged between the Syspine A50 Plus and Syspine
A50 Plus is encrypted.
Privacy of SMTP Servers
The information that is transmitted from the Syspine A50 Plus to the SMTP
server (such as, a Microsoft® Exchange® server on the LAN or an ISP’s E-mail
server on the Internet) will be encrypted or not depending on whether the
SMTP server requires encryption. Information that may not be encrypted
includes the user name and password for logging on to the SMTP server and
voice messages sent as E-mail attachments. For more information about the
Syspine A50 Plus’s connection to the SMTP server, contact the Syspine A50
Plus Phone System administrator.
Privacy of Backups
The Syspine A50 Plus Phone System administrator may choose to make a
backup of the data on the Syspine A50 Plus. Data saved in the backup file is
not encrypted. Therefore, it is recommend that the Syspine A50
Plus Phone System administrator store backups on a removable hard drive that
can be disconnected from the LAN and stored in a secure location (for example, on a disk that can be stored in a locked drawer).
Transfer of Syspine A50 Plus
Before transferring the Syspine A50 Plus to a third party, permanently delete all
information using the Erase Data program that comes on the installation CD.
See Resetting To Factory Defaults on page 132 for more information.
Security Considerations
Security and privacy are related topics. Privacy Considerations discusses the
handling of users’ personal information. This topic focuses on the issues
involved securing the Syspine A50 Plus Phone System.
While Voice over Internet Protocol (VoIP) brings the power of the Internet to
phone services, it also introduces some security issues. Unless the office LAN
is secure, employees or callers could change phone settings, listen to others'
voice messages, and even access the public address system, if available.
Consider the following issues in creating a secure phone system:
Change Default Passwords
The first step toward securing the Syspine A50 Plus Phone System is to
change the default password of the Syspine A50 Plus. The default password for
the Syspine A50 Plus is syspine.
System Vulnerabilities
The Syspine A50 Plus Phone System runs on the office LAN, and the organization may have a wireless LAN. While convenient and popular, the security features in many wireless default implementations may not be adequate. Consider
whether the LAN security configuration, especially the wireless LAN security
configuration, is correct for the business.
Firewall Issues
It’s a good idea to use firewalls to help protect an office LAN. A firewall blocks
requests or communication attempts from any unspecified programs.
If using a third-party firewall to provide security, instead of the default Windows® Firewall, Assistant and Administrator will not be able communicate with
the Syspine A50 Plus. To avoid this problem, create firewall exceptions in the
firewall program for Administrator and Assistant. A firewall exception allows
selected programs to connect with a computer.
If using a third-party firewall, refer to its documentation for instructions on creating firewall exceptions.
Security of Backups
Phone system data is not encrypted when a backup is created. Therefore, it is
recommended that the Syspine A50 Plus Phone System administrator store
backups on a removable hard drive, which can be disconnected from the LAN.
Environmental Considerations
To conserve natural resources, printing a hard copy of this manual
should only be performed if absolutely necessary. Adobe® Acrobat®
and most printers support printing two pages on one sheet. Refer to
the printer User Manual for more information.
This publication, including all photographs, illustrations and software, is protected under international copyright laws, with all rights reserved. Neither this
publication, nor any of the material contained herein, may be reproduced without written consent of the manufacturer.
Microsoft, Windows XP, and Windows Vista are trademarks of the Microsoft
group of companies.
© Copyright July 2010 http://www.syspine.com
Introduction ................................................................................................... 1
Product Info and Advantages ..................................................................... 2
Key Advantages of Syspine A50 Plus ......................................................... 3
Unpacking the Syspine Phone System ...................................................... 4
Package Contents .................................................................................... 4
Optional Contents .................................................................................... 5
Tour of the Syspine Phone System ............................................................ 6
Front View............................................................................................... 6
Rear View ............................................................................................... 7
Bottom View ............................................................................................ 8
LCD Panel .............................................................................................. 9
LED Behavior ........................................................................................ 10
Syspine IP Phone 310 .............................................................................. 11
Front View............................................................................................. 11
IP Phone 310 Operation ......................................................................... 12
Rear View ............................................................................................. 14
Installation ................................................................................................... 15
Hardware Installation ............................................................................... 16
LAN Setup ............................................................................................ 16
Recommended Installation Process ......................................................... 17
Locating the Syspine A50 Plus ................................................................ 18
Connecting the Syspine A50 Plus to Power and LAN ................................. 20
Connecting the Syspine A50 Plus to the PSTN.......................................... 22
Locating IP Phone 310s .......................................................................... 23
IP Phone 310 Cable Connections ............................................................ 24
Connecting IP Phone 310s to the LAN ..................................................... 25
Syspine A50 Plus Installation ................................................................... 26
System Requirements ............................................................................ 26
Installing Syspine Tools .......................................................................... 26
Logging on to The Syspine A50 Plus ....................................................... 30
Changing the Syspine A50 Plus Password ............................................... 32
Setting the Date and Time ...................................................................... 33
Auto Installation ........................................................................................ 35
Powering Down the Syspine A50 Plus ..................................................... 37
Configuring the IP Phone 310s ................................................................ 38
i
Adding a New User ................................................................................ 38
Basic Features............................................................................................. 43
Making Calls to Extensions ...................................................................... 44
Making External Calls .............................................................................. 45
Receiving Incoming Calls ......................................................................... 46
Transferring Calls ..................................................................................... 47
Using Voicemail ....................................................................................... 48
Leaving Voicemail .................................................................................. 48
Retrieving Voicemail............................................................................... 48
Configuring Voicemail Options................................................................. 49
Advanced Features ..................................................................................... 51
Using a Public Address System ............................................................... 52
Internal Page ......................................................................................... 52
External Page ........................................................................................ 52
Using Call Park and Retrieve ................................................................... 54
Parking a Call ........................................................................................ 54
Retrieving a Parked Call ......................................................................... 55
Using Agent Group ................................................................................... 56
Configuring Call Agent Groups ................................................................ 56
Using User Group .................................................................................... 60
Configuring User Groups ........................................................................ 60
Voicemail to E-mail Forwarding ............................................................... 63
Configuring E-mail Server Information ...................................................... 63
Configuring User Information ................................................................... 65
Administrator Software Configuration ...................................................... 69
Syspine A50 Plus ..................................................................................... 70
The Phone Setting Tab ............................................................................ 72
Using the User Menu .............................................................................. 72
Using the Voice Services Menu ............................................................... 82
Using the Others Menu ........................................................................... 92
The Call Routing Tab ............................................................................... 96
Configuring Incoming Call Routing ........................................................... 96
Configuring Outgoing Call Routing ......................................................... 107
ii
The System Setting Tab ......................................................................... 117
Using the Status Menu ......................................................................... 118
Using the Properties Menu .................................................................... 119
Using the Backup Menu ........................................................................ 128
Using the Others Menu ......................................................................... 131
The Group Setting Tab ........................................................................... 135
Configuring Call Agent Groups .............................................................. 135
Configuring User Groups ...................................................................... 143
Configuring Pickup Groups ................................................................... 148
Troubleshooting ........................................................................................ 153
Common Issues ..................................................................................... 153
Quick Reference Guides........................................................................... 157
Voicemail Quick Guide ........................................................................... 158
Syspine A50 Plus Wall Mounting Template ............................................ 159
Index........................................................................................................... 160
iii
iv
Introduction
1
Designed for ease of use and manageability, the Syspine A50 Plus combines
the Syspine A50 Plus base unit and Syspine IP Phone 310s in one easy to
install, end-to-end, communication solution.
The user friendly, Syspine A50 Plus provides the management and user
interface tools for the Syspine A50 Plus.
The Syspine A50 Plus provides public switched telephone network (PSTN) and
Voice over Internet Protocol (VoIP) service interconnection specifically
designed to empower small business customers to manage customer call traffic and employee use.
The IP Phone 310 combines ease of use with advanced functionality and ergonomic design.
Combined with a low Total Cost of Ownership (TCO), the Syspine Phone System is the ideal communication tool.
Introduction
1.1
•
•
•
•
2
Product Info and Advantages
Lower Total Cost of Ownership—The Syspine A50 Plus provides great value for
small businesses. Cut costs by routing calls over the Internet via SIP trunks from
your service provider.
– "Future proof" design. No additional system HW, SW, or licensing to add SIP
trunks or IP phones.
– Built in Intelligent Operator attendant with one digit menu routing and an over 115
hour Voice Mail system with message forward to Email.
Easy Set Up—Unlike other traditional IP PBX phone systems, familiar-looking
screens (GUIs) provide easy wizards with step by step set up for installation, configuration, and changes.
– Plug in to your existing LAN, click Auto Set Up in Administration and your
Syspine phones appear.
– Lower expense by handling Moves, Adds and Changes (MAC) for your office
phone system.
Mobility Apps—Place and receive customer calls while away from the office or at a
remote office with ease. On the go employees maximize productivity and are accessible….even when freed from your desk or office.
– Call forwarding to cell or remote phones and Voicemail to E-mail messages give
effortless mobility.
– Remote Office workers stay connected. Broadband internet connects your
remote IP phone / Softphone extension to the main office system and shares the
same phone lines and features.
– Smartphone applications will integrate mobility with popular devices. Extend your
business phone wherever and whenever your Smartphone is active (next
release).
Improve Customer Service, Support, and Sales—Respond quickly to customers
with clients with Agent and User Call Groups. Route calls to the right person or
department and ring all members or evenly distribute calls to improve customer
response time.
– Queue calls with recorded announcements while agents “Log in/Log out” based
on call loads.
– Utilize 10 Party Conference Rooms “on the fly” or with managed access. Keep
everyone connected, informed, and updated…all of the time.
– Manage and export system Call History Reports of incoming, outgoing, or internal calls.
Product Info and Advantages
Introduction
1.1.1
Key Advantages of Syspine A50 Plus
•
Reliable and intelligent hardware design
•
– Built-in ATA module (supports 4 or 8 PSTN-line ports)
– LCD operator panel enables multiple installation methods
– Fan-less design for low ambient noise environment and energy savings
– Gigabit Ethernet support
– Support for SIP standard devices: IP phones, gateways, etc.
Popular small business calling features
•
– Integrates both VoIP/SIP trunks and traditional analog phone lines
– Call Transfer, Call Forward, Call Park, Call Retrieve and Call Pickup
– Internal page to user, group or external page through add on speakers
– 10-party conference rooms with managed or “on-the-fly” anytime access
– More than 115 hours of solid state voicemail storage capacity
Flexible call routing
–
–
–
–
•
Automatic forwarding of voicemail by email
Flexible call distribution for small call center agent operations
Automatic route selection with overflow routing
Intelligent office manager for day, night, weekends and holiday scheduling
– Menu driven auto attendant with one digit routings
– 3-Tier user call restriction tables and block list
– Agent and User Group ring options with log in/log out capabilities
Unsurpassed user friendly interface
•
– Browser-based system administration
– Auto installation of Syspine IP phones and PSTN trunks with just one
mouse-click
– Setup configuration wizards make changes amazingly easy
– Auto detection of new installed or relocated Syspine phones
Mobility
– Remote office extensions (IP phones and Softphones) via broadband
internet
– SP 310 Softphone for PC’s provides extensions for on the road and out
of office employees.
Product Info and Advantages
3
Introduction
1.2
Unpacking the Syspine Phone System
1.2.1
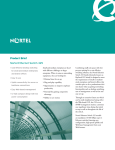
Package Contents
Verify all contents are present and in good condition. If any items are missing or damaged, contact the dealer immediately.
Sys
pin
eA
50
Plu
s
POW
ER
SYS
TEM
LIN
E1
LIN
E2
GAT
EWA
RES
Y
ET
IP
Syspine-A50 Plus
DC Adapter
Power Cable
1 x 3M RJ-45 (Male)
Ethernet Cable (yellow)
4 x 3M RJ-11 (Male)
Phone Line Cables
2 x Power Cable Clips
Quick Start Guide
Installation and
Help CD, includes
User’s Manual
Quick Start Guide
Wall Mounting Kit
NOTE: To conserve natural resources, it is advised that you print a
hard copy of the supplied User Manual only if absolutely
necessary. Adobe® Acrobat® and most printers support
printing two pages on one sheet. Refer to your printer’s User
Manual for more information.
4
Unpacking the Syspine Phone System
Introduction
1.2.2
Optional Contents
4 x 3M RJ-11 Male Phone Line Cable
Included with Optional ATA Module
Unpacking the Syspine Phone System
5
Introduction
1.3
Tour of the Syspine Phone System
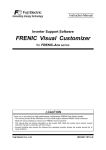
1.3.1
Front View
1
2
3
Sy
PO
W
sp
ine
A5
0P
lus
ER
SY
ST
EM
LI
NE
4
1
LI
NE
2
GA
TE
4
6
W
RES
AY
ET
IP
No.
Item
Description
1.
2.
3.
4.
Top Ventilation
Panel Release
LCD Panel
Ventilation
Cooling vent—do not obstruct
Press to remove LCD panel
See LCD Panel on page 9
Cooling vents—do not obstruct
Tour of the Syspine Phone System
Introduction
1.3.2
Rear View
P4
P3
P2
P1
DC IN
1
2
3 4 5
6 7
8
9
No.
Item
1.
2.
3.
Telephone Lines Module 1 telephone lines P1 to P4
DC IN Jack
Connect the DC power adapter to this jack
Phone Line LCDs Indicates phone line activity on the corresponding line
Status LED
Indicates module 1 connection status
Optional
Module 2 telephone lines P5 to P8
Telephone Lines (optional)
LINE OUT
Connect an output device, such as a Public
Address system or speaker. See Using a
Public Address System on page 52
LINE IN
Standard Line-in jack. See Service Manual
for updated functions
USB Ports
Connect USB devices to these ports
LAN Port
Connect an Ethernet RJ-45 to the LAN
4.
5.
6.
7.
8.
9.
Description
Tour of the Syspine Phone System
7
Introduction
1.3.3
Bottom View
2
1
8
No.
Item
Description
1.
2.
Module Feet
Wall Fixing Slots
Desktop non-skid feet
Attach to wall using wall mounting template
(see Syspine A50 Plus Wall Mounting Template on page 159)
Tour of the Syspine Phone System
Introduction
1.3.4
LCD Panel
QUANTA COMPUTER
RESET
IP
POWER SYSTEM
LINE1
LINE2 GATEWAY
Syspine A50 Plus
RESET
IP
1
POWER
SYSTEM
LINE1
LINE2
GATEWAY
2
3
4
5
6
7 8 9 1011 12
13
No.
Item
Description
1.
2.
3.
LCD panel
Power LED
System LED
2 x 16 characters 5 x 7 dot display
LED lights orange in power-on state
LED lights blue when system is in ready
state
4.
7.
8.
Line Module1
LED
Line Module2
LED
Gateway Module
LED
Left Button
Enter Button
9.
10.
11.
Down Button
Up Button
Right Button
5.
6.
Tri-color Line 1 Module LED
Tri-color Line 2 Module LED
Tri-color Gateway Module LED
Up one level in Admin Mode
Press to Apply settings / Down one level in
Admin mode
Hold for 5 seconds to enter Admin Mode
Scroll down through options in Admin Mode
Scroll up through options in Admin Mode
View lower line message
Select option in Admin Mode
Tour of the Syspine Phone System
9
Introduction
No.
Item
Description
12.
IP Button
13.
Reset Button
Push to view: IP address, subnet mask,
default gateway, DNS server, and DHCP
Mode (enabled or disabled)
Hold for 5 seconds to reset the system (see
Powering Down the Syspine A50 Plus on
page 37)
NOTE: The Syspine A50 Plus is set to DHCP client enabled as default and cannot be changed.
1.3.5
LED Behavior
LED
Behavior/Color Description
Power
Solid Orange
Off
System Status Solid Blue
Blinking Blue
Line Module 1 Solid Red
Solid Orange
Solid Green
Line Module 2 Solid Red
Solid Orange
Solid Green
Gateway
Solid Red
Module
Solid Orange
Solid Green
10
Power on
Power off
System in ready state
System booting or system failure
detected
Module 1 failure detected
Module 1 booting
Module 1 in service (registered)
Module 2 failure detected
Module 2 booting
Module 2 in service (registered)
Gateway Module failure detected
Gateway Module active, but WAN
is inactive
Gateway Module active, and WAN
is connected
Tour of the Syspine Phone System
Introduction
1.4
Syspine IP Phone 310
1.4.1
Front View
7
1
IP Phone 310
8
2
1
3
4
4
5
6
GHI
7
PQRS
2
ABC
5
JKL
8
3
DEF
6
MNO
9
TUV
WXYZ
0
#
HOLD
9
10
11
12
13
14
No.
Item
Description
1.
2.
3.
4.
5.
6.
7.
8.
9.
10.
11.
Handset
Transfer
Conference
Call History
Redial
Hold
Call Indicator
LCD Screen
Blue Button
Voicemail
Mute
12.
Handsfree
High quality telephone handset
Transfers the current call
Start conference call
Display call history menu
Dial last number entered
Place caller on hold
Flashes to indicates incoming calls
2 x 16 character LCD display
Parks the call
Retrieve voicemail
Turn mute on or off during handsfree or
handset calling
Place or answer a call without the use of the
handset
Syspine IP Phone 310
11
Introduction
No.
Item
13.
Volume and Menu Move up and down through menu options
Navigation
and adjust ringer volume. Increase or
decrease volume while phone is in use
Dial / Enter
Press to dial manually entered phone numbers / select items in the LCD menu
14.
Description
NOTE: For ease of use, place the labels as shown in the preceding image.
1.4.2
IP Phone 310 Operation
The following table describes the IP Phone 310 basic functions.
IMPORTANT! IP Phone 310 Hook functionality may differ depending on the selected
service provider. Contact the provider for more information.
Label
Description
Answer Call Pick up the handset to answer or press
Handsfree mode.
12
to use
Reject Call
Press
Number
Dial
Enter the desired number on the keypad and press
to reject call.
to confirm (press
to correct mistakes).
Call
Transfer
Press
Call Hold
During a call, press
to hold the call. Press
again to retrieve the call.
Call Park
During a call, press
Call
Retrieve
Press
assigned.
+ ext. number +
.
.
and dial the parked zone number
Syspine IP Phone 310
Introduction
Label
3 Way
Conference
Description
During a call with the1st party, press
to hold the
1st party and get the dial tone, dial the 2nd party and
press
again to start the conference.
Redial
Press
to redial the last number.
Mute
Press
to turn Mute on or off during handsfree or
handset calling
Press
to access the following call history options:
1. Missed Calls
2. Received Calls
Call
History
3. Dialed Numbers
4. Erase Records
5. Press
to access next item
6. Press # to confirm the item
7. Press
to go back one level
Voicemail
Press
.The auto attendant says Welcome to voice
mail, please enter your password.The default password is 9999. Press 1 to listen to the new message or
follow the prompts for more options.
Check IP
address
Press # *47 (# *IP) to display the phone IP address.
Syspine IP Phone 310
13
Introduction
1.4.3
Rear View
1
2
5
3
LAN
6
PC
DC 12V
4
7
No.
Item
Description
1.
2.
3.
4.
Desk Stand Slots
Wall Mount Slot
LAN Port
Handset
Connection Jack
PC Port
Attach the desk stand to these slots
Attach to wall using this slot
Connect RJ-45 ethernet cable
Connect the handset cord
5.
6.
7.
Connect RJ-45 ethernet cable to PC, or
daisy chain a PC, hub, or other ethernet
device
Connect AC power adapter
AC Power
Connection Jack
Wall Mount Stand Attach the wall mount stand to these slots
Slots
NOTE: See Locating IP Phone 310s on page 23 for installation instructions.
14
Syspine IP Phone 310
Installation
2
This section contains details on how to install the Syspine A50 Plus Phone System and connect and configure the sup-plied Syspine IP Phone 310s
Terms used in this chapter:
• DHCP—Dynamic Host Configuration Protocol (DHCP) is used by networked devices (clients) to obtain IP addresses and other parameters from
a DHCP server.
•
IP—Internet Protocol (IP) is used for communicating data across a network. IP provides the service of communicable unique global addressing
amongst devices.
•
LAN—Local Area Network (LAN) is a computer network covering a small
geographic area, like an office, or group of buildings.
•
PoE—Power over Ethernet (PoE) is an alternate method of powering
devices without using a standard power outlet. The IP Phone 310 supports
PoE, although the required adapter is not supplied.
•
PSTN—Public Switched Telephone Network (PSTN) is the network of the
world's public telephone networks, in much the same way that the Internet
is the network of the world's public IP-based networks.
Installation
2.1
2.1.1
Hardware Installation
LAN Setup
The diagram describes the LAN architecture using the Syspine A50 Plus Phone
System.
16
Hardware Installation
Installation
2.1.2
Recommended Installation Process
To save time, it is recommended that all the IP Phone 310s are installed and
connected to a suitable power outlet at the same time. For example, if ten IP
Phone 310s are required for an office setup, perform the installation in the following order.
1. Locate the Syspine A50 Plus (desktop or wall mount). See “Locating the
Syspine A50 Plus” on page 18.
2. Connect the Syspine A50 Plus to the LAN and power outlet. See “Connecting the Syspine A50 Plus to Power and LAN” on page 20.
3. Connect the Syspine A50 Plus to the PSTN. See “Connecting the Syspine
A50 Plus to the PSTN” on page 22.
4. Locate all ten IP Phone 310s (desktop or wall mount). See “Locating IP
Phone 310s” on page 23.
5. Connect all ten IP Phone 310s to the LAN and suitable outlet. See “Connecting IP Phone 310s to the LAN” on page 25.
6. Install the Syspine A50 Plus Syspine A50 Plus. See “Syspine A50 Plus
Installation” on page 26.
7. Change the Syspine A50 Plus password and set the date and time. See
“Changing the Syspine A50 Plus Password” on page 32. and Setting the
Date and Time on page 33.
8. Use the Auto Installation function, see Auto Installation on page 35.
Hardware Installation
17
Installation
2.1.3
Locating the Syspine A50 Plus
The Syspine A50 Plus provides two distinct setup options—desktop and wall
mounted. The LCD panel and top ventilation panel can be inverted for upright
and wall mounted installation.
2.1.3.1
DESKTOP INSTALLATION
Place the Syspine A50 Plus on a flat, stable surface in a well ventilated area.
IMPORTANT! Do not obstruct the cooling vents (see Front View on page 6 for vent
locations).
1. Press the LCD panel release button (see Front View on page 6) and lift the
panel up.
2. Invert the panel and insert it into the panel bay.
3. Press the panel inward until a click is heard. Apply steady pressure until a
further click is heard.
NOTE: When located correctly, the LCD panel does not move within the bay.
4. Grip the top ventilation panel (see Front View on page 6) and twist counterclockwise to remove it.
5. Twist clockwise to secure the panel in place.
18
Hardware Installation
Installation
2.1.3.2
WALL MOUNTED INSTALLATION
The Syspine A50 Plus wall mounting solution is designed to reduce clutter by
locating the Syspine A50 Plus in an otherwise unused area.
There are two wall mounting slots on the underside of the Syspine A50 Plus
(see Bottom View on page 8) for mounting purposes.
At the back of this user’s manual is a wall mounting template to assist in the
positioning of the Syspine A50 Plus. To wall mount the Syspine A50 Plus, perform the following steps:
1. Press the LCD panel release button (see Front View on page 6) and lift the
panel clear.
2. Invert the panel and insert it into the panel bay.
3. Press the panel inward until a click is heard. Apply steady pressure until a
further click is heard.
NOTE: When located correctly, the panel does not move in the bay.
4. Grip the top ventilation panel (see Front View on page 6) and twist counterclockwise to remove it.
5. Invert the ventilation panel so that the Syspine name is readable and
replace the panel.
6. Twist clockwise to secure the panel in place.
7. Locate a clean, even wall space with adequate room for cabling.
8. Print out the template at the back of this manual and place it on the wall
(see Syspine A50 Plus Wall Mounting Template on page 159)
9. Use the guide line on the wall mounting template and a level to ensure the
Syspine A50 Plus is in horizontal position.
10. Mark the locations for the two positioning screws using the template.
11. Drill two holes and insert the supplied wall fixing plugs.
12. Insert the supplied screws and tighten fully, until none of the thread is
showing.
NOTE: The screws are designed to project out from the wall for mounting purposes.
13. Align the wall mounting slots on the underside of the Syspine A50 Plus with
the screws. Fit the screws into the wall mounting slots and apply slight
downward pressure to secure the unit.
Hardware Installation
19
Installation
2.1.4
Connecting the Syspine A50 Plus to Power and
LAN
After locating the Syspine A50 Plus, connect to power by performing the following steps:
1. Insert the cable pin into the left-hand side of the Syspine A50 Plus case as
shown.
P8
P7
P6
P5
P4
P3
P2
P1
DC IN
2. Connect the AC adapter to the Syspine A50 Plus and secure it in place as
shown in the following illustration.
20
Hardware Installation
Installation
P8
P7
P6
P5
P4
P3
P2
P1
DC IN
3. Use one of the supplied Ethernet cables (yellow) to connect the LAN port of
the Syspine A50 Plus to the LAN switch and plug in the AC adapter into a
standard electrical outlet.
Before continuing, make sure the display shows SERVICE READY.
NOTE: Ensure that all cables are properly inserted and the LAN switch is working properly before continuing.
Hardware Installation
21
Installation
2.1.5
Connecting the Syspine A50 Plus to the PSTN
After locating the Syspine A50 Plus, connect the PSTN by performing the following steps:
1. Connect the phone cable to the PSTN as shown.
2. Check that the telephone line module LED on the back of the Syspine A50
Plus lights green (see Rear View on page 7 for location).
NOTE: If the telephone line status LED does not light for any active phone line,
check the public telephone line and Voice Services. See Using the Voice
Services Menu on page 82 for more information.
22
Hardware Installation
Installation
2.1.6
Locating IP Phone 310s
The IP Phone 310 provides two distinct setup options—desktop and wall
mounted.
2.1.6.1 DESKTOP INSTALLATION
1. Insert the two locating tabs (1) into the slots
as shown.
2. Push the stand (2) toward the top of the IP
Phone 310 until it clicks into place.
2
1
2.1.6.1
WALL MOUNTED INSTALLATION
The IP Phone 310 wall mounting solution is
designed to reduce clutter by locating the IP
Phone 310 in an otherwise unused area.
The wall mounting slot is located on the underside of the IP Phone 310 (see
Rear View on page 7) for mounting purposes.
NOTE: The handset hook is supplied in the upright position, suitable for desktop
or wall mounting. If the phone is installed on a desktop without the stand,
remove the hook and install it point down.
Perform the following steps to wall mount an IP Phone 310:
1. Insert the two stand locating tabs in to the
slots on the phone.
2. Push the stand toward the bottom of the IP
Phone 310 to until it clicks into place.
3. Locate a clean, even wall space with adequate room for cabling.
4. Drill a hole and insert a suitable wall-fixing
plug.
5. Insert a suitable screw and tighten, leaving a
5 mm (0.2 inches) gap.
6. Align the wall-mounting slot on the underside
of the IP Phone 310 with the screw.
7. Place the IP Phone 310 on the wall and align it with the screw on the wall.
Hardware Installation
23
Installation
2.1.7
IP Phone 310 Cable Connections
Connect the IP Phone 310 cables as shown in the diagram:
1
2
3
1.
LAN cable
2.
Power cable
3.
Handset cord
1. Connect the white Ethernet cable to the LAN port.
2. Connect the power cable to the DC power jack.
NOTE: If the IP Phone 310 is connected through a Power over Ethernet (PoE)
device, it is not necessary to connect the power adapter.
3. Connect the handset cable to the handset jack.
NOTE: The handset cable has a long straight connection and a short straight
connection. Use the long section to connect to the IP Phone 310. Secure
the cable in place by pressing down as shown in the preceding image.
24
Hardware Installation
Installation
2.1.8
Connecting IP Phone 310s to the LAN
After connecting the Syspine A50 Plus to the LAN and a suitable power outlet,
connect all the required IP Phone 310s at once to the LAN.
The IP Phone 310 supports daisy-chain connection for limited port access
using the supplied Ethernet cable.
IMPORTANT! PoE operation is not possible when wiring in daisy chain sequence—
power adapters must be used on series phones.
Perform the following steps to connect the IP Phone 310 as part of a daisychain:
1. Disconnect the existing LAN cable from the PC.
2. Plug the LAN cable into the LAN port on the IP Phone 310.
3. Using the supplied Ethernet cable, connect the PC port on the IP Phone
310 to the LAN port on the PC.
4. Using the supplied power cables for each phone, connect the IP Phones to
a power source.
5. Record the IP address for each phone as displayed on the LCD screen.
NOTE: If the IP address is not displayed, enter # * 47 (# * IP) on the keypad to
display the IP address.
If port access is not a consideration and a daisy chain connection is not required,
attach the IP Phone 310 directly to the LAN switch with the supplied cable.
Hardware Installation
25
Installation
2.2
Syspine A50 Plus Installation
This section contains details on how to install the Syspine A50 Plus and how to
configure the IP Phone 310s.
2.2.1
System Requirements
Syspine A50 Plus requires:
•
Processor: Intel Pentium III 700 MHz or greater
•
Memory: 128 MB RAM
•
Hard Disk: 100 MB
•
Operating System: Windows XP, Windows Vista, Windows 7 (32-bit)
2.2.2
Installing Syspine Tools
NOTE: Screenshots will vary depending on your operating system.
1. Insert the Installation CD provided. The Auto-run interface starts automatically.
NOTE: If the Auto-run Interface does not start automatically, access the CD
using Windows Explorer and manually execute CDRun.exe in the root
directory to begin installation.
The Install Syspine Tools screen displays.
26
Syspine A50 Plus Installation
Installation
2. Click Install Syspine Tools to begin the process.
The Phoenix Setup Wizard screen displays.
3. Click Next to continue the installation.
NOTE: It is recommended that you close all other applications before continuing.
4. Select the destination folder to install the Syspine A50 Plus. Click Next to
continue. Click Browse to manually select a specific location.
NOTE: At least 24.1 MB of free disk space is required for installation.
Syspine A50 Plus Installation
27
Installation
5. Select the destination where you want the Syspine A50 Plus short-cuts to
be installed. To continue, click Next. If you would like to select a different
folder, click Browse.
6. Select the additional items that you would like installed onto your computer
by checking off the items from the list, the click Next to continue.
28
Syspine A50 Plus Installation
Installation
7. Review the settings you have selected and click Install.
NOTE: If you want to change any settings, click Back to take you to the appropriate window.
8. Once you have completed the installation, click Finish to exit the Syspine
A50 Plus Setup Wizard.
NOTE: Installation screens are O/S dependant. For this demonstration the Windows XP operating system was used.
Syspine A50 Plus Installation
29
Installation
2.3
Logging on to The Syspine A50 Plus
After the initial hardware and software installation, the Syspine A50 Plus is
automatically detected through the LAN connection. Perform the following
steps to log in to the Syspine A50 Plus:
1. To launch the Syspine A50 Plus, go to StartAll ProgramsSyspineAdministratorAdministrator 1.0.nnnnn.
2. Select the desired Syspine A50 Plus, and click Connect. If the software
does not automatically detect the Syspine A50 Plus system, you can manually enter the IP address by clicking on the yellow arrow and enter the IP
address in the field designated.
NOTE: Compare the IP address on screen with the IP address attached to the
Syspine A50 Plus. To view the IP address on the Syspine A50 Plus,
press the IP button located on the front panel and the IP address will
show on the screen.
30
Logging on to The Syspine A50 Plus
Installation
3. Click Connect
NOTE: The connection process can take a few seconds. If the required
Syspine A50 Plus is not present, see Troubleshooting on page 153.
Once connection is established, a password prompt displays.
4. Enter the default password syspine (all lower case) and click Login.
The main Syspine A50 Plus screen displays.
Logging on to The Syspine A50 Plus
31
Installation
2.3.1
Changing the Syspine A50 Plus Password
After logging in, change the password to prevent any security issues.
NOTE: The default password for the Syspine A50 Plus is syspine.
To change the Syspine A50 Plus password, perform the following steps:
1. Once you have logged in to the Syspine A50 Plus, on the System Setting
tab, click Change Password in the Properties panel.
The Change Password screen displays.
2. Enter the current password, a new password, and confirm the new password.
3. Click OK.
4. The following message is displayed when the password is changed successfully.
NOTE: If an error message is displayed, follow the on-screen prompts to correct
the problem and try again.
32
Logging on to The Syspine A50 Plus
Installation
2.3.1.1
STRONG PASSWORD TIPS
Your password can be 4-20 digits and should contain letters (A, B, C, a, b, c...),
numerals (0, 1, 2, 3, 4, 5, 6, 7, 8, 9), and symbols (‘ ~ ! @ # $ % ^ & * ( ) _ + - =
{ } | [ [ \ : “ ; < > ? , . /). Due to the way passwords are encrypted, the most
secure passwords are 7 or 14 characters long.
For a password to be strong, it should:
– Be significantly different from prior passwords.
– Not contain a name or user name.
– Not be a common word or name.
2.3.2
Setting the Date and Time
To set the Syspine A50 Plus date and time, perform the following steps:
1. On the System Setting tab, click Change Date/Time in the Properties
panel.
The Change Date and Time screen displays.
2. Select the appropriate time zone from the drop down list.
Logging on to The Syspine A50 Plus
33
Installation
3. You have the option to automatically synchronize the date and time with an
internet time server by entering the web address or IP address into the
server field and clicking Update Now or manually setting the date and time
information from the drop-down menus. Click OK to save the changes.
NOTE: The Syspine A50 Plus only reboots if the time zone is changed. All other
changes are updated immediately.
4. Verify the new date and time in the Properties table under the System
Setting tab.
NOTE: You may need to refresh the page in order to view your changes.
34
Logging on to The Syspine A50 Plus
Installation
2.4
Auto Installation
The Auto Installation function allows the administrator to search the network
for new devices and configures them to the system. The new devices are numbered consecutively starting with 100.
During this process, the ATA module is also automatically configured.
CAUTION: AUTO INSTALLATION CONFIGURES ALL IP PHONES CONNECTED TO
YOUR NETWORK. DO NOT USE THE AUTO INSTALLATION FUNCTION IF YOU
HAVE ALREADY CONFIGURED YOUR SYSTEM AS PREVIOUS CONFIGURATION
SETTINGS WILL BE LOST.
1. Navigate to Phone Setting Others Auto Installation.
Auto Installation
35
Installation
2. Click Auto Installation.
The Automatic Installation screen displays.
NOTE: The system detects and installs any available devices. During this time,
the system may not respond to prevent any configuration conflicts.
3. Click Yes to continue with the installation process.
4. Once the installation process is complete, you will receive a confirmation
dialog.
The Automatic Installation process is now complete.
After installation, the newly added devices can be personalized if required, see
Editing Users on page 77.
36
Auto Installation
Installation
2.5
Powering Down the Syspine A50 Plus
The Syspine A50 Plus does not provide an on/off power switch like other electrical appliances, the Reset button is used to shutdown the Syspine A50 Plus
properly.
To power off the Syspine A50 Plus, perform the following steps:
1. Exit any active Administrator and Assistant sessions.
2. Press and hold the Reset button on the Syspine A50 Plus front panel for 5
seconds and release.
3. The Syspine A50 Plus enters a Standby state and the LCD panel displays
UNPLUG POWER CORD for 15 seconds.
4. To power down the device, unplug the power cord from the back of the
Syspine A50 Plus in these 15 seconds. Otherwise wait for the system to
reboot.
IMPORTANT! Do not unplug the Syspine A50 Plus unless the LCD displays
UNPLUG POWER CORD. Incorrect power down can damage the Syspine A50 Plus.
Powering Down the Syspine A50 Plus
37
Installation
2.6
Configuring the IP Phone 310s
After logging on to the Syspine A50 Plus, the installed IP Phone 310s must be
detected and new users added. Perform the following steps to detect the
phones and add new user information.
2.6.1
Adding a New User
1. Go to StartAll ProgramsSyspine A50 Plus to launch the software, if it
is not already running.
2. Navigate to Phone SettingUser and click Add User.
38
Configuring the IP Phone 310s
Installation
The Add User screen displays. The default tab is the User tab.
3. In the User Account section under the User tab, enter in the Display
Name (this name will display on the phone) and select an extension number from the drop down list of available extensions (100-399).
4. In the Device section, click on Add Device.
The Choose Device screen displays.
Configuring the IP Phone 310s
39
Installation
5. You have the option to either select a device from a list of detected devices
or enter a MAC address to pre-add a device before it is connected. Click
OK to save your changes.
6. Click the Call Forwarding tab to display the following screen.
7. Set Call Forwarding as desired.
– Within—set the time elapsed before the call is forwarded.
– Forward to—set where the call will be forwarded.
8. Click the Advanced tab to display the following screen.
9. Set Toll Restrictions as desired.
– No Restriction—gives the user full dialing privileges.
– Assign Custom Dialing Privileges—apply dialing privileges (local,
operator/international, special).
10. Set Voicemail as desired.
– • Enable Voicemail—turns on voicemail for the user.
– • Retrieve messages as attachment to Email—turns on Email alerts
when voicemail is received.
– • Personal Authority Code—set the security code for voicemail.
40
Configuring the IP Phone 310s
Installation
11. Set Other Settings as desired.
– Check the check box to allow this user to be paged.
12. Click OK to save all changes.
13. The Syspine A50 Plus will then register the phone to the system, configure
the phone, and connect it to the system. Click Finish to complete the process.
Configuring the IP Phone 310s
41
Installation
42
Configuring the IP Phone 310s
Basic Features
3
This chapter contains information on basic Syspine A50 Plus Phone System
operation using Syspine A50 Plus. Topics include making and receiving internal
and external calls, transferring calls, using a Public Address (PA) system, and
voicemail functions.
Terms used in this chapter:
• IP—Internet Protocol (IP) is used for communicating data across a network. IP provides the service of communicable unique global addressing
amongst devices.
•
LAN—Local Area Network (LAN) is a computer network covering a small
geographic area, like an office, or group of buildings.
•
MAC—Media Access Control (MAC) addresses are numbers that represent a unique name for particular network adapters, so, for example, the
network adapters in two different computers will have different names.
•
PBX—A Private Branch eXchange (PBX) is a telephone exchange that
serves a particular business or office.
•
URL—Uniform Resource Locator (URL) is a global identifier of networkretrievable documents and in the scope of this User’s Manual represents a
World Wide Web address.
•
WAV—Waveform audio format (WAV), is a Microsoft and IBM audio file format standard for storing audio on PCs.
Basic Features
3.1
Making Calls to Extensions
Extension calls are calls placed to other Syspine IP Phone 310s using the
Syspine A50 Plus.
To make an extension call, perform the following steps:
1. Lift the handset of the IP Phone 310.
2. Dial the required extension using the keypad.
3. The system connects the phone to the supplied extension.
44
Making Calls to Extensions
Basic Features
3.2
Making External Calls
External calls are calls placed to contacts outside the internal network.
To make an outgoing call using the keypad, perform the following steps:
1. Lift the handset of the IP Phone 310.
2. Press 9 to specify an outbound call.
3. Dial the required number using the keypad. The system connects the
phone to the supplied external number.
NOTE: If VoIP calls result in an error, logon to Administrator and go to
Base Unit View Event Log and look for information on any failures
that occurred.
Making External Calls
45
Basic Features
3.3
Receiving Incoming Calls
The Syspine Phone System functions as a traditional phone system when
receiving incoming calls. Simply pick up the IP Phone 310 handset or press the
Speaker button to accept the call.
Incoming calls using Syspine A50 Plus are processed as follows:
• The external caller dials the PSTN number assigned to the Syspine A50
Plus.
• The Auto Attendant asks the caller to dial the extension of the required contact.
NOTE: The Syspine A50 Plus handles the call as defined in the Call Routing
Plan (see The Call Routing Tab on page 96).
46
Receiving Incoming Calls
Basic Features
3.4
Transferring Calls
Call transfer is used to manually extend a call to another extension or user.
NOTE: Only phones and users added to Syspine A50 Plus are accessible for
transfer.
To Transfer a call using the keypad, perform the following steps:
1. Ask the calling party to wait while you transfer the call.
2. Press the Transfer button on the IP Phone 310.
3. Dial the required extension, press Dial / Enter (
phone.
) and hang up the
The system connects the call to the extension associated with the supplied
name.
Transferring Calls
47
Basic Features
3.5
Using Voicemail
If a call is not answered within 15 seconds, the call will be forwarded to voicemail. The term voicemail is used for mobile, cellular, and desktop computerized
telephone answering systems that digitize incoming voice messages and
stores them on disk or flash memory. Incoming calls are diverted to voicemail
when the user is unavailable or the phone is powered off. The voicemail button
flashes red to indicate the receipt of a message.
Syspine A50 Plus allows users to review voice messages while in the office or
from outside.
NOTE: The default password is 9999.
3.5.1
Leaving Voicemail
If a call is not answered within 15 seconds (default), the voicemail function is
activated.
1. The Auto Attendant informs the caller that the user is not available.
2. After the tone, record a short message (less than 120 seconds).
3. When finished, hang up the phone or press the # key.
3.5.2
Retrieving Voicemail
Voicemail can be reviewed while in the office or from an external number.
3.5.2.1
RETRIEVING VOICEMAIL IN THE OFFICE
To retrieve voicemail, perform the following steps:
1. Press the voicemail button on the IP Phone 310 or dial 500.
2. You are prompted to enter the password by using the keypad.
3. Enter the password to enter the main menu.
4. Press 1 to listen to voicemail messages.
The Auto Attendant supplies the number of new messages and saved messages available then plays the first new message recorded.
5. After listening to the message, the following options are available:
48
•
Repeat—press 1 to replay the previous message.
•
Continue—press 3 to proceed to the next message or return to the main
voicemail menu if there are no further messages.
Using Voicemail
Basic Features
NOTE: If no new messages remain, the first saved message is played.
•
Delete—press 7 to delete the current message.
•
Forward—press 9 to forward the message to another extension.
3.5.2.2
RETRIEVING VOICEMAIL FROM AN EXTERNAL NUMBER
To access voicemail from an external number, perform the following steps:
1. Dial the PSTN number to call.
2. After the Auto Attendant answers, dial 500.
3. Follow steps 2 through 5 in Retrieving Voicemail in the Office on page 48.
3.5.3
Configuring Voicemail Options
To configure voicemail options, perform the following steps:
1. Lift the handset and press the voicemail button,
OR
Press the voicemail button for hands-free operation.
2. A standard voicemail greeting is supplied prompting the user to enter their
password or press the * key to check voicemail for a different extension.
3. Enter the password to enter the main menu.
4. Press 2 to enter the Change Your Settings menu.
There are six options within the Personal Options menu:
•
Listen to Personal Greeting—press 1 to review the personal greeting
message for the current user.
NOTE: If no custom message is recorded, the Auto Attendant Greeting is used.
•
Record Personal Greeting—press 2 to record the personal greeting message for the current user.
•
Change Greeting Type—press 3 to change the type of voicemail greeting
for the current user.
Select from System Greeting (default) and Personal Greeting (custom).
•
Change Password—press 4 to enter a new 4~8 digit password followed
by the # key. Confirm the new password by re-entering the new password
followed by the # key.
•
Go Back to Main Menu—press * to return to the main voicemail menu.
Using Voicemail
49
Basic Features
50
Using Voicemail
Advanced Features
4
This chapter contains information on advanced Syspine A50 Plus operation
using Syspine A50 Plus. Topics include using a paging system, call park/ call
retrieve, configuring agent/user groups, and outgoing call routing.
For more information on Syspine Module configuration, see the Service Manual
and Security Gateway User’s Manual.
Advanced Features
4.1
Using a Public Address System
The Syspine A50 Plus supports connection to a Public Address system (PA) or
to speakers directly attached to the Syspine A50 Plus. To connect the PA to the
Syspine A50 Plus, refer to the following diagram:
NOTE: See Rear View on page 7 for the location of the Line-Out jack.
4.1.1
Internal Page
An internal page can be made if user groups have been set up (See “Adding A
User Group” on page 60.):
1. Lift the IP Phone handset and dial *5+User Group ext.
2. Wait for the ready tone, then speak as normal.
3. Syspine A50 Plus routes the voice page to the extensions that belong to
that user group.
4. Hang up when finished.
4.1.2
External Page
Once the PA (or speaker) is connected to the Line-Out jack, perform the following steps to make an external page over the PA:
1. Lift the IP Phone handset and dial *6.
2. Wait for the ready tone, then speak as normal.
52
Using a Public Address System
Advanced Features
3. Syspine A50 Plus routes the voice page to the line-out jack and over external, amplified paging equipment as well as the phones connected.
4. Hang up when finished.
NOTE: Users can be disabled from receiving pages.
Using a Public Address System
53
Advanced Features
4.2
Using Call Park and Retrieve
Call park is used to hold a call in the system until another system extension or
user is free to respond. While parked, a caller hears the default Syspine A50
Plus music or a custom audio file played through the Line In jack on the rear of
Syspine A50 Plus. See Configuring Hold Music on page 123 for more information.
There are a total of nine slots available for call parking. Any IP Phone 310 can
retrieve a parked call by using the call retrieve function.
4.2.1
Parking a Call
To park an incoming call, perform the following steps:
1. After answering the incoming call, press the Big Blue button to park the call.
2. User will hear the parked zone number where the call was parked.
3. Replace the handset on the phone.
The incoming call is now parked.
54
Using Call Park and Retrieve
Advanced Features
4.2.2
Retrieving a Parked Call
To retrieve a parked call, perform the following steps:
1. Lift up any handset and dial the parked zone number that has been designated to the parked call.
The call is retrieved from the parked status.
Using Call Park and Retrieve
55
Advanced Features
4.3
Using Agent Group
Agent groups allows calls to reach a specified group. Once the agent group is
configured, calls can be set up to ring simultaneously, circularly, or round robin.
4.3.1
Configuring Call Agent Groups
4.3.1.1
ADDING A CALL AGENT GROUP
1. In the Group Setting tab, click Add Call Agent Group in the Call Agent
Group panel.
The Configure Call Agent Group screen displays.
56
Using Agent Group
Advanced Features
2. Specify a name for this agent group.
3. Specify a number for this agent group.
4. To add members to this agent group, click Add.
The Configure Members screen displays.
5. Select the members that you want to assign to the selected group and click
OK. To add all members to the selected group, put a check beside All
Members.
Using Agent Group
57
Advanced Features
6. Select how the system should ring the members in the group from the following drop down list:
– Simultaneous
– Circular
– Round Robin
7. Select the ring time (3-30 seconds).
8. To choose a greeting if no one is able to answer the call, click Configure.
The Configure Greetings screen displays.
9. To add a greeting, click Add.
The Upload Sound File screen displays.
NOTE: The sound file must be a .wav file format and cannot exceed 2MB in
size.
10. Click Browse to locate the desired sound file.
58
Using Agent Group
Advanced Features
11. Click Upload to upload the sound file to the Syspine A50 Plus.
NOTE: To confirm that the file has been uploaded properly, you should see the
uploaded file in the Configure Greeting screen.
12. Click OK in the Configure Greeting screen to save the settings.
13. Click OK in the Configure Call Agent Group screen to save the settings.
NOTE: To confirm that the call agent group has been saved, it should be on the
Call Agent Groups list in the Group Settings tab.
Using Agent Group
59
Advanced Features
4.4
Using User Group
Much like agent groups, user groups allows calls to reach a specified group.
However, user groups do not have a queue function. When all members of the
group are unable to pick up the call, it will be forwarded to another destination.
4.4.1
Configuring User Groups
4.4.1.1
ADDING A USER GROUP
1. In the Group Setting tab, click Add User Group in the User Groups
panel.
60
Using User Group
Advanced Features
The Configure User Group screen displays.
2. Specify a name for this user group.
3. Specify a number for this user group.
4. To add members to this user group, click Add.
The Configure Members screen displays.
5. Select the members that you want to assign to the selected group and click
OK. To add all members to the selected group, put a check beside All
Members.
Using User Group
61
Advanced Features
6. Select how the system should ring the members in the group from the following drop down list:
– Simultaneous
– Circular
– Round Robin
7. Select the ring time (3-30 seconds).
8. Select the users who the call should be forwarded to from the drop down
list.
9. Click OK to save the settings.
62
Using User Group
Advanced Features
4.5
Voicemail to E-mail Forwarding
Voicemail to Email is an extension of the voicemail service providing another
point of access for messages. When enabled, voicemail to email sends an alert
email to the target user including a WAV file attachment containing the recorded
voicemail message.
This function is especially useful for mobile users with no access to Syspine
A50 Plus’ regular voicemail service.
4.5.1
Configuring E-mail Server Information
To configure the E-mail server and user account, perform the following steps:
1. Log into Syspine A50 Plus, see Logging on to The Syspine A50 Plus on
page 30.
2. On the System Setting tab, click Configure email Server in the Properties
panel.
Voicemail to E-mail Forwarding
63
Advanced Features
The Configure Email Server screen displays.
3. Check the box beside Allow sending voicemail in email.
4. In the Server Information section, enter the Outgoing email server
(SMTP) information, enter in the server port number (default is 25), and put
a check mark if the email server requires a secure connection (SSL).
5. In the Sender and Logon Information section, enter in the email address
the emails will be sent from, the User name/password, and re-enter the
password for confirmation. Click OK to save the settings.
64
Voicemail to E-mail Forwarding
Advanced Features
4.5.2
Configuring User Information
NOTE: At least one user must be added before configuring Email user information. See “Adding Users” on page 72.
1. On the Phone Setting tab, click Edit User in the User panel.
The Edit User screen displays.
2. Select the user from the list. Click Next.
Voicemail to E-mail Forwarding
65
Advanced Features
3. In the Voicemail section under the Advanced tab, put a check mark next
to Voicemail and Retrieve messages as attachment to email.
4. Enter the user Email address and click OK to save user settings.
66
Voicemail to E-mail Forwarding
Advanced Features
4.5.2.1
TESTING THE VOICEMAIL TO E-MAIL SERVICE
Once the configuration is complete, perform this simple test to confirm voicemail to email connection:
NOTE: The test user does not need to be assigned to a phone.
1. Leave a test voicemail for the created user (see Leaving Voicemail on
page 48).
2. From the Phone Setting tab, click View Call History under the Others
panel.
•
If an event similar to the examples shown at Troubleshooting on page153.,
the test failed and voicemail to email is incorrectly set up.
•
If no event is logged, the test is successful and voicemail to Email is correctly setup.
3. Wait an appropriate amount of time for the Email to be delivered to the destination Email address.
NOTE: Timeline to receive Email varies depending on the performance of the
mail system in use.
4. Launch the test user's Email program. Check that the Email was received
and that it has an attachment (WAV file).
5. Double click the attachment (WAV file) to listen to the voicemail.
Voicemail to E-mail Forwarding
67
Advanced Features
68
Voicemail to E-mail Forwarding
5
Administrator Software Configuration
This chapter contains information on administrator software configuration of the Syspine
A50 Plus using the Syspine A50 Plus. Topics include adding users, configuring call routing, configuring hold music, and restarting the system.
For more information on Syspine Module configuration, see the Service Manual
and Security Gateway User’s Manual.
Terms used in this chapter:
• ATA—Analogue Telephone Adapter (ATA) is a device used to connect one
or more standard analog telephones to a digital and/or non-standard telephone system network.
•
URL—Uniform Resource Locator (URL) is a global identifier of networkretrievable documents and in the scope of this User’s Manual represents a
World Wide Web address.
Administrator Software Configuration
5.1
Syspine A50 Plus
This section contains information on the basic functionality available when
using the Syspine A50 Plus. Syspine A50 Plus provides the management tools
for the Syspine A50 Plus including many features available in standard PBX
systems. The Syspine A50 Plus also provides effective management of hardware and user access.
IMPORTANT! Access to the Syspine A50 Plus should be restricted to the system
administrators only.
To begin using the Syspine A50 Plus, perform the following steps:
1. Go to Start All Programs Syspine A50 Plus to launch Syspine A50
Plus.
2. Select the desired Syspine A50 Plus. If the software does not automatically
detect the Syspine A50 Plus system, you can manually enter the IP
address by clicking on the yellow directional arrow and enter the IP address
in the designated field.
70
Syspine A50 Plus
Administrator Software Configuration
3. Click Connect.
NOTE: The detection process can take a few seconds. If the required Syspine
A50 Plus is not present, see Troubleshooting on page 153.
Once connection is established, a password prompt displays.
4. Enter the default password syspine (all lower case) and click Login.The
main Syspine A50 Plus screen displays.
1
2
3
4
The Administrator screen is composed of the following areas:
1. Navigation tabs—shows configuration options of the selected tab.
2. Task panel—shows a list of tasks.
3. Summary panel—shows a brief summary of configured items.
4. Refresh Page—refreshes the page to show the latest changes.
Syspine A50 Plus
71
Administrator Software Configuration
5.2
The Phone Setting Tab
The Phone Setting tab provides access to various tasks such as adding users
to the system and configuring voice services. There is also a brief summary
panel showing added phones, users, and services.
5.2.1
Using the User Menu
The User menu in the task panel is used to add users, edit users, and delete
users that are no longer required.
5.2.1.1
ADDING USERS
1. Go to Start All Programs Syspine A50 Plus to launch the soft-ware if
it is not already running.
72
The Phone Setting Tab
Administrator Software Configuration
2. Click the Phone Setting tab. In the User panel, click Add User.
The Add User screen displays. The default tab is the User tab.
The Phone Setting Tab
73
Administrator Software Configuration
3. In the User Account section under the User tab, enter in the Display
Name (this name will display on the phone) and select an extension number from the drop down list of available extensions (100-399).
4. In the Device section, click on Add Device.
The Choose Device screen displays.
5. You have the option to either select a device from a list of detected devices
or enter a MAC address to pre-add a device that is not yet connected. Click
OK to save your changes.
74
The Phone Setting Tab
Administrator Software Configuration
6. Click the Call Forwarding tab to display the following screen.
7. Set Call Forwarding behavior as desired.
– Within—set the ring time before call forwarding takes over(0-60 seconds).
– Do the following—specify how the call is forwarded and to whom using
the Forward to: go to voicemail 101, forward to another internal user,
for-ward to an User Group, forward to an external phone number, forward to auto attendant.
The Phone Setting Tab
75
Administrator Software Configuration
8. Click the Advanced tab to display the following screen.
9. Set Toll Restrictions as desired.
– No Restriction—gives the user full dialing privileges.
– Assign Custom Dialing Privileges—apply dialing privileges (local,
opera-tor/international, special).
10. Set Voicemail as desired.
Enable Voicemail—turns on voicemail for the user.
Retrieve messages as attachment to email—turns on email alerts when
voicemail is received.
Personal Authority Code—set the security code for voicemail.
11. Set Other Settings as desired.
– Check the following box in order to allow this user to be paged.
12. Click OK to save all changes.
76
The Phone Setting Tab
Administrator Software Configuration
13. The Syspine A50 Plus will then register the phone to the system, configure
the phone, and connect it to the system. Click Finish to complete the process.
5.2.1.2
EDITING USERS
To edit an existing user, perform the following steps:
1. Click the Phone Setting tab. In the User panel, click Edit User.
The Phone Setting Tab
77
Administrator Software Configuration
The Edit User screen displays.
2. Select the required phone and click Next.
The Edit User screen displays. The default tab is User.
78
The Phone Setting Tab
Administrator Software Configuration
3. In the User Account section under the User tab, edit the Display Name
(this name will display on the phone).
4. In the Device section, click on Add Device.
The Choose Device screen displays.
5. Click the Call Forwarding tab to display the following screen.
6. Set Call Forwarding behavior as desired.
– Within—set the ring time before call forwarding takes over(0-60 seconds).
– Do the following—specify how the call is forwarded and to whom using
the Forward to: go to voicemail 101, forward to another internal user, forward to an User Group, forward to an external phone number, forward to
auto attendant.
The Phone Setting Tab
79
Administrator Software Configuration
7. Click the Advanced tab to display the following screen.
8. Set Toll Restrictions as desired.
– No Restriction—gives the user full dialing privileges.
– Assign Custom Dialing Privileges—apply dialing privileges (local,
opera-tor/international, special).
9. Set Voicemail as desired.
– Enable Voicemail—turns on voicemail for the user.
– Retrieve messages as attachment to email—turns on email alerts
when voicemail is received.
– Personal Authority Code—set the security code for voicemail.
10. Set Other Settings as desired.
– Check the following box in order to allow this user to be paged.
11. Click OK to save all changes.
80
The Phone Setting Tab
Administrator Software Configuration
5.2.1.3
REMOVING A USER
To remove an existing user, perform the following steps:
NOTE: Removing a user deletes them permanently from the Syspine A50 Plus.
1. In Phone SettingUser click Remove User.
The Remove User screen displays.
2. Select the user to remove from the list and click Delete.
NOTE: Operators cannot be deleted from the system. To delete an Operator you
must change the Operator settings.
The Phone Setting Tab
81
Administrator Software Configuration
5.2.2
Using the Voice Services Menu
The Voice Services menu in the task panel is used to add voice services,
edit existing voice services, remove voice services no longer required, and
check phone line status.
The Voice Services menu tree in the summary panel shows all available
modules and ports associated with them. The administrator can check
module and line status using this panel.
Syspine A50 Plus supports Plug and Play connection to traditional analog
voice services through the built in ATA modules or VoIP connected through
the Inter-net, each requiring no extra hardware.
5.2.2.1
ADDING VOIP VOICE SERVICES
IMPORTANT! Not all VoIP service providers provide access to 911 emergency services. Check the service provider documentation to determine whether 911 dialing is
supported.
To add a new VoIP voice service, perform the following steps:
82
The Phone Setting Tab
Administrator Software Configuration
3. In Phone Setting Voice Services click Add Voice Services.
The Add Voice Services screen displays.
The Phone Setting Tab
83
Administrator Software Configuration
4. Select VoIP service that does not need any extra hardware and click
OK.
The Configure VoIP Service screen displays.
5. Enter in the appropriate fields (Service Name, Default Domain, Proxy
Server Address, Authentication User ID, Authentication Password, Confirmation Password).
6. Click Next.
The Configure VoIP Service screen displays.
84
The Phone Setting Tab
Administrator Software Configuration
7. Enter in the appropriate fields (Registration Interval (sec), Trunk Group,
and DTMF Mode).
8. Click Next.
The DID (Direct Inward Dial) Number setting screen displays.
Direct-Inward-Dial (DID) routes specific numbers directly to an internal
user, in a similar way to the Bypass Operator feature.
9. Click Add to setup DID to a specific number and enter the desired number
on the following screen.
10. Enter the DID Phone Number and select the user to receive the DID number from the drop down list.
The Phone Setting Tab
85
Administrator Software Configuration
NOTE: Phone numbers not configured for direct dial or listed here are automatically routed to the operator or Auto Attendant.
11. Click Finish to save the changes made.
Check that the VoIP voice service is added to the services list.
5.2.2.2
ADDING ANALOG VOICE SERVICES
To edit an existing voice service, perform the following steps:
1. In Phone SettingVoice Services click Edit Voice Service.
The Add Voice Services screen displays.
86
The Phone Setting Tab
Administrator Software Configuration
2. Select the analog service to modify and click OK.
The Configure Analog Service screen displays.
3. Edit the Analog Service as desired.
– Activate this voice service—check this box to activate this voice service.
– Analog name—set the name of the service.
– Trunk Group—choose the Trunk Group from the drop down list.
– Port/Trunk Number/Call Control—set the Trunk extension number for
each port and designate the calling privileges (2-way calling or Incoming
calls only).
4. Click Finish to save the settings.
The Phone Setting Tab
87
Administrator Software Configuration
5.2.2.3
EDITING VOIP VOICE SERVICES
To edit an existing VoIP voice service, perform the following steps:
1. In Phone SettingVoice Services click Edit Voice Service.
The Edit Voice Services screen displays.
88
The Phone Setting Tab
Administrator Software Configuration
2. Select the VoIP service to modify and click OK.
The Configure VoIP Service screen displays.
3. Make changes to the appropriate fields (Service Name, Default Domain,
Proxy Server Address, Authentication User ID, Authentication Password,
Confirmation Password).
4. Click Next.
The Configure VoIP Service screen displays.
The Phone Setting Tab
89
Administrator Software Configuration
5. Make changes to the appropriate fields (Registration Interval (sec), Trunk
Group, and DTMF Mode).
6. Click Next.
The DID (Direct Inward Dial) Number setting screen displays.
Direct-Inward-Dial (DID) routes specific numbers directly to an internal
user, in a similar way to the Bypass Operator feature.
7. Click Add to setup DID to a specific number and enter the desired number
on the following screen.
8. Enter the DID Phone Number and select the user to receive the DID number from the drop down list.
90
The Phone Setting Tab
Administrator Software Configuration
NOTE: Phone numbers not configured for direct dial or listed here are automatically routed to the operator or Auto Attendant.
9. Click Finish to save the changes made.
5.2.2.4
REMOVING VOICE SERVICES
To remove an existing voice service, perform the following steps:
1. In Phone Setting Voice Services click Remove Voice Service.
2. The Remove Voice Services screen displays.
The Phone Setting Tab
91
Administrator Software Configuration
3. Select the voice service to remove from the list and click Delete.
5.2.3
Using the Others Menu
The Others menu in the task panel is used to run an automatic installation,
view detailed call history, upgrade device firmware, and refresh the Administrator main page to display setting changes.
92
The Phone Setting Tab
Administrator Software Configuration
5.2.3.1
VIEWING CALL HISTORY
The Call History screen enables the administrator to view all system call activity, whether incoming, outgoing, and internal.
1
4
2
5
3
6
The Call History screen is composed of the following areas:
1. Interval From/To—filter the Call History by time scale, call type, and user.
2. Call Direction—indicates whether calls were incoming or outgoing.
3. Legend panel—describes the symbols used in the interface.
4. Type of calls—filter Call History by type of call.
5. Call History list—view detailed call information.
6. Actions—Refresh, Save, and Close buttons:
– Refresh the screen to update with the latest information.
– Save the current Call History to a .csv file.
– Close Call History.
The Phone Setting Tab
93
Administrator Software Configuration
5.2.3.2
UPGRADING DEVICE FIRMWARE
From time-to-time, new firmware becomes available to correct reported bugs or
enhance functionality. These firmware files can be downloaded from
www.syspine.com and placed on the administrator’s PC ready for installation to
the system.
To upgrade a Syspine A50 Plus module, perform the following steps:
1. Click Device Firmware Upgrade.
2. The Upgrade Device Firmware screen displays.
94
The Phone Setting Tab
Administrator Software Configuration
3. Click Browse to locate the desired upgrade package.
The screen refreshes with all the available upgrades associated with the
.rpu file and the number of devices to which the upgrades apply.
4. Select the desired upgrade method:
– Upgrade all devices to which this package applies—the recommended
upgrade method. Automatically selects and applies all appropriate
upgrades in the selected .rpu release.
– Let me choose which devices to upgrade—select the devices to upgrade
manually.
5. Click Next.
– The Warnings and confirmation screen displays.The screen displays a
list of devices that require upgrades.
IMPORTANT! Read the warnings displayed in the list before continuing.
6. Click Upgrade to start the upgrade process.
The Upgrade device firmware screen displays.
The screen shows the progress of all upgrades dynamically. When the
upgrades are complete, the following message displays.
7. Click OK to re-display the Upgrade device firmware screen. All the
selected devices show a green check when upgrades have completed successfully.
NOTE: After upgrading modules, Syspine A50 Plus displays a prompt to create
a new system backup.
8. Click Yes to perform a backup, or click No to backup the system later.
The Phone Setting Tab
95
Administrator Software Configuration
5.3
The Call Routing Tab
The Call Routing tab is used to determine how incoming calls are handled
when they enter the Syspine Phone System. Choose how calls are answered
and configure Auto Attendant properties using this tab. There is also a brief
summary panel showing the incoming/outgoing call routing.
5.3.1
Configuring Incoming Call Routing
The Syspine A50 Plus provides several options for configuring an incoming call
routing plan for a new phone system.
5.3.1.1
CONFIGURING DAY/NIGHT SCHEDULE
To add, edit, or remove a day time schedule, holiday, or exception, perform the
following steps to launch the Specify Day/Night Schedule screen:
96
The Call Routing Tab
Administrator Software Configuration
1. Click Specify Day/Night Schedule in the Incoming Call Routing panel.
The Specify Day/Night Schedule screen displays.
5.3.1.2
CREATING A DAY/NIGHT SCHEDULE
NOTE: The default day time settings are 8:30 AM to 5:30 PM on Monday, Tuesday, Wednesday, Thursday, and Friday. Any other period that is not
defined will be treated as night time.
The Call Routing Tab
97
Administrator Software Configuration
1. Click Add in the Day Time Schedule section.
The Specify Day Time screen displays.
2. Enter in the Start Time, End Time, and the days of the week you want the
schedule to apply to.
3. Click OK to create the schedule.
NOTE: To confirm that the schedule has been saved, it should be on the Day
Time Schedule list in the Specify Day/Night Schedule screen.
5.3.1.3
EDITING A DAY/NIGHT SCHEDULE
1. Select a schedule in the Day Time Schedule section list and click Edit.
The Specify Day Time screen displays.
2. Modify the Start Time, End Time, and the days of the week you want the
schedule to apply to.
98
The Call Routing Tab
Administrator Software Configuration
3. Click OK to save the schedule.
NOTE: To confirm that the schedule has been saved, it should be on the Day
Time Schedule list in the Specify Day/Night Schedule screen.
5.3.1.4
REMOVING DAY/NIGHT SCHEDULES
1. Select the schedule you want to remove in the Day Time Schedule section
list and click Remove.
2. To remove all day time schedules, click Remove All.
5.3.1.5
CREATING HOLIDAYS AND EXCEPTIONS
1. Click Add in the Holiday and Exceptions section.
The Specify Date screen displays.
2. Enter in the description, month, and the day of the holiday or exception.
3. Click OK to create the holiday or exception.
NOTE: To confirm that the holiday or exception has been saved, it should be on
the Holiday and Exceptions list in the Specify Day/Night Schedule
screen.
The Call Routing Tab
99
Administrator Software Configuration
5.3.1.6
EDITING A HOLIDAY OR EXCEPTION
1. Click Edit in the Holiday and Exceptions section.
The Specify Date screen displays.
2. Modify the description, month, and the day of the holiday or exception.
3. Click OK to save the holiday or exception.
NOTE: To confirm that the holiday or exception has been saved, it should be on
the Holiday and Exceptions list in the Specify Day/Night Schedule
screen.
5.3.1.7
REMOVING A HOLIDAY OR EXCEPTION
1. Select the schedule you want to remove in the Holiday and Exceptions
section list and click Remove.
2. To remove all holidays and exceptions, click Remove All.
100
The Call Routing Tab
Administrator Software Configuration
5.3.1.8
CHOOSE WHO WILL ANSWER CALLS
1. Click Choose Who Will Answer Calls in the Incoming Call Routing
panel.
The Choose Who Will Answer Calls screen displays.
2. Select the Trunk Group you want to edit from the drop down list.
3. Select who will answer Day Time calls from the drop down list from:
–
–
–
–
Auto Attendant
Operator
User Group
Call Agent Group
The Call Routing Tab
101
Administrator Software Configuration
4. If Call Agent Group is selected, select the Call Agent Group that should
receive incoming calls.
5. Select who will answer Night Time calls from the drop down list from:
–
–
–
–
Auto Attendant
Operator
User Group
Call Agent Group
6. If Call Agent Group is selected, select the Call Agent Group that should
receive incoming calls.
7. Click OK to save the settings.
5.3.1.9
CONFIGURE AUTO ATTENDANT
1. Click Configure Auto Attendant in the Incoming Call Routing panel.
102
The Call Routing Tab
Administrator Software Configuration
The Configure Auto Attendant screen displays.
2. To manage the Day/Night welcome greeting recording, click Configure for
the appropriate greeting.
The Configure Greetings screen displays.
The Call Routing Tab
103
Administrator Software Configuration
3. To add a greeting, click Add.
The Upload Sound File screen displays.
NOTE: The sound file must be a .wav file format and cannot exceed 2MB in
size.
4. Click Browse to locate the desired sound file.
5. Click Upload to upload the sound file to the Syspine A50 Plus.
NOTE: To confirm that the file has been uploaded properly, you should see the
uploaded file in the Configure Greetings screen.
6. Click OK in the Configure Greetings screen to save the settings.
7. To enable level 2 Auto Attendant, place a check mark in the Enable level 2
Auto Attendant check box.
IMPORTANT! When Level 2 Auto Attendant is enabled, the Level 1 Auto Attendant
will only accept single digit selection (1-9, *, and #). Dialing 3 or 4 digit extension numbers is only allowed in the Level 2 Auto Attendant.
104
The Call Routing Tab
Administrator Software Configuration
8. Click Add to Configure Level 2 Auto Attendant.
The Configure Level 2 Auto Attendant screen displays.
9. Enter the Level 2 Auto Attendant details (name, digit received, call
answered by).
10. Click Configure.
The Configure Greetings screen displays.
The Call Routing Tab
105
Administrator Software Configuration
11. To add a greeting, click Add.
The Upload Sound File screen displays.
NOTE: The sound file must be a .wav file format and cannot exceed 2MB in
size.
12. Click Browse to locate the desired sound file.
13. Click Upload to upload the sound file to the Syspine A50 Plus.
NOTE: To confirm that the file has been uploaded properly, you should see the
uploaded file in the Configure Greetings screen.
14. Click OK in the Configure Greetings screen to save the settings.
15. Click OK in the Configure Auto Attendant screen to save the settings.
106
The Call Routing Tab
Administrator Software Configuration
5.3.2
Configuring Outgoing Call Routing
The Syspine A50 Plus provides several options for configuring an outgoing call
routing plan for a new phone system. This function allows the system to route
specific calls through different trunk groups. Routing rules can be set for dialing
local, long distance, or mobile numbers to be connected using VoIP or analog
service based on your settings.
5.3.2.1
CONFIGURING ROUTING RULE
1. Click Configure Routing Rule in the Outgoing Call Routing panel.
The Configure Outgoing Call Routing screen displays.
The Call Routing Tab
107
Administrator Software Configuration
2. To create an outgoing call routing rule, click Add.
The Configure the routing rule screen displays.
3. Configure the following routing rule settings:
– Leading digits from/to - set the range of leading digits of the number
dialed (ex. if the range is from 2-9, any number dialed beginning with a
digit between 2-9 will route to the specific Trunk Group you set it to).
– Send the call through - set the Trunk Group you want the call to route.
– How many digits do you want to strip - designate the number of digits
should be striped from the number.
– Add digits before the dialed number - set any additional digits that
need to be dialed prior to the number.
– Add digits after the dialed number - set any additional digits that need
to be dialed after the number.
– Enable second trunk group for backup - set a backup trunk group if
the primary trunk group is unavailable.
NOTE: To confirm that the routing rule has been created properly, you should
see the details in the Configure Outgoing Call Routing screen.
4. Once you have created the routing rule, click OK to exit the Configure
Outgoing Call Routing screen.
108
The Call Routing Tab
Administrator Software Configuration
5.3.2.2
CREATING TOLL RESTRICTIONS
1. Click Toll Restriction in the Outgoing Call Routing panel.
The Configure Toll Restriction screen displays.
The Call Routing Tab
109
Administrator Software Configuration
2. To create a Toll Restriction, click Add.
The Add/Edit Toll Restriction screen displays.
3. Specify the Toll Restriction Type from the drop down list:
– Auto Attendant
– Operator
– User Group
4. Enter in the extension range to be restricted.
5. Click OK to save the settings.
NOTE: To confirm that the toll restriction has been created properly, you should
see the details in the Configure Toll Restriction screen.
6. Once you have created the toll restriction, click OK to exit the Configure
Toll Restriction screen.
110
The Call Routing Tab
Administrator Software Configuration
5.3.2.3
CONFIGURING BLOCK LIST
1. Click Configure Block List in the Outgoing Call Routing panel.
The Configure Block List screen displays.
The Call Routing Tab
111
Administrator Software Configuration
2. To create a block list rule, click Add.
The Configure Block List screen displays.
IMPORTANT! Outbound numbers dialed which correspond with any entry in the
Block List will be treated as NOT PERMITTED, regardless of any other programmed
custom dialing privileges or user unrestricted status.
3. Select one of the following and enter the number to be blocked.
– Block the following specified phone number.
– Block the phone numbers mapped to the following leading digits.
4. Click OK to save the settings.
NOTE: To confirm that the block rule has been created properly, you should see
the details in the Configure Block List screen.
5. Once you have created the block rule, click OK to exit the Configure Block
List screen.
112
The Call Routing Tab
Administrator Software Configuration
5.3.2.4
VIEW NUMBER PLAN
6. Click View Number Plan in the Others panel.
The View Numbering Plan screen displays.
Click Close once you are done viewing the number plan.
The Call Routing Tab
113
Administrator Software Configuration
5.3.2.5
CONFIGURING DIALING PREFIX
1. Click Configure Dialing Prefix in the Others panel.
The Configure Dialing Prefix screen displays.
2. Enter in the dialing prefix number for the following actions:
– Operator
– Trunk Access
Click OK to save the settings.
114
The Call Routing Tab
Administrator Software Configuration
5.3.2.6
ASSIGNING THE OPERATOR
1. Click Assign Operator in the Others panel.
The Assign Operator screen displays.
2. Select the user who will server as the Operator and click OK.
The Call Routing Tab
115
Administrator Software Configuration
5.3.2.7
ASSIGNING THE ADMIN USER
1. Click Assign Admin User in the Others panel.
The Assign Admin User screen displays.
2. Select the user who will server as the Operator and click OK.
116
The Call Routing Tab
Administrator Software Configuration
5.4
The System Setting Tab
The System Setting tab provides access to Status information, various tasks
such as changing the system password, configuring the Email server, and
backing up and restoring voicemail and configuration settings. There is also a
brief summary panel showing remaining storage space, and Properties.
The summary screen is the default view in the System Setting tab and shows at
a glance any system issues that need attention.
The summary screen is broken down into two areas.
No.
Item
Description
1.
Status
2.
Properties
Displays voicemail storage space and total
storage space.
Displays general system information, such
as IP and MAC address, Syspine A50 Plus
software and hardware versions, System
date and time, System running time, and
Email server information.
The System Setting Tab
117
Administrator Software Configuration
5.4.1
Using the Status Menu
The Status menu in the task panel is used to review storage details.
VIEWING STORAGE DETAILS
5.4.1.1
The Storage Detail screen shows a summary of total system storage space and
a breakdown of system storage space by user.
1. To access the storage summary, click View Storage Detail in the Status
panel.
118
The System Setting Tab
Administrator Software Configuration
The View Storage Detail screen displays.
5.4.2
Using the Properties Menu
The Properties menu in the task panel is used to change the system password, date and time, configure Email server settings, configure hold music,
configure conference rooms, and to configure IP address.
The System Setting Tab
119
Administrator Software Configuration
5.4.2.1
CHANGING THE SYSPINE A50 PLUS PASSWORD
After logging in and setting up phones and users, it is recommended that the
Syspine A50 Plus password is changed.
NOTE: The default password for the Syspine A50 Plus is syspine.
To change the Syspine A50 Plus password, perform the following steps:
1. Once you have logged in to the Syspine A50 Plus, on the System Setting
tab, click Change Password in the Properties panel.
The Change Password screen displays.
2. Enter the current password (syspine), a new password, and confirm the
new password.
3. Click OK.
The following message is displayed when the password is changed successfully.
NOTE: If an error message is displayed, follow the on-screen prompts to correct
the problem and try again.
120
The System Setting Tab
Administrator Software Configuration
5.4.2.2
STRONG PASSWORD TIPS
Your password can be 4-20 digits and should contain letters (A, B, C, a, b,
c...), numerals (0, 1, 2, 3, 4, 5, 6, 7, 8, 9), and symbols (‘ ~ ! @ # $ % ^ & * (
) _ + - = { } | [ [ \ : “ ; < > ? , . /). Due to the way passwords are encrypted, the
most secure passwords are 7 or 14 characters long.
For a password to be strong, it should:
– Be significantly different from prior passwords.
– Not contain a name or user name.
– Not be a common word or name.
5.4.2.3
CHANGING SYSPINE A50 PLUS DATE AND TIME
To set the Syspine A50 Plus date and time values, perform the following
steps:
1. On the System Setting tab, click Change Date/Time in the Properties
panel.
The Change Date and Time screen displays.
2. Select the appropriate time zone from the drop down list.
The System Setting Tab
121
Administrator Software Configuration
3. You have the option to automatically synchronize the date and time with an
internet time server by entering the web address or IP address into the
server field and clicking Update Now or manually setting the date and time
information from the drop-down menus. Click OK to save the changes.
NOTE: The Syspine A50 Plus only reboots if the time zone is changed. All other
changes are updated immediately.
4. Verify the new date and time in the Properties table under the System
Setting tab.
NOTE: You may need to refresh the page in order to view your changes.
5.4.2.4
USING THE VOICEMAIL TO EMAIL SERVICE
The Syspine Administrator has a voicemail to Email option that, when enabled,
sends voicemail as an Email including the actual message as a WAV extension
file. See Voicemail to E-mail Forwarding on page 63 for more details.
122
The System Setting Tab
Administrator Software Configuration
5.4.2.5
CONFIGURING HOLD MUSIC
Syspine A50 Plus supports playback of custom music during calls on hold
through the audio jack on the rear of the system.
NOTE: If no custom music is supplied, the system plays the default music during
calls on hold.
To set the hold music using system default music, perform the following steps:
1. In System SettingProperties, click Configure Hold Music.
The Configure Hold Music screen displays.
2. Click Use the system default, and then click OK.
To customize the hold music using a prerecorded sound file, perform the
following steps:
3. In System Setting Properties, click Configure Hold Music.
The Configure Hold Music screen displays.
The System Setting Tab
123
Administrator Software Configuration
4. Click Use a prerecorded sound file uploaded to the system, and then
click OK.
The Configure Greetings screen displays.
5. Click Add to add a prerecorded sound file.
The Upload Sound File screen displays.
NOTE: The selected sound file must be .wav type file and cannot exceed 2MB
in file size.
To customize the hold music using an external audio source, perform the
following steps:
1. Prepare the desired music on an audio device with analog output.
124
The System Setting Tab
Administrator Software Configuration
2. Connect the device to the audio in jack on the rear of Syspine A50 Plus as
shown.
P4
P3
P2
DC
P1
IN
1. In System Setting Properties, click Configure Hold Music.
The Configure Hold Music screen displays.
2. Click Use the input connected to the audio jack on the back of the system, and then click OK.
All calls on hold hear the selected audio in place of the default Syspine A50
Plus music.
The System Setting Tab
125
Administrator Software Configuration
5.4.2.6
CONFIGURING CONFERENCE ROOMS
Syspine A50 Plus provides two Conference Rooms which allows users to
call an extension and enter a PIN number to connect to a conference call.
1. In System Setting Properties, click Configure Conference Rooms.
The Configure Conference Rooms screen displays.
2. Check the box beside Conference Room 1 to enable the conference room.
3. Enter in a 4-digit PIN number for participants to dial in to gain access to the
conference room.
4. Enter in a 4-digit PIN number for the host user to dial in to gain access the
conference room.
5. Repeat steps 2-4 in the Conference Room 2 fields if you would like to
enable the conference room.
6. Set the Conference Room Options. Enter a check mark into the options
you want enabled.
– Play alerting tone when any participant enter/leave the conference room
– The conference room participants can not hear each other until host user
entered.
7. Click OK to save the settings.
126
The System Setting Tab
Administrator Software Configuration
5.4.2.7
CONFIGURING IP ADDRESS
Syspine A50 Plus allows the administrator to assign the IP address automatically if the network supports this capability or they can assign a static IP
address to the system.
1. In System Setting Properties, click Configure IP Address.
The Configure IP Address screen displays.
2. In the IP Address section, select one of the following options:
• Obtain an IP address automatically
Use the following IP address: (set the following fields)
– IP address
– Subnet mask
– Default gateway
3. In the DNS Server Address section, select one of the options:
• Obtain DNS server address automatically
• Use the following DNS server addresses: (set the following fields)
– Preferred DNS server
– Alternate DNS server
4. In the External Access section, set the following field:
– Public IP Address
5. Click OK to save the settings.
NOTE: The Syspine A50 Plus will automatically reboot if IP address settings are
modified.
The System Setting Tab
127
Administrator Software Configuration
5.4.3
Using the Backup Menu
The Backup menu in the task panel enables the backup and retrieval of configuration and voicemail files for disaster recovery or security purposes.
IMPORTANT! Configuration and voicemail files may contain the names of users, personal phone calls, or other confidential information and therefore it is important to store
backups in a secure location on the LAN or on removable media.
128
The System Setting Tab
Administrator Software Configuration
5.4.3.1
BACKING UP VOICEMAIL, GREETINGS, AND SETTINGS
To create a backup, perform the following steps:
1. Click Create Backup in the Backup panel.
The Create Backup screen displays.
2. Enter the file path to the secure area of the network or removable media or
browse to the desired location.
3. Enter a meaningful backup name or use the default name.
4. Select the backup options:
– Backup configuration settings
– Backup voicemail
– Backup greetings
5. Enter a description of the backup.
6. Click OK.
The backup is complete when #/# Completed displays at the bottom of the
window.
NOTE: Completion times vary according to the amount of data on the system.
7. Click Close to complete the backup process.
The System Setting Tab
129
Administrator Software Configuration
5.4.3.2
RESTORING VOICEMAIL, GREETINGS, AND SETTINGS
To restore data from a previously saved file, perform the following steps:
1. Click Restore Backup in the Backup panel.
The Restore Backup screen displays.
2. The Path to the backup location field is completed automatically with the
file path to the most recent backup. If the required backup is located elsewhere, click Browse to navigate to the file.
3. Select the required backup from the Specify which one backup package
drop down list.
4. In the Specify what happens to data in the backup file panel select from:
– Backup system settings
– Backup voicemail
– Backup system greeting.
5. Click OK.
NOTE: The configuration files are restored when the you see #/# Completed.
The server will reboot at the bottom of the window.
6. Click Close.
NOTE: The Syspine A50 Plus will automatically reboot after the system restore.
130
The System Setting Tab
Administrator Software Configuration
5.4.4
Using the Others Menu
The Others menu in the task panel allows the administrator to restart the
system, reset to factory default, and activate group settings.
5.4.4.1
RESTARTING THE SYSTEM
To restart the system:
1. Click Restart the system in the Others panel.
The Restart the system screen displays.
IMPORTANT! Restarting the system will interrupt phone activity for approximately 1
minute.
The System Setting Tab
131
Administrator Software Configuration
2. Click Restart the system.
The Restart confirmation screen displays.
3. Click Yes.
The Reboot warning screen displays.
IMPORTANT! Ensure that there is no phone activity on the system otherwise it will be
interrupted.
4. Click OK.
NOTE: The Syspine A50 Plus will automatically reboot.
5.4.4.2
RESETTING TO FACTORY DEFAULTS
To reset the Syspine A50 Plus to its factory default settings, perform the following steps:
IMPORTANT! Before resetting the Syspine A50 Plus to its factory settings, it is recommended to create a backup (see Backing Up Voicemail, Greetings, And Settings on page 129).
CAUTION: ALL EXISTING PHONE AND VOICE SERVICE REGISTRATIONS WILL BE
REMOVED. ALL MAILBOX GREETINGS AND PERSONAL MESSAGES WILL BE
CLEARED.
132
The System Setting Tab
Administrator Software Configuration
1. Click Reset to Factory Default in the Others panel.
The Reset to Factory Default screen displays.
2. Click the Reset to Factory Default button.
The following warning screen displays.
3. Click OK to continue.
The Reboot warning screen displays.
IMPORTANT! Ensure that there is no phone activity on the system otherwise it will be
interrupted.
4. Click OK.
NOTE: The Syspine A50 Plus will automatically reboot.
The System Setting Tab
133
Administrator Software Configuration
5.4.4.3
ADVANCED SETTINGS
To activate group settings, perform the following steps:
1. Click Advanced Setting in the Others panel.
The Advanced Setting screen displays.
2. Put a check mark in the Activate group setting check box.
3. Click OK to save the setting.
134
The System Setting Tab
Administrator Software Configuration
5.5
The Group Setting Tab
The Group Setting tab is used to configure call agent groups, user groups,
and pickup groups. In this section the administrator can assign users into
groups and determine how the calls are handled for each group.
5.5.1
Configuring Call Agent Groups
5.5.1.1
ADDING A CALL AGENT GROUP
1. Click Add Call Agent Group in the Call Agent Group panel.
The Group Setting Tab
135
Administrator Software Configuration
The Configure Call Agent Group screen displays.
2. Specify a name for this agent group.
3. Specify a number for this agent group.
4. To add members to this agent group, click Add.
The Configure Members screen displays.
136
The Group Setting Tab
Administrator Software Configuration
5. Select the members that you want to assign to the selected group and click
OK. To add all members to the selected group, put a check beside All
Members.
6. Select how the system should ring the members in the group from the following drop down list:
– Simultaneous
– Circular
– Round Robin
7. Select the ring time (3-30 seconds).
8. To choose a greeting if no one is able to answer the call, click Configure.
The Configure Greetings screen displays.
9. To add a greeting, click Add.
The Upload Sound File screen displays.
The Group Setting Tab
137
Administrator Software Configuration
NOTE: The sound file must be a .wav file format and cannot exceed 2MB in
size.
10. Click Browse to locate the desired sound file.
11. Click Upload to upload the sound file to the Syspine A50 Plus.
NOTE: To confirm that the file has been uploaded properly, you should see the
uploaded file in the Configure Greetings screen.
12. Click OK in the Configure Greetings screen to save the settings.
13. Click OK in the Configure Call Agent Group screen to save the settings.
NOTE: To confirm that the call agent group has been saved, it should be on the
Call Agent Groups list in the Group Settings tab.
5.5.1.2
EDITING A CALL AGENT GROUP
1. Click Edit Call Agent Group in the Call Agent Group panel.
138
The Group Setting Tab
Administrator Software Configuration
The Edit Call Agent Group screen displays.
2. Select the agent group from the list shown and click Next.
The Configure Call Agent Group screen displays.
3. Edit the name for this agent group.
4. Edit the number for this agent group.
The Group Setting Tab
139
Administrator Software Configuration
5. To add members to this agent group, click Add.
The Configure Members screen displays.
6. Select the members that you want to assign to the selected group and click
OK. To add all members to the selected group, put a check beside All
Members.
7. Select how the system should ring the members in the group from the following drop down list:
– Simultaneous
– Circular
– Round Robin
8. Select the ring time (3-30 seconds).
9. To choose a greeting if no one is able to answer the call, click Configure.
The Configure Greetings screen displays.
140
The Group Setting Tab
Administrator Software Configuration
10. To add a greeting, click Add.
The Upload Sound File screen displays.
NOTE: The sound file must be a .wav file format and cannot exceed 2MB in
size.
11. Click Browse to locate the desired sound file.
12. Click Upload to upload the sound file to the Syspine A50 Plus.
NOTE: To confirm that the file has been uploaded properly, you should see the
uploaded file in the Configure Greetings screen.
13. Click OK in the Configure Greetings screen to save the settings.
14. Click OK in the Configure Call Agent Group screen to save the settings.
NOTE: To confirm that the call agent group has been saved, it should be on the
Call Agent Groups list in the Group Settings tab.
The Group Setting Tab
141
Administrator Software Configuration
5.5.1.3
REMOVE A CALL AGENT GROUP
1. Click Remove Call Agent Group in the Call Agent Group panel.
The Remove Call Agent Group screen displays.
2. Select the agent group from the list shown and click Delete.
NOTE: The system will not allow you to delete a group if it is part of a routing
rule. Remove any rule associated with the group before you delete the
group.
142
The Group Setting Tab
Administrator Software Configuration
5.5.2
Configuring User Groups
5.5.2.1
ADDING A USER GROUP
1. Click Add User Group in the User Groups panel.
The Configure User Group screen displays.
The Group Setting Tab
143
Administrator Software Configuration
2. Specify a name for this user group.
3. Specify a number for this user group.
4. To add members to this user group, click Add.
The Configure Members screen displays.
5. Select the members that you want to assign to the selected group and click
OK. To add all members to the selected group, put a check beside All
Members.
6. Select how the system should ring the members in the group from the following drop down list:
– Simultaneous
– Circular
– Round Robin
7. Select the ring time (3-30 seconds).
8. Select the user who the call should be forwarded to from the drop down list.
9. Click OK to save the settings.
144
The Group Setting Tab
Administrator Software Configuration
5.5.2.2
EDITING A USER GROUP
1. Click Edit User Group in the User Groups panel.
The Edit User Group screen displays.
The Group Setting Tab
145
Administrator Software Configuration
2. Select the user group from the list shown and click Next.
The Configure User Group screen displays.
3. Edit the name for this user group.
4. Edit the number for this user group.
5. To add members to this user group, click Add.
The Configure Members screen displays.
146
The Group Setting Tab
Administrator Software Configuration
6. Select the members that you want to assign to the selected group and click
OK. To add all members to the selected group, put a check beside All
Members.
7. Select how the system should ring the members in the group from the following drop down list:
– Simultaneous
– Circular
– Round Robin
8. Select the ring time (3-30 seconds).
9. Select the user who the call should be forwarded to from the drop down list.
10. Click OK to save the settings.
5.5.2.3
REMOVE A USER GROUP
1. Click Remove User Group in the User Groups panel
The Group Setting Tab
147
Administrator Software Configuration
The Remove User Group screen displays.
2. Select the user group from the list shown and click Delete.
NOTE: The system will not allow you to delete a group if it is part of a routing
rule. Remove any rule associated with the group before you delete the
group.
5.5.3
Configuring Pickup Groups
5.5.3.1
ADDING A PICKUP GROUP
1. Click Add Pickup Group in the Pickup Groups panel.
148
The Group Setting Tab
Administrator Software Configuration
The Configure Pickup Group screen displays.
2. Specify a name for this pickup group.
3. To add members to this pickup group, click Add.
The Configure Members screen displays.
4. Select the members that you want to assign to the selected group and click
OK. To add all members to the selected group, put a check beside All
Members.
5. Click OK to save the settings.
The Group Setting Tab
149
Administrator Software Configuration
5.5.3.2
EDITING A PICKUP GROUP
1. Click Edit Pickup Group in the Pickup Groups panel.
The Edit Pickup Group screen displays.
150
The Group Setting Tab
Administrator Software Configuration
2. Select the pickup group from the list shown and click Next.
The Configure Pickup Group screen displays.
3. Edit the name for this pickup group.
4. To add members to this pickup group, click Add.
The Configure Members screen displays.
5. Select the members that you want to assign to the selected group and click
OK. To add all members to the selected group, put a check beside All
Members.
6. Click OK to save the settings.
The Group Setting Tab
151
Administrator Software Configuration
5.5.3.3
REMOVE A PICKUP GROUP
1. Click Remove Pickup Group in the Pickup Groups panel.
The Remove Pickup Group screen displays.
2. Select the pickup group from the list shown and click Delete.
– The system will not allow you to delete a group if it is part of a routing
rule. Remove any rule associated with the group before you delete the
group.
152
The Group Setting Tab
Troubleshooting
A
This appendix contains guidelines for troubleshooting general installation and
connection errors as well as procedures to reset the Syspine A50 Plus factory
default settings and Syspine A50 Plus administrator password.
6.1
Common Issues
How can I setup all phones without a PC using the Syspine A50 Plus?
1. On the LCD panel of Syspine A50 Plus, press and hold the Enter button
until it shows Auto Install. Release the Enter button and press the Enter
button twice to confirm and accept the auto installation command.
2. After 10 seconds, all phones should be setup with Syspine A50 Plus automatically.
What should I do if I lost my password?
1. On the LCD panel of Syspine A50 Plus, press and hold the Enter button
until it shows Auto Install. Release the Enter button and press the Down
button twice to switch the option to Reset Password.
2. Press the Enter button twice to confirm and accept the command to reset
the password. The password should reset to the default value - 'syspine'
(case-sensitive).
What should I do if the LCD panel of Syspine A50 Plus is blank?
1. Remove the LCD panel by pressing the button to the left of the LCD panel.
Then, re-insert it by pressing the panel inward until an audible click is
heard. Apply steady pressure until a second click is heard.
2. Reboot the Syspine A50 Plus. The LCD panel should display something if
it is functioning properly.
Appendix A
I am having problems connecting to another extension, what should I do?
1. Please confirm that both IP phones are registered with Syspine A50 Plus.
2. Reboot both IP phones to renew IP address and re-register both phones
with the Syspine A50 Plus.
I cannot receive the incoming calls or make outgoing calls, what should I
do?
1. Please confirm that your phone is registered with the Syspine A50 Plus.
2. If your phone service provider is PSTN (phone cables), you should add an
ATA module (FXO) into Syspine A50 Plus to enable a voice trunk.
3. If your phone service provider is VoIP service provider, you should add a
SIP account into Syspine A50 Plus to enable a voice trunk.
I can receive incoming calls, but cannot make outgoing calls, what should
I do?
1. Please confirm that you have set up an outgoing call rule in both the user
account and call routing settings.
2. If your voice trunk is based on ATA service, please check the call control to
make sure is “2 ways”.
I created one VoIP account for the additional voice trunk, but I cannot dial
out through that VoIP voice service. Why?
1. You should create an outgoing call rule for both original and additional
voice trunks.
Some outbound calls can dial out, but some outbound calls cannot. Why?
1. Please check the outgoing call rule.
2. Please check the toll restriction in both user account and call routing settings.
3. Please check the block list in the outgoing call routing settings.
The blue light on my phone is always flashing, what's going on?
1. There could be a problem with the network.
2. The phone cannot find the Syspine A50 Plus.
3. Replace the network cable and reboot the IP phone.
154
Common Issues
Appendix A
All incoming calls cannot hear the auto-attendant, what should I do?
1. Please confirm the incoming call routing.
2. Please check that the day/night welcome greeting is in the proper .wav format.
How do I pickup an incoming call for another extension?
1. Create a pickup group, and then add you and the other extension to that
group.
2. When someone gets an incoming call, dial [*2] to answer the incoming call
from your phone.
The system doesn't accept my music file. Why?
1. The music or voice file should be formatted as a .mp3 or .wav.
The Administrator program cannot run in my PC. Why?
1. Install the program on a different PC to confirm that the program works.
2. Remove the program and re-install it on your PC.
The Administrator program cannot log into the Syspine A50 Plus. Why?
1. Make sure the firewall on the PC has the program enabled.
2. Make sure the PC is in the same network environment as the Syspine A50
Plus.
I have a problem that has not been resolved in this troubleshooting section, where can I get help?
1. If your problem cannot be resolved in this chapter, please contact our support center.
2. Please contact the support center at:
– Phone: 800-713-3386 (10am-6pm EST, Monday-Friday)
– Email: [email protected]
– Web Site: www.syspine.com
Common Issues
155
Appendix A
156
Common Issues
Quick Reference Guides
B
This appendix contains quick reference guides to making phone calls and
using voicemail. The information supplied here is also available in the Syspine
A50 Plus Help menu.
Appendix A
7.1
Voicemail Quick Guide
Review voice messages whether in or out of the office using Syspine A50 Plus.
The password used to access voicemail and the Assistant program are the
same. The default password is 9999.
To access voicemail in the office, dial 500.
To access voicemail out of the office, dial the office phone number. If the Auto
Attendant answers, dial 500. If the operator answers, ask to be transferred to
voicemail.
158
Voicemail Quick Guide
Horizontal G
Ensure 100 mm between guides
Drill Guide
NT: This template MUST be printed full size on A4
or greater). Ensure that the distance between the
Drill Guide
Index
C
Calls
Extensions 44
External 45
Incoming 46
Parking 54
Retrieving 55
Transferring 47
Connections
IP Phone 310 25
I
Installation
Hardware 16
Recommended Installation 17
System Requirements 26
IP Phone 310
Cabling 24
Connecting 25
Front View 11
Installation
Wall Mount 23
Rear View 14
L
LCD Panel 9
LED Behavior 10
P
PA. See Public Address System
Public Address System
Using 52
Q
Quick Guide
Voicemail 158
S
Syspine A50 Plus
Bottom View 8
Front View 6
Installation
Desktop 18
Wall Mount 19
Rear View 7
Syspine A50 Plus Phone System
System Tour 6
T
Troubleshooting
Common Issues 153
U
Unpacking 4
Optional Contents 5
V
Voicemail
Index
E-mail Forwarding 63
Leaving Messages 48
Options 49
Quick Guide 158
Retrieving Messages 48
Using 48
161