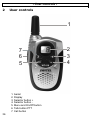
1
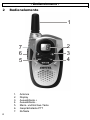
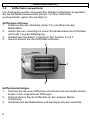
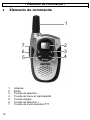
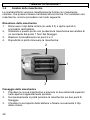
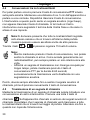
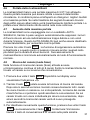
WT010
Bedienungsanleitung
Mode d’emploi
Istruzioni per l'uso
Operating Instructions
WT010
Bedienungsanleitung ________________3
Mode d’emploi ____________________13
Istruzioni per l'uso ________________23
Operating instructions ______________33
Declaration of Conformity __________43
2
- Inhaltsverzeichnis 1 Wichtige Hinweise ................................................................ 4
2 Bedienelemente.................................................................... 6
3 Inbetriebnahme..................................................................... 7
3.1
3.2
3.3
3.4
Verpackungsinhalt prüfen.................................................................................7
Batterien einsetzen ...........................................................................................7
Gürtelclip entfernen oder anbringen.................................................................7
Griffschalen auswechseln.................................................................................8
4 Bedienung ............................................................................ 9
4.1
4.2
4.3
4.4
4.5
4.6
4.7
4.8
Ein-/Ausschalten der Funkgeräte .....................................................................9
Lautstärkeregelung ...........................................................................................9
Kanalwahl .........................................................................................................9
Gespräche zwischen den Funkgeräten..........................................................10
Anrufsignal senden .........................................................................................10
Reichweite der Funkgeräte.............................................................................11
Erhöhung der maximalen Reichweite.............................................................11
Kanalsuche (Scan-Modus) .............................................................................11
5 Technische Daten............................................................... 12
3
- Wichtige Hinweise 1
Wichtige Hinweise
Bitte lesen Sie diese Bedienungsanleitung sorgfältig durch. Öffnen Sie
das Gerät in keinem Fall selbst und führen Sie keine eigenen
Reparaturversuche aus. Bei Gewährleistungsansprüchen wenden Sie sich
bitte an Ihren Fachhändler.
Batterien
Verwenden Sie immer nur Batterien des Typs Alkaline AAA 1,5V.
Batterien nicht ins Feuer werfen oder ins Wasser tauchen. Alte oder
defekte Batterien nicht mit dem normalen Hausmüll entsorgen. Nehmen
Sie bitte unbedingt die Batterien aus dem Gerät, wenn Sie es länger als
etwa einen Monat nicht mehr brauchen sollten. Im Gerät vergessene
Batterien können sich in einigen Monaten entladen. Leere Batterien
können auslaufen, was die Kontakte oder die empfindliche Elektronik im
Gerät zerstören kann.
Entsorgung
Ist die Gebrauchszeit der Batterien oder der Funkgeräte abgelaufen,
entsorgen Sie diese bitte umweltfreundlich gemäß den gesetzlichen
Bestimmungen.
Reinigung und Pflege
Die Gehäuseoberflächen können mit einem trockenen, weichen und
fusselfreien Tuch gereinigt werden. Niemals Reinigungsmittel oder gar
aggressive Lösungsmittel verwenden. Außer einer gelegentlichen
Gehäusereinigung ist keine weitere Pflege erforderlich.
4
- Wichtige Hinweise Wichtige Sicherheitshinweise
Verwenden Sie die Funkgeräte nicht in explosionsgefährdeten
Bereichen wie z. B. Brennstofflagern, Sprengbereichen,
Chemielagern oder Bereichen in denen Chemikalien oder andere
Feststoffe in der Luft vorhanden sind. Befolgen Sie immer alle
Hinweisschilder. Bereiche mit Explosionsgefahr sind aber nicht
immer deutlich markiert.
Das Wechseln von Batterien in explosionsgefährdeten Bereichen
bedeutet Lebensgefahr.
Wird das Funkgerät nass, schalten Sie es sofort aus und entfernen
Sie die Batterien. Das Funkgerät nicht verwenden, bis es völlig
trocken ist.
Beim Senden das Funkgerät immer senkrecht und ca. 2,5 bis 5 cm
vom Munde entfernt halten.
Beim Empfang das Funkgerät mindestens 2,5 cm vom Kopf entfernt
halten.
Um elektromagnetische Konflikte zu verhindern, schalten Sie die
Funkgeräte aus, wenn ein Hinweisschild dazu auffordert.
Sind Sie nicht sicher, ob der Betrieb von Funkgeräten erlaubt ist
(Flugzeuge, Schiffe, Krankenhäuser, usw.) fragen Sie eine
verantwortliche Person, bevor Sie die Funkgeräte benutzen.
Legen Sie die Funkgeräte im Auto niemals über einen Airbag, da
lose Gegenstände beim Auslösen des Airbags mit Gewalt
weggeschleudert werden und eine Verletzungsgefahr darstellen.
Übermäßige Belastungen durch Rauch, Staub, Erschütterungen,
Chemikalien, Feuchtigkeit, Hitze oder direkte Sonneneinstrahlung
müssen vermieden werden.
5
- Bedienelemente 2
Bedienelemente
1
7
6
5
1.
2.
3.
4.
5.
6.
7.
6
Antenne
Display
Auswahltaste +
Auswahltaste Menü- und Ein/Aus-Taste
Gesprächstaste PTT
Ruftaste
2
3
4
- Inbetriebnahme 3
Inbetriebnahme
3.1
Verpackungsinhalt prüfen
Zum Lieferumfang gehören:
Zwei Funkgeräte mit
Jeweils drei Griffschalen pro Funkgerät
Gürtelclip
eine Bedienungsanleitung
3.2
Batterien einsetzen
Die benötigten Batterien befinden sich nicht im Lieferumfang. Sie
benötigen je Gerät drei Batterien des Typs AAA 1.5V. Bitte verwenden Sie
neue hochwertige Alkaline-Batterien.
Hinweis: Sie können auch wiederaufladbare NiMH Standard-Akkus mit
einer Leistung von 600mAH verwenden. Wiederaufladbare StandardAkkus können nicht innerhalb der Funkgeräte geladen werden.
1. Um den Gürtelclip zu lösen, ziehen Sie etwas an der oberen Lasche
und schieben Sie den Gürtelclip nach oben (siehe 3.3).
2. Öffnen Sie dann das Fach, indem Sie die Abdeckung nach unten
wegschieben.
3. Legen Sie nun die Batterien ein und achten Sie auf die richtige Polung.
Falsche Polung kann das Gerät beschädigen.
4. Schliessen Sie das Fach und befestigen Sie den Gürtelclip (siehe 3.3).
Sind die Batterien entladen, hören Sie Signaltöne oder das Funkgerät
kann nicht mehr eingeschaltet werden.
3.3
Gürtelclip entfernen oder anbringen
Um den Gürtelclip zu lösen, ziehen Sie etwas
an der oberen Lasche (1) und schieben Sie
den Gürtelclip (2) nach oben.
1
2
Schieben Sie den Gürtelclip von oben auf die
Führung (2) bis er hörbar einrastet.
7
- Inbetriebnahme 3.4
Griffschalen auswechseln
Ihre Funkgeräte wurden mit jeweils drei farbigen Griffschalen ausgeliefert,
die Sie bei Bedarf auswechseln können. Um eine Griffschale
auszuwechseln, gehen Sie wie folgt vor:
Griffschale entfernen
1. Entfernen Sie den Gürtelclip (siehe 3.3) und öffnen Sie das
Batteriefach.
2. Hebeln Sie nun vorsichtig mit einem Schraubenzieher die Griffschale
am Punkt 1 aus der Befestigung.
3. Wiederholen Sie diesen Vorgang an den Punkten 2 und 3.
4. Danach können Sie die Griffschale entfernen.
2
1
3
Griffschale befestigen
1. Nehmen Sie die neue Griffschale und drücken Sie die beiden oberen
Enden in die vorgesehenen Öffnungen.
2. Danach können Sie die Griffschale an den anderen Stellen
festdrücken.
3. Schließen Sie das Batteriefach und befestigen Sie den Gürtelclip.
8
- Bedienung 4
4.1
Bedienung
Ein-/Ausschalten der Funkgeräte
MENU Ein/Aus-Taste
Um ein Funkgerät einzuschalten, halten Sie die
bis zu einem Signalton gedrückt. Das Display zeigt den aktuell
eingestellten Kanal zwischen 1 und 8.
Zum Ausschalten des Funkgerätes wieder die
zu einem Signalton gedrückt halten.
4.2
MENU
Ein/Aus-Taste bis
Lautstärkeregelung
Die Lautstärke des eingebauten Lautsprechers kann mit den Tasten
+
in 15 Lautstärkestufen angezeigt werden. Die eingestellte
und
Lautstärke wird im Display mit v1 bis v15 angezeigt.
4.3
Kanalwahl
Die Funkgeräte verfügen über 8 verschiedene Übertragungskanäle, die
von dem europäischen Komitee für Funkkommunikation als „Private
Mobile Radio“, kurz PMR genannt, freigegeben wurden.
Um zwischen zwei Funkgräten zu sprechen, müssen beide Geräte
auf den gleichen Kanal eingestellt sein.
1. Drücken Sie einmal die Taste
eingestellten Kanal.
MENU
. Die Displayanzeige blinkt mit dem
+
2. Wählen Sie mit den Tasten
und
den gewünschten Kanal
aus.
3. Bestätigen Sie die Auswahl mit der Gesprächstaste PTT auf der linken
Seite.
9
- Bedienung 4.4
Gespräche zwischen den Funkgeräten
Um selbst zu sprechen, drücken Sie die Gesprächstaste PTT auf der
linken Seite. Halten Sie das Gerät ca. 5 cm vom Mund entfernt und
sprechen Sie in normaler Lautstärke. Lassen Sie danach die
Gesprächstaste wieder los. Ihr Gesprächspartner hört einen Signalton
(Roger Beep), wenn Sie die Gesprächstaste losgelassen haben. Damit
wird dem anderen Teilnehmer angezeigt, dass Sie mit dem Sprechen
fertig sind und auf eine Antwort warten.
Hinweis: Denken Sie daran, dass alle Funkgeräte die auf dem
gleichen Kanal eingestellt sind und sich im Empfangsbereich
befinden, Ihr Gespräch mithören können.
Mit den Tasten
werden.
+
und
können 15 Lautstärkestufen eingestellt
Hinweise:
- Während Sie die Gesprächstaste festhalten, können Sie keine
ankommenden Anrufe hören. Von beiden Gesprächspartnern
kann, wie bei Funkgeräten üblich, nur ein Gesprächspartner
sprechen.
- Damit ein Funkkanal nicht zu lange belegt ist, können Sie die
Gesprächstaste PTT bis zu 60 Sekunden drücken, danach
schaltet das Funkgerät die Übertragung ab und Sie hören einen
Signalton.
Warten Sie also immer, bis Sie den Signalton hören, bevor Sie wieder die
Gesprächstaste drücken.
4.5
Anrufsignal senden
Mit dem Anrufsignal können Sie Ihren Gesprächspartner auffordern zu
. An dem gerufenen Gerät
sprechen. Drücken Sie einmal die Ruftaste
erklingen Signaltöne. Denken Sie daran, dass das Rufsignal an allen
Funkgeräten erklingt, die sich im Empfangsbereich befinden. Warten Sie
nun bis der Gesprächspartner sich meldet.
10
- Bedienung 4.6
Reichweite der Funkgeräte
Die Funkgeräte haben im Freien eine Reichweite von bis zu 3 km. Diese
maximale Reichweite kann durch bestimmte Umstände verringert werden.
Bei flachen, offenen Bedingungen erreichen Sie die maximale Reichweite.
Befinden sich Gebäude oder Bäume im Signalweg wird die Reichweite
verringert. Die Reichweite wird in hügeligem Gelände noch weiter
verringert.
4.7
Erhöhung der maximalen Reichweite
Die Funkgeräte sind mit einem sogenannten Auto-Squelch ausgestattet,
mit dem automatisch schwache Übertragungen und unerwünschte
Geräusche während der Benutzung ausgeblendet werden. Dieser AutoSquelch kann vorübergehend ausgeschaltet werden, um die Reichweite
zu erhöhen.
Drücken Sie dreimal die Taste MENU . Die automatische Unterdrückung
ist abgeschaltet, und es können für einige Sekunden auch sehr schwache
Signale empfangen werden. Danach schaltet das Funkgerät wieder in
den normalen Modus um.
4.8
Kanalsuche (Scan-Modus)
Bei eingeschalteter Kanalsuche (Scan) werden alle 8 Kanäle permanent
abgefragt, bis das Funkgerät einen Kanal gefunden hat, auf dem
gesprochen wird.
1. Drücken Sie zweimal die Taste
Anzeige
.
MENU
. Im Display erscheint die
+
wird die Kanalsuche eingeschaltet. Nach einigen
2. Mit der Taste
Sekunden werden nun nacheinander alle Kanäle abgesucht. Wird ein
Kanal auf dem gesprochen wird gefunden, bleibt die Kanalsuche
stehen und Sie können das Gespräch hören. Wird auf dem gefundenen
Kanal nicht mehr gesprochen, wird die Kanalsuche nach einigen
Sekunden automatisch wieder fortgesetzt.
3. Um diese Funktion wieder auszuschalten, drücken Sie zweimal die
Taste MENU und dann die Taste
. Bestätigen Sie mit der
Gesprächstaste PTT auf der linken Seite.
11
- Technische Daten 5
Technische Daten
PMR Kanal Frequenzen (MHz) :
Kanal 1: 446,00625
Kanal 2: 446,01875
Kanal 3: 446,03125
Kanal 4: 446,04375
Kanal 5: 446,05625
Kanal 6: 446,06875
Kanal 7: 446,08125
Kanal 8: 446,09375
Kanaltrennung
Sendeleistung
Audio Ausgang
Batterielebensdauer bei gemischtem Betrieb
12.5 kHz
500mW
80dB SPL minimum
ca. 12 Stunden
Die technischen Daten können ohne vorherige Ankündigung geändert
werden.
12
- Sommaire 1 Remarques importantes ..................................................... 14
2 Éléments de commande ..................................................... 16
3 Mise en service................................................................... 17
3.1
3.2
3.3
3.4
Vérifier le contenu de l’emballage ..................................................................17
Mettre les piles en place.................................................................................17
Retirer ou installer le clip-ceinture ..................................................................17
Changer les coques........................................................................................18
4 Utilisation ............................................................................ 19
4.1
4.2
4.3
4.4
4.5
4.6
4.7
4.8
Mise en marche / arrêt des émetteurs-récepteurs. ........................................19
Réglage du volume.........................................................................................19
Sélection de canal ..........................................................................................19
Conversations entre les émetteurs-récepteurs ..............................................20
Émettre un signal d’appel ...............................................................................20
Portée des émetteurs-récepteurs...................................................................21
Augmentation de la portée maximale.............................................................21
Recherche de canal (mode scan)...................................................................21
5 Caractéristiques techniques ............................................... 22
13
- Remarques importantes 1
Remarques importantes
Veuillez lire soigneusement ce mode d’emploi en entier. N’ouvrez en
aucun cas l’appareil vous-même et ne tentez pas d’effectuer vous-même
des réparations. Veuillez vous adresser à votre revendeur en cas de
droits découlant de la garantie.
Piles
Utilisez toujours uniquement des piles de type alcalines AAA 1,5 V. Ne
pas jeter les piles au feu, ni les plonger dans l’eau. Ne pas jeter les piles
usées ou défectueuses en même temps que les ordures ménagères
normales. Retirez impérativement les piles de l’appareil s’il vous arrive de
ne plus avoir besoin de l’utiliser durant plus d’1 mois environ. Des piles
oubliées dans l’appareil peuvent se décharger en l’espace de quelques
mois. Les piles vides peuvent couler, ce qui peut endommager les
contacts ou l’électronique sensible dans l’appareil.
Élimination
Lorsque les piles ou les émetteurs-récepteurs arrivent en fin de vie,
veuillez les éliminer en respectant l’environnement conformément aux
dispositions légales.
Nettoyage et entretien
Vous pouvez utiliser un chiffon sec, doux et non-pelucheux pour nettoyer
les surfaces du boîtier. Ne jamais utiliser de produits nettoyants ou de
solvants agressifs. Aucun entretien n’est nécessaire hormis le nettoyage
du boîtier de temps en temps.
14
- Remarques importantes Consignes importantes de sécurité
N’utilisez pas le combiné dans des endroits menacés
d’explosion tels que par ex. des entrepôts de combustibles, des
zones d’explosion, des entrepôts de chimie ou des zones dans
lesquelles des produits chimiques ou autres combustibles sont
présents dans l’air. Respectez toujours les panneaux
indicateurs. Les zones menacées d’explosion ne sont toutefois
pas toujours marquées clairement.
Le remplacement de piles dans des zones menacées
d’explosion représente un danger de mort.
Si l’émetteur-récepteur est mouillé, désactivez-le
immédiatement et retirez les piles. Ne pas utiliser l’émetteurrécepteur jusqu’à ce qu’il soit complètement sec.
Lors de l’émission, tenir toujours l’émetteur-récepteur
verticalement à une distance d’env. 2,5 à 5 cm de la bouche.
Lors de la réception, tenir l’émetteur-récepteur à une distance
d’au moins 2,5 cm de la tête.
Afin d’éviter des conflits électromagnétiques, désactivez les
émetteurs-récepteurs lorsqu’un panneau indicateur vous le
demande.
Si vous n’êtes pas certain que le fonctionnement d’émetteursrécepteurs est permis (avions, navires, hôpitaux, etc.),
interrogez une personne responsable avant d’utiliser les
émetteurs-récepteurs.
Ne posez jamais les émetteurs-récepteurs en voiture sur un
airbag car les objets non fixés sont projetés violemment en cas
de déclenchement de l’airbag, ce qui représente un risque de
blessure.
Évitez les expositions excessives à la fumée, à la poussière,
aux secousses, à des substances chimiques, à l'humidité, à la
chaleur ou l’exposition directe au soleil.
15
- Éléments de commande 2
Éléments de commande
1
7
6
5
1.
2.
3.
4.
5.
6.
7.
16
Antenne
Écran
Touche de sélection Touche de menu et marche/arrêt
Touche d’appel
Touche de sélection +
Touche de communication PTT
2
3
4
- Mise en service 3
Mise en service
3.1
Vérifier le contenu de l’emballage
Le contenu de l’emballage :
deux émetteurs-récepteurs avec
trois coques par émetteurclip-ceinture
récepteur.
un mode d’emploi
3.2
Mettre les piles en place
Les piles nécessaires ne sont pas fournies. Vous avez besoin pour
chaque appareil de trois piles de type AAA 1,5 V. Veuillez utiliser des piles
neuves « alcalines » de haute qualité.
Remarque : Vous pouvez utiliser également des piles NiMH
rechargeables d’une puissance de 600mAH. Les piles rechargeables ne
peuvent pas être chargées dans les émetteurs-récepteurs.
1.
2.
3.
4.
Pour détacher le clip ceinture, tirez un peu sur l’attache supérieure et
poussez le clip-ceinture vers le haut (voir 3.3).
Ouvrez ensuite le compartiment en poussant le couvercle vers le
bas.
Mettez ensuite les piles en place en respectant la polarité adéquate.
Une polarité incorrecte risque d’endommager l’appareil.
Fermez le compartiment et fixez le clip-ceinture (voir 3.3).
Si les piles sont déchargées, des signaux sonores retentissent ou
l’émetteur-récepteur ne peut plus être mise en marche.
3.3
Retirer ou installer le clip-ceinture
Pour détacher le clip-ceinture, tirez un peu
sur l’attache supérieure (1) et poussez le clipceinture vers le haut (2).
Enfoncez le clip-ceinture par le haut dans la
coulisse (2) jusqu'à ce qu'il s'enclenche de
manière perceptible.
1
2
17
- Mise en service 3.4
Changer les coques
Vos émetteurs-récepteurs ont été livrés chacun avec trois coques en
couleur que vous pouvez changer si nécessaire. Procédez de la manière
suivante pour remplacer une coque :
Retirer la coque
1. Retirez le clip-ceinture (voir 3.3) et ouvrez le compartiment des piles.
2. Retirez de la fixation la coque au point 1 en soulevant avec
précaution à l’aide d’un tournevis.
3. Réitérez cette procédure aux points 2 et 3.
4. Vous pouvez ensuite retirer la coque.
2
1
3
Fixer la coque
1. Prenez la nouvelle coque et enfoncez les deux extrémités
supérieures dans les orifices prévus à cet effet.
2. Vous pouvez ensuite enfoncer la coque aux autres endroits.
3. Fermez le compartiment des piles et fixez le clip-ceinture.
18
- Utilisation 4
Utilisation
4.1
Mise en marche / arrêt des émetteurs-récepteurs.
Pour mettre en marche un émetteur-récepteur, maintenez la touche
MENU enfoncée jusqu’au retentissement d’un signal
marche/arrêt
sonore. L’écran affiche le canal actuellement réglé de 1 à 8.
Pour arrêter l’émetteur-récepteur, maintenez à nouveau la touche
MENU enfoncée jusqu’au retentissement d’un signal
marche/arrêt
sonore.
4.2
Réglage du volume
+
et
permettent d’afficher le volume du haut-parleur
Les touches
intégré sur 15 niveaux de volume. Le volume réglé est affiché à l’écran
par v1 à v15.
4.3
Sélection de canal
Les émetteurs-récepteurs disposent de 8 canaux de transmission
différents autorisés par le comité européen de radiocommunication en tant
que « Private Mobile Radio » (radio portative privée), en abrégé PMR.
Pour pouvoir communiquer entre eux, les deux émetteurs-récepteurs
doivent être réglés sur le même canal.
MENU
. L’affichage d’écran
1.
Appuyez une fois sur la touche
clignote avec le canal réglé.
2.
Sélectionnez le canal souhaité à l’aide des touches
3.
.
Validez la sélection à l’aide de la touche de communication PTT
située sur le côté gauche.
+
et
19
- Utilisation 4.4
Conversations entre les émetteurs-récepteurs
Pour parler vous-même, appuyez sur la touche de communication PTT
située sur le côté gauche. Maintenez l’appareil à env. 5 cm de votre
bouche et parlez d’une voix normalement forte. Relâchez ensuite la
touche de communication. Votre interlocuteur entend un signal sonore
(message bien reçu) lorsque vous avez relâché la touche de
communication. Cela indique à l’autre utilisateur que vous avez fini de
parler et que vous attendez une réponse.
Remarque : N’oubliez pas que tous les émetteurs-récepteurs
réglés sur le même canal et se trouvant dans la zone de réception
peuvent entendre votre conversation.
Les touches
volume.
+
et
vous permettent de régler 15 niveaux de
Remarques :
Vous ne pouvez pas entendre d’autres appels lorsque vous
maintenez la touche de communication enfoncée. Un seul
utilisateur à la fois peut parler, comme c’est habituellement le
cas pour les émetteurs-récepteurs.
Afin qu’un canal d’émission ne soit pas occupé trop longtemps,
vous pouvez appuyer sur la touche de communication PTT
durant jusqu’à 60 secondes. Ensuite, l’émetteur-récepteur
interrompt la transmission et un signal sonore retentit.
-
Attendez donc toujours le signal sonore avant d’appuyer à nouveau sur la
touche de communication.
4.5
Émettre un signal d’appel
Ce signal d’appel vous permet de demander à votre interlocuteur de
. Des signaux sonores
parler. Appuyez une fois sur la touche d’appel
retentissent sur l’appareil appelé. N’oubliez pas que le signal d’appel
sonne sur tous les émetteurs-récepteurs se trouvant dans la zone de
réception. Attendez alors que votre interlocuteur réponde.
20
- Utilisation 4.6
Portée des émetteurs-récepteurs
Les émetteurs-récepteurs ont une portée pouvant atteindre 3-5 ?? km
dehors. Cette portée maximale peut être réduite dans certaines
conditions. Vous obtenez une portée maximale sur un terrain plat et dans
un espace ouvert. La portée est réduite si la trajectoire des signaux est
entravée par des bâtiments ou des arbres. La portée est davantage
réduite sur un terrain accidenté.
4.7
Augmentation de la portée maximale
Les émetteurs-récepteurs sont équipés d’un système « auto-squelch » qui
permet la suppression automatique des transmissions faibles et des bruits
indésirables survenant durant l’utilisation. Vous pouvez désactiver
provisoirement cette fonction auto-squelch afin d’augmenter la portée.
Appuyez trois fois sur la touche MENU . La suppression automatique est
désactivée et vous pouvez recevoir durant quelques secondes des
signaux même très faibles. L’émetteur-récepteur se remet ensuite en
mode normal.
4.8
Recherche de canal (mode scan)
Lorsque la recherche de canal (scan) est activée, tous les 8 canaux sont
interrogés en permanence jusqu’à ce que l’émetteur-récepteur trouve un
canal sur lequel des conversations ont lieu.
MENU
. L’icône
s’affiche à
1.
Appuyez deux fois sur la touche
l’écran.
2.
La touche
permet d’activer la recherche de canal. Au bout de
quelques secondes, tous les canaux sont recherchés les uns après
les autres. Lorsqu’un canal sur lequel des conversations ont lieu est
trouvé, la recherche de canal s’arrête et vous pouvez entendre la
conversation. Si la conversation cesse sur le canal trouvé, la
recherche de canal se poursuit automatiquement au bout de
quelques secondes.
Pour désactiver à nouveau cette fonction, appuyez deux fois sur la
3.
+
touche MENU , puis sur la touche
. Validez à l’aide de la touche
de communication PTT située sur le côté gauche.
21
- Caractéristiques techniques 5
Caractéristiques techniques
Fréquences de canal PMR (MHz) :
Canal 1 : 446,00625
Canal 5 : 446,05625
Canal 2 : 446,01875
Canal 6 : 446,06875
Canal 3 : 446,03125
Canal 7 : 446,08125
Canal 4 : 446,04375
Canal 8 : 446,09375
Séparation de canal
Puissance d’émission
Sortie audio
Durée de vie des piles lors d’un
fonctionnement mixte
12,5 kHz
500mW
80dB SPL minimum
env. 12 heures
Les caractéristiques techniques peuvent être modifiées sans avis
préalable.
22
- Sommario 1 Informazioni importanti ....................................................... 24
2 Elementi di comando .......................................................... 26
3 Messa in funzione............................................................... 27
3.1
3.2
3.3
3.4
Controllare il contenuto dell'imballaggio .........................................................27
Inserimento delle batterie ...............................................................................27
Applicazione e rimozione del clip della cintura...............................................27
Cambio delle mascherine ...............................................................................28
4 Impiego............................................................................... 29
4.1
4.2
4.3
4.4
4.5
4.6
4.7
4.8
Inserimento e disinserimento delle ricetrasmittenti ........................................29
Regolazione del volume .................................................................................29
Selezione del canale.......................................................................................29
Conversazioni tra le ricetrasmittenti ...............................................................30
Trasmissione di un segnale di chiamata ........................................................30
Portata delle ricetrasmittenti ...........................................................................31
Aumento della massima portata .....................................................................31
Ricerca del canale (modo Scan) ....................................................................31
5 Dati tecnici .......................................................................... 32
23
- Informazioni importanti 1
Informazioni importanti
Si prega di leggere attentamente le presenti istruzioni per l'uso. Non aprire
in nessun caso l'apparecchio su propria iniziativa, per tentare di effettuare
da soli delle riparazioni. Per le richieste di garanzia Vi preghiamo di
rivolgerVi al Vostro rivenditore di fiducia.
Batterie
Utilizzare sempre e esclusivamente batterie alcaline del tipo AAA 1,5V.
Non gettare mai le batterie nel fuoco e non immergerle nell'acqua. Le
batterie vecchie o difettose non devono mai essere smaltite nei normali
rifiuti urbani. Quando l'apparecchio non viene più utilizzato per la durata di
oltre un mese, si raccomanda di rimuovere assolutamente le batterie
dall'apparecchio. Le batterie dimenticate nell'apparecchio possono
scaricarsi completamente dopo alcuni mesi. Inoltre, dalle batterie scariche
può defluire l'acido, con la conseguenza di distruggere definitivamente i
componenti elettronici all'interno dell'apparecchio.
Smaltimento
Una volta che le batterie o le ricetrasmittenti non servono più, occorre
provvedere ad uno smaltimento appropriato e conforme alle prescrizioni
vigenti per la protezione ambientale.
Pulizia e manutenzione
Le superfici del contenitore possono essere pulite con un panno pulito,
asciutto e privo di peluria. Non utilizzare mai dei detergenti o delle
soluzioni aggressive. Oltre ad una pulizia occasionale del contenitore
dell'apparecchio non è necessaria alcuna particolare manutenzione.
24
- Informazioni importanti Importanti informazioni di sicurezza
Non utilizzare l'unità portatile in zone esposte al pericolo di
deflagrazioni, quali ad esempio magazzini di carburanti, in zone
d'abbattimento con esplosivi, magazzini di prodotti chimici oppure
ambienti in cui sono presenti prodotti chimici o altre sostanze solide
che possano reagire con l'aria. Seguire sempre i rispettivi cartelli
d'avvertimento. Ma le zone esposte al pericolo di deflagrazioni non
sempre sono evidenziate con questi cartelli.
Un cambio dalle batterie in zone esposte al pericolo di deflagrazioni
può costituire un imminente pericolo di morte.
Spegnere immediatamente la ricetrasmittente nel caso si fosse
bagnata e rimuovere le batterie. Non utilizzare la ricetrasmittente
finché non si è completamente asciugata.
Mantenere la ricetrasmittente sempre in posizione perpendicolare e
ad una distanza di ca. 2,5 bis 5 cm dalla bocca durante la
trasmissione.
Durante la ricezione mantenere la ricetrasmittente almeno ad una
distanza di 2,5 cm dal capo.
Per prevenire dei conflitti elettromagnetici, occorre spegnere la
ricetrasmittente quando esplicitamente prescritto ovvero segnalato.
In caso di dubbi sul divieto di utilizzare ricetrasmittenti (in aeroplani,
navi, ospedali, ecc.) si raccomanda di domandare ad una persona
responsabile se poterle utilizzare o meno.
Non piazzare mai le ricetrasmittenti in automobile sopra un airbag,
poiché all'azionamento dello stesso gli oggetti possono essere
proiettati con violenza e causare in tal modo delle lesioni.
Evitare di gran lunga di esporre l'apparecchio ad eccessive
sollecitazioni, quali ad esempio fumo, polvere, urti, sostanze
chimiche, umidità, calore o diretta esposizione ai raggi solari.
25
- Elementi di comando 2
Elementi di comando
1
7
6
5
1. antenna
2. display
3. tasto di selezione –
4. menu e tasto ON/OFF
5. tasto di chiamata
6. tasto di selezione +
7. tasto di conversazione PTT
26
2
3
4
- Messa in funzione 3
Messa in funzione
3.1
Controllare il contenuto dell'imballaggio
La dotazione comprende:
due ricetrasmittenti con
rispettivamente 3 mascherine per ogni
clip a cintura
ricetrasmittente
istruzioni per l'uso
3.2
Inserimento delle batterie
Le necessarie batterie non sono comprese nella dotazione. Per ciascun
apparecchio Vi occorrono rispettivamente 3 batterie del tipo AAA 1.5V. Si
prega di utilizzare comunque delle batterie di qualità del tipo “alcalino”.
Nota: Si possono anche utilizzare batterie ricaricabili al NiMH con una
capacità di 600mAH. Le batterie ricaricabili non possono tuttavia essere
ricaricate all'interno delle ricetrasmittenti.
1. Per staccare il clip della cintura, tirare leggermente la linguetta
superiore e spingere quindi il clip della cintura verso l'alto (si veda 3.3).
2. Aprire quindi lo scomparto, spingendo verso il basso il coperchio.
3. Introdurre a questo punto le batterie e rispettare la corretta polarità.
Un'inversione di polarità può danneggiare l'apparecchio.
4. Chiudere lo scompartimento delle batterie e fissare il clip della cintura
(si veda 3.3).
Se le batterie sono esaurite, si sentono dei segnali acustici oppure, in casi
estremi, la ricetrasmittente non potranno essere accesa.
3.3
Applicazione e rimozione del clip della cintura
Per staccare il clip della cintura, tirare
leggermente la linguetta superiore (1) e
spingere quindi il clip della cintura verso l'alto
(2).
1
2
Spingere il clip della cintura dall'alto sulla
guida (2), fino a farlo scattare in posizione .
27
- Messa in funzione 3.4
Cambio delle mascherine
Le ricetrasmittenti vengono rispettivamente fornite con mascherine
colorate, che possono essere cambiate all'occorrenza. Per cambiare una
mascherina, occorre procedere nel modo seguente:
Rimozione della mascherina
1. Rimuovere il clip della cintura (si veda 3.3) e aprire quindi lo
scomparto dell batterie.
2. Sollevare a questo punto con prudenza la mascherina servendosi di
un cacciavite dal punto 1 fuori dal fissaggio.
3. Ripetere il procedimento nei punti 2 e 3.
4. Dopodiché si potrà rimuovere la mascherina.
2
1
3
Fissaggio della mascherina
1. Prendere la nuova mascherina e premere le due estremità superiori
nelle aperture appositamente previste.
2. Successivamente si potrà premere la mascherina sui due punti di
fissaggio.
3. Chiudere lo scomparto delle batterie e fissare nuovamente il clip
della cintura.
28
- Impiego 4
4.1
Impiego
Inserimento e disinserimento delle ricetrasmittenti
Per inserire una ricetrasmittente, mantenere premuto il tasto
ON/OFF , fino a sentire un segnale acustico. Sul display viene
visualizzato il canale attualmente selezionato da 1 e 8.
MENU
Per disinserire la ricetrasmittente, mantenere di nuovo premuto il tasto
MENU , fino a sentire un segnale acustico.
ON/OFF
4.2
Regolazione del volume
Il volume dell'altoparlante integrato può essere indicato in 15 livelli di
+
volume tramite i tasti
display con v1 fino v15.
e
. Il volume regolato viene indicato sul
4.3
Selezione del canale
Le ricetrasmittenti dispongono di 8 diversi canali di radiotrasmissione,
omologati dal Comitato Europeo per radiocomunicazioni per l'impiego
come “radio mobile privata”, detto in breve RMP.
Per parlare attraverso due radiotrasmettitori, è necessario che
ambedue le unità siano regolate sullo stesso canale.
1. Premere una volta il tasto MENU . La visualizzazione sul display
lampeggia con il canale regolato.
2. Selezionare a questo punto il canale desiderato tramite i tasti
+
e
.
3. Confermare l'immissione tramite il tasto di conversazione PTT situato
sulla parte sinistra.
29
- Impiego 4.4
Conversazioni tra le ricetrasmittenti
Per poter parlare occorre premere il tasto di conversazione PTT situato
sulla parte sinistra. Mantenere una distanza di ca. 5 cm dall'apparecchio e
parlare a voce normale. Dopodiché rilasciare il tasto di conversazione.
L'interlocutore a questo punto sente un segnale acustico (roger beep),
non appena rilasciate il tasto di chiamata. In tal modo al Vostro
interlocutore viene segnalato il termine della Vostra frase e che siete in
attesa di una risposta.
Nota: È da tenere presente che tutte le ricetrasmittenti regolate
sullo stesso canale e che si trovano all'interno della portata
massima possono essere ascoltate anche da altre persone.
Tramite i tasti
+
e
si possono regolare 15 livelli di volume.
Note:
- Mentre mantenete premuto il tasto di conversazione, non potete
sentire le chiamate in arrivo. Come accade generalmente nei
radiotrasmettitori, può sempre parlare un solo interlocutore alla
volta.
- Affinché un segnale di trasmissione non rimanga occupato per
troppo tempo, potete mantenere premuto il tasto di
conversazione PTT per la durata di 60 secondi,
successivamente la trasmissione verrà disattivata con una
segnalazione acustica.
Perciò, dovete sempre attendere fino a sentire il segnale acustico di
chiamata, prima di premere nuovamente il tasto di conversazione.
4.5
Trasmissione di un segnale di chiamata
Mediante la trasmissione di un segnale di chiamata potete richiedere una
conversazione al vostro interlocutore. Premere una volta il tasto di
. Sull'apparecchio chiamato si sentono dei segnali acustici di
chiamata
chiamata. Ricordatevi che il segnale di chiamata verrà trasmesso a tutte
le ricetrasmittenti che si trovano nel raggio di portata. Attendere ora fino a
quando non risponde l'interlocutore.
30
- Impiego 4.6
Portata delle ricetrasmittenti
Le ricetrasmittenti hanno una portata massima di 3-5?? km all'aperto.
Questa portata massima può essere ridotta a causa di determinate
circostanze. In condizioni piane ed all'aperto si ottengono i migliori risultati
e la massima portata. Se nella traiettoria dei segnali dovessero trovarsi
degli edifici oppure alberi allora verrà rispettivamente ridotta la portata. La
portata viene ulteriormente ridotta anche nelle zone collinose.
4.7
Aumento della massima portata
Le ricetrasmittenti sono equipaggiate con un cosiddetto AUTOSQUELCH, tramite il quale vengono automaticamente soppressi i rumori
di fruscio dovuto ad una radiotrasmissione troppo debole e non voluti
durante l'impiego. Questo AUTO-SQUELCH può anche essere disattivato
momentaneamente, per aumentare così la portata.
Premere tre volte il tasto MENU . La funzione di soppressione automatica
è disattivata e a questo punto si possono ricevere anche i segnali radio
più deboli per la durata di alcuni secondi. Successivamente la
ricetrasmittente si ricommuta automaticamente al modo di funzionamento
normale.
4.8
Ricerca del canale (modo Scan)
Nella funzione di ricerca del canale (Scan) attivata avviene
un'interrogazione continua di tutti gli 8 canali, finché la ricetrasmittente ha
trovato un canale su cui avviene una conversazione.
1. Premere due volte il tasto
visualizzata l'indicazione
+
MENU
. Dopodiché nel display viene
.
2. Tramite il tasto
potete avviare la funzione di ricerca del canale.
Dopo alcuni secondi verranno ricercati consecutivamente tutti i canali.
Se viene trovato un canale su cui si sta parlando, la ricerca del canale
rimarrà ferma e si potranno quindi ascoltare le conversazioni. Se sul
canale trovato non viene individuata più alcuna conversazione, dopo
alcuni secondi la ricerca del canale verrà di nuovo proseguita
automaticamente.
3. Per disattivare nuovamente questa funzione, premere due volte il tasto
MENU e successivamente il tasto
. Confermare l'immissione
tramite il tasto di conversazione PTT situato sulla parte sinistra.
31
- Dati tecnici 5
Dati tecnici
Frequenze canale PMR (MHz) :
canale 1: 446,00625
canale 2: 446,01875
canale 3: 446,03125
canale 4: 446,04375
canale 5: 446,05625
canale 6: 446,06875
canale 7: 446,08125
canale 8: 446,09375
Separazione canale
Potenza di trasmissione
Uscita audio
Durata delle batterie in funzionamento misto
12.5 kHz
500mW
80dB SPL minimo
ca. 12 ore
I presenti dati tecnici possono essere modificati, senza alcun preavviso.
32
- Contents 1 Important information.......................................................... 34
2 User controls ...................................................................... 36
3 Setting up ........................................................................... 37
3.1
3.2
3.3
3.4
Check contents of pack........................................................... 37
Fitting the batteries.................................................................. 37
Removing and fitting the belt clip ............................................ 37
Changing the moulded grip ..................................................... 38
4 Operation............................................................................ 39
4.1
4.2
4.3
4.4
4.5
4.6
4.7
4.8
Switching the radios on and off ............................................... 39
Volume control ........................................................................ 39
Channel selection.................................................................... 39
Calls between radios............................................................... 40
Sending a call signal ............................................................... 40
Range of the radios................................................................. 41
Increasing the maximum range............................................... 41
Channel search (scan mode) .................................................. 41
5 Technical data .................................................................... 42
33
- Important information 1
Important information
Please read these operating instructions carefully. Under no
circumstances open the unit yourself and do not try to carry out your own
repairs. For any claims under the warranty, please refer to your dealer.
Batteries
Please always use only type AAA 1.5V alkaline batteries. Do not throw
batteries into the fire or immerse in water. Do not dispose of old or
defective batteries with the normal household waste. Be sure to remove
the batteries from the unit if you do not intend to use it for more than 1
month. Batteries that have been left in the unit can discharge in a few
months. Flat batteries can leak, which can damage the contacts or the
sensitive electronics in the unit.
Disposal
If the useful life of the batteries or the radios has expired, please dispose
of these carefully in accordance with the statutory requirements and in a
manner friendly to the environment.
Cleaning and care
The surface of the case can be cleaned with a soft, dry, lint-free cloth.
Never use cleaning agents, particularly aggressive solvents. No attention
is necessary apart from cleaning the case occasionally.
34
- Important information Important safety information
Do not use the handset in areas where there is a risk of explosion,
such as fuel stores, blasting areas, chemical stores or areas in which
chemicals or other solids are present in the air. Always follow all
information signs. Areas at risk of explosion are not always clearly
marked however.
Changing batteries in areas at risk of explosion means a danger to
life.
If the radio becomes wet, switch it off immediately and remove the
batteries. Do not use the radio until it is completely dry.
When transmitting, always hold the radio vertically and approximately
2.5 to 5 cm from your mouth.
When receiving, hold the radio at least 2.5 cm from your head.
In order to avoid electromagnetic conflicts, switch the radios off if
requested to do so by an information sign.
If you are not sure whether the use of radios is permitted
(aeroplanes, boats, hospitals, etc.) ask a responsible person before
using the radios.
In the car, never place radios above an airbag, as loose objects are
flung away with force when the airbag is released and present a risk
of injury.
Excessive exposure to smoke, dust, vibrations, chemicals, moisture,
heat or the direct rays of the sun must be avoided.
35
- User controls 2
User controls
1
7
6
5
1. Aerial
2. Display
3. Selector button +
4. Selector button 5. Menu and On/Off button
6. Talk button PTT
7. Call button
36
2
3
4
- Setting up 3
Setting up
3.1
Check contents of pack
The following items are supplied:
two radios with belt clip
three moulded grips for each radio
one instruction manual
3.2
Fitting the batteries
The batteries required are not supplied with the unit. For each unit you will
require three type AAA 1.5V batteries. Please use new high-quality
alkaline batteries.
Note: You can also use rechargeable NiMH batteries with a capacity of
600mAH. Rechargeable batteries cannot be charged while in the radios.
1. To release the belt clip, pull gently on the upper tab and slide the belt
clip upwards (see 3.3).
2. Then open the compartment by sliding the cover downwards.
3. Now insert the batteries taking care to ensure that the polarity is
correct. Incorrect polarity can damage the unit.
4. Close the battery compartment and re-fix the belt clip (see 3.3).
If the batteries are discharged, you will hear signal tones or it will no
longer be possible to switch the radio on.
3.3
Removing and fitting the belt clip
To release the belt clip, pull gently on the upper
tab (1) and slide the belt clip upwards (2).
1
2
Slide the belt clip into the guide from above until
it audibly engages (2).
If the t belt clip should not engage firmly, press the small latch with the
fingernail against the back of the radio.
37
- Setting up 3.4
Changing the moulded grip
Your radios are each supplied with three coloured moulded grips, which
you can change as required. To change the moulded grip, proceed as
follows:
Removing the grip
1. Remove the belt clip (see 3.3) and open the battery compartment.
2. Now carefully lever the moulded grip out of the fixing at position 1
using a screwdriver.
3. Repeat this procedure at positions 2 and 3.
4. You can then remove the moulded grip.
2
1
3
Fitting the grip
1. Take the new grip and push the two upper ends into the openings
provided.
2. You can then push the grip home at the other positions.
3. Close the battery compartment and re-fit the belt clip.
38
- Operation 4
4.1
Operation
Switching the radios on and off
MENU pressed until a
To switch on the radio, hold the On/Off button
signal tone sounds. The display will show the currently selected channel
between 1 and 8.
To switch the radio off, hold the On/Off button
more until a signal tone sounds.
MENU
pressed once
4.2
Volume control
The volume of the built-in loudspeaker can be displayed in 15 volume
+
steps using the
and
buttons. The selected volume will be
shown in the display with v1 to v15.
4.3
Channel selection
The radios have 8 different transmission channels, which are approved by
the European Committee for Radio Communications as " Private Mobile
Radio" channels, known as PMR for short.
In order to be able to speak between two radios, both units must be
set to the same channel.
1. Press the
channel.
MENU
button once. The display will flash with the selected
+
2. Select the required channel using the
and
buttons.
3. Confirm the selection with the PTT talk button on the left-hand side.
39
- Operation 4.4
Calls between radios
To speak yourself, press the PTT talk button on the left-hand side. Hold
the unit about 5 cm from your mouth and speak in a normal voice. When
you have finished, release the talk button. The person you are speaking to
will hear a signal tone (Roger beep) when you have released the talk
button. This will indicate to the other subscriber that you have finished
speaking and are waiting for a reply.
Note: Remember that all radios, which are set to the same
channel and are within receiving range, will be able to hear your
call at the same time.
15 volume levels can be set using the
+
and
buttons.
Note:
- While you are holding the talk button, you will not be able to
hear any incoming calls. As is usual with radio units, only one of
the two participants in the call can speak at any one time.
- In order that a radio channel is not engaged for too long, you
can keep the PTT talk button pressed for up to 60 seconds.
After this, the radio will switch off the transmission and you will
hear a signal tone.
Therefore, always wait until you hear the signal tone before pressing the
talk button again.
4.5
Sending a call signal
You can summon the attention of the person you are calling by means of
once. A signal tone will sound on
the call signal. Press the call button
the unit called. Remember that call signals will sound on all radios that are
within receiving range. Now wait until the person called answers.
40
- Operation 4.6
Range of the radios
The radios have a range of up to 3 km outdoors. This maximum range can
be reduced under certain circumstances. You can achieve maximum
range in open, flat conditions. If there are buildings or trees in the signal
path then the range will be reduced. The range is even further reduced in
hilly terrain.
4.7
Increasing the maximum range
The radios are equipped with a so-called Auto-Squelch system, by means
of which weak transmissions and undesirable noises are automatically
filtered out during use. This Auto-Squelch system can be temporarily
switched off in order to increase the range.
Press the MENU button three times. The automatic suppression will be
switched off and it will now be possible for even very weak signals to be
received for a few seconds. The radio will then switch back to the normal
mode.
4.8
Channel search (scan mode)
When channel search (scan) is switched on, all 8 channels are
continuously polled until the radio finds a channel that is being used for
speech.
1. Press the
display.
MENU
button twice. The
indicator will appear in the
+
2. Channel search is started by means of the
button. After a few
seconds, all channels will be searched one after the other. If a channel
is found, which is being used for speech, the channel search will stop
and you will be able to hear the conversation. If the channel that has
been found is no longer being used for speech, the channel search will
automatically be continued after a few seconds.
3. To deactivate this function once more, press the MENU button twice and
then the
side.
button. Confirm with the PTT talk button on the left-hand
41
- Technical Data 5
Technical data
PMR channel frequencies (MHz):
Channel 1: 446.00625
Channel 2: 446.01875
Channel 3: 446.03125
Channel 4: 446.04375
Channel separation
Transmitter power
Audio output
Battery life in mixed operation
Channel 5: 446.05625
Channel 6: 446.06875
Channel 7: 446.08125
Channel 8: 446.09375
12.5 kHz
500mW
80dB SPL minimum
ca. 12 hours
Technical data are subject to change without previous notice.
42
- Declaration of conformity WE
Of
TELGO AG
Route d'Englisberg 11
CH-1763 Granges Paccot
Declare under our own responsibility that the product
Model:
SWITEL WT010
Description: Private Mobile Radio, frequency 446 MHz
Is in conformity with directives: 1999/5/EC R & TTE Directives
Compliance is achieved by conformity to the following:
EN300 296-2 v1.1.1:2001, EN301 489-5 v1.2.1:2000, EN60950:2000
Test report number:
04010801.emc, 04010801.ev, 04010801.p01, 04010801.r01
AUTHORISED SIGNATORY:
Signature:
Name:
Position in the company:
Date of issue:
______________________
Selim Dusi
Managing Director
06.05.04
A copy of this declaration will be retained for 10 years after cessation of production.
CE0336
SUPPLIER: TELGO AG
Route d'Englisberg 11
CH-1763 Granges Paccot
PRODUCT: SWITEL WT010
This product transmits in a non-EU-harmonised frequency band
(466.00625 – 446.09375 MHz distribute on 8 channels) and may thus only
be used within those countries that permit usage of such equipment.
43
www.switel.com