1
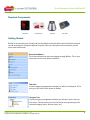
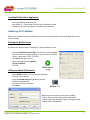
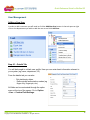
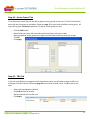
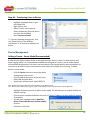
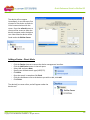
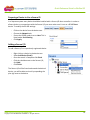
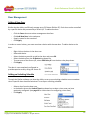
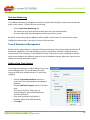
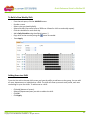
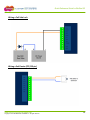
Quick Reference Guide for BioStar SE Version: 1.0 Published: February 2012 [email protected] www.ENTERTECHSYSTEMS.com Quick Reference Guide for BioStar SE Table of Contents REQUIRED COMPONENTS ............................................................................................................... 4 GETTING STARTED ........................................................................................................................... 4 SUPPORT INFORMATION ................................................................................................................. 5 SOFTWARE INSTALLATION ............................................................................................................. 6 SYSTEM REQUIREMENTS ................................................................................................................... 6 INSTALLING BIOSTAR SERVER APPLICATION ....................................................................................... 6 INSTALLING BIOSTAR CLIENT APPLICATION ......................................................................................... 7 INITIAL LOG ON TO BIOSTAR .......................................................................................................... 7 STARTING THE BIOSTAR SERVER ....................................................................................................... 7 ADDING AN ADMIN ID/PASSWORD ....................................................................................................... 7 USER MANAGEMENT ........................................................................................................................ 8 ADDING A NEW USER......................................................................................................................... 8 Step # 1 - Details Tab .................................................................................................................. 8 Step # 2 - Fingerprint Tab ............................................................................................................ 9 Important Notes ........................................................................................................................... 9 Step # 3 – Card Tab................................................................................................................... 10 Step #4 – Access Control Tab.................................................................................................... 11 Step #4 – T&A Tab .................................................................................................................... 11 Step #5 - Transferring Users to Device ...................................................................................... 12 DEVICE MANAGEMENT .................................................................................................................. 12 ADDING A DEVICE – SERVER MODE (RECOMMENDED) ....................................................................... 12 ADDING A DEVICE – DIRECT MODE ................................................................................................... 13 PREPARING A DEVICE TO USE A SECURE IO...................................................................................... 14 ADDING A SECURE I/O ..................................................................................................................... 14 DOOR MANAGEMENT ..................................................................................................................... 15 ADDING A NEW DOOR ..................................................................................................................... 15 ADDING AN UNLOCKING SCHEDULE .................................................................................................. 15 ADDING A EXIT DEVICE .................................................................................................................... 16 ACCESS CONTROL MANAGEMENT .............................................................................................. 16 ADDING A NEW TIMEZONE ................................................................................................................ 16 TRANSFERRING TIMEZONES TO A DEVICE.......................................................................................... 17 ADDING AN NEW ACCESS GROUP .................................................................................................... 17 ADDING USERS TO AN ACCESS GROUP ............................................................................................. 18 MONITORING MANAGEMENT ........................................................................................................ 18 OPENING/CLOSING A DOOR ............................................................................................................. 18 REALTIME MONITORING ................................................................................................................... 19 TIME & ATTENDANCE MANAGEMENT .......................................................................................... 19 ADDING A NEW TIME CATEGORY ...................................................................................................... 19 ADDING A NEW DAILY SCHEDULE ...................................................................................................... 20 ADDING A NEW SHIFT ....................................................................................................................... 20 ADDING USERS TO A SHIFT .............................................................................................................. 21 www.ENTERTECHSYSTEMS.com Copyright © 2012 ENTERTECH SYSTEMS Inc. All rights reserved. 2 Quick Reference Guide for BioStar SE SYSTEM INSTALLATION ................................................................................................................. 22 SECURE I/O W IRING ........................................................................................................................ 22 Power Connection...................................................................................................................... 22 Device Connection ..................................................................................................................... 23 Wiring a Fail Secure Lock .......................................................................................................... 23 Wiring a Fail Safe Lock .............................................................................................................. 24 Wiring a Exit Device (RTE,PIR,etc) ............................................................................................ 24 RS-485 W IRING HARNESSES ........................................................................................................... 25 BioStation T2 ......................................................................................................................... 25 BioLite Net ............................................................................................................................. 25 D-Station ................................................................................................................................ 25 BioEntry Plus ......................................................................................................................... 25 BioStation .............................................................................................................................. 26 X-Pass ................................................................................................................................... 26 X-Station ............................................................................................................................................................... 26 www.ENTERTECHSYSTEMS.com Copyright © 2012 ENTERTECH SYSTEMS Inc. All rights reserved. 3 Quick Reference Guide for BioStar SE Required Components Per Door Per Solution Per Job Per Door Getting Started BioStar is an extremely user friendly and intuitive platform that will allow control of both access and time & attendance in a Suprema biometric system. Here are a few pieces of the software you will want to be familiar with. Shortcut Dashboard This is the main panel to help you navigate through BioStar. This is your access point to the main system interfaces. Task Pane In every category management interface you will find a task pane. This is your go-to link for all main actions in BioStar. Category Tree In every category management interface you will see a tree in the top left corner. This will show you a list of all active items pertaining to the selected category (users, devices, doors, etc). www.ENTERTECHSYSTEMS.com Copyright © 2012 ENTERTECH SYSTEMS Inc. All rights reserved. 4 Quick Reference Guide for BioStar SE Support Information Thank you for your purchase and welcome to ENTERTECH SYSTEMS, the exclusive agent of Suprema technology for the United States, Canada and Puerto Rico. We are purpose-built to make biometric technologies available for mainstream adoption. Our systems approach Access Control and Time & Attendance removes the three main obstacles to mass market adoption of biometric systems: Cost, Complexity, and On Boarding Users. We are based in North America and dedicated to helping you successfully use your newly purchased Suprema products and solutions. Support Contact 905 582 5110 | [email protected] Training www.entertechsystems.com/youtube Remote Desktop Support www.entertechsystems.com/support Warranty Info www.entertechsystems.com/rma www.ENTERTECHSYSTEMS.com Copyright © 2012 ENTERTECH SYSTEMS Inc. All rights reserved. 5 Quick Reference Guide for BioStar SE Software Installation BioStar is simple to install and comes in three pieces (Server Installer, Client Application and Express Installer). This allows for basic installation and different options for setup. Server Installer: Installs the BioStar server application as well as MS SQL Server Express(optional). The Server Application Installer is ideal where a system is deployed with a dedicated server and many Client Applications running on one or more workstations. Client Application: Installs the BioStar client application along with Microsoft Visual C++ 2005 Redistributable. The client application can be installed multiple times throughout the system, and will be installed on each workstation required to manage the BioStar system. Express Installer: Installs both the server setup and client application. The Express Installer is ideal for systems where the BioStar server application and client application will be managed from one workstation. System Requirements The software requirements to run the BioStar software are: - CPU - Intel Pentium Dual Core or similar processor, capable of processing - Speeds of 2GHz or faster - RAM - 1GB for Windows XP; 2GB for other operating systems - HDD - 10GB Installing BioStar Server Application - - - Insert the BioStar installation CD. Locate the installation directory and run BioStar 1.5 Server Setup. Follow the on-screen prompts to begin the installation. You will be required to accept the OpenSSL license agreement. You have the option to install the MS SQL server express edition. If you wish to use an existing version of MS SQL, MySQL or Oracle you can choose to. When the Create Database [BioStar] window appears, select a database type (MS SQL Server, MySQL or Oracle). The database server address and port numbers will be automatically populated. With a MS SQL server Windows authentication will be used as default. You can choose to use Server authentication if needed. Click Setup to create the database. Upon completion click Finish. Once program completes remaining tasks click Finish. www.ENTERTECHSYSTEMS.com Copyright © 2012 ENTERTECH SYSTEMS Inc. All rights reserved. 6 Quick Reference Guide for BioStar SE Installing BioStar Client Application - Insert the BioStar installation CD. - Run BioStar 1.5 Client Setup to launch the installation wizard. - Follow the on-screen prompts to complete the installation. Initial Log On To BioStar Before you are able to log on to BioStar you must first start the BioStar server and apply the correct server settings. Starting the BioStar Server By default the BioStar server is stopped. To start the BioStar server: - Open the BioStar Server Config from the icon on your desktop - You will receive a message reading “Cannot connect to BioStar Server. Please start it first.” Click OK. - Click Start (top right corner). - Status will now show the BioStar Server IP address. - Click OK. Adding an Admin ID/Password - Open BioStar 1.5 from the icon on your desktop. - Click on server setting. - Enter the BioStar Server IP (generally listed in BioStar Config window). - Click test to verify connection. - Click Save. BioStar will now prompt you to enter an Admin ID/Pass. Once you have entered the appropriate credentials you will be able to login in using the newly created admin ID/Password. www.ENTERTECHSYSTEMS.com Copyright © 2012 ENTERTECH SYSTEMS Inc. All rights reserved. 7 Quick Reference Guide for BioStar SE User Management Adding a New User In order to add a new user you will need to click the Add New User button in the task pane or right click on the department you wish to add the user to and click Add User. Step # 1 – Details Tab You will be brought to a blank user profile. Here you can enter basic information relevant to your system (eg, name, department, ID). From the details tab you can also: - Set start/expiry dates. Define private authorization modes (eg finger only, finger+pin, etc). All fields can be customized through the option menu at the top of the screen. Go to: Option>User-> Custom Field Settings. www.ENTERTECHSYSTEMS.com Copyright © 2012 ENTERTECH SYSTEMS Inc. All rights reserved. 8 Quick Reference Guide for BioStar SE Step # 2 – Fingerprint Tab BioStar provides the power of handling up to 10 templates per user. All enrollments MUST be completed using a 2X3 enrolment strategy. This means two fingers, with three templates per user. From the finger print tab: Ensure the enroll device is the correct device you want to use. Press the add button to add a finger, add six fingers. Highlight the first finger. Press scan, user places finger, removes, places again. Enroll three templates of right index and three templates of left index fingers. Click Apply. Good Enrollment Poor Enrollment Important Notes When completing an enrollment you want to make sure the core (middle) of the finger is visible. This is where the majority of data is stored and will ensure a higher rate of success. Employees that have a hard time on the system can be enrolled using a 2X5 method. (Two fingers, five templates each.) Success rates can be dependent on the user’s method of use. Ensure users place finger flat on sensor. There is a ridge at the bottom of the sensor for the line of the user’s first knuckle. www.ENTERTECHSYSTEMS.com Copyright © 2012 ENTERTECH SYSTEMS Inc. All rights reserved. 9 Quick Reference Guide for BioStar SE Step # 3 – Card Tab From the card tab, BioStar will allow users to have a card enrolled to be used for sole access or in combination with a biometric/pin. BioStar is capable of managing a wide variety of card types, including Mifare, HID and iCLASS. You also have the ability to enroll templates directly to a Mifare or iCLASS card. To enroll a card: - Select the card type you wish to enroll (this will be device dependent). Press the Card Management button. Select the device you wish to enroll the card from by choosing it in the device ID drop down box. Press the Read Card button. Place card on the device at the card sensor (generally under the finger sensor). Press OK. Press Apply. www.ENTERTECHSYSTEMS.com Copyright © 2012 ENTERTECH SYSTEMS Inc. All rights reserved. 10 Quick Reference Guide for BioStar SE Step #4 – Access Control Tab From the access control tab you are able to apply an access group to the user. This will control which doors the user has access to and when. Please see page 17 to learn how to build an access group. All users will be given Full Access by default. To add an access group to a user: - Click the Add button. Move Full Access to the left hand side (unselected items) using the arrows. Move the desired access group to the right hand side (selected items) using the arrows. Click OK. Click Apply. Step #5 – T&A Tab If you are using BioStar to manage a time & attendance system you will want to apply a shift to an employee from the T&A tab. Please see page 19 to learn how to build a shift. To add a shift to the user: - Select shift management (default). Click Add (bottom of screen). Add the desired shift for that user. Click Apply. www.ENTERTECHSYSTEMS.com Copyright © 2012 ENTERTECH SYSTEMS Inc. All rights reserved. 11 Quick Reference Guide for BioStar SE Step #6 – Transferring Users to Device - Highlight user/department in user tree (upper left). Right click on user. Select Transfer user to device. Select the device(s) from the device tree (click the checkbox). Press Transfer to Device ** If you are updating existing users, click the “overwrite users with different information” to ensure up-to-date data on device. Device Management Adding a Device – Server Mode (Recommended) BioStar has the ability to add a device in two separate ways, direct or server. For best practice and better logging ability it is recommended to add devices using server mode. In server mode, devices will automatically populate in the device tree and upon an event automatically communicate back to the server to provide constant communication even when the software is not running. To add a device in server mode: - Click the Device shortcut to access the device management home screen. Click the Add Device button in the task pane. Select LAN and press Next. Specify your desired search type (UDP/TCP). UDP – BioStar will search under the current IP address of the BioStar server TCP – Allows you to define the IP range to search under. Ideal if you are using alternative static IP addresses - - Highlight the device you wish to add in server mode. This will allow you to modify the device’s network settings. Click the server checkbox and enter the server IP. Server IP address can be modified if needed. Click Modify. You will get a message reading “Modified device cannot add this step, confirm modify.” Click Yes. Click Next, Click Finish. www.ENTERTECHSYSTEMS.com Copyright © 2012 ENTERTECH SYSTEMS Inc. All rights reserved. 12 Quick Reference Guide for BioStar SE The device will not appear immediately, it can take up to five minutes for the device to make its initial communication with the server. Press the refresh button at the top of the screen to allow the device to appear under the device tree. Note now the device will be listed under the BioStar Server. Adding a Device – Direct Mode - Click the Device shortcut to access the device management interface. Click the Add Device button in the task pane. Select LAN and press Next. Specify your desired search type (UDP/TCP). Click Next. Once the search is complete click finish. Click the checkboxes next to the devices you wish to add, click Add. Click Finish. The device(s) are now online, and will appear under the device tree. www.ENTERTECHSYSTEMS.com Copyright © 2012 ENTERTECH SYSTEMS Inc. All rights reserved. 13 Quick Reference Guide for BioStar SE Preparing a Device to Use a Secure IO In a Suprema system every device should be installed with a Secure I/O door controller. In order to allow a device to communicate with the Secure I/O you must make sure it is set as a RS-485 host device. To modify the RS-485 settings: - Click on the device from the device tree. Choose the Network tab. Ensure the RS485 mode is set to Host. This is listed under Serial Setting. Click Apply. Adding a Secure I/O To add a Secure I/O to a previously registered device: - Right click on a device in the device tree. Select Add Device (Serial). Once the search is complete click finish. Click the checkbox next to the Secure I/O, click Add. Click Finish. The Secure I/O will be listed underneath the desired device, you will be able to view it by expanding the plus sign next to the device. www.ENTERTECHSYSTEMS.com Copyright © 2012 ENTERTECH SYSTEMS Inc. All rights reserved. 14 Quick Reference Guide for BioStar SE Door Management Adding A New Door BioStar has the ability to efficiently manage up to 512 doors (BioStar SE). Each door can be controlled by a specific device and protected by a Secure I/O. To add a new door: - Click the Doors shortcut to door management interface. Click Add New Door in the task pane. Supply a name for the new door. Click Apply. In order to control a door, you must associate a device with the new door. To add a device to the door: - - Right click on the door in the door tree. Select add device. Select the device you wish to add to the door and press OK. Select the device from the IO Device drop down bar. To ensure use of the Secure I/O, select SIO0 Relay 0 from the door relay drop down. Click Apply. The door is now completely configured to provide superior security using the Secure IO. Adding an Unlocking Schedule Through the BioStar software you have the ability to set up an unlocking schedule to accommodate times a specific door should be unlocked. To set up an unlocking schedule: - Select a door from the door tree. In the details tab use the Unlock Time drop down bar to select a time zone you have previously configured. (see page 16 for instructions for configuring a time zone). Click Apply. www.ENTERTECHSYSTEMS.com Copyright © 2012 ENTERTECH SYSTEMS Inc. All rights reserved. 15 Quick Reference Guide for BioStar SE Adding a Exit Device Adding an exit device (RTE, PIR, etc) to a Suprema system is extremely simple. To add an exit device to a door: - Select the door from the door tree. From the details tab use the Exit Button drop down bar to select the correct input to trigger with the exit button. Click Apply. Access Control Management Adding a New Timezone One very helpful tool in BioStar is Timezones. Timezones can be used to configure unlocking schedules for doors, access times for certain users as well as time parameters for specific device functions. To build a Timezone: - Click the Access Control shortcut to view the access control management interface. Click the New Timezone button under the task pane. Use the mouse to drag the time parameter you wish to set in the Timezone. You can copy the information from the previous day by using the buttons. Once you have added the correct time parameters for each day, click Apply. www.ENTERTECHSYSTEMS.com Copyright © 2012 ENTERTECH SYSTEMS Inc. All rights reserved. 16 Quick Reference Guide for BioStar SE Transferring Timezones to a Device Once a Timezone has been correctly built it must be transferred to the device(s). This will ensure that the device(s) still function correctly in the case of a network outage. To transfer a Timezone: - Highlight the desired Timezone in the Timezone tree. Select Transfer to Device in the task pane. Select all devices. Click OK. Adding An New Access Group In BioStar an access group will define which set of doors a particular group of users have access to and when. A user can belong to up to four different user groups to ensure any access scenario is accommodated. To build an access group: - - Click the Access Control shortcut to view the access control management interface. Click the New Access Group button under the task pane. Click add (bottom of the screen). Select which door(s) you wish users in this group to have access to. Choose a Timezone from the drop down bar. This will determine what time parameters users in this group will have access to the defined door(s). Click OK. Click Apply www.ENTERTECHSYSTEMS.com Copyright © 2012 ENTERTECH SYSTEMS Inc. All rights reserved. 17 Quick Reference Guide for BioStar SE Adding Users to an Access Group After adding a list of doors for your new access group, you will want to add users to the group. This is done from the User (in the access group window) tab. To add users to an access group: - Click Add at the bottom of the screen. Choose all users, the department, or an individual user you wish to add to the group. Click OK. Click Apply. Monitoring Management Opening/Closing a Door Through the BioStar software you have the ability to remotely open/close a door. To open/close a door: - Click the Monitoring shortcut to access the monitoring management interface. From the Door/Zone Monitoring tab you will see a list of all doors. Click the door you wish to open/close. Click Open Door/Close Door. ** Once a door has been remotely opened through the BioStar software it will remain open until forced closed through the software. www.ENTERTECHSYSTEMS.com Copyright © 2012 ENTERTECH SYSTEMS Inc. All rights reserved. 18 Quick Reference Guide for BioStar SE Real-time Monitoring In the BioStar Monitoring management interface you will have the ability to view events as the take place in your system. To view Real-time monitoring: - Click the Real-time Monitoring tab. This shows you any events that have taken place since you started BioStar. As events take place they will populate at the bottom of the screen. By default events taking place at all doors will be visible; to view events at a specific door simply highlight the desired door in the door tree on the left hand side. Time & Attendance Management BioStar has the unique ability to combine a full featured access control system with powerful time & attendance capabilities. A time & attendance system in the BioStar software is made up of three unique pieces (Time Categories, Daily Schedules, Shifts). These pieces can be configured in multiple ways to accommodate the different needs of a time & attendance system. Below are instructions to build a basic time & attendance system. Adding a New Time Category Time Categories allow you to define different time rates and rounding abilities. This can be beneficial when setting up shifts that include overtime. To add a time category: - - - Click the Time and Attendance shortcut to access the Time and Attendance management interface. Click the Add Time Category button in the task pane. Enter your Time Rate. Time rates can accommodate for time & half/double time scenarios (Default 1). Enter your Rounding Unit (Default 1). Choose a display color (Default Black). Click Apply. www.ENTERTECHSYSTEMS.com Copyright © 2012 ENTERTECH SYSTEMS Inc. All rights reserved. 19 Quick Reference Guide for BioStar SE Adding a New Daily Schedule Daily Schedules are used to define the time parameters BioStar will recognize and capture a user’s time. Using a Daily Schedule you can apply a variety of features such as grace times, minimum work time durations, etc. After a Daily Schedule is complete you will use it to help build a shift. To add a Daily Schedule: - Click the Add Daily Schedule under the task pane. Provide a name. Set a day start time (this is the earliest you can begin clocking time). Under the time slot section enter a start/end time (this is the time parameters we will capture with our Time Category). Choose a Time Category from the (Time Category) drop down bar. Click Add. Click Apply. Adding a New Shift The final piece of setting up basic time & attendance is a Shift. There are two different shift cycles available in BioStar SE, weekly and daily. Weekly Cycle: Shift repeats on a weekly basis, able to apply a daily schedule to each day of the week. Daily Cycle (BioStar SE): Shift is customizable by day. Daily schedule is able to be applied to each day of the month. www.ENTERTECHSYSTEMS.com Copyright © 2012 ENTERTECH SYSTEMS Inc. All rights reserved. 20 Quick Reference Guide for BioStar SE To Build a New Weekly Shift - From the task pane, click the Add Shift button. Provide a name. Select cycle type (weekly/daily). Select end date (can extend year to 2030 max. Allows for shift to continually repeat). Click the checkbox for each work day. Add a Daily Schedule using the ellipsis button (…) - Copy shifts to the next day using the Press Apply. button as needed. Adding Users to a Shift From the User tab in the new shift screen you have the ability to add users to the group. You can add all users, departments or individuals to a Shift. The shift will show up on each user profile, each user can belong to up to four shifts. To add a user to a shift: - Click add (bottom of screen). Select all/department/user you wish to add to the shift. Click OK. Click Apply. www.ENTERTECHSYSTEMS.com Copyright © 2012 ENTERTECH SYSTEMS Inc. All rights reserved. 21 Quick Reference Guide for BioStar SE System Installation Suprema’s IP access control systems provide simplistic installation methods that allow for quick setup and convenient maintenance methods. Secure I/O Wiring The secure I/O is designed to make installation of a Suprema biometric system straight forward while not compromising the functionality of traditional access control systems. Below are the basic wiring methods for a Secure I/O: Power Connection www.ENTERTECHSYSTEMS.com Copyright © 2012 ENTERTECH SYSTEMS Inc. All rights reserved. 22 Quick Reference Guide for BioStar SE Device Connection Wiring a Fail Secure Lock www.ENTERTECHSYSTEMS.com Copyright © 2012 ENTERTECH SYSTEMS Inc. All rights reserved. 23 Quick Reference Guide for BioStar SE Wiring a Fail Safe Lock Wiring a Exit Device (RTE,PIR,etc) www.ENTERTECHSYSTEMS.com Copyright © 2012 ENTERTECH SYSTEMS Inc. All rights reserved. 24 Quick Reference Guide for BioStar SE RS-485 Wiring Harnesses When wiring a Secure I/O you will consistently use the RS-485 wiring harness. This is included with the device. Below is a diagram of each device’s RS-485 harness. BioStation T2 BioLite Net D-Station BioEntry Plus www.ENTERTECHSYSTEMS.com Copyright © 2012 ENTERTECH SYSTEMS Inc. All rights reserved. 25 Quick Reference Guide for BioStar SE BioStation X-Pass X-Station www.ENTERTECHSYSTEMS.com Copyright © 2012 ENTERTECH SYSTEMS Inc. All rights reserved. 26