1
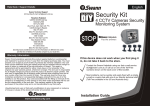
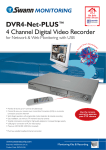
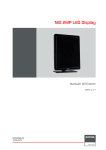
English
Help Desk / Support Details
Swann Technical Support
All Countries E-mail: [email protected]
Telephone Helpdesk
UNITED STATES toll free
877-274-3695
(Sun-Thurs, 2pm-10.30pm PST)
800-627-2799
(Mon0Fri, 9am-1pm PST)
USA Exchange & Repairs
562-777-2551
(Mon-Fri, 9am-5pm PST)
AUSTRALIA toll free
1300 13 8324
(Mon-Fri, 9am-5.30pm Aus EST)
International
+61 3 8412 4610
(Mon-Fri, 9am-5.30pm Aus EST)
See http://www.worldtimeserver.com for information on different time zones
and the time in Melbourne Australia compare to your local time.
Warranty Information
Swann warrants this product against defects in workmanship and material for a period of one
(1) year from it’s original purchase date. You must present your receipt as proof of date of
purchase for warranty validation. Any unit which proves defective during the stated period will
be repaired without charge for parts or labour or replaced at the sole discretion of Swann. The
repair or replacement will be warranted for either ninety days or the remainder of the original
one year warranty period, whichever is longer. The end user is responsible for all freight
charges incurred to send the product to Swann’s repair centres. The end user is responsible for
all shipping costs incurred when shipping from and to any country other than the country of
origin. The warranty does not cover any incidental, accidental or consequential damages arising
from the use of or the inability to use this product. Any costs associated with the fitting or
removal of this product by a tradesman or other person or any other costs associated with its
use are the responsibility of the end user. This warranty applies to the original purchaser of the
product only and is not transferrable to any third party.
Maxi Day/Night Cam
Security Camera
Weatherproof Day & Night Camera
If this device does not work when you first plug it in,
do not take it back to the store.
Contact the Swann Helpdesk using our fast e-mail service
[email protected] or call us on one of the Toll-Free
numbers shown on the back cover of this booklet.
Most problems can be quickly and easily fixed with a simple
e-mail or a quick chat with one of our friendly technical staff.
(Toll-Free available in the US and Australia only)
Unauthorised end user or third party modifications to any component or evidence of misuse or
abuse of the device will render all warranties void.
Installation Guide
www.swannsecurity.com
8
Contents
Technical Specifications
Introduction
Your package comes with
Connect the Maxi Day/Night Camera to your monitoring device
Connect the Maxi Day/Night Camera to your monitoring device (continued)
Connect the Maxi Day/Night Camera to your monitoring device (continued)
Important Information about this product
Tips for using your Swann Security Camera
Technical Specifications
Help Desk / Support Details
Warranty Information
2
2
3
4
5
6
6
7
Back Cover
Back Cover
Introduction
The Maxi Day/Night Camera is a versatile Weatherproof CCD Security camera that includes 24 InfraRed LEDs that give you the capability of viewing the images produced under most lighting conditions,
even at night. Use the included bonus 12mm lens to switch from the standard wide view to a more
focussed narrow view of your camera location. It can be used to provide your home or office with a clear
picture that can be easily displayed on a DVR, TV, VCR or Security Monitor.
The Maxi Day/Night camera is designed for best performance when used with Swann DVRs and Security
Monitors, but will just as easily work with your existing CCTV Equipment, TV, VCR or a Computer with a
video capture card. The camera can be used indoors or outdoors. The Maxi Day/Night camera can be
used for a variety of purposes including monitoring callers at the door or keeping your car, yard, shop or
children’s play area under observation.
Your package comes with…
•
•
•
•
•
•
•
•
Maxi Day/Night Camera with fixed cable and Camera Hood
Camera Stand
Bonus 12mm lens
BNC male to RCA female Gender Changer
RCA male to RCA male Gender Changer
Power Adaptor
Security Stickers
This Instruction Sheet
If any of these items are missing, please contact your retailer.
INSTALLATION
FCC NOTICE
This device complies with Part 15 of FCC Rules.
Operation is subject to the following conditions:
(1) This device may not cause harmful interference, and
(2) this device must accept any interference received,
including interference that may cause undesired operation
2
Image Sensor:
¼” SuperHAD CCD
Picture Element:
PAL - 500 (H) x 582 (V) / NTSC - 510 (H) x 492 (V)
Video System*:
NTSC - USA & CANADA, PAL - AU, UK & EU
Horizontal Resolution:
420 TV Lines
S/N Ratio:
> 48db
Minimum Illumination:
0 Lux (IR LEDs on)
Video Output:
1.0v (P-P) @ 75ohm
Power Supply:
12volts DC
Operating Current:
180mA - 280mA (IR On)
Video Cable Connector:
BNC female
Infra-Red LEDs:
24
Infra-Red LED Wavelength:
850nm
Maximum IR Illumination Range:
66ft (20m)
IR Activation:
Automatic from PE Cel
Auto On at Night
Auto Off during Day
Housing Material:
Aluminium Alloy
Dimensions (H x W x L):
4” x 2¾” x 6¾” / 99mm x 71mm x 169mm
*Please note that this camera ships in the appropriate TV/Video system for the country of sale. In countries using the NTSC
TV standard for the camera will be built to the NTSC standard, and in countries using PAL TV standard, the camera will be
built to the PAL standard. The camera cannot switched from one standard to the other.
FCC Notice
We, Swann Communications of 10612 Shoemaker Avenue, Bldg A, Santa Fe Springs, CA 90670 USA, declare under our
sole responsibility that the product:
SW-C-MDNC
This product meets the requirements specified in Part 15 of FCC Regulation. Operation rests with the following two
conditions:
(1) The equipment should not cause any harmful interference;
(2) The equipment must receive and process any interference, including any possible interference caused by operation
mistakes. After testing the product, we confirm that it complies with the provision for class C digital equipment in the 15th
part in FCC regulation; and the receiver complies with the limitations for class B digital equipment in Part 15 of FCC
regulation. The product generates, applies and emits radio waves. It might cause harmful interferences to wireless
communication if not be installed and used following the description of the manual. The product may cause interference in
residential area, and the customer should take remedies to eliminate the interference at their own costs. If the product
causes any harmful interference to wireless equipment or disturbs the receiving of TV signals (it can be identified by turning
on and off the product), you can solve the trouble by following methods:
(1) Re-adjust the product or put it in another place;
(2) Extend the distance between the equipment interfered and the product; and
(3) Refer to dealers or experienced radio electrician for help.
CE Notice
This product complies with standards including Low Voltage Device Directive 73/23/EEC; EMC Directive 89/336/EEC and
R&TTE Directive 1999/5/EC. It passed the subject tests by the authority concerned and is authorized to bear CE mark.
7
Important Information about this product
!
Best Results are achieved when the camera is looking down on the subject area.
!
The hood can be used to stop sunlight entering the lens and causing the picture to wash out
during bright daylight.
!
Please test all devices before final installation as it is far easier to rectify problems at this stage.
!
To avoid the risk of damage to your product, use only the supplied power adaptors.
!
Areas with a bright background may caused degradation of the image. If possible position
your camera so that it doesn’t point towards a very bright light source.
!
Do not cut the DC power cable of the Camera to fit with another power source. This may result in
damage to the Camera & any unauthorised modifications will void your warranty.
Tips for using your Swann Security camera
1.
Deterrence is the best and most cost effective security method for:
- preventing criminal activity before it occurs is preferable to, and cheaper than, cleaning
up after it occurs
- the Swann Maxi Day/Night Camera is an example of cost effective security utilising
the 'art of deterrence' to outsmart thieves and criminals
Connect the Maxi Day/Night Camera to your monitoring device
These step by step instructions are provided for you to enable a quick and simple installation of
your camera. Please refer to the diagram over the page for component identification details.
Step 1: At the end of your Maxi Day/Night Camera cable you will find two plugs:
•Video BNC Female
•DC Power Jack
Step 2a: Plug the BNC Female (1b) into the BNC Male Adaptor (3) and turn the outer ring to
lock the connectors. Plug the RCA Male Gender Changer (4) into the opposite end of
the BNC Male Adaptor (3) and then into the RCA Video In socket on your TV or VCR
(usually located at the back). This is the best method of connecting the camera initially to
test it for correct operation.
Step 2b: If you are mounting the camera permanently it is recommended that you use coaxial cable
with BNC male connectors to ensure the best possible fit and electrical connection. You can
also use the Swann Security Camera Extension cables with BNC adaptors such as the 120ft
AV Cable (Product code SW-P-36M) or the 60ft AV Cable (Product Code SWAVCABLE) Check the Swann website for information on other Swann cable and accessory
products or see your local electrical store for more information on what cables and accessories
are available in their range to suit Security Cameras with BNC video connectors.
Step 3: Connect the Power Connector (2a) at the end of the power adaptor (2) in to your
Maxi Day/Night Camera’s DC Jack (1a).
2.
Always place cameras high enough that they can't be closely inspected or easily accessed.
Step 4: Plug the power adaptor (2) into the mains power point on your wall and switch on.
3.
Position cameras and dummies where they can be easily seen for maximum deterrence.
4.
Position a monitor where it can be seen but not touched.
5.
If you have more than one camera use a monitor with channel switching function, a Quad
Processor or DVR with multiple views to show potential offenders the level of coverage you have
protecting your site.
Step 5: If you have an A/V TV with RCA sockets you will need to switch the TV to the AV channel
to view the camera. To connect the camera to your VCR, you will need to turn the VCR to
the A/V Input selection and turn your TV onto the channel you would normally use to view
a tape or movie on your VCR. This channel may be activated by a button on your remote
that is marked with this symbol
, or L1 or L2 or possibly AV1 or AV2. Please read the
instructions for your VCR or TV for more information on using their A/V inputs.
6.
Add extra Swann dummy cameras to give the impression of heightened security.
7.
Purchase a Swann DVR (product code SW-R-DVR4NET) to monitor and record activity on your
cameras. Depending on the settings used, DVRs can record for months.
8.
Position a VCR with tapes or boxes close to your monitor for added effect,
implying there is a security video recorder even if there isn't one.
Step 6: To fit the Camera Hood use a small Philips Head screwdriver to remove the two screws from
the top mounting block. Once these are removed, place the hood on top of the camera
casing with the slots over the screw holes in the casing. Place the mounting block on top of
the hood, then using the screwdriver screw the two screws back into the casing until the hood
is firmly secured.
Please note: if you wish to use the bonus 12mm lens you should fit and adjust it before fitting
the hood.
Step 7: If you are fitting the 12mm lens, (if you have already fitted the hood, remove it using the
instructions in step 6 first)
6
3
Connect the Maxi Day/Night Camera to your monitoring device (continued)
Connect the Maxi Day/Night Camera to your monitoring device (continued)
SETTING UP YOUR SYSTEM
Basic Connection to VCR, TV or MONITOR
2
POWER
ADAPTOR
VCR, TV or MONITOR
1. Unscrew the front housing of the camera in an anticlockwise direction. Note: Please be careful to avoid
breaking the glass.
2. Unscrew inner camera cover thread by turning anti
clockwise carefully removing the LED panel with the camera
cover Warning: Do not turn the LED panel as you unscrew
the camera cover it should remain stationary. Doing so may
damage the LED panel connecting cable.
CAMERA
1 with Stand
2a
1a DC Jack
VIDEO AUDIO
OUT
IN
VIDEO AUDIO
4
1b BNC Female
3
RCA VIDEO IN 2
Note: The Maxi Day/Night Color Camera will automatically change to a black & white image using
the Infra-Red LEDs when available light is too low to support a clear color picture.
3. Loosen locking screw with Phillips head screw driver by
turning screw in an anticlockwise direction.
4. Unscrew the lens in a anti clock wise direction and
remove lens now replace lens with the new lens.
5. To adjust the lens for correct focus, temporally connect
the camera to a monitor and power the camera using the
power supply found in the packaging.
Plan where you want to situate the camera, and estimate
how far objects will be from the camera. Then adjust the
lens until you have focussed the camera for your desired
distance. Disconnect the power from the camera once it is
in focus, now re tighten the locking screw with a Phillips
head screw driver by turning it in a clockwise direction.
Connection to VCR, TV or MONITOR using an extension cable
POWER
ADAPTOR
DVR or MONITOR
With BNC Sockets
VIDEO AUDIO
OUT
IN
Extension
Cable with
BNC Male
Connectors
(not included)
DC POWER
CONNECTOR
CAMERA
with Stand
DC Jack
VIDEO AUDIO
BNC Female
BNC VIDEO IN
6. Tighten threaded camera cover by turning it in a clockwise 7. Screw the front housing back onto the camera by turning
direction.
the housing in a clockwise direction.
4
5