1
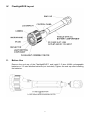
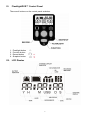
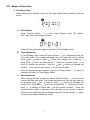
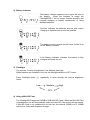
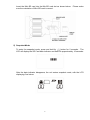
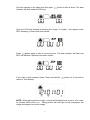
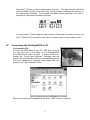
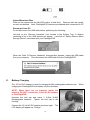
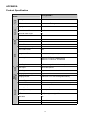
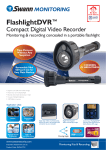
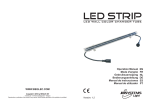
FlashlightDVR™
USER MANUAL
SW244-TDV
Before You Begin
READ THESE INSTRUCTIONS BEFORE USE AND RETAIN FOR FUTURE REFERENCE.
WARNING: Important notice about correct usage of the power adapter
The correct orientation for the enclosed power adapter is in a vertical or floor mount position.
FCC WARNING STATEMENT
This device complies with Part 15 of FCC Rules.
Operation is subject to the following two conditions:
(1) This device may not cause harmful interference, and
(2) This device must accept any interference received, including interference that may cause
undesired operation
Important Notice
All jurisdictions have specific laws and regulations regarding the use of cameras. Before using
any camera for any purpose, it is the buyer’s responsibility to be aware of all applicable laws and
regulations that prohibit or limit the use of cameras and to comply with the applicable laws and
regulations. The legality of watching people other than yourself changes from country to
country and even state to state. Contact your local government’s privacy information body or
your local Police for more information on what if any restrictions you may face.
Technical Support
Swann Technical Support is available for any inquiries you may have.
Website: www.swannsecurity.com
USA/Canada: 1-800-627-2799, 1-877-274-3695
Australia: 1300 13 8324
Email: [email protected]
2
I.
Introduction
Thank you for purchasing the Swann FlashlightDVR™. This manual details the operation
of the product. Please read it carefully and keep it for future reference.
The Swann FlashlightDVR is an innovative ALL-IN-ONE PORTABLE solution for
Flashlight, Camera and Digital Video Recorder. It is ideal for instant MPEG4 Video
Recording for Security Applications.
II.
Features
-
III.
High powered White LED flashlight
Highly Durable with precision tooled aluminum housing
Compact size and portable DVR System
Support up to 2GB external Mini SD Card flash storage
MPEG4 Video Recording
Support 1.5 Hours VGA recording with 1 GB Mini SD card
Built-in CMOS Color VGA Sensor (640x480)
Night Vision support
Backup using USB1.1 compatible interface
Easy operation with one touch control
LCD Status Display with backlight
Clock Display
Built-in Ni-MH Charger (12V input)
Package Contents
1 x FlashlightDVR
1 x USB Cable
1 x User Manual
1 x 12V AC-DC Adaptor for Charging
1 x Charger for Cigarette Adapter
3
IV.
FlashlightDVR Layout
V.
Before Use
Remove the end cap of the FlashlightDVR™ and install 3 C-size Ni-MH rechargeable
batteries or 3 C-size alkaline batteries (not included). Tighten the end cap after installing
the batteries.
4
VI.
FlashlightDVR™ Control Panel
There are 4 buttons on the control panel as below:
1.
2.
3.
4.
VII.
Flashlight button
Function button
Record button
Snapshot button
LCD Display
5
VIII. Modes of Operation
1) Time/Date Setup
When batteries are installed in the unit, the Time Display Mode appears as shown
below:
A.
Date Display
Press Function button
to enter Date Display mode. By default,
2007-January-01 will display as below:
Press the Function button again to go back to Time Display mode.
B.
Time Adjustment
for 2 seconds to enter the
In Time Display mode, hold the Function button
Time edit mode. The number indicating Hour will flash and can be edited
using
and
buttons. Press
button will increase the number by 1
while press
button will decrease by 1. Press the Function button
to
move to change the Minutes. Use the
and
buttons to change the
minutes.
Press the Function button
to edit the Seconds.
Once all adjustments are complete, press the Function button
changes and return to Time Display Mode.
C.
to save all
Date Adjustment
When viewing the date, press and hold the Function button
for 2 seconds
to enter the Date edit mode. The number indicating the Year will flash and can
and
buttons. Press
button will increase the
be changed using
number by 1 while press
button will decrease by 1. Press the Function
to change to Month edit. Use the arrows as above. Press the
button
Function button again to change to Day edit and use the arrows to adjust.
When you have finished making changes press the Function button
to save and exit Date Adjustment mode.
6
again
2) Battery Indicator
The battery indicator appears in the upper left area of
the display.
When the indicator is empty the
FlashlightDVR™ will no longer function properly and
requires charging or battery replacement (if using
alkaline batteries).
One bar indicates the batteries are low and require
charging or replacement as soon as possible.
The battery level is normal and will have 2 slots lit up
on the Battery Indicator.
A full Battery Indicator indicates the battery is fully
charged and ready for use.
3) Flashlight
The unit has 3 levels of brightness, Low, Medium and High.
When batteries are installed in the unit the flashlight defaults to OFF mode.
Press Flashlight button
levels:
repeatedly to cycle through the various brightness
Low
Medium
High
OFF
4) Using a Mini-SD Card
The FlashlightDVR supports 128MB to 2GB Mini-SD Cards. When the Mini-SD Card
is installed the unit will automatically select the Mini-SD Card as the storage media.
If Mini-SD Card is not installed the unit will use the internal 100MB out of 128MB
memory for Video and Snapshot storage.
7
Insert the Mini-SD card into the Min-SD card slot as shown below.
sure the orientation of Mini-SD card is correct.
Please make
5) Snapshot Mode
To enter the snapshot mode, press and hold the
button for 2 seconds. The
LCD will display the SD Card data indicator and flash for approximately 10 seconds:
After the data indicator disappears, the unit enters snapshot mode, with the LCD
displaying 0 as below:
8
Point the camera to the object and then press
indicator will flash under the SD logo:
button to take a photo. The data
Once the DVR has finished processing the image, a number 1 will appear under
REC indicating 1 picture has been saved:
Press
button again to take a second picture. The data indicator will flash and
REC will indicate 2 pictures have been stored:
If you want to quit snapshot mode, Press and hold the
return to Time display.
button for 2 seconds to
NOTE: When taking photos at night, ensure the flashlight level is set to off in order
for infrared LEDs to turn on. Taking photos with the light on will overexpose the
image and appear as a white image
9
6) Video/Audio Recording
To enter the video/audio recording mode, press and hold
button for 2 seconds.
The LCD will display the SD Card data indicator and will flash for approximately 10
seconds:
After the data indicator disappears, the unit enters the video/audio recording mode,
with LCD displaying 0 as below:
Point the FlashlightDVR at an object and then press the
button to start the
video/audio recording. The data indicator will flash under the SD logo:
Once the data indicator disappears the video will begin to record and the timer will
start counting:
10
Press the
button to stop a video/audio recording. The data indicator will flash
while the data is writing to the SD Card. The time display indicates the duration of
the video/audio recorded. For example, the below figure indicates 10 minutes 3
seconds of video/audio has been recorded.
You can press
button again to start another video/audio recording or press and
hold
button for 2 seconds to exit video mode and return to time display mode.
IX.
Connecting the FlashlightDVR to PC
Connection to PC
Connect the USB cable to your PC USB port. Connect
the mini plug end of the cable to the FlashlightDVR
mini-USB port as shown at right. A popup window will
display the “Found new hardware” message and the
system will automatically install the corresponding driver.
Once the installation is complete “Removable Disk” will
appear in the “My Computer” folder.
When connected, the FlashlightDVR will show “USB” on the LCD panel.
11
Upload/Download Files
Data can be copied from the Mini-SD card to a hard drive. Data can also be copied,
moved, and deleted. Note: FlashlightDVR features are disabled while connected to PC
Disconnect from PC
Do not disconnect the USB cable before performing the following:
Left-click on the “Remove Hardware” icon located in the System Tray. A window
containing a list of the USB devices will appear. Left-click on “Safely Remove Mass
Storage Device” associated with your FlashlightDVR.
When the “Safe To Remove Hardware” message box appears, unplug the USB cable
from your computer. Then disconnect the USB cable from the FlashlightDVR.
X.
Battery Charging
The 12V AC-DC Adapter is used for charging Ni-MH rechargeable batteries only.
charging the FlashlightDVR will display only the time/date.
NOTE: When there are no batteries inside the
housing, DO NOT connect the 12 Volt AC-DC adaptor
to FlashlightDVR.
Unscrew the end cap and insert 3 C-Size Ni-MH
Rechargeable batteries. Tighten the end cap to the
housing.
Connect the 12 Volt AC-DC adapter as shown right.
LCD display will appear as “Charge”:
12
The
When
When “Charge” disappears, the battery indicator will appear showing the amount of
charge.
The FlashlightDVR will automatically stop charging after 6 hours or internal temperature
reaches 80 degrees Celsius.
When the battery is full, the battery indicator will stop rolling and will appear as full charge.
IMPORTANT: If the battery indicator shows no or low charge please recharge or replace
batteries immediately.
XI.
Cautions for Use:
-
Only use the included 12Volt AD-DC adaptor when using Ni-MH rechargeable batteries.
DO NOT charge the unit when using alkaline batteries.
DO NOT bend unit.
DO NOT short circuit, bend, deform the batteries or dispose batteries in fire for risk of
physical injury.
Do not use batteries with varying voltages or charge as it may damage the unit.
DO NOT disassemble the unit.
DO NOT charge the unit in high temperatures.
If there is a problem with the unit contact Swann Technical Support for assistance.
13
APPENDIX:
Product Specification
FlashlightDVR™
General
Battery
Charger
Audio
DVR
IR LED
Camera
Torch
Model:
Flashlight
Built-in Cool-White 3Watt LED
Brightness
3-Levels of Brightness
Over Heat Protection
Shut Down at 80 Degree C
Imaging Sensor
Color CMOS Sensor
Active Pixel Array
300K pixels
Sensor Resolution
VGA 640 x 480
Horizontal View Angle
66°
Gain Control
Automatic
White Balance
Automatic
Number of IR LED
17pcs
Wavelength of IR LED
850nM
IR Effective Distance
At 0Lux,IR Effective Distance: Maximum 4 Meter
Video Compression system
MPEG-4
Record File Format
MP4
Built-In Memory
128MB
Storage Media
Mini SD Card, Supports Up to 2GB
User Interface
Recording Time
TN-LCD display
Backup Method
Compliant with USB1.1 Interface
Recording Rate
Maximum Image Transfer Rate 30 fps
Audio Input
Built-In Microphone
Audio Engine
Single Channel 16-bit ADC,Gain:35.25dB
Charging Input Voltage
Adaptor 12VDC
Charging Current
Full Charge Protection
Over Charge protection
Ni-MH 3A/h 3 x C size rechargeable battery
Yes
6 Hour Timer
Power Source
3 x C size battery, Alkaline or Ni-MH rechargeable
Power consumption
Below 7Watt
Operating Temperature
-10 to 35 Degree C
Operating Humidity
20-95% (Non-Condensation)
Weight
520 grams Without Battery
Dimensions
79(W) x 97(H) x 323(L)mm
USB cable
Weather Proof
Approval
Yes
Yes
FCC, CE, RoHS
Maximum 18 minute /128MB @VGA
Maximum 1.5 Hours for 1G SD Card
14