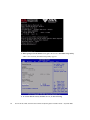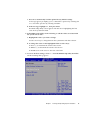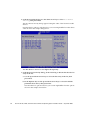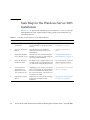
1
Sun Fire™ X4170, X4270, and
X4275 Servers Windows Operating
System Installation Guide
Sun Microsystems, Inc.
www.sun.com
Part No. 820-5829-11
September 2009, Revision A
Submit comments about this document by clicking the Feedback[+] link at: http://docs.sun.com
Copyright © 2009 Sun Microsystems, Inc., 4150 Network Circle, Santa Clara, California 95054, U.S.A. All rights reserved.
Sun Microsystems, Inc. has intellectual property rights relating to technology embodied in the product that is described in this document. In
particular, and without limitation, these intellectual property rights may include one or more of the U.S. patents listed at
http://www.sun.com/patents and one or more additional patents or pending patent applications in the U.S. and in other countries.
This distribution may include materials developed by third parties.
Parts of the product may be derived from Berkeley BSD systems, licensed from the University of California. UNIX is a registered trademark in
the U.S. and in other countries, exclusively licensed through X/Open Company, Ltd.
Sun, Sun Microsystems, the Sun logo, Java, Sun Studio, Solaris and Sun Fire are trademarks or registered trademarks of Sun Microsystems, Inc.,
or its subsidiaries, in the U.S. and other countries.
Intel is a trademark or registered trademark of Intel Corporation or its subsidiaries in the United States and other countries. The Adobe logo is a
registered trademark of Adobe Systems, Incorporated.
The OPEN LOOK and Sun™ Graphical User Interface was developed by Sun Microsystems, Inc. for its users and licensees. Sun acknowledges
the pioneering efforts of Xerox in researching and developing the concept of visual or graphical user interfaces for the computer industry. Sun
holds a non-exclusive license from Xerox to the Xerox Graphical User Interface, which license also covers Sun’s licensees who implement OPEN
LOOK GUIs and otherwise comply with Sun’s written license agreements.
Use of any spare or replacement CPUs is limited to repair or one-for-one replacement of CPUs in products exported in compliance with U.S.
export laws. Use of CPUs as product upgrades unless authorized by the U.S. Government is strictly prohibited.
DOCUMENTATION IS PROVIDED "AS IS" AND ALL EXPRESS OR IMPLIED CONDITIONS, REPRESENTATIONS AND WARRANTIES,
INCLUDING ANY IMPLIED WARRANTY OF MERCHANTABILITY, FITNESS FOR A PARTICULAR PURPOSE OR NON-INFRINGEMENT,
ARE DISCLAIMED, EXCEPT TO THE EXTENT THAT SUCH DISCLAIMERS ARE HELD TO BE LEGALLY INVALID.
Copyright © 2009 Sun Microsystems, Inc., 4150 Network Circle, Santa Clara, California 95054, Etats-Unis. Tous droits réservés.
Sun Microsystems, Inc. détient les droits de propriété intellectuels relatifs à la technologie incorporée dans le produit qui est décrit dans ce
document. En particulier, et ce sans limitation, ces droits de propriété intellectuelle peuvent inclure un ou plus des brevets américains listés à
l’adresse http://www.sun.com/patents et un ou les brevets supplémentaires ou les applications de brevet en attente aux Etats - Unis et dans les
autres pays.
Cette distribution peut comprendre des composants développés par des tierces parties.
Des parties de ce produit pourront être dérivées des systèmes Berkeley BSD licenciés par l’Université de Californie. UNIX est une marque
déposée aux Etats-Unis et dans d’autres pays et licenciée exclusivement par X/Open Company, Ltd.
Sun, Sun Microsystems, le logo Sun, Java, Sun Studio, Solaris et Sun Fire sont des marques, ou des marques déposée de Sun Microsystems, Inc.,
ou ses filiales, aux Etats-Unis et autres pays.
Intel est une marque ou une marque déposée de Intel Corporation, ou ses filiales, aux Etats-Unis, et dans d’autres pays. Le logo Adobe. est une
marque déposée de Adobe Systems, Incorporated.
L’interface d’utilisation graphique OPEN LOOK et Sun™ a été développée par Sun Microsystems, Inc. pour ses utilisateurs et licenciés. Sun
reconnaît les efforts de pionniers de Xerox pour la recherche et le développement du concept des interfaces d’utilisation visuelle ou graphique
pour l’industrie de l’informatique. Sun détient une license non exclusive de Xerox sur l’interface d’utilisation graphique Xerox, cette licence
couvrant également les licenciés de Sun qui mettent en place l’interface d’utilisation graphique OPEN LOOK et qui, en outre, se conforment aux
licences écrites de Sun.
L’utilisation de pieces detachees ou d’unites centrales de remplacement est limitee aux reparations ou a l’echange standard d’unites centrales
pour les produits exportes, conformement a la legislation americaine en matiere d’exportation. Sauf autorisation par les autorites des EtatsUnis, l’utilisation d’unites centrales pour proceder a des mises a jour de produits est rigoureusement interdite.
LA DOCUMENTATION EST FOURNIE "EN L’ETAT" ET TOUTES AUTRES CONDITIONS, DECLARATIONS ET GARANTIES EXPRESSES
OU TACITES SONT FORMELLEMENT EXCLUES, DANS LA MESURE AUTORISEE PAR LA LOI APPLICABLE, Y COMPRIS NOTAMMENT
TOUTE GARANTIE IMPLICITE RELATIVE A LA QUALITE MARCHANDE, A L’APTITUDE A UNE UTILISATION PARTICULIERE OU A
L’ABSENCE DE CONTREFACON.
L’ABSENCE DE CONTREFACON.
Please
Recycle
Contents
Preface
1.
vii
Planning the Operating System Installation
Supported Operating Systems
1
2
Preinstalled Solaris 10 or OpenSolaris Image
Installation Prerequisites
Installation Methods
5
Console Outputs
5
3
Installation Boot Media
Installation Targets
7
9
Verifying BIOS Settings for New Installations
Before You Begin
▼
2.
3
10
11
View or Edit BIOS Settings for New Installations
Install Windows Server 2003 Operating System
17
Task Map for the Windows Server 2003 Installation
Boot-Time Device Drivers
18
19
Prepare Mass-Storage Drivers for Delivery
20
Create Floppy Disk For Device Drivers
21
▼
11
Create Floppy Disk For Device Driver Installation
21
iii
Prepare Floppy Image For Device Drivers
▼
24
Prepare Floppy Image For Device Driver Installation
Install Windows Server 2003 Using Local or Remote Media
▼
Before You Begin
3.
Install Windows Server 2003 via PXE
43
44
Install Windows Server 2008 Using Local or Remote Media
4.
52
57
Download the Server-Specific Drivers
Installing Server-Specific Device Drivers
58
59
Install the Server-Specific Device Drivers
Installing Supplemental Software
▼
51
57
Downloading Server-Specific Drivers
▼
46
52
Install Windows Server 2008 via PXE
Post Installation
▼
45
Install Windows Server 2008 Using Local or Remote Media
Install Windows Server 2008 via PXE Network
▼
35
36
Task Map for the Windows Server 2008 Installation
Before You Begin
26
36
Install Windows Server 2008 Operating System
▼
25
Install Windows Server 2003 Using Local or Remote Media
Install Windows Server 2003 via PXE Network Environment
▼
24
59
65
Install the Supplemental Software
67
Configuring Microsoft’s IPMI System Management Driver for Windows Server
2003 R2 SP2 68
▼
Configure Microsoft’s IPMI System Management Driver for Windows
Server 2003 R2 SP2 68
Enable the Option for Wake On LAN
Configure the TPM Option
A.
iv
70
70
Incorporate Sun Fire Server Drivers Into WIM or RIS Images
71
Sun Fire X4170, X4270, and X4275 Servers Windows Operating System Installation Guide • September 2009
Determine Required Drivers
Add Drivers to a WIM Image
Before you Begin
▼
Add Drivers to the WIM Image
Before you Begin
Index
72
73
Add Drivers to a RIS Image
▼
71
73
75
76
Add Drivers to a RIS image
76
83
Contents
v
vi
Sun Fire X4170, X4270, and X4275 Servers Windows Operating System Installation Guide • September 2009
Preface
The Sun Fire X4170, X4270, and X4275 Servers Windows Operating System Installation
Guide contains operating system installation for the Windows Server 2003 or
Windows Server 2008 operating systems and initial software configuration
procedures for bringing the server to a configurable and usable state.
This document is written for technicians, system administrators, authorized service
providers (ASPs), and users who have experience with installing operating systems.
Product Updates
For product updates that you can download for the Sun Fire X4170, X4175, and
X4275 Servers, visit the following web site:
http://www.sun.com/download/index.jsp
Find the Hardware Drivers section and click x64 Servers & Workstations. The Sun
Fire X4170, X4270, and X4275 Servers sites contain updates for firmware and drivers,
as well as CD-ROM .iso images.
Related Documentation
The related documents listed in the following table are available online at:
http://docs.sun.com/app/docs/prod/sf.x4170#hic
http://docs.sun.com/app/docs/prod/sf.x4270#hic
http://docs.sun.com/app/docs/prod/sf.x4275#hic
vii
viii
Title
Content
Part Number
Format
Sun Fire X4170, X4270, and
X4275 Servers Product Notes
Late-breaking information
about the server
820-5831
PDF
HTML
Sun Fire X4170, X4270, and
X4275 Servers Getting Started
Guide
Basic installation information
for setting up the server
820-5833
PDF
Print
Sun Fire X4170, X4270, and
X4275 Servers Installation
Guide
Detailed installation
information for setting up the
server
820-5827
PDF
HTML
Print option
Sun Fire X4170, X4270, and
X4275 Servers Solaris and
Linux Operating Systems
Installation Guide
Installation instructions for
the Linux, VMware, and
Solaris operating systems
820-5828
PDF
HTML
Sun Fire X4170, X4270, and
X4275 Servers Windows
Operating System Installation
Guide
Installation instructions for
the Windows Server
operating system
820-5829
PDF
HTML
Sun Installation Assistant for
Linux and Windows User’s
Guide
Instructions for using the Sun
Installation Assistant to
install the Windows and
Linux operating systems
820-3357
PDF
HTML
Sun Fire X4170, X4270, and
X4275 Servers Service Manual
Information and procedures
for maintaining and
upgrading the server
820-5830
PDF
HTML
Sun x64 Servers Diagnostics
Guide
Information for diagnosing
and troubleshooting the
server
820-6750
PDF
HTML
x64 Servers Utilities Reference
Manual
Information for using
applications and utilities
common to x64 servers
820-1120
PDF
HTML
Sun Integrated Lights Out
Manager 3.0 Documentation
Collection
These documents cover ILOM
features and tasks that are
common to servers and
server modules that support
ILOM 3.0.
820-5523
820-6410
820-6411
820-6412
820-6413
PDF
HTML
Sun Integrated Lights Out
Manager 2.0 User’s Guide
ILOM 2.0 features and tasks
that are common to servers
and server modules that
support ILOM
820-1188
PDF
HTML
Sun Fire X4170, X4270, and X4275 Servers Windows Operating System Installation Guide • September 2009
Title
Content
Part Number
Format
Sun Integrated Lights Out
Manager (ILOM) 3.0
Supplement for Sun X4170,
X4270, and X4275 Servers
ILOM 3.0 information that is
specific to the Sun Fire X4170,
X4270, and X4275 Servers
820-7959
PDF
HTML
Sun Integrated Lights Out
Manager (ILOM) 2.0
Supplement for Sun Fire X4170,
X4270, and X4275 Servers
ILOM 2.0 information that is
specific to the Sun Fire X4170,
X4270, and X4275 Servers
820-7629
PDF
HTML
Sun Fire X4170, X4270, and
X4275 Servers Safety and
Compliance Guide
Hardware safety and
compliance information for
the server.
820-5832
PDF
Important Safety Information
for Sun Hardware Systems
Multilingual hardware safety
and compliance information
for all Sun hardware system
816-7190
Print
Translated versions of some of these documents are available at the web site
described above in French, Simplified Chinese, and Japanese. English documentation
is revised more frequently and might be more up-to-date than the translated
documentation.
Documentation, Support, and Training
Sun Function
URL
Sun Documentation
http://docs.sun.com
Support
http://www.sun.com/support/
Training
http://www.sun.com/training/
Preface
ix
Using UNIX Commands
This document might not contain information about basic UNIX® commands and
procedures such as shutting down the system, booting the system, and configuring
devices. Refer to the following for this information:
■
Software documentation that you received with your system
■
Solaris™ Operating System documentation, which is at:
http://docs.sun.com
Third-Party Web Sites
Sun is not responsible for the availability of third-party web sites mentioned in this
document. Sun does not endorse and is not responsible or liable for any content,
advertising, products, or other materials that are available on or through such sites or
resources. Sun will not be responsible or liable for any actual or alleged damage or
loss caused by or in connection with the use of or reliance on any such content,
goods, or services that are available on or through such sites or resources.
x
Sun Fire X4170, X4270, and X4275 Servers Windows Operating System Installation Guide • September 2009
Typographic Conventions
Typeface*
Meaning
Examples
AaBbCc123
The names of commands, files,
and directories; on-screen
computer output
Edit your.login file.
Use ls -a to list all files.
% You have mail.
AaBbCc123
What you type, when contrasted
with on-screen computer output
% su
AaBbCc123
Book titles, new words or terms,
words to be emphasized.
Replace command-line variables
with real names or values.
Password:
Read Chapter 6 in the User’s Guide.
These are called class options.
You must be superuser to do this.
To delete a file, enter rm filename.
* The settings on your browser might differ from these settings.
Sun Welcomes Your Comments
Sun is interested in improving its documentation and welcomes your comments and
suggestions. You can submit your comments by going to:
http://www.sun.com/hwdocs/feedback
Please include the title and part number of your document with your feedback:
Sun Fire X4170, X4270, and X4275 Servers Windows Operating System Installation Guide,
part number 820-5829-11.
Preface
xi
xii
Sun Fire X4170, X4270, and X4275 Servers Windows Operating System Installation Guide • September 2009
CHAPTER
1
Planning the Operating System
Installation
This chapter identifies the information you need to properly plan the installation of
an operating system onto Sun Fire X4170, X4175, and X4275 servers.
This chapter contains the following topics:
■
“Supported Operating Systems” on page 2
■
“Installation Prerequisites” on page 3
■
“Installation Methods” on page 5
■
“Verifying BIOS Settings for New Installations” on page 10
1
Supported Operating Systems
The Sun Fire X4170, X4175, and X4275 servers support the installation and use of the
following operating systems, or a subsequent release of the operating systems.
TABLE 1-1
2
Supported Operating Systems
Operating System Supported Version
For more information, see
Windows
• Microsoft Windows Server 2003 Enterprise
Edition (R2 with SP2, or SP2) (32-bit and 64-bit)
• Microsoft Windows Server 2003 Standard
Edition (R2 with SP2, or SP2) (32-bit and 64-bit)
• Microsoft Windows Server 2008, Standard
Edition (32-bit or 64-bit)
• Microsoft Windows Server 2008, Enterprise
Edition (32-bit or 64-bit)
• Microsoft Windows Server 2008, Datacenter
Edition (32-bit or 64-bit)
• Microsoft Windows Server 2008 R2, Standard
Edition
• Microsoft Windows Server 2008 R2, Enterprise
Edition
• Microsoft Windows Server 2008 R2, Datacenter
Edition
• “Install Windows
Server 2003
Operating System”
on page 17
• “Install Windows
Server 2008
Operating System”
on page 43
Linux
• SUSE Linux Enterprise Server (SLES) 10 SP2
• Sun Fire X4170,
(64-bit)
X4270, and X4275
Servers Linux,
• SLES 11 (64-bit)
VMware, Solaris, and
• Red Hat Enterprise Linux (RHEL) 4.8 (32-bit and
OpenSolaris
64-bit)
Operating Systems
• RHEL 5.3 (64-bit)
Installation Guide
• Oracle Enterprise Linux (OEL) 4.8 and 5.3 (64bit)
VMware
•
•
•
•
Solaris
• Solaris 10 05/09
OpenSolaris
• OpenSolaris 2009.06
VMware
VMware
VMware
VMware
ESX Server 3.5 Update 4
ESXi Server 3.5 Update 4
ESX Server 4.0
ESXi Server 4.0
Sun Fire X4170, X4270, and X4275 Servers Windows Operating System Installation Guide • September 2009
Preinstalled Solaris 10 or OpenSolaris Image
You can order either a Solaris 10 Operating System (OS) image or an OpenSolaris OS
image preinstalled on the server. If you order a preinstalled image, it is shipped on
the hard disk drive. If you need to install another operating system on this drive,
you can choose to partition the drive in one of the following ways:
■
Partition the local drive to remove the Solaris 10 or OpenSolaris OS image
or
■
Partition the local drive to support a dual-boot operating system configuration
The Linux operating system installation procedures described later in this guide
explain the appropriate point in the installation program where you can either
partition the drive to remove the preinstalled image or to support a dual-boot
operating system configuration.
Note – To configure the Solaris 10 or OpenSolaris preinstalled OS image, see the
Solaris 10 or OpenSolaris Preinstalled OS chapter in the Sun Fire X4170, X4270, and
X4275 Servers Installation Guide (820-5827) for details.
Installation Prerequisites
The following requirements must be met prior to installing an operating system.
TABLE 1-2
OS Installation Prerequisites
Requirement
Mandatory or Optional For More Information, See:
The server is mounted and poweredon in a rack.
Mandatory
• Sun Fire X4170, X4270, and X4275 Servers
Installation Guide
The SP network management port on
the server is configured with an IP
address.
Mandatory
• Sun Fire X4170, X4270, and X4275 Servers
Installation Guide
or
• Sun Integrated Lights Out Manager 2.0 User’s
Guide
Select a console option and a media
Mandatory
option for performing the installation,
as well as an installation target.
• “Installation Methods” on page 5
Ensure that factory-default settings in Recommended
the BIOS utility are set.
• “Verifying BIOS Settings for New Installations”
on page 10
Chapter 1
Planning the Operating System Installation
3
TABLE 1-2
OS Installation Prerequisites (Continued)
Requirement
Mandatory or Optional For More Information, See:
Set up a RAID set on SAS or SATA
disk drives configured with a host
bus adapter (HBA) (such as REM or
FEM), see the documentation
supplied with the HBA.
Mandatory*
• Sun Fire X4170, X4270, and X4275 Servers Service
Manual (820-5830) for instructions for adding or
replacing disk drives in the server.
•
Sun™ Disk Management Overview For x64 Sun
*For local disk drive OS
install targets.
Fire and Sun Blade Series Servers (820-6350)
Gather the applicable vendor
operating system installation
documentation.
Recommended
• Applicable operating system vendor
documentation:
•Microsoft Windows 2003 Product
Documentation at:
http://www.microsoft.com/windowsse
rver2003/proddoc/default.mspx
•Microsoft Windows 2008 Product
Documentation at
http://www.microsoft.com/windowsse
rver2008/en/us/productdocumentation.aspx
Mandatory
• Sun Fire X4170, X4175, and X4275 Servers Tools
and Drivers CD/DVD
or
• Download version of the Tools and Drivers
CD/DVD for the Sun Fire X4170, X4175, and
X4275 servers is available at:
http://www.sun.com/servers/x64/x4170
/downloads.jsp
Recommended
• Sun Fire X4170, X4270, and X4275 Servers
Product Notes.
Note - Use operating system vendor
documentation in conjunction with
the operating system instructions in
this guide.
Ensure that you have the Tools and
Drivers CD/DVD that was provided
with your server.
Note - If device drivers are required
for your OS installation, the device
drivers are provided on the Tools and
Driver DVD.
Review the Sun Fire X4170, X4270,
and X4275 Servers Product Notes
Product Notes for late-breaking news
about supported operating system
software and patches.
4
Sun Fire X4170, X4270, and X4275 Servers Windows Operating System Installation Guide • September 2009
Installation Methods
To determine which installation method is best for your infrastructure, consider the
options and requirements summarized in the following sections:
■
“Console Outputs” on page 5
■
“Installation Boot Media” on page 7
■
“Installation Targets” on page 9
Console Outputs
TABLE 1-3 lists the consoles that you can use to capture the output and input of the
operating system installation.
TABLE 1-3
Console Options for Performing an OS Installation
Console
Description
Setup Requirement
Local Console
You can install the OS and
administer the server by
attaching a local console directly
to the server SP.
1. Attach a local console to the server.
For details, see “Connecting to the ILOM Service
Processor for the First Time” in the Sun Fire X4170,
X4270, and X4275 Servers Installation Guide.
2. At the ILOM prompt, type your ILOM user name and
password.
3. For serial console connections only, establish a
connection to the host serial port by typing start
/SP/console.
The video output is automatically routed to local console.
For further details about establishing a connection to the
server SP, see the Sun Integrated Lights Out Manager 2.0
User’s Guide.
Examples of local consoles
include:
• Serial console
• VGA console, with USB
keyboard and mouse
Chapter 1
Planning the Operating System Installation
5
TABLE 1-3
Console Options for Performing an OS Installation (Continued)
Console
Description
Setup Requirement
Remote Console
You can install the OS and
administer the server from a
remote console by establishing a
network connection to the server
SP.
Examples of remote consoles
include:
• Web-based client connection
using the Sun ILOM Remote
Console application
• SSH client connection using a
serial console
1. Establish an IP address for the server SP.
For details, see the Sun Integrated Lights Out Manager
2.0 User’s Guide.
2. Establish a connection between a remote console and
the server SP:
• For web-based client connection, perform these steps:
1) In a web browser, type the IP address for the server
SP; 2) log in to the ILOM web interface; 3) redirect the
video output from the server to the web client by
launching the Sun ILOM Remote Console; then 4)
enable device redirection (mouse, keyboard, etc.) in the
Device menu.
• For SSH client connection, perform these steps:
1) From a serial console, establish an SSH connection to
the server SP (ssh root@ipaddress); 2) log in to the
ILOM command-line interface, then 3) redirect the
serial output from the server to the SSH client by
typing start /SP/console.
For additional information about establishing a remote
connection to the ILOM SP or using the Sun ILOM
Remote Console, see the Sun Integrated Lights Out
Manager 2.0 User’s Guide.
6
Sun Fire X4170, X4270, and X4275 Servers Windows Operating System Installation Guide • September 2009
Installation Boot Media
You can start the operating system installation to a server by booting a local or
remote installation media source. TABLE 1-4 identifies the supported media sources
and the setup requirements for each source.
TABLE 1-4
Boot Media Options for Performing the OS Installation
Installation Media
Description
Setup Requirement
Local Boot
Media
Local boot media requires a built-in
storage device on the server, or an
external storage device attached to
the server.
Supported OS local boot media
sources can include:
• CD/DVD-ROM installation
media, and, if applicable, floppy
device driver media
To perform the installation using local boot media,
perform these steps:
1. If your server does not contain a built-in storage
device, attach the appropriate storage device to the
front panel of the server using a USB connector.
2. For more information about how to attach local
devices to the server, see “Setting Up the Server” in
the Sun Fire X4170, X4270, and X4275 Servers
Installation Guide.
Note - For the Sun Fire X4275 server, which has
neither a CD/DVD-ROM drive nor a USB connector
on the front panel, use the Sun ILOM Remote Console
to redirect the boot media from a remote storage
device. For instructions, see instructions for Remote
Boot Media in this table.
Chapter 1
Planning the Operating System Installation
7
TABLE 1-4
Boot Media Options for Performing the OS Installation (Continued)
Installation Media
Description
Remote Boot
Media
Remote media requires you to boot
the installation over the network.
You can start the network
installation from a redirected boot
storage device or another
networked system that exports the
installation over the network using
a Pre-Boot eXecution environment
(PXE).
8
Setup Requirement
To redirect the boot media from a remote storage
device, perform these steps:
1. Insert the boot media into the storage device, for
example:
• For CD/DVD-ROM, insert media into the built-in or
external CD/DVD-ROM drive.
• For CD/DVD-ROM ISO image, ensure that the ISO
image(s) are readily available on a network shared
location.
Supported OS remote media sources • For device driver floppy ISO image, ensure that the
can include:
ISO image, if applicable, is readily available on a
network shared location or on a thumb drive.
• CD/DVD-ROM installation
media, and, if applicable, floppy • For device driver floppy media, if applicable, insert
device driver media
floppy media into the external floppy drive.
• CD/DVD-ROM ISO installation
2. Establish a web-based client connection to the server
image and, if applicable, floppy
ILOM SP and launch the Sun ILOM Remote Console
ISO device driver media
application.
• Automated installation image
For more details, see the Setup Requirements for web(requires PXE boot)
based client connection in TABLE 1-3.
3. In the Device menu of the Sun ILOM Remote
Console application, specify the location of the boot
media, for example:
• For CD/DVD-ROM boot media, select CD-ROM.
• For CD/DVD-ROM ISO image boot media, select
CD-ROM Image.
• For floppy device driver boot media, if applicable,
select Floppy.
• For floppy image device driver boot media, if
applicable, select Floppy Image.
For more information about the Sun ILOM Remote
Console, see the Sun Integrated Lights Out Manager 2.0
User’s Guide.
Sun Fire X4170, X4270, and X4275 Servers Windows Operating System Installation Guide • September 2009
TABLE 1-4
Boot Media Options for Performing the OS Installation (Continued)
Installation Media
Description
Setup Requirement
Remote Boot
Media,
continued
Note - An automated installation
image enables you to perform the
OS installation on multiple servers.
By using an automated image, you
can ensure configuration uniformity
among many systems.
To perform the installation using PXE, perform these
steps:
1. Configure the network server to export the
installation using a PXE boot.
2. Make the OS installation media available for PXE
boot.
If you are using an automated OS installation image,
Automated installations use a Preyou will need to create and provide the automated OS
boot eXecution Environment (PXE)
installation image, for example:
technology to enable the clients
without an operating system to boot • Solaris JumpStart Image
• RHEL KickStart Image
remotely to the automated install
server that performs the installation • SLES AutoYaST Image
of the operating system.
• Windows RIS or WDS Image
For detailed instructions for automating the
installation setup process, consult the operating
system vendor documentation.
3. To boot the installation media, select the PXE boot
interface card as the temporary boot device. For
details, see the applicable PXE-based operating system
installation procedure described later in this chapter.
Installation Targets
TABLE 1-5 identifies the supported installation targets that you can use to install an
operating system.
TABLE 1-5
Installation Targets for OS Installations
Install Target
Description
Setup Requirement
Supported OS
Local Hard
Disk Drive
(HDD)
or
Solid State
Drive (SSD)
You can choose to install the
operating system to any of the
hard drives or SSDs installed in
the server.
• Ensure that the HDD or SSD is
properly installed and powered-on in
the server.
For more information about installing
and powering on an HDD or SDD, refer
to the installation guide or the service
manual provided with your server.
• All operating
systems listed
in TABLE 1-1.
Chapter 1
Planning the Operating System Installation
9
TABLE 1-5
Installation Targets for OS Installations (Continued)
Install Target
Description
Setup Requirement
Supported OS
Fibre Channel
(FC) Storage
Area Network
(SAN) device
For chassis systems equipped
• Ensure FC PCI HBA is properly
• All operating
with Fibre Channel PCI Host
installed in the chassis and is
systems listed
Bus Adapter (HBA), you can
operating.
in TABLE 1-1.
choose to install the operating
For more information about installing
system to an external FC storage
an HBA in a chassis, refer to the Sun
device.
Fire X4170, X4270, and X4275 Servers
Installation Guide.
• The SAN must be installed and
configured to make the storage visible
to the host. For instructions, refer to
the documentation supplied with the
FC HBA.
Verifying BIOS Settings for New
Installations
For all new operating system installations on a hard disk drive, you should verify
that the following BIOS settings are properly configured before you perform the
operating system installation:
■
System time
■
System date
■
Boot order
In the BIOS Setup utility, you can set optimal defaults, as well as view and edit BIOS
settings as needed. Note that all changes you make in the BIOS Setup utility
(through F2) are permanent until the next time you change them.
Note – If necessary, you can specify a temporary boot device by pressing F8 during
the BIOS start-up. Note that a temporary boot device setting is only in effect for the
current system boot. After the system boots from a temporary boot device, the
permanent boot device setting specified through F2 (in the BIOS) will be in effect.
10
Sun Fire X4170, X4270, and X4275 Servers Windows Operating System Installation Guide • September 2009
Before You Begin
Ensure that the following requirements are met prior to accessing the BIOS Setup
utility:
■
Server is mounted and powered on in a rack. For details, see the Sun Fire X4170,
X4270, and X4275 Servers Installation Guide.
■
Server is equipped with a hard disk drive (HDD) or a solid state drive (SSD).
■
HDD or SSD is properly installed in the server. For details, see the Sun Fire X4170,
X4270, and X4275 Servers Installation Guide.
■
Console connection is established to the server. For details, see “Console
Outputs” on page 5.
▼ View or Edit BIOS Settings for New Installations
1. Reset the power on the server.
For example:
■
From the ILOM web interface, select the Remote Control --> Remote
Power Control tab, then select the Power Cycle option from the Host
action drop-down list box.
■
From the local server, press the Power button (approximately 1 second) on the
front panel of the server to power off the server, then press the Power button
again to power on the server.
For further details for powering on or off your server, see the Sun Fire X4170,
X4275, and X4275 Servers Service Manual.
■
From the ILOM CLI, type: reset /SYS
The BIOS screen appears.
Chapter 1
Planning the Operating System Installation
11
2. When prompted in the BIOS screen, press F2 to access the BIOS Setup utility.
After a few moments, the BIOS Setup utility appears.
3. To ensure that the factory defaults are set, do the following:
12
Sun Fire X4170, X4270, and X4275 Servers Windows Operating System Installation Guide • September 2009
a. Press F9 to automatically load the optimal factory default settings.
A message appears prompting you to continue this operation by selecting OK
or to cancel this operation by selecting CANCEL.
b. In the message, highlight OK, then press Enter.
The BIOS Setup utility screen appears with the cursor highlighting the first
value in the system time field.
4. In the BIOS Setup utility, do the following to edit the values associated with
the system time or date.
a. Highlight the values you want to change.
Use the arrow keys to change between the system time and date selection.
b. To change the values in the highlighted fields use these keys:
■
PLUS (+) to increment the current value shown
■
MINUS (-) to decrement the current value shown
■
ENTER to move the cursor to the next value field
5. To access the boot settings, select Boot from the BIOS Setup utility menu bar.
The Boot Settings dialog appears.
Chapter 1
Planning the Operating System Installation
13
6. In the Boot Settings dialog, use the down arrow key to select Boot Device
Priority, then press Enter.
The Boot Device Priority dialog appears listing the order of the known bootable
devices.
Note that the boot device order listed on your screen might differ from the device
order shown in the sample dialog below.
The first device in the list has the highest boot priority.
7. In the Boot Device Priority dialog, do the following to edit the first boot device
entry in the list:
a. Use the up and down arrow keys to select the first entry in the list, then
press Enter.
b. In the Options tab, use the up and down arrow keys to select the default
permanent boot device, then press Enter.
Note that the boot options listed on your screen might differ from the options
shown in the sample screen below.
14
Sun Fire X4170, X4270, and X4275 Servers Windows Operating System Installation Guide • September 2009
The device strings listed on the Boot dialog and Options tab are in the format
of: device type, slot indicator, and product ID string.
Note – You can change the boot order for other devices in the list by repeating Steps
7a and 7b for each device entry you want to change.
8. To save your changes and exit the BIOS Setup utility, press F10.
Note – When using the Sun ILOM Remote Console, F10 is trapped by the local OS.
You must use the F10 option listed in the Keyboard drop-down menu that is
available at the top of the Remote console.
Alternatively, you can save the changes and exit the BIOS Setup utility by
selecting Save on the Exit menu.
A message appears prompting you to save changes and exit setup.
9. In the message dialog, select OK, then press Enter.
Chapter 1
Planning the Operating System Installation
15
16
Sun Fire X4170, X4270, and X4275 Servers Windows Operating System Installation Guide • September 2009
CHAPTER
2
Install Windows Server 2003
Operating System
This chapter provides information about installing the Windows Server 2003
Operating System (OS).
Note – If you are planning to create a RAID set on your disk, the recommended
procedure is to create a hardware RAID before you install the OS. For more
information, see the Sun™ Disk Management Overview, For x64 Sun Fire and Sun Blade
Series Servers (820-6350)
This chapter includes the following topics:
■
“Task Map for the Windows Server 2003 Installation” on page 18
■
“Boot-Time Device Drivers” on page 19
■
“Prepare Mass-Storage Drivers for Delivery” on page 20
■
“Install Windows Server 2003 Using Local or Remote Media” on page 25
■
“Install Windows Server 2003 via PXE Network Environment” on page 35
17
Task Map for the Windows Server 2003
Installation
Use TABLE 2-1 To preview the installation process defined as a series of tasks. The
table identifies the tasks required and provides pointers to the instructions for
performing that task.
TABLE 2-1
Task Map for the Windows Server 2003 Installation
Step
Task
Description
1
Review installation
prerequisites
Verify that all applicable requirements are • TABLE 1-2 “OS Installation
met for installing an operating system to
Prerequisites” on page 3
a server.
2
Choose an installation
method
Evaluate and select an installation
method that meets the needs of your
infrastructure.
• “Installation Methods” on
page 5
3
Ensure that the BIOS
factory defaults are set
Verify that the factory default settings in
the BIOS are set prior to performing the
operating system installation.
• “Verifying BIOS Settings for
New Installations” on page 10
4
Gather the Windows
installation media
The Windows OS is shipped with the CD
and DVD media and documentation that
you will need to install the Windows OS.
• You can download or order the
media for Windows 2003 at
http://www.microsoft.co
m
5
Download serverspecific drivers or
obtain drivers from
Tools and Driver CD
Depending on your system, some device • “Download the Server-Specific
drivers are required to be installed at boot
Drivers” on page 58
time. You can obtain these drivers from
the Sun download site or from the Tools
and Drivers CD/DVD.
6
Prepare mass-storage
drivers
Produce the mass-storage drivers floppy
required for the Windows 2003
installation.
18
Relevant Topic(s)
• “Prepare Mass-Storage Drivers
for Delivery” on page 20
Sun Fire X4170, X4270, and X4275 Servers Windows Operating System Installation Guide • September 2009
TABLE 2-1
Task Map for the Windows Server 2003 Installation (Continued)
Step
Task
Description
Relevant Topic(s)
7
Perform the Windows
OS installation
Follow the instructions in this chapter to
install the Windows 2003 operating
system.
• “Install Windows Server 2003
Using Local or Remote Media”
on page 25
• “Install Windows Server 2003
via PXE Network
Environment” on page 35
8
Install driver(s) and
post supplemental
software, post
installation, if necessary.
If the Windows operating system does
• “Post Installation” on page 57
not include the necessary device drivers
to support your system, you may need to
install additional device drivers.
If your system includes RAID controllers,
you may need to install supplemental
software to support these controllers.
9
Enable Wake On LAN
feature, if appropriate
If required, you can enable the Wake On
LAN feature for this server.
• “Post Installation” on page 57
Note – The complete Microsoft Windows operating system installation process is
not documented in this section. This section describes the steps for booting the
Windows Server 2003 media, installing drivers (if necessary) at boot, and
partitioning the drive. For additional information, consult the Microsoft Windows
2003 product documentation at
http://www.microsoft.com/windowsserver2003/proddoc/default.mspx
Boot-Time Device Drivers
TABLE 2-2 identifies the device drivers that you may need to install at boot time while
performing the Windows Server 2003 installation.
Chapter 2
Install Windows Server 2003 Operating System
19
TABLE 2-2
Windows 2003 Server-specific Drivers Installed at Boot Time
Device Driver
Description
Intel SATA Driver
The Intel SATA device driver must be available at boot time if installing to a
local SATA hard disk drive (HDD).
LSI SAS/SATA RAID Driver
The LSI SAS/SATA device driver must be available at boot time if installing to a
local SAS or SATA hard disk drive (HDD).
Sun StorageTek SAS/SATA
RAID Driver
The Sun StorageTek SAS/SATA device driver must be available at boot time if
installing to a local SAS or SATA hard disk drive (HDD).
QLogic SAN Driver
The QLogic Fibre Channel (FC) device driver must be installed at installation
boot time if your installation target is a QLogic FC Storage Area Network (SAN)
device.
Emulex SAN Driver
The Emulex FC device driver must be installed at installation boot time if your
installation target is a Emulex FC SAN device.
The boot-time device drivers listed in TABLE 2-2 are included on the Tools and
Drivers CD/DVD that ships with the server. However, if you do not have the Tools
and Drivers CD/DVD, you can download these same drivers from the Sun
download site. For instructions on downloading the server-specific drivers package,
which includes the boot-time device drivers, see “Downloading Server-Specific
Drivers” on page 57.
Prepare Mass-Storage Drivers for
Delivery
This section contains instructions on preparing the necessary mass-storage drivers
media for a local or remote Windows Server 2003 installation.
You can choose to prepare the mass-storage drivers on a floppy disk or floppy
image, see TABLE 2-3.
TABLE 2-3
20
Mass-Storage Driver Media Options
Media Option
Section to Read
Floppy Disk Local or
Remote
“Create Floppy Disk For Device Drivers” on page 21
Floppy Image
“Prepare Floppy Image For Device Drivers” on page 24
Sun Fire X4170, X4270, and X4275 Servers Windows Operating System Installation Guide • September 2009
Create Floppy Disk For Device Drivers
Perform the following procedure in this section if you have chosen to create a floppy
disk to store the required Windows 2003 device drivers.
Before You Begin
Prior to performing the following procedure to create a floppy disk, ensure that the
following requirements have been met:
■
The system being used to create the floppy disk is connected to a USB floppy
drive
■
Floppy disk media is available
■
FloppyPack_x_x_x.zip file is available
You can obtain the FloppyPack_x_x_x.zip file on the Tools and Drivers
CD/DVD or you can download it from the Sun download site. For instructions
about how to download it from Sun, see “Downloading Server-Specific Drivers”
on page 57.
Note – The _x_x_x number identifies the version of the package (for example,
FloppyPack_1_1_4.zip).
▼ Create Floppy Disk For Device Driver Installation
Sun provides a Sun Mass-Storage Driver Disk Creation wizard to help you create a
floppy disk. Follow these steps to create a floppy disk using the Sun Mass-Storage
Driver Disk Creation wizard.
1. Start the Sun Mass-Storage Driver Disk Creation wizard from one of the
following media sources:
■
Tools and Driver CD
Perform the following steps to start the wizard:
a. Insert the Tools and Drivers CD/DVD into a Windows system with a
CD/DVD drive.
The CD will start automatically.
b. At the main menu, select Make a Windows Server 2003 Mass-Storage Driver
Disk, and then proceed to Step 2.
The Welcome page for the Mass-Storage Driver Disk Creation wizard appears.
Or
■
FloppyPack_x_x_x.zip file (obtained from Sun download site)
Chapter 2
Install Windows Server 2003 Operating System
21
Perform the following steps to copy and extract the files and start the wizard.
a. On a system running Microsoft Windows software with a floppy drive, copy
the FloppyPack_x_x_x.zip file to a temporary directory.
b. Start Windows Explorer.
c. Navigate to the folder where you placed the downloaded file.
d. Select FloppyPack_x_x_x.zip.
e. On the File menu, click Extract All to extract the files into a new (empty)
folder.
Note – If your version of Windows Explorer does not natively support compressed
folders, use a third-party utility to extract the contents of the zip file. Make sure to
maintain the directory structure of the folders after extracting them.
f. Start Windows Explorer and navigate to the folder containing the extracted
files.
g. In Windows Explorer, open the directory containing the extracted files and
double-click the mkfloppy.exe wizard, and then proceed to Step 2.
The Welcome page for the Mass-Storage Driver Disk Creation wizard appears.
2. In the Mass-Storage Driver Disk Creation wizard Welcome page, do the following:
a. Click Next and follow the instructions in the wizard to create the massstorage driver floppy disk for your server.
b. Insert a blank floppy disk into drive A: when prompted.
The Format 3 1/2 Floppy dialog appears.
22
Sun Fire X4170, X4270, and X4275 Servers Windows Operating System Installation Guide • September 2009
3. In the Format 3 1/2 Floppy dialog, click the Start button to begin formatting.
Chapter 2
Install Windows Server 2003 Operating System
23
4. When the floppy disk formatting completes, click the Close button.
The Format 3 1/2 Floppy page closes and you are returned to the Mass-Storage
Driver Disk Creation wizard.
5. Click Next and follow the instructions in the wizard to complete the creation of
the mass-storage driver floppy disk.
6. Proceed to “Install Windows Server 2003 Using Local or Remote Media” on
page 25.
Prepare Floppy Image For Device Drivers
Perform the following procedure in this section if you have chosen to use the floppy
image media to install the required Windows 2003 device drivers.
Before You Begin
Prior to performing the following procedure to prepare the floppy image for device
driver installation, ensure that the following requirements have been met:
■
Obtain FloppyPack_x_x_x.zip driver package from the Tools and Drivers
CD/DVD or from the Sun download site as described in “Downloading ServerSpecific Drivers” on page 57
■
The system hosting the Sun ILOM Remote Console must have local or network
access to the FloppyPack_x_x_x.zip driver package.
▼ Prepare Floppy Image For Device Driver Installation
1. Obtain the floppy image file containing the device drivers from one of the
following media sources:
■
Tools and Drivers CD/DVD
Perform these steps to access the floppy package:
a. Insert the CD into the Sun ILOM Remote Console system.
b. Navigate to the following directory:
windows\w2k3\packages\FloppyPack\image
c. Proceed to Step 2.
■
FloppyPack.zip file (from the Sun download site)
a. Copy the FloppyPack_x_x_x.zip file to a temporary directory.
b. Start Windows Explorer.
24
Sun Fire X4170, X4270, and X4275 Servers Windows Operating System Installation Guide • September 2009
c. Navigate to the temporary folder where you placed the downloaded file.
d. Select FloppyPack_x_x_x.zip.
e. On the File menu, click Extract All to a new empty folder.
Note – If your version of Windows Explorer does not natively support compressed
folders, use a third-party utility to extract the contents of the zip file. Make sure to
maintain the directory structure of the folders after extracting them.
f. Navigate to the image folder where the extracted files reside then proceed to
Step 2.
2. Copy the appropriate floppy image file to a local or network shared location where
the Sun ILOM Remote Console system can access it during the Windows installation
(for example, intelsmilsi.img).
For instructions for enabling image file media redirection in the Sun ILOM
Remote Console, see the Sun Integrated Lights Out Manager 2.0 User’s Guide.
3. Proceed to “Install Windows Server 2003 Using Local or Remote Media” on
page 25.
Install Windows Server 2003 Using Local
or Remote Media
The following procedure describes how to boot the Windows Server 2003 operating
system from local or remote media. It assumes you are booting the Windows
installation media from one of the following sources:
■
Windows CD or DVD (internal or external CD/DVD)
■
Windows 2003 ISO image (network repository)
Note – If you are booting the installation media from a PXE environment, refer to
“Install Windows Server 2003 via PXE Network Environment” on page 35 for
instructions.
Before You Begin
Prior to performing the installation, the following requirements must be met:
Chapter 2
Install Windows Server 2003 Operating System
25
■
All applicable installation prerequisites for installing an operating system should
have been met. For further information about these prerequisites, see TABLE 1-2
“OS Installation Prerequisites” on page 3.
■
An installation method (for example: console, boot media, and installation target)
should have been chosen and established prior to performing the installation. For
more information about these setup requirements, see “Installation Methods” on
page 5.
After completing this procedure, you will need to perform the post installation tasks
as described in “Post Installation” on page 57.
▼ Install Windows Server 2003 Using Local or
Remote Media
1. Ensure that the installation media is available to boot.
Note – For the Sun Fire X4275 server, which has neither a CD/DVD-ROM drive nor
a USB connector on the front panel, use the Sun ILOM Remote Console to redirect
the boot media from a remote storage device. For instructions, see instructions for
Remote Boot Media in TABLE 1-4 “Boot Media Options for Performing the OS
Installation” on page 7.
For example:
■
For distribution CD/DVD—Insert the Windows 2003 Distribution media (CD
labeled #1 or the single DVD) into the local or remote USB CD/DVD-ROM
drive.
■
For ISO image—Ensure that the ISO images are available and that the ILOM
Remote Console application is aware of the first ISO image location.
For additional information about how to set up the installation media, see
TABLE 1-4 “Boot Media Options for Performing the OS Installation” on page 7.
2. Reset the power on the server.
For example:
■
From the ILOM web interface, select the Remote Control --> Remote
Power Control tab, then select the Power Cycle option from the Host
action drop-down list box.
■
From the local server, press the Power button (approximately 1 second) on the
front panel of the server to power off the server, then press the Power button
again to power on the server.
For further details for powering on or off your server, see the Sun Fire X4170,
X4275, and X4275 Servers Service Manual.
26
Sun Fire X4170, X4270, and X4275 Servers Windows Operating System Installation Guide • September 2009
■
From the ILOM CLI, type: reset /SYS
The BIOS screen appears.
3. When the Press F8 for BBS POPUP prompt appears on the BIOS POST
screen, press F8.
The BBS POPUP menu allows you to select a boot device.
4. Once the BIOS POST process is complete, the Boot Device menu appears.
Note – The screen that appears in your installation may be different depending on
the type of disk controller installed in your server.
Chapter 2
Install Windows Server 2003 Operating System
27
5. In the Boot Device menu, select a boot device based on the Windows media
installation method you elected to use and press Enter.
For example:
■
If you elected to use the Windows local delivery method, select CD/DVDW.
■
If you elected to use the ILOM Remote Console method, select Virtual
CDROM.
6. When prompted with Press any key to boot from CD, quickly press any
key.
The Windows Setup process begins.
7. When you see the following prompt at the bottom of the Windows Setup
dialog, quickly press F6:
Press F6 if you need to install a third party SCSI or RAID
driver.
28
Sun Fire X4170, X4270, and X4275 Servers Windows Operating System Installation Guide • September 2009
Note – The above prompt lasts for approximately five seconds and is easy to miss.
If you do not press F6 while the prompt is displayed, the dialog allowing you to
specify additional drivers is not displayed and the installation will fail. If this
happens, restart the server on which you are performing the installation and go back
to Step 3.
After pressing F6, the setup process continues and the following dialog appears.
This dialog gives you the option of specifying additional mass-storage devices.
8. Make sure that the mass-storage drivers are accessible according to the massstorage driver installation method that you have selected.
For example:
■
For Floppy Disk Local—Mass-storage drivers floppy disk in floppy drive A on
the server.
■
For Floppy Disk Remote—Mass-storage drivers floppy disk in the Sun ILOM
Remote Console system floppy drive.
■
For Floppy Image—Use the floppy image file accessible from the Sun ILOM
Remote Console system (for example, intelsmilsi.img).
9. Press S to specify additional devices.
A dialog appears listing the available drivers.
Chapter 2
Install Windows Server 2003 Operating System
29
Note – The above dialog will vary depending on the type of mass-storage controller
driver(s) you are installing.
10. In the Select Adapter dialog, select the appropriate mass-storage controller
driver version (Windows 32-bit or 64-bit) that you are installing, then press
Enter.
For example:
■
For servers with an LSI-based integrated RAID controller, select:
LSI Logic Fusion-MPT SAS Driver (32-bit or 64-bit)
■
For servers with an Adaptec-based integrated RAID controller, select:
Adaptec SAS/SATA-II RAID Driver (32-bit or 64-bit)
■
For servers with an Intel-based integrated disk controller, select:
Intel(R) ICH10R SATA AHCI Controller (32-bit or 64-bit)
A dialog similar to the following appears stating that the setup will load support
for the specified mass-storage device.
30
Sun Fire X4170, X4270, and X4275 Servers Windows Operating System Installation Guide • September 2009
11. Press Enter to continue.
The Windows setup process continues and a Setup Notification dialog appears.
12. At the Setup Notification dialog, press Enter to continue.
The Welcome to Setup dialog appears.
Chapter 2
Install Windows Server 2003 Operating System
31
13. At the Welcome to Setup dialog, press Enter to continue.
The Windows Licensing Agreement dialog appears.
14. To accept the license agreement, press F8.
A dialog appears that shows the existing partitions on the server and the
unpartitioned space.
Note – Any previous installations on the server’s boot disk will cause the
partitioning dialog to appear.
32
Sun Fire X4170, X4270, and X4275 Servers Windows Operating System Installation Guide • September 2009
15. To delete the existing partition, press D.
A confirmation dialog appears to verify that you really want to delete the
partition.
16. Press Enter to continue.
Another confirmation dialog with a caution notice appears and describes the
partition that you are about to delete.
17. Press L to delete the partition.
The partition is deleted and the a dialog appears that shows the unpartitioned
space on the server’s disk.
18. To create a partition in the unpartitioned space, press C.
A dialog appears that allows you to specify the size of the new partition.
19. Either accept the default size of the partition to be created or use the Back
Space key to delete the size specified and enter a new size and press Enter.
A recommended size of 40,000 megabytes is usually sufficient for a Windows
installation. This will leave adequate space on the disk for installations of other
media.
A partition confirmation windows appears.
20. Press Enter to accept the partition.
A partition formatting dialog appears.
Chapter 2
Install Windows Server 2003 Operating System
33
21. Use the up and down arrow keys to select the <Quick> menu option and press
Enter to format the partition.
The setup process formats the partition and copies the files to the Windows
installation folders. This process might take several minutes
22. Follow the on-screen instructions to complete the initial setup of Windows
Server 2003 until you are prompted with the following message:
Remove disks or other media. Press any key to restart.
When this message appears you will need to complete one of the following steps,
depending on which driver delivery method you have chosen, to complete the
installation:
■
Floppy Disk Local—Remove the floppy disk from the floppy drive on the
server.
■
Floppy Disk Remote—Remove the floppy disk from the Sun ILOM Remote
Console system.
■
Floppy Image—Deselect Floppy Image from the Sun ILOM Remote Console
Devices menu.
Then, press any key to restart the system and complete the Windows Server 2003
Installation.
23. Proceed to “Post Installation” on page 57.
34
Sun Fire X4170, X4270, and X4275 Servers Windows Operating System Installation Guide • September 2009
Install Windows Server 2003 via PXE
Network Environment
This section explains the initial information you will need to install the Windows
Server 2003 operating system software over an established PXE-based network via a
customer-provided Windows 2003 Remote Installation Services (RIS) image.
Note – As an alternative, you can install the Windows 2003 operating system over
an established PXE-based network via a customer-provided Windows Deployment
Services (WDS) image.
After completing this procedure, you will need to perform the post installation tasks
as described in “Post Installation” on page 57.
Before You Begin
The following requirements must be met prior to performing the Windows Server
2003 installation from a RIS image.
■
■
To use PXE to boot the installation media over the network:
■
Configure the network (NFS, FTP, HTTP) server to export the installation tree.
■
Configure the files on the TFTP server that are necessary for PXE booting.
■
Configure the Sun server MAC network port address to boot from the PXE
configuration.
■
Configure DHCP
To use a RIS image to perform the installation:
■
Create the RIS installation image.
Follow the RIS installation instructions in the Windows Server 2003
documentation.
■
Add the required system device drivers to the RIS installation image.
For instruction, see Appendix A “Incorporate Sun Fire Server Drivers Into
WIM or RIS Images” on page 71.
■
RIS Administrator password.
Chapter 2
Install Windows Server 2003 Operating System
35
▼ Install Windows Server 2003 via PXE
1. Ensure that the PXE network environment is properly set up and the Windows
Server 2003 installation media is available for PXE boot.
Note – Information concerning how to properly set up and deploy a RIS network
environment is outside the scope of this installation guide. For these details, see
Microsoft’s documentation for deploying and using Remote Installation Services.
2. Reset the power on the server.
For example:
■
From the ILOM web interface, select the Remote Control --> Remote
Power Control tab, then select the Power Cycle option from the Host
action drop-down list box.
■
From the local server, press the Power button (approximately 1 second) on the
front panel of the server to power off the server, then press the Power button
again to power on the server.
For further details for powering on or off your server, see the Sun Fire X4170,
X4275, and X4275 Servers Service Manual.
36
Sun Fire X4170, X4270, and X4275 Servers Windows Operating System Installation Guide • September 2009
■
From the ILOM CLI, type: reset /SYS
The BIOS screen appears.
Note – The next events occur very quickly, so focused attention is needed for the
following steps. Watch carefully for these messages as they appear on the screen for
a brief time. You might want to enlarge the size of your screen to eliminate scroll
bars.
3. Press F8 to specify a temporary boot device.
The Please Select Boot Device menu appears.
4. In the Please Select Boot Device menu, select the appropriate PXE installation
boot device and press Enter.
The PXE installation boot device is the physical network port configured to
communicate with your network installation server.
Note – The boot device options shown on the following Select Boot Device dialog
may be different from the options listed on your screen.
Chapter 2
Install Windows Server 2003 Operating System
37
The Boot Agent dialog appears.
5. In the Boot Agent dialog, press F12 for a network service boot.
38
Sun Fire X4170, X4270, and X4275 Servers Windows Operating System Installation Guide • September 2009
The Welcome to Client Installation wizard appears.
6. In the Welcome to Client Installation wizard, press Enter to continue.
The next dialog prompts you for a user name, password, and domain name.
7. In the user name and password dialog, specify your user name and password,
then press Enter.
Use the Tab key to move between fields.
Chapter 2
Install Windows Server 2003 Operating System
39
The Windows Server 2003 version dialog appears.
8. In the Windows Server 2003 version dialog, select the version (32-bit or 64-bit)
you are installing, then press Enter.
The Windows Server 2003 operating system choice dialog appears.
9. In the OS choice dialog, select the OS option you are installing, then press
Enter.
Note – The OS choice dialog identifies the names of the OS images that are available
for you to install from your RIS server. The OS choice dialog from your RIS server
will list different options from the ones shown in the example dialog below.
40
Sun Fire X4170, X4270, and X4275 Servers Windows Operating System Installation Guide • September 2009
A Caution dialog appears.
10. In the Caution dialog, press Enter to continue.
The Installation Information dialog appears.
11. In the Installation Information dialog, press Enter to continue.
The Administrator Password dialog appears.
Chapter 2
Install Windows Server 2003 Operating System
41
12. In the Administrator Password dialog, specify an OS Administrator password
and press Enter.
Note that this password is assigned to the OS installation target.
You will be asked to confirm the password.
13. In the Administrator Password Confirmation dialog, retype the password and
press Enter.
The Windows Setup starts and a message appears that the setup is formatting the
partition.
14. Proceed to “Post Installation” on page 57.
42
Sun Fire X4170, X4270, and X4275 Servers Windows Operating System Installation Guide • September 2009
CHAPTER
3
Install Windows Server 2008
Operating System
This chapter provides information about installing the Windows Server 2008 and
Windows Server 2008 R2 Operating Systems (OS).
Note – If you are planning to create a RAID set on your disk, the recommended
procedure is to create a hardware RAID before you install the OS. For more
information, see the Sun™ Disk Management Overview, For x64 Sun Fire and Sun Blade
Series Servers (820-6350)
This chapter includes the following topics:
■
“Task Map for the Windows Server 2008 Installation” on page 44
■
“Install Windows Server 2008 Using Local or Remote Media” on page 45
■
“Install Windows Server 2008 via PXE Network” on page 51
43
Task Map for the Windows Server 2008
Installation
Use TABLE 3-1 to preview the installation process defined as a series of tasks. The
table defines the required tasks, describes them, and provides pointers to the
instructions for performing that task.
TABLE 3-1
Task Map for the Windows Server 2008 Installation
Step
Task
Description
1
Review installation
prerequisites
Verify that all applicable requirements are • TABLE 1-2 “OS Installation
met for installing an operating system to
Prerequisites” on page 3
a server.
2
Choose an installation
method
Evaluate and select an installation
method that meets the needs of your
infrastructure.
• “Installation Methods” on
page 5
3
Ensure that the BIOS
factory defaults are set
Verify that the factory default settings in
the BIOS are set prior to performing the
operating system installation.
• “Verifying BIOS Settings for
New Installations” on page 10
4
Gather the Windows
installation media
The Windows OS is shipped with the CD
and DVD media and documentation that
you will need to install the Windows OS.
• You can download or order the
media for Windows 2003 at
http://www.microsoft.co
m
5
Perform the Windows
2008 OS installation
Follow the instructions in this chapter to
install the Windows 2008 operating
system.
• “Install Windows Server 2008
Using Local or Remote Media”
on page 45
• “Install Windows Server 2008
via PXE Network” on page 51
6
Install driver(s) and
supplemental software
post installation, if
applicable.
If necessary, install the updated serverspecific drivers and the server
supplemental software.
• “Post Installation” on page 57
9
Enable Wake On LAN
feature, if appropriate
If required, you can enable the Wake On
LAN feature for this server.
• “Post Installation” on page 57
44
Relevant Topic(s)
Sun Fire X4170, X4270, and X4275 Servers Windows Operating System Installation Guide • September 2009
Note – The complete Microsoft Windows operating system installation process is
not documented in this section. This section walks you through the steps for booting
the Windows Server 2008 media, installing drivers (if necessary) at boot, and
partitioning the drive. For additional information, consult the Microsoft Windows
2008 Product Documentation at
http://www.microsoft.com/windowsserver2008/en/us/productdocumentation.aspx
Install Windows Server 2008 Using Local
or Remote Media
The following procedure describes how to boot the Windows Server 2008 operating
system from local or remote media. It assumes you are booting the Windows
installation media from one of the following sources:
■
Windows 2008 CD or DVD (internal or external CD/DVD)
■
Windows 2008 ISO image (network repository)
Note – If you are booting the installation media from a PXE environment, refer to
“Install Windows Server 2008 via PXE Network” on page 51 for instructions.
Before You Begin
Prior to performing the installation, the following requirements must be met:
■
All applicable installation prerequisites for installing an operating system should
have been met. For further information about these prerequisites, see TABLE 1-2
“OS Installation Prerequisites” on page 3.
■
An installation method (for example: console, boot media, and install target)
should have been chosen and established prior to performing the installation. For
more information about these setup requirements, see “Installation Methods” on
page 5.
After completing this procedure, you will need to perform the post installation tasks
as described in “Post Installation” on page 57.
Chapter 3
Install Windows Server 2008 Operating System
45
▼ Install Windows Server 2008 Using Local or
Remote Media
1. Ensure that the installation media is available to boot.
Note – For the Sun Fire X4275 server, which has neither a CD/DVD-ROM drive nor
a USB connector on the front panel, use the Sun ILOM Remote Console to redirect
the boot media from a remote storage device. For instructions, see instructions for
Remote Boot Media in TABLE 1-4 “Boot Media Options for Performing the OS
Installation” on page 7.
For example:
■
For distribution CD/DVD, insert the Windows 2008 Distribution media (CD
labeled #1 or the single DVD) into the local or remote USB CD/DVD-ROM
drive.
■
For ISO image, ensure that the ISO images are available and that the ILOM
Remote Console application is aware of the first ISO image location.
For additional information about how to set up the installation media, see
TABLE 1-4 “Boot Media Options for Performing the OS Installation” on page 7.
2. Reset the power on the server.
For example:
■
From the ILOM web interface, select the Remote Control --> Remote
Power Control tab, then select the Power Cycle option from the Host
action drop-down list box.
■
From the local server, press the Power button (approximately 1 second) on the
front panel of the server to power off the server, then press the Power button
again to power on the server.
For further details for powering on or off your server, see the Sun Fire X4170,
X4275, and X4275 Servers Service Manual.
■
From the ILOM CLI, type: reset /SYS
The BIOS screen appears.
46
Sun Fire X4170, X4270, and X4275 Servers Windows Operating System Installation Guide • September 2009
3. In the BIOS screen, press F8.
The Boot Device dialog appears.
Note – The dialog that appears in your installation may be different depending the
type of disk controller installed in your server.
Chapter 3
Install Windows Server 2008 Operating System
47
4. In the Boot Device dialog, select the menu item according to the Windows
media installation method you elected to use and press Enter.
For example:
■
If you elected to use the Windows Local delivery method, select CD/DVDW.
■
If you elected to use the Sun ILOM Remote Console delivery method, select
Virtual CDROM.
5. When prompted with Press any key to boot from CD, press any key.
The Windows installation wizard starts.
Continue the Windows installation wizard until the Installation Type dialog
appears.
48
Sun Fire X4170, X4270, and X4275 Servers Windows Operating System Installation Guide • September 2009
6. In the Installation Type dialog, click Custom (advanced).
The Where Do You Want to Install Windows dialog appears.
Chapter 3
Install Windows Server 2008 Operating System
49
7. In the Where Do You Want To Install Windows? dialog, do one of the
following:
■
If you do not want to override the Windows Default partition information,
click Next then skip to Step 9.
■
If you do want to override the Windows default partition information, click
the Driver options (advanced) option and proceed to Step 8.
Caution – Formatting or re-partitioning a pre-existing partition will destroy all data
on the partition.
The Where do you want to Install Windows? dialog appears.
8. In the Where to Install Windows dialog, do the following:
a. Click Delete to delete the existing partition.
A confirmation window appears.
b. Click Ok to confirm the partition deletion.
c. Click New to create the new partition.
d. Change partition size settings as needed, and then click Apply.
The partition is created.
50
Sun Fire X4170, X4270, and X4275 Servers Windows Operating System Installation Guide • September 2009
e. Click Next and proceed to the next step.
The Windows installation begins.
The server will reboot multiple times during the installation process. This
process could take several minutes.
9. When the Windows installation is complete, Windows starts and prompts you
to change the user password.
10. In the user password dialog, click OK and set up the initial user login account.
Note – Windows Server 2008 enforces stronger password schemes for user accounts.
Password standards include restrictions on length, complexity and history. For more
details, click the Accessibility link at the account creation page.
After the initial user account is created, the Windows Server 2008 desktop
appears.
11. Proceed to “Post Installation” on page 57.
Install Windows Server 2008 via PXE
Network
This section explains the initial information you will need to install the Windows
Server 2008 operating system over an established PXE-based network using a
customer-provided Windows Deployment Services (WDS) image.
Topics included in this section:
■
“Before You Begin” on page 52
Chapter 3
Install Windows Server 2008 Operating System
51
■
“Install Windows Server 2008 via PXE” on page 52
Note that the procedure presented in this section documents the initial steps to
install Windows 2008 over the network using a Windows Deployment Services
(WDS) image. Specifically, it explains the steps for selecting the server PXE network
interface card that will be communicate with your WDS installation server. For
further information about using a WDS image to install the Windows Server 2008
operating system, see Microsoft’s Windows Deployment Services documentation.
After completing this procedure, you will need to perform the post installation tasks
as described in “Post Installation” on page 57.
Before You Begin
■
■
To use PXE to boot the installation media over the network:
■
Configure the network (NFS, FTP, HTTP) server to export the installation tree.
■
Configure the files on the TFTP server that are necessary for PXE booting.
■
Configure the Sun server MAC network port address to boot from the PXE
configuration.
■
Configure DHCP
To use a WIM image to perform the installation, you must:
■
Create the WIM installation image.
Follow the WIM installation instructions in the Windows Server 2008
documentation.
■
Add the required system device drivers to the WIM installation image.
For instruction, see Appendix A “Incorporate Sun Fire Server Drivers Into
WIM or RIS Images” on page 71.
■
WIM Administrator password.
▼ Install Windows Server 2008 via PXE
1. Reset the power on the server.
For example:
52
■
From the ILOM web interface, select the Remote Control --> Remote
Power Control tab, then select the Power Cycle option from the Host
action drop-down list box.
■
From the local server, press the Power button (approximately 1 second) on the
front panel of the server to power off the server, then press the Power button
again to power on the server.
Sun Fire X4170, X4270, and X4275 Servers Windows Operating System Installation Guide • September 2009
For further details for powering on or off your server, see the Sun Fire X4170,
X4275, and X4275 Servers Service Manual.
■
From the ILOM CLI, type: reset /SYS
The BIOS screen appears.
Note – The next events occur very quickly; therefore, focused attention is needed
for the following steps. Watch carefully for these messages as they appear on the
screen for a brief time. You might want to enlarge the size of your screen to eliminate
scroll bars.
2. Press F8 to specify a temporary boot device.
The Please Select Boot Device menu appears.
Chapter 3
Install Windows Server 2008 Operating System
53
3. In the Please Select Boot Device menu, select the appropriate PXE installation
boot device and press Enter.
The PXE installation boot device is the physical network port configured to
communicate with your network installation server.
The Boot Agent dialog appears.
54
Sun Fire X4170, X4270, and X4275 Servers Windows Operating System Installation Guide • September 2009
4. In the Boot Agent dialog, press F12 for a network service boot.
5. Continue the normal Windows Server 2008 WDS network installation. For
additional information, consult Microsoft’s Windows Deployment Services
product documentation.
6. Proceed to “Post Installation” on page 57.
Chapter 3
Install Windows Server 2008 Operating System
55
56
Sun Fire X4170, X4270, and X4275 Servers Windows Operating System Installation Guide • September 2009
CHAPTER
4
Post Installation
After completing the Windows 2003 or Windows 2008 installation and rebooting the
operating system, you should review the following post installation tasks and, if
necessary, perform the tasks that are applicable to your system.
■
“Downloading Server-Specific Drivers” on page 57
■
“Installing Server-Specific Device Drivers” on page 59
■
“Installing Supplemental Software” on page 65
■
“Configuring Microsoft’s IPMI System Management Driver for Windows Server
2003 R2 SP2” on page 68
■
“Enable the Option for Wake On LAN” on page 70
■
“Configure the TPM Option” on page 70
Downloading Server-Specific Drivers
This section describes how to download the server-specific driver packages needed
for Windows Server installations.
Note – If you have the Tools and Drivers CD/DVD and want to use it, you can skip
this section and proceed to “Installing Server-Specific Device Drivers” on page 59.
However, the latest version of the Tools and Drivers CD/DVD is available as a
downloadable image on the Sun download site, which is specified in “Download the
Server-Specific Drivers” on page 58.
57
▼ Download the Server-Specific Drivers
1. Go to the driver download site for your server.
■
For the X4170 server:
http://www.sun.com/servers/x64/x4170/downloads.jsp
■
For the X4270 server:
http://www.sun.com/servers/x64/x4270/downloads.jsp
■
For the X4275 server:
http://www.sun.com/servers/x64/x4275/downloads.jsp
2. Choose one of the following download options:
■
■
If you are installing the server-specific drivers using media, download
Windows.zip to a hard drive location or media that will be accessible
during the installation. Extract the following sub-packages contained in
Windows.zip:
■
FloppyPack_x_x_x.zip (contains Intel SATA drivers, LSI SAS/SATA
RAID drivers, Sun StorageTek SAS/SATA RAID drivers, QLogic SAN
drivers, and Emulex SAN drivers). You will use this file to create driver
media for your installation of Windows Server 2003.
■
InstallPack_x_x_x.exe (program to install all server-specific device
drivers after installing Windows Server) You will use this file to install all of
the server-specific drivers.
■
DriverPack_x_x_x.zip (for experts only, server-specific driver archive for
Windows Server, English). Download this file if you want to incorporate
Sun server drivers into a Remote Installation Service (RIS) image.
■
OptPack_x_x_x.zip (for experts only, supplemental software archive).
Download this file if you want to incorporate the supplemental software
into a PXE installation.
If you are installing server-specific drivers using a PXE server (advanced
installation), extract the contents of the DriverPack_x_x_x.zip file on to
the PXE server.
Note – The _x_x_x number identifies the version of the package (for example,
FloppyPack_1_1_4.zip).
3. Proceed to “Installing Server-Specific Device Drivers” on page 59.
58
Sun Fire X4170, X4270, and X4275 Servers Windows Operating System Installation Guide • September 2009
Installing Server-Specific Device Drivers
Sun provides a wizard to install Sun server-specific device drivers and supplemental
software. The server-specific device drivers are provided to support optional devices
that you added to the server when you completed the hardware installation or that
you may want to add in the future.
The Sun Server Installation Package wizard may be started using one of the
following methods:
■
From the main menu of your server’s Tools and Drivers CD/DVD, or
■
From the InstallPack_x_x_x.exe executable file
Note – Using a recently downloaded InstallPack_x_x_x.exe to update the
drivers ensures that you update the server-specific drivers with the latest versions
available.
▼ Install the Server-Specific Device Drivers
1. Start the Sun Installation Package software using one of the following
methods:
■
Insert the Tools and Drivers CD/DVD into the server’s CD/DVD drive.
The CD will start automatically. At the main menu, select Install Drivers and
Supplemental Software.
Or
■
If you downloaded the InstallPack_x_x_x.exe file from the Sun
download site (as described in “Downloading Server-Specific Drivers” on
page 57), ensure that it has been copied to a local drive on the server, and
then run the InstallPack_x_x_x.exe application.
The Sun Server Install Pack dialog box displays.
Chapter 4
Post Installation
59
2. Click Next to accept the default settings.
Note that you should always accept the “platform-specific drivers” to ensure that
the most recent versions of the drivers are installed.
The Install Pack notice dialog box displays.
60
Sun Fire X4170, X4270, and X4275 Servers Windows Operating System Installation Guide • September 2009
3. Review the Important Note and then click Next.
The Welcome to the Sun Server Installation Wizard displays.
Chapter 4
Post Installation
61
4. Click Next.
The End User License Agreement page appears.
62
Sun Fire X4170, X4270, and X4275 Servers Windows Operating System Installation Guide • September 2009
5. Select “I accept this agreement”, and then click Next.
The platform-specific drivers are installed.
In the following screen a green check mark verifies that each driver has been
successfully installed.
Chapter 4
Post Installation
63
6. Click Finish.
The System Settings Change dialog box displays.
Note – If you plan to install Supplemental Software (highly recommended), do not
restart your system at this time. Once the Supplemental Software has been installed,
you will be prompted to restart the system.
7. If you accepted the default settings in Step 2, click No to proceed to “Installing
Supplemental Software” on page 65.
If you are not installing the Supplemental Software, click Yes to restart your
computer.
64
Sun Fire X4170, X4270, and X4275 Servers Windows Operating System Installation Guide • September 2009
Installing Supplemental Software
TABLE 4-1 identifies the optional supplemental software components available for
your server.
During the supplemental software installation wizard, you can choose to install all
the supplemental software (listed in TABLE 4-1) on your system by choosing a Typical
installation; or, you can individually select the supplemental software (listed in
TABLE 4-1) to install by choosing a Custom installation. For instructions for installing
the supplemental software, see “Install the Supplemental Software” on page 67.
TABLE 4-1
Install Pack Optional Supplemental Software
Available for
Windows 2003
Available for
Windows 2008
Servers with
LSI
Integrated
RAID
Controller
Servers with
Adaptec
Integrated
RAID
Controller
Servers with
Intel
Integrated
Disk
Controller
LSI MegaRAID Storage Manager
Allows you to configure, monitor, and
maintain RAID on the SAS internal
RAID Host Bus Adapter. For
information on using MSM, refer to the
Sun LSI 106x RAID User’s Guide for
your server available at:
http://docs.sun.com.
Yes
Yes
Typical
Not
applicable
Not
applicable
Sun STK RAID Manager
Allows you to configure, administer
and monitor RAID on the Adaptec SGXPCIESAS-R-IN integrated RAID
controller. For information on the Sun
STK RAID Manager, see the Sun
documentation web site at:
http://docs.sun.com/app/docs/
coll/dsk-cntrl
Yes
Yes
Not
applicable
Typical
Not
applicable
IPMItool command line utility
This utility reads the sensor data
repository (SDR) and displays sensor
values, System Event Log (SEL), Field
Replaceable Unit (FRU) inventory
information, gets and sets LAN
configuration parameters, and
performs chassis power control
operations via the BMC (also called the
Service Processor).
Yes
Yes
Typical
Typical
Typical
Available Supplemental Software
Components
Chapter 4
Post Installation
65
TABLE 4-1
Install Pack Optional Supplemental Software (Continued)
Available for
Windows 2003
Available for
Windows 2008
Available Supplemental Software
Components
IPMI System Management Driver*
(Sun Microsystems)—
Windows driver that reads the sensor
data repository (SDR) and displays
sensor values, System Event Log (SEL),
Field Replaceable Unit (FRU)
inventory information.
This driver is available from the Install
Pack media only.
Note - This supplemental software is
intended for Windows Server 2003 SP2
only. For Windows 2003 R2 SP2, use
the inbox Microsoft Driver. For driver
configuration instructions, see
“Configuring Microsoft’s IPMI System
Management Driver for Windows
Server 2003 R2 SP2” on page 68.
Yes
(Non-R2
only)
Intel NIC Teaming
Enables the network interfaces on a
server to be grouped together into a
team of physical ports called a virtual
interface.
Yes
66
Typical
Servers with
LSI
Integrated
RAID
Controller
Servers with
Adaptec
Integrated
RAID
Controller
Servers with
Intel
Integrated
Disk
Controller
Typical
Typical
Typical
Typical
Typical
Typical
Sun Fire X4170, X4270, and X4275 Servers Windows Operating System Installation Guide • September 2009
▼ Install the Supplemental Software
Note – If you have already installed the supplemental software, running the
installation again will not necessarily reinstall the supplemental software. It may
result in the components being removed. Carefully review the dialog boxes during
supplemental software installation to ensure that the results are as expected.
1. Do one of the following:
■
If you did not select the Supplemental Software when you ran the
procedure “Installing Server-Specific Device Drivers” on page 59, refer back to
that procedure and run it again, but this time accept the default settings in
Step 2 (the default is to install the supplemental software), and select No in
Step 7.
The Supplemental Software dialog box displays. Proceed to the next step.
■
If you did select Supplemental Software at the Sun Server Installation
Package dialog box in Step 2 of “Installing Server-Specific Device Drivers” on
page 59, and selected No in Step 7, the supplemental software dialog box
appears. Proceed to the next step.
Chapter 4
Post Installation
67
2. Click Next to accept the Typical settings, or select Custom to choose the options
to install (see descriptions in TABLE 4-1).
Component installation wizards will guide you through the installation of each of
the selected supplemental software components.
3. Once the supplemental software has been installed, click Finish.
4. Click Yes at the System Setting Change dialog box to restart your system.
If you ran the Sun Server Installation Package software from the Tools and
Drivers CD/DVD, remove the CD from your system now.
5. If you are running Windows Server 2003 R2 SP2 and you have installed the
IPMItool supplemental software, you need to configure this driver before you
can run the IPMItool.
For instructions, see‘“Configuring Microsoft’s IPMI System Management Driver
for Windows Server 2003 R2 SP2” on page 68.
Configuring Microsoft’s IPMI System
Management Driver for Windows Server
2003 R2 SP2
If you are running Windows Server 2003 R2 SP2 and you have installed the IPMItool
supplemental software, you need to configure this driver before you can run the
IPMItool.
▼ Configure Microsoft’s IPMI System Management
Driver for Windows Server 2003 R2 SP2
Follow these steps to configure the IPMI driver on the Windows Server 2003 R2 SP2
operating system.
1. On your Windows Server 2003 R2 SP2 system, perform the following steps to
configure the Microsoft IPMI System Management driver:
a. In Control Panel, open Add/Remove Programs.
The Add/Remove Programs dialog is displayed.
b. Click Add/Remove Windows Components.
The Windows Components Wizard dialog is displayed.
68
Sun Fire X4170, X4270, and X4275 Servers Windows Operating System Installation Guide • September 2009
c. Highlight Management and Monitoring Tools component, and then click
Details.
The Management and Monitoring Tools page is displayed.
d. In the Management and Monitoring Tools page, perform one of the
following:
■
If the Select the Hardware Management subcomponent check box is
already selected, skip to Step 2.
■
If the Select the Hardware Management subcomponent check box is not
selected, select it.
The 3rd Party Drivers warning dialog appears.
e. Read the warning and then click OK.
The Management and Monitoring Tools page is displayed.
f. Click OK.
The Windows Components Wizard dialog is displayed.
g. Click Next.
The Hardware Management component is installed.
2. Instantiate the IPMI System Management driver.
a. In the Taskbar, click Start, and then click Run.
The Run dialog box is displayed.
b. In the Open list, type:
rundll32 ipmisetp.dll,AddTheDevice
c. Click OK.
The IPMI System Management driver is instantiated.
3. Open Device Manager and verify that the Microsoft Generic IPMI device exists
under the System section.
For information about using the IPMItool, refer to your Sun Integrated Lights Out
Manager 2.0 User’s Guide (820-1188). For more information on standard IPMItool
commands, see:
http://ipmitool.sourceforge.net/manpage.html
Chapter 4
Post Installation
69
Enable the Option for Wake On LAN
After installing the operating system, you can optionally enable the Wake On LAN
(WOL) option in the BIOS Setup utility. This feature enables you to power on the
server from another location over the network. For details about the requirements
for enabling WOL, see “Wake On LAN - Remote Power On” in the Sun Fire X4170,
X4270, and X4275 Servers Service Manual.
Configure the TPM Option
The server supports Trusted Platform Module (TPM), however, you must configure
it before you can use it. For instructions on how to configure TPM, see the
“Configuring Support for TPM” in the Sun Fire X4170, X4270, and X4275 Servers
Service Manual.
70
Sun Fire X4170, X4270, and X4275 Servers Windows Operating System Installation Guide • September 2009
APPENDIX
A
Incorporate Sun Fire Server Drivers
Into WIM or RIS Images
This appendix is intended for advanced system administrators who need to
incorporate the server-specific drivers into a Windows Imaging Format (WIM) image
or a Remote Installation Services (RIS) image.
WIM files are installed using Windows Deployment Services (WDS). RIS images can
be deployed using either WDS in legacy mode or RIS. For more information on WDS
or RIS, refer to Microsoft documentation.
This appendix includes the following sections:
■
“Determine Required Drivers” on page 71
■
“Add Drivers to a WIM Image” on page 72
■
“Add Drivers to a RIS Image” on page 75
Determine Required Drivers
The server-specific drivers that must be incorporated into a WIM or RIS image are
shown in TABLE A-1.
TABLE A-1
Server-specific Drivers Required for WIM or RIS Images
Incorporate for Windows Server 2003
Incorporate for Windows Server 2008
Driver/Device
32-bit
64-bit
32-bit
64-bit
Intel Network Drivers
Yes
Yes
Yes
Yes
Intel Chipset Drivers
Yes
Yes
No
No
71
TABLE A-1
Server-specific Drivers Required for WIM or RIS Images (Continued)
Driver/Device
Aspeed Graphic Driver
Infineon TPM
Driver*
Disk Controller Driver (server
dependant):
• LSI SAS RAID HBA, SG-PCIE8SAS-I
(also referred to as LSI-based
integrated RAID controller)
--or-• Sun StorageTek SAS RAID HBA, SGXPCIESAS-R (also referred to as
Adaptec-based integrated RAID
controller)
--or-• Intel ICH10 Controller (also referred
to as Intel-based integrated disk
controller)
Incorporate for Windows Server 2003
Incorporate for Windows Server 2008
32-bit
64-bit
32-bit
64-bit
Yes
Yes
Yes
Yes
Yes
Yes
No
No
Yes
Yes
Yes
Yes
* You have to configure the Trusted Platform Module (TPM) feature on the server before you can use it. For instructions on configuring
TPM, see the Sun Fire X4170, X4270, and X4275 Servers Service Manual.
Add Drivers to a WIM Image
For Windows Server 2003, the LSI and Adaptec RAID controller and Intel disk
controller drivers must be incorporated for the operating system to be installed. For
Windows Server 2008, the LSI and Adaptec RAID controller and Intel disk controller
drivers are sufficient to install the system. Sun recommends updating both RAID
controller drivers to enable the full functionality of host control of the firmware
RAID functionality.
The procedures in the section assume the Windows Deployment Services are running
on Windows Server 2003.
72
Sun Fire X4170, X4270, and X4275 Servers Windows Operating System Installation Guide • September 2009
Before you Begin
Before creating your WIM image, you need to do the following:
■
Locate DriverPack_x_x_x.zip. You can obtain the DriverPack_x_x_x.zip
from the Tools and Drivers CD/DVD or you can download it from the Sun
download site. For download instructions, see “Downloading Server-Specific
Drivers” on page 57.
▼ Add Drivers to the WIM Image
1. Extract the contents of Windows Server 2008 DriverPack_x_x_x.zip to a
network share (for example: \\yourshare\share\DriverPack), making sure to
maintain the directory structure.
Note – Due to potential driver interaction problems during the installation, after you
extract the DriverPack_x_x_x.zip, if you are NOT installing to the Intel ICH10
Controller, you must delete the i386\Intel\hba and amd64\Intel\hba
directories.
2. Select the service image to update and export the image.
a. Click Start, click Administrative Tools, and then click Windows Deployment
Services.
b. Find the image to service. Right-click the image and then click Disable.
c. Right-click the image and select Export Image. Follow the Wizard directions
to export the image to the location of your choice.
3. Mount the Windows image you just exported. For example,
imagex /mountrw C:\windows_distribution\sources\install.wim 1
C:\win_mount
The first Windows image in the Install.wim file is mounted to C:\wim_mount.
4. Use Windows System Image Manager (Windows SIM) to create an answer file
that contains the paths to the device drivers that you intend to install.
See the Microsoft documentation for the Windows Automated Installation Kit
(AIK) for the details of starting the Windows SIM application.
5. Add the Microsoft-Windows-PnpCustomizationsNonWinPE component to
your answer file in the offlineServicing pass.
Appendix A
Incorporate Sun Fire Server Drivers Into WIM or RIS Images
73
6. Expand the Microsoft-Windows-PnpCustomizationsNonWinPE node in the
answer file. Right-click DevicePaths, and then select Insert New
PathAndCredentials.
A new PathAndCredentials list item appears.
7. In the Microsoft-Windows-PnpCustomizationsNonWinPE component,
specify the path to the architecture folder in the DriverPack folder on the
network share, and the credentials used to access the network share.
For example, the path and credentials for a 64-bit image might be:
<Path>\\yourshare\share\DriverPack\amd64</Path>
<Credentials>
<Domain>MyDomain</Domain>
<Username>MyUserName</Username>
<Password>MyPassword</Password>
</Credentials>
8. Save the answer file and exit Windows SIM. The answer file must be similar to
the following sample. The sample assumes the architecture is 64-bit.
<?xml version="1.0" ?>
<unattend xmlns="urn:schemas-microsoft-com:asm.v3" xmlns:wcm=
"http://schemas.microsoft.com/WMIConfig/2002/State">
<settings pass="offlineServicing">
<component name="Microsoft-Windows-PnpCustomizationsNonWinPE"
processorArchitecture="amd64" publicKeyToken="31bf3856ad364e35"
language="neutral" versionScope="nonSxS">
<DriverPaths>
<PathAndCredentials wcm:keyValue="1">
<Path>>\\yourshare\share\DriverPack\amd64</Path>
<Credentials>
<Domain>MyDomain</Domain>
<Username>MyUserName</Username>
<Password>MyPassword</Password>
</Credentials>
</PathAndCredentials>
</DriverPaths>
</component>
</settings>
</unattend>
74
Sun Fire X4170, X4270, and X4275 Servers Windows Operating System Installation Guide • September 2009
9. Use Package Manager to apply the unattended installation answer file to the
mounted Windows image. Specify a location for the log file to create. For
example:
pkgmgr /o:"C:\wim_mount\;C:\wim_mount\Windows" /n:"C:\
unattend.xml" /l:"C:\pkgmgrlogs\logfile.txt"
The .inf files referenced in the path in the answer file are added to the Windows
image. A log file is created in the directory C:\Pkgmgrlogs\.
For more information about using Package Manager, see the Microsoft Windows
AIK documentation.
10. Review the contents of the %WINDIR%\Inf\ directory in the mounted Windows
image to ensure that the .inf files were installed.
Drivers added to the Windows image are named oem*.inf. This is to ensure
unique naming for new drivers added to the computer. For example, the files
MyDriver1.inf and MyDriver2.inf are renamed oem0.inf and oem1.inf.
11. Unmount the .wim file and commit the changes. For example:
imagex /unmount /commit C:\wim_mount
12. Replace the service image and enable the image.
a. If the Windows Deployment Services snap-in is not running, click Start, click
Administrative Tools, and then click Windows Deployment Services.
b. Locate the image to service. Right-click the image and select Replace Image.
Follow the Wizard directions to replace the service image with the Windows
image that was updated.
c. Right-click the service image and select Enable.
The service image is now available and all the server-specific drivers are added to
the image.
Add Drivers to a RIS Image
For remote installation of Windows Server 2003 using a server running Windows
Remote Installation Services, the mass-storage controller driver provided with
Windows Server 2003 is not sufficient to install the operating system. Sun
recommends updating the RIS image with the mass-storage driver available with
DriverPack_x_x_x.zip.
Appendix A
Incorporate Sun Fire Server Drivers Into WIM or RIS Images
75
Before you Begin
Before creating a RIS image, you need to do the following:
■
Windows Remote Installation Services must be are running on a Windows Server.
Refer to the Windows Remote Installation Services documentation for more
information.
■
Locate DriverPack_x_x_x.zip for Windows Server 2003.
You can obtain the DriverPack_x_x_x.zip from the Tools and Drivers
CD/DVD or you can download it from the Sun download site. For download
instructions, see “Downloading Server-Specific Drivers” on page 57.
▼ Add Drivers to a RIS image
In the following procedure, %RIS_Image% refers to the root directory of your
Windows image on the RIS server.
1. Create the following directories in %RIS_Image%:
■
$OEM$\textmode
■
$OEM$\$$OEMDIR
■
$OEM$\$1\Sun\Drivers
2. Extract the contents of DriverPack_x_x_x.zip to a temporary location,
making sure to maintain the directory structure.
3. Update the %RIS_Image% with the server-specific drivers for your Windows
platform:
■
For 32-bit, copy the contents of the DriverPack\i386 folder to the
%RIS_Image%\$OEM$\$1\Sun\Drivers folder, being sure to maintain the
directory structure.
■
For 64-bit, copy the contents of the DriverPack\amd64 folder to the
%RIS_Image%\$OEM$\$1\Sun\Drivers folder, being sure to maintain the
directory structure.
4. Update the %RIS_Image%\$OEM$\textmode folder with the mass-storage
drivers using one of the following methods:
■
Method 1:
a. Using the Tools and Drivers CD/DVD, create a Windows 2003 Mass Storage
Driver Diskette for Intel ICH10/LSI/SMI using the MKFLOPPY Utility as
described in “Create Floppy Disk For Device Drivers” on page 21.
b. Copy the contents of the floppy to the %RIS_Image%\$OEM$\textmode
folder.
76
Sun Fire X4170, X4270, and X4275 Servers Windows Operating System Installation Guide • September 2009
■
Method 2:
a. Copy the appropriate floppypack folder on the Tools and Drivers CD/DVD to
the %RIS_Image%\$OEM$\textmode folder.
■
For LSI: \windows\w2k3\packages\floppypack\files\LSI
■
For Sun StorageTek (Adaptec): \windows\w2k3\packages\floppypack\
files\SMI
■
For Intel ICH10: \windows\w2k3\packages\floppypack\files\intel
5. Copy the contents of the appropriate mass-storage driver directory to the root
directory of the textmode directory
■
■
■
For LSI:
■
If you are installing Windows 2003 32-bit to the LSI controller, copy the
contents of %RIS_Image%\$OEM$\textmode\LSI\i386 to
%RIS_Image%\$OEM$\textmode.
■
If you are installing Windows 2003 64-bit to the LSI controller, copy the
contents of %RIS_Image%\$OEM$\textmode\LSI\amd64 to
%RIS_Image%\$OEM$\textmode.
For Sun StorageTek (Adaptec):
■
If you are installing Windows 2003 32-bit to the adaptec controller, copy
the contents of %RIS_Image%\$OEM$\textmode\smi\i386 to
%RIS_Image%\$OEM$\textmode.
■
If you are installing Windows 2003 64-bit to the adaptec controller, copy
the contents of %RIS_Image%\$OEM$\textmode\smi\amd64 to
%RIS_Image%\$OEM$\textmode.
For Intel ICH10:
■
If you are installing Windows 2003 32-bit to the ICH10 controller, copy the
contents of %RIS_Image%\$OEM$\textmode\intel\i386 to
%RIS_Image%\$OEM$\textmode.
■
If you are installing Windows 2003 64-bit to the ICH10 controller, copy the
contents of %RIS_Image%\$OEM$\textmode\intel\amd64 to
%RIS_Image%\$OEM$\textmode.
6. Create an answer file using the method described in the Microsoft TechNet
article “Creating an Answer File with Setup Manager.”
The article can be found at:
http://technet2.microsoft.com/WindowsServer/en/library/7842163
0-6fcc-4604-a888-bd9c84244a5b1033.mspx
Appendix A
Incorporate Sun Fire Server Drivers Into WIM or RIS Images
77
7. Make changes to the .sif file for your mass-storage solution as listed in one of
the following tables, then proceed to Step 8:
■
For servers with the LSI-based integrated RAID controller see TABLE A-2.
■
For servers with the Adaptec-based integrated RAID controller see TABLE A-3.
■
For servers with the Intel-based integrated disk controller see TABLE A-4.
Note – For readability, the OemPnpDriversPath information has been shown on
multiple lines; it must be entered on a single line. The three drivers listed in
MassStorageDrivers have been shown on multiple lines; each driver
(“driver description” = OEM) should be listed on a separate line. Due to potential
driver interaction problems during installation, only include the Sun\Drivers\
intel\hba path in the OemPnPDriversPath entry if you are installing to the Intel
ICH10 controller. If you are installing to a Sun StorageTek (Adaptec) or LSI Raid
Controller, install the Intel ICH10 driver manually after setup has completed. The
driver will reside in the Sun\Drivers\intel\hba directory at the root of your
installation disk.
TABLE A-2
.sif File Changes for Servers With an LSI-Based Integrated RAID Controller
Windows Server 2003 32-bit
Windows Server 2003 64-bit
[Unattended]
OemPreinstall = yes
OemPnPDriversPath = "\Sun\Drivers\ast;\
Sun\Drivers\emulex;\Sun\Drivers\qlogic;\
Sun\Drivers\infineon;\Sun\Drivers\intel\
chipset;\Sun\Drivers\intel\nic;\Sun\
Drivers\ısi;\Sun\Drivers\smi"
[Unattended]
OemPreinstall = yes
OemPnPDriversPath = "\Sun\Drivers\ast;\
Sun\Drivers\emulex;\Sun\Drivers\qlogic;\
Sun\Drivers\infineon;\Sun\Drivers\intel\
chipset;\Sun\Drivers\intel\nic;\Sun\
Drivers\ısi;\Sun\Drivers\smi"
[MassStorageDrivers]
"LSI Logic Fusion-MPT SAS Storport
Driver (32-bit)" = OEM
[MassStorageDrivers]
"LSI Logic Fusion-MPT SAS Storport Driver
(64-bit)"= OEM
[OEMBootFiles]
txtsetup.oem
disk4.tag
lsi_sas.inf
lsi_sas.sys
lsinodrv.inf
s2k332.cat
[OEMBootFiles]
txtsetup.oem
disk4.tag
lsi_sas.inf
lsi_sas.sys
lsinodrv.inf
s2k3amd64.cat
78
Sun Fire X4170, X4270, and X4275 Servers Windows Operating System Installation Guide • September 2009
TABLE A-3
.sif File Changes for Servers With an Adaptec-Based Integrated RAID Controller
Windows Server 2003 32-bit
Windows Server 2003 64-bit
[Unattended]
OemPreinstall = yes
OemPnPDriversPath = "\Sun\Drivers\ast;\
Sun\Drivers\emulex;\Sun\Drivers\qlogic;\
Sun\Drivers\infineon;\Sun\Drivers\intel\
chipset;\Sun\Drivers\intel\nic;\Sun\
Drivers\ısi;\Sun\Drivers\smi"
[Unattended]
OemPreinstall = yes
OemPnPDriversPath = "\Sun\Drivers\ast;\
Sun\Drivers\emulex;\Sun\Drivers\qlogic;\
Sun\Drivers\infineon;\Sun\Drivers\intel\
chipset;\Sun\Drivers\intel\nic;\Sun\
Drivers\ısi;Sun\Drivers\smi"
[MassStorageDrivers]
"Adaptec SAS/SATA-II RAID Controller
Driver (32-bit)" = OEM
[MassStorageDrivers]
"Adaptec SAS/SATA-II RAID Controller
Driver (64-bit)"= OEM
[OEMBootFiles]
txtsetup.oem
disk4.tag
adpenc.cat
adpenc.sys
arcsas.cat
arcsas.sys
arcsas.inf
raiddisk1
[OEMBootFiles]
txtsetup.oem
disk4.tag
adpenc.cat
adpenc.sys
arcsas.cat
arcsas.sys
arcsas.inf
raiddisk1
Appendix A
Incorporate Sun Fire Server Drivers Into WIM or RIS Images
79
TABLE A-4
.sif File Changes for Servers Intel-Based Integrated Disk Controller
Windows Server 2003 32-bit
Windows Server 2003 64-bit
[Unattended]
OemPreinstall = yes
OemPnPDriversPath = "\Sun\Drivers\ast;\
Sun\Drivers\emulex;\Sun\Drivers\qlogic;\
Sun\Drivers\infineon;\Sun\Drivers\intel\
chipset;\Sun\Drivers\intel\nic;Sun\
Drivers\intel\hba;\Sun\Drivers\ısi;\Sun\
Drivers\smi"
[Unattended]
OemPreinstall = yes
OemPnPDriversPath = "\Sun\Drivers\ast;\
Sun\Drivers\emulex;\Sun\Drivers\qlogic;\
Sun\Drivers\infineon;\Sun\Drivers\intel\
chipset;\Sun\Drivers\intel\nic;Sun\
Drivers\intel\hba;\Sun\Drivers\ısi;\Sun\
Drivers\smi"
[MassStorageDrivers]
"Intel Matrix Storage Manager driver
(32-bit)" = OEM
[MassStorageDrivers]
"Intel Matrix Storage Manager driver (64bit)"= OEM
[OEMBootFiles]
txtsetup.oem
disk4.tag
iaAHCI.inf
iaAHCI.sys
iaStor.inf
iaStor.sys
iaStor.cat
[OEMBootFiles]
txtsetup.oem
disk4.tag
iaAHCI.inf
iaAHCI.sys
iaStor.inf
iaStor.sys
iaStor.cat
8. Add the Intel Ethernet Drivers to your RIS image.
■
For the on board Intel 82575EB Gigabit Ethernet Devices, 32-bit:
i. Extract the inf file in the %RIS_Image%\$OEM$\$1\Sun\Drivers\
intel\nic\RIS_INF\elq5132.zip to %RIS_Image%\i386.
ii. Copy the elq5132.sys file from %RIS_Image%\$OEM$\$1\Sun\
Drivers\intel\nic to %RIS_Image%\i386.
■
For the on board Intel 82575EB Gigabit Ethernet Devices, 64-bit:
i. Extract the inf file in the %RIS_Image%\$OEM$\$1\Sun\Drivers\
intel\nic\RIS_INF\elq51x64.zip to %RIS_Image%\amd64.
ii. Copy the elq51x64.sys file from %RIS_Image%\$OEM$\$1\Sun\
Drivers\intel\nic to %RIS_Image%\amd64.
80
Sun Fire X4170, X4270, and X4275 Servers Windows Operating System Installation Guide • September 2009
9. Stop and start the Remote Installation Services BINLSVC service on the RIS
server.
To do this, type the following commands at the command prompt and press Enter
after each command:
> net stop binlsvc
> net start binlsvc
Appendix A
Incorporate Sun Fire Server Drivers Into WIM or RIS Images
81
82
Sun Fire X4170, X4270, and X4275 Servers Windows Operating System Installation Guide • September 2009
Index
B
BIOS
Boot device priority
changing, 14
Boot Device Priority dialog, 14
Boot Settings dialog, 13
factory defaults
loading, 13
system time or date, 13
BIOS settings
new installs, 10
BIOS Setup utility, 12
Boot Device dialog, 48
boot device, temporary, 10
C
consoles
local, 5
remote, 6
serial, 6
supported, 5
D
device drivers
boot-time, 19
creating a disk, 21
downloading, 21
floppy image, 24
installed at boot time, 19
ISO image, 26
mass-storage
preparing, 20
RIS, 71
WIM, 71
device drives
Tools and Drivers CD/DVD, 20
disk
configuring RAID, 17, 43
documentation
languages available in, ix
related documents, vii
software, x
Solaris operating system, x
support, ix
target audiences, vii
F
Fibre Channel PCI Host Bus Adapter, 10
FloppyPack_x_x_x.zip, 21
I
ILOM web interface, 11, 26, 36, 46, 52
Install, 36
Installation
Type dialog, 49
installation
automated image, 8
Boot Device dialog, 47
boot media, 7
change user password, 51
local and remote, 45
local or remote, 25
methods, 5
prerequisites, 3
83
PXE, 35
remote boot media, 8
steps, 19
targets, 9
task map, 18
using PXE, 9
WDS image, 51
installation task map
Windows 2008, 44
L
local drive
partitioning, 3
M
mass storage drivers
copying an image file, 24
floppy disk creation, 21
media
floppy disk, 21
O
operating systems
supported, 2
OS installation targets
Fibre Channel Storage Area Network, 10
P
PathAndCredentials, 74
Please Select Boot Device menu, 54
powering the server off and on
interfaces supported, 11, 26, 36, 46, 52
product updates
downloads, vii
PXE network environment, 36
R
related documents, vii
Remote Installation Service (RIS)
adding drivers, 75
required drivers, 71
Remote Installation Services
See RIS
RHEL
KickStart Image, 9
RIS
84
DriverPack, 75
image
adding drivers, 75
S
SAN
See Fibre Channel Storage Area Network.
sif file
changes needed, 78
sociated, 13
Sun support, ix
T
training
where to find, ix
U
UNIX commands, x
W
WDS, 51, 71
web sites
third party, x
WIM
Package Manager, 75
Windows
RIS or WDS Image, 9
Windows Deployment Services
See WDS
Windows Operating System, installation
using local or virtual media, 25
Windows Server 2003 Installation via PXE Network
Environment, 35
Windows Server 2003 Operating System, installation
media, summary of local and remote installation
methods, 7
targets, local vs. external storage devices, 9
Windows Server 2008 installation
using local or virtual media, 45
Sun Fire X4170, X4270, and X4275 Servers Windows Operating System Installation Guide • September 2009