1
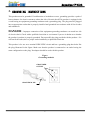
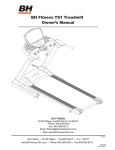
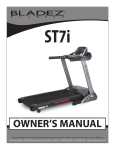
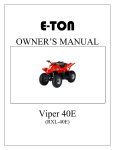
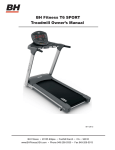
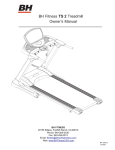
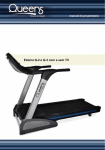
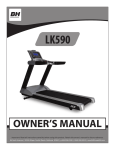
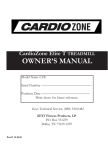
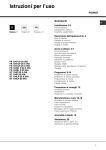
SuperSport™ Club
OWNER’S MANUAL
Super Gym’s FitnessBlowout.com
2210 S. Sepulveda Blvd.
Los Angeles, CA 90064
Phone: 800-FIT-4-LESS
or 800-348-4537
Fax: 310-235-2008
CONGRATULATIONS
Congratulations for selecting Super Gym’s CardioZone as your primary source of fitness.
CardioZone treadmills offer many exercise programs that benefit users of all levels and ages. The
treadmill is designed to make your workouts more effective and enjoyable.
Please read this manual carefully before using your CardioZone SuperSport™ Club. This will allow
you to get a full understanding of all the features that CardioZone treadmills provide. If you have
any questions or concerns, please contact Super Gym’s FitnessBlowout.com.
For service, please visit http://www.fitnessblowout.com/service
Register your warranty at http://www.fitnessblowout.com/warranty
Super Gym’s FitnessBlowout.com
2210 S. Sepulveda Blvd.
Los Angeles, CA 90064
Phone: 800-FIT-4-LESS
or 800-348-4537
Fax: 310-235-2008
1
2
TABLE OF CONTENTS
SECTION
PAGE
1. OVERVIEW DRAWING.......................................................................................... 4
2. IMPORTANT SAFETY INSTRUCTIONS .............................................................. 5
3. GROUNDING INSTRUCTIONS ............................................................................ 6
4. MOTORIZED TREADMILL PRE-ASSEMBLY..................................................... 7
5. ASSEMBLY STEPS ................................................................................................. 8
6. MAINTENANCE ..................................................................................................... 10
7. COMPUTER INSTRUCTION ................................................................................. 11
8. EXPLODED VIEW .................................................................................................. 25
9. TROUBLESHOOTING............................................................................................ 27
10. WARRANTY ............................................................................................................ 29
3
1. OVERVIEW DRAWING
4
2. IMPORTANT SAFETY INSTRUDCTIONS
When using an electrical appliance, basic precautions should always be followed,
including the followings:
Read all instructions before using the treadmill.
DANGER – To reduce the risk of electric shock:
1.
Always unplug this appliance from the electrical outlet immediately after using and
before cleaning.
WARNING – To reduce the risk of burns, fire, electric shock, or injury to persons:
1.
An appliance should never be left unattended when plugged in. Unplug
when not in use, and before putting on or taking off parts.
from
outlet
2.
Close supervision is necessary when this appliance is used by, on, or near children,
invalids, or disabled persons.
3.
Use this appliance only for its intended use as described in this manual. The
manufacturer does not recommend attachments onto the appliance.
4.
Never operate this appliance if it has a damaged cord or plug, if it is not working
properly, if it has been dropped or damaged, or dropped into water. Return
the
appliance to a service center for examination and repair.
5.
Do not carry this appliance by supply cord or use cord as a handle.
6.
Keep the cord away from heated surfaces.
7.
Never operate the appliance with the air openings blocked.
free of lint, hair, and the like.
8.
Never drop or insert any object into any opening.
9.
Do not use outdoors.
Keep the air openings
10. Do not operate where aerosol (spray) products are being used or where oxygen is
being administered.
11. To disconnect, turn all controls to the off position, than remove plug from outlet.
12. Connect this appliance to a properly grounded outlet only.
Base on content of product. If treadmill has elevation function, it needs to consider the
following issues:
13. If the treadmill is foldable, when user finishes to use the treadmill, the elevation needs
to be back to original position.
14. When user is using the treadmill, it cannot be folded at the same time.
15. The appliance is intended for household use on.
SAVE THESE INSTRUCTION
5
3. GROUNDING INSTRUCTIONS
This product must be grounded. If malfunction or breakdown occurs, grounding provides a path of
least resistance for electric current to reduce the risk of electric shock.This product is equipped with
a cord having an equipment-grounding conductor and a grounding plug. The plug must be plugged
into an appropriate outlet that is properly installed and grounded in accordance with all local codes
and ordinances.
DANGER – Improper connection of the equipment-grounding conductor can result in a risk
of electric shock. Check with a qualified electrician or serviceman if you are in doubt as to whether
the product is product is properly grounded. Do not modify the plug provided with the product - if it
will not fit the outlet; have a proper outlet installed by a qualified electrician.
This product is for use on a nominal 110V~120V circuit and has a grounding plug that looks like
the plug illustrated in the figure. Make sure that the product is connected to an outlet having the
same configuration as the plug. No adapter should be used with this product.
Figure
Grounding methods
GROUNDED
OUTLET
GROUNDED PIN
6
4. Motorized Treadmill Pre-Assembly
Handrail control button and heart rate strap are optional items in the package
1.Heart rate can be measured in this treadmill. Attach strap to chest during exercise, the heart rate value will
display on the PULSE window.
2. Except using the control button on the console, the control button on the handrail can also be used to
adjust speed and elevation. The control button on the left handrail is for elevation while the right handrail
button is for speed adjustment.
3. Under START/READY condition, if you did not hold grip pulse sensor, then PULSE window will display HP,
when you hole the both sides of grip pulse sensor, you will see the PULSE window display the heart rate values.
ITEM
Description
Qty
A
B
C
D
E
F
G
H
Computer Set
Frame
Left Upright
Right Upright
Left Handrail
Right Handrail
Left Handrail Cover
Right Handrail Cover
Cup/Bottle Holder
Cover
Bottle
1
1
1
1
1
1
1
1
I
J
1
1
ITEM
Description
Qty
a
Bolt M8xP1.25x40
2
b
Bolt M8xP1.25x60
4
c
Bolt M8xP1.25x75
4
d
Bolt M5xP0.8x15
2
e
Bolt ψ5x25
2
f
Cap of bolt
6
g
Allen Wrench 5mm
1
h
T Spanner
1
i
Power Cord
1
j
Safety Key/Clip
1
k
SILICON
1
7
5. Assembly Step
1.
First pull out the bottom control wire using
the guide wire inside the Upright Bar (D).
Pull to the position as shown in the
drawing, then insert the Upright Bar
(C,D),into the two locations on the frame
(B), Secure the upright bar with treadmill
frame by bolts (b、d) wrench provided.
After tightening the screws, cover the
screws with screw cover (G) as shown in
the drawing.
Ps.1.In order to keep the assembly safety,
please do it with 2 people instead of one
person.
Ps.2. One keeps the tube stable without any slit
2.
Computer Set:
Connect the control wire inside the Handrails
(E 、 F) with the control wire inside the
Computer Set (A), then follow the
directions shown on drawing. Assemble
the Handrails (L&R) to computer.
Ps.1. When assemble, assure that the screw
holes on the Handrails (L&R) have
matched the holes on the Computer set's
pipe.
Ps.2. Because, this product has the function
about Handrails switch. So that, when
assemble, it must be watched out that the
switch of Handrail (L) is used to adjust the
incline, and the switch of Handrail (R) is
used to adjust the speed.
8
3.
As the above steps have been completed,
alight the Computer Set (assembled in the
above step) on the Upright Bars, and connect
the control wire inside the Upright Bars with
the control wire inside the Computer Set.
After that, insert the excessive wire or cable
into the Upright Bars
Tighten up with bolt(c).
Final, connect the two Handrail Covers
(H、I) on to the Handrails, and tighten up
with screws(e)
Assembly requires two or more persons during
the process
4. Pot Holder assembly:
Put Tea Pot Holder (J) on the Upright Bar
(D), secure the Bolt (a) inserted and fixed
with fastening.
Ps. Personal option, the Tea Pot Holder may
Put on the other side of Upright Bar
9
6. Maintains
1 Walking Belt Centering. If the Walking Belt tracks off
center to the right or left of the deck, first turn the
power off. Then use a 6mm wrench (g) to tighten the
rear roller bolt on the side of the treadmill toward which
the belt is moving.. For example, if the belt moves to
the left and the deck becomes exposed on the right,
tighten the bolt on the left side of the frame.
Tighten
about 1/4 of turn(clockwise). If the belt does not move
back to the center of the treadmill, make another
adjustment to the same bolt. Once the Walking Belt
has been adjusted closer to the center, the treadmill can
be started again.
Ps.1: The above mentioned is pretty import, make sure to
follow the procedure.
Ps.2: Make sure the walking belt going on right without
any tracks off the centers it depends on the position
and weight.
2. It is recommended that the deck be lubricated every 6-12
months according to the frequency of usage. First, use
wrench to loosen the bolts in the end caps. Pull up the
Walking Belt, dispense the lubricant on the deck, and
spread evenly.
After lubricating the deck, center the
belt, and check the belt tension.
Adjust the belt as
mentioned in step 1.
Ps1: If the belt happens to slip, follow the above steps
and lubricate the running deck.
SUGGESTED PREVENTIVE MAINTENANCE SCHEDULE IN
ACCORDANCE WITH THE AVERAGE RUNNING SPEED
Measurement
Speed
Interval
6KM/hr below
1 year
Metric
6~12KM/hr
6 months
12KM/hr above
3 moths
4mile/hr below
1 year
English
4~8mile/hr
6 months
8mile/hr above
3 moths
Note: This preventive maintenance schedule is
only meant for home use. It is suggested to
maintain the unit every month for
commercial use.
10
7. COMPUTER INSTRUCTION
A. General operation:
1. Turn on the On-off switch.
2. Put the safety key into the recess of the console.
The beeper will make an alerting sound, meanwhile the dot matrix LED light will be
blinking, program light will blink circularly; this means the treadmill is ready to start. At
the ready-start stage, hold the heart rate grips to measure your heart rate.
3. Press
to begin; the treadmill starts with a velocity of 0.5MPH. While the belt is
、
, to accelerate or decelerate the speed of the belt. (Or press the
running, press
Fast Speed Buttons
the inclination angle
to set the speed you want.). Press
or smaller. (or press the
greater
Buttons
to set the incline you want.), press
、
Fast
to adjust
Elevation
, the treadmill will stop.
once, information window will display PAUSE, to pause motions of the
(press
treadmill and values on the computer console and will remain paused for 60 seconds, after
60 seconds all values will return to zero, if press
once, after that press
hold for 3 seconds, the treadmill will reset to the ready-start stage.)
**Adjustable Speed Range:0.5~12MPH , each level raise 0.1 MPH
Adjustable Incline Range:0~15 %, each level raise 1 %
again and
can set user’s weight.
4. At the ready-start condition, press
Pre-set Weight is 150LBS.
Adjustable Weight Range:Starts at 50 LBS. each level increases by 1 LB.
5. The treadmill can also use other methods to measure heart rate, when exercising, tied the
Chest Strap to your chest, and then you can see your heart rate in PULSE window.
6. Press
, after that press
to set the time. (After setting, time will start to count down,
when time is up, it will come back to ready-start stage)
Pre-set Time is 20 min
11
Adjustable Time Range:20~240 min, each level raise 5 min
, and that press
, Target window will display the DISTANCE、CAL、
7. Press
PACE、METS and PULSE(Only having the heart rate signals, that will have the PULSE
information.) status, shows a status per 8 seconds circularly. Or press
、
、
、
、
directly to show the single information.
**DISTANCE Range:0.1~999.9 mil
CAL Range:1~9999 cal
* Changes about CAL is direct ratio with user's weight.
PACE Range:75~3 min
METS Range:1.4~32.6
PULSE Range:40~240 Beats/min
* Heart rate signal has 3 colors, each color is represent different heart rate.:
Below 90:Signal shows GREEN color.
Between 91 and 130:Signal shows BLUE color.
Over 130:Signal shows RED color.
** The chart below provides different heart rate due to age and amount of exercise:
HEART BEATS/MIN
170
150
120
20
166
146
117
25
162
143
114
30
OVER
MIDDLE
LOW
157
137
111
35
153
135
108
40
149
131
105
45
145
128
102
50
140
124
99
55
136
120
96
60
132
116
93
65
(Age)
8. Except using the control button on the console, the control button on the handrail can also
be used to adjust speed and elevation. The control button on the left handrail is for
elevation while the right handrail button is for speed adjustment.
12
B. Program Operation Mode (Only in ready-start stage, this mode could be run.)
1.
:This program is used to do the heart rate training. When using, heart rate reached your
setting, then the incline and speed will keep steady, to keep the heart rate in a steady range, to
achieve the training objective. When choosing this mode, program will ask you to enter the
following values.:
Weight : Pre-set Value is 150LBS, Adjustable Weight Range : Starts at 50 LBS. each
level increases by 1 LB. After setting up correct value, press
to set next value.
Age:Pre-set age is 30, adjustable range:13~113, each level raise 1. After setting up correct value,
to set next value.
press
BPM:Between this value and user's age is inverse ratio. Refer to attached table, and choose the
value that fit you. After setting up correct value, press
to set next value.
Time:Pre-set time is 20 min., adjustable range:20~240 min., each level raise 5 min. After
setting up correct value, press
, the belt will start to move.
mode should be used with wireless heart rate
** Because thinking of safety problem,
sensor.
2.
:The pre-set distance in this program is 3500ml(2.17mil). It will be finished, after you run
3500ml(2.17mil), and the treadmill will stop. Under this mode, it imitated golf course, and the
difficulty is basing on the changes of upgrade or downgrade. When choosing this mode,
program will ask you to enter the following values.:
Weight : Pre-set value is 150LBS, Adjustable Weight Range : Starts at 50 LBS. each
level increases by 1 LB. After setting up correct value, press
to set next value.
LVL:Pre-set Value is 1 LVL, adjustable range:1~10 LVL,each level raise 1 LVL. After setting
up the correct value you want, press
3.
, and the belt will start to move.
:The pre-set distance in this program is5000ml(3.1mil). It will be finished, after you run
5000ml(3.1mil), and the treadmill will stop. Under this mode, jog is the main part. When
choosing this mode, program will ask you to enter the following values.:
Weight : Pre-set value is 150LBS, Adjustable Weight Range : Starts at 50 LBS. each
to set next value.
level increases by 1 LB. After setting up the correct value, press
LVL:Pre-set value is 1 LVL, adjustable range:1~10 LVL, each level raise 1 LVL. After setting
up the correct value you want, press
4.
, and the belt will start to move.
:The goal of this program is to consume user’s calories. User can set up a value, as a goal to
consume unnecessary calories, to keep slim easily. When choosing this mode, program will ask
you to enter the following values.:
Weight : Pre-set value is150LBS, Adjustable Weight Range : Starts at 50 LBS. each
level increases by 1 LB. After setting up the correct value, press
to set next value.
CAL:Pre-set value is 200 cal, adjustable range:40~560 cal, each level raise 1 cal. After setting
to set next value.
up the correct value, press
LVL:Pre-set value is 1 LVL, adjustable range:1~10 LVL, each level raise 1 LVL,After setting
up the correct value, what you want, press
5.
, and the belt will start to move.
、
、
、
:
When choosing this mode, program will ask you to enter the following values.:
Weight : Pre-set value is 150LBS, Adjustable Weight Range : Starts at 50 LBS. each
13
level increases by 1 LB.
After setting up the correct value, press
to set next value. From now on, you can set up the
mode by your favor. Under this mode, there are 50 grades (SE01~SE50).
Of each grade, adjustable time range: 1~10 min., adjustable speed range: 0.5~12MPH, and
adjustable incline range: 0~15 LVL.
After setting up one grade, press
to enter the next grade setting, or wait 10 sec., system will
enter the next grade setting automatically.
and the treadmill will
If you don't need to use all 50 grades, after finished settings, press
start to work. When the mode, according to your settings, finished, the treadmill will go back to
ready-start stage automatically.
6.
、
:When choosing this mode, program will ask you to enter the following values.:
Weight : Pre-set value is 150LBS, Adjustable Weight Range : Starts at 50 LBS. each
level increases by 1 LB.
After setting up the correct value, press
to set up next value. From now on, you can set up
the mode by your favor. Under this mode, there are 50 grades (SE01~SE50).
Of each grade, adjustable time range: 1~10 min., adjustable speed range: 0.5~12MPH, and
adjustable incline range: 0~15 LVL.
After setting up one grade, press
to enter the next grade setting, or wait 10 sec., system will
enter the next grade automatically. If you don't need to use all 50 grades, after finished settings,
press
and the treadmill will start to work.
When the mode, according to your settings, finished, the treadmill will go back to ready-start
stage automatically.
** This mode has the pre-set value too. But if you don't want to make any change to the pre-set
value; after setting up your weight, press
to run the program; and the treadmill will
start to work.
** These two functions not only can set up by user's favor, but have its pre-set values. About its
graph please refer to the attached graph.
** The way that how information shown on the dot matrix LED as below. (The information of
“Time”,“Speed” and “Incline”.) :
On the dot matrix LED, there are 10*21 LED in total. Among them, the LED line in center will
not bright. There are used to divide INCLINE and SPEED into two sections. Left 10 lines show
the changes of Incline and Time, this section called INCLINE section. Right 10 lines show the
changes of Incline and Time, this section called SPEED section. Each value as below represents
the each LED's value. The value in the INCLINE section represent the changes of incline, The
value in the SPEED section represent the changes of speed. The underside value represent the
changes of time, each one takes as 1 min.
As a reference, here is an operation example as below.:
14
(1) In ready-start stage, press
to enter the program.
(2) First, enter the weight. Press
、
to change weight value to 134LBS, then
press
to set other values.
(3) SE01:Press 、
to set incline to 0%, then press
then press
、
then press
、
、
then press
、
、
SE04:Press
、
then press
、
、
to set speed to 1.0 MPH,
to set time to 1 min.. Now, the result on the dot matrix LED is
to enter SE03.
to set incline to 2 %, then press
、
to set speed to1.3MPH,
to set time to 1 min.. Now, the result on the dot matrix LED is
showed as below, then press
(6)
to enter SE02.
to set incline to 1 %, then press
showed as below, then press
(5) SE03:Press
to set speed to 0.5MPH r,
to set time to 1 min. Now, the result on the dot matrix LED is
showed as below, then press
(4) SE02:Press
、
to enter SE04.
to set incline to 3 %, then press
、
to set speed to 2.0MPH,
to set time to 1 min.. Now, the result on the dot matrix LED is
showed as below, then press
to enter SE05
15
(7)
SE05:press
then press
、
、
to set incline to 4 %, then press
SE06:press
then press
、
、
SE07:press
、
then press
、
to enter SE06.
to set incline to 3 %, then press
、
to set speed to 2.0MPH,
to set time to 1min.. Now, the result on the dot matrix LED is
showed as below, then press
(9)
to set speed to 2.3MPH,
to set time to 2 min.. Now, the result on the dot matrix LED is
showed as below, then press
(8)
、
to enter SE07
to set incline to 2 %, then press
、
to set speed to 1.3MPH,
to set time to 1 min.. Now, the result on the dot matrix LED is
showed as below, then press
to enter SE08
16
( 10 )
SE08:press
then press
、
、
to set incline to 1 %, then press
SE09:press
then press
、
、
to enter SE08.
to set incline to 0 %, then press
、
to set speed to 0.5MPH,
to set time to 1 min.. Now, the result on the dot matrix LED is
showed as below, then press
( 12 )
to set speed to 1.0 MPH,
to set time to 1 min.. Now, the result on the dot matrix LED is
showed as below, then press
( 11 )
、
and start to run the program.
Now treadmill start to work, and the dot matrix LED is showed as below
17
C. Body Fat Function (Only in ready-start stage, this function could be run.)
1. At ready-start stage, press
to enter the Body Fat Function.
2. When choosing this function, program will ask you to enter the following values.
Weight:Pre-set value is150LBS, Adjustable Weight Range:Starts at 50 LBS. each
to set next value.
level increases by 1 LB. After setting up the correct value, press
Height:Pre-set value is 5’7”, adjustable range:4’ 3”~7’11”, each level raise 1”. After setting up
the correct value, press
to set next value.
Age:Pre-set value is 30, adjustable range:13~113, each level raise 1 kg. After setting up the
correct value, press
to set next value.
Sex:Pre-set value is 1(Male), use
、
can change to 1(♂,Male)、0(♀,Female),
and stretch out two hands to hold the heart rate
After setting up the correct value, press
sensor about 30 sec. After 30 sec, it will display your Body Fat value. At the same time, left
LED lines will display the estimation of the body, and right LED lines will show the Body Fat
value which computed by program.
3. Relation between LED and Body Fat value, refer to following table.:
LED
Body Fat Value
45.1~50.0
40.1~45.0
35.1~40.0
30.1~35.0
25.1~30.0
20.1~25.0
15.1~20.0
10.1~15.0
5.1~10.0
0~5.0
4. Because body fat degree has differences between the male and the female; so that the LED
which display the estimation of the physique, will display different too. The following table
provides the different body fat degree between the male and the female.:
LED
1(Male)
0(Female)
35.0%以上
45.0%以上
30.0~34.9(%)
25.0~29.9(%)
40.0~44.9(%)
35.0~39.9(%)
20.0~24.9(%)
30.0~34.9(%)
15.0~19.9(%)
10.0~14.9(%)
25.0~29.9(%)
20.0~24.9(%)
5.0~9.9(%)
15.0~19.9(%)
0~4.9(%)
0~14.9(%)
18
19
20
21
22
23
Attached Table
BPM
BPM
Age
BPM
Age
H Preset L
BPM
Age
H Preset L
Age
H Preset L
H Preset
L
13 197
124
124 39 172
109
109 65 147
93
93 91 123
90
77
14 196
124
124 40 171
108
108 66 146
92
92 92 122
90
77
15 195
123
123 41 170
107
107 67 145
92
92 93 121
90
76
16 194
122
122 42 169
107
107 68 144
91
91 94 120
90
76
17 193
122
122 43 168
106
106 69 143
91
91 95 119
90
75
18 192
121
121 44 167
106
106 70 143
90
90 96 118
90
74
19 191
121
121 45 166
105
105 71 142
90
89 97 117
90
74
20 190
120
120 46 165
104
104 72 141
90
89 98 116
90
73
21 189
119
119 47 164
104
104 73 140
90
88 99 115
90
73
22 188
119
119 48 163
103
103 74 139
90
88 100 114
90
72
23 187
118
118 49 162
103
103 75 138
90
87 101 113
90
71
24 186
118
118 50 162
102
102 76 137
90
86 102 112
90
71
25 185
117
117 51 161
101
101 77 136
90
86 103 111
90
70
26 184
116
116 52 160
101
101 78 135
90
85 104 110
90
70
27 183
116
116 53 159
100
100 79 134
90
85 105 109
90
69
28 182
115
115 54 158
100
100 80 133
90
84 106 108
90
68
29 181
115
115 55 157
99
99 81 132
90
83 107 107
90
68
30 181
114
114 56 156
98
98 82 131
90
83 108 106
90
67
31 180
113
113 57 155
98
98 83 130
90
82 109 105
90
67
32 179
113
113 58 154
97
97 84 129
90
82 110 105
90
66
33 178
112
112 59 153
97
97 85 128
90
81 111 104
90
65
34 177
112
112 60 152
96
96 86 127
90
80 112 103
90
65
35 176
111
111 61 151
95
95 87 126
90
80 113 102
90
64
36 175
110
110 62 150
95
95 88 125
90
79
37 174
110
110 63 149
94
94 89 124
90
79
38 173
109
109 64 148
94
94 90 124
90
78
24
8. EXPLODED VIEW
CardioZone SuperSport™ Club
25
PARTS LIST – CardioZone SuperSport™ Club
Item
1
2
3
4
5
6
7
8
9
10
11
12
13
14
15
16
17
18
19
20
21
22
23
24
25
26
27
28
29
30
31
32
33
34
35
36
37
38
39
40
41
42
43
44
45
46
47
48
49
50
51
52
53
54
55
56
57
58
59
60
De s c r ip t io n
Computer console
Safety key/ Clip
Bolt
Control wire (bottom)
Handrail upper cover (L)
Handrail upper cover (R)
Handrail upper cover plate
P-1044
K-299
P-1066L
P-1066R
NO.2405
Bolt
Handrail bottom cover (L)
Handrail bottom cover (R)
Bolt
Bolt
Upright (L)
Upright (R)
Handrail (L)
Handrail (R)
Cap
PVC sponge
Upper cover
Plastic cover
Motor set
Bolt
Spring washer
Washer
Incline motor
Bolt
Nut
Belt
Controller
Bolt
? x10
P-1065L
P-1065R
? x16
? x25
Bolt
Bolt
Bolt
Power cord
Power socket
Power switch
Circuit breaker
Sensor (round)
Bolt
Sensor plate
KSS wire plate
Bolt
Bolt
Frame
Cushion
Front roller
Walking board
Bolt
Walking belt
Bolt
Plastic
Bolt
Aluminum deck
Rear roller
Washer
Bolt
Rear adjust box (L)
Rear adjust box (R)
M10xP1.5
M8xP1.25x40
M5xP0.8x15
? -1/2"x1.5t
FM-005
P-1045
P-1064
M10xP1.5x25
M10
? 0x? 0x3.0t
M10xP1.5x40
M10xP1.5
M5xP0.8x12
M4xP0.7x15
NO.2399
HC-101S
M8xP1.25x75
M8xP1.25
P-1301
RL-005
MB-006
M8xP1.25x40
M8xP1.25x35
P-1034
M4xP0.7x10
AL-001
RL-005A
ψ10xψ20x2.0t
M10xP1.5x110
P-1096L
P-1096R
De s c r ip t io n
Qty Item
1
1
4
1
1
1
2
2
1
1
5
2
1
1
1
1
2
2
1
6
1
4
4
4
1
1
3
1
1
3
1
2
4
1
1
1
1
1
1
1
2
1
1
1
6
1
1
2
1
8
8
8
2
1
3
2
1
1
61
62
63
64
65
66
67
68
69
70
71
72
73
74
75
76
77
78
79
80
81
82
83
84
85
86
87
88
89
90
91
92
93
94
95
96
97
98
99
100
101
102
103
104
105
106
107
108
109
110
111
112
113
114
115
116
117
118
119
120
26
Qty
Bolt
Rubber foot pad
Bolt
Lifter
M5xP0.8x15
P-1032
M6xP1.0x10
2
2
4
1
Lifter plate
T*1000
2
Plastic sleeve
Wheels
Bolt
ㄇshape steel pin
R pin
Bolt
Extension (white)
Extension (black)
Extension (white)
Extension (black)
Extension (green)
P-1037
? 0x? 0x30t
M10xP1.5x60(30mm)
T*1001
ψ10xψ2.0
M10xP1.5x100
14AWGx90x2T
14AWGx90x2T
14AWGx650x2T
14AWGx630x2T
14AWGx120x1T1R
2
2
2
2
2
1
2
1
1
1
1
Allen wrench
5mm(80mmx80mm)
1
Chest strap transmitter
Bolt
Wire button
POLAR T41
? x38
UC-2
1
4
1
Bolt (brass)
Washer
Rubber pad
T shape wrench
M5xP0.8x8
? x? 3x1.0t
20x120x1.5t
8mmx200mm
2
8
8
1
Rubber pad
Washer
Foot pad
Bolt
Sensor plate
P-1155A
? x? 6x1.0t
P-1155
? x15
P-1152
3
5
2
2
1
Spring washer
Bolt
Nut
Bolt
Bolt
M8
M8xP1.25x25
M8xP1.25
M5xP0.8x12
K-298A
4
4
8
4
4
Bolt
Bottle holder
Water holder
Handrail control sticker (speed)
Handrail control sticker (angles)
Handrail switch plastic
Handrail switch + wire
Bolt
Bolt
M5xP0.8x15
2
1
1
1
1
2
2
2
4
ψ3x8
ψ3x20
9. TROUBLESHOOTING
ERROR MESSAGE
PROBABLE CAUSES
SOLUTION
- Loss of Feedback
Speed Sensor disconnected
Check Speed
Sensor Connection
- Running Deck
Running Deck not lubricated
Check R-Deck oil
Speed Sensor misaligned
Check Sensor position
Speed Sensor Faulty
Replace S-Sensor
Loose Display Cable
Check Display
Cable connection
Faulty MCB
(D2 LED on)
Replace MCB
Drive Motor disconnected
Check D-Motor connection
Drive Motor Faulty
Replace D-Motor
- Body Fat Data Incomplete
Heart Rate not detected
Hold Heart Rate Grip Properly
- Loss of Data
Faulty Receiver in Display
Replace Heart Rate Receiver
Faulty Control Board in
Display
Replace Heart Rate Control
Board
E1
E4
27
ERROR MESSAGE
PROBABLE CAUSES
SOLUTION
- Safety Key Off
Safety Key Faulty
Check Safety Key or Switch
- Elevation Motor
Elevation Motor not moving
Check Elevation Motor
connection
- Stalled Elevation
Elevation Motor screw binding
Clean screw and lubricate
Elevation Motor out of Range
Check Zero Position of
E-Motor
E-Motor Potentiometer
Replace Elevation Motor
- Elevation Motor
Elevation Motor out of Range
Replace Elevation Motor
Display Doesn’t Lit Up
On/Off switch
Check if unit is turned on
Insufficient Power Source
Plug unit in a dedicated 120V,
20Amp Outlet
Line Cord Damaged
Replace Line Cord
Fuse
Check Fuse on MCB
E6
E7
28
10.
WARRANTY
USA Warranty
Warranties may vary in other countries.
Please register your warranty at http://www.fitnessblowout.com/warranty
SUPER GYM’S FITNESSBLOWOUT.COM extends the following exclusive, limited warranty of CARDIOZONE,
which shall apply only to the use of the device in the home, for residential, non-commercial purposes only unless
otherwise stated in writing. Any other use of the device shall void this warranty.
FRAME – LifeTime
Super Gym’s FitnessBlowout.com warrants the Frame against defects in workmanship and materials for Lifetime, so
long as it remains in the possession of the original owner.
DRIVE MOTOR – LifeTime
Super Gym’s FitnessBlowout.com warrants the Drive Motor against defects in workmanship and materials for Lifetime
from the date of original purchase, so long as the device remains in the possession of the original owner.
ELECTRONICS & PARTS – 2 Years
Super Gym’s FitnessBlowout.com warrants the Electronic components and all original parts (other than the Motor)
against defects in workmanship and materials for a period of two years from the date of original purchase, so long as the
device remains in the possession of the original owner.
LABOR – 1 Year
Super Gym’s FitnessBlowout.com shall cover the labor cost for the repair of the device for a period of one year from
the date of original purchase, so long as the device remains in the possession of the original owner.
EXCLUSIVE REMEDY
The exclusive remedy for any of the above warranties shall be repair or replacement of defective parts, or the supply of
labor to cure any defect, provided that labor shall be limited to one year. All labor shall be supplied by the local retailer
and the product must be located within the retailer’s service area. Products located outside the retailer’s service area will
not be covered by the labor warranty.
EXCLUSIONS AND LIMITATIONS
This warranty applies only to the original owner and is not transferable. This warranty is expressly limited to the repair
or replacement of a defective Frame, Electronic component, or defective part and is the sole remedy of the warranty.
The warranty does not cover normal wear
SUPER GYM’S FITNESSBLOWOUT.COM expressly disclaims all other warranties, express or implied, including but
not limited to all warranties of fitness for a particular purpose or of merchantability. This warranty gives you specific
legal rights and your rights may vary from state to state.
WARRANTY REGISTRATION
Register your warranty online at http://www.fitnessblowout.com
29