1
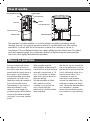
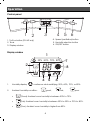
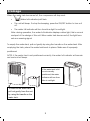
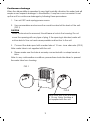
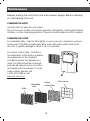
Dehumidifier
Instruction Manual
SD-46
SD-46T : with TiO2/UV
50% 60% 70% 80%
88 24
UV
hr
□ Please read and retain these instructions for future reference.
Contents
Please take time to read this manual carefully before use and save it for
future reference.
Model no. reference _______________
Specification ______________________
How it works _______________________
Where to position __________________
Before use_________________________
Parts _____________________________
Operation ________________________
Drainage _________________________
Maintenance _____________________
Trouble shooting ___________________
Warranty Info ______________________
Page
1
2
3
3
4
5
6, 7
8, 9
10, 11
12
13
Model no. Reference
SD-46
SD-46T
46 Pints/day dehumidifier
46 Pints/day dehumidifier with TiO2/UV
1
Specification
Model no.
SD-46
T
Power supply
115 V / 60Hz
Moisture removal capacity
46 Pints/day
Power /Amp consumption
*
440W / 4A
Compressor
Rotary
Refrigerant
R134a
Working range
T TR
41 ~ 95ºF
Water tank capacity
12.5 pint
Size (WxDxH)
16.14 x 8.27 x 21.46 inch
N.W.
27.5 lbs
•
Above is measured under RT 86ºF (30ºC), RH 80%.
•
The data marked with * may vary for technical reasons. For greater
precision, please refer to the rating label placed on the product.
2
How it works
DRY WARMER AIR
FAN
CONDENSER
EVAPORATER
MOIST
MOTOR
SATURATED AIR
MICRO SWITCH
WATER TANK
COMPRESSOR
WATER TANK
This product is a dehumidifier. It controls relative humidity by passing the air
through the unit, forcing the excess moisture to condensate over the cooling
elements. Contact with this cold surface causes the moisture in the air to
condense. This condensed water then drains safely into the water tank. The dried
air then passes through the condenser where it is slightly warmed and re-enters
the room at a slightly elevated temperature.
Where to position
Excess moisture will travel
throughout your home, in
the same way that cooking
smells waft to every room in
the house. For this reason,
the dehumidifier should be
positioned, so that it can
draw this moist air towards it
from all over the home.
Alternatively, if you have a
serious problem in one
area, you can begin by
positioning the dehumidifier
close to this area and later
moving it to a more central
point.
When positioning the
dehumidifier, ensure that it
is placed on a level surface
and with a minimum of 10
cm (4") of space on either
side of the unit to allow for
efficient airflow.
This dehumidifier is fitted
with castors for extra
mobility. If you move the
unit, it should first be
switched off and the water
tank emptied.
3
We do not recommend the
use of an extension cord, so
please try to ensure that the
unit is sufficiently close to a
fixed main socket. If it is
necessary to use an
extension cord, please
ensure the diameter of the
extension cable is at least 1
mm. When the dehumidifier
is in operation, outside
doors and windows should
be closed for most efficient
use.
Before use
Caution!
•
•
•
•
•
•
•
•
•
Always keep the unit in vertical position.
Leave the unit to stand for at least an hour after transport or when it
has been tilted (e.g. during cleaning), before connecting to the main
supply.
Keep all foreign objects away from the air intake or output openings.
The main supply must conform to the specification shown on the
rating plate at the back of the unit.
If the supply cord is damaged, it must be replaced by an approved
service technician or one similarly qualified.
Never use the plug to start or stop the unit. Always use the power
switch on the control panel.
Before moving the unit, first switch off, unplug and empty the water
tank.
Do not use bug sprays or other flammable cleaners on the unit.
Never pour or spray water over the unit.
IMPORTANT!
Do not use this unit at ambient temperatures below 41ºF, to prevent the
possibility of evaporating coils from icing.
4
Parts
Front
1.
2.
3.
4.
5.
6.
2
3
Control panel
Cover for air outlet
Air outlet
Water full indicator
Water tank
Handle
1
6
4
5
Rear
7.
8.
9.
10.
Air filter / air inlet
Power cord
Handle
Spout for continuous
drainage
11. Water tank
12. Caster
9
7
10
11
8
12
Assembly of the filters
Grille
Washable
filter
Active
carbon filter
5
Filter frame
Operation
Control panel
O / UV
TIMER
50% 60% 70% 80%
88 24
UV
1
2
HUMIDIT
Y
hr
4
3
5 6
4. Speed (ventilation) button
5. Humidity selection button
6. ON/OFF button
1. Tio2 /uv button (SD-46T only)
2. Timer
3. Display window
Display window
SPEED
1
7
50% 60% 70% 80%
88 24
2
3
UV
4 5
1.
Humidity display:
2.
Ambient humidity condition:
8
hr
6
continuous de-humidifying, 50%, 60%, 70%, or 80%.
good,
fair,
poor
•
(Good): Ambient room humidity is between 50% to 70%.
•
(Fair): Ambient room humidity is between 30% to 50% or 70% to 80%.
•
(Poor): Ambient room humidity is higher than 80%.
6
3.
Compressor is in progress. When unit is de-frosting, the water drops will
flash.
Compressor is not in progress.
Water tank is full.
4.
UV (ultraviolet) indicator: indicates that the TiO2/uv function is in operation.
O
S D -46T
5.
6.
TIMER indicator: sets timed operation from 1 to 24 hours.
HUMIDITY level indicator: displays the ambient room humidity level.
FAN speed indicator:
high speed,
low speed.
7.
Operation
1.
Plug unit into a correct main socket. (Please refer to the rating label at rear of
the unit.)
2.
Press ON/OFF button to turn on the unit. The compressor will start to work in
continuous mode.
3.
Press HUMIDITY button to set the desired room humidity: continuous
de-humidifying, 50%, 60%, 70% or 80%.
4.
Press the SPEED button to choose high or low fan.
5.
To set timer, press the TIMER button until desired hours of operation is indicated
on display window. One press equals one hour.
To turn on TiO2/UV light , press the TiO2/UV button (SD-46T only)
6.
To turn off the unit, press ON/OFF button again.
7.
The direction of the air outlet can be adjusted
8.
manually.
7
Drainage
When the water tank becomes full, the compressor will stop and:
•
(Water full indication) will flash.
•
The unit will beep. To stop the beeping, press the ON/OFF button to turn unit
off.
•
The water full indicator will turn from blue light to red light.
Note: during operation, the water full indicator displays a blue light; this is normal
and part of the design of this unit. When water tank becomes full, the light turns
red as a warning signal.
To empty the water tank, pull out gently by using the handle on the water tank. After
emptying the tank, place the water tank back in place. Make sure it is properly
positioned.
NOTE: if the water tank is not positioned correctly, the water full indicator will remain
red and unit will beep.
If the water tank is full
or not correctly
positioned, the water
indicator will turn from
blue to red light.
To remove the water tank,
pull out gently from the unit
by using the handle on the
water tank.
8
Continuous drainage
When the dehumidifier is operated in very high humidity climates, the water tank will
require more frequent drainage. In this situation, it may be more convenient to set
up the unit for continuous drainage by following these procedures:
1. Turn unit OFF and unplug power source.
2. Use a screwdriver and remove the round knockout at the back of the unit.
(FIG.1)
CAUTION
When the knockout is removed, this will leave a hole in the housing. Do not
cover the opening with any type of plug. If the opening is blocked, water will
not be able to flow out and cause possible malfunction to the unit.
3. Connect the drain spout with a water tube of 12 mm. inner diameter. (FIG.2)
Note: water tube is not supplied with the unit.
4. Please make sure the tube is securely connected with no sharp bends or
kinks.
Note: In very cold weather conditions, precautions should be taken to prevent
the water tube from freezing.
FIG. 1
FIG. 2
Water tube with inner diameter
of 12 mm. Note: the tube is
not supplied with the unit.
9
Maintenance
Always unplug the unit from the main power supply before cleaning
or maintaining the unit.
CLEANING THE BODY
Use soft cloth to wipe the unit clean.
Do not ever use volatile chemicals, gasoline, detergents, chemically treated
clothes, or other cleansing solutions. These all could possibly hurt the cabinet.
CLEANING THE FILTER
For washable filter – Tap the filter lightly or use a vacuum cleaner to remove
excess dirt. If the filter is particularly dirty, wash with warm water and small
amount of gentle detergent. Allow to dry completely.
For active carbon filter - This filter is
not washable. Its life span is variable
and depends on the ambient
conditions where the appliance is
used. The filter should be checked
periodically (about every 6 months)
and replaced if necessary. To order
carbon filters, please call
1-800-330-0388 or visit
www.spt-usa.com.
Grille
Washable
filter
Active
carbon filter
10
Filter frame
STORAGE
If unit will not be used for an extended period of time, please:
•
•
•
Turn unit off, unplug from power source and secure power cord.
Empty water tank and allow to dry completely.
Cover the unit and store in cool area, away from direct sunlight.
11
Trouble shooting
THE UNIT DOES NOT OPERATE:
• Is the unit plugged in?
• Is the house electricity on?
• Is the room temperature below 41°F (5°C) or above 95°F (35°C)? If so,
then it is out of the working temperature range of the unit.
• Make sure the humidistat (or ON/OFF switch) is turned on.
• Check if water tank is positioned correctly and tank is not full.
• Make sure the air inlet and outlet are not obstructed.
THE UNIT SEEMS TO DO NOTHING:
• Is the filter dusty or contaminated?
• Is the air intake or outlet blocked?
• Is the room humidity already quite low?
THE UNIT SEEMS TO DO LITTLE:
• Are too many windows or doors open?
• Is there something in the room producing lots of humidity?
THE UNIT IS TOO NOISY:
• Check whether the unit is sitting on a leveled surface.
THE UNIT IS LEAKING:
• Make sure the unit is in good shape.
• If you are using continuous drainage, make sure the tube is securely
connected.
12
R
Your Guarantee
If this product is found to be faulty as a result of faulty materials or
workmanship within one year from date of purchase, it will be repaired
free of charge.
This guarantee is subject to the following terms:
• Sunpentown must be notified of the fault.
• Proof of purchase must be presented to Sunpentown’s nominated
representative.
• The warranty will be void if the product if modified, misused or
repaired by an unauthorized person.
• The warranty after repair will not be extended beyond the original
one-year period.
• All replacement parts will be new or reconditioned.
• Parts , which are replaced, become the property of Sunpentown.
• The warranty applies for the use of the product in the USA only.
What is NOT COVERED:
• Warranty does not include freight charges.
• Incidental or consequential damage caused by possible defects with
this product.
• Damage to product caused by improper power supply voltage,
accident, fire, floods or acts of nature.
• Failure of product resulting from unauthorized modifications to the
product.
• Improper installation or failure to perform the necessary
maintenance.
This GUARANTEE is in addition to your Statutory Rights
SUNPENTOWN INTERNATIONAL INC.
21415 Baker Parkway, City of Industry, CA 91789-5236
909-468-5288
Fax:909-468-5279
[email protected]
www.sunpentown.com