1
Sun Fire X4100 and Sun Fire X4200
Servers Operating System
Installation Guide
Sun Microsystems, Inc.
www.sun.com
Part No. 819-1158-14
March 2006, Revision A
Submit comments about this document at: http://www.sun.com/hwdocs/feedback
Copyright 2006 Sun Microsystems, Inc., 4150 Network Circle, Santa Clara, California 95054, U.S.A. All rights reserved.
Sun Microsystems, Inc. has intellectual property rights relating to technology that is described in this document. In particular, and without
limitation, these intellectual property rights may include one or more of the U.S. patents listed at http://www.sun.com/patents and one or
more additional patents or pending patent applications in the U.S. and in other countries.
This document and the product to which it pertains are distributed under licenses restricting their use, copying, distribution, and
decompilation. No part of the product or of this document may be reproduced in any form by any means without prior written authorization of
Sun and its licensors, if any.
Third-party software, including font technology, is copyrighted and licensed from Sun suppliers.
Parts of the product may be derived from Berkeley BSD systems, licensed from the University of California. UNIX is a registered trademark in
the U.S. and in other countries, exclusively licensed through X/Open Company, Ltd.
Sun, Sun Microsystems, the Sun logo, Java, AnswerBook2, docs.sun.com, Sun Fire, and Solaris are trademarks or registered trademarks of Sun
Microsystems, Inc. in the U.S. and in other countries.
All SPARC trademarks are used under license and are trademarks or registered trademarks of SPARC International, Inc. in the U.S. and in other
countries. Products bearing SPARC trademarks are based upon an architecture developed by Sun Microsystems, Inc.
AMD Opteron is a trademark or registered trademark of Advanced Microdevices, Inc.
The OPEN LOOK and Sun™ Graphical User Interface was developed by Sun Microsystems, Inc. for its users and licensees. Sun acknowledges
the pioneering efforts of Xerox in researching and developing the concept of visual or graphical user interfaces for the computer industry. Sun
holds a non-exclusive license from Xerox to the Xerox Graphical User Interface, which license also covers Sun’s licensees who implement OPEN
LOOK GUIs and otherwise comply with Sun’s written license agreements.
U.S. Government Rights—Commercial use. Government users are subject to the Sun Microsystems, Inc. standard license agreement and
applicable provisions of the FAR and its supplements.
DOCUMENTATION IS PROVIDED “AS IS” AND ALL EXPRESS OR IMPLIED CONDITIONS, REPRESENTATIONS AND WARRANTIES,
INCLUDING ANY IMPLIED WARRANTY OF MERCHANTABILITY, FITNESS FOR A PARTICULAR PURPOSE OR NON-INFRINGEMENT,
ARE DISCLAIMED, EXCEPT TO THE EXTENT THAT SUCH DISCLAIMERS ARE HELD TO BE LEGALLY INVALID.
Copyright 2006 Sun Microsystems, Inc., 4150 Network Circle, Santa Clara, Californie 95054, Etats-Unis. Tous droits réservés.
Sun Microsystems, Inc. a les droits de propriété intellectuels relatants à la technologie qui est décrit dans ce document. En particulier, et sans la
limitation, ces droits de propriété intellectuels peuvent inclure un ou plus des brevets américains énumérés à http://www.sun.com/patents et
un ou les brevets plus supplémentaires ou les applications de brevet en attente dans les Etats-Unis et dans les autres pays.
Ce produit ou document est protégé par un copyright et distribué avec des licences qui en restreignent l’utilisation, la copie, la distribution, et la
décompilation. Aucune partie de ce produit ou document ne peut être reproduite sous aucune forme, par quelque moyen que ce soit, sans
l’autorisation préalable et écrite de Sun et de ses bailleurs de licence, s’il y en a.
Le logiciel détenu par des tiers, et qui comprend la technologie relative aux polices de caractères, est protégé par un copyright et licencié par des
fournisseurs de Sun.
Des parties de ce produit pourront être dérivées des systèmes Berkeley BSD licenciés par l’Université de Californie. UNIX est une marque
déposée aux Etats-Unis et dans d’autres pays et licenciée exclusivement par X/Open Company, Ltd.
Sun, Sun Microsystems, le logo Sun, Java, AnswerBook2, docs.sun.com, Sun Fire, et Solaris sont des marques de fabrique ou des marques
déposées de Sun Microsystems, Inc. aux Etats-Unis et dans d’autres pays.
Toutes les marques SPARC sont utilisées sous licence et sont des marques de fabrique ou des marques déposées de SPARC International, Inc.
aux Etats-Unis et dans d’autres pays. Les produits portant les marques SPARC sont basés sur une architecture développée par Sun
Microsystems, Inc.
AMD Opteron est une marque de fabrique ou une marque deposee de Advanced Microdevices, Inc.
L’interface d’utilisation graphique OPEN LOOK et Sun™ a été développée par Sun Microsystems, Inc. pour ses utilisateurs et licenciés. Sun
reconnaît les efforts de pionniers de Xerox pour la recherche et le développement du concept des interfaces d’utilisation visuelle ou graphique
pour l’industrie de l’informatique. Sun détient une license non exclusive de Xerox sur l’interface d’utilisation graphique Xerox, cette licence
couvrant également les licenciées de Sun qui mettent en place l’interface d ’utilisation graphique OPEN LOOK et qui en outre se conforment
aux licences écrites de Sun.
LA DOCUMENTATION EST FOURNIE “EN L’ÉTAT” ET TOUTES AUTRES CONDITIONS, DECLARATIONS ET GARANTIES EXPRESSES
OU TACITES SONT FORMELLEMENT EXCLUES, DANS LA MESURE AUTORISEE PAR LA LOI APPLICABLE, Y COMPRIS NOTAMMENT
TOUTE GARANTIE IMPLICITE RELATIVE A LA QUALITE MARCHANDE, A L’APTITUDE A UNE UTILISATION PARTICULIERE OU A
L’ABSENCE DE CONTREFAÇON.
Contents
Preface
1.
ix
Overview
1
About Installing an Operating System on a Sun Fire X4100 or Sun Fire X4200
Server 1
Prerequisites
1
Things You Must Decide
What Next
2.
Solaris 10
2
3
5
About Solaris OS Installation
Overview
5
5
Where to Find Solaris 10 Information
9
About Preparing to Install the Solaris OS
9
Installation Prerequisites
10
How to Boot a Server in a GRUB-Based Environment
How to Boot a Server Over the Network By Using PXE
Before You Begin
What to Do
11
11
12
12
How to Install the Solaris OS From Distribution Media
Before You Begin
13
13
iii
What to Do
13
How to Use a Serial Console to Install the Solaris OS
Before You Begin
What to Do
3.
14
15
Sun Installation Assistant CD
17
About the Sun Installation Assistant CD
Error Messages
Log File
14
17
18
18
How to Use the Sun Installation Assistant
Before You Begin
What to Do
19
19
20
How to Configure the Sun Installation Assistant for PXE Boot
What Do
4.
23
23
Red Hat Enterprise Linux
25
About Red Hat Enterprise Linux Installation
25
Red Hat Installation and Administration Documentation
Task Map for Red Hat Enterprise Linux Installation
About Preparing to Install Red Hat Enterprise Linux
Installation Prerequisites
28
28
How to Create a Red Hat Enterprise Linux Driver CD
What to Do
27
28
Additional Software Updates or Patches
Before You Begin
26
29
29
29
How to Install Red Hat Enterprise Linux From Distribution Media
Before You Begin
iv
What to Do
32
What Next
33
31
Sun Fire X4100 and Sun Fire X4200 Servers Operating System Installation Guide • March 2006
31
How to Update the Red Hat Enterprise Linux Operating System and Drivers
Before You Begin
What to Do
33
33
34
How to Install the Red Hat Enterprise Linux OS Using the Remote Console
Application 36
What to Do
36
Red Hat Enterprise Linux and PXE
38
About Red Hat Enterprise Linux and PXE
38
How to Create a PXE Install Image on the PXE Server
38
How to Install Red Hat Enterprise Linux From a PXE Server
5.
SUSE Linux Enterprise Server 9
43
About SUSE Linux Enterprise Server 9 Installation
43
Important SLES 9 Version Installation Guidelines
43
SUSE Linux Installation and Configuration Documentation
Task Map for SUSE Linux Enterprise Server 9 Installation
About Preparing to Install SUSE Linux Enterprise Server 9
Installation Prerequisites
What to Do
46
46
48
49
49
How to Update the SLES9 SCSI Driver
What to Do
45
47
How to Update the SLES9 Operating System
What to Do
44
46
How to Create a SLES9 or SLES9 SP1 Driver CD
Before You Begin
41
50
50
How to Install SLES9 From Distribution Media
Before You Begin
What to Do
52
What Next
53
51
51
Contents
v
How to Upgrade From SLES9 to SLES9 SP1
Before You Begin
What to Do
54
54
54
How to Install the SLES9 OS Using the Remote Console Application
What to Do
56
SUSE Linux Enterprise Server 9 and PXE
58
About SUSE Linux Enterprise Server 9, SP1 and PXE
58
How to Create a SLES9 SP1 PXE Install Image on the PXE Server
How to Install SLES9 From a PXE Server
6.
Windows Server 2003
63
65
About Windows Server 2003 Installation
65
Task Map for Windows Server 2003 Installation
About Preparing to Install Windows® Server 2003
Installation Prerequisites
System Requirements
67
68
68
How to Create a Mass-Storage Device Floppy
Before You Begin
65
67
Supported Operating System Software
What to Do
69
69
69
How to Download Driver Files for Windows Server 2003
What to Do
72
72
How to Install Windows Server 2003 From Distribution Media
Before You Begin
What to Do
Next
73
73
74
75
How to Update the Device Drivers for Windows® Server 2003
Before You Begin
76
Setting Up the Device Driver Update Package
vi
56
76
Sun Fire X4100 and Sun Fire X4200 Servers Operating System Installation Guide • March 2006
76
59
Updating the AMD Processor Driver
Index
81
105
Contents
vii
viii
Sun Fire X4100 and Sun Fire X4200 Servers Operating System Installation Guide • March 2006
Preface
This Sun Fire X4100 and Sun Fire X4200 Servers Setup Guide contains detailed
procedures for bringing the server from the packing box to a configurable, usable
state. Hardware installation and initial software configuration are covered.
Product Updates
For product updates that you can download for the Sun Fire X4100 or X4200 servers,
please visit the following Web site:
http://www.sun.com/servers/entry/x4100/downloads.jsp
This site contains updates for firmware and drivers, as well as CD-ROM .iso
images.
ix
Related Documentation
For the most up-to-date information on the Sun Fire™ X4100 server, go to this site:
http://www.sun.com/products-n-solutions/hardware/docs/Servers/
Workgroup_Servers/x4100/index.html
For the most up-to-date information on the Sun Fire X4200 server, go to this site:
http://www.sun.com/products-n-solutions/hardware/docs/Servers/
Workgroup_Servers/x4200/index.html
Information
Title and Format
Part Number
Safety information
Important Safety Information About Sun
Hardware (included in system box)
819- 7190
Safety notices and
international compliance
certification statements
Safety and Compliance Guide (PDF and HTML)
819- 1161
Server setup, including
rack installation
Setup Guide (included in system box, PDF, and
HTML)
819-1155
Pre-Installed Solaris 10
instructions
Sun Fire X4100 and Sun Fire X4200 Servers
Guide for Pre-Installed Solaris 10 Operating
System (PDF and HTML)
819-4153
Operating system
installation
Operating System Installation (PDF and HTML)
819-1158
System management
System Management (PDF and HTML)
819-1160
Server and software
setup
Setup and Maintenance Guide (PDF and HTML)
819-1157
Troubleshooting and
diagnostics
Troubleshooting Guide (PDF and HTML)
819-3284
Late-breaking
information and issues
Sun Fire X4100 and Sun Fire X4200 Server
Release Notes (PDF and HTML)
819-1162
Diagnostic software
SunVTS 6.0 User’s Guide (HTML)
817-7664
Diagnostic software
patch information
SunVTS 6.0 Patch Set Documentation Supplement
for x86 Platforms (HTML)
819-2948
Translated versions of some of these documents are available at the web sites described
above in French, Simplified Chinese, Traditional Chinese, Korean, Japanese, and German.
Note that the English documentation is revised more frequently and might therefore be
more up-to-date than the translated documentation.
x
Sun Fire X4100 and Sun Fire X4200 Servers Operating System Installation Guide • March 2006
Using UNIX Commands
This document might not contain information about basic UNIX® commands and
procedures such as shutting down the system, booting the system, and configuring
devices. Refer to the following for this information:
■
Software documentation that you received with your system
■
Solaris™ Operating System documentation, which is at:
http://docs.sun.com
Third-Party Web Sites
Sun is not responsible for the availability of third-party web sites mentioned in this
document. Sun does not endorse and is not responsible or liable for any content,
advertising, products, or other materials that are available on or through such sites
or resources. Sun will not be responsible or liable for any actual or alleged damage
or loss caused by or in connection with the use of or reliance on any such content,
goods, or services that are available on or through such sites or resources.
Preface
xi
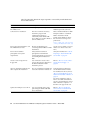
Typographic Conventions
Typeface*
Meaning
Examples
AaBbCc123
The names of commands, files,
and directories; on-screen
computer output
Edit your.login file.
Use ls -a to list all files.
% You have mail.
AaBbCc123
What you type, when contrasted
with on-screen computer output
% su
Password:
AaBbCc123
Book titles, new words or terms,
words to be emphasized.
Replace command-line variables
with real names or values.
Read Chapter 6 in the User’s Guide.
These are called class options.
You must be superuser to do this.
To delete a file, type rm filename.
* The settings on your browser might differ from these settings.
Sun Welcomes Your Comments
Sun is interested in improving its documentation and welcomes your comments and
suggestions. You can submit your comments by going to:
http://www.sun.com/hwdocs/feedback
Please include the title and part number of your document with your feedback:
Sun Fire X4100 and Sun Fire X4200 Servers Operating System Installation Guide, part
number 819-1158-14
xii
Sun Fire X4100 and Sun Fire X4200 Servers Operating System Installation Guide • March 2006
CHAPTER
1
Overview
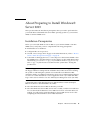
About Installing an Operating System on
a Sun Fire X4100 or Sun Fire X4200
Server
There are several supported operating system (OS) distributions and several ways to
install each. This topic is intended only as a general guide that refers you to detailed
procedures.
Prerequisites
You must complete the following prerequisite steps before you can begin the
installation.
■
Install the server hardware.
■
(Optional) Configure the service processor. (You can do this after installation if
you prefer.)
■
(Solaris only) Install and set up the software on the Resource CD.
■
(Linux only) Create a Driver CD or use the Sun Installation Assistant
(recommended procedure). See the topic about creating a Driver CD for your
particular Linux OS or the topics about the Sun Installation Assistant.
■
Gather needed information, such as IP address and netmask.
1
Things You Must Decide
In addition, you must decide the following.
■
Operating System
Notes
Solaris 10
The 64-bit version is supported.
Red Hat Linux
Both Red Hat Enterprise Linux 3 U5 and later (32-bit and 64-bit) and Red
Hat Enterprise Linux 4 U1 and later (64-bit) are supported.
SUSE Linux
SUSE Linux Enterprise Server 9 SP1 and later are supported.
Windows 2003
Server
Windows 2003 Server, Enterprise Edition 32/64-bit or Standard Edition
32/64-bit are supported.
■
Are you configuring the server for diskless booting?
Operating System
Relevant Documentation on Diskless Configurations
Solaris 10
See “About Solaris OS Installation” on page 5 or Solaris 10 Installation
Guide: Network-Based Installations at
http://docs.sun.com/app/docs/doc/817-5504
Red Hat Linux
See Red Hat Enterprise Linux System Administration Guide at
https://www.redhat.com/docs/manuals/enterprise/
SUSE Linux
See SUSE LINUX Enterprise Server 9 Administration Guide at
http://www.novell.com/documentation/oes/index.html?page
=/documentation/oes/sles_admin/data/front.html
■
2
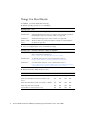
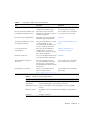
Which operating system are you installing?
Which installation method will you use?
Method
Solaris
Red Hat
SUSE
Windows
Preinstalled on disk
YES
NO
NO
NO
Install from distribution media (CD/DVD) on the
server
YES
YES
YES
YES
Install from distribution media (CD/DVD) via KVMS
YES
YES
YES
YES
Install from network using PXE
YES
YES
YES
YES
Sun Installation Assistant (Linux only)
NO
YES
YES
NO
Sun Fire X4100 and Sun Fire X4200 Servers Operating System Installation Guide • March 2006
Note – The Sun Fire X4100 or Sun Fire X4200 server supports industry-standard
KVMS via devices connected to it via a USB port or the ILOM Remote Console
application. For more information on setting up USB connections to your system, see
your server hardware documentation. For more information on setting up a remote
KVMS connection to your server via the ILOM Remote Console application, see the
Sun Fire X4100 or Sun Fire X4200 System Management Guide (819-1160).
For relevant procedures, see the appropriate chapter of this guide for your particular
OS.
■
Will you need to update the operating system and drivers?
In general, you need to perform updates once the operating system has been
installed. For details, see the appropriate chapter for your particular OS.
What Next
The sections in this guide provide detailed installation information—see the
appropriate chapter for your OS.
You should also gather the installation, administration, and configuration
documentation distributed with the operating system. These documents generally
accompany the distribution media as printed manuals, or else are included as PDF
files on the media itself. In many cases, the latest versions of such documents are
also downloadable from the web site of the OS vendor.
Chapter 1
Overview
3
4
Sun Fire X4100 and Sun Fire X4200 Servers Operating System Installation Guide • March 2006
CHAPTER
2
Solaris 10
About Solaris OS Installation
Note – This chapter contains instructions for installing the Solaris 10 operating
system from network or media. If you are configuring the preinstalled Solaris 10
operating system that is shipped with the server, refer to the Sun Fire X4100 or Sun
Fire X4200 Server Guide For the Preinstalled Solaris 10 Operating System (819-4153).
This chapter describes some of what you need to know to install the Solaris™
Operating System (Solaris OS) on a Sun Fire X4100 or Sun Fire X4200 server and
points you to the Solaris OS documentation for the more detailed information you
will need to complete the installation.
Overview
This Solaris release supports systems that use the SPARC and x86 families of
processor architectures: UltraSPARC, SPARC64, IA-32, AMD64.
The supported SPARC based systems are listed in the Solaris Sun Hardware
Platform Guide at http://docs.sun.com. The supported x86 based systems
appear in the Solaris Hardware Compatibility List at
http://www.sun.com/bigadmin/hcl. This document cites any implementation
differences between the platform types.
In this document the term “x86” refers to the Intel 32-bit family of microprocessors
and compatible 64-bit and 32-bit microprocessors made by AMD. For supported
systems, see the Solaris Hardware Compatibility List.
5
The minimum Solaris OS for a Sun Fire X4100 or Sun Fire X4200 server is Solaris 10
3/05 HW1 for the x86/x64 family of 64-bit and 32-bit AMD processors. The
recommended version to use is Solaris 10 1/06 U1. You can download or order the
media for Solaris 10 1/06 U1 at
http://www.sun.com/software/solaris/get.jsp
Solaris 10 3/05 HW1 might be preinstalled on the hard drive. Additional software is
shipped separately on a Resource CD. Contact your Sun service provider if you need
to order the Solaris OS or if you are missing the Resource CD.
For updates on Solaris 10 versions and hardware compatibility, go to
http://www.sunsolve.sun.com
Note – The Solaris 10 Operating System box contains the CD and DVD media and
documentation that you will need to install the Solaris OS software for both SPARC
and x86 platforms. For a Sun Fire X4100 or Sun Fire X4200 server, use the media for
x86 platforms.
The Sun Fire X4100 or Sun Fire X4200 server supports the following Solaris OS
installation methods:
■
Install one server from DVD or CD-ROM media interactively with the Solaris
installation program.
■
Install one or several servers over the network with Preboot Execution
Environment (PXE) technology and the following installation methods:
■
■
■
■
■
Solaris installation program over the network from remote DVD or CD images
JumpStart™ installation
Diskless boot
Install using a serial console
Boot from the preinstalled Solaris 10 OS image on the hard drive.
The Solaris Installation Program on the Solaris 10 Operating System media can be
run with a graphical user interface (GUI) or as an interactive text installer in a
console session. The Solaris Device Configuration Assistant is included in the Solaris
Installation Program.
Use TABLE 2-1 to identify the steps you need to perform to install the Solaris OS.
Note – This topic is intended for experienced system administrators who are
familiar with using the Solaris OS on an x86 platform.
6
Sun Fire X4100 and Sun Fire X4200 Servers Operating System Installation Guide • March 2006
TABLE 2-1
Task Map for Initial Solaris OS Installation
Task
Description
Instructions
Set up your server.
Install your server hardware and
configure the service processor.
Sun Fire X4100 or Sun Fire X4200
Server Setup Guide (819-1155)
Review the Sun Fire X4100 or Sun
Fire X4200 Server Release Notes.
The release notes contain latebreaking news about the Solaris OS
software and patches.
Sun Fire X4100 or Sun Fire X4200
Server Release Notes (819-1162)
Review the system requirements.
Verify that your server meets the
minimum system requirements.
TABLE 2-2
Gather the information you need
to install the Solaris OS.
The type of information you need
to collect depends on your
environment and the method you
choose to install the Solaris OS.
“About Solaris OS Installation” on
page 5
Locate the Solaris OS
documentation.
The Solaris OS documentation
included with your software
contains most of what you need to
know about installation.
“Where to Find Solaris 10
Information” on page 9
Install the Solaris OS.
Choose an installation method and
locate the installation instructions.
TABLE 2-3
Install additional software, if
necessary.
The Solaris OS drivers for the
server are bundled in the Solaris
OS. However, you may need to
install additional software from the
Resource CD.
Sun Fire X4100 or Sun Fire X4200
Server Release Notes (819-1162)
Install patches, if necessary.
Patches are available from the
SunSolve Patch Portal at:
http://www.sunsolve.sun.com
Sun Fire X4100 or Sun Fire X4200
Release Notes
TABLE 2-2
Minimum System Requirements
Requirement
Description
Hardware
requirements
The server hardware and the initial service processor configuration
must be installed before you install the Solaris OS.
Minimum Solaris OS
Solaris 10 3/05 HW1 for x86/x64 platforms or later compatible
versions.
Memory to install
256 Mbytes is the recommended size. 64 Mbytes is the minimum
size.
Disk space
12 Gbytes or greater.
Chapter 2
Solaris 10
7
TABLE 2-2
TABLE 2-3
Minimum System Requirements (Continued)
Requirement
Description
Swap area
512 Mbytes is the default size.
x86/x64 processor
requirements
x86/x64 120-MHz or faster processor is recommended. Hardware
floating point support is required.
BIOS
Industry standard x86/x64 BIOS (resident in FLASH). The BIOS
must be able to boot from CD or DVD media.
Installation Methods
Method
Description
Instructions
Install from DVD or
CD-ROM media.
Use the Solaris Installation Program on the CD or
DVD media to install one server interactively.
“How to Install the Solaris OS
From Distribution Media” on
page 13
Install from the
network by using
PXE.
You need a PXE installation to install the Solaris OS
over the network from remote DVD or CD images or
to automate the installation process and install several
systems with a JumpStart installation.
To boot over the network by using PXE, you need to
set up an install server and a DHCP server, and
configure the BIOS on each server to boot from the
network.
To set up for a PXE
installation, see “x86:
Guidelines for Booting with
PXE,” in the Solaris 10
Installation Guide: NetworkBased Installations
To boot by using PXE, see
“How to Boot a Server Over
the Network By Using PXE”
on page 11
Boot from the
preinstalled image.
Depending on your configuration, a Solaris OS image
may be preinstalled on a hard drive.
Solaris 10 Installation Guide:
Basic Installations
Install from a serial
console.
Use a serial console to install the Solaris OS in a PXEbased network installation.
“How to Use a Serial Console
to Install the Solaris OS” on
page 14
Perform a diskless
boot.
Boot the Solaris OS on a Sun Fire X4100 or Sun Fire
X4200 server without a hard drive. Use this method
with a PXE-based network installation.
“x86: Booting and Installing
Over the Network PXE,” in
the Solaris10 Installation Guide:
Network-Based Installations
Note – The Solaris OS provides additional programs for installation, such as
booting over a wide area network (WAN), but the Sun Fire X4100 or Sun Fire X4200
server supports only those methods listed in this topic.
8
Sun Fire X4100 and Sun Fire X4200 Servers Operating System Installation Guide • March 2006
Where to Find Solaris 10 Information
Solaris OS documentation is available from the web at: http://docs.sun.com/
Select Solaris 10 to display the list of documents in the Solaris 10 Documentation
Collection.
■
For the Solaris 10 installation guides, see
http://docs.sun.com/app/docs/coll/1236.1
■
For the Solaris 10 administration guides, see
http://docs.sun.com/app/docs/coll/47.16
■
For information about upgrading your system, see
http://docs.sun.com/app/docs/doc/817-5505
■
For troubleshooting information, see Appendix A at:
http://docs.sun.com/app/docs/doc/817-5504
Solaris 10 documentation is also available on the Solaris Documentation DVD
included with your Solaris OS software.
About Preparing to Install the Solaris OS
You need to gather information about your system before you install the Solaris OS.
The amount of planning and initial set up that you need to perform varies
depending on whether you are preparing for a local installation from DVD or CD, or
you are preparing for a Preboot Execution Environment (PXE)-based network
installation.
You also need to obtain the appropriate media for your installation.
Media
Title
DVD
Solaris 10 Operating System <version> DVD
CD-ROM
Solaris 10 Operating System <version> Software CDs
Solaris 10 HW1 Languages for x86 Platforms CD
Sun Fire X4100 or Sun Fire X4200 Resource CD
Patches
See the Sun Fire X4100 or Sun Fire X4200 Server Release Notes for
information about patches.
Chapter 2
Solaris 10
9
Installation Prerequisites
You must complete the following tasks before you install the Solaris OS.
1. Verify that your system meets the minimum system requirements.
See the System Requirements section in the related topic about Solaris OS
installation.
If you are using the Solaris Installation Program GUI or text installer, you need a
local DVD-ROM or CD-ROM drive or network connection, keyboard, and monitor.
For more information, see the Solaris 10 Installation Guide: Basic Installations.
2. Gather the information you need to install the Solaris OS.
See the “Checklist for Installation,” in Chapter 1, at
http://docs.sun.com/app/docs/doc/817-0544.
For a non-networked system, you need to know the host name of the system you are
installing and the language and the locales that you intend to use on the system.
For a networked system, use the checklist to gather the following information:
■
■
■
■
■
■
■
■
■
■
Host name of the system that you are installing
Language and locales that you intend to use on the system
IP address of the name server
Subnet mask
Type of name service (for example, DNS, NIS, or NIS+)
IP address of gateway
Domain name
Host name of the name server
IP address of the name server
Root password
3. If you are installing the Solaris OS over the network, you need to set up a PXEbased network installation before you install the Solaris OS.
For information about setting up a PXE-based network installation, see Solaris 10
Installation Guide: Network-Based Installations at
http://docs.sun.com/app/docs/doc/817-5504.
Note – Consult the appropriate platform guide that ships with Solaris 10 for
detailed information about remote installation via USB. If USB-based installation is
not supported, use PXE.
10
Sun Fire X4100 and Sun Fire X4200 Servers Operating System Installation Guide • March 2006
How to Boot a Server in a GRUB-Based
Environment
Starting with the Solaris 10 1/06 release, the open-source GNU Grand Unified
Bootloader (GRUB) has been implemented on x86-based systems that are running
the Solaris OS. GRUB is the boot loader that is responsible for loading a boot archive
into a system's memory. The boot archive contains the kernel modules and
configuration files that are required to boot the system. For more information on
GRUB, you can see the grub(5) man page.
For information on how to boot a Sun Fire X4100 or Sun Fire X4200 server that is
running Solaris 10 1/06 in a GRUB-based environment, refer to the Solaris 10 System
Administration Guide: Basic Administration, at this URL:
http://docs.sun.com/app/docs/doc/819-2379
How to Boot a Server Over the Network
By Using PXE
Use this procedure along with the instructions in Solaris 10 Installation Guide:
Networked-Based Installations.
The Sun Fire X4100 or Sun Fire X4200 server implements the Intel Preboot Execution
Environment (PXE) specification required for a PXE network boot. PXE technology
provides your server with the capability to boot the Solaris OS over the network
using the Dynamic Host Configuration Protocol (DHCP). Using a PXE-based
network installation, you can install the Solaris OS onto a server from the network
with remote CD or DVD images. You can also automate the installation process and
install the Solaris OS on several Sun Fire X4100 or Sun Fire X4200 servers using a
JumpStart scenario.
A PXE network boot is a direct network boot. No boot media is required on the Sun
Fire X4100 or Sun Fire X4200 client system.
Chapter 2
Solaris 10
11
Before You Begin
To boot over the network by using PXE, you first need to do the following:
1. Set up an install server.
2. Add the Sun Fire X4100 or Sun Fire X4200 clients to be installed.
3. Set up a DHCP server.
For instructions, see Step 1 below.
What to Do
1. Perform the tasks in “Guidelines for Booting with PXE,” located in Solaris 10
Installation Guide: Network-Based Installations, located at
http://docs.sun.com/app/docs/doc/817-5504.
If you have already set up the systems you need for a PXE boot, review the Task
Map to verify that you have performed all the steps.
2. Boot the server over the network by using PXE.
Complete the steps in Solaris 10 Installation Guide: Network-Based Installations at
http://docs.sun.com/app/docs/doc/817-5504. Follow the instructions on
the screen.
When the BIOS comes up, press F12 to tell the BIOS to perform a network boot from
the PXE server.
12
Sun Fire X4100 and Sun Fire X4200 Servers Operating System Installation Guide • March 2006
How to Install the Solaris OS From
Distribution Media
Use this procedure along with the instructions for x86 platforms in Solaris 10
Installation Guide: Basic Installations to install the Solaris OS onto a Sun Fire X4100 or
Sun Fire X4200 server from CD or DVD media. This procedure describes an
interactive installation using the Solaris Installation Program.
The Solaris Installation Program on the Solaris 10 Operating System media can be
run with a graphical user interface (GUI) or as an interactive text installer in a
console session. The GUI or command-line interface (CLI) uses wizard panels to
guide you step-by-step through installing the OS.
Note – Solaris 10 3/05 HW1 is preinstalled. You do not need to follow this
procedure unless you are installing a new OS version.
Before You Begin
Perform the tasks described in the Related topic about how to prepare for installing
the Solaris OS.
What to Do
1. Insert the Solaris 10 Operating System DVD or CD into your Sun Fire X4100 or
Sun Fire X4200 server.
2. Boot the system by shutting it down and then turning it off and on.
The server BIOS supports booting from a DVD or CD.
3. Continue the installation procedure by performing the steps in the procedure:
“x86: To Install or Upgrade with the Solaris Installation Program,” in Chapter 2 at
http://docs.sun.com/app/docs/doc/817-0544.
Start the procedure at Step 4. When prompted, answer the configuration questions to
complete the installation.
You can accept the default values on the screens to format the entire hard disk, use
auto-layout file systems, and install a preselected set of software. Or, you can
customize the installation to modify the hard disk layout, modify a Solaris fdisk
partition, and select the software that you want to install.
Chapter 2
Solaris 10
13
How to Use a Serial Console to Install the
Solaris OS
The Solaris text installer enables you to type information in a terminal or a console
window to interact with the Solaris OS Installation Program. Use this procedure to
use a serial console to install the Solaris 10 OS on a Sun Fire X4100 or Sun Fire X4200
server with a PXE-based network installation.
Before You Begin
Before you set up the serial console, you need to set up the following systems for a
PXE-based network installation:
■
■
An install server
A DHCP server
To set up these systems, see Solaris 10 Installation Guide: Network-Based Installations at
http://docs.sun.com/app/docs/doc/817-5504.
14
Sun Fire X4100 and Sun Fire X4200 Servers Operating System Installation Guide • March 2006
What to Do
To use a serial console to install the Solaris OS, do the following.
Note – For Steps 1 through 3, see Solaris 10 Installation Guide: Network-Based
Installations at http://docs.sun.com/app/docs/doc/817-5504.
1. Connect a terminal to the serial port on the service processor.
A terminal can be a VT100, a PC running terminal emulation, or a terminal server.
2. Set the terminal to receive at 9600 baud.
3. Add an x86 install client to an install server and specify a boot device to use
during the installation.
If you specify the boot device when you set up the install client, you are not
prompted for this information by the Device Configuration Assistant during the
installation.
The examples below use the following values:
■
Client IP address: 00:07:e9:04:4a:bf
■
Server IP address (GRUB only): 192.168.0.123
■
Client macro name (GRUB only): 01000039FCF2EF
Use the commands specified in the examples below for the operating system version
that you are using:
■
For a Solaris 10 3/05 HW1 system:
# cd /export/boot/Solaris_10/Tools
# ./add_install_client -d -e "00:07:e9:04:4a:bf" \
-b "console=ttya" \
-b "bootpath=/pci@0,0/pci1022,7450@1/pci8086,1011@1" i86pc
■
For Solaris 10 1/06 or later system with GRUB booting:
# cd /export/boot/Solaris_10/Tools
# ./add_install_client -d -e "00:07:e9:04:4a:bf" i86pc
# dhtadm -A -m 01000039FCF2EF \
-d ":BootSrvA=192.168.0.123:BootFile=01000039FCF2EF:"
# pntadm -f 01 -A $CLIENT_IP -i 01000039FCF2EF \
-m 01000039FCF2EF $CLIENT_NET
Chapter 2
Solaris 10
15
Note – See the man pages for these commands for more information on the
commands and options.
4. Log in to the service processor as an Administrator.
5. Type this command to use the serial console:
start /SP/console
6. Boot the Sun Fire X4100 or Sun Fire X4200 server.
Follow the instructions in Solaris 10 Installation Guide: Network-Based Installations at:
http://docs.sun.com/app/docs/doc/817-5504. When prompted, use the
following setting:
To boot via PXE, press F12 at the BIOS.
7. After the system is installed, log in to the system and use the eeprom command to
change bootenv.rc:
eeprom input-console=ttya
16
Sun Fire X4100 and Sun Fire X4200 Servers Operating System Installation Guide • March 2006
CHAPTER
3
Sun Installation Assistant CD
About the Sun Installation Assistant CD
Note – The Sun Installation Assistant CD can be used remotely with the ILOM
Remote CD-ROM feature and the Remote Console Application. For more details, see
the topic that describes the Remote Console application.
The Sun™ Installation Assistant CD helps you to install a supported Linux operating
system (OS) on your Sun Fire X4100 or Sun Fire X4200 server. It provides a set of
Sun-supported drivers that have been tested for quality assurance.
By using the Sun Installation Assistant CD, you can install the operating system, the
appropriate drivers, and additional software on your system. The Sun Installation
Assistant eliminates the need to create a Driver CD.
Note – The Sun Installation Assistant CD does not automate the OS installation
process. You will still need to follow the procedures provided in the Help topics
about Red Hat Enterprise Linux and SUSE Linux Enterprise Server 9 installation, but
you will not need to create a Driver CD. The Sun Installation Assistant automatically
installs the Sun-supported drivers.
The Sun Installation Assistant performs the following tasks:
■
■
■
Identifies the hardware on your system.
Installs the operating system.
Identifies and installs drivers and platform-specific software.
The use of the Sun Installation Assistant CD is optional but is provided to make the
installation of Linux easier for the user.
17
Error Messages
If the Sun Installation Assistant encounters an error or an unexpected condition, it
will generate an error message. You might encounter a number of straightforward
error messages such as the following:
You have inserted Disc 3 but the system requires Disc 2. Please insert
Disc 2.
You might also attempt to use the Sun Installation Assistant with versions of Linux
that are not supported. In that case you might see error messages such as the
following:
The media you have provided is not a release that is supported by Sun
Microsystems, Inc. on this platform. You cannot use the Sun
Installation Assistant to install this product and associated
software.
In this case, choose one of the following options:
■
To install a supported product, click Back and then insert the appropriate media.
■
To install this unsupported product, click Exit to exit the Sun Installation
Assistant and reboot the system. You can now install the unsupported product as
you normally would.
Log File
A log file of the Sun Installation Assistant is written to the /root directory of the
newly installed system.
To review this log file, refer to the file /root/SunInstallationAssistant.log.
18
Sun Fire X4100 and Sun Fire X4200 Servers Operating System Installation Guide • March 2006
How to Use the Sun Installation
Assistant
This procedure explains how to use the Sun Installation Assistant to install Linux on
your server.
Note – The Sun Installation Assistant does not automate the OS installation process.
However, you will not need to create a driver CD because the Sun Installation
Assistant automatically installs the Sun supported drivers. Once the installation is
complete, you will return to the Sun Installation Assistant screen.
The Sun Installation Assistant can be booted from either the server’s CD-ROM,
remote KVM with CD-ROM redirection or via a PXE network boot. Instructions for
configuring PXE network boot can be found in the topic that describes how to
configure the Sun Installation Assistant for PXE boot. In the steps below that
mention booting from the CD-ROM, simply substitute selecting network boot.
Media for the Linux system to be installed can be either a network image or a CDROM. Installation from a network image on a LAN is significantly faster to install.
Before You Begin
Installing the Sun Installation Assistant software consists of the following
procedures:
1. Boot the Sun Installation Assistant via the local CD, remote KVM with CD-ROM
redirection, or via PXE booting the images contained on the CD.
2. Follow the prompts to provide the media or network image from which to install
Linux.
See the Help topic about how to update the operating system and drivers.
Chapter 3
Sun Installation Assistant CD
19
What to Do
To use the Sun Installation Assistant, do the following.
1. Insert the Sun Installation Assistant CD into the server’s CD/DVD drive, use PXE
booting, or use the remote KVM with CD-ROM redirection. See the topic that
describes how to PXE boot or how to start and stop CD-ROM drive redirection.
2. Power on or reboot the server.
Your server boots the Sun Installation Assistant. This can take a few minutes. The
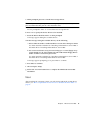
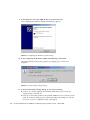
first screen that appears is the Software License Agreement screen.
3. Read through the terms of the agreement.
You must scroll to the bottom of the license text window to make active the Accept
radio button.
■
If you agree, select the Accept radio button and click Next to continue. (The Next
button becomes active only when you select the Accept radio button.) The
Welcome screen now appears with an introduction to the Sun Installation
Assistant.
■
If you do not agree, select the Decline radio button and click Exit to close the Sun
Installation Assistant. The system then prompts you to reboot the server.
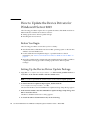
4. On the Welcome screen, click Next.
The Welcome screen explains what the Sun Installation Assistant will do. Click Next
to proceed.
5. Enable networking.
If you want to use an HTTP or FTP install image, select Yes to bring up the Ethernet
interface to reach that network install image. Select No to install from CD-ROM, and
skip to Step 7.
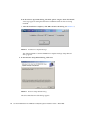
6. Configure networking.
Answer questions for the IP configuration and click Next. The Assistant now
identifies the hardware on which it is running and scans for any SCSI devices, as the
following example shows:
Identifying hardware... identified as Sun Fire X4100.
Scanning for SCSI devices... done.
It will then automatically proceed to the next screen.
7. Select installation method.
Select whether you want to install the Linux distribution from CD, HTTP, or FTP. If
the network has not been enabled yet and you select HTTP or FTP, you will be
prompted to enable the network.
20
Sun Fire X4100 and Sun Fire X4200 Servers Operating System Installation Guide • March 2006
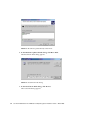
8. Provide installation media.
Installing from HTTP or FTP:
If you selected network installation, you will be prompted to supply the URL of the
network image to install from. For example:
http://host.name/path/to/install/image
http://ip.address/path/to/install/image
ftp://host.name/path/to/install/image
ftp://ip.address/path/to/install/image
Installing from CD:
The Assistant now identifies the hardware on which it is running and scans for any
SCSI devices. It will then eject the Sun Installation Assistant CD and display a list of
supported Linux distributions. This list of distributions is specific to the server
hardware.
The Sun Fire X4100 or Sun Fire X4200 server supports the following Linux
distributions:
■ Red Hat Linux 3.0 Update 5 and later updates, 32-bit and 64-bit
■ Red Hat Linux 4.0 Update 1 and later updates, 64-bit
■ SUSE Linux Enterprise Server 9 SP1 and later SPs, 64-bit
Insert Disc 1 for one of the supported distributions into the server’s CD/DVD drive.
Note – To install SLES9 SP1, insert the SLES9 CD 1 first. You will be prompted to
insert the SP1 CD after the SLES9 installation is complete.
Note – For the administrator’s convenience, the CD-ROM redirection feature of the
SP can be used. See the topic that describes how to start and stop CD-ROM drive
redirection.
Note – You must supply the OS media on the same CD-ROM as you booted the Sun
Installation Assistant.
9. Click Next.
The Assistant identifies the Linux distribution, as the following example shows:
Identifying distribution... identified as Red Hat Enterprise Linux 4
Update 1 AS - 64bit.
Note – If you provide an unsupported media, you will see an error message.
Chapter 3
Sun Installation Assistant CD
21
10. Click Next to start the installer for this distribution.
The installation software specific to the version of Linux that you are installing now
takes over.
11. Proceed through the installer screens.
12. After the installation is complete, the Sun Installation Assistant installs RPMs for
the Linux OS kernel(s) that you have just installed.
The Assistant installs only those RPMs for your specific Linux OS kernel.
Note – This operation replaces the steps for manually upgrading the drivers for
your server, as outlined in the Help topics that describe how to update the drivers.
13. Verify that the correct software has been installed.
The final screen identifies additional software that is installed, as the following
example shows:
The Red Hat Enterprise Linux 4 Update 1 AS - 64bit installation has
completed.
Installing Sun Fire X4100 drivers... completed.
The installation has completed.
Note – You will be prompted to insert the SLES9 SP1 CD from this screen before the
drivers are installed. Installing the patches from the SP1 CD will take a few minutes.
14. Click Reboot to reboot the server with the newly installed operating system.
22
Sun Fire X4100 and Sun Fire X4200 Servers Operating System Installation Guide • March 2006
How to Configure the Sun Installation
Assistant for PXE Boot
This procedure explains how to configure a Preboot Execution Environment (PXE) to
boot the Sun Installation Assistant on your server.
What Do
Note – This section presumes the user is already familiar with configuring a PXE
boot server. The following information is relevant to adding the Sun Installation
Assistant boot target on an existing PXE boot server.
Configuring the Sun Installation Assistant software for PXE boot consists of the
following procedures:
1. Preconfigure your network to support PXE as described in Appendix A.
2. Create a new subdirectory in the PXE Linux directory for the Sun Installation
Assistant images.
# mkdir /home/pxeboot/suninstall
3. Insert the Sun Installation Assistant CD into the PXE server CD drive and mount
the CD.
4. Copy the vmlinuz and initrd files from the CD to the PXE Linux directory. Use
the correct path to the mounted CD image. This example uses /mnt/cdrom.
# cp /mnt/cdrom/boot/isolinux/vmlinuz /home/pxeboot/suninstall
# cp /mnt/cdrom/boot/isolinux/initrd.img /home/pxeboot/suninstall
5. Add the Sun Installation Assistant to the PXE configuration file. Enter the
following lines to /home/pxeboot/pxelinux.cfg/default:
Chapter 3
Sun Installation Assistant CD
23
Note – Type the text block from append through netboot as one continuous string
with no returns.
default suninstall
label suninstall
kernel vmlinuz
append initrd=initrd.img vga=0x314 ramdisk_size=400000 root=
/dev/ram netboot
6. Unmount and remove the CD.
Booting the Sun Installation Assistant From the PXE Server
1. Connect the Sun Fire X4100 or Sun Fire X4200 server to the same network as the
PXE server and power on the system.
2. Press the F12 key on your system while it is initializing to start a network boot.
The system will attempt to get an IP address from the DHCP server.
3. Press the F8 key to begin the downloading of the PXE boot image.
4. When you are prompted at the boot: prompt, type in suninstall.
5. The Sun Installation Assistant image downloads onto your system. You can
continue with the installation as described in“How to Use the Sun Installation
Assistant” on page 19.
24
Sun Fire X4100 and Sun Fire X4200 Servers Operating System Installation Guide • March 2006
CHAPTER
4
Red Hat Enterprise Linux
About Red Hat Enterprise Linux
Installation
If you have installed Red Hat Enterprise Linux software on other Intel or AMD
Opteron servers, you are already familiar with how to install it on a Sun Fire X4100
or Sun Fire X4200 server. The two most common methods to install Red Hat
Enterprise Linux on your server are:
■
Installation from your Red Hat Enterprise Linux distribution media
■
Automatic kickstart installation from Red Hat Enterprise Linux software
(installation tree) stored on a Preboot Execution Environment (PXE) network
server
Note – The Sun Installation Assistant is a convenient, front-end application
designed to assist you in installing Red Hat Enterprise Linux on your server. The
Sun Installation Assistant supplements the standard installation utilities and
procedures that ship with Red Hat Enterprise Linux; it does not replace them.
25
Red Hat Installation and Administration
Documentation
Before you install the Red Hat Enterprise Linux software on a Sun Fire X4100 or Sun
Fire X4200 server, consult the following Red Hat Enterprise Linux documentation.
Document
Description
Where to Find
README file
Contains late-breaking information
about system requirements and
system configuration for your
version of the Red Hat Enterprise
Linux software.
On the Red Hat Enterprise Linux CD 1,
and online from
http://www.redhat.com/docs/
Red Hat Enterprise Linux Quick
Installation Guide
Brief printed guide containing
useful information to assist you
during the installation of Red Hat
Enterprise Linux.
Included with the Red Hat Enterprise
Linux distribution media
Red Hat Enterprise Linux
Installation Guide
Full version of the printed Quick
Installation Guide.
Included on the Red Hat
Documentation CD, and available for
download from
http://www.redhat.com/docs/
Red Hat Enterprise Linux
Introduction to System
Administration
Introductory information for Red
Hat Enterprise Linux system
administrators.
Available for download from
http://www.redhat.com/docs/ma
nuals/enterprise/
Red Hat Enterprise Linux
System Administration Guide
Information on customizing the
Red Hat Enterprise Linux
software.
Available for download from
http://www.redhat.com/docs/ma
nuals/enterprise/
System Administration for
Diskless Booting
Information on configuring your
server and Red Hat Linux for
diskless booting.
Available for download as the Red Hat
Enterprise Linux Installation Guide for the
x86, Itanium™, and AMD64
Architectures at
http://www.redhat.com/docs/ma
nuals/enterprise/
Red Hat Enterprise Linux
Security Guide
Guide for securing the Red Hat
Enterprise Linux software.
Available for download from
http://www.redhat.com/docs/ma
nuals/enterprise/
26
Sun Fire X4100 and Sun Fire X4200 Servers Operating System Installation Guide • March 2006
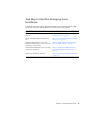
Task Map for Red Hat Enterprise Linux
Installation
Consult the following table to determine which topics documented in this Help
system are relevant to the installation tasks that you want to perform.
Installation Task (Goal)
Relevant Topic
Collect information about your system and
network.
“About Preparing to Install Red Hat
Enterprise Linux” on page 28
Create a Red Hat Enterprise Linux driver
CD.
“How to Create a Red Hat Enterprise Linux
Driver CD” on page 29
Install Red Hat Enterprise Linux from
distribution media using a local or networkattached CD or DVD drive.
“How to Install Red Hat Enterprise Linux
From Distribution Media” on page 31
Update Red Hat Enterprise Linux operating
system files and drivers.
“How to Update the Red Hat Enterprise
Linux Operating System and Drivers” on
page 33
Run the Sun Installation Assistant.
“How to Use the Sun Installation Assistant”
on page 19
Chapter 4
Red Hat Enterprise Linux
27
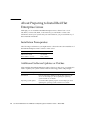
About Preparing to Install Red Hat
Enterprise Linux
Although you can install the Red Hat Enterprise Linux software from a local
CD/DVD, a remote CD/DVD, or the network, you will need to collect some
information about your system and your network before you proceed with any of
these installation methods.
Installation Prerequisites
The following is information you might need to collect relevant to the installation of
the Red Hat Enterprise Linux software on the server.
Item to Verify
Value
DHCP server name
servername
MAC address of server
MAC_address
Additional Software Updates or Patches
After installing the Red Hat Enterprise Linux software on the server, you might also
need to update your system software with the following patches and packages.
28
Patch or Software Package
Explanation
SCSI drivers
Download the driver RPMs from the product pages for the
server. See the Help topic about updating the operating
system and drivers for details.
Operating system update
Use the Red Hat up2date program. See the Help topic about
updating the operating system and drivers for details.
Sun Fire X4100 and Sun Fire X4200 Servers Operating System Installation Guide • March 2006
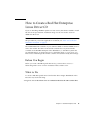
How to Create a Red Hat Enterprise
Linux Driver CD
If you are installing a RHEL 4 Update 2 or later version, the drivers needed to install
the OS are incorporated into installation image. You do not need to create an
additional driver CD.
Note – The Sun Installation Assistant automatically installs this driver. You can skip
this procedure if you use that application. For details, see “How to Use the Sun
Installation Assistant” on page 19.
The LSISAS1064 SCSI controller on your Sun Fire X4100 or Sun Fire X4200 server is
new to the market. The driver for that SCSI controller has not yet been made
available on the Red Hat Enterprise Linux distribution, so Sun Microsystems has
provided the driver on its Resource CD. To install this driver on your server, you
must create a Red Hat-specific CD that contains an installation-ready driver image.
Before You Begin
Before you create a Red Hat-specific Driver CD, you must have access to a
functioning Linux server or Linux workstation that can burn a CD.
What to Do
To create a Red Hat-specific Driver CD from the driver images distributed on the
Resource CD, do the following.
1. Log in as root to the Linux server or workstation that has the CD recorder drive.
Chapter 4
Red Hat Enterprise Linux
29
2. Determine the name of the recordable CD drive. Do one of the following:
■
If the recordable CD drive is an IDE (ATAPI) drive, type:
# cdrecord -scanbus dev=ATAPI
The system reports the names of matching devices:
scsibus0:
0,0,0 0) ’SAMSUNG ’’CDRW/DVD SM-352F’’T900’Removable CD-ROM
0,1,0 1) *
0,2,0 2) *
In this example, the name of the IDE CD device is ATAPI:0,0,0.
■
If the recordable CD drive is a SCSI drive, type:
# cdrecord -scanbus
The system reports the names of matching devices:
scsibus4:
4,0,0 0) ’SONY’’DVD RW DRU-530A’’1.0e’Removable CD-ROM
4,1,0 1) *
4,2,0 2) *
In this example, the name of the SCSI CD device is 4,0,0.
3. Insert the Resource CD into the local system CD drive.
4. Mount the CD. Type:
# mount /dev/cdrom /mnt/cdrom
5. Copy the driver image to the local /tmp directory. Type:
Note – The driver disk image in this step depends on the version of Red Hat
Enterprise Linux you are attempting to install. The example shows Red Hat
Enterprise Linux 3 32-bit version. For Red Hat Enterprise Linux 3 64-bit versions,
use -/mnt/cdrom/support/update_media/rhel3/64/driverUpdate.iso.
For Red Hat Enterprise Linux 4 64-bit versions, use
-/mnt/cdrom/support/update_media/rhel4/64/driverUpdate.img.
# cp /mnt/cdrom/support/update_media/rhel3/32/driverUpdate.img
/tmp
6. Unmount the Resource CD. Type:
# umount /mnt/cdrom
7. Insert a blank CD-R disc into the CD recorder drive.
30
Sun Fire X4100 and Sun Fire X4200 Servers Operating System Installation Guide • March 2006
8. Create the Driver CD. Type:
# cdrecord dev=drivename /tmp/driverUpdate.img
Where drivename is the device name of the CD recorder you obtained in Step 2.
Note – If you use a program other than cdrecord, it might warn you that
driverUpdate.img is not a valid file. You can ignore this warning.
9. Remove the newly created CD from the CD recorder when the recording process
is complete and the CD recorder ejects the CD.
Note – Use this Red Hat-specific Driver CD when you install the Red Hat Enterprise
Linux software from the Red Hat distribution media.
How to Install Red Hat Enterprise Linux
From Distribution Media
Red Hat Enterprise Linux provides both a text mode and an easy-to-use graphical
interface for installing and configuring the operating system. You can select the
interface that you want to use from the boot prompt, and both options are shown
later in this section.
Before You Begin
Installing Red Hat Enterprise Linux software from CDs consists of the following
procedures:
If you are using RHEL 4 Update 2 or later version, you do not need to do
Procedure 1. Proceed to Procedure 2.
1. If necessary, create the Enterprise Driver CD or use the Sun Installation Assistant
CD.
See the “How to Create a Red Hat Enterprise Linux Driver CD” on page 29 or
“How to Use the Sun Installation Assistant” on page 19.
Chapter 4
Red Hat Enterprise Linux
31
2. Install the Red Hat Enterprise Linux software.
3. Update the Red Hat Enterprise Linux software.
See “How to Update the Red Hat Enterprise Linux Operating System and
Drivers” on page 33.
Required Items
Installation from distribution media requires the following items:
■
Sun Fire X4100 or Sun Fire X4200 server equipped with:
■
■
■
DVD-ROM drive
USB keyboard and mouse
Monitor
■
Red Hat Enterprise Linux media CD set
■
Driver CD
You create this yourself. See the Help topic about how to create a Red Hat Enterprise
Linux Driver CD.
What to Do
To perform a basic installation from local media, do the following.
1. Insert the Red Hat Enterprise Linux Distribution CD 1 into the local DVD/CD
drive on the Sun Fire X4100 or Sun Fire X4200 server.
2. Power on the system.
The server will boot off of the CD and display a boot: prompt.
3. Select one of the following installation methods at the boot prompt:
■
For text mode: Type the following command:
boot: linux dd
■
For graphical mode: Press Enter.
The installer starts, and prompts you for a driver disk with the following message:
Do you have a driver disk?
The installer then prompts you to Insert your driver disk into /dev/hda and press
Ok.
4. Eject the Red Hat Enterprise Linux Distribution CD 1.
32
Sun Fire X4100 and Sun Fire X4200 Servers Operating System Installation Guide • March 2006
5. If necessary insert the Red Hat Enterprise Linux Driver CD.
This is the CD you created earlier. See “How to Create a Red Hat Enterprise Linux
Driver CD” on page 29.
6. Select Ok.
The installer loads the updated mptbase and mptscsih drivers needed to access the
hard drives. When the installer is finished loading the drivers, it prompts with Do
you have any more driver disks?.
7. Select No and remove the Red Hat Enterprise Linux Driver CD from the system.
8. Refer to the Red Hat Enterprise Linux Installation Guide to guide you through the
remainder of the installation process.
What Next
See “How to Update the Red Hat Enterprise Linux Operating System and Drivers”
on page 33.
How to Update the Red Hat Enterprise
Linux Operating System and Drivers
This procedure describes how to update the Red Hat Enterprise Linux operating
system and drivers.
Before You Begin
Since software is constantly being updated, your distribution media might not
contain the most up-to-date versions of the operating system. In addition, the kernel
that is installed on the system might not contain the proper SCSI drivers that the
server requires. Updating the drivers helps ensure proper system operation.
The following two procedures assume that you have already installed the Red Hat
Enterprise Linux software on the Sun Fire X4100 or Sun Fire X4200 server. These
procedures explain how to update that Red Hat Enterprise Linux installation with
the latest OS and driver software.
Chapter 4
Red Hat Enterprise Linux
33
What to Do
Updating the Red Hat Enterprise Linux Software
Follow these steps to update the operating system software.
1. Set up the up2date program on the server.
Refer to the documentation included with your Red Hat Enterprise Linux media kit
for details.
2. Run the up2date program.
Select the kernel packages in the available package updates section.
Caution – Do not reboot the server after running the up2date program. If the
server is rebooted before you installed the updated SCSI driver, the server might not
function properly upon restart.
3. If necessary, After you have finished running up2date, proceed to the next section
to update the SCSI drivers before rebooting the server.
Note – If you did reboot the system after updating the kernel and before updating
the SCSI drivers, the system might fail to boot and you must boot from the
installation media in rescue mode by typing linux rescue at the installation boot
prompt. For more information, see the Red Hat Enterprise Linux System Administration
Guide located at http://www.redhat.com/docs/manuals/enterprise/
Updating the SCSI Drivers
Note – If you are installing RHEL 4 Update 2 or later version, you do not need to
update the SCSI drivers.
This procedure describes how to copy the latest drivers from the Resource CD. You
can also download the driver RPMs from the product page for the Sun Fire X4100 or
Sun Fire X4200 server:
http://www.sun.com/servers/entry/x4100/downloads.jsp
34
Sun Fire X4100 and Sun Fire X4200 Servers Operating System Installation Guide • March 2006
1. Determine which kernel is currently installed on the system. Type the following
command:
# rpm -qa --qf="%{name}-%{version}-%{release}.%{arch}\n" | grep
^kernel
The following is an example of the output you might get:
kernel-2.4.21-32.EL.athlon
kernel-smp-2.4.21-32.EL.athlon
This example shows the 2.4.21-32.EL.athlon kernel.
2. Insert the Resource CD into the server’s DVD-ROM drive.
3. Mount the CD and locate the SCSI drivers by typing the following commands:
# mount /dev/cdrom /mnt/cdrom
# cd /mnt/cdrom/support/drivers/rhel3/32/
Note – The above command assumes that you are running Red Hat Enterprise
Linux 3 32-bit. If you are running Red Hat Enterprise Linux 3 64-bit or Red Hat
Enterprise Linux 4 64-bit, use the following different paths to the drivers. For Red
Hat Enterprise Linux 3 64-bit, use: /mnt/cdrom/support/drivers/rhel3/64.
For Red Hat Enterprise Linux 4 64-bit, use:
/mnt/cdrom/support/drivers/rhel4/64.
4. Determine which driver RPMs correspond to the installed kernel.
The file names of the RPMs contain the kernel version and type. Using the example
kernel versions shown above, the appropriate SCSI (mptlinux) drivers would be:
mptlinux-2.06.16_2.4.21_32.EL-rhel3_1.athlon.rpm
mptlinux-smp-2.06.16_2.4.21_32.EL-rhel3_1.athlon.rpm
5. Type the following command to install the driver RPM files:
# rpm -Uvh /mnt/cdrom/support/drivers/rhel3/32/mptlinux-drivers.rpm
Where mptlinux-drivers.rpm refers to the appropriate SCSI driver RPM files
determined in the previous step.
Note – Be sure to pick the correct architecture of the driver for the kernel you are
running. For example, if you are running the i686 kernel, be sure to choose the
correct driver RPM that ends with .i686.rpm.
6. After successful installation, reboot the system by typing:
# reboot
Chapter 4
Red Hat Enterprise Linux
35
How to Install the Red Hat Enterprise
Linux OS Using the Remote Console
Application
This topic explains how to install the Red Hat Enterprise Linux operating system on
your server using the ILOM Remote Console application.
What to Do
Use the following procedure to install the Red Hat Enterprise Linux 4 OS using the
ILOM Remote Console application.
1. Locate your Red Hat Enterprise Linux installation CD/DVD or the equivalent iso
images.
Note – The Remote Console application can redirect iso images.
2. Locate the appropriate LSISAS DriverUpdate.iso file from the resource CD.
Check the directory /support/drivers/rhel3/32/,
/support/drivers/rhel3/64/, or /support/drivers/rhel4/64/ on the
resource CD.
Note – This driver disk image can be written to a floppy disk or left as an image file
because the Remote Console application can redirect a floppy image. If your hard
drive is not displayed during the Red Hat installation process, verify that this driver
disk was recognized during Red Hat boot.
3. Connect to the ILOM Service Processor web GUI.
See the topic that describes how to log in to and out of the Sun ILOM web GUI.
4. Choose the Remote Control—Redirection tabs to start the Remote Console
application.
See the topic that describes how to launch the Remote Console application.
5. Start keyboard and mouse redirection.
See the topic that describes how to redirect keyboard, video, mouse, or storage
devices.
36
Sun Fire X4100 and Sun Fire X4200 Servers Operating System Installation Guide • March 2006
6. Start CD/DVD redirection.
There are two choices of redirection type, either to redirect a CD-ROM drive using
the Devices menu and to insert either installation CD 1 into the redirect CD-ROM
drive, or to redirect CD-ROM images using the Devices menu. Select disk 1 iso
image when prompted.
7. Start floppy drive redirection.
There are two choices of redirection type, either to redirect a floppy drive using the
Devices menu and to insert the driver disk floppy into the redirect floppy drive, or
to redirect floppy images using the Devices menu. Select driver image when
prompted.
8. Power on the server using the ILOM web GUI.
See the topic that describes how to control power on the host server.
9. Press F2 to enter BIOS Setup and set the BIOS boot device to use AMI Virtual
CDROM, or press F8 and select AMI Virtual CDROM when prompted.
10. When the boot prompt appears, type linux dd.
11. When prompted for the driver disk, select Yes.
12. When prompted for the driver disk source, select sda.
13. After the driver is done loading, select No when asked for additional driver.
14. When prompted for testing the CD media before installation, select Skip if you do
not want the media test to run.
15. Proceed with Red Hat OS installation as usual.
Chapter 4
Red Hat Enterprise Linux
37
Red Hat Enterprise Linux and PXE
About Red Hat Enterprise Linux and PXE
The network interface card (NIC) in your Sun Fire X4100 or Sun Fire X4200 server
supports the Preboot Execution Environment (PXE) network booting protocol. The
system BIOS and network interface BIOS on your server automatically query the
network for a DHCP server. If that DHCP server on the network has been configured
to support the PXE protocol and PXE image servers on the same network, then the
BIOS on your system can be used to install a bootable Red Hat Enterprise Linux
image on your server. PXE is a powerful and convenient solution for setting up a
number of Sun Fire X4100 or Sun Fire X4200 servers so their configuration is
identical.
Task Map
To take advantage of Red Hat Enterprise Linux and PXE on your network, you need
to perform the following tasks.
Task
Related Help Topic
Set up your Linux network and PXE server.
See Appendix A.
Install Red Hat Enterprise Linux images on
that PXE server.
“How to Create a PXE Install Image on the
PXE Server” on page 38
Configure your server to install from a Red
Hat Enterprise Linux image on a PXE server.
“How to Install Red Hat Enterprise Linux
From a PXE Server” on page 41
How to Create a PXE Install Image on the PXE
Server
This procedure describes how to create a Preboot Execution Environment (PXE)
install image on the same server that is your DHCP server, so that it will also act as
your PXE server. The PXE server provides the operating system files to your PXE
client.
38
Sun Fire X4100 and Sun Fire X4200 Servers Operating System Installation Guide • March 2006
Note – If you are installing RHEL 4 Update 2 or later version, you do not need to
complete the steps that refer to installing the drivers.
Before You Begin
Before you install a Red Hat Enterprise Linux image on your PXE server, you must
configure your Linux network to support PXE images. See Appendix A for
instructions on preconfiguring your network to support PXE installations of Red Hat
Enterprise Linux.
Required Items
The PXE installation procedure requires the following items:
■
■
■
A CD/DVD drive on the DHCP Server
Red Hat Enterprise Linux media CD set
Resource CD
What to Do
To create a Red Hat Enterprise Linux image on your PXE server, do the following.
1. Insert the Resource CD into the CD/DVD drive of the DHCP/PXE server.
2. Type the following commands to copy the Sun support files from the CD to the
/tmp directory on your DHCP/PXE server:
Note – The compressed tar file that is used in this step depends on which Red Hat
Enterprise Linux you are creating an install image. The remainder of the instructions
will assume that Red Hat Enterprise Linux 3 32-bit is being used. Modify the
example based on the version you are using. For Red Hat Enterprise Linux 3 32-bit,
use rhel3_32-pxefiles.tar.gz, for Red Hat Enterprise Linux 64-bit, use
rhel3_64-pxefiles.tar.gz, for Red Hat Enterprise Linux 4 64-bit, use
rhel4_64-pxefiles.tar.gz.
# mount /dev/cdrom /mnt/cdrom
# cp -a /mnt/cdrom/support/pxeboot/rhel3_32-pxefiles.tar.gz /tmp
# cd /tmp
# tar -zxvf rhel3_32-pxefiles.tar.gz
# umount /mnt/cdrom
Chapter 4
Red Hat Enterprise Linux
39
3. Set up the directory structure that will hold the Red Hat Enterprise Linux
software. Type:
Note – You can use a different target directory than the /home/pxeboot/rhel3_32/
directory shown below. The examples in this procedure use this directory.
# mkdir -p /home/pxeboot/rhel3_32/
4. For each Red Hat Enterprise Linux Distribution CD, type the following
commands to copy the contents of the Distribution CD to the appropriate PXE
target subdirectory:
# mount dev/cdrom /mnt/cdrom
# cp -a /mnt/cdrom/* /home/pxeboot/rhel3_32/
# umount /mnt/cdrom
Eject and insert Red Hat Enterprise Linux CDs only when the CD/DVD drive is
unmounted.
5. Copy the kickstart file ks.cfg to your PXE server. Type:
# cp /tmp/rhel3_32-pxefiles/ks.cfg /home/pxeboot/rhel3_32/
The kickstart configuration file contains a configuration that might not be optimal
for your operating environment. Modify the file as necessary to suit your
environment.
6. Copy the initial ramdisk from the PXE files uncompressed in Step 2 into the base
of the PXE image. Type:
# cp /tmp/rhel3_32-pxefiles/initrd.img /home/pxeboot/rhel3_32/
7. If necessary, copy the updated SCSI driver RPM files to the target directory. Type:
# cp /tmp/rhel3_32-pxefiles/mptlinux* /home/pxeboot/rhel3_32/
8. On your PXE server, edit and save the kickstart file,
/home/pxeboot/rhel3_32/ks.cfg.
Edit the nfs line is as follows:
nfs --server n.n.n.n --dir /home/pxeboot/rhel3_32/
Where n.n.n.n is the IP address of your PXE server. Ensure that the location
indicated after --dir is pointing to the top level of your image.
9. Add the following entry to the file /home/pxeboot/pxelinux.cfg/default:
40
Sun Fire X4100 and Sun Fire X4200 Servers Operating System Installation Guide • March 2006
Note – Type the text block from append through ks.cfg as one continuous string
with no returns.
default rhel3_32
label rhel3_32
kernel rhel3_32/vmlinuz
append ksdevice=eth0 console=tty0 load_ramdisk=1
initrd=rhel3_32/initrd.img network
ks=nfs:n.n.n.n:/home/pxeboot/rhel3_32/ks.cfg
Where n.n.n.n is the IP address of your PXE server.
Note – For console-based installations, add console=ttyS0,9600 to the append
line.
10. Save the modified version of the /home/pxeboot/pxelinux.cfg/default file.
11. Insert the Red Hat Enterprise Linux Distribution CD1 into the CD/DVD drive of
the DHCP/PXE server.
# mount /dev/cdrom /mnt/cdrom
# cp /mnt/cdrom/images/pxeboot/vmlinuz /home/pxeboot/rhel3_32/
How to Install Red Hat Enterprise Linux From a
PXE Server
This procedure describes how to configure your Sun Fire X4100 or Sun Fire X4200
server to initiate the request to download the boot image file from the PXE/DHCP
server and how to install the Red Hat Enterprise Linux boot image onto your Sun
Fire X4100 or Sun Fire X4200 server.
Note – If you are installing RHEL 4 Update 2 or later version, you do not need to
complete the steps that refer to updating the drivers.
Before You Begin
Before you configure your server to install Red Hat Enterprise Linux from a PXE
server, you need to have done the following:
Chapter 4
Red Hat Enterprise Linux
41
■
Configured your Linux network to support a PXE server. See the topic that
describes how to preconfigure your network to support PXE installation of Red
Hat Enterprise Linux.
■
Installed a Red Hat Enterprise Linux image on that Linux PXE server. See the
topic that describes how to create a PXE install image on the PXE server.
What to Do
To configure your server to install a Red Hat Enterprise Linux image from a PXE
server, do the following.
1. Connect the PXE client to the same network as the PXE server, and power on the
PXE client.
The PXE client is the target Sun Fire X4100 or Sun Fire X4200 server to which you are
installing Red Hat Enterprise Linux software.
2. When the PXE client prompts you for a network boot, press the F12 key.
The PXE client connects to the PXE server and attempts to obtain an IP address from
the DHCP server.
3. Press the F8 key to begin the downloading of the PXE boot image.
4. When you are prompted at the boot: prompt, type in the label you gave the
image when you installed a Red Hat Enterprise Linux image on the PXE server.
The Red Hat Enterprise Linux install image downloads onto the targetSun Fire
X4100 or Sun Fire X4200 server.
5. To configure the Linux operating system for your server, refer to the manual that is
shipped with your Red Hat Enterprise Linux media kit.
6. Update the operating system files and driver files, if necessary.
See “How to Update the Red Hat Enterprise Linux Operating System and Drivers”
on page 33.
42
Sun Fire X4100 and Sun Fire X4200 Servers Operating System Installation Guide • March 2006
CHAPTER
5
SUSE Linux Enterprise Server 9
About SUSE Linux Enterprise Server 9
Installation
If you have installed the SLES9 operating system (OS) on other x86-based servers,
you are already familiar with how to install Linux on your Sun Fire X4100 or Sun
Fire X4200 server. The most common methods to install SLES9 on your server are:
■
Installation from your SLES9 Distribution CD (local or remote)
■
Installation from the network, either from a Preboot Execution Environment
(PXE) image stored on a PXE server on your local network or from an image
stored elsewhere on your network.
Note – The Sun Installation Assistant is a convenient, front-end application
designed to assist you in installing SUSE Linux on your server. The Sun Installation
Assistant supplements the standard installation utilities and procedures that ship
with SLES9; it does not replace them.
Important SLES 9 Version Installation Guidelines
Read the following guidelines for specific versions of the SLES 9 operating system:
■
The minimum supported SUSE Linux Enterprise Server (SLES) version is SLES 9
Service Pack 1 (SP1).
43
■
If you are installing SP1, you will need to first install the base SLES9 package
before installing SLES 9 SP1, because SP1 consists of packages that are installed
on top of the base SLES9 operating system. See SLES9 version guidelines for more
information.
■
If you are installing SP2, you cannot install the SP on top of the base SLES9
package. If the base SLES9 package is already installed on the system, you will
need to remove the base package, and install SLES9 SP2 by inserting the SP2 CD
first.
■
If you are installing a version higher than SLES 9 SP1, refer to the SLES
documentation for installation information. You will not need Sun-supplied
drivers for SP2 and higher.
SUSE Linux Installation and Configuration
Documentation
Before you install SLES9 Linux on your server, consult the following SUSE Linux
Enterprise Server 9 documentation:
44
■
README file—The README file on your SUSE Linux Enterprise Server 9
Documentation CD contains late-breaking information about system requirements
and system configuration for your version of SUSE Linux Enterprise Server 9.
■
SUSE Linux Enterprise Server 9 Installation Manual—This manual provides detailed
information about installation requirements, disk partitioning, the YaST2
installation application, and other configuration options.
■
SUSE Linux Enterprise Server 9 Administration Manual—This manual provides
additional information about configuring your system and integrating it with
your existing network services.
■
SUSE Linux Enterprise Server 9 Support Sites—SUSE provides considerable
technical information about the Enterprise Server operating system at its product
and support web sites. See the SUSE Linux Enterprise Server 9 Home Page at
http://www.novell.com/products/linuxenterpriseserver for
additional support information.
Sun Fire X4100 and Sun Fire X4200 Servers Operating System Installation Guide • March 2006
Task Map for SUSE Linux Enterprise Server 9
Installation
Consult the following table to determine which procedures documented in this Help
system are relevant to the installation task(s) that you need to perform.
Installation Task (Goal)
Relevant Procedure(s) or Source(s)
Collect information about your system and
network.
“About Preparing to Install SUSE Linux
Enterprise Server 9” on page 46
Create a Driver CD.
“How to Create a SLES9 or SLES9 SP1
Driver CD” on page 46
Run the Sun Installation Assistant.
“How to Use the Sun Installation Assistant”
on page 19
Install SLES9 and SLES9 SP1 from local or
remote CD/DVD drive.
“How to Install SLES9 From Distribution
Media” on page 51
Install SLES9 SP2 or later version from local
or remote CD/DVD drive or PXE server.
SUSE Linux Enterprise Server 9 Installation
Manual
Install SLES9, SLES9 SP1, or SLE9 SP2 from
an image stored on a networked system.
SUSE Linux Enterprise Server 9 Installation
Manual
Install SLES9 and SLES9 SP1 from a PXE
server.
Appendix A: “Preconfiguring Your Network
to Support PXE Installation” on page 89
“How to Create a SLES9 SP1 PXE Install
Image on the PXE Server” on page 59
“How to Install SLES9 From a PXE Server”
on page 63
Update SLES9 and SLES9 SP1 software and
drivers.
“How to Update the SLES9 Operating
System” on page 49
“How to Update the SLES9 SCSI Driver” on
page 50
Note – SLES9 SP2 and later versions do not require additional Sun-supported
drivers. Make sure to include the all of the drivers recommended by SUSE when
installing the operating system. See “SUSE Linux Installation and Configuration
Documentation” on page 44 for more information on installing SLES 9 SP2 and later,
and obtaining the correct drivers.
Before you install SUSE Linux from CD, from DVD, or from the network, you need
to gather information about your system and your local area network.
Chapter 5
SUSE Linux Enterprise Server 9
45
About Preparing to Install SUSE Linux
Enterprise Server 9
Although you can install the SUSE Linux Enterprise Server 9 (SLES9) operating
system (OS) from a local CD/DVD, remote CD/DVD, or the network, you will need
to collect some information about your system before you proceed with any one of
these installation.
The server ships with a DVD-ROM device. However, an external CD-ROM device
can also be used.
Note – The Sun Installation Assistant is a convenient, front-end application
designed to assist you in installing SUSE Linux on your server. The Sun Installation
Assistant supplements the standard installation utilities and procedures that ship
with SLES9; it does not replace them.
Installation Prerequisites
Before installing SLES9 on your server, verify or collect the following information:
■
■
DHCP server name
MAC address on system label
How to Create a SLES9 or SLES9 SP1
Driver CD
Note – The Sun Installation Assistant automatically installs this driver. You can skip
this procedure if you use that application. For details, see “How to Use the Sun
Installation Assistant” on page 19.
The LSISAS1064 SCSI controller on your Sun Fire X4100 or Sun Fire X4200 server is
new to the market. The driver for that SCSI controller is not yet available on the
SUSE Linux distribution, so Sun Microsystems has provided that driver on its
46
Sun Fire X4100 and Sun Fire X4200 Servers Operating System Installation Guide • March 2006
Resource CD. You must install this new driver. To install this driver on your server,
you must create a SLES9 or SLES9 SP1-specific CD that contains an installationready image of the driver distributed on the Resource CD.
Note – SLES9 SP2 and later versions do not require additional Sun-supported
drivers. Make sure to include the all of the drivers recommended by SUSE when
installing the operating system. See “SUSE Linux Installation and Configuration
Documentation” on page 44 for more information on installing SLES 9 SP2 and later,
and obtaining the correct drivers.
Before You Begin
Before you create a SLES9 or SLES9 SP1-specific Driver CD, you must have the
following:
■
Access to another Linux server or Linux workstation that can burn a CD.
■
The name of the CD device on that Linux server or workstation that can create the
SUSE-specific Driver CD. Type one of the following commands on the Linux
server or workstation to determine the name of that CD device:
■
If your Linux server or workstation uses IDE drives, type the following:
# cdrecord -scanbus dev=ATAPI
The system reports the names of matching devices:
scsibus0:
0,0,0 0) ’SAMSUNG’’CDRW/DVD SM-352F’’T900’Removable CD-ROM
0,1,0 1) *
0,2,0 2) *
In this example, the name of the CD drive would be ATAPI:0,0,0.
■
If your Linux server or workstation uses SCSI drives, type the following:
# cdrecord -scanbus
The system reports the names of matching devices:
scsibus4:
4,0,0 0) ’SONY’’DVD RW DRU-530A’’1.0’Removable CD-ROM
4,1,0 1) *
4,2,0 2) *
In this example, the name of the CD drive would be 4,0,0.
Chapter 5
SUSE Linux Enterprise Server 9
47
What to Do
To create a SLES9 or SLES9 SP1-specific Driver CD from the driver images
distributed on your Resource CD, do the following.
Note – The instructions below show how to create a driver disk for SLES9. For
SLES9 SP1 or substitute the SLES9 SP1 or driver disk iso.
1. Log in as root to the Linux server or workstation that has a CD recorder drive.
2. Insert the Resource CD into the local system CD drive.
3. Mount the CD. Type:
# mount /dev/cdrom /mnt/cdrom
4. Copy the driver image from the Resource CD to the local /tmp directory. Type:
# cp /mnt/cdrom/support/update_media/sles9/64/driverUpdate.iso
/tmp
5. Unmount the Resource CD. Type:
# umount /mnt/cdrom
6. Remove the Resource CD.
7. Insert a blank CD into the CD recorder drive.
8. Create a SUSE-specific Driver CD from the local copy of the driver image. Type:
Note – Use the device name of the CD recorder obtained in the “Before You Begin”
on page 47.
# cdrecord -v -eject dev=ATAPI:0,0,0 /tmp/driverUpdate.iso
9. Remove the newly created CD from the CD recorder when the recording process
is complete and the CD recorder ejects the CD.
Note – Use this SUSE-specific Driver CD when you install SLES9 Linux from the
SUSE Distribution CDs.
48
Sun Fire X4100 and Sun Fire X4200 Servers Operating System Installation Guide • March 2006
How to Update the SLES9 Operating
System
The operating system installation media shipping with SUSE Linux Enterprise
Server 9 (SLES9) software might not contain the most up-to-date versions of the
SUSE software. Since the media has been released, there have been many updates to
the SLES9 software that you should install. This procedure describes how to update
the SUSE operating system software on your Sun Fire X4100 or Sun Fire X4200
server after you have installed it from a PXE server or from Distribution CDs.
What to Do
To update your SLES9 operating system files, do the following.
1. Log in as the superuser.
2. Type the following command to run the YaST Online Update:
# you
3. Follow the directions on the screen.
Caution – Do not reboot your system after the YaST Online Update has completed
its updates. You must update your SCSI driver before rebooting. See the topic that
describes how to update the SLES9 SCSI driver.
Note – If a newer kernel is installed as part of the update, it might downgrade some
drivers. Refer to the topic that describes how to update the SLES9 SCSI driver.
Chapter 5
SUSE Linux Enterprise Server 9
49
How to Update the SLES9 SCSI Driver
The kernel that is installed on your system might not load the optimal drivers that
ensure proper system performance. Periodically Sun releases sets of drivers that
have been optimized for your system and for your operating environment. This
procedure describes how to locate and install the latest SUSE Linux Enterprise
Server 9 (SLES9) SCSI driver distributed by Sun for your server. Sun distributes
updated drivers for your server in two ways:
■
On the Resource CD
■
At Sun server product web sites:
http://www.sun.com/servers/entry/x4100/downloads.jsp
Note – SLES9 SP2 and later versions do not require additional Sun-supplied drivers.
Make sure to include all of the drivers recommended by SUSE when installing the
operating system. See “SUSE Linux Installation and Configuration Documentation”
on page 44 for more information on obtaining the correct drivers.
What to Do
To update the SLES9 SCSI driver distributed by Sun Microsystems on the Resource
CD, do the following.
Note – For updating SLES9 Service Pack 1 (SP1), substitute SLES9 SP1 driver RPMs
in the following example.
1. Determine which kernel is currently installed on the system. Type:
# rpm -qa | grep kernel
The following is an example of the output you might get:
kernel-smp-2.6.5-7.97
2. Insert the Resource CD into the local DVD-ROM drive of your Sun Fire X4100 or
Sun Fire X4200 server.
3. Mount the CD and locate the SCSI driver. Type:
# mount /dev/cdrom /mnt/cdrom
# ls /mnt/cdrom/support/drivers/sles9/64
50
Sun Fire X4100 and Sun Fire X4200 Servers Operating System Installation Guide • March 2006
4. Determine which driver RPM corresponds to the kernel version as determined in
Step 1.
The file names of the RPM contain the kernel version and type. For example, for the
kernel version in Step 1, the SCSI (mptlinux) drivers would be: mptlinux-smp3.02.18_2.6.5_7.97-sles9_1.x86_64.rpm
Where 3.02.18_2.6.5_7.97 represents the kernel number that corresponds to
kernel-smp-2.6.5-7.97.
5. Type the following command to install the RPM files:
# rpm -Uvh /mnt/cdrom/support/drivers/sles9/64/mptlinux-driver.rpm
Where mptlinux-driver refers to the appropriate SCSI driver RPM files, as determined
in Step 4.
6. After successful installation, remove the CD and reboot the system. Type:
# umount /mnt/cdrom
# reboot
How to Install SLES9 From Distribution
Media
SUSE Linux Enterprise Server 9 (SLES9) provides an easy-to-use graphical interface
for installing and configuring the operating system. Whether you are using
Distribution CDs to install SUSE Linux from a locally attached CD/DVD drive or
from a remote CD/DVD drive attached via KVMS, the installation procedure is
fundamentally the same. The following procedure documents how to install SUSE
Linux from a local CD/DVD drive.
Note – To install SLES9 SP2 or later versions, use the instructions in the
documentation listed in the documentation in “SUSE Linux Installation and
Configuration Documentation” on page 44.
Before You Begin
Installing SUSE software from CD consists of the following procedures:
Chapter 5
SUSE Linux Enterprise Server 9
51
1. Create the Driver CD or use the Sun Installation Assistant CD.
See “How to Create a SLES9 or SLES9 SP1 Driver CD” on page 46 or “How to Use
the Sun Installation Assistant” on page 19.
2. Install the SLES9 software.
3. Update the SLES9 software.
See “How to Update the SLES9 Operating System” on page 49 and “How to Update
the SLES9 SCSI Driver” on page 50.
Required Items
Installation from distribution media requires the following items:
■
Sun Fire X4100 or Sun Fire X4200 server equipped with:
■
DVD-ROM drive
Note – The server ships with a DVD-ROM device. However, an external CD-ROM
device can also be used.
■
■
USB keyboard and mouse
Monitor
■
SUSE Linux Enterprise Server 9 media CD set
■
Driver CD
You create this yourself. See “How to Create a SLES9 or SLES9 SP1 Driver CD” on
page 46.
What to Do
To perform a basic installation from local CD/DVD drive, do the following.
1. Insert the SUSE Linux Enterprise Server 9 CD 1 (or the DVD) into your local
CD/DVD drive.
Note – During the installation process, you will be prompted to swap Distribution
CDs and to remove media before reboots. Follow the prompts.
2. Power on the system.
SUSE Linux boots from the Distribution CD. The graphical boot loader displays
several boot options.
52
Sun Fire X4100 and Sun Fire X4200 Servers Operating System Installation Guide • March 2006
Note – You can change the video resolution of the installer by pressing the
corresponding Function key on your keyboard displayed on the selection menu.
3. Press F6 Driver Update so the installer will prompt you for the additional driver
disk that you created when you followed the procedure that explained how to
create a SLES9 or SLES9 SP1 Driver CD.
4. Select Installation from the driver boot menu.
The SLES9 boot loader prompts you to insert a CD with updated drivers into the
CD/DVD drive.
5. Eject the SLES9 Distribution CD and insert the SLES9-specific Driver CD that you
created from the Resource CD.
6. Click OK to begin installation of the updated drivers.
Note – You might be prompted to specify the name of the CD/DVD drive
containing the updated Driver CD from the list of available devices.
7. Click OK once the SLES9 boot loader has completed installation of the updated
drivers.
The SLES9 boot loader installs the updated drivers and prompts you to replace the
updated Driver CD with the SLES9 Distribution CD.
8. Eject the updated Driver CD and insert the SLES9 Distribution CD.
9. Click Back from the SUSE boot loader menu to continue installing SUSE Linux
from CD/DVD.
10. Follow the installation instructions provided with the SLES9 Installation Guide to
complete installation of the system software.
What Next
Proceed to the Help topics on updating the SUSE operating system and updating
SLES9 drivers.
Chapter 5
SUSE Linux Enterprise Server 9
53
How to Upgrade From SLES9 to SLES9
SP1
Note – The Sun Installation Assistant will install SUSE Linux Enterprise Server 9
(SLES9) and SLES9 with Service Pack 1 (SP1) for you. You can skip this procedure if
you use the Sun Installation Assistant. For details, see the topic that describes using
the Sun Installation Assistant.
This procedure describes how to upgrade from SLES9 to SLES9 SP1.
Note – If the base version of SLES 9 is already installed on a system, SLES 9 SP2
cannot be installed until the base SLES 9 version if removed. To install SLES9 SP2,
use the instructions in the documentation listed in the documentation in “SUSE
Linux Installation and Configuration Documentation” on page 44.
Before You Begin
Before upgrading your system, you must gather the following:
■
■
■
Sun Fire X4100 or Sun Fire X4200 Resource CD
SLES9 SP1 disks
System with SLES9 preinstalled
What to Do
Follow these steps to upgrade from SLES9 to SLES9 SP1.
1. Perform the SLES9 installation described in the Related topic.
2. Log in as root.
3. Insert the Resource CD and copy the RPM driver files to the hard drive. Type:
# mount /dev/cdrom /mnt/cdrom
# cp /mnt/cdrom/support/drivers/sles9/64/*rpm /tmp
# umount /mnt/cdrom
4. Remove the Resource CD from the DVD-ROM drive.
54
Sun Fire X4100 and Sun Fire X4200 Servers Operating System Installation Guide • March 2006
5. Insert the SLES9 SP1 update disk. Type:
mount /dev/cdrecorder /mnt/cdrom
6. Execute the command for YaST. Type:
# yast
7. Within YaST, select “software->change source of installation.”
8. Select Add and choose the Local Directory option. Type:
/mnt/cdrom
YaST will read the SLES9 SP1 update disk and add it to the source of installation list.
9. Select Finish.
10. Within YaST, select “software->system update.”
A summary of the updates will be displayed. At this point you can customize the
update or do nothing and accept the default, which is recommended.
11. Select Next to continue.
Installation of the update will start and proceed automatically.
12. When the installation is complete, exit YaST and return to the command prompt.
Caution – Do not reboot your system after the YaST Update has completed its
updates. You must update your SCSI drivers before rebooting.
13. Remove the SLES9 SP1 CD after you type the following command:
umount /mnt/cdrom
14. Determine whether you are using an SMP or default kernel. Type:
# ls -l /boot/vmlinux
This command will return the kernel that will be used at the next boot. You will see
a kernel of type -default or -smp.
15. Install the updated storage driver.
■
In the previous step, if you see a file that has -smp, type the following:
# rpm -Uvh /tmp/mptlinux-smp-3.02.18_2.6.5_7.139sles9_1.x86_64.rpm
■
In the previous step, if you see a file that has -default, type the following:
# rpm -Uvh /tmp/mptlinux-default-3.02.18_2.6.5_7.139sles9_1.x86_64.rpm
Chapter 5
SUSE Linux Enterprise Server 9
55
16. Verify that mptlinux drivers for kernel version 2.6.5_7.139 were installed correctly.
Type:
# rpm -qa | grep 139
You will get a list of RPMs. Verify that you see the mptlinux for kernel 2.6.5_7.139.
If you do not see the correct drivers, repeat Steps 11 through 13.
The update to SLES9 SP1 is now complete.
17. Reboot your system. Type:
# shutdown -r now
How to Install the SLES9 OS Using the
Remote Console Application
This topic explains how to install the SLES9 OS on your Sun Fire X4100 or Sun Fire
X4200 server using the ILOM Remote Console application.
Note – To install SLES9 SP2 or later versions, use the instructions in the
documentation listed in “SUSE Linux Installation and Configuration
Documentation” on page 44.
What to Do
Use the following procedure to install the SLES9 OS on your Sun Fire X4100 or Sun
Fire X4200 server using the ILOM Remote Console application.
1. Locate your SLES9 installation CD/DVD or the equivalent iso images.
Note – The Remote Console application can redirect iso images.
2. Locate the appropriate DriverUpdate.iso file from the resource CD.
Check the directory /support/drivers/sles9/64 on the resource CD.
56
Sun Fire X4100 and Sun Fire X4200 Servers Operating System Installation Guide • March 2006
Note – This image can be transferred to a floppy disk or left on a hard disk drive
because the Remote Console application can redirect a floppy image. If your hard
drive is not displayed during the SLES9 installation process, verify that this driver is
loaded.
3. Connect to the ILOM Service Processor web GUI.
See the topic that describes how to log in to and out of the Sun ILOM web GUI.
4. Choose Remote Control—Redirection to start the Remote Console application.
5. Start keyboard and mouse redirection.
See the topic that describes how to redirect keyboard, video, mouse, or storage
devices.
6. Start CD/DVD redirection.
There are two choices of redirection type, either to redirect a CD-ROM drive using
the Devices menu and to insert either installation CD 1 into the redirect CD-ROM
drive, or to redirect CD-ROM images using the Devices menu. Select disk 1 iso
image when prompted.
7. Power on the server using the ILOM web GUI.
See the topic that describes how to control power on the host server.
8. Press F2 to enter BIOS Setup and set the BIOS boot device to use AMI Virtual
CDROM, or press F8 and select AMI Virtual CDROM when prompted.
9. When the SLES9 installation menu appears, use arrow keys to select Installation.
Do not press ENTER.
Note – Make this selection quickly before another value (the default) executes.
10. (Optional) Press F2 to change the display resolution to 1024x768.
This is the default display resolution for the Remote Console application.
11. Press F6 to load the driver.
SLES9 will indicate that you must have a driver floppy/CD ready.
12. Press ENTER to continue with the installation.
SLES9 will prompt you for that driver disk.
13. Insert the driver disk into the redirected CD/DVD drive or (if using iso images)
switch images by selecting CD-ROM Image from the Devices menu.
14. Select the CD/DVD image again and select driver iso image when prompted.
Chapter 5
SUSE Linux Enterprise Server 9
57
15. Select sr0 and press ENTER when SLES9 prompts you for which device the
driver disk is in.
16. Select OK when SLES9 finishes installing the driver.
17. Choose Back.
18. Switch back to the SLES9 installation CD-1 or iso image-1 when SLES9 prompts
you to insert CD-1 into the drive.
Note – If SLES9 at this point indicates that there is not enough memory for
graphical installation and that you must use text-based installation, use Tab keys to
navigate options.
19. Proceed with SLES9 installation as usual.
SUSE Linux Enterprise Server 9 and PXE
About SUSE Linux Enterprise Server 9, SP1 and
PXE
The network interface card (NIC) in your Sun Fire X4100 or Sun Fire X4200 server
supports the Preboot Execution Environment (PXE) network booting protocol. The
system BIOS and network interface BIOS on your server automatically query the
network for a DHCP server. PXE is a powerful and convenient solution for setting
up a number of Sun Fire X4100 or Sun Fire X4200 servers so their configuration is
identical.
58
Sun Fire X4100 and Sun Fire X4200 Servers Operating System Installation Guide • March 2006
Task Map
To take advantage of SUSE Linux Enterprise Server 9 (SLSE9), Service Pack 1 (SP1)
and PXE on your network, you need to perform the following tasks.
Task
Related Help Topic
Set up your Linux network and PXE server.
Appendix A
Install SUSE Linux images on that PXE
server.
“How to Create a SLES9 SP1 PXE Install
Image on the PXE Server” on page 59
Configure your server to boot from or to
install from a SLES9 or SLES9 SP1 image on
a PXE server.
“How to Install SLES9 From a PXE Server”
on page 63
How to Create a SLES9 SP1 PXE Install Image on
the PXE Server
This procedure describes how to create a Preboot Execution Environment (PXE)
install image on the same server that is your DHCP server, so that it will also act as
your PXE server. The PXE server provides the operating system files to your PXE
client.
Before You Begin
Before you install a SUSE Linux Enterprise Server 9 (SLES9) image on your PXE
server, you must configure your Linux network to support PXE images. See
Appendix A for instructions on how to preconfigure your network to support PXE
installations of SLES9.
Required Items
The PXE installation procedure requires the following items:
■
The DHCP server that you set up when you preconfigured your network to
support PXE installation, equipped with a CD-ROM or DVD-ROM drive
■
SUSE Linux Enterprise Server 9 media CD set
■
SUSE Linux Enterprise Server 9 SP1 media CD set
■
Sun Fire X4100 or Sun Fire X4200 Resource CD
Chapter 5
SUSE Linux Enterprise Server 9
59
What to Do
Follow these steps to create a PXE install image on the PXE server.
Note – Before you start this procedure, verify that your network has been
configured as described in the topic about preconfiguring your network to support
PXE installation.
1. Insert the Resource CD into the DVD-ROM drive.
2. Copy the PXE support files from the Resource CD into the /tmp directory by
typing the following commands:
# mount /dev/cdrom /mnt/cdrom
# cp -a /mnt/cdrom/support/pxeboot/sles9-pxefiles.tar.gz /tmp/.
# cd /tmp
# gunzip sles9-pxefiles.tar.gz
# tar xvf sles9-pxefiles.tar
# umount /mnt/cdrom
3. Set up the directory structure that will hold the SUSE Linux Enterprise Server 9
software. Type:
Note – You can use a different target directory than the /home/pxeboot/sles9/
directory shown. The examples in this procedure use this directory.
# mkdir -p /home/pxeboot/sles9/sles9/CD1
mkdir -p /home/pxeboot/sles9/core9/CD{1,2,3,4,5}
4. Insert SUSE Linux Enterprise Server 9 CD 1 into your server and copy its contents
to your PXE server. Type:
# mount /dev/cdrom /mnt/cdrom
# cp -a /mnt/cdrom/* /home/pxeboot/sles9/sles9/CD1
5. Remove SUSE Linux Enterprise Server 9 CD 1 from the server after you type the
following command:
# umount /mnt/cdrom
6. Insert SUSE Linux Enterprise Server 9 CD 2 into your server and copy its contents
to your PXE server. Type:
# mount /dev/cdrom /mnt/cdrom
# cp -a /mnt/cdrom/* /home/pxeboot/sles9/core9/CD1
60
Sun Fire X4100 and Sun Fire X4200 Servers Operating System Installation Guide • March 2006
7. Remove SUSE Linux Enterprise Server 9 CD 2 from the server after you type the
following command:
# umount /mnt/cdrom
8. Insert SUSE Linux Enterprise Server 9 CD 3 into your server and copy its contents
to your PXE server. Type:
# mount /dev/cdrom /mnt/cdrom
# cp -a /mnt/cdrom/* /home/pxeboot/sles9/core9/CD2
9. Remove SUSE Linux Enterprise Server 9 CD 3 from the server after you type the
following command:
# umount /mnt/cdrom
10. Insert SUSE Linux Enterprise Server 9 CD 4 into your server and copy its contents
to your PXE server. Type:
# mount /dev/cdrom /mnt/cdrom
# cp -a /mnt/cdrom/* /home/pxeboot/sles9/core9/CD3
11. Remove SUSE Linux Enterprise Server 9 CD 4 from the server after you type the
following command:
# umount /mnt/cdrom
12. Insert SUSE Linux Enterprise Server 9 CD 5 into your server and copy its contents
to your PXE server. Type:
# mount /dev/cdrom /mnt/cdrom
# cp -a /mnt/cdrom/* /home/pxeboot/sles9/core9/CD4
13. Remove SUSE Linux Enterprise Server 9 CD 5 from the server after you type the
following command:
# umount /mnt/cdrom
14. Insert SUSE Linux Enterprise Server 9 CD 6 into your server and copy its contents
to your PXE server. Type:
# mount /dev/cdrom /mnt/cdrom
# cp -a /mnt/cdrom/* /home/pxeboot/sles9/core9/CD5
15. Remove SUSE Linux Enterprise Server 9 CD 6 from the server after you type the
following command:
# umount /mnt/cdrom
Chapter 5
SUSE Linux Enterprise Server 9
61
16. Insert the SUSE Linux Enterprise Server 9 SPx CD 1 into your server and copy its
contents to your PXE server. Type:
# mount /dev/cdrom /mnt/cdrom
# cp -a /mnt/cdrom/* /home/pxeboot/sles9/SPx/CD1
Replace x with 1 for SP1.
17. Remove the SUSE Linux Enterprise Server 9 SPx CD 1 from the server after you
type the following command:
# umount /mnt/cdrom
Replace x with 1 for SP1.
18. Insert SUSE Linux Enterprise Server 9 SPx CD 2 into your server and copy its
contents to your PXE server. Type:
# mount /dev/cdrom /mnt/cdrom
# cp -a /mnt/cdrom/* /home/pxeboot/sles9/SPx/CD2
Replace x with 1 for SP1.
19. Remove SUSE Linux Enterprise Server 9 SPx CD 2 from the server after you type
the following command:
# umount /mnt/cdrom
Replace x with 1 for SP1.
20. Set up the boot environment for the client system to boot from. Type:
# cd /home/pxeboot/sles9
# ln -s sles9/CD1/boot .
21. Set up the content and media directories. Type:
# ln -s sles9/CD1/content .
# ln -s sles9/CD1/media.1 .
# ln -s sles9/CD1/control.xml .
22. Set up the appropriate content and instorder files. Type:
# mkdir yast
# cp /tmp/sles9-pxefiles/order yast/
# cp /tmp/sles9-pxefiles/instorder yast/
23. Copy the autoyast.xml file from the /tmp/sles9-pxefiles/ directory to the
root of the PXE image. Type:
# cp /tmp/sles9-pxefiles/autoyast.xml /home/pxeboot/sles9/
62
Sun Fire X4100 and Sun Fire X4200 Servers Operating System Installation Guide • March 2006
24. Copy the updated initrd file from the /tmp/sles9-pxefiles/ directory to the
root of the PXE image. Type:
# cp /tmp/sles9-pxefiles/initrd /home/pxeboot/sles9/
25. Create a directory to hold the updated Ethernet and SCSI driver RPMs. Type:
# mkdir /home/pxeboot/sles9/rpms
26. Copy the Ethernet and SCSI RPMs into this new directory. Type:
# cp /tmp/sles9-pxefiles/*.x86_64.rpm /home/pxeboot/sles9/rpms/
27. On your PXE server, modify and save the file
/home/pxeboot/pxelinux.cfg/default to add the following entry to it:
Note – Type the text block from append through autoyast.xml as one continuous
line with no returns.
default sles9
label sles9
kernel sles9/boot/loader/linux
append textmode=1 initrd=sles9/initrd install=
nfs://n.n.n.n/home/pxeboot/sles9 insmod = mptbase insmod=
mptscsih
autoyast=nfs://n.n.n.n/home/pxeboot/sles9/autoyast.xml
Where n.n.n.n is the IP address of your PXE server.
Note – For console-based installations, add console=ttyS0,9600 to the append
line.
How to Install SLES9 From a PXE Server
This procedure describes how to configure your Sun Fire X4100 or Sun Fire X4200
server to initiate the request to download the boot image file from the PXE/DHCP
server and how to install the SUSE Linux Enterprise Server 9 (SLES9) boot image
onto your Sun Fire X4100 or Sun Fire X4200 server.
Before You Begin
Before you configure your server to install SUSE Linux from a PXE server, you need
to have done the following:
Chapter 5
SUSE Linux Enterprise Server 9
63
■
Configured your Linux network to support a PXE server. See the topic that
describes how to preconfigure your network to support PXE installations of
SLES9.
■
Installed a SLES9 image on that Linux PXE server. See the topic that describes
how to create a PXE install image on the PXE server.
What to Do
To configure your server to install a SLES9 image from a PXE server, do the
following.
1. Connect the PXE client to the same network as the PXE server, and power on the
PXE client.
The PXE client is the target Sun Fire X4100 or Sun Fire X4200 server to which you are
installing SUSE Linux Enterprise Server 9 software.
2. When the PXE client prompts you for a network boot, press the F12 key.
The PXE client connects to the PXE server and attempts to obtain an IP address from
the DHCP server.
3. Press the F8 key to begin the downloading of the PXE boot image.
4. When you are prompted at the boot: prompt, type in the label you gave the image
when you installed a SUSE image on the PXE server.
The SLES9 install image downloads onto the target Sun Fire X4100 or Sun Fire X4200
server.
5. To configure the Linux operating system for your server, refer to the manual that is
shipped with your SLES9 media kit.
6. Update the operating system files.
See the topic that describes how to update the SUSE Linux operating system.
7. Update system driver files.
See the topic that describes how to update the SCSI drivers.
64
Sun Fire X4100 and Sun Fire X4200 Servers Operating System Installation Guide • March 2006
CHAPTER
6
Windows Server 2003
About Windows Server 2003 Installation
This topic describes some of the information you will need to know before installing
the Microsoft® Windows® Server 2003 operating system on a Sun Fire X4100 or Sun
Fire X4200 server.
The Microsoft® Windows® Server 2003 operating system software is distributed on
an installation media such as a CD. Most often, the installation media is used to
install the operating system locally.
If you want to install the operating system remotely, you should use the Remote
Installation Service (RIS). For instructions on installing Windows® Server 2003
remotely via RIS, refer to “How to Use Remote Installation Service to Install
Windows Server 2003 on Remote Computers” on the Microsoft support web site.
Task Map for Windows Server 2003 Installation
This section describes the tasks you need to perform to install Windows® Server
2003 on a Sun Fire X4100 or Sun Fire X4200 server.
65
The following table details the steps required to successfully install Windows®
Server 2003 software.
Task
Description
For Instructions
Set up your Sun Fire X4100 or Sun
Fire X4200 server.
Configure your service processor.
See the Sun Fire X4100 or Sun Fire
X4200 Setup Guide (819-1155).
Collect CDs for installation.
The CDs contain the necessary
installation program and
supplemental software to
successfully install Windows®
Server 2003 on a Sun Fire X4100 or
Sun Fire X4200 server.
Microsoft Windows® Server 2003
Enterprise Edition or Standard
Edition installation media.
Download the Windows driver
files from the following server
product site:
http://www.sun.com/servers
/entry/x4100/downloads.jsp
Review the Sun Fire X4100 or Sun
Fire X4200 Release Notes.
Review late-breaking news
concerning Windows® Server 2003
installations.
See the Sun Fire X4100 or Sun Fire
X4200 Server Release Notes (8191162)
Review the installation
prerequisites and system
requirements.
Verify that the installation
prerequisites and minimum
system requirements are met prior
to installing Windows® Server
2003.
Verify the information in “About
Preparing to Install Windows®
Server 2003” on page 67
Create a mass-storage drivers
floppy disk.
You will need to create a massstorage driver floppy disk prior to
the Windows® Server 2003
installation process.
Refer to “How to Create a MassStorage Device Floppy” on
page 69.
Select an installation method and
then complete the installation.
Choose an installation method and
locate the installation instructions.
Using the Microsoft Windows
Server 2003 Installation media.
For installation from CD, refer to
“How to Install Windows Server
2003 From Distribution Media” on
page 73.
For remote installation, refer to
How to Use Remote Installation
Service to Install Windows Server
2003 on Remote Computers” on
the Microsoft support web site.
Update the AMD processor driver.
You can install this driver after
performing the Windows® 2003
Server installation.
Refer to “How to Update the
Device Drivers for Windows®
Server 2003” on page 76.
66
Sun Fire X4100 and Sun Fire X4200 Servers Operating System Installation Guide • March 2006
About Preparing to Install Windows®
Server 2003
This topic describes the installation prerequisites that you need to perform before
you install Microsoft® Windows® Server 2003 operating system on your Sun Fire
X4100 or Sun Fire X4200 server.
Installation Prerequisites
Before you can install Windows Server 2003 on your Sun Fire X4100 or Sun Fire
X4200 server, verify that you have completed the following prerequisites:
■
Installed the server hardware.
■
Configured the service processor.
■
Created a mass-storage device floppy. For detailed instructions, refer to “How to
Create a Mass-Storage Device Floppy” on page 69.
■
Connected a USB floppy device to a rear USB port on the Sun Fire X4100 or Sun
Fire X4200 server so that the LSI mass-storage drivers can be loaded during setup.
Alternatively, you can use a floppy.img available from the FloppyPack.zip.
This floppy.img file must be accessible from the system that is hosting the
JavaRConsole.
Note – If floppy redirection is used instead of an external USB Floppy drive, then
the floppy redirection setting must be enabled in the JavaRConsole before turning
the system on and letting the system boot from the Microsoft Windows 2003
installation media. For additional information about console redirected installations,
see “How to Launch the Remote Console Application From a Java Web Start Web
Page” in the Sun Fire X4100 or Sun Fire X4200 System Management Guide (819-1160).
Collected the Microsoft® Windows® Server 2003 Installation media (Enterprise
Edition 32/64-bit or Standard Edition 32/64-bit).
■
Have the Windows® Server 2003 Product Key available.
■
Have the Windows® Server 2003 Service Pack 1 readily available for installation.
You can download the Windows Server 2003 Service Pack 1 from the Microsoft
website. You will need to install the Windows Server 2003 Service Pack 1 after
completing the initial Windows Server 2003 installation.
Chapter 6
Windows Server 2003
67
■
Downloaded the device drivers (DriverUpdatePackage<version>.exe) from the
following server product site:
http://www.sun.com/servers/entry/x4100/downloads.jsp
Gather specific information, if necessary, about the Windows Server 2003
installation. See the Getting Started Guide: Microsoft Windows Server 2003 Standard
Edition and refer to its Chapter 5, “Getting Ready for a New Installation” for details
about installation preparation.
System Requirements
This section lists the system requirements to install Windows Server 2003 on a Sun
Fire X4100 or Sun Fire X4200 server.
Requirement
Description
Processors
• A recommended minimum speed of 550 MHz or faster (minimum
supported speed of 133 MHz) (applies to Windows® Server 2003
Standard and Enterprise Editions).
RAM
• A minimum of 128 MB of RAM recommended.
• A maximum of 32 GB is supported.
Hard disk
availability
• A minimum of 1.25 GB to 2 GB of available hard-disk-space for
Windows® Server Standard Edition; Enterprise: 1.5 GB - X86, 2GB X64.
• Larger amounts of space is required if you are running setup across a
network; or, if you are using FAT/FAT32 instead of an NTFS file
system.
Monitor
• A VGA or higher resolution monitor, keyboard, and mouse or
pointing device.
Supported Operating System Software
The Sun Fire X4100 or Sun Fire X4200 server supports the following Microsoft®
Windows operating systems:
■
■
68
Windows® Server 2003, Enterprise Edition, 32-bit/64-bit
Windows® Server 2003, Standard Edition, 32-bit/64-bit
Sun Fire X4100 and Sun Fire X4200 Servers Operating System Installation Guide • March 2006
How to Create a Mass-Storage Device
Floppy
This topic identifies how to create a mass-storage device floppy. This floppy must be
created before performing the Microsoft® Windows® Server 2003 installation.
Before You Begin
Ensure that the following system configurations and materials are readily available:
■
■
External USB floppy drive
Floppy disk
Note – If you use the floppy.img file, you do not need a floppy drive. The
floppy.img file (available in the FloppyPack.zip) must be accessible from the
system that is hosting the JavaRConsole.
■
Additional system running Microsoft® Windows software.
What to Do
1. On a system running Microsoft® Windows software with a floppy device, copy
the FloppyPack<version>.zip file to a temporary directory.
2. In the temporary directory, extract the content from the FloppyPack
<version>.zip file by double-clicking the file in Windows Explorer and copying
the files to a new directory. Alternatively, for systems running older versions of
Microsoft Windows, you can use an application such as Winzip to extract the files.
Note – Within the extracted files is a folder named image. This image folder
contains a floppy.img file. You can use the floppy.img file (or a floppy disk) for
a redirected installation. For additional information about console redirected
installations, see “How to Launch the Remote Console Application From a Java Web
Start Web Page” in the Sun Fire X4100 or Sun Fire X4200 System Management Guide
(819-1160).
3. Insert a blank floppy disk into the floppy drive.
Chapter 6
Windows Server 2003
69
4. In Windows Explorer, open the directory containing the extracted files and
double-click mkfloppy.exe.
For older versions of Microsoft Windows, you might see this error message:
"This application failed to initialize properly (0xC0000135).
Click OK to terminate the application."
To resolve this issue, run dotnetfx.exe located in the mkfloppy folder to install
the Microsoft.NET Framework.
a. Double-click dotnetfx.exe in the mkfloppy folder.
The Microsoft.NET Framework License appears.
b. Agree to accept the Microsoft.NET Framework License to continue the
installation.
c. Click OK to complete the Microsoft.NET Framework installation.
The Create Installation Floppy dialog appears.
FIGURE 6-1
Create Installation Floppy Dialog
5. In the Create Installation Floppy dialog box, click OK.
The Format 3.5 Floppy (A:) dialog box appears.
70
Sun Fire X4100 and Sun Fire X4200 Servers Operating System Installation Guide • March 2006
FIGURE 6-2
Format 3 1/2 Floppy Dialog
6. In the Format Floppy 3.5 (A:) dialog, specify the settings to format the floppy disk,
then click Start. Note that “Quick Format” is an acceptable format for this process.
The Create Installation Floppy message appears informing you that it is copying
files to the floppy.
FIGURE 6-3
Create Installation Floppy Message
7. After the floppy disk is formatted, close the message box.
The mass-storage device floppy is created.
Note – During a normal 32-bit or 64-bit Microsoft Windows setup, you can use the
mass-storage device floppy in conjunction with the F6 option.
Chapter 6
Windows Server 2003
71
How to Download Driver Files for
Windows Server 2003
This procedure explains how to download the necessary Microsoft Windows related
driver files from the server product page. You should download these driver files to
a portable media before installing the Windows Server 2003 operating system.
What to Do
1. Browse to the following product download site:
http://www.sun.com/servers/entry/x4100/downloads.jsp
2. Download the following files to a portable media, such as CD, DVD, or a Flash
device.
■
■
72
FloppyPack<version>.zip (containing LSI 1064 drivers)
DriverUpdatePackage<version>.exe (program to install all system device
drivers)
Sun Fire X4100 and Sun Fire X4200 Servers Operating System Installation Guide • March 2006
How to Install Windows Server 2003
From Distribution Media
This topic describes how to install the Microsoft Windows Server 2003 operating
system on a Sun Fire X4100 or Sun Fire X4200 server using the Microsoft Windows
Server 2003 distribution media.
Before You Begin
Collect the information described below and ensure that the following items and
services are available prior to starting installation.
■
Review the topic “About Windows Server 2003 Installation.”
■
Review the topic “About Preparing to Install Windows Server 2003.”
■
Complete the steps in the topic “How to Create a Mass-Storage Device Floppy.”
■
Have the mass-storage device floppy available or have the floppy image
(floppy.img) file. The floppy.img file is available in the FloppyPack.zip.
This file must be accessible from the system that is hosting the JavaRConsole. For
additional information about console redirected installations, see “How to Launch
the Remote Console Application From a Java Web Start Web Page” in the Sun Fire
X4100 or Sun Fire X4200 System Management Guide (819-1160).
■
Have the Microsoft Windows Server 2003 distribution media available.
■
Verify that a keyboard and mouse is attached to the appropriate connections on
your Sun Fire X4100 or Sun Fire X4200 server.
■
Power off the server.
Note – If console redirection is enabled (in the BIOS), you will have additional popup windows displayed during installation asking about EMS (Emergency
Management Services). If using the Installation CD, you can click [ OK ] when
these pop-up windows appear and proceed with the installation.
For information about specific details of the operating system installation, refer to
your Microsoft Windows documentation.
Chapter 6
Windows Server 2003
73
Note – The complete Microsoft Windows operating system installation process is
not documented in this section. This section documents only the steps that are
specific for installing Windows Server 2003 on a Sun Fire X4100 or Sun Fire X4200
server.
What to Do
Follow these steps to install the Microsoft Windows Server 2003 software on your
Sun Fire X4100 or Sun Fire X4200 server using the Installation CD.
Note – The Solaris Operating System is preinstalled on the Sun Fire X4100 or Sun
Fire X4200 server, so during your Windows installation, you can repartition and
format the disk, which effectively will uninstall Solaris software.
1. Ensure that the Sun Fire X4100 or Sun Fire X4200 server is powered off.
2. Do one of the following:
■
If you are using a floppy disk, connect the USB floppy drive to the rear of the
server and insert the mass-storage device floppy into the floppy disk drive.
■
If you are using the floppy.img file, ensure that the file is accessible from the
system that is hosting the JavaRConsole. For additional information about console
redirection, see “How to Launch the Remote Console Application From a Java
Web Start Web Page” in the Sun Fire X4100 or Sun Fire X4200 System Management
Guide (819-1160).
3. Power on the Sun Fire X4100 or Sun Fire X4200 server.
4. Insert the Microsoft® Windows® Server 2003 installation media into the server’s
DVD-ROM drive.
5. When prompted, press any key to boot from CD. When the text mode setup
instruction dialog appears, then do the following:
Note – If you miss the prompt to boot from the CD, restart the system so that the
BIOS boots from the DVD-ROM drive again.
74
Sun Fire X4100 and Sun Fire X4200 Servers Operating System Installation Guide • March 2006
a. When prompted, press F6 to install mass-storage drivers.
Note – If you miss the prompt to install third-party drivers, restart the system and
press F6 within this time period or the installation fails.
You are prompted to enter “S” to install the mass-storage drivers.
b. Press “S” to specify the device drivers to be installed.
c. Insert the Driver Disk into Drive A: when prompted.
A message appears listing the available drivers.
d. In the message listing the available drivers, do the following:
i. Select either the 32-bit or 64-bit LSI driver version driver then press Enter.
You must install the 32-bit driver if installing 32-bit Windows Server 2003 or
the 64-bit driver if installing 64-bit Windows Server 2003.
ii. For remote installations using the Virtual Floppy or a virtual floppy image
(remote KVMS over IP from ILOM): Select the AMI Virtual Floppy Driver
(32-bit or 64-bit version) then press Enter.
You must install the 32-bit driver if installing 32-bit Windows Server 2003 or
the 64-bit driver if installing 64-bit Windows Server 2003.
A message appears prompting you to press Enter to continue.
e. Press Enter to continue.
f. Choose Express Setup.
g. Follow the on-screen instructions to complete the Windows® Server 2003
installation.
Next
After installing the operating system, you will need to update the system device
drivers; see “How to Update the Device Drivers for Windows® Server 2003” on
page 76.
Chapter 6
Windows Server 2003
75
How to Update the Device Drivers for
Windows® Server 2003
The following procedures explain how to update the Microsoft® Windows® Server
2003 installation with the device driver software:
■
■
Setting up the Device Driver Update Package
Installing the Device Drivers
Before You Begin
The following procedures assume that you have already:
■
Installed the Microsoft® Windows® Server 2003 operating system on the Sun Fire
X4100 or Sun Fire X4200 server.
■
Downloaded the DriverUpdatePackage to a portable media. For detail
instructions, see “How to Download Driver Files for Windows Server 2003” on
page 72.
■
Have the portable media containing the DriverUpdatePackage readily available to
complete the following procedure “Setting Up the Device Driver Update
Package”.
Setting Up the Device Driver Update Package
1. Copy the DriverUpdatePackage<version>.exe file from the portable media to a
local drive on the Sun Fire X4100 or Sun Fire X4200 server.
Note – <version> represents the current version of the software update package.
2. To launch the Driver Update Setup Program, double-click the
DriverUpdatePackage<version>.exe file.
The Sun Fire X4100 or Sun Fire X4200 Driver Update Package Setup dialog appears.
3. In the Sun Fire X4100 or Sun Fire X4200 Driver Update Package Setup dialog, click
OK to install the drivers.
The Microsoft.NET Framework 1.1 dialog appears.
4. To install the Microsoft.NET Framework, do the following:
76
Sun Fire X4100 and Sun Fire X4200 Servers Operating System Installation Guide • March 2006
a. In the Microsoft.NET Framework dialog, click Continue.
FIGURE 6-4
Microsoft .NET Framework Dialog
The License Agreement dialog appears.
FIGURE 6-5
Microsoft .NET Framework License Dialog
Chapter 6
Windows Server 2003
77
b. In the License Agreement dialog, check the option “I Agree” then click Install.
A message appears stating that the Microsoft.NET Framework files are being
installed.
c. After the installation completes, click OK to dismiss the dialog (see FIGURE 6-6).
FIGURE 6-6
Installation Complete Message
The Sun Fire X4100 or Sun Fire X4200 Driver Update Package Setup Wizard
dialog appears.
5. In the Welcome Setup Wizard dialog, click Next.
FIGURE 6-7
Welcome Setup Wizard Dialog
The Select Installation Folder dialog appears.
78
Sun Fire X4100 and Sun Fire X4200 Servers Operating System Installation Guide • March 2006
FIGURE 6-8
Select Installation Folder Dialog
6. In the Select Installation Folder dialog, do the following:
a. Choose the default installation location specified in the Folder text box or click
Browse to specify a different location.
b. Select the option “Just Me” if you want to limit access to the package to your
user ID. Otherwise, select the option “Everyone” if you want any user ID to be
able to access the package.
c. Click Next.
A Confirmation Installation dialog appears.
Chapter 6
Windows Server 2003
79
FIGURE 6-9
Confirm Installation Dialog
7. In the Confirmation Installation dialog, click Next to continue the installation.
This message appears “Inspecting System. Please Wait.”
8. Continue clicking Next until the following dialog appears, then click OK.
FIGURE 6-10
AMD-8131 PCIX HyperTransport Tunnel Driver Message
A series of four Security Alert dialogs may appear (in some cases).
9. In each Security Alert dialog, you must click Yes to install the PCIX Tunnel
drivers required for operating the Sun Fire X4100 or Sun Fire X4200 server.
80
Sun Fire X4100 and Sun Fire X4200 Servers Operating System Installation Guide • March 2006
Note – After the Sun Fire X4100 or Sun Fire X4200 Driver Update Package
installation completes, you must manually update the AMD Processor driver then
reboot the system for the updates to take effect.
Updating the AMD Processor Driver
1. Open Device Manager and expand the Processor list.
2. Right-click the first processor in the list, then select Update.
FIGURE 6-11
Device Manager Window With Processors Expanded
The Welcome to the Hardware Update Wizard appears.
Chapter 6
Windows Server 2003
81
FIGURE 6-12
Welcome to Hardware Update Wizard
3. In the Welcome dialog, click the option “No, not this time” then click Next.
The Hardware Update Wizard dialog appears.
FIGURE 6-13
82
Hardware Update Wizard Dialog
Sun Fire X4100 and Sun Fire X4200 Servers Operating System Installation Guide • March 2006
4. In the Hardware Update Wizard dialog, select the option “Install from a list or
specific location,”
The Hardware Update Wizard dialog appears prompting you to choose a search and
installation option.
FIGURE 6-14
Hardware Update Wizard, Search Option
5. In the Hardware Update Wizard dialog, select the option “Don’t search, I will
choose the driver to install,” and then click Next.
The Hardware Update Wizard dialog appears prompting you to select a device
driver to install.
Chapter 6
Windows Server 2003
83
FIGURE 6-15
Hardware Update Wizard, Select Driver
6. In the Hardware Update Wizard dialog, click Have Disk.
The Install From Disk dialog appears.
FIGURE 6-16
Install From Disk Dialog
7. In the Install From Disk dialog, click Browse.
The Locate File dialog appears.
84
Sun Fire X4100 and Sun Fire X4200 Servers Operating System Installation Guide • March 2006
FIGURE 6-17
Locate File Dialog
8. In the Locate File dialog, specify the location of the AMD CPU (Program
Files/Sun/DriverUpdatePackage/Drivers/AMD/CPU) then click OK.
The Select Device Driver dialog appears with the AMD K8 Processor in the Model
list.
FIGURE 6-18
Select Device Driver Dialog
Chapter 6
Windows Server 2003
85
9. In the Model list, select the AMD K8 Processor, then click Next.
The Completing the Hardware Update Wizard dialog appears.
FIGURE 6-19
Completing the Hardware Update Dialog
10. In the Completing the Hardware Update Wizard dialog, click Finish.
The System Settings Change dialog appears, prompting you to restart your
computer.
FIGURE 6-20
System Settings Change Dialog
11. In the System Settings Change dialog, do one of the following:
86
■
Click No to continue updating the remaining AMD K8 Processor Driver by
repeating Steps 1 through 10.
■
Click Yes to restart the system for the updated AMD K8 Processor Drivers to take
effect. Note that by clicking Yes the system will update the settings for only the
processors you have completed in Steps 1 through 10.
Sun Fire X4100 and Sun Fire X4200 Servers Operating System Installation Guide • March 2006
Note – After all the system drivers are installed, you can remove the Sun Fire X4100
or Sun Fire X4200 Driver Update Package program from your system using the
Add/Remove Program utility in the Control Panel.
Chapter 6
Windows Server 2003
87
88
Sun Fire X4100 and Sun Fire X4200 Servers Operating System Installation Guide • March 2006
APPENDIX
A
Preconfiguring Your Network to
Support PXE Installation
This appendix contains procedures for preconfiguring your network prior to
performing a PXE installation.
Follow the procedures in the section appropriate for your operating system:
■
“How to Preconfigure Your Network to Support PXE Installation of Red Hat
Enterprise Linux” on page 89.
■
“How to Preconfigure Your Network to Support PXE Installation of SUSE
Enterprise Linux Server” on page 96.
How to Preconfigure Your Network to
Support PXE Installation of Red Hat
Enterprise Linux
These procedures describe how to preconfigure your network running Red Hat
Enterprise Linux to support PXE installation of Red Hat Enterprise Linux software
on your server. These procedures assume that you already have a bootable server
that is running a version of the Red Hat Enterprise Linux operating system.
Note – Some of the following procedures might not be necessary if you confirm that
the server packages are already in place and are configured.
89
Preconfiguring your network for PXE installation involves the following procedures:
■
■
■
■
■
■
■
Copying Files From the Resource CD
Configuring a DHCP Server
Installing Portmap
Configuring the TFTP Service
Installing and Configuring the neopxe Boot Server Daemon
Configuring the NFS Service
Disabling the Firewall
Required Items
Preconfiguring your network for PXE installation requires the following items:
■
Red Hat Enterprise Linux server equipped with:
■
■
■
DVD drive
USB keyboard
Monitor
■
Red Hat Enterprise Linux media set
■
Resource CD
Copying Files From the Resource CD
This section describes how to copy the PXE support files, which are required for PXE
configurations, from the Resource CD. You can also download the driver RPMs from
the Sun Fire X4100 or Sun Fire X4200 server. The download links are at:
http://www.sun.com/servers/
1. Insert the Resource CD into the DHCP/PXE server.
2. Create a temporary directory to copy the PXE support files in to. Type:
# mkdir /tmp
3. Type the following commands to copy the files to the /tmp/ directory:
90
Sun Fire X4100 and Sun Fire X4200 Servers Operating System Installation Guide • March 2006
Note – The compressed tar file that is used in this step depends on which version of
Red Hat Enterprise Linux you are preconfiguring. The remainder of the instructions
will assume that Red Hat Enterprise Linux 3 32-bit is being used. Modify the
example based upon the version you are using. For Red Hat Enterprise Linux 3 32bit, use rhel3_32-pxefiles.tar.gz. For Red Hat Enterprise Linux 3 64-bit, use
rhel3_64-pxefiles.tar.gz. For Red Hat Enterprise Linux 4 64-bit, use
rhel4_64-pxefiles.tar.gz.
#mount /dev/cdrom /mnt/cdrom
# cp /mnt/cdrom/support/pxeboot/rhel3_32-pxefiles.tar.gz /tmp/
4. Uncompress and extract the contents of the tar file into the /tmp/ directory. Type:
# cd /tmp
# tar -zxvf rhel3_32-pxefiles.tar.gz
When you extract the file, a directory with all required files is created at
/tmp/rhel3_32-pxefiles/
Configuring a DHCP Server
Complete the following steps on the server that will be your DHCP server.
1. Power on the server and log in as superuser.
2. Determine whether the DHCP server package is already installed on the server.
Type:
# rpm -qa | grep dhcp3. If the DHCP server package is not listed, insert the Red Hat Enterprise Linux CD
1 and install the DHCP server. Type:
Note – For Red Hat Enterprise Linux 4, insert CD 5.
# mount /dev/cdrom /mnt/cdrom
# rpm -Uvh /mnt/cdrom/RedHat/RPMS/dhcp-*.rpm
4. Remove the CD from the server after you type the following command:
# umount /mnt/cdrom
Appendix A
Preconfiguring Your Network to Support PXE Installation
91
5. Set up your DHCP configuration file (for example, /etc/dhcpd.conf) so that
only PXEClient requests receive PXEClient responses.
Add the following entry to the DHCP configuration file. Refer to the dhcpd.conf
man page for more information.
class "PXE" {match if substring(option vendor-class-identifier, 0, 9)
="PXEClient"; option vendor-class-identifier "PXEClient"; }
Note – If the server does not already have a dhcpd.conf file in its /etc directory,
you an copy the dhcpd.conf file from the sample DHCP configuration file in the
/tmp/rhel3_32-pxefiles directory.
6. Start the DHCP service. Type:
# service dhcpd start
7. Configure the server to always start DHCP. Type:
# chkconfig dhcpd on
Installing Portmap
Complete the following steps on your DHCP server.
1. Determine whether the portmap server package is already installed on the server.
Type:
# rpm -qa | grep portmap
2. If portmap is not listed, insert the Red Hat Enterprise Linux CD 2 and install the
portmap service with the following commands:
# mount /dev/cdrom /mnt/cdrom
# rpm -Uvh /mnt/cdrom/RedHat/RPMS/portmap-*
3. Remove the CD from the server after you type the following command:
# umount /mnt/cdrom
Configuring the TFTP Service
Complete the following steps on your DHCP server.
1. Determine whether the TFTP server package is already installed on the server.
Type:
# rpm -qa | grep tftp-server
92
Sun Fire X4100 and Sun Fire X4200 Servers Operating System Installation Guide • March 2006
2. If the TFTP server package is not listed, insert the Red Hat Enterprise Linux CD 1
and install the TFTP service with the following commands:
Note – For Red Hat Enterprise Linux 4, insert CD 4.
# mount /dev/cdrom /mnt/cdrom
# rpm -Uvh /mnt/cdrom/RedHat/RPMS/tftp-server*
3. Remove the CD from the server after you type the following command:
# umount /mnt/cdrom
4. Edit and save the /etc/xinetd.d/tftp file.
Make the following changes:
■
■
Change the -s /tftpboot entry to -v -s /home/pxeboot.
Change the disable attribute to no.
5. Restart the inetd server. Type:
# service xinetd restart
Installing and Configuring the neopxe Boot Server
Daemon
Complete the following steps on your DHCP server. The neopxe server is designed
for use with a DHCP server that is running on the same system.
1. Install the neopxe boot server daemon onto your system that is your DHCP server.
Type:
# cd /tmp/rhel3_32-pxefiles/neopxe-0.2.0
# ./configure
# make
# make install
2. Append the path /usr/local/sbin/neopxe to the rc.local file by typing the
following command, making sure to use two greater-than signs:
# echo "/usr/local/sbin/neopxe" >> /etc/rc.d/rc.local
3. Copy the PXE Linux image from the /tmp/ directory. Type:
# mkdir /home/pxeboot
# cp /tmp/rhel3_32-pxefiles/pxelinux.0 /home/pxeboot
Appendix A
Preconfiguring Your Network to Support PXE Installation
93
4. Configure the PXE Linux image. Type:
# mkdir /home/pxeboot/pxelinux.cfg/
# touch /home/pxeboot/pxelinux.cfg/default
5. Edit the /usr/local/etc/neopxe.conf configuration file, which is read by
neopxe at startup.
■
If the neopxe.conf file is not in the /usr/local/etc directory, you can copy it from
the /tmp/rhel3_32-pxefiles/neopxe-0.2.0/ directory.
■
A valid configuration file must have entries for each of the following lines,
including at least one service line.
ip_addr=n.n.n.n
prompt=boot-prompt-string
prompt_timeout=timeout
service=service-number,boot-server,boot-file,label
Where:
■
n.n.n.n is the IP address of your PXE server.
■
boot-prompt-string is the character string displayed during a network boot that
prompts the user to press the F8 key for a boot menu.
■
timeout is the number of seconds the prompt is displayed before the server
defaults to the first service for booting.
■
service-number is an integer in the range of 1 to 254 that identifies the boot
service.
■
boot-server is the IP address of the boot server for that boot service.
■
boot-file is the name of the boot file that is read from your /home/pxeboot
directory.
■
label is the text string that is displayed when the boot menu is invoked by
pressing the F8 key.
For example:
ip_addr=192.168.0.1
prompt=Press [F8] for menu.. .
prompt_timeout=10
service=1,192.168.0.1,pxelinux.0,Linux
service=2,192.169.0.1,nbp.unknown,Solaris
Note – Refer to the neopxe.conf man page for more information.
6. Start the neopxe daemon. Type:
# /usr/local/sbin/neopxe
94
Sun Fire X4100 and Sun Fire X4200 Servers Operating System Installation Guide • March 2006
Configuring the NFS Service
Complete the following steps on your DHCP server.
1. Determine whether the NFS service package is already installed on the server.
Type:
# rpm -qa | grep nfs-utils
2. If the NFS service package is not listed, insert the Red Hat Enterprise Linux CD 1
and install the NFS service with the following commands:
# mount /dev/cdrom /mnt/cdrom
# rpm -Uvh /mnt/cdrom/RedHat/RPMS/nfs-utils-*
3. Remove the CD from the server after you type the following command:
# umount /mnt/cdrom
4. Edit and save the /etc/exports file to add the following line to it:
/home/pxeboot *(no_root_squash,no_subtree_check,insecure)
5. Start the NFS service. Type:
# service nfs start
6. Configure the server to always start the NFS service. Type:
# chkconfig nfslock on
Note – If you are using a DNS server, verify that DNS entries exist for the range of
addresses defined in the PXE subnet dynamic-bootp entry in the dhcpd.conf file. If
you are not using a DNS server, edit the /etc/hosts file to add the range of host
addresses found in the PXE subnet dynamic-bootp entry in the dhcpd.conf file.
Disabling the Firewall
If you enabled firewall security when you installed Red Hat Enterprise Linux
software on the system that will be your PXE server, complete the following steps to
disable the firewall so that PXE clients can download from the server.
1. Stop the ipchains service. Type:
# service ipchains stop
2. Stop the iptables service. Type:
# service iptables stop
Appendix A
Preconfiguring Your Network to Support PXE Installation
95
3. Stop the ipchains service from starting when you restart the server. Type:
# chkconfig ipchains off
4. Stop the iptables service from starting when you restart the server. Type:
# chkconfig iptables off
Note – You might encounter error messages if the ipchains service is not installed
on the server. You can safely ignore these messages.
Note – When you disable the firewall protection on the system that is your PXE
server, the security of the data on that server cannot be ensured. If this server is
networked outside of your local intranet, be sure to re-enable the firewall after
downloading software to PXE clients.
Installing Red Hat Enterprise Linux From the
Network
When you have completed all the previous configuration steps, do the following.
1. Reboot the PXE/DHCP server.
2. Refer to “How to Create a PXE Install Image on the PXE Server” on page 38.
How to Preconfigure Your Network to
Support PXE Installation of SUSE
Enterprise Linux Server
These procedures describe how to preconfigure your network running SUSE Linux
Enterprise Server 9 (SLES9) software to support PXE installation of SUSE Linux
software on your Sun Fire X4100 or Sun Fire X4200 server. These procedures assume
that you already have a bootable server that is running a version of the SLES9
operating system.
96
Sun Fire X4100 and Sun Fire X4200 Servers Operating System Installation Guide • March 2006
Note – Some of the following procedures might not be necessary if you confirm that
the server packages are already in place and are configured. You might be prompted
for a UnitedLinux CD.
Preconfiguring your network for PXE installation involves the following procedures:
■
■
■
■
■
■
■
Copying Files From the Sun Fire X4100 or Sun Fire X4200 Resource CD
Configuring a DHCP Server
Installing Portmap
Configuring the TFTP Service
Installing and Configuring the neopxe Boot Server Daemon
Configuring the NFS Service
Disabling the Firewall
Required Items
Preconfiguring your network for PXE installation requires the following items:
■
SUSE Linux Enterprise Server 9 server equipped with:
■
■
■
CD/DVD drive
USB keyboard
Monitor (optional)
■
SUSE Linux Enterprise Server 9 media set
■
Sun Fire X4100 or Sun Fire X4200 Resource CD
Copying Files From the Resource CD
This section describes how to copy the PXE support files, which are required for PXE
configurations, from the Resource CD. You can also download the driver RPMs from
the Sun Fire X4100 or Sun Fire X4200 web site. The downloads links are at:
http://www.sun.com/servers/entry/x4100/downloads.jsp
Note – This procedure provides instructions for copying files from the Resource CD
on SLES9. However, these instructions are also valid for SLES9 with Service Pack
(SP1). For SP1, substitute SLES9SP1 where SLES9 appears in the commands.
1. Insert the Resource CD into the DHCP/PXE server.
2. Create a temporary directory to copy the PXE support files to. Type:
# mkdir /tmp
Appendix A
Preconfiguring Your Network to Support PXE Installation
97
3. Type the following commands to copy the files to the /tmp/ directory:
# mount /dev/cdrom /mnt/cdrom
# cp /mnt/cdrom/support/pxeboot/sles9-pxefiles.tar.gz /tmp/
4. Uncompress and extract the contents of the tar file into the /tmp/ directory. Type:
# tar -zxf /tmp/sles9-pxefiles.tar.gz
When you extract the file, a directory with all required files is created at
/tmp/sles9-pxefiles/
5. Remove the Resource CD from the server after you type the following command:
# umount /mnt/cdrom
Configuring a DHCP Server
Complete the following steps on the server that will be your DHCP server.
1. Power on the server and log in as superuser.
2. Determine whether the DHCP server package is already installed on the server.
Type:
# rpm -qa | grep dhcp-server
3. If the DHCP server package is not listed, install the package using YaST. Type:
# yast -i dhcp-server
4. Set up your DHCP configuration file (for example, /etc/dhcpd.conf) so that
only PXEClient requests receive PXEClient responses.
Add the following entry to the DHCP configuration file. Refer to the dhcpd.conf
man page for more information.
class "PXE" {match if substring(option vendor-class-identifier,
0, 9) ="PXEClient"; option vendor-class-identifier "PXEClient";
}
Note – You can start with a sample DHCP configuration file in the /tmp/sles9pxefiles directory.
5. Edit the /etc/sysconfig/dhcpd file and verify that the DHCPD_INTERFACE is
set to the interface that is connected to the network you are planning to run the
PXE server.
For example, if you are using Ethernet interface 0, the DHCPD_INTERFACE variable
would be set as follows:
DHCPD_INTERFACE="eth0"
98
Sun Fire X4100 and Sun Fire X4200 Servers Operating System Installation Guide • March 2006
6. Start the DHCP service. Type:
# /etc/init.d/dhcpd start
7. Configure the server to always start DHCP. Type:
# chkconfig dhcpd on
Installing Portmap
Complete the following steps on your DHCP server.
1. Determine whether the portmap server package is already installed on the server.
Type:
# rpm -qa | grep portmap
2. If portmap is not listed, install the package using YaST. Type:
# yast -i portmap
Configuring the TFTP Service
Complete the following steps on your DHCP server.
1. Determine whether the TFTP server package is already installed on the server.
Type:
# rpm -qa | grep tftp
2. If the TFTP server package is not listed, install the package using YaST. Type:
# yast -i tftp
3. Edit and save the /etc/xinetd.d/tftp file.
Make the following changes:
■
■
Change the -s /tftpboot entry to -v -s /home/pxeboot
Change the disable attribute to no
4. Restart the inetd server. Type:
# /etc/init.d/xinetd restart
Appendix A
Preconfiguring Your Network to Support PXE Installation
99
Installing and Configuring the neopxe Boot Server
Daemon
Complete the following steps on your DHCP server. The neopxe server is designed
for use with a DHCP server that is running on the same system.
1. If a compiler is not installed on the server, use YaST to install gcc with the
following commands:
# yast -i gcc
# yast -i make
2. Install the neopxe boot server daemon onto your system that is your DHCP server.
Type:
# cd /tmp/sles9-pxefiles/neopxe-0.2.0
# ./configure
# make
# make install
3. Append the path /usr/local/sbin/neopxe to the rc.local file by typing the
following command, making sure to use two greater-than signs:
# echo "/usr/local/sbin/neopxe" >> /etc/rc.d/boot.local
4. Copy the PXE Linux image from the /tmp/ directory. Type:
# mkdir /home/pxeboot
# cp /tmp/sles9-pxefiles/pxelinux.0 /home/pxeboot
5. Configure the PXE Linux image. Type:
# mkdir /home/pxeboot/pxelinux.cfg/
# touch /home/pxeboot/pxelinux.cfg/default
6. Edit the /usr/local/etc/neopxe.conf configuration file, which is read by
neopxe at startup.
■
If the /usr/local/etc/ directory does not exist, create it with the following
command:
# mkdir /usr/local/etc
■
100
If you need to create the neopxe.conf file, you can copy it from the
/tmp/sles9-pxefiles/neopxe-0.2.0/ directory.
Sun Fire X4100 and Sun Fire X4200 Servers Operating System Installation Guide • March 2006
■
A valid configuration file must have entries for each of the following lines,
including at least one service line.
ip_addr=n.n.n. n
prompt=boot-prompt-string
prompt_timeout=timeout
service=service-number,boot-server,boot-file,label
Where:
■
n.n.n.n is the IP address of your PXE server.
■
boot-prompt-string is the character string displayed during a network
boot that prompts the user to press the F8 key for a boot menu.
■
timeout is the number of seconds the prompt is displayed before the server
defaults to the first service for booting.
■
service-number is an integer in the range of 1 to 254 that identifies the boot
service.
■
boot-server is the IP address of the boot server for that boot service.
■
boot-file is the name of the boot file that is read from your /home/pxeboot
directory.
■
label is the text string that is displayed when the boot menu is invoked by
pressing the F8 key.
For example:
ip_addr=192.168.0.1
prompt=Press [F8] for menu.. .
prompt_timeout=10
service=1,192.168.0.1,pxelinux.0,Linux
service=2,192.169.0.1,nbp.unknown,Solaris
Note – Refer to the neopxe.conf man page for more information.
7. Start the neopxe daemon. Type:
# /usr/local/sbin/neopxe
Configuring the NFS Service
Complete the following steps on your DHCP server.
Appendix A
Preconfiguring Your Network to Support PXE Installation
101
1. Determine whether the NFS service package is already installed on the server.
Type:
# rpm -qa | grep nfs-utils
2. If the NFS service package is not listed, install the package using YaST. Type:
# yast -i nfs-utils
3. Edit and save the /etc/exports file to add the following line to it:
/home/pxeboot *(sync,no_root_squash,no_subtree_check,insecure)
4. Start the NFS service. Type:
# /etc/init.d/nfsserver start
5. Configure the server to always start the NFS service. Type:
# chkconfig nfslock on
# chkconfig nfsserver on
Note – If you are using a DNS server, verify that DNS entries exist for the range of
addresses defined in the PXE subnet dynamic-bootp entry in the dhcpd.conf file.
If you are not using a DNS server, edit the /etc/hosts file to add the range of host
addresses found in the PXE subnet dynamic-bootp entry in the dhcpd.conf file.
Disabling the Firewall
If a firewall is enabled on your PXE/DHCP server, you must disable it before
attempting to install a PXE image onto the client system.
Note – When you disable the firewall protection on the system that is your PXE
server, the security of the data on that server cannot be ensured. If this server is
networked outside of your local intranet, be sure to re-enable the firewall after
downloading software to PXE clients.
1. Execute the YaST command. Type:
yast
2. Choose Security & Users.
3. Choose Firewall.
■
■
102
Choose none to disable the firewall for all network interfaces.
Choose specific interfaces to enable the firewall on those only.
Sun Fire X4100 and Sun Fire X4200 Servers Operating System Installation Guide • March 2006
Installing SLES9 and SLES9 SP1 From the
Network
When you have completed all the previous configuration steps, do the following.
1. Reboot the PXE/DHCP server.
2. Refer to the “How to Create a SLES9 SP1 PXE Install Image on the PXE Server” on
page 59.
Appendix A
Preconfiguring Your Network to Support PXE Installation
103
104
Sun Fire X4100 and Sun Fire X4200 Servers Operating System Installation Guide • March 2006
Index
D
L
device driver update
Windows Server 2003, 76 to 87
documentation
Solaris 10 Operating System, 9
Sun Fire X4100 server, x
Sun Fire X4200 server, x
downloads
Sun Fire X4100 server, ix
Sun Fire X4200 server, ix
driver CD creation
Red Hat Enterprise Linux, 29 to 31
SUSE Linux Enterprise Server, 46 to 48
driver download
Windows Server 2003, 72
log file, Sun Installation Assistant, 18
E
error messages, Sun Installation Assistant, 18
F
floppy creation
Windows Server 2003, 69 to 71
I
installing an operating system
overview, 1 to 3
Red Hat Enterprise Linux, 25 to ??
Solaris 10, 5 to 16
SUSE Linux Enterprise Server, 43 to 64
Windows Server 2003, 65 to 87
M
media installation
Red Hat Enterprise Linux, 31 to 33
Solaris 10, 13
SUSE Linux Enterprise Server, 51 to 53
Windows Server 2003, 73 to 75
P
preparing for installation
Red Hat Enterprise Linux, 28
Solaris 10, 9 to 10
SUSE Linux Enterprise Server, 46
Windows Server 2003, 67 to 68
product updates
Sun Fire X2100 server, ix
Sun Fire X4100 server, ix
PXE configuration
Sun Installation Assistant, 23 to 24
PXE installation
Red Hat Enterprise Linux, 38 to ??
creating a PXE install image, 38 to 41
installing the OS, 41 to ??
preconfiguring the network, 89 to 96, 96 to ??
Solaris 10, ?? to 12
SUSE Linux Enterprise Server, 58 to 64
creating the install image, 59 to 63
installing the OS, 63 to 64
preconfiguring the network, ?? to 103
105
upgrading to SP1, 54 to 56
R
Red Hat Enterprise Linux installation
driver CD creation, 29 to 31
media installation, 31 to 33
overview, 25 to 27
preparation, 28
PXE installation, 38 to ??
creating a PXE install image, 38 to 41
installing the OS, 41 to ??
preconfiguring the network, 89 to 96, 96 to ??
remote console installation, 36 to 37
updating the operating system, 33 to 35
updating the SCSI drivers, 34
remote console installation
Red Hat Enterprise Linux, 36 to 37
SUSE Linux Enterprise Server, 56 to 58
S
SCSI driver update
Red Hat Enterprise Linux, 34
SUSE Linux Enterprise Server, 50 to 51
serial console installation
Solaris 10, 14 to 16
SLES, see SUSE Linux Enterprise Server
Solaris 10 installation
media installation, 13
overview, 5 to 9
preparation, 9 to 10
PXE installation, ?? to 12
serial console installation, 14 to 16
Sun Installation Assistant
error messages, 18
how to use, 19 to 22
log file, 18
overview, 17 to 18
PXE configuration, 23 to 24
SUSE Linux Enterprise Server installation
driver CD creation, 46 to 48
media installation, 51 to 53
overview, 43 to 45
preparation, 46
PXE installation, 58 to 64
creating the install image, 59 to 63
installing the OS, 63 to 64
preconfiguring the network, ?? to 103
remote console application, 56 to 58
updating the operating system, 49
updating the SCSI driver, 50 to 51
106
T
typographic conventions, xii
U
updating SCSI drivers
Red Hat Enterprise Linux, 34
SUSE Linux Enterprise Server, 50 to 51
updating the operating system
Red Hat Enterprise Linux, 33 to 35
SUSE Linux Enterprise Server, 49
W
Windows Server 2003 installation
device driver update, 76 to 87
driver file download, 72
floppy creation, 69 to 71
media installation, 73 to 75
overview, 65 to 66
preparation, 67 to 68
Sun Fire X4100 and Sun Fire X4200 Servers Operating System Installation Guide • March 2006