1
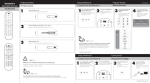
Quick Start Guide
SB-HDWT Wireless HD Transceiver
Thanks for purchasing the SunBriteTV SB-HDWT wireless HD
transceiver! Now let’s get it working.
We’re going to start by doing a quick test of the system to make
sure all the connections and components in the system are
working correctly before you install them permanently.
Step 1: Connect the transmitter
Start with the HDWT-Tx transmitter,
which is the smaller of the two components in the system. You can lay it flat
or mount it upright on its stand. Make
sure it’s placed a couple of feet away
from the other electronics.
Connect the included 6-foot
HD cable to the back of the
transmitter, then to the HD
output of a Blu-ray player, DVD player,
cable box or satellite receiver. Make
sure the device is powered up and
playing.
Now connect the small
coaxial plug from the AC
adapter to the transmitter,
and plug the AC adapter into a wall
outlet or a power strip. The green LED
on the front of the transmitter marked
Power should light up.
Step 2: Connect the receiver
First, remove the cover on the underside of the receiver, which is held
in place by a screw.
Connect the included 15foot HD cable to the HD
jack on the underside of
the receiver. Connect the other end
to one of the HD inputs on the TV.
Turn on the TV and select the HD input you used to connect the receiver.
Now plug the included AC
cord into the AC power
input on the underside of
the receiver, near the HD jack. Plug
the other end of the power cord into
a wall outlet or power strip.
All three green LEDs on the front of
the transmitter marked Power, Video
and Link, should light up then on the
receiver, Power and Link will remain
on. The Link light may take up to 60
seconds to go on.
Step 3: Make sure it’s working
The TV screen should display “Connecting to SB HDWT,” then your
program should appear on the screen.
If the screen isn’t showing the picture
from the DVD player, cable box, etc.,
check these things in order:
1) Check if all three lights
on the front of the transmitter and two lights on the
receiver are on. If they’re not, check
the power and video connections.
2) Make sure the TV is turned on and
the proper HD input is selected.
3) Make sure the source device (DVD
player, cable box, etc.) is powered up
and playing.
4) Move the transmitter and receiver
so there’s a direct line of sight between
them.
If you’ve checked all the above items
and you’re still not getting a picture,
please contact SunBriteTV.
Step 4: Connect the IR blaster
Place the transmitter as far away from
other electronic equipment as you can.
Avoid putting it inside a cabinet, which
will reduce the range of the transmitter.
Connect the 1/8-inch plug
at the end of the included IR
blaster into the IR jack on
the back of the transmitter.
Locate the source device
IR sensor: Take a small
flashlight and shine it at the
shaded, transparent front display on
the source component. You should see
a small circle or square hiding behind
the transparent plastic. Usually it’s just
to the side of the display that shows
things like play, pause and channel.
Once you find the IR sensor, peel the
adhesive from the back of the tiny
pod on the other end of the IR blaster
cable and stick it directly to the plastic
window in front of the IR sensor.
Step 5: Install the receiver
Take one of the included
rubber grommets and push it
around the 15-foot HD cable
near where it enters the receiver. Move
the grommet to where it aligns with the
slotted plastic piece on the underside
of the receiver, and slide it in so the
plastic pieces enters the groove around
the grommet.
Repeat this with the AC power cable
going into the receiver. Replace the
cover, making sure that it fits into the
grooves around the grommets, and
secure it with the retaining screw.
Now mount the receiver in a place that
will allow it to get a clear signal from
the transmitter. Preferably it should be
line-of-sight with the transmitter, such
as through a window. The signal can
usually go through one wall with no
problems, depending on how the wall
is constructed. If possible, mount the
receiver a couple of feet above the TV
so it gets a clearer signal.
You have two mounting
options for the receiver.
You can attach it directly to
a vertical surface using the keyhole
mounts, with two wood screws spaced
2-1/4 inches apart, and installed so
that the heads are 1/4-inch above the
surface.
Or you can attach the receiver directly to a horizontal
surface using the mounting
screw holes on the bottom.