1
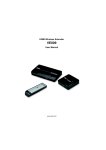
Operator’s Manual
SB-HDWT Wireless HD Transceiver
Contents
1. Important Information 1.1 Warranty
1.2 Safety Precautions 1.3 Warning: Protect Transmitter From Heat/Moisture 1.4 Declaration of Conformity
1.5 Avoiding Radio Interference 3
3
3
4
4
4
2. Introduction 2.1 Product Overview
2.2 Product Features 2.3 Package Content 2.4 HDWT-Tx Transmitter Controls and Connections
2.5 HDWT-Rx Receiver Controls and Connections
5
5
5
5
6
6
3. Installation and Operation 3.1 Connect the HDWT-Tx Transmitter
3.2 Connect the HDWT-Rx Receiver
3.3 Confirm Proper Operation
3.4 Mount the Receiver
3.5 Setting Up for Multiple Transmitter Operation
3.6 Connecting a USB Keyboard and/or Mouse
3.7 Operating Notes
7
7
7
8
8
9
10
10
4 Product Specifications 11
5 Troubleshooting 12
6 FCC ID Warning 13
7 IC ID Warning 13
8 Other Information 13
2
1. Important Information
Take time to read this user manual before using the SB-HDWT Wireless HD Transceiver.
This manual contains important information and instructions regarding operating your wireless
HDWT-Tx (transmitter) and HDWT-Rx (receiver).
1.1 Warranty
Your SB-HDWT is under limited warranty by SunBriteTV, provided the product is handled
properly for intended use, in accordance with its operating instruction. Examples of actions
that may void this warranty include but are not limited to:
●● Repairs, modification or alterations perfomed by unauthorized service personnel
●● Damages caused by accidents including but not limited to lighting, water, fire, or moisture
●● Use of third-party power adapters, or use of supplied power adapters with power sources
not compliant with the specifications on the labels of the power adaptors
●● Altering, deleting, removing or making illegible the serial numbers on the units.
1.2 Safety Precautions
WARNING!
RISK OF ELECTRICAL
SHOCK DO NOT OPEN
WARNING:
TO REDUCE THE RISK OF ELECTRICAL SHOCK DO NOT REMOVE THE COVER NO USERSERVICEABLE PARTS ARE INSIDE REFER SERVICING TO QUALIFIED PERSONNEL
●● Unplug the power supply for the transmitter and the power cord for the receiver before
you connect or disconnect A/V components to the SB-HDWT system.
●● To prevent electric shock, be sure the electrical plugs used on the transmitter's power
supply and the receiver's power cord fit the AC electrical outlets they are plugged into.
These units are designed for 120-volt, 60-cycle AC power.
●● Be sure the power cord for the receiver and the cord running from the power supply to the
transmitter are routed so they will not be accidentally damaged.
●● Do not overload AC outlets or extension cords by connecting more electrical load than
they were designed to handle. This could result in electric shock or fire.
●● If the SB-HDWT system will not be used for a month or longer, unplug the receiver's
power cord and the transmitter's power supply. This will prevent damage from lightning
strikes.
3
1.3 Warning: Protect Transmitter From Heat/Moisture
●● The transmitter should not be exposed to rain or moisture. Do not place objects
filled with liquids, such as vases, on or near the transmitter.
●● Install the transmitter in a property ventilated area, away from direct sunlight or any
source of heat.
1.4 Declaration of Conformity
This device complies with Part 15C and Part 15E of FCC Rules.
Part 15: Subpart C—Radiated Emission Limits, Additional Provisions.
Part 15: Subpart E—Unlicensed National Information Infrastructure Devices.
1.5 Avoiding Radio Interference
●● This wireless audio/video system is designed to meet the regulations of the
FCC. As such, its transmission level is set to minimize the possibility of creating
interference. By taking the steps explained below, you should be able to get about
100 feet of range as long as the transmitter and receiver are separated by no more
than one wall or one window.
●● Keep the SBHD-WT system away from equipment that may interfere with its signals.
If you see noise in the picture, the image appears blocky, or the sound breaks up,
check to make sure the transmitter and receiver are not placed near other electrical
equipment that is not part of the audio/video system.
●● Do not place the transmitter or receiver on or near large metal or metallic objects,
such as refrigerators, decorations, mirrors and patio furniture.
●● This product has been tested and manufactured to comply with all applicable safety
rules. However, there is no guarantee that interference will not occur in a specific
installation. If the interference occurs, try moving the transmitter or receiver, or
decrease the separation distance between the transmitter and receiver if possible.
●● If the transmitter and receiver are separated by a glass window or door, the glass
must not have metallic coating or tinting.
●● This product is susceptible to interference from other 5 GHz wireless devices such
as WiFi routers and some cordless phones. If this occurs, reconfigure the device to
use the 2.4 GHz band rather than the 5 GHz band if possible.
●● Never use this product in or nearby an aircraft or medical facility. Like many
products that emit radio signals, it can interfere with certain types of sensitive
equipment.
4
2. Introduction
2.1 Product Overview
The SB-HDWT wireless system contains two main components: the HDWT-Tx transmitter
and the HDWT-Rx receiver. The system transmits uncompressed video signals with
resolution up to 1080p/60Hz with accompanying stereo audio. The HDWT-Tx transmitter
connects via HD cable to standard video sources including a cable box, satellite receiver,
Internet streaming box (Apple TV, Roku, etc.), a Blu-ray or DVD player, most video game
consoles, and computers and tablets with HD output. The HDWT-Rx connects to any TV with
HD input, and its weather-resistant design allows it to be used outdoors. The SB-HDWT can
save users the trouble and expense of running video and audio cables through walls.
2.2 Product Features
l
l
l
l
l
l
l
l
Working frequency range: 4.9 GHz - 5.9 GHz
Compact transmitter and receiver designs
Built in omnidirectional antennas
USB connection for remote operation of USB keyboard/mouse/joystick
Up to 100-foot range under specified condition, with very low latency
Remote control and all necessary cables included
Weatherproof receiver can be used outdoors
Transmits/receives commands from standard IR remote controls
2.3 Package Contents
Please make sure the following items are present in the package. If any items are missing or
damaged, please call your SunBriteTV distributor.
transmitter base
HDWT-Rx transmitter
transmitter power supply
HDWT-Rx receiver
receiver
power cord
15-foot HD cable
IR emitter
remote
control
quick start
guide
6-foot HD cable
5
2.4 HDWT-Tx Transmitter Controls and
Connections
FRONT PANEL
1. Power LED: Indicates that unit is powered
2. Video LED: Indicates that active HD source is connected
3. Link LED: Indicates wireless connection between HDWT-Tx and HDWT-Rx
receiver
4. USB Interface: Used for PC connection or other USB device, such as a
keyboard
BACK PANEL
5. IR IN: Connects to the supplied IR emitter
6. Reset button: Press to reset wireless connection. Holding this button down for more than 5 seconds will turn the unit off.
7. HD IN: Connects to the video source device
(cable box, satellite receiver, etc.)
8. DC IN Jack: Connects to the power supply
2.5 HDWT-Rx Receiver Controls and
Connections
FRONT PANEL
1. Link LED: Indicates wireless connection between HDWT-Rx and
HDWT-Tx transmitter
2. Video LED: Indicates that active HDMI source is connected
3. Power LED: Indicates that unit is powered
BACK PANEL
4. HD OUT Jack: Connects to the video monitor/TV
5. AC POWER IN: Connects to the supplied power cord
6. USB Interface: Used for PC connection or other USB device, such as a
keyboard
6
3. Installation and Operation
3.1 Connecting the HDWT-Tx Transmitter
You can lay the transmitter flat or mount it upright on its stand. Make sure it’s placed
a couple of feet away from the other electronics. Avoid putting it inside a cabinet,
which will reduce the range of the transmitter.
Connect the included 6-foot HD cable to the back of the transmitter, then to the HD
output of a Blu-ray player, DVD player, cable box or satellite receiver. Make sure the
device is powered up and playing.
source device
HD cable
IR emitter cable
Connect the 1/8-inch plug at the end of the included IR emitter to the IR IN jack on
the transmitter. Locate the source device IR sensor by taking a small flashlight and
shining it at the shaded, transparent front display on the source component. You
should see a small circle or square hiding behind the transparent plastic. Once you
find the IR sensor, peel the adhesive from the back of the tiny pod on the other end of
the IR emitter cable and stick it directly to the plastic window in front of the IR sensor.
Now connect the small coaxial plug from the included power supply to the transmitter,
and plug the AC adapter into a wall outlet or a power strip. The green LED on the
front of the transmitter marked Power should light up.
3.2 Connecting the HDWT-Rx Receiver
Remove the cover on the underside of the receiver, which is held in place by a screw.
HD video cable
AC power cord
7
Connect the included 15-foot HD cable to the HD jack on the underside of the receiver. Connect the other end to one of the HD inputs on the TV. Turn on the TV and
select the HD input you used to connect the receiver.
Now plug the included AC cord into the AC power input on the underside of the
receiver, near the HD jack. Plug the other end of the power cord into a wall outlet or
power strip.
All three green LEDs on the front of the transmitter and the receiver, marked Power,
Video and Link, should light up. The Link light may take up to 60 seconds to go on.
3.3 Confirm Proper Operation
The TV screen should display “Connecting to SB HDWT,” then your program should
appear on the screen. If you have connected an IR emitter to the HDWT-Tx transmitter and the source device, the source device’s remote should now control the device
when the remote is pointed at the HDWT-Rx receiver window.
If the screen isn’t showing the picture from the DVD player, cable box, etc., check
these things in order:
1) Check if all three lights on the front of the transmitter and two lights on the receiver
are on. If they’re not, check the power and video connections.
2) Make sure the TV is turned on and the proper HD input is selected.
3) Make sure the source device (DVD player, cable box, etc.) is powered up and
playing.
4) Move the transmitter and receiver so there’s a direct line of sight between them.
If you’ve checked all the above items and you’re still not getting a picture, please contact SunBriteTV.
3.4 Mount the Receiver
Take one of the included rubber grommets and push it around
the 15-foot HD cable near where it enters the receiver. Move
the grommet to where it aligns with the slotted plastic piece on
the underside of the receiver, and slide it in so the plastic pieces enters the groove around the grommet.
Repeat this with the AC power cable going into the receiver.
Replace the cover, making sure that it fits into the grooves
around the grommets, and secure it with the retaining screw.
Mount the receiver where it can get a clear signal from the
transmitter. Preferably it should be line-of-sight with the transmitter, such as through a window. The signal can usually go
through one wall, depending on how the wall is constructed. If
possible, mount the receiver a couple of feet above the TV so it gets a clearer signal.
You have two mounting options for the receiver. You can attach it directly to a vertical
surface using the keyhole mounts, with two wood screws spaced 2-1/4 inches apart,
and installed so that the heads are 1/4-inch above the surface. Or you can attach the
receiver directly to a horizontal surface using the mounting screw holes on the bottom.
8
keyhole mounts
grommets
mounting screw holes
3.5 Setting Up for Multiple Transmitter Operation
The HDWT-Rx receiver can be used with multiple HDWT-Tx transmitters, which are
available separately from your SunBriteTV dealer or distributor. With multiple transmitters set up, you will be able to use mulitple source devices and switch among them
using the Source button on the included remote control.
ADDING A TRANSMITTER
To add a second (or third, fourth, etc.) transmitter to the system, first connect the
source to the transmitter with an HDMI cable. Plug in the power supply and you
should see the green power light on. Point the SB-HDWT
remote at the HDWT-Rx receiver. The remote’s operating
range is relatively narrow, so it’s best to hold it about 3 feet
away, directly in front of the receiver. Press the Menu button on the remote. You should see the on-screen menu at
right appear on your TV.
Use the up/down cursor keys on the remote to highlight “Add New Video Source” on
the menu, then press the OK button at the center of the cursor keys. You will see a
message on-screen that says “Please Activate Registration on Transmitter Unit.” Now
push the reset button on the transmitter.
Within about 15 seconds, it should connect and will then display “Press OK to continue or Exit to cancel.” Press OK and you should see a picture on the TV if a source
device is connected to the additional transmitter.
After you have added all the additional transmitters, press the Exit button on the remote to exit the on-screen menu.
USING MULTIPLE TRANSMITTERS
Once the additional transmitter is connected with the receiver, you will be able to
switch among the different transmitters/source devices by using the Source button on
the remote control.
Note that if there is no video source connected to one of the transmitters, or if the
video source or transmitter is powered down, you will get an on-screen message that
says “Wireless Off.” Reconnect the video source if necessary, and make sure the
video source and the transmitter are both powered up.
DELETING A TRANSMITTER
Press the Menu button on the remote. Use the up/down cursor keys on the remote to
highlight “Remove Video Source” on the menu, then press
the OK button at the center of the cursor keys. Then use
the up/down cursor keys to select the source you want to
remove.
Once the transmitter/source is removed, the video image will disappear. Use the
Source button on the remote to switch to an active source.
9
3.6 Connecting a USB Keyboard and/or Mouse
The SB-HDWT system can transmit signals from a USB keyboard connected to the
HDWT-Rx receiver to a computer connected to the HDWT-Tx transmitter. This arrangement may come in handy if you are using the SB-HDWT system to transmit HD
video from a computer, or if you wish to browse the web through the TV connected to
the system. A wireless keyboard and mouse using a USB dongle works well.
To set up a USB keyboard and/or mouse with the system, simply plug the USB
device into the jack on the side of the receiver. This jack is normally protected by a
rubber cover, which you will have to remove to access the jack.
Now use a female-to-female USB cable to connect the USB jack on the transmitter to
any USB input on the computer. The USB device connected to the transmitter should
now be able to operate the connected computer through the wireless link.
When you are done using the USB device connected to the receiver, it’s best to disconnect it and reinstall the rubber cover to protect the receiver from moisture and dust.
3.7 Operating Notes
In normal operation, the SB-HDWT wireless HD system needs no input from the user,
other than using the Source button on the remote to select the desired source when
multiple transmitters are used.
If the source device is powered off or is disconnected, the SB-HDWT system will go
into standby mode after 1 minute. The Power LEDs on the transmitter and receiver will
still be green. The transmitter and receiver will both go active as soon as an active
source device is connected.
If you want to put the system into “deep sleep” mode to minimize power consumption,
hold down the Reset button on the back of the transmitter for 5 seconds. The Power
LED will turn red.
To turn the system back on, press and hold the reset button on the transmitter for 5
seconds. The green power light will come on. Then point the remote at the receiver
and press Power. The red light will turn green. Or just cycle the power on both units.
10
4. Product Specifications
GENERAL SPECIFICATIONS
Model
HDWT-Tx
HDWT-Rx
Supported video frequencies
1080p, 720p, 1080i, 576p, 480p, 480i, 576i
HDMI port
Supports HDMI1.3 audio format and encrypted video format
HDCP 2.0
Transmission distance
100 feet / 35 meters
System latency
<1 ms
Antenna
Built-in omnidirectional antennas
Operating frequency
4.9 - 5.9 GHz
Power supply
100 - 240V alternating current input, 5V 2.5/3A direct current
power adaptor
Certificates
FCC Part 15
Standard
WHDI 1.0
IR repeater function
3.5mm input jack for standard
IR emitter (included)
Built-in IR remote control
receiving module
IR specification
153(L) x 101(W) x 4mm(H)
Working temperature
0 °C -70 °C
Dimensions
HDWT-Tx 5.75" x 3.5" x 1"; HDWT-Rx 9.75" x 8.5" x 2.25"
11
5. Troubleshooting
Before following the troubleshooting guide below, please make sure that transmitter,
receiver, source equipment and display equipment are all switched on and properly
connected. In normal operation, the Video LED on the receiver will be off (it is
on only during the connection process.) The Power, Video and Link LEDs on the
transmitter and the Power and Link LEDs on the receiver will glow steady green.
No picture
1. Check the status of the Link LEDs, and check to make sure the source
device is powered up and working normally.
2. Make sure the HD video cables from the source device to the transmitter
and from the receiver to the TV are undamanged and plugged in correctly.
3. Make sure the correct input is selected on the TV.
4. If you are using multiple transmitters, use the Source button on the remote
to make sure an active source is selected.
5. Make sure that the transmitter and receiver are within 100 feet of each
other and there is at most one wall or window between them. If the two are
separated by a window, the window must not have a metallic coating.
Power LED off
on transmitter or
receiver
1. If the LED is off on the transmitter, make sure the AC adapter is plugged in
to an active wall socket and that it is connected to the transmitter's DC input.
2. If the LED is off on the receiver, make sure the AC cord is firmly plugged
into the receiver and the wall socket.
Video LED on
receiver glows
steady green
1. Make sure the HD video cable between the source device and the
transmitter is undamaged and firmly connected. Reconnect the cable if it has
come loose, or replace it if it has become damaged.
Link LED on
receiver is on,
but no picture
1. Make sure the correct source is selected on the TV set.
2. Make sure the HD video cable from the receiver to the TV set is
undamaged and properly connected.
Link LED on
transmitter and
receiver is off
1. Make sure that the transmitter and receiver are within 100 feet of each
other and there is at most one wall or window between them. If the two are
separated by a window, the window must not have a metallic coating.
Bad picture
1. Check the quality of the picture coming from the source device by
connecting the device directly to a TV, if possible.
2. Make sure the HD video cables between the source and the transmitter
and the receiver and TV are undamaged and connected correctly.
3. Make sure that the transmitter and receiver are within 100 feet of each
other and there is at most one wall or window between them.
Good picture
but bad audio or
no audio
1. Make sure that the source is set to output stereo audio.
2. Make sure the volume is turned up on the TV.
3. Restart the audio source and reconnect the transceiver and video source.
4. Make sure there are no 4.9 - 5.9 GHz devices within 2 ft / 50 cm of the
receiver.
Other problems
1. If any other issue occurs, try unplugging the power on the transmitter and
receiver to reestablish a connection.
12
6. FCC ID Warning
This device complies with Part 15 of the FCC Rules. Operation is subject to the
following two conditions: (1) this device may not cause harmful interference, and (2)
this device must accept any interference received, including interference that may
cause undesired operation.
The user manual or instruction manual for an intentional or unintentional radiator shall
caution the user that changes or modifications not expressly approved by the party
responsible for compliance could void the user's authority to operate the equipment.
In cases where the manual is provided only in a form other than paper, such as on
a computer disk or over the Internet, the information required by this section may be
included in the manual in that alternative form, provided the user can reasonably be
expected to have the capability to access information in that form.
For a Class B digital device or peripheral, the user instructions shall include the
following or similar statement, placed in a prominent location in the text of the manual:
NOTE: This equipment has been tested and found to comply with the limits for a Class
B digital device, pursuant to Part 15 of the FCC Rules. These limits are designed to
provide reasonable protection against harmful interference in a residential installation.
This equipment generates, uses and can radiate radio frequency energy and, if not
installed and used in accordance with the instructions, may cause harmful interference
to radio communications. However, there is no guarantee that interference will not
occur in a particular installation. If this equipment does cause harmful interference to
radio or television reception, which can be determined by turning the equipment off
and on, the user is encouraged to try to correct the interference by one or more of the
following measures:
• Reorient or relocate the HDWT-Rx. Increase the separation between the equipment and receiver.
• Connect the equipment into an outlet on a circuit different from that to which the receiver is connected.
• Consult the dealer or an experienced radio/TV technician for help.
7. IC ID Warning
DISCLAIMER
Operation is subject to the following two conditions: (1) this device may not cause
interference, and (2) this device must accept any interference, including interference
that may cause undesired effects.
8.Other Information
We suggest you read this user manual carefully before using our product. If any
problems occur while using our product that cannot be resolved after consulting this
manual, please contact us:
E-mail: [email protected]
Tel: 866 357-8688
13