1
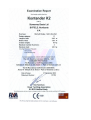
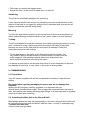
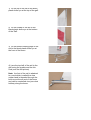
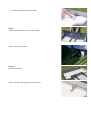
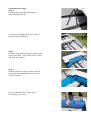
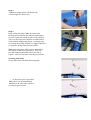
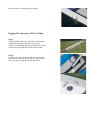
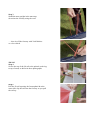
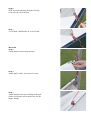
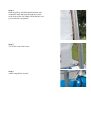
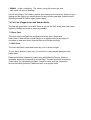
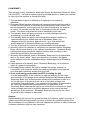
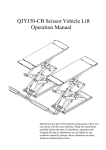
K2
OWNERʼS MANUAL
Stowaway Boats Ltd. 7 Towers Close, Kenilworth,
Warwickshire, CV8 1FG
Tel. +44 (0)1327 264704 Fax. +44 0870 7063053
Email: [email protected]
Website: www.stowawayboats.com
INDEX
1. INTRODUCTION
2. SPECIFICATIONS - RYA Examination Report Certificate
2.2 Identification
2.3 Dimension
3. EC Declaration of Conformity
4. SAFETY INFORMATION
4.1 Design Category
4.2 Loading
4.3 Safety Equipment
4.4 Buoyancy Tubes
4.5 Capsize Recovery
4.6 Man Overboard Prevention and Recovery
4.7 Use of an Outboard Engine
4.8 Towing, Anchoring, Mooring and Trailing
5. COMMISSIONING
5.1 Preparation
5.2 Attaching the Main Sail to Boom & Gaff
6 Assembly & Rigging Instructions
7. MAINTENANCE
7.1 Boat Care
7.2 Foil Care (Rudder blade & dagger board
7.3 Spar Care
7.4 Sail Care
8. WARRANTY
1. INTRODUCTION
Congratulations on the purchase of your new Stowaway K2 folding sailing dinghy.
This manual has been compiled to help you operate your K2 with safety and
pleasure. It contains details of the craft; the equipment supplied or fitted, its systems
and information on its safe operation and maintenance. Please read it carefully and
be sure that you understand its contents before using your K2.
If this is your first craft, or you are changing to a type of craft you are not
familiar with, for your own safety and comfort, please ensure that you have
adequate experience before assuming command of the craft. If you are
unsure, your dealer or national sailing federation (RYA in UK) will be able to advise
you of a local sailing school, or competent instructor.
Please keep this manual in a secure place and hand it over to the new
owner if you sell the craft.
Please Note the builders plate attached at the stern of the craft.
For further information, spares and accessories, please contact your
local dealer or:
Stowaway Boats Ltd
7 Towers Close
Kenilworth
Warwickshire CV8 1FG
Tel: 01327 264704
Fax: 0870 7063053
Email: [email protected]
2.
SPECIFICATIONS
2.1
Identification.
Your K2 can be identified by the Craft Identification Number (CIN).
You may also assign a sail number and put the sail number on the mainsail itself.
This number Is 8,9, & 10th part of your CIN on the next page.
The Craft Identification Number, or CIN, is required by European law. The
Recreational Craft Directive stipulates that every craft sold in Europe should
meet the categories set down by it and display an individual number to show it
meets with these rules. Your K2 complies with the RCD to design
category D and a CIN is printed on the top of the dagger box and under the boat on
the keel near the skeg wheel.
2.2
Dimensions.
Length Overall (LOA): 3070mm
Beam: 1285mm
Folded dimensions:
Length 3100mm
Width (Max) 480mm
Depth 220mm
Weights:
Weight of folded hull 43.4kg
Thwarts, Side seats & transoms15kg
Sails, mast, boom and gaff 9kg
Rudder tiller 2.8kg
Dagger board 3.6kg
Sail Area, Main & Jib 5.67 sq.m
3. EC DECLARATION OF CONFORMITY TO
DIRECTIVE 94/25/CE
I declare that the craft described as:
K2
Bearing the Craft Identification Number:
G B S
F
K K 2
0
0
2
F
7
0
Conforms to EU Recreational Craft Directive 94/25/EC
Annex 1 – sections 3.2 & 3.3 and Annex 6 – Module Aa
EU Notified Body: No. 1681 (Royal Yachting Assoc.)
ISO Standards BS EN ISO 10087, 12217, 12215, 10240,
14945, 8666
Trade Marque Stowaway Boats
Type K2
Design Category D
Maximum Crew 3
Maximum Load 260kg inc. 3 persons at 75kg each, carry on load &
outboard engine
Overall Length 3.05m
Builders Name Stowaway Boats Ltd, England
Date
__ / __ / __
(The date does not indicate the date of manufacture)
Signed Name: ____________________
Signature: _________________
7
4. SAFETY INFORMATION
4.1 Design Category.
The K2 is a Design Category D boat. The definition of this category is:
• Design Category: D – ‘inshore’
• Description of Use: Designed for sheltered coastal waters, large
bays, estuaries, lakes and rivers.
• Wind Force: Up to, and including Beaufort force 4.
• Significant Wave Height: up to, and including 1/3 m.
The K2 complies with this design category, subject to:
• The crew having suitable skill and experience.
• Satisfactory construction and maintenance of the boat and its
equipment, including the provision of buoyancy provided.
Users of this boat are advised that:
• All crew should receive suitable training.
• The boat should not carry more than the maximum load.
• Any water in the hull should be kept to a minimum.
• Stability is reduced by any weight added high up (e.g. standing up!).
4.2 Loading.
The maximum recommended load for the K2 is 260 kg and the
maximum number of crew it can carry is three.
The minimum recommended crew weight is 75 kg.
4.3 Safety Equipment.
It is your responsibility to ensure that all necessary safety equipment is
obtained for the type of sailing you are participating in and it is readily
accessible on board while the boat is in operation. Each person should wear a
correct size and correctly fitted life jacket or buoyancy aid (a crutch strap is
advisable to stop the life jacket riding up). A bailer or other suitable device (e.g.
small bucket, plastic milk bottle with opening cut in), should be attached by rope to
the boat. A set of oars and paddles is advisable in case you cannot sail or motor the
boat. Note: the self draining bailer should be kept shut using the bungee cord
provided and only used to expel water when underway at sufficient speed.
All crew must ensure their safety, particularly in relation to the boom which could
injure and/or render someone unconscious if it swings without warning. This danger
may be reduced by wearing a helmet (canoe or cycle variety) and/or putting
domestic pipe foam insulation along the boom to spread any impact.
4.4 Capsize Recovery.
The capsize is an inevitable part of dinghy sailing and the K2 is no exception. You
should practice capsize recovery when you first sail the boat, ideally in an area
where there is some kind of safety patrol to assist you, should you get into difficulty.
Recovery technique.
Should you capsize your K2:
• If the dagger board was up, it should be lowered and secured with the
bungee cord by a member of the crew.
• The jib sheet should be uncleated and made sure that it will run freely
when the boat is righted.
• The vang should be eased to de-power the top of the mainsail.
If the boat inverts, it should be pulled onto its side so that the rig is horizontal
to the water. This can be done by pulling on the dagger board using your body
weight and placing feet on the underside of the boat.
You can slow/prevent the inversion of the boat by attaching a float (e.g. large plastic
milk bottle) to the top of the gunter (top of sail) to help keep this on the water rather
than sink under it.
Recovery: Sailing Solo
If possible get hold of a jib sheet or the main sail so that you are attached to the
boat. As you start to right the boat, the wind will blow under the mainsail and help
you right it. Try to let the sail come out of the water slowly to help turn the boat into
the wind, so that there is no wind pressure on the sail when the boat reaches the
upright position. If the sail comes up too quickly and there is wind in the sail, it is
likely to cause the boat to capsize again. Once the boat is up, still holding onto a
sheet enter the boat quickly from the stern and crawl in - bale out as much as you
can before proceeding to sail off.
Note: Some people permanently attach a rope step (loop) to their boat to be
deployed to help them get back on board.
Recovery: Sailing with a crew member
Position your crew member on the other side of the boat so that when the boat
comes up he/she scoops them self into the boat. Get him/her to ensure the dagger
board is down and the boat is head to wind, sails flapping freely before attempting to
help you on board, whilst keeping the boat level by adjusting his/her weight to the
other side until you clamber on.
4.5 Buoyancy Tubes.
The K2 is equipped with 3 buoyancy tubes just in case of capsize or swamping.
The following points should be noted:
• Should a buoyancy tube become punctured, do not use
the boat until it is properly repaired. If in any doubt, contact Stowaway
Boats for repair details.
• Ensure the tubes are strapped through the plastic bridges to the bottom and
sides of the hull and adequately inflated.
Danger: The boat will sink without adequate buoyancy
4.6 Man Overboard Prevention and Recovery.
Working deck.
The working deck of the K2, is covered with a non slip coating. Ensure you wear
non slip footwear to provide a good grip:
Crew overboard recovery.
The K2 is designed to be sailed solo or with two persons. However, it can
accommodate up to three persons. When sailing it is recommended that
you ensure adequate safety cover is in attendance before launching should
you or your crew get into trouble.
Should one of you fall overboard, be it helm or crew, you should try to gain
control of the boat as soon as possible. It may be that the boat has capsized
soon after, in which case the crewmember in the water should endeavour to return
to the boat to aid in it’s righting.
To recover a crew member from the water:
• The helm should bring the boat just downwind of the person in the
water and then head the boat to wind to stop the boat - let the sails go
freely.
• The helm should balance the boat, using a combination of body weight
movement.
• The crew should board the boat via the windward gunwale using a
combination of the following handholds: the gunnel and the side seat.
4.7 Use of an Outboard Engine.
The K2 is designed for use with an outboard engine. Do not use an engine heavier
than 20kg (including fuel) or greater than 3kw (4h.p.). Ensure the engine is bolted
on properly to the transom; we strongly advise that you spread the pressure on the
fiberglass by using a thin piece of ply either side.
Ensure you sit far enough forward to keep the bow just in the water and that you do
not suddenly gun the engine in a way that causes the front of the boat to suddenly
lift out of the water, thereby creating a danger of capsize.
You may choose to put the side tubes on the outside of the boat for extra stability
but still ensure that the aft buoyancy tube is fixed internally.
4.8 Towing, Anchoring, Mooring and Trailing.
Towing.
Should it become necessary to tow the K2, you should follow the
procedure below:
• Secure the towing line around the base of the mast. If the mast has
failed, secure the line around the painter fixing on the bow.
• Fully raise or remove the dagger board.
• Stay at the tiller. In the event of rudder loss, sit well aft.
Anchoring.
The K2 is not specifically equipped for anchoring.
If you intend to anchor, the anchor line should be secured round the base of the
mast or if the boat is not rigged for sailing to the 2 stainless steel eyes on the aft
transom so that the boat will swing freely.
Mooring.
To moor the boat use the painter to secure the front of the boat and another line
either passed through a rowlock holder or the "horse" (rope on the aft transom)
Trailing.
The K2 Is designed to avoid the necessity for a trailer by putting the boat on a roof
rack. However if using a trailer tying down the boat to its trailer is important
because too much or too little tension could result in damage. Follow the
instructions below for safe trailing:
• Tie the boat down to the trailer at the bow and across the middle. You
only need to apply sufficient tension to hold the boat in contact with the
trailer supports. Use padding material where any straps touch the
deck and where the boat is touching the trailer..
It is always a good idea to tie the boat down when it is left unattended to prevent
any damage to you boat, or any other, in the event of strong winds.
5. COMMISSIONING
5.1 Preparation.
Your K2 comes complete with all the components necessary to take the boat
sailing.
Be careful when opening packaging to ensure you do not damage the
contents.
Whilst your K2 has been carefully prepared, it is important that you
should check that all bolts are tight. This is especially important when the boat is
new, as travelling can loosen seemingly tight fittings. It is also important to regularly
check such items prior to sailing.
5.2 Attaching the Main Sail to the Boom & Gaff
Most people attach the main sail permanently to the boom and gaff and roll the sail
up round the boom and gaff and store it with the mast – usually in a sail/spar bag.
To attach the main sail
Use the white cord provided.
1) Tie the top of the sail to the black
plastic bulls eye at the top of the gaff.
2) Tie the middle of the sail to the
black plastic bulls eye at the bottom
of the Gaff.
3) Tie the bottom leading edge of the
sail to the black plastic bulls eye at
the front of the boom.
4) Lace the top half of the sail to the
gaff using the eyelets and the thin
cord (see the first picture)
Note: the foot of the sail is attached
to a cord which is called the clew
outhaul and is threaded through the
bulls eye at the aft end of the boom
and can be controlled via a jam cleat
halfway along the boom.
6 Assembling a Stowaway K2
Step 1
Open boat up preferably on grass to avoid
damaging/scratching the fibreglass.
Step 2
Insert centre thwart.
Step 3
Secure catches on top.
Step 4
Secure catches underneath, located either
side of centre box.
Step 5
Attach Forward Transom (bow plate).
Step 6
Secure catch to keel.
Step 7
Secure internal side catches.
Step 8
Insert forward thwart.
Secure catches.
….. and insert locking pin if provided.
Step 9
Attach stern transom & secure side catches.
Secure catch to keel plate
Step 10
Insert stern thwart.
Secure catches (& locking pins if provided).
Fitting Buoyancy Bags
Step 1
Put buoyancy straps through bridges on
side and bottom of hull.
8 straps in total: Note: these can be left in
the boat when folded away
Step 2
Partially inflate and insert stern buoyancy bag
first (if provided) – fully inflate once in place
and strap in (2 straps).
Step 3
Partially inflate the long buoyancy tubes &
ensure that they push against the stern bag
to hold it in place
Keep the inflation valve visible at the
bow end for easy access.
Step 4
Tighten all straps (these will then be the
correct length for future use).
Step 5
Fully inflate the tubes. Note: be aware that
the bags will expand as the ambient temperature
rises & if under too much pressure may puncture.
The air in the bags may contract overtime and/or
if the ambient temperature drops, requiring extra
air to keep them fully inflated; we suggest therefore
you take the pump with you when afloat.
Note: these buoyancy tubes may be attached to
the outside of the boat if preferred. This will
provide fendering and also reduce the risk of
capsize. However keep the stern bag in position.
Securing Side Seats
Secure side seats with bolts and wing nuts.
…… or drop nose pins if provided.
Note: these can be permanently
attached to the side seats with wire
or string to prevent loss.
Insert & secure rowlocks only if rowing.
Rigging The Stowaway K2 For Sailing
Step 1
Check that the main sail is securing and correctly
attached to the boom and gaff (see separate
pictures for attaching this; normally the sail is kept
on the boom and gaff and stored with the mast.
Step 2
Lay the mast in the boat with the foot of the mast
near the mast step (on floor of boat). Then secure
the 2 side stays using the catches provided.
Step 3
Stand the mast upright in the mast step
& tension the forestay using the cord.
…. then tie off the forestay with 2 half hitches
or a clove hitch.
Jib Sail
Step 4
Secure the top of the jib sail to the uphaul (cord ring
to top of mast) as shown in these photographs
Step 5
Pull the jib sail up using the front uphaul & at the
same time clip the sail onto the forestay as you pull
the sail up.
Step 6
With the cord remaining from the forestay,
secure the jib sail to the bow..
Step 7
Tie off with 2 half hitches or a clove hitch.
Main Sail
Step 1
Attach boom to mast using split pin.
Step 2
Attach gaff to slider, ensure pin is secure.
Step 3
Attach uphaul to the lower fitting on the gaff
(unless reefing the sail in which case use the
higher fitting)
Step 4
Haul the gaff up and then thread the thin cord
around the mast and back through the eyelets
in the front of the sail. Note: check that the cord
goes inside the sail uphauls.
Step 5
Tie off the cord at the boom.
Step 6
Attach vang/kicker to mast.
Note: The dagger board should only be put in
when the boat is in the water. If the water is
shallow, hold the dagger board up using the
elasticated cord attached to the front of the centre
thwart and securing it to the back of the centre
thwart.
The rudder/tiller are best put on when the boat
is in the water. If not care must be taken not to
damage the rudder on the ground.
Note: the tiller goes underneath the rope horse.
You are now ready to launch the boat.
7. Maintenance
7.1 Boat Care.
The K2 is made using fibreglass; the hull floor panels also have a foam sandwich.
This is stiff and light, but will dent if subjected to point loading. The boat should be
protected when supported on roof bars etc by dense foam (e.g. domestic pipe
insulation).
Obviously in dealing with a marine environment, equipment gets wet, which in
itself is not a problem. The problem starts when moisture is trapped for any
length of time. The key, therefore, is to store the boat properly dried off. Water
absorption could cause blistering and raised fibre pattern.
Keep your dinghy drained and well ventilated.
• Ensure the boat is stored with self draining bailer open to allow water to
drain away.
Wash with fresh water.
Fresh water evaporates far more quickly than salt water; so if your dinghy has
been sailed in salt water wash it off thoroughly. The fittings will also work
better if regularly washed. Be sure to flush any grit out of the boat before folding it
to ensure nothing gets trapped in the neoprene rubber hinge.
Hull damage falls into three categories:
• SERIOUS – large hole, split, crack or worse. Don’t be too distressed!
Get the remnants back to our factory – most problems can be repaired.
• MEDIUM – small hole or split, gel crazing. If this occurs during an event,
sailing can often be continued as long as leaking can be prevented by
drying the area and applying strong adhesive tape.
CAUTION – if the damage is close to a heavily loaded point then a close
examination should be made to ensure joints and laminate are fit for the
prevailing conditions. Get the damage professionally repaired as soon as possible.
• SMALL – chips, scratching. The owner, using the correct gel coat,
can repair this type of damage.
As with any dinghy, the loads on blocks and ropes can be immense. As part of your
rigging and de-rigging you should check for worn blocks and rope, twisted or bent
shackle pins and any other highly loaded parts.
7.2 Foil Care (Dagger board and Rudder Blade).
The foils are glass fibre. Look after them as you do the hull. Wash with fresh water
regularly. Repair any chips as soon as possible.
7.3 Spar Care.
The mast, boom and gaff are anodised aluminium tube. Wash with
fresh water. Check all the riveted fittings on a regular basis for any signs of
corrosion or wear and check that the bolts on the slider are tight.
7.4 Sail Care.
The main should be rolled and stored dry, out of direct sunlight.
If your sail is stained in any way, try to remove it using normal detergent and
warm water.
Repairs should be temporarily made using self-adhesive Dacron, Mylar or
spinnaker repair tape (depending on sail type). The sail should be returned to
a sail maker for a professional repair. Check for wear and tear, especially
around the batten pockets (if battened sail) on a regular basis.
8 WARRANTY
This warranty is only available for boats sold directly by Stowaway Boats Ltd, within
UK & the EEC. If a boat is sold through a nominated retailer or dealer your redress
by law in the first instance is through the seller.
1. This warrantee is given in addition to all rights given by statute or
otherwise.
2. Stowaway Boats warrants all boats and component parts manufactured by
it to be free from defects in materials and workmanship under normal use
and circumstances, and the exercise of prudent seamanship, for a period
of twelve (12) months form the date of commissioning by the original
owner. The owner must exercise routine maintenance and care.
3. This warranty does not apply to defects in surface coatings caused by
weathering or normal use and wear.
4. This warranty does not apply if the boat has been altered, modified, or
repaired without prior written approval of Stowaway Boats. Any
changes to the hull structure, deck structure, rig or foils without the
written approval of Stowaway Boats may void this warranty.
5. The use of the boat for commercial purposes shall void this warranty.
6. Warranty claims for materials or equipment not manufactured by Stowaway
Boats can be made directly to the relevant manufacturer. Stowaway Boats
warrants that these parts were installed correctly and according to the
instructions provided by the manufacturer.
7. Warranty claims shall be made to Stowaway Boats as soon as practicable
and, in any event, within 7 days upon discovery of a defect. No repairs
under warranty are to be undertaken without written approval of Stowaway
Boats.
8. Upon approval of a warranty claim, Stowaway Boats may, at its expense,
repair or replace the component.
9. Stowaway Boats reserves the right to change the design, material, or
construction of its products without incurring any obligation to incorporate
such changes in products already built or in use.
10.Cost of returning goods within the EEC (including the UK)
It is the responsibility of the customer to organise and pay for the return
and insurance of the goods to the address designated by Stowaway Boats.
Stowaway Boats may at its discretion reimburse the customer in part or in
full for the return of goods up to the value of the initial carriage cost
incurred by Stowaway Boats. If on inspection the problem is considered to
be clearly and demonstrably exempted from our guarantee, then
Stowaway Boats reserves the right to not reimburse the customer for these
return carriage costs and to be paid in advance for the cost of sending
goods back to the customer. Stowaway Boats will only pay for the return
of goods to the customer its discretion.
General
Notwithstanding the terms of our guarantee and your statutory rights, our policy is,
wherever practical and appropriate, to strive to resolve any problems arising from
the manufacture of our products in the most appropriate manner in order to maintain
customer satisfaction and our own reputation.