1
Code Composer Studio
Development Tools v3.3
Getting Started Guide
Literature Number: SPRU509H
October 2006
2
SPRU509H – October 2006
Submit Documentation Feedback
Contents
Preface ............................................................................................................................... 9
1
2
Introduction
Welcome to the World of eXpressDSP™ ...................................................................... 12
1.2
Development Flow
13
............................................................................................. 15
2.1
Launching the Code Composer Studio Development Tools ................................................. 16
2.2
Creating a New Project ........................................................................................... 16
2.3
Building Your Program............................................................................................ 17
2.4
Loading Your Program............................................................................................ 17
2.5
Basic Debugging
2.6
Important Icons Used in Code Composer Studio .................................................... 16
..................................................................................................
2.5.1 Go to Main ................................................................................................
2.5.2 Using Breakpoints ........................................................................................
2.5.3 Source Stepping ..........................................................................................
2.5.4 Viewing Variables ........................................................................................
2.5.5 Output Window ...........................................................................................
2.5.6 Symbol Browser ..........................................................................................
Introduction to Help ...............................................................................................
Target and Host Setup
3.1
3.2
17
17
17
18
18
18
18
18
.............................................................................................. 19
Setting Up the Target ............................................................................................. 20
..................................................................
3.1.2 Parallel Debug Manager.................................................................................
3.1.3 Connect/Disconnect ......................................................................................
3.1.4 Status Bar .................................................................................................
Host IDE Customization ..........................................................................................
3.2.1 Default Colors and Faults ...............................................................................
3.2.2 Default Keyboard Shortcuts .............................................................................
3.2.3 Other IDE Customizations ..............................................................................
3.1.1
4
................................................................................................
Getting Started Quickly
2.1.1
3
............................................................................................................. 11
1.1
Code Composer Studio Setup Utility
20
23
23
24
24
24
25
25
.......................................................................................................... 27
.............................................................................................. 28
4.1.1 Creating a Project ........................................................................................ 28
4.1.2 Project Configurations ................................................................................... 30
4.1.3 Project Dependencies ................................................................................... 31
4.1.4 Makefiles .................................................................................................. 32
4.1.5 Source Control Integration .............................................................................. 33
Text Editor .......................................................................................................... 34
4.2.1 Viewing and Editing Code ............................................................................... 34
4.2.2 Customizing the Code Window ......................................................................... 34
4.2.3 Using the Editor's Text Processing Functionality .................................................... 35
4.2.4 Setting Auto-Save Defaults ............................................................................. 36
4.2.5 Autocompletion, Tooltips and Variable Watching (CodeSense) ................................... 36
4.2.6 Using an External Editor................................................................................. 37
Code Generation Tools ........................................................................................... 38
Code Creation
4.1
4.2
4.3
Configuring Projects
SPRU509H – October 2006
Submit Documentation Feedback
Contents
3
4.3.1
4.4
4.5
4.6
5
Debug
5.1
5.2
38
40
40
40
41
41
42
42
42
43
43
43
44
44
44
45
46
47
49
49
49
..................................................................................................................... 51
........................................................................
5.1.1
Setting Custom Debug Options
5.1.2
Simulation ................................................................................................. 55
5.1.3
Memory Mapping ......................................................................................... 55
5.1.4
Pin Connect ............................................................................................... 57
5.1.5
Port Connect .............................................................................................. 57
5.1.6
Program Load ............................................................................................. 58
..................................................................................................
Running/Stepping ........................................................................................
Breakpoints................................................................................................
Connecting Breakpoints to Files........................................................................
Watch Window ............................................................................................
Property Page Manager Window .......................................................................
Memory Window ..........................................................................................
Register Window .........................................................................................
Disassembly/Mixed Mode ...............................................................................
Call Stack..................................................................................................
Symbol Browser .........................................................................................
Command Window ......................................................................................
Memory Save/Load Utility ..............................................................................
C6000 Functional Simulators Interrupt Latency Detection Feature...............................
Cache Coherence .......................................................................................
Cache Tag RAM Viewer................................................................................
Exception Reporting ....................................................................................
Software Pipelined Loop (SPLOOP) Buffer ..........................................................
52
Basic Debugging
59
5.2.1
59
5.2.3
5.2.4
5.2.5
5.2.6
5.2.7
5.2.8
5.2.9
5.2.10
5.2.11
5.2.12
5.2.13
5.2.14
5.2.15
5.2.16
5.2.17
Contents
Project Build Options
Setting Up Your Environment for Debug ....................................................................... 52
5.2.2
4
Code Development Flow ................................................................................ 38
....................................................................................
4.3.3 Compiler Overview .......................................................................................
4.3.4 Assembly Language Development Tools .............................................................
4.3.5 Assembler Overview .....................................................................................
4.3.6 Linker Overview ..........................................................................................
4.3.7 C/C++ Development Tools ..............................................................................
Building Your Code Composer Studio Project ................................................................
4.4.1 From Code Composer Studio...........................................................................
4.4.2 External Make ............................................................................................
4.4.3 Command Line ...........................................................................................
Available Foundation Software ..................................................................................
4.5.1 DSP/BIOS .................................................................................................
4.5.2 Chip Support Library (CSL) .............................................................................
4.5.3 Board Support Library (BSL)............................................................................
4.5.4 DSP Library (DSPLIB) ...................................................................................
4.5.5 Image/Video Processing Library (IMGLIB) ............................................................
4.5.6 TMS320 DSP Algorithm Standard Components .....................................................
4.5.7 Reference Frameworks ..................................................................................
Automation (for Project Management) ..........................................................................
4.6.1 Using General Extension Language (GEL) ...........................................................
4.6.2 Scripting Utility ............................................................................................
4.3.2
60
63
65
67
68
70
72
72
73
73
74
74
74
75
77
78
SPRU509H – October 2006
Submit Documentation Feedback
5.2.18 MMU Page Table Viewer............................................................................... 78
5.3
5.4
5.5
5.6
6
79
79
81
81
82
83
86
86
86
86
86
87
87
87
........................................................................................................... 89
Application Code Analysis ....................................................................................... 90
6.1.1 Data Visualization ........................................................................................ 90
6.1.2 Simulator Analysis........................................................................................ 91
6.1.3 Emulator Analysis ........................................................................................ 91
6.1.4 DSP/BIOS Real-Time Analysis (RTA) Tools.......................................................... 91
6.1.5 Code Coverage and Multi-Event Profiler Tool ........................................................ 94
Application Code Tuning (ACT) ................................................................................. 94
6.2.1 Tuning Dashboard........................................................................................ 94
6.2.2 Compiler Consultant ..................................................................................... 96
6.2.3 Cache Tune ............................................................................................... 96
Analyze/Tune
6.1
6.2
7
.................................................................................
5.3.1 Advanced Event Triggering (AET) .....................................................................
Real-Time Debugging ............................................................................................
5.4.1 Real-Time Mode ..........................................................................................
5.4.2 Rude Real-Time Mode...................................................................................
5.4.3 Real-Time Data Exchange (RTDX) ....................................................................
Automation (for Debug) ...........................................................................................
5.5.1 Using the General Extension Language (GEL) ......................................................
5.5.2 Scripting Utility for Debug ...............................................................................
Reset Options ......................................................................................................
5.6.1 Target Reset ..............................................................................................
5.6.2 Emulator Reset ...........................................................................................
5.6.3 Advanced Resets.........................................................................................
5.6.4 Halt on Reset .............................................................................................
Advanced Debugging Features
Additional Tools, Help, and Tips
7.1
7.2
7.3
................................................................................. 99
Component Manager ............................................................................................ 100
7.1.1
Opening Component Manager ........................................................................ 101
7.1.2
Multiple Versions of Code Composer Studio ........................................................ 101
Update Advisor ................................................................................................... 101
7.2.1
Registering Update Advisor ........................................................................... 101
7.2.2
Checking for Tool Updates ............................................................................ 101
7.2.3
Automatically Checking for Tool Updates ........................................................... 102
7.2.4
Uninstalling the Updates ............................................................................... 102
Additional Help ................................................................................................... 102
7.3.1
Online Help .............................................................................................. 102
7.3.2
Online Tutorial ........................................................................................... 102
SPRU509H – October 2006
Submit Documentation Feedback
Contents
5
List of Figures
1-1
1-2
2-1
3-1
3-2
3-3
3-4
4-1
4-2
4-3
4-4
4-5
4-6
4-7
4-8
4-9
4-10
4-11
4-12
4-13
4-14
4-15
5-1
5-2
5-3
5-4
5-5
5-6
5-7
5-8
5-9
5-10
5-11
5-12
5-13
5-14
5-15
5-16
5-17
5-18
5-19
5-20
5-21
5-22
5-23
5-24
5-25
5-26
5-27
5-28
5-29
5-30
6
eXpress DSP™ Software and Development Tools ....................................................................
Simplified Code Composer Studio Development Flow ................................................................
Icons on the Code Composer Studio Toolbar ..........................................................................
Standard Setup Configurations ...........................................................................................
GEL File Configuration ....................................................................................................
Parallel Debug Manager...................................................................................................
Modifying Keyboard Shortcuts ............................................................................................
Project Creation Wizard ...................................................................................................
Code Composer Studio Control Window ................................................................................
Add Files to Project ........................................................................................................
Configuration Toolbar ......................................................................................................
Add Project Configurations................................................................................................
Project Configuration Dependencies ....................................................................................
Source Control Integration ................................................................................................
Elements in the Source Code Window ..................................................................................
Using Regular Expressions with the Text Editor .......................................................................
Selective Display ...........................................................................................................
Code Sense .................................................................................................................
Code Development Flow .................................................................................................
Build Options Dialog Box ..................................................................................................
TMS320 DSP Algorithm Standard Elements ..........................................................................
Reference Framework Elements .........................................................................................
Disassembly Style ..........................................................................................................
Memory Map ................................................................................................................
Data Offset ..................................................................................................................
Toolbar Icons for Running and Debugging .............................................................................
Breakpoint Manager .......................................................................................................
Sample Parameter Dialog .................................................................................................
Data File Control ...........................................................................................................
Watch Locals Tab ..........................................................................................................
Specifying a Variable to Watch ...........................................................................................
Watch Element Values ....................................................................................................
Property Window ...........................................................................................................
Memory Window ............................................................................................................
Memory Window Options..................................................................................................
Register Window ...........................................................................................................
Editing a Registry Value ...................................................................................................
Customize Register Groups...............................................................................................
Register Window with Customized Register Group....................................................................
Disassembly Window ......................................................................................................
Call Stack Window .........................................................................................................
Symbol Browser Window ..................................................................................................
Command Window .........................................................................................................
Cache Tag RAM Viewer ...................................................................................................
Cache Tag RAM Viewer Property Page.................................................................................
Exceptions Window ........................................................................................................
Event Analysis Window ....................................................................................................
Event Sequencer ...........................................................................................................
RTDX Data Flow ...........................................................................................................
RTDX Diagnostics Window ...............................................................................................
RTDX Configuration Window .............................................................................................
RTDX Channel Viewer Window ..........................................................................................
List of Figures
12
13
16
20
22
23
25
28
29
29
30
31
32
33
34
35
36
37
38
39
46
48
54
55
58
59
61
64
64
65
66
66
67
68
68
70
71
71
71
72
72
73
73
75
76
77
80
81
83
84
84
85
SPRU509H – October 2006
Submit Documentation Feedback
6-1
6-2
6-3
6-4
6-5
6-6
7-1
7-2
Sample Graph Properties Dialog ......................................................................................... 90
Example Graph ............................................................................................................. 90
Real-Time Capture and Analysis ......................................................................................... 92
DSP/BIOS RTA Toolbar ................................................................................................... 92
Goals Window .............................................................................................................. 95
Cache Tune Tool ........................................................................................................... 97
Component Manager ..................................................................................................... 100
Update Advisor Web Settings ........................................................................................... 102
SPRU509H – October 2006
Submit Documentation Feedback
List of Figures
7
List of Tables
4-1
5-1
8
CodeWright Text Editor: A Quick Reference ........................................................................... 35
GEL Functions for Memory Maps ........................................................................................ 56
List of Tables
SPRU509H – October 2006
Submit Documentation Feedback
Preface
SPRU509H – October 2006
Read This First
About This Manual
To get started with Code Composer Studio™ (CCStudio) Development Tools, review the first two sections
of this book. The remaining sections contain more detailed information on specific processes and tools. To
determine whether you can utilize these features, see the online help provided with the Code Composer
Studio installation.
Trademarks
Code Composer Studio, CCStudio, DSP/BIOS, RTDX, TMS320C2000, TMS320C6000, C6000,
TMS320C62x, TMS320C64x, TMS320C67x, C62x, C64x, C67x, TMS320C5000, TMS320C55x, C55x, and
C54x are trademarks of Texas Instruments Incorporated. The Texas Instruments logo and Texas
Instruments are registered trademarks of Texas Instruments Incorporated.
Intel, Pentium are trademarks of Intel Corporation or its subsidiaries in the United States and other
countries.
Windows and Windows NT are registered trademarks of Microsoft Corporation.
All trademarks are the property of their respective owners.
SPRU509H – October 2006
Submit Documentation Feedback
Read This First
9
www.ti.com
Trademarks
10
Read This First
SPRU509H – October 2006
Submit Documentation Feedback
Chapter 1
SPRU509H – October 2006
Introduction
This section introduces TI’s eXpressDSP technology initiative. It also includes a
simplified development flow for Code Composer Studio development tools.
Topic
1.1
1.2
..................................................................................................
Page
Welcome to the World of eXpressDSP™ ...................................... 12
Development Flow..................................................................... 13
SPRU509H – October 2006
Submit Documentation Feedback
Introduction
11
www.ti.com
Welcome to the World of eXpressDSP™
1.1
Welcome to the World of eXpressDSP™
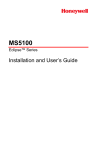
TI has a variety of development tools available that enable quick movement through the digital signal
processor (DSP) based application design process from concept, to code/ build, through debug analysis,
tuning, and on to testing. Many of the tools are part of TI’s real-time eXpressDSP™ software and
development tool strategy, which is very helpful in quickly getting started as well as saving valuable time in
the design process. TI’s real-time eXpressDSP Software and Development Tool strategy includes three
components that allow developers to use the full potential of TMS320™ DSPs:
• Powerful DSP-integrated development tools in Code Composer Studio
• eXpressDSP Software, including:
– Scalable, real-time software foundation: DSP/BIOS™ kernel
– Standards for application interoperability and reuse: TMS320 DSP Algorithm Standard
– Design-ready code that is common to many applications to get you started quickly on DSP design:
eXpressDSP Reference Frameworks
• A growing base of TI DSP-based products from TI’s DSP Third Party Network, including
eXpressDSP-compliant products that can be easily integrated into systems
Figure 1-1. eXpress DSP™ Software and Development Tools
Application/developer kits
Reference Frameworks
Code Composer
StudioTM
Compliant
algorithm
dev tools
Application
software
TMS320TM DSP Algorithm Standard
Compliant
plug−in
Program
build
Compliant
plug−in
Program
debug
Compliant
algorithm
Compliant
algorithm
Signal processing libraries
Real−time
analysis
DSP/BIOSTM
Drivers
RTDXTM
XDS560TM
emulator
JTAG
Host computer
12
Introduction
Embedded emulation
components
TMS320TM DSP
SPRU509H – October 2006
Submit Documentation Feedback
www.ti.com
Development Flow
1.2
Development Flow
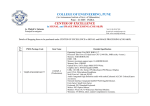
The development flow of most DSP-based applications consists of four basic phases: application design,
code creation, debug, and analysis/tuning. This user’s guide will provide basic procedures and techniques
in program development flow using Code Composer Studio.
Figure 1-2. Simplified Code Composer Studio Development Flow
Design
conceptual
planning
SPRU509H – October 2006
Submit Documentation Feedback
Code & build
create project,
write source code,
configuration file
Debug
Syntax checking,
breakpoints,
logging, etc.
Analyze and Tune
Introduction
13
www.ti.com
Development Flow
14
Introduction
SPRU509H – October 2006
Submit Documentation Feedback
Chapter 2
SPRU509H – October 2006
Getting Started Quickly
This section introduces some of the basic features and functions in Code Composer
Studio so you can create and build simple projects. Experienced users can proceed to
the following sections for more in-depth explanations of Code Composer Studio’s
various features.
Topic
2.1
2.2
2.3
2.4
2.5
2.6
..................................................................................................
Launching the Code Composer Studio Development Tools............
Creating a New Project ..............................................................
Building Your Program ..............................................................
Loading Your Program ..............................................................
Basic Debugging.......................................................................
Introduction to Help ..................................................................
SPRU509H – October 2006
Submit Documentation Feedback
Page
16
16
17
17
17
18
Getting Started Quickly
15
www.ti.com
Launching the Code Composer Studio Development Tools
2.1
Launching the Code Composer Studio Development Tools
To launch Code Composer Studio IDE for the first time, click the icon (shown below) on your desktop. A
simulator is automatically configured by default. To configure Code Composer Studio for a specific target,
see Chapter 3 for more information.
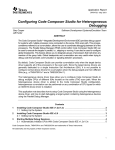
2.1.1 Important Icons Used in Code Composer Studio
These icons will be referred to throughout this manual.
Figure 2-1. Icons on the Code Composer Studio Toolbar
Launches Code Composer Studio
Rebuilds the project
Builds the project incrementally
Halts execution
Toggles breakpoint
Runs project
Single steps project
Step out
Step over
2.2
Creating a New Project
To create a working project, follow these steps:
1. If you installed Code Composer Studio in C:\CCStudio_v3.3, create a folder called practice in the
C:\CCStudio_v3.3\myprojects folder.
2. Copy the contents of C:\CCStudio_v3.3\tutorial\target\consultant folder to this new folder. Target refers
to the current configuration of Code Composer Studio. There is no default configuration, you must set
a configuration before starting Code Composer Studio. See Chapter 3 for more about Code Composer
Studio configurations.
3. Launch Code Composer Studio.
4. From the CCStudio Project menu, choose New.
5. In the Project Name field, type the project name (practice).
6. In the Location field, type or browse to the folder you created in step 1.
7. By default, Project Type is set as Executable (.out) and Target is set as the current configuration of
Code Composer Studio.
8. Click Finish. Code Composer Studio creates a project file called practice.pjt. This file stores your
project settings and references the various files used by your project.
9. Add files to the project by choosing Add Files to Project from the Project menu. You can also right-click
the project in the Project View window on the left and then select Add Files to Project.
16
Getting Started Quickly
SPRU509H – October 2006
Submit Documentation Feedback
www.ti.com
Building Your Program
10. Add main.c, DoLoop.c, and lnk.cmd (this is a linker command file that maps sections to memory) from
the folder you created. You may need to choose All Files from the Files of type dropdown box to view
all the types of files.
11. Next, choose Add Files to Project again and browse to the C:\CCStudio_v3.3\target\cgtools\lib\
directory and add the rts.lib file for your configured target.
12. You do not need to manually add any include files to your project, because the program finds them
automatically when it scans for dependencies as part of the build process. After you build your project,
the include files appear in the Project View.
2.3
Building Your Program
Now that you have created a functional program, you can build it. Use the Project→Rebuild All function
the first time you build the project. An output window will show the build process and status. When the
build is finished, the output window will display Build complete 0 errors, 0 warnings.
The Rebuild All command is mainly used to rebuild the project when the project options or any files in the
project have changed. For further information, see Section 2.3.
2.4
Loading Your Program
After the program has been built successfully, load the program by going to File→Load Program. By
default, Code Composer Studio IDE will create a subdirectory called Debug within your project directory
and store the .out file in it. Select practice.out and click Open to load the program.
Note:
2.5
Remember to reload the program by choosing File→Reload Program if you rebuild the
project after making changes.
Basic Debugging
To see Code Composer Studio’s versatile debugger in action, complete the following exercises. For more
in-depth information, see Chapter 5.
2.5.1 Go to Main
To begin execution of the Main function, select Debug→Go Main. The execution halts at the Main function
and you will notice the program counter (yellow arrow) in the left margin beside the function. This is called
the selection margin.
2.5.2 Using Breakpoints
To set a breakpoint, place the cursor on the desired line and press F9. In addition, you can set the
breakpoint by selecting the Toggle Breakpoint toolbar button. When a breakpoint has been set, a red icon
will appear in the selection margin. To remove the breakpoint, simply press F9 or the Toggle Breakpoint
toolbar button again. You can also open the Breakpoints Manager (Debug→Breakpoints) to view all the
breakpoints, set new ones, or change the breakpoint action.
In main.c, set a breakpoint at the line: DoLoop(Input1, Input2, Weights, Output, LOOPCOUNT);As
execution was halted at the main function, you can press F5, select Debug→Run, or select the Run
toolbar button to run the program. Once execution reaches the breakpoint, it halts, as displayed in the
status bar at the bottom of the CCStudio window.
SPRU509H – October 2006
Submit Documentation Feedback
Getting Started Quickly
17
www.ti.com
Introduction to Help
2.5.3 Source Stepping
Source stepping is only possible when program execution has been halted. Since you halted at the
breakpoint, you can now execute the program line by line using source stepping. Step into the DoLoop
function by selecting the Source-Single Step button on the side toolbar. Step through a few times to
observe the executions. The Step Over and Step Out functions are also available below the Single Step
button. Assembly stepping is also available. Whereas source stepping steps through the lines of code,
assembly stepping steps through the assembly instructions. For more information on assembly stepping,
see Section 5.2.1.
2.5.4 Viewing Variables
In the debugging process, you should view the value of the variables to ensure that the function executes
properly. Variables can be viewed in the watch window when the CPU has been halted. The watch
window can be opened by selecting View→Watch Window. The Watch Locals tab shows all the relevant
variables in the current execution.
As you continue to Step Into the while loop, the values of the variables change through each execution. In
addition, you can view the values of specific variables by hovering the mouse pointer over the variable or
by placing the variables in the Watch1 tab. For more information on variables and watch windows, see
Section 5.2.4.
2.5.5 Output Window
The Output window is located at the bottom of the screen by default. It can also be accessed by
View→Output Window. By default, the printf function displays the same Output window, showing
information such as the contents of Stdout and the build log.
2.5.6 Symbol Browser
The symbol browser allows you to access all the components in your project with a single click. Select
View→Symbol Browser to open the window. The symbol browser has multiple tabs, including tabs for
Files, Functions, and Globals.
Expanding the tree in the Files tab shows the source files in your project. Double-clicking on files in the
Files or Functions tabs automatically accesses the file. The Globals tab allows you to access the global
symbols in your project.
For more information on the Symbol browser, see Section 5.2.10.
You should now have successfully created, built, loaded, and debugged your first Code Composer Studio
program.
2.6
Introduction to Help
Code Composer Studio provides many help tools through the Help menu. Select Help→Contents to
search by contents. Select Help→Tutorial to access tutorials to guide you through the Code Composer
Studio development process.
Select Help→Web Resources to obtain the most current help topics and other guidance. User manuals
are PDF files that provide information on specific features or processes.
You can access updates and a number of optional plug-ins through Help→Update Advisor.
18
Getting Started Quickly
SPRU509H – October 2006
Submit Documentation Feedback
Chapter 3
SPRU509H – October 2006
Target and Host Setup
This section provides information on how to define and set up your target configuration
for both single processor and multiprocessor configurations, and how to customize
several general IDE options.
Topic
3.1
3.2
..................................................................................................
Page
Setting Up the Target................................................................. 20
Host IDE Customization ............................................................. 24
SPRU509H – October 2006
Submit Documentation Feedback
Target and Host Setup
19
www.ti.com
Setting Up the Target
3.1
Setting Up the Target
3.1.1 Code Composer Studio Setup Utility
This section provides information on how to define and set up your target configuration for both single
processor and multiprocessor configurations, and how to customize several general IDE options.
3.1.1.1
Adding an Existing Configuration
The Setup utility allows you to configure the software to work with different hardware or simulator targets.
You must select a configuration in Setup before starting the Code Composer Studio IDE.
You can create a configuration using the provided standard configuration files, or create a customized
configuration using your own configuration files (see the online help and/or the tutorial). This example
uses the standard configuration files.
To create a system configuration using a standard configuration file:
1. Double-click on the Setup CCStudio desktop icon. The System Configuration dialog box appears.
2. From the list of Available Factory Boards, select the standard configuration that matches your system.
Your list of available boards will differ depending on your installation.
Determine if one of the available configurations matches your system. If none are adequate, you can
create a customized configuration (see the online help and/or the tutorial).
Figure 3-1. Standard Setup Configurations
3. Click the Add button to import your selection to the system configuration currently being created. The
configuration you selected now displays under the My System icon in the System Configuration pane
of the Setup window.
If your configuration has more than one target, repeat these steps until you have selected a
configuration for each board.
4. Click the Save & Quit button to save the configuration.
5. Click the Yes button to start the Code Composer Studio IDE with your configuration. You can now start
a project. See Chapter 4 of this book, or the online help and tutorial for more information.
20
Target and Host Setup
SPRU509H – October 2006
Submit Documentation Feedback
www.ti.com
Setting Up the Target
3.1.1.2
Creating a New System Configuration
To set up a new system configuration, start with the Code Composer Studio Setup dialog box.
Start with a blank working configuration by selecting Remove All from the File menu. (You may also start
with a standard or imported configuration that is close to your desired system. In that case, begin at step
three below after loading the starting configuration).
1. Select the My System icon in the System Configuration pane.
2. In the Available Factory Boards pane, select a target board or simulator that represents your system.
With your mouse drag the board that you want to the left screen under My System, or click on the Add
button. To find the correct board, you can filter the list of boards by family, platform and endianness. If
you wish, you can drag more than one board to the left panel under My System.
3. If you want to use a target board or simulator that is not listed in the Available Factory Boards pane,
you must install a suitable device driver now. (For example, you may have received a device driver
from a third-party vendor or you may want to use a driver from a previous version of Code Composer
Studio.) Proceed to the Installing/Uninstalling Device Drivers help topic (from the main CCStudio
program, select Help→Contents→Code Composer Studio Setup→How To Start→Installing/Uninstalling
Device Drivers) and then continue with this section to complete your system configuration.
4. Click on the processor type you have just added, and open the Connection Properties dialog box using
one of the following procedures:
• Right-click on the processor type in the System Configuration pane and select Properties from the
context menu. If you have selected the current processor, selecting Properties will display the
Processor Properties dialog.
• Select the processor type in the System Configuration pane and then select the Modify Properties
button in the right-hand pane.
5. Edit the information in the Connection Properties dialog.
6. The starting GEL file, the Master/Slave value, the Startup mode, and the BYPASS name and bit
numbers are included in the Processor Properties dialog. To access the Processor Properties dialog,
right-click on the desired processor and choose Properties from the context menu. Other properties
may be available, depending on your processor. When configuring simulators, multiple properties may
appear with default values based on the processor.
The Connection Properties and Processor Properties dialogs may have tabs with different fields. The
tabs that appear and the fields that can be edited will differ depending on the board or processor that
you have selected. After filling in the information in each tab, you can click the Next button to go to the
next tab, or simply click on the next tab itself. When you are done, click the Finish button.
For more information on configuring the Connection or Processor Properties dialogs, see the online help
(Help→Contents→Code Composer Studio Setup→Custom Setup).
3.1.1.3
Creating Multiprocessor Configurations
The most common configurations include a single simulator or a single target board with a single CPU.
However, you can create more complicated configurations in the following ways:
• Connect multiple emulators to your computer, each with its own target board.
• Connect more than one target board to a single emulator, using special hardware to link the scan
paths on the boards.
• Create multiple CPUs on a single board, and the CPUs can be all of the same kind or they can be of
different types (e.g., DSPs and microcontrollers).
Although a Code Composer Studio configuration is represented as a series of boards, in fact, each board
is either a single CPU simulator or a single emulator scan chain that can be attached to one or more
boards with multiple processors. The device driver associated with the board must be able to comprehend
all the CPUs on the scan chain. More information may be found in the online help (Help→Contents→Code
Composer Studio Setup→How To Start→Configuring CCStudio for Heterogeneous Debugging).
SPRU509H – October 2006
Submit Documentation Feedback
Target and Host Setup
21
www.ti.com
Setting Up the Target
3.1.1.4
Startup GEL Files
The general extension language (GEL) is an interpretive language, similar to C. GEL functions can be
used to configure the Code Composer Studio development environment. They can also be used to
initialize the target CPU. A rich set of built-in GEL functions is available, or you can create your own
user-defined GEL functions.
The GEL file field under the Processor Properties dialog allows you to associate a GEL file (.gel) with
each processor in your system configuration. Access the Processor Properties dialog by selecting the
current processor and choosing Properties from the context menu.
Figure 3-2. GEL File Configuration
When Code Composer Studio is started, each startup GEL file is scanned and all GEL functions contained
in the file are loaded. If the GEL file contains a StartUp() function, the code within that function is also
executed. For example, the GEL mapping functions can be used to create a memory map that describes
the processor’s memory to the debugger.
StartUp(){ /*Everything in this function will be executed
on startup*/ GEL_MapOn(); GEL_MapAdd(0, 0, 0xF000, 1,
1); GEL_MapAdd(0, 1, 0xF000, 1, 1);}
GEL files are asynchronous and not synchronous; in other words, the next command in the GEL file will
execute before the previous one completes. For more information, see the Code Composer Studio online
help. Select Help→Contents→Making a Code Composer Project→Building & Running Your
Project→Automating Tasks with General Extension Language (GEL).
3.1.1.5
Device Drivers
Special software modules called device drivers, are used to communicate with the target. Each driver file
defines a specific target configuration: a target board and emulator, or simulator. Device drivers may either
be supplied by Texas Instruments or by third-party vendors.
Each target board or simulator type listed in the Available Factory Boards pane is physically represented
by a device driver file. Code Composer Studio IDE does not support creating device drivers, but TI or third
parties may ship device drivers separately from those which are pre-installed.
22
Target and Host Setup
SPRU509H – October 2006
Submit Documentation Feedback
www.ti.com
Setting Up the Target
3.1.2 Parallel Debug Manager
In multiprocessor configurations, invoking Code Composer Studio starts a special control known as the
Parallel Debug Manager Plus (PDM+).
Figure 3-3. Parallel Debug Manager
The Parallel Debug Manager allows you to open a separate Code Composer Studio IDE session for each
target device. Activity on the specified devices can be controlled in parallel using the PDM control.
This version of Parallel Debug Manager (PDM+) includes the following features:
• You can connect or disconnect from targets on-the-fly by right-clicking the processor on the right panel.
• The interface allows an expanded view of processors, with several dropdown filters to reveal a list by
group, by CPU or by board.
• Red highlighting on the processor icon (on the left pane) indicates that the processor is not connected
to the system or that it has updated status information.
• Your can put processors into loosely-coupled groups, (i.e., where the processors are not all on the
same physical scan chain). Choosing Group View from the second dropdown menu on the toolbar and
System on PDM’s left pane shows which groups are synchronous.
Global breakpoints work only when processors in a group belong to the same physical scan chain. For
further details on the Parallel Debug Manager, see the online help under Help→Contents→Debugging
Windows and Analysis Tools→Parallel Debug Manager.
3.1.3 Connect/Disconnect
Code Composer Studio IDE makes it easy to dynamically connect and disconnect with the target by using
the Connect/Disconnect functionality. Connect/Disconnect allows you to disconnect from your hardware
target and even to restore the previous debug state when reconnecting.
By default, Code Composer Studio IDE will not attempt to connect to the target when the control window
is opened. Connection to the target can be established by going to Debug→Connect. The default behavior
can be changed in the Debug Properties tab under Option→Customize. The status bar will briefly flash a
help icon to indicate changes in the target’s status. When the target is disconnected, the status bar will
indicate this fact, as well as the last known execution state of the target (i.e., halted, running, free running
or error condition). When connected, the status bar will also indicate if the target is stepping (into, over, or
out), and the type of breakpoint that caused the halt (software or hardware). See Section 3.1.4 for more
information on the status bar.
After a connection to the target (except for the first connection), a menu option entitled Restore Debug
State will be available under the Debug Menu. Selecting this option will enable every breakpoint that was
disabled at disconnect. You can also reset them by pressing F9 or by selecting Toggle Breakpoints from
the right-click menu. Breakpoints from Advanced Event Triggering jobs and emulator analysis will not be
enabled.
If the Parallel Debug Manager is open, you can connect to a target by right-clicking on the cell
corresponding to the target device underneath the column marked Name. For further details on
Connect/Disconnect, see the Code Composer Studio online help under Debugging Windows and Analysis
Tools→The Debugging Process→Connect/Disconnect.
SPRU509H – October 2006
Submit Documentation Feedback
Target and Host Setup
23
www.ti.com
Host IDE Customization
3.1.4 Status Bar
The status bar is displayed at the bottom of the Code Composer Studio application window. The status
bar displays messages relating to the target’s connect status along with a basic status indicator. The left
side of the status indicator shows if the target is running or not. The right side of the status indicator turns
yellow to indicate that the target was recently halted. This occurs when you manually halt the process, or
when Code Composer Studio temporarily halts the target to carry out another internal process. The
indicator will turn grey after a few seconds.
The status bar also shows messages about the current options used by CCStudio:
• Process Mode (ARM processors only). The status bar displays the name of the current mode used
by the executed process. The options are:
– ARM: Indicates that the process is in the ARM mode.
– THUMB: Indicates that the process is in the Thumb mode.
• Endianness.The status bar denotes the Endianness sequencing method being used, with either LE
(Little Endian) or BE (Big Endian).
• Jazelle Indicator. The word JAVA is displayed in the status bar when Jazelle is enabled.
• MMU Indicator (ARM processors only). The status bar displays either MMU Off or MMU On to
indicate the status of the Memory Management Unit (MMU) mode. Note: This feature is only available
for ARM 9 and ARM 11 targets.
• Privileges (ARM processors only).The status bar indicates the privilege mode for the application by
displaying either USER mode or SUPERVISOR mode.
• Task Level Debugging Indicator. The status bar indicates the status of Task Level Debugging (TLD)
by displaying TLD when TLD has been enabled on the device. Note: TLD support is not available for
all operating systems.
• Descriptions. The center of the status bar displays text which describes the actions of individual menu
commands and toolbar items as you hold the mouse cursor over them, and the path of the active
source file window. The right area of the status bar shows the line and column position of the cursor
when viewing a source file.
• Profile Clock. The Profile Clock is displayed on the right side of the status bar, if it has been enabled.
See the Application Code Tuning Online Help for more information.
3.2
Host IDE Customization
Once Code Composer Studio is launched, you can customize several general IDE options.
3.2.1 Default Colors and Faults
Selecting the menu options Option→Font→Editor Font and Option→Color→Editor Color allows you to
modify the default appearance (or View Setup) in the CodeWright text editor (Section 4.2.2). Selecting the
menu options Option→Font→Tools Font or Tools Color allows you to modify the default appearance for
various IDE tool windows.
24
Target and Host Setup
SPRU509H – October 2006
Submit Documentation Feedback
www.ti.com
Host IDE Customization
3.2.2 Default Keyboard Shortcuts
The default IDE has more than 80 predefined keyboard shortcuts that can be modified. New keyboard
shortcuts can be created for any editing or debugging commands that can be invoked from a document
window. To assign keyboard shortcuts:
1. Select Option→Customize.
2. In the Customize dialog box, select the Keyboard tab to view the following options:
• Filename. The standard keyboard shortcuts file is displayed by default. To load a previous
keyboard configuration file (*.key), enter the path and filename, or navigate to the file.
• Commands. Select the command you want to assign to a keyboard shortcut.
• Assigned Keys. Displays the keyboard shortcuts that are assigned to the selected command.
• Add. Click the Add button to assign a new key sequence for invoking the selected command. In
the Assign Shortcut dialog box, enter the new key sequence, and then click OK.
• Remove. To remove a particular key sequence for a command, select the key sequence in the
Assigned Keys list and click the Remove button.
• Default Keys. Immediately reverts to the default keyboard shortcuts.
• Save As. Click the Save As button to save your custom keyboard configuration in a file. In the
Save As dialog box, navigate to the location where you want to save your configuration, name the
keyword configuration file, and click Save.
Figure 3-4. Modifying Keyboard Shortcuts
3. Click OK to exit the dialog box.
3.2.3 Other IDE Customizations
•
•
•
•
•
Specify the number of recent files on the File menu by selecting Option→Customize→File Access.
Remember a project's active directory by selecting Option→Customize→File Access. When you switch
projects, you can specify whether the IDE will start you inside the directory of your active project or
inside the last directory you used.
Set what kind of information (processor type, project name, path, etc.) appears in the title bar by
selecting Option→Customize→Control Window Display.
Set default closing options by selecting Option→Customize→Control Window Display. You can specify
that the IDE should automatically close all windows when you close a project. Or you can choose to
close all projects whenever you close a control window.
Customize the code window using CodeWright (see Section 4.2.2).
SPRU509H – October 2006
Submit Documentation Feedback
Target and Host Setup
25
www.ti.com
Host IDE Customization
26
Target and Host Setup
SPRU509H – October 2006
Submit Documentation Feedback
Chapter 4
SPRU509H – October 2006
Code Creation
This describes the options available to create code and build a basic Code Composer
Studio IDE project.
Topic
4.1
4.2
4.3
4.4
4.5
4.6
..................................................................................................
Configuring Projects .................................................................
Text Editor ...............................................................................
Code Generation Tools ..............................................................
Building Your Code Composer Studio Project ..............................
Available Foundation Software ...................................................
Automation (for Project Management) .........................................
SPRU509H – October 2006
Submit Documentation Feedback
Page
28
34
38
42
43
49
Code Creation
27
www.ti.com
Configuring Projects
4.1
Configuring Projects
A project stores all the information needed to build an individual program or library, including:
• Filenames of source code and object libraries
• Code generation tool options
• Include file dependencies
4.1.1 Creating a Project
The following procedure allows you to create single or multiple new projects (multiple projects can be
open simultaneously). Each project’s filename must be unique.
The information for a project is stored in a single project file (*.pjt).
1. From the Project menu, choose New. The Project Creation wizard window displays.
Figure 4-1. Project Creation Wizard
2. In the Project Name field, type the project name.
3. In the Location field, specify the directory where you want to store the project file. Object files
generated by the compiler and assembler are also stored here. You can type the full path in the
Location field or click the Browse button and use the Choose Directory dialog box. It is a good idea to
use a different directory for each new project.
4. In the Project Type field, select a Project Type from the dropdown list. Choose either Executable (.out)
or Library (lib). Executable indicates that the project generates an executable file. Library indicates that
you are building an object library.
5. In the Target field, select the target family for your CPU. This information is necessary when tools are
installed for multiple targets.
6. Click Finish. A project file called yourprojectname.pjt is created. This file stores all files and project
settings used by your project.
The new project and first project configuration (in alphabetical order) become the active project, and
inherit the TI-supplied default compiler and linker options for debug and release configurations.
28
Code Creation
SPRU509H – October 2006
Submit Documentation Feedback
www.ti.com
Configuring Projects
Figure 4-2. Code Composer Studio Control Window
Active
project
DSP/BIOS toolbar
Build
toolbar
Project view window
After creating a new project file, add the files for your source code, object libraries, and linker command
file to the project list.
4.1.1.1
Adding Files to a Project
You can add several different files or file types to your project. The types are shown in the graphic below.
To add files to your project:
1. Select Project→Add Files to Project, or right-click on the project’s filename in the Project View window
and select Add Files to Project from the context menu. The Add Files to Project dialog box displays.
Figure 4-3. Add Files to Project
2. In the Add Files to Project dialog box, specify a file to add. If the file does not exist in the current
directory, browse to the correct location. Use the Files of Type dropdown list to set the type of files that
appear in the File name field.
Note:
Do not try to manually add header/include files (*.h) to the project. These files are
automatically added when the source files are scanned for dependencies as part of the
build process.
3. Click Open to add the specified file to your project.
The Project View (see Figure 4-2) is automatically updated when a file is added to the current project.
SPRU509H – October 2006
Submit Documentation Feedback
Code Creation
29
www.ti.com
Configuring Projects
The project manager organizes files into folders for source files, include files, libraries, and DSP/BIOS
configuration files. Source files that are generated by DSP/BIOS are placed in the Generated Files folder.
Code Composer Studio IDE searches for project files in the following path order when building the
program:
• The folder that contains the source file
• The folders listed in the Include search path for the compiler or assembler options (from left to right)
• The folders listed in the definitions of the optional DSP_C_DIR (compiler) and DSP_A_DIR
(assembler) environment variables (from left to right)
4.1.1.2
Removing a File
If you need to remove a file from the project, right-click on the file in the Project View and choose Remove
from Project from the context menu.
4.1.2 Project Configurations
A project configuration defines a set of project level build options. Options specified at this level apply to
every file in the project.
Project configurations enable you to define build options for the different phases of program development.
For example, you can define a Debug configuration to use while debugging your program and a Release
configuration for building the finished product.
Each project is created with two default configurations: Debug and Release. Additional configurations can
be defined. Whenever a project is created or an existing project is initially opened, the first configuration
(in alphabetical order) is set to active in the workspace.
When you build your program, the output files generated by the software tools are placed in a
configuration-specific subdirectory. For example, if you have created a project in the directory MyProjects,
the output files for the Debug configuration are placed in MyProjects\Debug. Similarly, the output files for
the Release configuration are placed in MyProjects\Release.
4.1.2.1
Changing the Active Project Configuration
Click on the Select Active Configuration field in the Project toolbar and select a configuration from the
dropdown list.
Figure 4-4. Configuration Toolbar
Select Active Project
Select Active Configuration
30
Code Creation
SPRU509H – October 2006
Submit Documentation Feedback
www.ti.com
Configuring Projects
4.1.2.2 Adding a New Project Configuration
1. Select Project→Configurations, or right-click on the project's filename in the Project View window and
select Configurations.
2. In the Project Configurations dialog box, click Add. The Add Project Configuration window displays.
Figure 4-5. Add Project Configurations
3. In the Add Project Configuration dialog box, specify the name of the new configuration in the Create
Configuration field, and choose to Use Default Settings (build options) or Copy Settings from an
existing configuration to populate your new configuration.
4. Click OK to accept your selections and exit the Add Project Configuration dialog.
5. Click Done to exit the Project Configurations dialog.
6. Modify your new configuration using the Build Options dialog found in the Project menu.
4.1.3 Project Dependencies
The project dependencies tool allows you to manage and build more complex projects. Project
dependencies allow you to break a large project into multiple smaller projects and then create the final
project using those dependencies. Subprojects are always built first, because the main project depends on
them.
4.1.3.1
Creating Project Dependencies (Subprojects)
There are three ways to create a project dependency relationship or subproject.
• Drag-and-drop from the project view windows. Drop the sub-project to the target project icon or to
the Dependent Projects icon under the target project. You can drag-and-drop from within the same
project view window, or you can drag-and-drop between the project view windows of two Code
Composer Studios running simultaneously.
• Drag-and-drop from Windows File Explorer.
1. Open the main project in Code Composer Studio.
2. Launch Windows Explorer. Both Explorer and Code Composer Studio should be open.
3. In Windows Explorer, select the .pjt file of the project you want to be a subproject.
4. Drag this .pjt file to the Project Window of Code Composer Studio. A plus sign should appear on
the .pjt file you are moving.
5. Drop it into the Dependent Projects folder of the main project.
• Use the context menu. In the project view, right-click on the Dependent Projects icon under a loaded
project, select Add Dependent Projects from the context menu. In the dialog, browse and select
another project .pjt file. The selected .pjt file will be a sub-project of the loaded project. If the selected
.pjt file is not yet loaded, it will be automatically loaded.
SPRU509H – October 2006
Submit Documentation Feedback
Code Creation
31
www.ti.com
Configuring Projects
4.1.3.2
Project Dependencies Settings
Sub-projects each have their own configuration settings. In addition, the main project has configuration
settings for each sub-project. All of these settings can be accessed from the Project Dependencies dialog.
To open the dialog, select Project Dependencies from the Project menu or from the context menu of the
project.
4.1.3.3
Modifying Project Configurations
In the Project Dependencies dialog, it is possible to modify the subproject settings. As mentioned
previously, the dialog can be accessed by Project→Project Dependencies.
As shown by Figure 4-6, you can choose to exclude certain subprojects from your configuration. In the
example shown, the MyConfig configuration for modem.pjt excludes zlib.pjt from the build. In addition, you
can also select a particular subproject configuration for this configuration. In MyConfig, sinewave.pjt is built
using the Debug configuration rather than the default MyConfig subproject configuration.
Figure 4-6. Project Configuration Dependencies
4.1.3.4
Sub-project configurations
Each sub-project has its own set of build configurations. For each main project configuration, you can
choose to build each sub-project using a particular configuration. To modify the sub-project setting, use
the dropdown box beside the project (under the Setting column).
4.1.4 Makefiles
The Code Composer Studio IDE supports the use of external makefiles (*.mak) and an associated
external make utility for project management and build process customization.
To enable the Code Composer Studio IDE to build a program using a makefile, a Code Composer Studio
project must be created that contains the makefile. After a Code Composer Studio project is associated
with the makefile, the project and its contents can be displayed in the Project View window and the
Project→Build and Project→Rebuild All commands can be used to build the program.
1. Double-click on the name of the makefile in the Project View window to open the file for editing.
2. Modify your makefile build commands and options.
Special dialogs enable you to modify the makefile build commands and makefile options. The normal
Code Composer Studio Build Options dialogs are not available when working with makefiles.
Multiple configurations can be created, each with its own build commands and options.
32
Code Creation
SPRU509H – October 2006
Submit Documentation Feedback
www.ti.com
Configuring Projects
Note:
Limitations and Restrictions: Source files can be added to or removed from the project
in the Project View. However, changes made in the Project View do not change the
contents of the makefile. These source files do not affect the build process nor are they
reflected in the contents of the makefile. Similarly, editing the makefile does not change
the contents in the Project View. File-specific options for source files that are added in the
Project View are disabled. The Project→Compile File command is also disabled.
However, when the project is saved, the current state of the Project View is preserved.
Note:
Before using Code Composer Studio IDE commands to build your program using a
makefile, it is necessary to set the required environment variables. To set environment
variables, run the batch file DosRun.bat. The batch file is located in the directory
C:\CCStudio_v3.3. If you installed Code Composer Studio IDE in a directory other than
C:\CCStudio_v3.3, the batch file will be located in the specified directory.
4.1.5 Source Control Integration
The project manager can connect your projects to a variety of source control providers. The Code
Composer Studio IDE automatically detects any installed providers that are compatible.
1. From the Project menu, choose Source Control→Select Provider.
2. Select the Source Control Provider that you want to use and press OK.
If no source control providers are listed, ensure that you have correctly installed the client software for
the provider on your machine.
3. Open one of your projects and select Add to Source Control from Project→Source Control.
4. Add your source files to Source Control.
5. You can check files in and out of source control by selecting a file in the Project View window and right
clicking on the file. Icons will identify source files that are connected to a source control.
Figure 4-7. Source Control Integration
SPRU509H – October 2006
Submit Documentation Feedback
Code Creation
33
www.ti.com
Text Editor
4.2
Text Editor
4.2.1 Viewing and Editing Code
Double-click on the filename in the Project View to display the source code in the IDE window.
• Selection margin. By default, a selection margin is displayed on the left-hand side of integrated editor
and disassembly windows. Colored icons in the selection margin indicate various options, as described
in the online help. A yellow arrow identifies the location of the Program Counter (PC).
• Keywords. The integrated editor features keyword highlighting. Keywords, comments, strings,
assembler directives, and GEL commands are highlighted in different colors. In addition, you can
create or customize new sets of keywords and save them in keyword files (*.kwd).
• Keyboard shortcuts. Default keyboard shortcuts can be changed or created for any editing or
debugging commands in a document window. Select Option→Customize to modify keyboard shortcuts.
• Bookmarks. Set bookmarks on any line in any source file to find and maintain key locations.
Figure 4-8. Elements in the Source Code Window
Selection
Margin
Divider
Mixed Mode (Assembly
and C source)
Program
Counter
4.2.2 Customizing the Code Window
The IDE's text editor (called CodeWright) lets you customize code formatting and behavior. The
Option→Editor menu has additional options for Language, ChromaCoding Lexers, and View Setups.
• Language. You can associate a file type (i.e., .cpp , .awk , etc.) with a set of behaviors. Note that the
list of file types under Option→Editor→Language is different from the list of ChromaCoding lexers. By
default, many of the file types are associated with the relevant lexer (i.e., the .h file type is associated
with the C lexer). Some file types are not mapped to lexers at all.
• ChromaCoding Lexers. A lexer stores a collection of settings to color various elements of the
programming language vocabulary. This vocabulary includes identifiers, braces, preprocessors,
keywords, operators, strings, and comments. The CodeWright text editor comes with about 20
language-specific lexers already configured for use, including several specific lexers for the Code
Composer Studio IDE, such as GEL, CCS, C, and DSP/BIOS. You can also create new lexers by
clicking the New or Save as button on the right side of any ChromaCoding Lexer dialog box.
• View Setups. This defines generic features that are not specific to a single programming language,
such as coloring all comments in all languages blue. However, a lexer defines what comment
delimiters to use before and after a comment for the text editor.
34
Code Creation
SPRU509H – October 2006
Submit Documentation Feedback
www.ti.com
Text Editor
Table 4-1. CodeWright Text Editor: A Quick Reference
CodeWright Menu Location
Configurable Settings and Options
Editor Properties (global settings):
Option→Editor→Properties
Options for the editor, file loading, debug, selection margin
resizing, tool tips, external editors, and backup (auto-save)
Settings for File Types (language properties):
Option→Editor→Language
Language options and mapping, tabs and indenting, templates,
coloring for code text, CodeSense, formatting for different file
types, and comments
Lexer Settings (settings for language-specific lexers):
Option→Editor→ChromaCoding Lexers
Identifiers, brace characters, excluding coloring text with regex,
adding new words (keywords, preprocessors, operators) and
keyword defaults, language-specific comments, defaults for
strings, number elements
View Setups (additional global settings):
Option→Editor→View Setups
Showing line numbers and rulers, line highlighting, scrolling, line
number widths, showing visibles (EOL, tabs, spaces, etc.),
general color defaults, general font defaults
Advanced Text Processing
Edit→Advanced, or right-click within text window and select
Advanced
Caps to lower (and vice versa), inserting comments and
functions, tabs to spaces (and vice versa), and other advanced
editing options
4.2.3 Using the Editor's Text Processing Functionality
The text editor includes several additional functions for processing text.
• Differencing and merging. You can use the diffing function (File→Difference between files) to
compare two similar files. Merging (File→Merge Files) allows you to merge multiple files.
• Support for regular expressions. Select Edit→Find in Files or Edit→Replace in Files. In addition to
the usual find or replace functionality, the text editor lets you use regular expressions for more complex
text processing. For example, you can do a global replace for all the files in a certain directory. You
can also use saved searches and use the helper dropdown window (see Figure 4-9) to construct
regular expressions.
Figure 4-9. Using Regular Expressions with the Text Editor
•
Selectively hiding and displaying code. Selective display (Edit→Advanced→Selective Display)
allows you to reveal or hide certain kinds of code according to the chosen parameters. For example,
you can specify that the editor use the selective display function to expand and collapse certain kinds
of code. Or you can choose to hide all function definitions or preprocessor directives by choosing the
appropriate option. A small icon will appear on the margin to indicate that code has been hidden (see
Figure 4-10). Clicking on the icon toggles the visibility of that particular block of code.
SPRU509H – October 2006
Submit Documentation Feedback
Code Creation
35
www.ti.com
Text Editor
Figure 4-10. Selective Display
4.2.4 Setting Auto-Save Defaults
The text editor can periodically save your working files to prevent loss of work in the event of a system
crash. To use this function, select Option→Editor→Properties→Backup tab and check the box to enable
auto-save. You can also select the time interval between saves or specify the name and location of the
backup file. CCStudio will prompt you before overwriting an old backup file unless you specify otherwise.
4.2.5 Autocompletion, Tooltips and Variable Watching (CodeSense)
The CodeWright text editor uses an autocompletion engine called CodeSense. When the tooltip or
autocompletion activates, an icon will appear underneath the current line of your code. It shows symbols,
function parameters and tooltips for C, C++, and Java code. Tooltips can also be used for variable
watching.
CodeSense only works with certain file types and the CodeSense DLL must be enabled.
To enable CodeSense:
1. Choose Option→Editor→Language→CodeSense tab.
2. In the left box, highlight the file type you are working with.
3. To the right of the File Type box, make sure that CodeSense DLL is enabled. (If CodeSense is not
supported for that particular file type, the option will be disabled.)
After the CodeSense DLL is enabled, CodeSense can be used to:
• List symbols (functions, structs, macros, members, etc.) that are associated with the symbol being
typed.
• Insert symbols from the context list into the current document, completing the symbol being typed.
• Access a symbol's definition using a selected symbol's Goto button in the list. (Ctrl-G is the
corresponding keyboard shortcut for the Goto functionality).
• Obtain a tooltip listing necessary parameters for a function as it is being typed.
• See a symbol's definition in a hover tooltip that can appear automatically, or when either Ctrl or Shift is
pressed (depending on the CodeSense settings).
36
Code Creation
SPRU509H – October 2006
Submit Documentation Feedback
www.ti.com
Text Editor
CodeSense word completion helps you finish typing symbols. Once you have entered a few characters,
complete the following steps to use this feature:
1. Press Ctrl and Space together to bring up a list box of context-sensitive symbols to choose from. The
symbols begin with whatever you have typed so far; the right-hand column provides the definition of
each symbol.
Figure 4-11. Code Sense
2. Highlight the appropriate symbol from the list. Press the selected symbol's corresponding image (the
Goto button) to display the definition of the symbol within the library's source code. The key sequence
Ctrl-G will also access a selected symbol's definition.
3. While the dropdown list is still displayed, press Enter. The highlighted symbol is entered into your
document automatically, completing the word you began.
4.2.6 Using an External Editor
The Code Composer Studio IDE supports the use of an external (third-party) text editor in place of the
default integrated editor. After an external editor is configured and enabled, it is launched whenever a new
blank document is created or an existing file is opened. An external editor can only be used to edit files.
The integrated editor is used to debug your program. You can configure an external editor by selecting the
External Editor tab from the Option→Editor→Properties dialog.
SPRU509H – October 2006
Submit Documentation Feedback
Code Creation
37
www.ti.com
Code Generation Tools
4.3
Code Generation Tools
4.3.1 Code Development Flow
Code generation tools include an optimizing C/C++ compiler, an assembler, a linker, and assorted utilities,
see Figure 4-12.
Figure 4-12. Code Development Flow
C or C/C++
source files
C/C++ compiler
Parser
Optimizer
(optional)
Assembly
optimizer:
ONLY applies
to C6000
Assembly
preprocessor
Code
generator
Assembler
source
.asm files
With the linker
option (−z)
Assembler
Linker
COFF
object
(.obj) files
Executable
COFF file
.out file
4.3.2 Project Build Options
A graphical interface is provided for using the code generation tools. A Code Composer Studio project
keeps track of all information needed to build a target program or library. A project records:
• Filenames of source code and object libraries
• Compiler, assembler, and linker options
• Include file dependencies
When you build a project, CCStudio invokes the appropriate code generation tools to compile, assemble,
and/or link the program. The Build Options dialog box specifies the compiler, assembler, and linker
options (see Figure 4-13). Choose Build Options from the Project menu to access this dialog. This dialog
box lists nearly all the command line options. Any options that are not represented can be typed directly
into the editable text box at the top of the dialog. Each target configuration has a device-specific set of
options. See the compiler or assembly guide for your target for more information.
38
Code Creation
SPRU509H – October 2006
Submit Documentation Feedback
www.ti.com
Code Generation Tools
Figure 4-13. Build Options Dialog Box
You can set the compiler and linker options that are used during the build process.
Your build options can be set at two different levels, depending on how frequently or in what configuration
they are needed. First, you can define a set of project-level options that apply to all files in your project.
Then, you can optimize your program by defining file-specific options for individual source code files.
Note:
4.3.2.1
1.
2.
3.
4.
For options that are commonly used together, you can set project-level configurations,
rather than setting the same individual options repeatedly. You can also look for this
information in the online help and tutorial.
Setting Project-Level Build Options
Select Project→Build Options.
In the Build Options Dialog Box, select the appropriate tab.
Select the options to be used when building your program.
Click OK to accept your selections.
4.3.2.2 Setting File-Specific Options
1. Right-click on the name of the source file in the Project View window and select File Specific Options
from the context menu.
2. Select the options to be used when compiling this file. These will differ from the project-level build
options.
3. Click OK to accept your selections.
4. Any changes will only be applied to the selected file.
SPRU509H – October 2006
Submit Documentation Feedback
Code Creation
39
www.ti.com
Code Generation Tools
4.3.3 Compiler Overview
The C and C++ compilers (for C5000™ and C6000™) are full-featured optimizing compilers that translate
standard ANSI C programs into assembly language source. The following subsection describes the key
features of the compilers.
4.3.3.1
Interfacing with the Code Composer Studio IDE
The following features allow you to interface with the compiler:
• Compiler shell program. The compiler tools include a shell program that you use to compile,
assembly optimize, assemble, and link programs in a single step. For more information, see the About
the Shell Program section in the Optimizing Compiler User’s Guide appropriate for your device.
• Flexible assembly language interface. The compiler has straightforward calling conventions, so you
can write assembly and C functions that call each other. For more information, see the section on
Run-Time Environment in the Optimizing Compiler User’s Guide appropriate for your device.
4.3.4 Assembly Language Development Tools
The following is a list of the assembly language development tools:
• Assembler. The assembler translates assembly language source files into machine language object
files. The machine language is based on common object file format (COFF).
• Archiver. The archiver allows you to collect a group of files into a single archive file called a library.
Additionally, the archiver allows you to modify a library by deleting, replacing, extracting, or adding
members. One of the most useful applications of the archiver is building a library of object modules.
• Linker. The linker combines object files into a single executable object module. As it creates the
executable module, it performs relocation and resolves external references. The linker accepts
relocatable COFF object files and object libraries as input.
• Absolute lister. The absolute lister accepts linked object files as input and creates .abs files as output.
You can assemble these .abs files to produce a listing that contains absolute, rather than relative,
addresses. Without the absolute lister, producing such a listing requires many manual operations.
• Cross-reference lister. The cross-reference lister uses object files to produce a cross-reference listing
showing symbols, their definitions, and their references in the linked source files.
• Hex-conversion utility. The hex-conversion utility converts a COFF object file into TI-Tagged,
ASCII-hex, Intel, Motorola-S, or Tektronix object format. You can download the converted file to an
EPROM programmer.
• Mnemonic-to-algebraic translator utility. For the TMS320C54x device only, this tool converts
assembly language source files. The utility accepts an assembly language source file containing
mnemonic instructions. It converts the mnemonic instructions to algebraic instructions, producing an
assembly language source file containing algebraic instructions.
4.3.5 Assembler Overview
The assembler translates assembly language source files into machine language object files. These files
are in common object file format (COFF).
The two-pass assembler does the following:
• Processes the source statements in a text file to produce a relocatable object file
• Produces a source listing (if requested) and provides you with control over this listing
• Allows you to segment your code into sections and maintains a section program counter (SPC) for
each section of object code
• Defines and references global symbols and appends a cross-reference listing to the source listing (if
requested)
• Assembles conditional blocks
• Supports macros, allowing you to define macros inline or in a library
40
Code Creation
SPRU509H – October 2006
Submit Documentation Feedback
www.ti.com
Code Generation Tools
4.3.6 Linker Overview
The linker allows you to configure system memory by allocating output sections efficiently into the memory
map. As the linker combines object files, it performs the following tasks:
• Allocates sections into the target system’s configured memory
• Relocates symbols and sections to assign them to final addresses
• Resolves undefined external references between input files
The linker command language controls memory configuration, output section definition, and address
binding. The language supports expression assignment and evaluation. You configure system memory by
defining and creating a memory module. The directives MEMORY and SECTIONS allow you to:
• Allocate sections into specific areas of memory
• Combine object file sections
• Define or redefine global symbols at link time
4.3.6.1
Text-Based Linker
The text linker combines object files into a single executable COFF object module. Linker directives in a
linker command file allow you to combine object file sections, bind sections or symbols to addresses or
within memory ranges, and define or redefine global symbols. For more information, see the Code
Generation Tools online help.
4.3.7 C/C++ Development Tools
The following is a list of the C/C++ development tools:
• C/C++ compiler. The C/C++ compiler accepts C/C++ source code and produces assembly language
source code. A shell program, an optimizer, and an interlist utility are parts of the compiler.
– The shell program enables you to compile, assemble, and link source modules in one step. If any
input file has a .sa extension, the shell program invokes the assembly optimizer.
– The optimizer modifies code to improve the efficiency of C programs.
– The interlist utility interweaves C/C++ source statements with assembly language output.
• Assembly optimizer (C6000 only). The assembly optimizer allows you to write linear assembly code
without being concerned with the pipeline structure or with assigning registers. It accepts assembly
code that has not been register-allocated and is unscheduled. The assembly optimizer assigns
registers and uses loop optimization to turn linear assembly into highly parallel assembly that takes
advantage of software pipelining.
• Library-build utility. You can use the library-build utility to build your own customized
run-time-support library. Standard run-time-support library functions are provided as source code in
rts.src and rstcpp.src. The object code for the run-time-support functions is compiled for little-endian
mode versus big-endian mode and C code versus C++ code into standard libraries. The
run-time-support libraries contain the ANSI standard run-time-support functions, compiler-utility
functions, floating-point arithmetic functions, and C I/O functions that are supported by the compiler.
• C++ name demangling utility. The C++ compiler implements function overloading, operator
overloading, and type-safe linking by encoding a function’s signature in its link-level name. The
process of encoding the signature into the link name is often referred to as name mangling. When you
inspect mangled names, such as in assembly files or linker output, it can be difficult to associate a
mangled name with its corresponding name in the C++ source code. The C++ name demangler is a
debugging aid that translates each mangled name it detects to its original name found in the C++
source code.
SPRU509H – October 2006
Submit Documentation Feedback
Code Creation
41
www.ti.com
Building Your Code Composer Studio Project
4.4
Building Your Code Composer Studio Project
4.4.1 From Code Composer Studio
To build and run a program, follow these steps:
1. Choose Project→Rebuild All or click the Rebuild All toolbar button. All the files in your project are
recompiled, reassembled, and relinked. Messages about this process are shown in the status bar at
the bottom of the window.
2. By default, the .out file is built into a debug directory located under your current project folder. To
change this location, select a different one from the Select Configuration toolbar.
3. Choose File→Load Program. Select the program you just rebuilt, and click Open. The program is
loaded onto the target DSP and opens a disassembly window that shows the disassembled
instructions that make up the program.
4. Choose View→Mixed Source/ASM. This allows you to simultaneously view your c source and the
resulting assembly code.
5. Click on an assembly instruction in the mixed-mode window. (Click on the actual instruction, not the
address of the instruction or the fields passed to the instruction.)
6. Press the F1 key. The Code Composer Studio IDE searches for help on that instruction.
7. Choose Debug→Go Main to begin execution from the main function. The execution halts at Main.
8. Choose Debug→Run to run the program.
9. Choose Debug→Halt to quit running the program.
Note:
You can use the supplied timake.exe utility located in the CCStudio_v3.3\cc\bin directory
to build a project from the DOS shell.
4.4.2 External Make
Code Composer Studio supports the use of external makefiles (*.mak) and an associated external make
utility for project management and build process customization.
To enable the Code Composer Studio IDE to build a program using a makefile, a Code Composer Studio
project must be created that contains the makefile. After a Code Composer Studio project is associated
with the makefile, the project and its contents can be displayed in the Project View window and the
Project→Build and Project→Rebuild All commands can be used to build the program.
Double-click on the name of the makefile in the Project View window to open the file for editing. You can
also modify your makefile build commands and options through special dialogs. The normal Build Options
dialogs are not available when working with makefiles. Multiple configurations can be created, each with
its own build commands and options.
Note:
42
Code Creation
Limitations and Restrictions: Source files can be added to or removed from the project
in the Project View. However, changes made in the Project View do not change the
contents of the makefile. These source files do not affect the build process nor are they
reflected in the contents of the makefile. Similarly, editing the makefile does not change
the contents in the Project View. File-specific options for source files that are added in the
Project View are disabled. The Project→Compile File command is also disabled.
However, when the project is saved, the current state of the Project View is preserved.
SPRU509H – October 2006
Submit Documentation Feedback
www.ti.com
Available Foundation Software
4.4.3 Command Line
4.4.3.1
Using the Timake Utility From the Command Line
The timake.exe utility located in the CCStudio_v3.3\cc\bin directory provides a way to build projects (*.pjt)
outside of the Code Composer Studio environment from a command prompt. This utility can be used to
accomplish batch builds.
To invoke the timake utility:
1. Open a DOS Command prompt.
2. Set up the necessary environment variables by running the batch file DosRun.bat. This batch file must
be run before using timake. If you installed the Code Composer Studio product in C:\CCStudio_v3.3,
the batch file is located at: C:\CCStudio_v3.3\DosRun.bat.
3. Run the timake.exe utility in the CCStudio_v3.3\cc\bin directory.
See the online help topic on the timake utility for more information.
4.4.3.2
Makefiles
In addition to the option of using external makefiles within the Code Composer Studio IDE, you can also
export a standard Code Composer Studio project file (*.pjt) to a standard makefile that can be built from
the command line using any standard make utility. Code Composer Studio comes with a standard make
utility (gmake) that can be run after running the DosRun.bat file.
To export a Code Composer Studio Project to a standard makefile:
1. Make the desired project active by selecting the project name from the Select Active Project dropdown
list on the Project toolbar.
2. Select Project→Export to Makefile.
3. In the Exporting <filename>.pjt dialog box, specify the configurations to export, the default
configuration, the host operating system for your make utility, and the file name for the standard
makefile.
4. Click OK to accept your selections and generate a standard makefile.
See the online help topic, Exporting a Project to a Makefile for more information.
4.5
Available Foundation Software
4.5.1 DSP/BIOS
DSP/BIOS™ is a scalable real-time kernel, designed specifically for the TMS320C5000™ ,
TMS320C2000™, and TMS320C6000™ DSP platforms. DSP/BIOS enables you to develop and deploy
sophisticated applications more quickly than with traditional DSP software methodologies and eliminates
the need to develop and maintain custom operating systems or control loops. Because multithreading
enables real-time applications to be cleanly partitioned, an application using DSP/BIOS is easier to
maintain and new functions can be added without disrupting real-time response. DSP/BIOS provides
standardized APIs across C2000, C5000, and C6000 DSP platforms to support rapid application
migration.
DSP/BIOS is released separately from the main CCS releases, so updated versions of the DSP/BIOS API
and configuration tools are available through the Update Advisor. After installing an updated version of
DSP/BIOS, you can specify which DSP/BIOS version to be used by CCStudio with the Component
Manager.
SPRU509H – October 2006
Submit Documentation Feedback
Code Creation
43
www.ti.com
Available Foundation Software
4.5.2 Chip Support Library (CSL)
The Chip Support Library (CSL) provides C-program functions to configure and control on-chip
peripherals. It is intended to simplify the process of running algorithms in a real system. The goal is
peripheral ease of use, shortened development time, portability, hardware abstraction, and a small level of
standardization and compatibility among devices.
Note:
4.5.2.1
Support for the CSL graphic user interface has been removed in CCStudio v3.3. For more
information about CSL or to find out if CSL is supported by your device, check your
device product folder on www.ti.com, or contact the Product Information Center
(http://www-k.ext.ti.com/sc/technical-support/product-information-centers.htm).
Benefits of CSL
CSL has the following benefits:
• Standard protocol to program peripherals. CSL provides a higher-level programming interface for
each on-chip peripheral. This includes data types and macros to define peripheral register
configuration, and functions to implement the various operations of each peripheral.
• Basic resource management. Basic resource management is provided through the use of open and
close functions for many of the peripherals. This is especially helpful for peripherals that support
multiple channels.
• Symbol peripheral descriptions. As a side benefit to the creation of CSL, a complete symbolic
description of all peripheral registers and register fields has been created. It is suggested that you use
the higher-level protocols described in the first two bullets, as these are less device-specific, making it
easier to migrate your code to newer versions of DSPs.
4.5.3 Board Support Library (BSL)
The TMS320C6000 DSK Board Support Library (BSL) is a set of C-language application programming
interfaces (APIs) used to configure and control all on-board devices, allowing developers to get algorithms
functioning in a real system. The BSL consists of discrete modules that are built and archived into a library
file. Each module represents an individual API and is referred to as an API module. The module
granularity is constructed such that each device is covered by a single API module except the I/O Port
module, which is divided into two API modules: LED and DIP.
4.5.3.1
Benefits of BSL
Some of the advantages offered by the BSL include: device ease of use, a level of compatibility between
devices, shortened development time, portability, some standardization, and hardware abstraction.
4.5.4 DSP Library (DSPLIB)
The DSP Library (DSPLIB) includes many C-callable, assembly-optimized, general-purpose
signal-processing, and image/video processing routines. These routines are typically used in
computationally intensive real-time applications where optimal execution speed is critical. By using these
routines, you can achieve execution speeds considerably faster than equivalent code written in standard
ANSI C language. In addition, by providing ready-to-use DSP and image/video processing functions,
DSPLIB and IMGLIB can significantly shorten your application development time.
For more information on DSPLIB, see the appropriate reference guide for your device:
• TMS320C54x DSP Library Programmer’s Reference (SPRU518)
• TMS320C55x DSP Library Programmer’s Reference (SPRU422)
• TMS320C62x DSP Library Programmer’s Reference (SPRU402)
• TMS320C64x DSP Library Programmer’s Reference (SPRU565)
• TMS320C64x+ DSP Big-Endian Library Programmer's Reference(SPRUEC5)
• TMS320C64x+ DSP Little-Endian Library Programmer's Reference(SPRUEB8)
44
Code Creation
SPRU509H – October 2006
Submit Documentation Feedback
www.ti.com
Available Foundation Software
4.5.4.1
Benefits of DSPLIB
DSPLIB includes commonly-used routines. Use the provided source code to modify functions.
Features include:
• Optimized assembly code routines
• C and linear assembly source code
• C-callable routines fully compatible with the TI Optimizing C compiler
• Benchmarks (cycles and code size)
• Tested against reference C model
4.5.4.2
DSPLIB Functions Overview
DSPLIB provides a collection of C-callable high performance routines that serve as key enablers for a
wide range of signal and image/video processing applications.
The routines contained in the DSPLIB are organized into the following functional categories:
• Adaptive filtering
• Correlation
• FFT
• Filtering and convolution
• Math
• Matrix functions
• Miscellaneous
4.5.5 Image/Video Processing Library (IMGLIB)
The Image/Video Processing Library (IMGLIB) includes many C-callable, assembly-optimized,
general-purpose signal-processing, and image/video processing routines. The IMGLIB is only available for
C5500/C6000 platform devices. These routines are typically used in computationally intensive real-time
applications where optimal execution speed is critical. By using these routines, you can achieve execution
speeds faster than equivalent code written in standard ANSI C language. In addition, DSPLIB and IMGLIB
can significantly shorten application development time by providing ready-to-use DSP and image/video
processing functions.
For more information on IMGLIB, see the appropriate reference guide for your device:
• TMS32C55x Imaging/Video Processing Library Programmer’s Reference (SPRU037)
• TMS320C62x Image/Video Processing Library Programmer’s Reference (SPRU400)
• TMS320C64x Image/Video Processing Library Programmer’s Reference (SPRU023)
• TMS320C64x+ mage/Video Processing Library Programmer's Reference(SPRUEB9)
4.5.5.1
Benefits of IMGLIB
IMGLIB includes commonly used routines. Source code is provided that allows you to modify functions to
match your specific needs.
Features include:
• Optimized assembly code routines
• C and linear assembly source code
• C-callable routines fully compatible with the TI Optimizing C compiler
• Benchmarks (cycles and code size)
• Tested against reference C model
SPRU509H – October 2006
Submit Documentation Feedback
Code Creation
45
www.ti.com
Available Foundation Software
4.5.5.2
IMGLIB Functions Overview
IMGLIB provides a collection of C-callable high performance routines that can serve as key enablers for a
wide range of signal and image/video processing applications.
The set of software routines included in the IMGLIB are organized into three different functional categories
as follows:
• Image/video compression and decompression
• Image analysis
• Picture filtering/format conversions
4.5.6 TMS320 DSP Algorithm Standard Components
DSPs are programmed in a mix of C and assembly language, and directly access hardware peripherals.
For performance reasons, DSPs have little or no standard operating system support. Unlike
general-purpose embedded microprocessors, DSPs are designed to run sophisticated signal processing
algorithms and heuristics. However, because of the lack of consistent standards, it is not possible to use
an algorithm in more than one system without significant reengineering. Reusing DSP algorithms is labor
intensive, so the time-to-market for a new DSP-based product is lengthy.
The TMS320 DSP Algorithm Standard (known as XDAIS) defines a set of requirements for DSP
algorithms that allow system integrators to quickly assemble systems from using one or more such
algorithms.
4.5.6.1
Scope of XDAIS
Figure 4-14. TMS320 DSP Algorithm Standard Elements
Level 1
General Programming Guidelines
C callable
No hard coded addresses
Reentrant etc.
Level 2
Algorithm Component Model
Modules
Generic Interfaces
Packaging etc.
Level 3
Level 4
Rules for C62xx
Interrupt usage
Memory usage
Register usage
etc.
Telecom
Vocoders
Echo cancel
etc.
Rules for C54xx
Interrupt usage
Memory usage
Register usage
etc.
Imaging
JPEG
etc.
Audio
Coders
etc.
Rules for C2xxx
Interrupt usage
Memory usage
Register usage
etc.
Automotive
etc.
Other
Level 1 contains programming guidelines that apply to all algorithms on all DSP architectures, regardless
of application area. Almost all recently developed software modules already follow these guidelines, so
this level formalizes them.
Level 2 contains rules and guidelines that enable all algorithms to operate within a single system.
Conventions are established for an algorithm’s use of data memory and names for external identifiers, as
well as rules for algorithm packaging.
Level 3 contains the guidelines for specific DSP families. There are no current agreed-upon guidelines for
algorithms for use of processor resources. These guidelines outline the uses of the various architectures.
Deviations from these guidelines may occur, but the algorithm vendor can outline the deviation in the
relevant documentation or module headers.
The shaded boxes in Figure 4-14 represent the areas that are covered in this version of the specification.
46
Code Creation
SPRU509H – October 2006
Submit Documentation Feedback
www.ti.com
Available Foundation Software
Level 4 contains the various vertical markets. Due to the inherently different nature of each of these
businesses, it seems appropriate for the market leaders to define the interfaces for groups of algorithms
based on the vertical market. If each unique algorithm has an interface, the standard will not stay current.
At this level, any algorithm that conforms to the rules defined in the top three levels is considered
eXpressDSP-compliant.
4.5.6.2
Rules and Guidelines
The TMS320 DSP Algorithm Standard specifies both rules and guidelines. Rules must be followed for
software to be eXpressDSP-compliant. On the other hand, guidelines are strongly suggested
recommendations that are not required for software to be eXpressDSP-compliant.
4.5.6.3
Requirements of the Standard
The required elements of XDAIS are as follows:
• Algorithms from multiple vendors can be integrated into a single system.
• Algorithms are framework-agnostic. That is, the same algorithm can be efficiently used in virtually any
application or framework.
• Algorithms can be deployed in purely static as well as dynamic run-time environments.
• Algorithms can be distributed in binary form.
• Integration of algorithms does not require recompilation of the client application; however,
reconfiguration and relinking may be required.
4.5.6.4
Goals of the Standard
The XDAIS must meet the following goals:
• Enable developers to easily conform to the standard
• Enable developers to verify conformance to the standard
• Enable system integrators to easily migrate between TI DSPs
• Enable host tools to simplify a system integrator’s tasks; including configuration, performance
modeling, standard conformance, and debugging
• Incur little or no overhead for static systems
4.5.7 Reference Frameworks
Reference frameworks for eXpressDSP software are provided for applications that use DSP/BIOS and the
TMS320 DSP Algorithm Standard. You first select the reference framework that best approximates your
system and its future needs, and then adapt the framework and populate it with eXpressDSP-compliant
algorithms. Common elements such as device drivers, memory management, and channel encapsulation
are already pre-configured in the frameworks, therefore you can focus on your system. Reference
frameworks contain design-ready, reusable, C-language source code for TMS320C5000 and
TMS320C6000 DSPs.
Reference frameworks software and documentation are available for download from the TI website. They
are not included in the Code Composer Studio installation.
Figure 4-15 shows the elements that make up a reference framework on the target DSP.
SPRU509H – October 2006
Submit Documentation Feedback
Code Creation
47
www.ti.com
Available Foundation Software
Figure 4-15. Reference Framework Elements
Application level code
Framework components
Memory
management
and overlays
eXpressDSP
alg. 1
Channel
abstraction
eXpressDSP
alg. 2
Algorithm
manager
DSP/BIOS
Chip support library
Device driver adapter
Device driver controller
TMS320 DSP hardware
See the following list for element descriptions:
•
•
•
•
•
48
Device controller and device adapter. The device drivers used in reference frameworks are based
on a standard driver model, which provides device adapters and specifies a standard device controller
interface. If you have unique external hardware, the device controller might require modification, but
the device adapter probably needs little or no modification.
Chip Support Library (CSL). The controller uses CSL modules to support peripheral hardware.
DSP/BIOS. This extensible software kernel is a good example of how each reference framework
leverages different amounts of the eXpressDSP infrastructure, depending on its needs. The low-end
RF1 framework uses relatively few DSP/BIOS modules. In addition to providing an obvious footprint
savings, reducing the number of modules helps clarify design choices for a designer who may not fully
appreciate the ramifications of module selections.
Framework components. These elements are crafted to provide overall system resource
management. One example of this is channel abstraction. Every reference framework needs some
kind of channel management. However, design optimizations can be made based on the number of
channels likely to be in use. For simple systems with 1 to 3 channels, channel scheduling is handled
with the low-overhead DSP/BIOS HWI and IDL modules. For larger numbers of channels, it is wiser to
use the SWI module, although it comes with some extra footprint. For large systems with channels that
change dynamically, the TSK module is most appropriate. The algorithm managers manage some
eXpressDSP-compliant algorithms, similar to channel managers. Other framework components are
modules that handle memory overlay schemes, which is a critical technique in most memory
constrained systems. Starting with the appropriate framework simplifies many development choices.
eXpressDSP-compliant algorithms. Each algorithm follows the rules and guidelines detailed in the
TMS320 DSP Algorithm Standard Rules and Guidelines (SPRU352). To be standard-compliant,
algorithms must not directly access any hardware peripherals and must implement standard resource
management interfaces known as IALG (for memory management) and optionally, IDMA (for DMA
resource management). In the examples that TI provides, the algorithms are simple, including finite
impulse response (FIR) filters and volume controllers. You can substitute more significant
eXpressDSP-compliant algorithms for the TI-provided ones, making a generic reference framework
more application-specific.
Code Creation
SPRU509H – October 2006
Submit Documentation Feedback
www.ti.com
Automation (for Project Management)
•
4.6
Application-level code. The last step is to modify the application-level code. This code applies unique
and value-added application-specific knowledge, allowing for real product differentiation. For instance,
the application code required for a single-channel MP3 player is different than that required for a digital
hearing aid.
Automation (for Project Management)
4.6.1 Using General Extension Language (GEL)
The General Extension Language (GEL) is an interpretive language, similar to C, that lets you create
functions for Code Composer Studio. You create your GEL functions by using the GEL grammar, and then
load them into the Code Composer Studio IDE. A subset of GEL functions may be used to automate
project build options, or custom GEL menus may be created to automatically open and build a project.
Here's a sample GEL Script to open the volume project:
/*
* Copyright 1998 by Texas Instruments Incorporated.
* All rights reserved. Property of Texas Instruments
Incorporated.
* Restricted rights to use, duplicate or disclose this
code are
* granted through contract.
*/
/*
* ======== PrjOpen.gel ========
* Simple gel file to demonstrate project management
capabilities of GEL
*/
menuitem "MyProjects"
hotmenu OpenVolume()
{
// Open Volume tutorial example
GEL_ProjectLoad("C:\\CCStudio_v3.3\\tutorial\\sim55xx\\volume1\\volume.pjt");
// Set currently active configuration to debug
GEL_ProjectSetActiveConfig("C:\\CCStudio_v3.3\\tutorial\\sim55xx\\volume1\\volume.pjt",
"Debug");
// Build the project.
GEL_ProjectBuild();
}
4.6.2 Scripting Utility
The scripting utility is a set of IDE commands that are integrated into a VB or perl scripting language. You
may utilize the full capabilities of a scripting language, such as perl or VB, and combine it with automation
tasks in Code Composer Studio. The scripting utility can configure a test scenario, open and build a
corresponding project, and load it for execution. There are a number of scripting commands that may be
used to build and manage projects. Scripting is synchronous.
The scripting utility is an add-on capability available through Update Advisor (see Section 7.2).
SPRU509H – October 2006
Submit Documentation Feedback
Code Creation
49
www.ti.com
Automation (for Project Management)
50
Code Creation
SPRU509H – October 2006
Submit Documentation Feedback
Chapter 5
SPRU509H – October 2006
Debug
This section applies to all platforms using Code Composer Studio IDE. However, not all
devices have access to all of the tools discussed in this section. For a complete listing
of the tools available to you, see the online help and online documentation provided
with the Code Composer Studio IDE.
This section discusses the various debug tools included with Code Composer Studio.
Topic
5.1
5.2
5.3
5.4
5.5
5.6
..................................................................................................
Setting Up Your Environment for Debug ......................................
Basic Debugging.......................................................................
Advanced Debugging Features ...................................................
Real-Time Debugging ................................................................
Automation (for Debug) .............................................................
Reset Options ...........................................................................
SPRU509H – October 2006
Submit Documentation Feedback
Page
52
59
79
81
86
86
Debug
51
www.ti.com
Setting Up Your Environment for Debug
5.1
Setting Up Your Environment for Debug
Before you can successfully debug an application, the environment must be configured as shown in the
following sections.
5.1.1 Setting Custom Debug Options
Several debugging options are customizable within Code Composer Studio IDE. You can configure these
options to help with the debug process or to suit your desired preferences.
5.1.1.1
Debug Properties Tab
This debug properties dialog is available from the Customize dialog under Option→Customize→Debug
Properties. It allows you to disable certain default behaviors when debugging, other options are described
in the online help. The behaviors available from the debug properties tab are as follows, your list may
have additional items depending on your installation:
• Open the Disassembly Window automatically. Disabling this option prevents the disassembly
Window from appearing after a program is loaded. This option is enabled by default.
• Perform Go Main automatically. Enabling this option instructs the debugger to automatically run to
the symbol main for the application loaded. This option is disabled by default.
• Connect to the target when a control window is opened. You can disable this option when you are
experiencing target connection problems or don’t need the actual target to be connected (i.e., when
writing source code, etc.). This option is disabled by default.
• Remove remaining debug state at connect. When the Code Composer Studio IDE disconnects from
the target, it typically tries to remove breakpoints by default. If there are errors in this process, Code
Composer Studio will try again to remove breakpoints when reconnecting to the target. However, this
second attempt to remove breakpoints may put some targets into a bad state. Thus, TI recommends
disabling this option to prevent a second attempt to remove breakpoints when reconnecting.
• Step over functions without debug information when source stepping. This option allows you to
step over functions that do not have debug information when you are source stepping.
• Enable cache highlighting for disassembly and mixed mode. You can disable this feature to
improve performance while debugging. This is only relevant for devices that support cache visibility,
which is currently limited to C64x+ devices. If this option is enabled, then addresses that have been
read from the target device’s cache are displayed with a background color indicating from which level
of cache the address has been read (if any). The same cache highlighting colors will be used in the
memory window, disassembly window, and mixed mode window. The cache highlighting colors can be
configured via the memory window properties (select View→Memory, then right click on the Memory
Window and select Properties from the context menu). Disabling both the cache highlighting and
protected memory options will significantly improve the speed at which a program can be
single-stepped.
• Enable highlighting of protected memory for disassembly and mixed mode. You can disable this
feature to improve performance while debugging. This is only relevant for devices that support memory
protection visibility, which is currently limited to C64x+ devices. To use this option, your program must
have a range of addresses configured as a protected memory region. If this option is enabled, then the
disassembly window and mixed mode windows will display "****" for addresses in the protected
memory regions. If the option is not enabled, then the data read from addresses in protected memory
regions for C64x+ devices will be indeterminate and garbage opcodes will be displayed. If you are
debugging programs on C64x+ devices that use the memory protection features of these devices, it is
recommended that this option be enabled. Disabling both the cache highlighting and protected memory
options will significantly improve the speed at which a program can be single-stepped.
• Animation speed. Animation speed is the minimum time (in seconds) between breakpoints. Program
execution does not resume until the minimum time has expired since the previous breakpoint. See
Section 5.2.1.1 for more details.
52
Debug
SPRU509H – October 2006
Submit Documentation Feedback
www.ti.com
Setting Up Your Environment for Debug
5.1.1.2
Directories
To open the source file, the debugger needs the location of the source file where the application is halted.
The debugger includes source path information for all the files in an open project, files in the current
directory, and specified paths to Code Composer Studio IDE.
The paths you specify to Code Composer Studio IDE are empty by default. Thus, if the application being
debugged uses source files that are not in an open project or current directory, then you must specify the
path to these files. If not, the debugger will not be able to automatically open the file when execution halts
at a location that references that source file. It will then prompt you to manually find the file. For instance,
including libraries in a build is a common example of using source files that are not in the open project.
The Directories dialog box enables you to specify additional search paths that the debugger uses to find
the included source files.
To specify a search path directory, select the Directories tab in the Option→Customize menu dialog. The
options include:
• Directories. The Directories list displays the defined search path. The debugger searches the listed
directories in order from top to bottom. If two files have the same name and are located in different
directories, the file located in the directory that appears highest in the Directories list takes precedence.
• New. To add a new directory to the Directories list, click the New icon button. Enter the full path or
browse to the appropriate directory. By default, the new directory is added to the bottom of the list.
• Delete. Select a directory in the Directories list, then click the Delete icon button to remove it.
• Move Up/Move Down. Select a directory in the Directories list, then click the Move Up icon button to
move that directory higher in the list, or Move Down to move that directory lower in the list.
• Look in subfolders. You can enable the debugger to search in the subfolders of the listed paths.
• Default File I/O Directory. In addition to setting source file directories, you can now set a default
directory for File I/O files by enabling the Default File I/O directory option. Use the browse button to
find the path you wish to select as the default directory.
5.1.1.3
Program/Project/CIO Load Options
You can set defaults for loading a program by selecting the Program/Project/CIO tab from the
Option→Customize menu dialog, including the following default behaviors in the Program section:
• Perform verification during Program Load. This checkbox is enabled by default, so Code Composer
Studio reads back selected memory to verify that the program loaded correctly.
• Load Program After Build. When this option is selected, the executable is loaded immediately upon
building the project, thus the target contains the current symbolic information generated after a build.
• Do Not Set CIO Breakpoint At Load. By default, if your program has been linked using a TI library
(rts*.lib), a C I/O breakpoint (C$$IO$$) is set when the program is loaded. This option enables you to
choose not to set the C I/O breakpoint. The C I/O breakpoint is necessary for the normal operation of
C I/O library functions such as printf and scanf. The C I/O breakpoint is not needed if your program
does not execute CIO functions. When C I/O code is loaded in RAM, Code Composer Studio sets a
software breakpoint. However, when C I/O code is loaded in ROM, Code Composer Studio uses a
hardware breakpoint. Since most processors support only a small number of hardware breakpoints,
using even one can significantly impact debugging. You can also avoid using the hardware breakpoint
when C I/O code is loaded in ROM by embedding a breakpoint in your code and renaming the label
C$$IO$$ to C$$IOE$$.
• Do Not Set End of Program Breakpoint At Load. By default, if your program has been linked using a
TI library (rts*.lib), an End of Program breakpoint (C$$EXIT) is set when the program is loaded. This
option allows you to choose not to set the End of Program breakpoint. The End of Program breakpoint
halts the processor when your program exits following completion. The End of Program breakpoint is
not needed if your program executes an infinite loop. When End of Program code is loaded in RAM,
Code Composer Studio sets a software breakpoint. However, when End of Program code is loaded in
ROM, Code Composer Studio uses a hardware breakpoint. Since most processors support only a
small number of hardware breakpoints, using even one can have a significant impact when debugging.
You can also avoid using the hardware breakpoint when End of Program code is loaded in ROM by
embedding a breakpoint in your code and renaming the label C$$EXIT to C$$EXITE$$ to indicate that
this is an embedded breakpoint.
SPRU509H – October 2006
Submit Documentation Feedback
Debug
53
www.ti.com
Setting Up Your Environment for Debug
•
Disable All Breakpoints When Loading New Programs. Enabling this option will remove all existing
breakpoints before loading a new program.
The Project Options section offers the following options:
• Open Dependent Projects When Loading Projects. By default, if your program has subprojects
upon which a main project is dependent, all the subprojects are opened along with the main project. If
this option is disabled, then the subprojects will not be opened.
• Do Not Scan Dependencies When Loading Projects. To determine which files must be compiled
during an incremental build, the project must maintain a list of include file dependencies for each
source file. A dependency tree is created whenever you build a project. To create the dependency
tree, all the source files in the project list are recursively scanned for #include, .include, and .copy
directives, and each included file name is added to the project list. By default, when a project is
opened, all files in the project are scanned for dependencies. If this option is disabled, it will not
automatically scan for dependencies upon opening a project, and the project may open more quickly.
• Auto-save Projects Before Build. Enabling this option will save your project automatically before
beginning a build.
• Open Project Window On Startup. Enabling this feature will open the active project window when
CCStudio is started.
The CIO Options section offers the following option.
• Maximum # of lines. This option allows you to set the maximum number of lines shown in the Output
window’s Stdout tab. The default maximum is 256 lines, but you can set it as high as 32768. Changing
this option may require restarting the program. Once a running application has output more lines than
supported, the oldest output lines will be removed from the window so that the number of displayed
lines does not exceed the maximum.
5.1.1.4
Disassembly Style
Several options are available for changing the information view in the disassembly window. The
Disassembly Style Options dialog box allows you to input specific viewing options for your debugging
session.
To set disassembly style options:
1. Select Option→Disassembly Style, or right-click in the disassembly window and select
Properties→Disassembly Options.
2. Enter your choices in the Disassembly Style Options dialog box.
Figure 5-1. Disassembly Style
3. Click OK. The contents of the disassembly window are immediately updated with the new style.
54
Debug
SPRU509H – October 2006
Submit Documentation Feedback
www.ti.com
Setting Up Your Environment for Debug
5.1.2 Simulation
To configure the simulator to behave closer to the actual hardware target, you can set options for memory
mapping (Section 5.1.3), pin connect (Section 5.1.4), or port connect (Section 5.1.5).
5.1.3 Memory Mapping
The memory map tells the debugger which areas of memory it can access. Memory maps vary depending
on the application.
When a memory map is defined and memory mapping is enabled, the debugger checks every memory
access against the memory map. The debugger will not attempt to access an area of memory that is
protected by the memory map.
The debugger compares memory accesses against the memory map in software, not hardware. The
debugger cannot prevent your program from attempting to access nonexistent memory.
5.1.3.1
Memory Mapping with Simulation
The simulator utilizes pre-defined memory map ranges to allow the most generic representation of valid
memory settings for simulated DSP targets. The memory map settings can be altered to some degree;
however, this is not recommended, as simulator performance may be affected by extensive changes to
valid memory ranges.
5.1.3.2
Memory Mapping Using the Debugger
Although the memory map can be defined interactively while using the debugger, this can be inconvenient
because you normally set up one memory map before debugging, and then use this memory map for all
other debugging sessions.
To add a new memory map range:
1. Select Option→Memory Map.
Figure 5-2. Memory Map
2. If your actual or simulated target memory configuration supports multiple pages, the Memory Map
dialog box contains a separate tab for each type of memory page (e.g., Program, Data, and I/O).
Select the appropriate tab for the type of memory that you want to modify. Tabs do not appear for
processors that have only one memory page.
3. Click Done to accept your selections.
SPRU509H – October 2006
Submit Documentation Feedback
Debug
55
www.ti.com
Setting Up Your Environment for Debug
The Memory Map dialog offers the following options:
• Enable Memory Mapping. Ensure that the Enable Memory Mapping checkbox is checked. Otherwise,
the debugger assumes all addressable memory (RAM) on your target is valid.
• Starting Address. Enter the start address of the new memory range in the Starting Address input
field.
• Length. Enter the length of the new memory range in the Length input field.
• Attributes. Select the read/write characteristics of the new memory range in the Attributes field.
• Access Size (bits). Specify the access size for your target processor. You can select an access size
from the dropdown list, or you can type a value in the Access Size field. It is not necessary to specify a
size for processors that support only one access size.
• Volatile Memory. Normally, a write access consists of Read, Modify, and Write operations. When the
Volatile Memory option is set on a segment of memory, any write access to that memory is completed
by using only a Write operation.
• Memory Map List. Displays the list of memory-mapped ranges.
• Add. Adds a new memory range to the Memory Map list.
• Delete. In the Memory Map List, select the desired memory map range and click the Delete button.
You can also delete an existing memory map range by changing the Attributes field to None - No
Memory/Protected. This means you can neither read nor write to this memory location.
• Reset. Resets the default values in the Memory Map List.
The debugger allows you to enter a new memory range that overlaps existing ones. The new range is
assumed to be valid, and the overlapped range’s attributes are changed accordingly.
After you have defined a memory map, you may wish to modify its read/write attributes. You can do this
by defining a new memory map (with the same Starting Address and Length) and clicking the Add button.
The debugger overwrites the existing attributes with the new ones.
5.1.3.3
Defining Memory Map with GEL
The memory map can also be defined using the general extension language (GEL) built-in functions. GEL
provides a complete set of memory-mapping functions. You can easily implement a memory map by
putting the memory-mapping functions in a GEL text file and executing the GEL file at start up. (See
Section 5.5.1 for an introduction to GEL.)
When you first invoke the Code Composer Studio IDE, the memory map is turned off. You can access any
memory location without interference from the memory map. If you invoke Code Composer Studio with an
optional GEL filename specified as a parameter, the GEL file is automatically loaded. If the file contains
the GEL function StartUp(), the GEL functions in the file are executed. You can specify GEL mapping
functions in this file to automatically define the memory mapping requirements for your environment.
Use the following GEL functions to define your memory map:
Table 5-1. GEL Functions for Memory Maps
56
Function
Description
GEL_MapAdd()
Memory map add
GEL_MapDelete()
Memory map delete
GEL_MapOn()
Enable memory map
GEL_MapOff()
Disable memory map
GEL_MapReset()
Reset memory map
GEL_MapAddStr()
Adds to the memory map
Debug
SPRU509H – October 2006
Submit Documentation Feedback
www.ti.com
Setting Up Your Environment for Debug
The GEL_MapAdd() function defines a valid memory range and identifies the read/write characteristics of
the memory range. The following is a sample of a GEL file that can be used to define two blocks of length
0xF000 that are both readable and writeable:
StartUp()
{
GEL_MapOn();
GEL_MapReset();
GEL_MapAdd(0, 0, 0xF000, 1, 1);
GEL_MapAdd(0, 1, 0xF000, 1, 1);
}
When you have set up your memory map, choose Option→Memory Map to view the memory map.
5.1.4 Pin Connect
The Pin Connect tool enables you to specify the interval at which selected external interrupts occur.
To simulate external interrupts:
1. Create a data file that specifies interrupt intervals.
2. Start the Pin Connect tool by choosing Pin Connect from the Tools menu.
3. Select the pin name and click Connect.
4. Load your program.
5. Run your program.
For detailed information on the Pin Connect tool, see the Pin Connect topics provided in the online help:
Help→Contents→Debugging Windows and Analysis Tools→Analysis Tools (Generic)→Pin Connect.
5.1.5 Port Connect
You can use the Port Connect tool to access a file through a memory address. Then, by connecting to the
memory (port) address, you can read data in from a file, and/or write data out to a file.
To connect a memory (port) address to a data file, follow these steps:
1. From the Tools menu, select Port Connect to display the Port Connect window and start the Port
Connect tool.
2. Click the Connect button to open the Connect dialog box.
3. In the Port Address field, enter the memory address. This parameter can be an absolute address, any
C expression, the name of a C function, or an assembly language label. If you want to specify a hex
address, be sure to prefix the address number with 0x. Otherwise, it is treated as a decimal address.
4. In the Length field, enter the length of the memory range. The length can be any C expression.
5. In the Page field (C5000 only), choose type of memory (program or I/O) that the address occupies. For
program memory, choose Prog. For I/O space, choose I/O.
6. In the Type field, select the Write or Read radio button, depending on whether you want to read data
from a file or write data to a file.
7. Click OK to display the Open Port File window.
8. Select the data file to which you want to connect and click Open.
9. Select the No Rewind feature to prohibit the file from being rewound when the end-of-file (EOF) is
reached. For read accesses made after EOF, the value 0xFFFFFFFF is read and the file pointer is
kept unchanged.
The file is accessed during an assembly language read or write of the associated memory address. Any
memory address can be connected to a file. A maximum of one input and one output file can be
connected to a single memory address. Multiple addresses can be connected to a single file.
For detailed information on the Port Connect tool, see the Port Connect topics provided in the online help:
Help→Contents→Debugging Windows and Analysis Tools→Analysis Tools (Generic)→Port Connect.
SPRU509H – October 2006
Submit Documentation Feedback
Debug
57
www.ti.com
Setting Up Your Environment for Debug
5.1.6 Program Load
The COFF file (*.out) produced by building your program must be loaded onto the actual or simulated
target board prior to execution.
Program code and data are downloaded onto the target at the addresses specified in the COFF file.
Symbols are loaded into a symbol table maintained by the debugger on the host. The symbols are loaded
at the code and data addresses specified in the COFF file.
A COFF file can be loaded by selecting File→Load Program and then using the Load Program dialog box
to select the desired COFF file.
5.1.6.1
Loading Symbols Only
It is useful to load only symbol information when working in a debugging environment where the debugger
cannot or need not load the object code, such as when the code is in ROM.
Symbols can be loaded by selecting File→Load Symbols→Load Symbols Only from the main menu and
then using the Load Symbols dialog box to select the desired COFF file.
The debugger deletes any previously loaded symbols from the symbol table maintained on the host. The
symbols in the symbol file are then loaded into the symbol table. Symbols are loaded at the code and data
addresses specified in the symbol file. This command does not modify memory or set the program entry
point.
You can also specify a code offset and a data offset that the debugger will apply to every symbol in the
specified symbol file. For example, if you have a symbol file for an executable that contains code
addresses starting at 0x100 and data addresses starting at 0x1000. However, in the program loaded on
the target, the corresponding code starts at 0x500100 and the data is located at 0x501000.
To specify the code and data offset, select File→Load Symbols→Load Symbols with Offsets from the
main menu and then use the Load Symbols dialog box to select the desired COFF file. Once a COFF file
is selected, an additional Load Symbols with Offsets dialog box will appear for you to enter the actual
starting addresses for code and data.
Figure 5-3. Data Offset
The debugger automatically offsets every symbol in that symbol file by the given value.
5.1.6.2
Adding Symbols Only
Symbol information can also be appended to the existing symbol table. This command differs from the
Load Symbol command in that it does not clear the existing symbol table before loading the new symbols,
but just appends the new symbols to the existing symbol table.
The steps for adding symbol information, with File→Load Symbols→Add Symbols with Offsets, or without
offsets File→Load Symbols→Add Symbols Only, is similar to the steps outlined above for loading
symbols.
58
Debug
SPRU509H – October 2006
Submit Documentation Feedback
www.ti.com
Basic Debugging
5.2
Basic Debugging
Several components are often necessary for basic debugging in the Code Composer Studio IDE. The
chart below provides a list of the icons used for debugging in CCStudio. If these icons are not visible in
the toolbar, select View→Debug Toolbars→ASM/Source Stepping. From the Debug Toolbars options list,
you will see a list of various debug toolbars which can be made visible. A visible toolbar has a checkmark
next to the name in the menu.
Figure 5-4. Toolbar Icons for Running and Debugging
Step into (source mode)
Step over (source mode)
Step out (source and assembly mode)
Single step (assembly mode)
Step over (assembly mode)
Run
Halt
Animate
Toggle breakpoint
Expression
Run to Cursor
Set PC to Cursor
5.2.1 Running/Stepping
5.2.1.1
Running
To run a program, select the appropriate command under the Debug item on the IDE's menu. If the Target
Control toolbar is also visible, run icons will be visible on a vertical toolbar on the left side. If these icons
are not already visible, select View→Debug Toolbars→Target Control.
These commands allow you to run the program:
• Main. Take your execution to your main function by selecting Debug→Go Main.
• Run. After execution has been halted, you can continue to run by pressing the Run button.
• Run to Cursor. If you want the program to run to a specific location, you can place the cursor at that
location and press this button.
• Set PC to Cursor. You can also set the program counter to a certain location by placing the cursor at
the location and then pressing this button.
• Low Power Run. Choose Debug→Low Power Run. This is the same as a normal run, except that the
target is not prevented from going into low power mode (sleep mode). If power is lost, the lower left
corner of the CCStudio window will display a message. Losing power may cause breakpoints to be
lost. After a halt, all breakpoints will be verified, and disabled if they are no longer present.
• Animate. This action runs the program until a breakpoint is encountered. Breakpoints stop the
execution of the program. While the program is stopped, you can examine the state of the program,
examine or modify variables, examine the call stack, etc. If you associate a file with the breakpoint
action Read Data from File or Write Data to File, you can stop the program execution and then
resume. Modify the animate speed by selecting Customize from the Option menu.
• Halt. Lastly, you can halt execution at any time by pressing the halt button.
SPRU509H – October 2006
Submit Documentation Feedback
Debug
59
www.ti.com
Basic Debugging
5.2.1.2
Stepping
Both source and assembly stepping are available only when the execution has been halted. Source
stepping steps through lines of code displayed in your source editor; Assembly stepping steps through
lines of instructions that display in your disassembly window. By accessing the mixed Source/ASM mode
through View→Mixed Source/ASM, you can view both source and assembly code simultaneously.
To perform a stepping command, choose the appropriate stepping icon on the toolbar, or select
Debug→Assembly/Source Stepping and then the appropriate command.
There are three types of stepping:
• Single Step or Step Into executes one single statement and halts execution.
• Step Over executes the function and halts after the function returns.
• Step Out executes the current subroutine and returns to the calling function. Execution is then halted
after returning to the calling function.
5.2.1.3
Multiprocessor Broadcast Commands Using PDM
When using the Parallel Debug Manager (PDM), all run/step commands are broadcast to all target
processors in the current group. If the device driver supports synchronous operation, each of the following
commands is synchronized to start at the same time on each processor.
• Use Locked Step (Step Into) to single step all processors that are not already running.
• Use Step Over to execute a step over on all processors that are not already running.
• If all the processors are inside a subroutine, you can use Step Out to execute the step-out command
on all the processors that are not already running.
• Run sends a global run command to all processors that are not already running.
• Halt stops all processors simultaneously.
• Animate starts animating all the processors that are not already running.
• Run Free disables all breakpoints before executing the loaded program starting from the current PC
location.
5.2.2 Breakpoints
Breakpoints are essential components of any debugging session. They stop the execution of the program.
While the program is stopped, you can examine the state of the program, examine or modify variables,
examine the call stack, etc. Breakpoints can be set on a line of source code in an editor window or on a
disassembled instruction in the disassembly window. After a breakpoint is set, it can be enabled or
disabled. You can also associate actions or conditions with it.
If a breakpoint is set on a source line, there must be an associated line of disassembly code. When
compiler optimization is turned on, many source lines do not allow the setting of breakpoints. To see
allowable lines, use mixed mode in the editor window.
60
Note:
Code Composer Studio tries to relocate a breakpoint to a valid line in your source window
and places a breakpoint icon in the selection margin beside the line on which it locates
the breakpoint. If an allowable line cannot be determined, it reports an error in the
message window.
Note:
Code Composer Studio briefly halts the target whenever it reaches a breakpoint that is
connected to a file. Any windows or displays connected to that breakpoint are updated
when execution stops. Therefore, the target application may not meet real-time deadlines
if you are using certain actions with breakpoints. At this stage of development, you are
testing the algorithm. Later, you can analyze real-time behavior using RTDX and
DSP/BIOS.
Debug
SPRU509H – October 2006
Submit Documentation Feedback
www.ti.com
Basic Debugging
5.2.2.1
Breakpoint Manager
The Breakpoint Manager allows you to configure individual breakpoints, and allows you to choose various
actions or properties to associate with the breakpoints. To open the Breakpoint Manager, select
Breakpoints from the Debug menu. On C55x emulators, you also have options to set hardware
breakpoints, watchpoints, or counters. See the C55x Emulation Breakpoint Options main online help topic
for more information on these options.
Figure 5-5. Breakpoint Manager
The Breakpoint Manager includes the following functions on the toolbar:
• New Item. When you click this, it will prompt you to enter an address that will be the location for the
breakpoint. That address corresponds to the location within the Assembly window. It can also
correspond to a symbol in your code. If you type in a location that the breakpoint manager does not
recognize, you will receive an error message that the breakpoint’s location does not resolve to an
address. To correct this, verify that the location is valid and that it is spelled correctly. You can still
create/enable a breakpoint by double-clicking in the Selection Margin. By default, all newly created
breakpoints are enabled. However, you can disable an individual breakpoint by unchecking the first
checkbox for the breakpoint in the Breakpoint Manager. On C55x emulators, this menu also has
options to create hardware breakpoints, watchpoints, and counters. On the C64xx CPU Cycle Accurate
Simulator and C6416 Device Functional Simulator, there is also an option to make a Watchpoint. See
Section 5.2.2.4 for more information.
• Remove Selected Items. Clicking this icon allows you to remove several breakpoints at the same
time. However, it only removes the selected breakpoints. To remove more than one breakpoint, you
need to select several breakpoints.
• Remove All. Clicking this icon removes all breakpoints. A different icon performs the same action in
the project toolbar.
• Enable All. This icon has two separate actions it can execute. If you click on the icon, it will
automatically enable all breakpoints. There is also a dropdown menu next to the icon that has a list of
breakpoint groups you have configured. Choosing a group from the list will enable only those
breakpoints in the group you have chosen. Enabled breakpoints have a checkmark next to them in the
manager window.
• Disable All. If you click on the icon, it will automatically disable all breakpoints. There is also a
dropdown menu next to the icon that has a list of breakpoint groups you have configured. Choosing a
group from the list will disable only those breakpoints in the group you have chosen. Disabled
breakpoints do not have a checkmark next to them in the manager window.
• Goto Location. This opens the location of any of your breakpoints in the Breakpoint Manager.
Highlight the breakpoint in the Breakpoint Manager and click on the main icon to view the location of
the breakpoint in the source editor. You can also view the same memory address in different windows
(Source Editor, Disassembly Window, Memory Window) by choosing a window from the dropdown
menu next to the icon.
SPRU509H – October 2006
Submit Documentation Feedback
Debug
61
www.ti.com
Basic Debugging
•
•
•
•
•
Open Property Window. This button launches the property window for the selected breakpoint. You
can also open the Property Window by right-clicking within the Breakpoint Manager window and
selecting Properties from the context menu. Properties that cannot be edited will appear grayed-out in
the Property Window.
Hide/Show Columns. This option allows you to choose which columns to display inside the
Breakpoint Manager.
Create/Filter Groups. If you have created a group of breakpoints, clicking this button will display a list
of the groups you have created. This dialog allows you to create, remove, or rename breakpoint
groups. There is also a dropdown menu that lists all breakpoint group, including the default group
(grayed out). A checkmark beside the menu item indicates the breakpoint that belongs to this group is
visible in the list view; otherwise, it is hidden. The menu item Show System Breakpoints enables
system breakpoint visibility, although system breakpoints are read only.
Load Configuration. This button allows you to load a set of breakpoints that you have previously
saved (see Save Breakpoint Configuration).
Save Configuration. After closing the IDE, all your breakpoints will be lost. However, you can save
them to a configuration with this button, which creates an XML file inside your project, making it
possible to restore them later.
Once a breakpoint has been created, the Breakpoint Manager allows you to associate an action with that
breakpoint. See the online help for more information on the Breakpoint Manager, including a guide to the
different breakpoint icons.
5.2.2.2
Software Breakpoints
Breakpoints can be set in any disassembly window or document window containing C/C++ source code.
There is no limit to the number of software breakpoints that can be set, provided they are set at writable
memory locations (RAM). Software breakpoints operate by modifying the target program to add a
breakpoint instruction at the desired location.
To set a software breakpoint:
1. In a document window or disassembly window, move the cursor over the line where you want to place
a breakpoint.
2. Double-click in the selection margin immediately preceding the line when you are in a document
window. In a disassembly window, double-click on the desired line.
A breakpoint icon (solid red dot) in the selection margin indicates that a breakpoint has been set at the
desired location.
The Toggle Breakpoint context menu option or Toggle Breakpoint button also enable you to quickly set
and clear breakpoints.
1. In a document window or disassembly window, put the cursor in the line where you want to set the
breakpoint.
2. Right-click and select Toggle Breakpoint from the context menu, or click on the Toggle Breakpoint icon
button on the Project toolbar.
Finally, you can also create a software breakpoint using the Breakpoint Manager.
1. From the Debug menu, select Breakpoints.
2. In the Breakpoint Manager, select the New Item icon in the toolbar, select New Software Breakpoint
from the dropdown menu and type in a location for the breakpoint.
3. The new breakpoint will appear in the Breakpoint Manager list.
62
Debug
SPRU509H – October 2006
Submit Documentation Feedback
www.ti.com
Basic Debugging
5.2.2.3
Hardware Breakpoints
Hardware breakpoints differ from software breakpoints in that they do not modify the target program; they
use hardware resources available on the chip. Hardware breakpoints are useful for setting breakpoints in
ROM memory or breaking on memory accesses instead of instruction acquisitions. A breakpoint can be
set for a particular memory read, memory write, or memory read or write. Memory access breakpoints are
not shown in the source or memory windows. The number of hardware breakpoints you can use depends
on your DSP target. Hardware breakpoints can also have a count, which determines the number of times
a location is encountered before a breakpoint is generated. If the count is 1, a breakpoint is generated
every time. Hardware breakpoints cannot be implemented on a simulated target. On C55x emulators, you
also have options to set hardware breakpoints, watchpoints, or counters. See the C55x Emulation
Breakpoint Options main help topic for more information on these options.
To set a hardware breakpoint:
1. Select Debug→Breakpoints. The Breakpoint Manager appears.
2. From the New Item button dropdown menu, select Hardware Breakpoint.
3. Enter the program or memory location where you want to set the breakpoint. Use one of the following
methods:
• For an absolute address, you can enter any valid C expression, the name of a C function, or a
symbol name.
• Enter a breakpoint location based on your C source file. This is convenient when you do not know
where the C instruction is located in the executable. The format for entering in a location based on
the C source file is: fileName, lineNumber.
5.2.2.4
C64x Simulator Watchpoints
Watchpoints halt simulation when an access is made to a targeted memory location. The access could
be from the CPU or from the DMA (if supported by the particular device configuration). Debug reads
and writes to memory locations do not cause watchpoints to trigger. Watchpoints are supported by the
following configurations:
• C64xx CPU Cycle Accurate Simulator
• C6416 Device Functional Simulator
To use this option, you must load a project and open the Breakpoint Manager by selecting Debug →
Breakpoints. In the Breakpoint Manager, select New Watchpoint from the dropdown menu next to the
New Item icon in the toolbar. The New Watchpoint dialog will open. Enter a location for the watchpoint
and an event to break on. Location can be specified either as an absolute memory address, or a
symbol name. For example, to create a watchpoint on a global variable defined in a .c file as:
int IntegerA;
You would specify the watchpoint location as:
&IntegerA
You can choose from the following events:
• Memory Read
• Memory Write
• All Access Types
Choose an event and click OK. The Breakpoint Manager will show your new watchpoint. See the
online help for Watchpoints for more information on modifying existing watchpoint properties or halting
the target on these breakpoints.
5.2.3 Connecting Breakpoints to Files
5.2.3.1
Functions
You can set an action for a breakpoint that will allow you to:
• Transfer input data from a file on the host PC to a buffer on the target for use by the algorithm
• Transfer output data from a buffer on the target to a file on the host PC for analysis
• Update a window, such as a graph, with data
SPRU509H – October 2006
Submit Documentation Feedback
Debug
63
www.ti.com
Basic Debugging
5.2.3.2
Using Breakpoints to Transfer Data from a PC File to a Target
You can use a breakpoint to transfer the contents of a PC file to the target for use as test data and update
the data windows.
1. Choose File→Load Program. Select filename.out, and click Open.
2. Double-click on the filename.c file in the Project View.
3. Choose Breakpoints from the Debug menu to open the Breakpoint Manager.
4. Put your cursor in a line of the main function to which you want to add a breakpoint. Identify the name
of the function (dataIO, for instance).
5. Click the Toggle Breakpoint toolbar button or press F9. This will set a software breakpoint. The
selection margin indicates that a breakpoint has been set (red icon). You can also set a breakpoint
using the Breakpoint Manager or using the Property Window for the Breakpoint Manager.
6. The breakpoint should appear in the Breakpoint Manager. In the Breakpoint Manager window, find the
Action column, and click on the dropdown box in the row for the breakpoint you just made. Select
Read Data from File as the action. A Parameter dialog box appears.
7. Click on the space next to File in the Parameter dialog box, browse to your project folder, select
filename.dat, and click Open. Then change the Start Address and the Length values as desired. Also,
you can put a check mark in the Wrap Around box if required. The Start Address field specifies where
the data from the file is to be placed. The Length field specifies how many samples from the data file
are read each time the breakpoint is reached. The Wrap Around option causes the IDE to start reading
from the beginning of the file when it reaches the end of the file. This allows the data file to be treated
as a continuous stream of data.
Figure 5-6. Sample Parameter Dialog
8. Click OK. A control window for the filename.dat file appears that allows you to start, stop, rewind, or
fast forward within the data file.
Figure 5-7. Data File Control
9. The breakpoint should appear as connected in the Breakpoint Manager.
To connect to a file output, choose the action Write Data to File in the Breakpoint Manager. You will need
to input information on the File, Format, Starting Address, and Length, as well as Page type for certain
devices.
64
Debug
SPRU509H – October 2006
Submit Documentation Feedback
www.ti.com
Basic Debugging
5.2.4 Watch Window
5.2.4.1
Using Watch Window to Track a Variable's Value
When debugging a program, it is useful to see how the value of a variable changes during program
execution. The watch window allows you to monitor the values of local and global variables and C/C++
expressions. You can also add a global or file static variable from a list as a watched expression. For
detailed information on the watch window, see the Watch Window topics provided in the online help:
Help→Contents→Debugging Windows and Analysis Tools→Debugging Windows→Watch Window. To
open the watch window:
1. Select View→Watch Window, or click the Watch Window icon button on the Watch toolbar.
The watch window contains two tabs: Watch Locals and Watch 1.
• In the Watch Locals tab, the debugger automatically displays the Name, Value, Type, and Radix
option of the variables that are local to the currently executing function.
• In the Watch 1 tab, the debugger displays the Name, Value, Type, and Radix option of the local
and global variables and expressions that you specify.
2. Choose File→Load Program. Load your .out file for this project.
3. Double-click on the filename.c file in the Project View.
4. Put your cursor in a line that allows breakpoints.
5. Click the Toggle Breakpoint toolbar button or press F9. The selection margin indicates that a
breakpoint has been set (red icon).
6. Choose View→Watch Window. A separate area in the lower-right corner of the window appears. At run
time, this area shows the values of watched variables. By default, the Watch Locals tab is selected and
displays variables that are local to the executed function.
7. If not at main, choose Debug→Go Main.
8. Choose Debug→Run, or press F5 or the Run icon. The watch window will update the local values.
Figure 5-8. Watch Locals Tab
9. Select the Watch 1 tab.
10. Click on the Expression icon in the Name column and type the name of the variable to watch.
11. Click on the white space in the watch window to save the change. The value should immediately
appear, similar to this example.
SPRU509H – October 2006
Submit Documentation Feedback
Debug
65
www.ti.com
Basic Debugging
Figure 5-9. Specifying a Variable to Watch
12. Click the Step Over toolbar button or press F10 to step over the call to your watched variable.
In addition to watching the value of a simple variable, you can watch the values of the elements of a
structure.
5.2.4.2
Using Watch Window to Watch Values of a Structure's Elements
To watch the values of the elements of a structure:
1. Select the Watch 1 tab.
2. Click on the Expression icon in the Name column and type the name of the expression to watch.
3. Click on the white space in the watch window to save the change.
4. Click once on the + sign. The line expands to list all the elements of the structure and their values.
(The address shown for Link may vary.)
Figure 5-10. Watch Element Values
5. Double-click on the value of any element in the structure to edit that value.
6. Change the value of a variable.
Notice that the value changes in the watch window. The value also changes color to red, indicating that
you have changed it manually.
66
Debug
SPRU509H – October 2006
Submit Documentation Feedback
www.ti.com
Basic Debugging
5.2.5 Property Page Manager Window
CCStudio has added property windows for options relating to the following debug windows: the Breakpoint
Manager (Section 5.2.2), the Memory window (Section 5.2.6), and the Cache Tag RAM Viewer
(Section 5.2.15). Other debug windows still use separate dialog boxes for property configuration. Each
debug window has a different set of options and the list may change depending on what is selected inside
the debug window. For instance, the property values may change for different breakpoints in the
Breakpoint Manager, or for different memory addresses in the Memory window. When the Breakpoint
Manager, Memory Window, or Cache Tag RAM Viewer are open, right-click anywhere in that window and
select Properties from the context menu, or select View→Property Window.
Figure 5-11. Property Window
To collapse a set of properties, choose the minus sign next to the set. To expand a set of properties,
choose the plus sign next to the collapsed set. If you click on a single property, the description of that
property will appear in the bottom of the window. Clicking on a property value and hovering over it with the
mouse will display a short tool tip description of that property value.
If the descriptions of a property are long, you may not be able to read the entire description of that
property. To show the rest of the description, grab the border cursor (i.e., the two parallel lines) and move
it upward to expand the available space for description.
To enable or disable the value of a property, click on the value twice to confirm the change. Otherwise,
choose the desired value from the dropdown menu or type in the box.
For the Breakpoint Manager Property Window, once you have changed a property, the title of the Property
Window will show in italics with a star (*) next to it. Click on the Submit Changes icon in the toolbar to
apply the changes to the property window. The Refresh icon will also apply the changes. Once you have
applied the changes, the title of the window will be in normal text again. The Add icon will add a new
breakpoint (or other item) with the same properties.
The Property Window for C55x emulator breakpoints also has advanced options available for each item
selected. If you click on one of the advanced properties, a description of the property will appear in the
description box below.
SPRU509H – October 2006
Submit Documentation Feedback
Debug
67
www.ti.com
Basic Debugging
5.2.6 Memory Window
The memory window allows you to view the contents of memory starting at a specified address. Select
View→Memory to display the memory window. You can enter a starting address in the text box at the top
left of the window, or select a target from the right dropdown menu. You can also edit the contents of a
selected memory location by double-clicking on the value. For devices that support cache management,
the memory window also has color backgrounds and highlighting to display various kinds of cache and
cache tag information. You can open multiple instances of the memory window. Any property changes
made within an open memory window apply only to that memory window, except for the Memory Analysis
property, which applies to all memory windows.
Figure 5-12. Memory Window
The L1P Cache/L1D Cache/L2 Cache checkboxes on the bottom let you highlight memory values coming
from cache instead of addressable memory for certain devices. See the online help sections on the
memory window for more detailed information on using the memory window for cache coherency.
Double-clicking on a memory value will allow you to directly edit the value. Values that have been edited
will appear in red. For more information on the memory window and its options, see the online help. To
refresh the active memory window, right-click within the memory window and choose Refresh.
The Memory Window Properties window allows you to specify various characteristics of the memory
window. To view the properties of the memory window, right-click in the Memory Window and choose
Properties from the context menu. Some properties will appear only if you enable other properties. The list
below contains a comprehensive list of properties. However, that does not mean all are available for your
target or applicable to your configuration.
Figure 5-13. Memory Window Options
68
Debug
SPRU509H – October 2006
Submit Documentation Feedback
www.ti.com
Basic Debugging
The Properties page offers these memory window options:
• Memory Display:
– Window Title: This string is used to display the title for the memory window.
– Symbol Display: This Boolean property indicates whether the memory window should display
symbols.
– Font Family: This specifies which font family to use when displaying data in the memory window.
– Font Size: This specifies which font size to use when displaying data in the memory window.
– Top Control Bar Visibility: Use this to show and hide the top control bar on the memory window.
– Bottom Control Bar Visibility: Use this to show and hide the bottom bar on the memory window.
– Minimum Scroll: Use this to set the minimum possible value the memory window can be scrolled to.
– Maximum Scroll: Use this to set the minimum possible value the memory window can be scrolled
to.
– Track Expression: If enabled, the memory window will refreshed the expression currently in the
address combo box each time the target halts.
• Memory Window Configuration:
– Background Coloring Mode:
• None: Turns off background coloring.
• Cache Coloring: Background color reflects which level of cache the memory was read from.
• Memory Level Coloring: Background color reflects which level of cache or mapped memory the
memory was read from.
– Cache Line Boundary Markers: Configures the memory window to draw a thin line around the left
and top edges of the data at the start of a cache line.
– Memory Analysis: Note: Auto-disabled when in polite real-time mode or continuous refresh. When
enabled, Cache Tag RAM Details will be displayed as properties of the selected address item in the
property editor and memory analyzer options will become visible in the Bold property category. This
property is shared by all views of this memory space. Disable to reduce the time it takes to update
the display.
• Address (specific address of cursor): The properties under this category vary depending on the
memory/cache type currently selected by the cursor. Depending on cache levels you are using at that
memory address, you may see one line or multiple lines containing values. The data can reveal the
cause of visibility or data corruption problems by indicating whether a line is dirty in any cache.
– L1D Cache/L1P Cache/L2 Cache/External: The values listed here display discrepancy/coherency
problems. It also displays which levels of the memory hierarchy this data is cached in.
– L1D Cache LRU/L2 Cache LRU: LRU (least recently used) is true if this cache line is the next to be
evicted from cache. L1P does not have LRUs.
– L1D Cache Dirty Bit/L2 Cache Dirty Bit: Dirty bit is true if this cache line has been modified by the
CPU. L1P does not have dirty bits, and emulation writes will not set the dirty bit.
– Dirty Cache Lines Analysis: This value will indicate any cache marked as dirty at this memory
address.
• Bold Values (Memory Analyzers): Only visible when Memory Analysis has been enabled.
– Data Memory Differences: Compares the contents of cached data memory with the contents of the
mapped data memory it is associated with and highlights addresses where the two are different.
– LRU Cache Lines: Highlights cached memory addresses that have been marked as Least Recently
Used.
– Dirty Cache Lines: Highlights cached memory addresses that have been marked as dirty.
– Program Memory Differences: Compares the contents of cached program memory with the
contents of the mapped program memory it is associated with and highlights addresses where the
two are different.
SPRU509H – October 2006
Submit Documentation Feedback
Debug
69
www.ti.com
Basic Debugging
• Colors:
– Label Display Color: The color to be used when displaying labels in the memory window.
– CacheLineBoundaryMarkerColor: If one of the Cache Line Border Marks is enabled, the start of each
cache line in the target device's memory is identified by drawing a line to the left and above the first
memory item in the cache line.
– L1D BackColor: Each level in the target device's memory hierarchy can be displayed with a unique
background color to provide a visual indication in the memory window of where in the memory
hierarchy a memory item is being read from.
– External BackColor: Each level in the target devices' memory hierarchy can be displayed with a unique
background color to provide a visual indication in the memory window of where in the memory
hierarchy
– L1P Back Color: Each level in the target device's memory hierarchy can be displayed with a unique
background color to provide a visual indication in the memory window of where in the memory
hierarchy a memory item is being read from.
– L2 Back Color: Each level in the target device's memory hierarchy can be displayed with a unique
background color to provide a visual indication in the memory window of where in the memory
hierarchy a memory item is being read from.
– InaccessibleBackColor : Each level in the target device's memory hierarchy can be displayed with a
unique background color to provide a visual indication in the memory window of where in the memory
hierarchy a memory item is being read from.
5.2.7 Register Window
The register window enables you to view and edit the contents of various registers on the target.
Figure 5-14. Register Window
To access the register window, select View→Registers and select the register set that you would like to
view or edit. Double-clicking on the value of a register will allow you to directly edit the value. Values that
have been edited will appear in red.
You can view the registers in grid view (default) or in tree view. Right-click on the Register window and
select Grid view or Tree view from the context menu. Tree view allows you to expand some registers to
show the individual bits for that register. Any registers that support a bitfield will have a small + sign next
to them. These can be expanded to view the bitfield. The value for each bit can be edited by
double-clicking on the value. Any edited values will appear in red.
To access the contents of a register without opening the Registers window, select Edit→Register. Choose
the register from the dropdown list and edit the value as desired.
70
Debug
SPRU509H – October 2006
Submit Documentation Feedback
www.ti.com
Basic Debugging
Figure 5-15. Editing a Registry Value
5.2.7.1
Customizing Register Groups
The register now has a additional feature that allows you to organize registers into customized groups.
With the register window open, right-click and choose Customize Register Group from the context menu.
Create a new group with the New Group button, and then use the arrow buttons in the dialog to move
individual registers into the register group.
Figure 5-16. Customize Register Groups
Choose OK to return to your normal register window, which will now show your custom group. If you click
on it, your chosen registers now appear on the right panel.
Figure 5-17. Register Window with Customized Register Group
To delete the custom group you have created, either right-click inside the Register Window and choose
Remove User Defined Group or open the Customize Register dialog and choose the Del Group(s) button.
SPRU509H – October 2006
Submit Documentation Feedback
Debug
71
www.ti.com
Basic Debugging
5.2.8 Disassembly/Mixed Mode
5.2.8.1
Disassembly Mode
When you load a program onto your actual or simulated target, the debugger automatically opens a
disassembly window.
Figure 5-18. Disassembly Window
The disassembly window displays the disassembled instructions and symbolic information needed for
debugging. Disassembly reverses the assembly process and allows the contents of memory to be
displayed as assembly language code. Symbolic information consists of symbols and strings of
alphanumeric characters that represent addresses or values on the target.
As you step through your program using the stepping commands, the PC advances to the instruction.
5.2.8.2
Mixed Mode
In addition to viewing disassembled instructions in the disassembly window, the debugger enables you to
view your C source code interleaved with disassembled code, allowing you to toggle between source
mode and mixed mode. To change your selection, toggle View→Mixed Source/ASM, or right-click in the
source file window and select Mixed Mode or Source Mode, depending on your current selection.
5.2.9 Call Stack
Use the Call Stack window to examine the function calls that led to the current location in the program. To
display the Call Stack:
1. Select View→Call Stack, or click the View Stack button on the Debug toolbar.
Figure 5-19. Call Stack Window
2. Double-click on a function listed in the Call Stack window. The source code containing that function is
displayed in a document window. The cursor is set to the current line within the desired function. Once
you select a function in the Call Stack window, you can observe local variables that are within the
scope of that function.
The call stack only works with C programs. Calling functions are determined by walking through the linked
list of frame pointers on the runtime stack. Your program must have a stack section and a main function;
otherwise, the call stack displays the message C source is not available. Also note that the Call Stack
window displays only the first 100 lines of output, it omits any lines over 100.
72
Debug
SPRU509H – October 2006
Submit Documentation Feedback
www.ti.com
Basic Debugging
5.2.10 Symbol Browser
The Symbol Browser window (Figure 5-20) displays five tabbed windows for a loaded COFF output file
(*.out):
• All associated files
• Functions
• Global variables
• Types
• Labels
Each tabbed window contains nodes representing various symbols. A plus sign (+) preceding a node
indicates that the node can be further expanded. To expand the node, simply click the + sign. A minus
sign (-) precedes an expanded node. Click the - sign to hide the contents of that node.
To open the Symbol Browser window, select View→Symbol Browser.
Figure 5-20. Symbol Browser Window
For detailed information on the Symbol Browser tool, see the Symbol Browser topics provided in the
online help.
5.2.11 Command Window
The Command Window enables you to specify commands to the debugger using the TI Debugger
command syntax.
Many of the commands accept C expressions as parameters. This allows the instruction set to be
relatively small, yet powerful. Because evaluating some types of C expressions can affect existing values,
you can use the same command to display or change a value.
To open the Command Window, select Tools→Command Window.
Figure 5-21. Command Window
For detailed information on the Command Window, see the Command Window topics provided in the
online help.
SPRU509H – October 2006
Submit Documentation Feedback
Debug
73
www.ti.com
Basic Debugging
5.2.12 Memory Save/Load Utility
Previous versions of CCStudio supported data file formats in either a COFF output file (.out) or a
CCStudio data file (.dat). This tool allows you to support raw binary data transfers, and also allows for
faster download speeds. This new option is available for ARM and C5000 targets. It has been optimized to
take advantage of the newer emulation capabilities of the XDS560 to allow improvements of data
download speeds (host to target), as well as additional improvements in speed regardless of emulator.
There is also an option to perform byte swapping for every 16-bit word during the data transfer. You can
use the Write file to memory tab to load a file, and the Save memory to file tab to save a file.
5.2.13 C6000 Functional Simulators Interrupt Latency Detection Feature
This tool allows you to measure the worst-case interrupt latency of the code, including programming
interrupt constraints such as disabling GIE /NMIE, and architectural behavior such as non-serviceability of
interrupts in branch delay slots. Note: This feature is only available on the C6000 functional simulators.
While programming, you may find that the algorithm has a larger interrupt latency than quoted. If so, you
may not discover it until late in the development lifecycle, and it may require a delay to correct.
Characterization of the interrupt latency of the code is needed so that you can determine the real time
latencies in the application. The application consists of multiple components that cannot be individually
designed. The Interrupt Latency Detection (ILD) feature on the C6000 simulator provides you with a
deterministic measure of the worst-case interrupt latency of the code. As a result, you can quote the
interrupt latency of the code for a given set of test vectors. See the online help topics for the Interrupt
Latency Detection Feature for more information on how to use this option.
5.2.14 Cache Coherence
If multiple devices, such as the CPU or peripherals, share the same cacheable memory region, cache and
memory can become incoherent. Suppose the CPU accesses a memory location that is subsequently
allocated in cache. Later, a peripheral writes data to this same location that is meant to be read and
processed by the CPU. However, since this memory location is kept in cache, the memory access hits in
cache and the CPU reads the old data instead of the new data. A similar problem occurs if the CPU writes
to a memory location that is cached, and the data is to be read by a peripheral. The data only is updated
in cache but not in memory from where the peripheral reads the data. The cache and the memory are said
to be incoherent. Coherence needs to be addressed if the following events are true:
• Multiple requestors (CPU data path, CPU fetch path, peripherals, DMA controllers, other external
entities) share a region of memory for the purpose of data exchange.
• This memory region is cacheable by at least one device.
• A memory location in this region has been cached.
• This memory location has been modified (by any device).
Consequently, if a memory location is shared, cached, and has been modified, there is a cache coherence
problem.
C64x+ DSPs automatically maintain cache coherence for DMA (includes EDMA and IDMA) data accesses
to L2 SRAM through a hardware cache coherence protocol based on snoop commands. The coherence
mechanism is activated on a DMA read and write access. When a DMA read of a cached L2 SRAM
location occurs, the data is directly forwarded from L1D cache to the DMA without being updated in L2
SRAM. On a DMA write, the data is forwarded to L1D cache and is updated in L2 SRAM.
For other scenarios, it is your responsibility to maintain cache coherency, see the online help for more
information.
74
Debug
SPRU509H – October 2006
Submit Documentation Feedback
www.ti.com
Basic Debugging
5.2.15 Cache Tag RAM Viewer
The Cache Tag RAM viewer displays the contents of a tag RAM in tabular form. The cache tag RAM
stores cache states including tag address, valid, dirty, and LRU. The Cache Tag RAM viewer provides a
static view into cache that lets you verify your optimization methods. You can check whether what is
expected to be in cache is currently in cache. You can also fine-tune memory layouts and access patterns.
For instance, the LRU status can be actively managed to retain certain data structures in cache.
Note:
The Cache Tag RAM Viewer is only supported on C64x+ based devices.
Although this same information displays in the memory window, the memory map representation offers
limited capability to view cache capacity and assess cache conflicts. For these tasks, the information is
better represented in a cache "map" that shows cache lines and their associated status bits.
To launch the viewer, choose Tools→CacheTagRAMViewer Control→Cache Tag RAM Viewer.
Figure 5-22. Cache Tag RAM Viewer
•
•
•
•
•
•
•
•
•
•
Core ID: Core ID identifies the CPU core on the device to which each core device belongs
Cache: Cache identifies the cache level and type to which each cache line belongs.
Set: Set identifies the set of cache lines to which each cache lines belongs
Way: For N-way set associative caches, Way identifies the way each cache line occupies. Blank for
direct-mapped caches.
Valid: V if the cache line is valid, hyphen (-) if line is marked invalid
Dirty: D if the cache line is dirty, hyphen (-) if not dirty, blank if not implemented by the cache
LRU Least Recently Used Way: L for the least-recently used way in the set, hyphen (-) if not least
recently used, blank if not implemented by the cache
Line Start Adrs: The first address in the line of memory that has been cached
Symbols in Cache: This shows the symbolic names defined for any of the addresses in the cached line
of memory. See online help for more detail.
Headers: Uncheck to remove all of this core's caches from the cache tag RAM view
SPRU509H – October 2006
Submit Documentation Feedback
Debug
75
www.ti.com
Basic Debugging
5.2.15.1 Cache Tag RAM Viewer Properties
To view the properties for the Cache Tag RAM, right-click on the Cache Tag RAM viewer and choose
Properties from the context menu. Using the Property Window, you can show only dirty or invalid cache
lines or limit your view only to changed cache lines. You can also make the display show a row for each
cache line, or a row for each symbol.
Figure 5-23. Cache Tag RAM Viewer Property Page
•
76
Cache Tag RAM View Configuration
– Window Title: Title of window.
– Show Dashboard: Controls whether the target status and cache controls at the top of the Cache
Tag RAM Viewer display are shown or not
– Auto-Update: Controls whether the display is automatically updated when a target device halts, or
requires a manual refresh
– Log Changes to Output Window: When true, logs cache lines that have changed since the previous
refresh to the IDE’s output window
– Show Invalid Cache Lines: When enabled, both valid and invalid cache lines in the selected caches
are displayed.
– Show Symbols: When true, all of the symbols for each device are read out and displayed against
the cache lines in which they reside. (Tip: Turn off to improve single step execution speed.)
– Sort By: Data in the Cache Tag RAM Viewer can be sorted by any of the columns.
– Show Only Dirty Cache Lines: When true, only lines that are dirty are displayed
– Show Only Changed Cache Lines.
– Display Mode: In Symbol Per Row display mode, only cache lines that contain addresses with
symbols defined are displayed with each symbol on a separate row. In Cache Lines per Row
display mode, each cache line is shown on a unique row with all of its symbols shown in a string
separated by commas.
Debug
SPRU509H – October 2006
Submit Documentation Feedback
www.ti.com
Basic Debugging
•
•
•
•
•
•
Colors
– L2 BackColor: Each level in the target device's memory hierarchy can be displayed with a unique
background to provide a visual indication in the memory window of where a memory item is being
read from in the memory hierarchy.
– L1D BackColor: Each level in the target device's memory hierarchy can be displayed with a unique
background to provide a visual indication in the memory window of where a memory item is being
read from in the memory hierarchy.
– L1P BackColor: Each level in the target device's memory hierarchy can be displayed with a unique
background to provide a visual indication in the memory window of where a memory item is being
read from in the memory hierarchy.
Core 0: (device name)
Minimum Address to Display: Only cache lines that include an address greater than or equal to this
address are displayed. Hit the Escape key to revert to the default value.
Maximum Address to Display: Only cache lines that include an address less than or equal to this
address are displayed. Hit the Escape key to revert to the default value.
Show Only Memory Differences: When true, only cache lines with contents that differ from the
associated mapped memory are displayed
Symbol Color: Determines the displayed foreground color of symbols such as labels
5.2.16 Exception Reporting
Exceptions are high priority interrupts that can cause the CPU to branch to an exception handler. The
exception handler then attempts to recover from the fault and resume normal execution, thereby avoiding
a full reset or power cycle of the system. Exceptions can signal many kinds of problems, and provide
information about CPU fault conditions. Exceptions resulting from memory protection or security violations
might indicate problems with memory maps or bad pointers (CPU or DMA).
If the exception reporting tool reports an exception, the CPU will halt and display a message in the output
window. At that point, you can view the information and decide whether to terminate the application (and
reset the CPU), resume the application, or let an exception handler proceed to run.
If your device supports exceptions, you can configure exception reporting by selecting
Debug→Exceptions. An option dialog will open, check the feature marked Enable Exception Handling on
the bottom left to view and choose exception types.
Figure 5-24. Exceptions Window
SPRU509H – October 2006
Submit Documentation Feedback
Debug
77
www.ti.com
Basic Debugging
Note:
Even if you check Enable Exception Handling, no exceptions will be enabled until you first
check which types of exceptions you wish to report. The types include the following basic
exceptions, see the main help topic on Configuring Exception Reporting for more
information.
•
•
•
•
A software exception is caused by the instruction SWE (or SWENR). It can be used to
call into the operating system functions which require the CPU to be in secure
supervisor mode.
An internal exception is caused by illegal conditions within the CPU core (e.g., an
illegal opcode was encountered).
The NMI exception is an external exception that is non-maskable. It can be used to
notify the application about a serious problem outside the CPU.
An external exception is maskable and can be used to alert the application about an
error outside the CPU (e.g., memory protection faults, peripheral errors, etc).
Changes to the exception configuration will remain even if a project is closed, but check the Apply CPU
Exceptions After Reset option to keep the configuration between CCStudio uses. See the online help
topics on Exception Reporting for more information.
Note:
Exception reporting is only supported on C64x+ based devices.
5.2.17 Software Pipelined Loop (SPLOOP) Buffer
More recent targets like C64x+ support Software Pipelined Loop (SPLOOP), an algorithm for processing
software loops in a more efficient manner. For detailed information about SPLOOPs and their
characteristics, see the TMS320C64x/C64x+ DSP CPU and Instruction Set Reference Guide (SPRU732).
The SPLOOP facility on the C64x+ DSP stores a single iteration of the loop in a specialized buffer and
contains hardware that will selectively overlay copies of the single iteration in a software pipeline manner
to construct an optimized execution of the loop. To view the SPLOOPs on an appropriate target, choose
Project → Build Options, and then select the following build options: Opt Level: (-2 or higher) and Target
Version: mv64+. If you step through a disassembly code that uses SPLOOPs, you may notice that more
than one cursor arrow appears in the selection margin of the disassembly code. These multiple cursor
arrows are a virtual representation of the loops executing in parallel. SPLOOP-supported targets will
organize execution packets within these loops to optimize power use, efficiency and speed.
Note:
SPLOOP is only supported on C64x+ based devices.
5.2.18 MMU Page Table Viewer
The MMU Page Table Viewer tool is a new option for CCStudio on the ARM 9 and ARM 11 devices that
allows you to visualize how the Memory Management Unit (MMU) translates virtual memory to physical
memory. Physical memory refers to the memory devices that are attached to the CPU. Virtual memory is
generated by the program. Virtual addresses are translated and mapped by hardware on the CPU into the
physical addresses required to access the memory devices. This translation allows multiple tasks to
simultaneously run the same program without linking the program against the physical memory address
range associated with each task. The translation process also controls which memory regions are
accessible, protects regions of memory from inadvertent or malicious access by a program, and manages
memory resources. The mapping and translation are performed by the Memory Management Unit (MMU),
which uses a virtual address to look up the corresponding physical address region and its configuration
information.
78
Debug
SPRU509H – October 2006
Submit Documentation Feedback
www.ti.com
Advanced Debugging Features
The MMU Page Table Viewer allows you to accurately visualize the address translation tables and
configuration of the MMU. It decodes the two level page table hierarchy of the MMU, displaying the logical
to physical memory mapping and the page frame attributes. The Page Table Viewer has a flexible XML
driven display, which supports ARM 9 and ARM 11 MMU page tables. The Viewer display can be set to
either automatically or manually update, and when sorted by logical address, only the visible page table
entries are read from the target. However, the Viewer is currently only supported for emulation, and there
is no visualization of cached Translation Lookaside Buffer (TLB) page table entries. Note: The MMU Page
Table Viewer currently only provides visibility into the ARM v5 MMU. It does not support the ARM v6
MMU.
To launch the MMU Page Table Viewer, choose MMU Page Table Viewer from the Tools menu. This
opens a new window at the bottom of CCStudio. Scroll over each column to display the associated tooltip
which provides an explanation of the options available, as well as tips for usage. Both levels of the page
hierarchy are merged into one view in the Viewer. The master page table (Level 1) is indexed, and the
second level index (Level 2) is shown for each entry. The column on the far left of the window displays the
page levels: the first number is the L1 table index, and the second number is the L2 table index for each
entry. To choose a logical address for viewing, select the desired address from the dropdown box in the
upper left corner of the Viewer window. You can also choose to enable the MMU, system mode, or ROM
mode. Choosing any of these options will reload the Viewer. Double-clicking on an entry in the Viewer will
open that page table entry in the memory window for editing. You can also edit the entry by in the
Property Manager Window for that row.
5.3
Advanced Debugging Features
5.3.1 Advanced Event Triggering (AET)
Advanced Event Triggering uses Event Analysis and Event Sequencer tools to simplify hardware analysis.
Event Analysis uses an interface to configure common hardware debug tasks called jobs. You can easily
set breakpoints, action points, and counters by using a context menu and performing a drag-and-drop
action. You can access Event Analysis from the Tools menu, or by right-clicking in a source file.
Event Sequencer looks for conditions in your target program and initiates specific actions when it detects
these conditions. While the CPU is halted, you define the conditions and actions, then run your target
program. The sequence program looks for the specified condition and performs the requested action.
5.3.1.1
Event Analysis
The following jobs can be performed using Event Analysis:
• Setting breakpoints
– Hardware breakpoints
– Hardware breakpoints with count
– Chained breakpoint
• Setting action/watch points
– Data actionpoint
– Program actionpoint
– Watchpoint
– Watchpoint with data
• Setting counters
– Data access counter
– Watchdog timer
– Counter (from current location)
– Count in Range
• Other
– Benchmark to here
– Emulation pin configuration
SPRU509H – October 2006
Submit Documentation Feedback
Debug
79
www.ti.com
Advanced Debugging Features
For detailed information on the Event Analysis tool, see the online help.
To configure a job using the Event Analysis Tool, Code Composer Studio IDE must be configured for a
target processor that contains on-chip analysis features. You can use Event Analysis by selecting it from
the Tools menu or by right-clicking in a source file. Once you configure a job, it is enabled and will perform
analysis when you run code on your target. For information about how to enable or disable a job that is
already configured, see the Advanced Event Triggering online help.
1. Select Tools→Advanced Event Triggering→Event Analysis to view the Event Analysis window.
Figure 5-25. Event Analysis Window
2. Right-click in the Event Analysis Window and choose Event Triggering→Job Type→Job. The job menu
is dynamically built and dependent on the target configuration. Unsupported jobs are grayed out.
3. Type your information in the Job dialog box.
4. Click Apply to program the job and save your changes.
5.3.1.2
Event Sequencer
Event Sequencer looks for conditions in your target program and initiates specific actions when it detects
these conditions. While the CPU is halted, you define the conditions and actions, then run your target
program. The sequence program looks for the specified condition and performs the requested action.
To use the Event Sequencer, Code Composer Studio IDE must be configured for a target processor that
contains on-chip analysis features. You can use the Event Sequencer by selecting it from the Tools menu.
Once you create an Event Sequencer program, it is enabled and performs analysis when you run code on
your target. For information on creating an Event Sequencer program, see the Advanced Event Triggering
online help.
80
Debug
SPRU509H – October 2006
Submit Documentation Feedback
www.ti.com
Real-Time Debugging
To enable the Event Sequencer:
1. Select Tools→Advanced Event Triggering→Event Sequencer. The Event Sequencer displays.
Figure 5-26. Event Sequencer
Add a boolean
“and” operator
Add a state
Add open and close
parenthesis
Erase the Sequencer
program
Launch online help
Add a Global
Action
Add a Global
If statement
2. Right-click in the Event Sequencer window or use the Event Sequencer toolbar buttons to create a
sequencer program.
5.4
Real-Time Debugging
Traditional debugging approaches (stop mode) require that programmers completely halt their system,
which stops all threads and prevents interrupts from being handled. Stop mode can be exclusively used
for debug as long as the system/application does not have any real-time constraints. However, for a better
gauge of your application’s real-world system behavior, Code Composer Studio IDE offers several options,
including Real-Time Mode (Section 5.4.1), Rude Real-Time Mode (Section 5.4.2), and Real-Time Data
Exchange (Section 5.4.3).
5.4.1 Real-Time Mode
Real-time mode allows time-critical interrupts in the foreground code to be taken while the target is halted
in background code. A time-critical interrupt is an interrupt that must be serviced even when background
code is halted. For example, a time-critical interrupt might service a motor controller or a high-speed timer.
You can suspend program execution in multiple locations, which allows you to break within one
time-critical interrupt while still servicing others.
SPRU509H – October 2006
Submit Documentation Feedback
Debug
81
www.ti.com
Real-Time Debugging
To enable real-time mode debug:
1. You may need to configure interrupts and set breakpoints to get ready for real-time mode, see the
online tutorial on Real-Time Emulation for more information. Select Debug→Real-time Mode. The
status bar at the bottom of the control window now indicates POLITE REALTIME.
2. Configure the real-time refresh options by selecting View→Real-Time Refresh Options. The first option
will specify how often the Watch Window is updated. Checking the Global Continuous Refresh
checkbox will continuously refresh all windows that display target data, including memory, graph, and
watch windows. To continuously update only a certain window, uncheck this box and select
Continuous Refresh from the window’s context menu.
3. Click OK to close the dialog box.
4. Select View→Registers→Core Registers to open the Core Register window. The debug interrupt
enable register (DIER) should be visible in the list. DIER designates a single interrupt, a specific subset
of interrupts, or all interrupts that you selected via the interrupt enable registers (IER) as real-time
(time-critical) interrupts. DIER mirrors the architecturally specified IER.
5. Double-click on a register value and enter the new register value to specify which interrupts to
designate as real-time interrupts.
6. Click somewhere in the white space to view the change. Values that have been edited will appear in
red.
7. Code Composer Studio IDE has been configured for Real-Time Mode debug.
5.4.2 Rude Real-Time Mode
High priority interrupts, or other sections of code can be extremely time-critical, and the number of cycles
taken to execute them must be kept at a minimum or to an exact number. This means debug actions (both
execution control and register/memory accesses) may need to be prohibited in some code areas or
targeted at a specific machine state. In default real-time mode, the processor runs in polite mode by
absence of privileges, i.e., debug actions will respect the appropriate action delaying and not intrude in the
debug sensitive windows.
However, debug commands (both execution control and register/memory access) can fail if they are not
able to find a window that is not marked debug action-sensitive. In order to have the debugger gain
control, you must change real-time debug from polite to rude mode. In rude real-time mode, the
possession of privileges allows a debug action to override any protection that may prevent debug access
and be executed successfully without delay. Also, you can not debug critical code regions until they are
switched into rude real- time mode.
To enable rude real-time mode, perform one of the following:
• Select Perform a Rude Retry from the display window when a debug command fails.
• Select Enable Rude Real-time Mode from Debug menu when Real-Time is enabled.
When rude real-time is enabled, the status bar at the bottom of the main program window displays RUDE
REALTIME. To disable rude real-time, deselect the Enable Rude Real-time Mode item in the Debug
menu. The status bar now reads POLITE REALTIME.
If rude real-time is enabled and you halt the CPU, there is a good chance that the CPU will halt even
when debug accesses are blocked, which might be within a time-critical ISR. This prevents the CPU from
completing that ISR in the appropriate amount of time, as the CPU cannot proceed until you respond to
the breakpoint. To prevent this problem, you must switch back to polite real-time mode by deselecting
Enable Rude Real-time Mode.
See the online help section Debugging Windows and Analysis Tools→Analysis Tools (Generic)→Real
Time Debugging for more detailed information on real-time mode.
82
Debug
SPRU509H – October 2006
Submit Documentation Feedback
www.ti.com
Real-Time Debugging
5.4.3 Real-Time Data Exchange (RTDX)
The DSP/BIOS Real-Time Analysis (RTA) facilities utilize the Real-Time Data Exchange (RTDX) link to
obtain and monitor target data in real-time. You can utilize the RTDX link to create your own customized
interfaces to the DSP target by using the RTDX API Library. See the online help or tutorial for more
details.
Real-time data exchange (RTDX) transfers data between a host computer and target devices without
interfering with the target application. This bi-directional communication path provides for data collection
by the host as well as host interaction with the running target application. The data collected from the
target may be analyzed and visualized on the host. Application parameters may be adjusted using host
tools, without stopping the application. RTDX also enables host systems to provide data stimulation to the
target application and algorithms.
RTDX consists of both target and host components. A small RTDX software library runs on the target
application. The target application makes function calls to this library’s API in order to pass data to or from
it. This library uses a scan-based emulator to move data to or from the host platform via a JTAG interface.
Data transfer to the host occurs in real-time while the target application is running.
On the host platform, an RTDX host library operates in conjunction with Code Composer Studio IDE. Data
visualization and analysis tools communicate with RTDX through COM APIs to obtain the target data
and/or to send data to the DSP application.
The host library supports two modes of receiving data from a target application: continuous and
non-continuous. In continuous mode, the data is simply buffered by the RTDX Host Library and is not
written to a log file. Continuous mode should be used when the developer wants to continuously obtain
and display the data from a target application, and does not need to store the data in a log file. In
non-continuous mode, data is written to a log file on the host. This mode should be used when developers
want to capture a finite amount of data and record it in a log file.
5.4.3.1
RTDX Data Flow
RTDX forms a two-way data pipe between a target application and a host client. This data pipe consists of
a combination of hardware and software components as shown below.
Figure 5-27. RTDX Data Flow
Target
User
interface
RTDX
target
library
Target
application
JTAG interface
Host
COM
interface
Host
client
Code
composer
RTDX
host
library
Optional
log file
SPRU509H – October 2006
Submit Documentation Feedback
Debug
83
www.ti.com
Real-Time Debugging
5.4.3.2
Configuring RTDX Graphically
The RTDX tools allow you to configure RTDX graphically, set up RTDX channels, and run diagnostics on
RTDX. These tools allow you to enhance RTDX functionality when transmitting data.
RTDX has three menu options: Diagnostics Control, Configuration Control, and Channel Viewer Control.
Diagnostics Control. RTDX provides the RTDX Diagnostics Control to verify that RTDX is working
correctly on your system. The diagnostics test the basic functionality of target-to-host transmission and
host-to-target transmission. To open the RTDX Diagnostics Control, select Tools→RTDX→Diagnostics
Control. These tests are only available if RTDX is enabled.
Figure 5-28. RTDX Diagnostics Window
Configuration Control. This is the main RTDX window. It allows you to:
• View the current RTDX configuration settings
• Enable or disable RTDX
• Access the RTDX Configuration Control Properties page to reconfigure RTDX and select port
configuration settings
To open the RTDX Configuration Control, select Tools→RTDX→Configuration Control.
Figure 5-29. RTDX Configuration Window
Channel View Control. The RTDX Channel Viewer Control is an Active X control that automatically
detects target-declared channels and adds them to the viewable list. The RTDX Channel Viewer Control
also allows you to:
• Remove or add a target-declared channel from the viewable list
• Enable or disable a channel that is on the list
To open the RTDX Channel Viewer Control in Code Composer Studio IDE, select
Tools→RTDX→Channel Viewer Control. The Channel Viewer Control window displays.
84
Debug
SPRU509H – October 2006
Submit Documentation Feedback
www.ti.com
Real-Time Debugging
Figure 5-30. RTDX Channel Viewer Window
Click on the Input and Output Channels tabs to display a list of those channels. Both the Output and Input
Channels windows allow you to view, delete, and re-add channels.
Checking the Auto-Update feature enables you to automatically update information for all channels without
refreshing the display. If you are not using the Auto-Update feature, right-click on a tab and select Refresh
from the context menu to update information for all channels.
Note:
5.4.3.3
For the RTDX Channel View Control to receive extended channel information for a
specific channel, an RTDX client must have that channel open.
Sending a Single Integer to the Host
The basic function of RTDX is to send a single integer to the host. The following steps provide an
overview of the process of sending data from the target to the host and from the host to the target. For
specific commands and details on transmitting different types of data, see the online RTDX help or tutorial.
To send data from your target application to the host:
1. Prepare your target application to capture real-time data by inserting specific RTDX syntax into your
application code to allow real-time data transfer from the target to the host. Although the process for
preparing a target application is the same for all data types, different data types require different
function calls for data transfer. Therefore, sending an integer to the host requires you to add a function
call that is specific to only transmitting a single integer, instead of sending an array of integers to the
host.
2. Prepare your host client to process the data by instantiating one RTDX object for each desired
channel, opening a channel for the objects specified, and calling any other desired functions.
3. Start Code Composer Studio IDE.
4. Load your target application onto the TI processor.
5. Check the Enable RTDX box under Tools→RTDX→Configuration Control.
6. Run your target application to capture real-time data and send it to the RTDX Host Library.
7. Run your host client to process the data.
For details on using RTDX, see the online RTDX help or tutorial.
SPRU509H – October 2006
Submit Documentation Feedback
Debug
85
www.ti.com
Automation (for Debug)
5.4.3.4
Receiving Data from the Host
A client application can send data to the target application by writing data to the target. Data sent from the
client application to the target is first buffered in the RTDX Host Library. The data remains in the RTDX
Host Library until a request for data arrives from the target. Once the RTDX Host Library has enough data
to satisfy the request, it writes the data to the target without interfering with the target application.
The state of the buffer is returned into the variable buffer state. A positive value indicates the number of
bytes the RTDX Host Library has buffered which the target has not yet requested. A negative value
indicates the number of bytes that the target has requested which the RTDX Host Library has not yet
satisfied.
To send data from a host client to your target application:
1. Prepare your target application to receive data by writing a simple RTDX target application that reads
data from the host client.
2. Prepare your host client to send data by instantiating one RTDX object for each desired channel,
opening a channel for the objects specified, and calling any other desired functions.
3. Start Code Composer Studio IDE.
4. Load your target application onto the TI processor.
5. Check the Enable RTDX box under Tools→RTDX→Configuration Control.
6. Run your target application.
7. Run your host client.
For details on using RTDX, see the online RTDX help or tutorial.
5.5
Automation (for Debug)
5.5.1 Using the General Extension Language (GEL)
As mentioned earlier, GEL scripts can be used to create custom GEL menus and automate steps in Code
Composer Studio. Section 4.6.1 described how to use built-in GEL functions to automate various project
management steps. There are also many built-in GEL functions that can be used to automate debug
steps, such as setting breakpoints, adding variables to the Watch Window, beginning execution, halting
execution, and setting up File I/O.
5.5.2 Scripting Utility for Debug
The scripting utility (Section 4.6.2) also has commands that can automate many debug steps. See the
online help that comes with the scripting utility for more information.
5.6
Reset Options
It may be necessary to perform a reset of the target or the emulator using commands integrated in the
Code Composer Studio IDE. The availability of these reset commands depends on the IDE connection to
the target. See Section 3.1.3 for more information on connecting or disconnecting the target.
5.6.1 Target Reset
Target reset initializes the contents of all registers to their power-up state, and halts execution of the
program. If the target board does not respond to this command and you are using a kernel-based device
driver, the CPU kernel may be corrupt. In this case, you must reload the kernel. The simulator initializes
the contents of all registers to their power-up state, according to target simulation specifications. To reset
the target processor, select Debug→Reset CPU.
Note:
86
Debug
Connection must be established with the target for the Debug→Reset CPU option to be
available.
SPRU509H – October 2006
Submit Documentation Feedback
www.ti.com
Reset Options
5.6.2 Emulator Reset
Some processors require putting the processor into its functional run state before a hard reset will work. In
this case, the only way to force the processor back into this functional run state is to reset the emulator.
An emulator reset will pull the TRST pin active, forcing the device to the functional run mode.
The Reset Emulator option becomes available whenever Code Composer Studio is disconnected from the
target. To reset the emulator, choose Debug→Reset Emulator. Upon running Reset Emulator, the
hardware is left in a free running state and you can now manually reset the target hardware by pressing
the reset button or by selecting Debug→Reset CPU. Note that this does not apply to ARM devices.
5.6.3 Advanced Resets
In addition to the default reset option (Reset CPU), you may have a choice of alternate resets depending
on your target. Click on Debug→ Advanced Resets to see a list of alternate resets. These are defined
differently on each target; your target documentation will describe any new resets that are available
through this menu item.
5.6.4 Halt on Reset
When Halt on Reset is selected from the Debug menu, the target will halt after a reset (inside the reset
vector). Otherwise, the target will run. Some user-initiated resets will not necessarily run the target
immediately, this is more for an external reset or when running and executing a reset. This value is
undetermined until the target is connected. If you have hardwired this state in the hardware after a power
up, the value will not be correct until it is connected. You can force a change on the target even when it is
not connected.
SPRU509H – October 2006
Submit Documentation Feedback
Debug
87
www.ti.com
Reset Options
88
Debug
SPRU509H – October 2006
Submit Documentation Feedback
Chapter 6
SPRU509H – October 2006
Analyze/Tune
To create an efficient application, you may need to focus on performance, power, code
size, or cost, depending on your goals.
Application Code Analysis is the process of gathering and interpreting data about the
factors that influence an application’s efficiency. Application Code Tuning is the
modification of code to improve its efficiency. DSP developers can analyze and tune
their application as often as necessary to meet the efficiency goals defined by their
customers, application, and hardware.
Code Composer Studio IDE provides various tools to help developers analyze and tune
their applications.
Topic
6.1
6.2
..................................................................................................
Page
Application Code Analysis ......................................................... 90
Application Code Tuning (ACT) .................................................. 94
SPRU509H – October 2006
Submit Documentation Feedback
Analyze/Tune
89
www.ti.com
Application Code Analysis
6.1
Application Code Analysis
The analysis tools offered by Code Composer Studio IDE have been designed to gather and present
important data.
6.1.1 Data Visualization
Code Composer Studio IDE can graph data processed by your program in a variety of ways, including
time/frequency, constellation diagram, eye diagram, and image. Access these graphs by choosing
View→Graph and selecting the desired graph type. Then you can specify the graph properties in the
graph property dialog. The example below shows a Single Time (Time/Frequency) graph property dialog.
See the online help for more detailed information.
Figure 6-1. Sample Graph Properties Dialog
Once the properties are configured, click the OK button to open a graph window that plots the specified
data points. If the graph is animated, it will update on every halt if there are no breakpoints connected to
the graph. However, if there is a connected breakpoint, it will only update on that breakpoint.
Figure 6-2. Example Graph
90
Analyze/Tune
SPRU509H – October 2006
Submit Documentation Feedback
www.ti.com
Application Code Analysis
6.1.2 Simulator Analysis
The Simulator Analysis tool reports on particular system events so you can accurately monitor and
measure your program performance. For detailed information, see the Simulator Analysis topics provided
in the online help.
User options for simulator analysis include:
• Enable/disable analysis
• Count the occurrence of selected events
• Halt execution whenever a selected event occurs
• Delete count or break events
• Create a log file
• Reset event counter
To use the Simulator Analysis tool:
1. Load your program.
2. Start the analysis tool. Select Tools→Simulator Analysis for your device.
3. Right-click in the Simulator Analysis window and select Enable Analysis from the context menu, if it is
not already enabled.
4. Run or step through your program.
5. Analyze the output of the analysis tool.
6.1.3 Emulator Analysis
The C6000 Emulator Analysis tool allows you to set up, monitor, and count events and hardware
breakpoints. For detailed information, see the Emulator Analysis topics provided in the online help.
To start the Emulator Analysis tool, load your program, and select Tools→Emulator Analysis for your
device from the menu bar. This option is only available when emulators are in use.
The Emulator Analysis window contains the following information in columns:
• Event. The event name.
• Type. Whether the event is a break or count event.
• Count. The number of times the event occurred before the program halted.
• Break Address. The address at which the break event occurred.
• Routine. The routine in which the break event occurred.
Note:
You cannot use the analysis feature while you are using the profiling clock.
6.1.4 DSP/BIOS Real-Time Analysis (RTA) Tools
The DSP/BIOS Real-Time Analysis (RTA) features, shown in Figure 6-3, provide you with unique visibility
into your application by allowing you to probe, trace, and monitor a DSP application during execution.
These utilities piggyback upon the same physical JTAG connection already employed by the debugger,
and use this connection as a low-speed (albeit real-time) communication link between the target and host.
SPRU509H – October 2006
Submit Documentation Feedback
Analyze/Tune
91
www.ti.com
Application Code Analysis
Figure 6-3. Real-Time Capture and Analysis
Development
DSP/BIOS kernel interface
Execution trace
Timing analysis
Regression testing
Parametric variation
Host command
server
Statistics
accumulators
Deployment
System console
Activity monitoring
Live signal capture
Diagnostic modules
Host
data
channels
Real−
time
data
link
Host computer
Software
event
logs
Target DSP platform
DSP/BIOS RTA requires the presence of the DSP/BIOS kernel within the target system. In addition to
providing run-time services to the application, the DSP/BIOS kernel provides support for real-time
communication with the host through the physical link. By structuring an application around the DSP/BIOS
APIs and statically created objects, you can automatically instrument the target for capturing and
uploading the real-time information that drives the CCStudio visual analysis tools. Supplementary APIs
and objects allow explicit information capture under target program control as well. From the perspective
of its hosted utilities, DSP/BIOS affords several broad capabilities for real-time program analysis.
The DSP/BIOS Real-Time Analysis tools can be accessed through the DSP/BIOS toolbar (Figure 6-4).
Figure 6-4. DSP/BIOS RTA Toolbar
Open Kernel/Object View
Open CPU Load Graph
Open Execution Graph
Open RTA Control Panel
Open Host Channel Control
Open Statistics View
Open Message Log
92
Analyze/Tune
SPRU509H – October 2006
Submit Documentation Feedback
www.ti.com
Application Code Analysis
Here is a description of each element on the toolbar:
• Message Log. Displays time-ordered sequences of events written to kernel log objects by independent
real-time threads. This is useful for tracing the overall flow of control in the program. There are two
ways in which the target program logs events:
– Explicitly, through DSP/BIOS API calls. For example, this can be done through LOG_printf(&trace,
“hello world!”); , where trace is the name of the log object.
– Implicitly, by the underlying kernel when threads become ready, dispatched, and terminated. An
example of this would be log events in the Execution Graph Details.
You can output the log to a file by right-clicking in the Message Log window and selecting Property
Page.
• Statistics View. Displays summary statistics amassed in kernel accumulator objects, reflecting
dynamic program elements ranging from simple counters and time-varying data values, to elapsed
processing intervals of independent threads. The target program accumulates statistics explicitly
through DSP/BIOS API calls or implicitly by the kernel when scheduling threads for execution or
performing I/O operations. You can change various settings by right-clicking in the Statistics View
window and selecting Property Page.
• Host Channel Control. Displays host channels defined by your program. You can use this window to
bind files to these channels, start the data transfer over a channel, and monitor the amount of data
transferred. Binding kernel I/O objects to host files provides the target program with standard data
streams for deterministic testing of algorithms. Other real-time target data streams managed with
kernel I/O objects can be tapped and captured to host files on-the-fly for subsequent analysis.
• RTA Control Panel. Controls the real-time trace and statistics accumulation in target programs. In
effect, this allows developers to control the degree of visibility into the real-time program execution. By
default, all types of tracing are enabled. You must check the Global host enable option to enable the
tracing types. Your program can also change the settings in this window. The RTA Control Panel
checks for any programmatic changes at the rate set for the RTA Control Panel in the Property Page.
In the Property Page, you can also change refresh rates for any RTA tool, such as the Execution
Graph.
• Execution Graph. Displays the execution of threads in real-time. Through the execution graph you
can see the timing and the order in which threads are executed. Thick blue lines indicate the thread
that is currently running, that is, the thread using the CPU. More information about different lines in the
graph can be accessed by right-clicking in the Execution Graph window and selecting Legend. If you
display the Execution Graph Details in a Message Log window, you can double-click on a box (a
segment of a line) in the Execution Graph to see details about that event in text form. You can also
hide threads in the graph by right-clicking in the Execution Graph window and selecting Property Page.
• CPU Load Graph. Displays a graph of the target CPU processing load. The most recent CPU load is
shown in the lower-left corner and the highest CPU load reached so far is shown in the lower-right
corner. The CPU load is defined as the amount of time not spent performing the low-priority task that
runs when no other thread needs to run. Thus, the CPU load includes any time required to transfer
data from the target to the host and to perform additional background tasks. The CPU load is averaged
over the polling rate period. The longer the polling period, the more likely it is that short spikes in the
CPU load are not shown in the graph. To set the polling rate, open the RTA Control Panel window and
right-click in the window. Select Property Page, and in the Host Refresh Rates tab, set the polling rate
with the Statistics View / CPU Load Graph slider and click OK.
• Kernel/Object View. Displays the configuration, state, and status of the DSP/BIOS objects currently
running on the target. This tool shows both the dynamic and statically configured objects that exist on
the target. You can right-click in the window and select Save Server Data to save the current data.
Note:
When used in tandem with the Code Composer Studio IDE standard debugger during
software development, the DSP/BIOS real-time analysis tools provide critical visibility into
target program behavior during program execution when the debugger can offer little
insight. Even after the debugger halts the program and assumes control of the target,
information already captured through DSP/BIOS can provide invaluable insights into the
sequence of events that led up to the current point of execution.
SPRU509H – October 2006
Submit Documentation Feedback
Analyze/Tune
93
www.ti.com
Application Code Tuning (ACT)
The DSP/BIOS real-time analysis tools also can act as the software counterpart of the hardware logic
analyzer. The embedded DSP/BIOS kernel and host analysis tools combine to form a new set of
manufacturing test and field diagnostic tools. These tools are capable of interacting with application
programs in operative production systems through the existing JTAG infrastructure.
The overhead cost of using DSP/BIOS is minimal, therefore instrumentation can be left in to enable field
diagnostics, so that developers can capture and analyze the actual data that causes failures.
6.1.5 Code Coverage and Multi-Event Profiler Tool
The Code Coverage and Multi-event Profiler tool provides two distinct capabilities:
• Code coverage provides visualization of source line coverage to help developers to construct tests to
ensure adequate code coverage.
• Multi-event profiling provides function profile data collected over multiple events of interest – all in a
single simulation run of the application. Events include CPU cycles, instructions executed, pipeline
stalls, cache hits, misses and so on. This tool helps identify possible factors affecting performance.
See the Code Coverage and Multi-event Profiler User’s Guide (SPRU624) for further details.
6.2
Application Code Tuning (ACT)
The tuning process begins where the analysis stage ends. When application code analysis is complete,
the DSP developer should have identified inefficient code. The tuning process consists of determining
whether inefficient code can be improved, setting efficiency objectives, and attempting to meet those goals
by modifying code. Code Composer Studio links several tools together into an organized method of
tuning, as well as providing a single point for analyzing tuning progress.
6.2.1 Tuning Dashboard
The Dashboard is a central focal point for the tuning process. It displays build- and run-time profile data
suggestions for which tuning tool to use, and it can launch each of the tools. The Dashboard is the main
interface during the tuning phase of the development cycle.
6.2.1.1
Advice Window
The Advice window is a component of the Dashboard that displays tuning information. It guides you
through the tuning process, explaining and detailing the appropriate steps, and displaying helpful
information, links to other tools and documentation, and important messages. The Advice window should
be consulted when first using a tool, or to determine the appropriate action to take at any point in the
tuning procedure.
Code Composer Studio IDE initially starts in the Debug layout. To open the Advice window, switch to the
Tuning layout by clicking the tuning fork icon on the toolbar. Alternatively, you can choose Advice from the
Profile→Tuning menu item. The Advice window will open at the left of the Code Composer Studio IDE
screen and display the Welcome information.
At the top of the Advice Window there is a toolbar with buttons for Internet-style navigation of advice
pages as well as buttons for opening the main advice pages. Click on the arrows in the toolbar to navigate
back and forth through the history of advice pages for that tab. There are one or more tabs below the
center pane. These tabs display different advice pages, allowing you to carry out more than one task at
once. Click on the tabs at the bottom of the Advice Window to switch between open pages. To close the
active tab, right-click on the Advice Window and choose Close Active Tab from the context menu.
The Welcome advice page contains links to descriptions of each of the major tuning tools. At the bottom of
the Welcome advice page, there is a blue box containing suggestions for the next step in the tuning
process. These blue Action boxes are found throughout the Advice Window pages. When navigating
through the Advice Window pages, red warning messages may appear. These messages serve as helpful
reminders and contain valuable solutions for various problems.
When you have launched a tool, such as CacheTune, an advice tab for that tool appears at the bottom of
the Advice window. The page contains information about the tool, including its function, use, and how to
apply the tool for optimum tuning efficiency.
94
Analyze/Tune
SPRU509H – October 2006
Submit Documentation Feedback
www.ti.com
Application Code Tuning (ACT)
6.2.1.2
Profile Setup
As the Advice Window indicates, Code Composer Studio IDE must identify the desired code elements for
tuning before beginning the process. This can be accomplished using Profile Setup. The Profile Setup
window should be used at the beginning of the tuning process to specify the data to be collected and the
requisite sections of code.
The Profile Setup window can be opened using the Advice Window. In the blue Action box at the bottom
of the Welcome page, click the link to open the Setup Advice page. The first Action box will contain a link
to open the Profile Setup window. Profile Setup can also be launched from the main menu topic
Profile→Setup.
The Activities tab displays the activity for which the profiling session will collect data for your application.
The Ranges tab specifies the program ranges for which data is collected. Functions, loops, and arbitrary
segments of code can be added to the Ranges tab for collection of tuning information. Use the exit points
in the Control tab to notify Code Composer Studio when to stop data collection. You can also use the
Control tab to isolate different sections of code by adding Halt or Resume Collection points. The Custom
tab collects custom data, such as cache hits or CPU idle cycles.
6.2.1.3
Goals Window
Tuning an application requires setting and reaching efficiency goals, so Code Composer Studio provides a
method of recording numerical goals and tracking your progress.
The Goals Window displays a summary of application data, including values for the size of the code and
number of cycles, that can be updated each time the code is run. It also compares the current data
against both the last run's data and the defined goals.
To open the Goals Window, select Goals from the Profile→Tuning menu.
Figure 6-5. Goals Window
If an application has been loaded and profiling has been set up, the Goals Window can be populated with
data simply by running the application. To record objectives for tuning, click in the Goals column, type in
the goal and press Enter. If a goal has been reached, the data will be displayed in green and in
parentheses. Otherwise, the data will appear in red. When the application is restarted and run, the Current
values in the Goals Window will move to the Previous column and the difference will be displayed in the
Delta column. The Goals Window also allows you to save or view the contents in a log at any time, by
using the logging icons at the left side of the window.
6.2.1.4
Profile Viewer
The Profile Viewer displays collected data during the tuning process. It consists of an information grid.
Each row corresponds to the elements of code selected in the Ranges tab of the Profile Setup window.
The columns store the collected data for each profiled section of code, as selected in the Activities and
Custom tabs of the Profile Setup window.
The Profile Viewer provides a single location for the display of all collected information during the tuning
process. Ranges can be sorted by different data values. Data sets displayed in the Profile Viewer can be
saved, restored, and compared with other data sets.
The Profile Viewer pinpoints the most inefficient sections of code. For instance, to determine which
function results in the most cache stalls, the cache stall data in the Profile Viewer can be sorted from
largest to smallest. Sections of the function can then be profiled to determine exactly what code is
generating cache stalls.
SPRU509H – October 2006
Submit Documentation Feedback
Analyze/Tune
95
www.ti.com
Application Code Tuning (ACT)
To open the Profile Viewer, select Profile→Viewer from the main menu. Alternatively, navigate to the
Setup tab in the Advice Window. At the bottom of the Setup Advice page, click on the Profile Data Viewer
link to display the Profile Viewer in the lower portion of the screen. If tuning has been set up using the
Profile Setup window, running the application will display data in the Profile Viewer. The view can be
customized by dragging and dropping rows and columns. The data can be saved and restored using the
Profile Viewer buttons, and it can be sorted by double-clicking on the title of a column. In addition, several
Profile Viewers can be opened simultaneously.
6.2.2 Compiler Consultant
The Compiler Consultant tool analyzes your C/C++ source code and provides you with specific advice on
changes that will improve performance. The tool displays two types of information: Compile Time Loop
Information and Run Time Loop Information. Compile Time Loop Information is created by the compiler.
Run Time Loop Information is data gathered by profiling your application. Each time you compile or build
your code, Consultant will analyze the code and create suggestions for different optimization techniques to
improve code efficiency. You then have the option of implementing the advice and building the project
again. You can then use the Profile Viewer window to view the results of the optimization. The project
must be built with the - -consultant option enabled in the Build options. For more information, see Compiler
Consultant in the online help under Application Code Tuning.
When you analyze Compiler Consultant information, sort information in the Profile Viewer by the different
columns, as follows:
• If you didn’t profile, sort on Estimated Cycles Per Iteration to see which loops take the most estimated
cycles in a single iteration (Compile Time Loop Information).
• If you profiled with the activity Collect Run Time Loop Information, sort on cycle.CPU: Excl. Total to
see which loops execute the most cycles, ignoring system effects.
• If you profiled with the activity Profile all Functions and Loops for Total Cycles, sort on cycle.Total:
Excl. Total to see which loops execute the most cycles, including system effects.
• Sort on Advice Count to see which loops have the most advice.
This sorting will bring the rows to the top of the Profile Viewer that consume the most CPU cycles and
which should gain the most performance benefit by tuning. You can then work on tuning one loop at a
time. Double-clicking on the Advice Types entry for any loop row will bring up the full advice for that loop
in the Consultant tab of the Advice window.
After you have applied the advice to fix individual loops, it is useful to hide that row in the Profile Viewer
window. Hiding rows reduces the amount of information present in the Profile Viewer window. Rows can
always be unhidden.
6.2.3 Cache Tune
The CacheTune tool provides a graphical visualization of cache accesses over time. This tool is highly
effective at highlighting non-optimal cache usage (due to conflicting code placement, inefficient data
access patterns, etc.). Using this tool, you can significantly optimize cache efficiency, thereby reducing the
cycles consumed in the memory subsystem and improving the cache efficiency of the overall application.
All the memory accesses are color-coded by type. Various filters, panning, and zoom features facilitate
quick drill-down to view specific areas. This visual/temporal view of cache accesses enables quick
identification of problem areas, such as conflict, capacity, or compulsory misses.
96
Analyze/Tune
SPRU509H – October 2006
Submit Documentation Feedback
www.ti.com
Application Code Tuning (ACT)
The Tuning→CacheTune menu item launches the Cache Tune tool showing the latest cache traces.
Various options must be chosen in the Profile Setup to view the cache traces, see the online help for more
information. There are three kinds of cache trace files:
• Program Cache trace
• Data Cache trace
• Cross Cache trace
The data cache trace tab is displayed by default. If no cache traces have been collected, then the graph is
empty.
Once the tool is launched, you can view other cache data files by opening a saved dataset.
Datasets can be opened by clicking the Open dataset button, pressing its hotkey, or clicking the Load
dataset item in the context menu.
For more information, see Compiler Consultant in the online help under Application Code Tuning, or see
the Cache Analysis User’s Guide (SPRU575) on the TI website for further information on the Cache
Analysis tool.
Figure 6-6. Cache Tune Tool
SPRU509H – October 2006
Submit Documentation Feedback
Analyze/Tune
97
www.ti.com
Application Code Tuning (ACT)
98
Analyze/Tune
SPRU509H – October 2006
Submit Documentation Feedback
Chapter 7
SPRU509H – October 2006
Additional Tools, Help, and Tips
This section identifies how to customize your IDE installation, how to update the
installation, and how to find additional help and documentation.
Topic
7.1
7.2
7.3
..................................................................................................
Page
Component Manager................................................................ 100
Update Advisor ....................................................................... 101
Additional Help ....................................................................... 102
SPRU509H – October 2006
Submit Documentation Feedback
Additional Tools, Help, and Tips
99
www.ti.com
Component Manager
7.1
Component Manager
Note:
The Component Manager is an advanced tool used primarily to customize or modify your
installation. Use this tool only to resolve component interaction in a custom or multiple
installation environment.
Multiple installations of the Code Composer Studio IDE can share installed tools. The Component
Manager provides an interface for handling multiple versions of tools with these multiple installations.
The Component Manager window displays a listing of all installations, build tools, Texas Instruments
plug-in tools, and third-party plug-in tools. When a node is selected in the tree (the left pane of the
Component Manager), its properties are displayed in the Properties pane to the right (see Figure 7-1).
With the Component Manager, you can enable or disable tools for a particular Code Composer Studio
installation. This functionality allows you to create a custom combination of tools contained within the IDE.
The Component Manager also allows you to access the Update Advisor to download the most recent
version of the tools from the web.
Figure 7-1. Component Manager
Tree listing of all Code Composer Studio
installations and tools
Properties of item highlighted in the
Code Composer Studio installation
pane.
100
Additional Tools, Help, and Tips
SPRU509H – October 2006
Submit Documentation Feedback
www.ti.com
Update Advisor
7.1.1 Opening Component Manager
To open the Component Manager:
1. From the Help menu in the Code Composer Studio IDE, select About. The About Code Composer
Studio dialog box appears.
2. In the About dialog box, click the Component Manager button to display the window.
7.1.2 Multiple Versions of Code Composer Studio
The following is a list of requirements for maintaining multiple versions of the Code Composer Studio IDE
and related tools:
• To keep more than one version of the Code Composer Studio IDE or a related tool, you must install
each version in a different directory.
• If you install an additional version of the Code Composer Studio IDE, or an additional version of a tool
in the same directory as its previous installation, the original installation will be overwritten.
• You cannot enable multiple versions of the same tool within one installation.
7.2
Update Advisor
The Update Advisor allows you to download updated versions of the Code Composer Studio IDE and
related tools. The Update Advisor accesses the Available Updates web site. This site displays a list of
patches, drivers, and tools available for downloading.
To use the Update Advisor, you must have Internet access and a browser installed on your machine. See
Update Advisor under the online help for complete system requirements.
Note:
You must be registered with my.TI before you can access the Available Updates web site.
7.2.1 Registering Update Advisor
If you did not register your product during installation, you can access the online registration form from the
Code Composer Studio help menu: Help→Register.
Note:
The first time you use Update Advisor, your browser may display the my.TI web page. To
register, follow the directions displayed on the page.
You must register online and have a valid subscription plan to receive downloads through Update Advisor.
You receive a 90 day free subscription service with the Code Composer Studio product. At the end of this
period, you must purchase an annual subscription service. Annual subscriptions are only available for the
full product.
7.2.2 Checking for Tool Updates
In the Code Composer Studio IDE, select Help→Update Advisor→Check for Updates. If you are already
registered with my.TI and have accepted the cookie necessary for automatic log-in, your browser will go
directly to the Available Updates web site. To query the Available Updates web site, the Update Advisor
passes certain information from your machine:
• Code Composer Studio IDE product registration number
• Code Composer Studio IDE installation version
• Text description of the installed product
• List of installed plugins
The Available Updates web site will then list any updates appropriate for your installation. You have the
opportunity to just download the updates, or to download and install them immediately.
You can also configure the Update Advisor to automatically check for updates.
SPRU509H – October 2006
Submit Documentation Feedback
Additional Tools, Help, and Tips
101
www.ti.com
Additional Help
7.2.3 Automatically Checking for Tool Updates
You may check for tool updates at any time, or you can configure the Update Advisor to automatically
check for updates.
1. Select Help→Update Advisor→Settings. The Web Setting dialog box appears:
Figure 7-2. Update Advisor Web Settings
2. To enable the automatic update feature, click the checkbox to the left of the Enable timed check for
update upon startup field. When this field is enabled, the Update Advisor automatically checks for web
updates according to the specified schedule.
3. In the Check for Update field, specify how often the Update Advisor should check the Available
Updates web site.
4. Click OK to save your changes and close the dialog box.
7.2.4 Uninstalling the Updates
Any installed update can be uninstalled to restore the previous version of the Code Composer Studio IDE.
Note that only the previous version of a tool can be restored. If you install one update for a tool, and then
install a second update for the same tool, the first update can be restored. The original version of the tool
cannot be restored, even if you uninstall both the second update and the first update.
7.3
Additional Help
You can access Help→Contents to guide you through certain topics step by step, perform the online
tutorials, view online help sites that provide the most current help topics, or view user manuals in PDF
format that provide information on specific features or processes. Additionally, you can access the Update
Advisor to get the newest features through Help→Update Advisor.
7.3.1 Online Help
The online help provides links to the tutorials, multimedia demos, user manuals, application reports, and a
website (www.dspvillage.com) where you can obtain information regarding the software. Simply click on
Help and follow the links provided. For context-sensitive help, choose a relevant part of the IDE and click
F1.
7.3.2 Online Tutorial
The Code Composer Studio IDE Tutorial contains lessons that help you get started quickly with the Code
Composer Studio IDE. To start the Code Composer Studio IDE Tutorial, select Help→Tutorial.
102
Additional Tools, Help, and Tips
SPRU509H – October 2006
Submit Documentation Feedback
IMPORTANT NOTICE
Texas Instruments Incorporated and its subsidiaries (TI) reserve the right to make corrections, modifications,
enhancements, improvements, and other changes to its products and services at any time and to discontinue
any product or service without notice. Customers should obtain the latest relevant information before placing
orders and should verify that such information is current and complete. All products are sold subject to TI’s terms
and conditions of sale supplied at the time of order acknowledgment.
TI warrants performance of its hardware products to the specifications applicable at the time of sale in
accordance with TI’s standard warranty. Testing and other quality control techniques are used to the extent TI
deems necessary to support this warranty. Except where mandated by government requirements, testing of all
parameters of each product is not necessarily performed.
TI assumes no liability for applications assistance or customer product design. Customers are responsible for
their products and applications using TI components. To minimize the risks associated with customer products
and applications, customers should provide adequate design and operating safeguards.
TI does not warrant or represent that any license, either express or implied, is granted under any TI patent right,
copyright, mask work right, or other TI intellectual property right relating to any combination, machine, or process
in which TI products or services are used. Information published by TI regarding third-party products or services
does not constitute a license from TI to use such products or services or a warranty or endorsement thereof.
Use of such information may require a license from a third party under the patents or other intellectual property
of the third party, or a license from TI under the patents or other intellectual property of TI.
Reproduction of information in TI data books or data sheets is permissible only if reproduction is without
alteration and is accompanied by all associated warranties, conditions, limitations, and notices. Reproduction
of this information with alteration is an unfair and deceptive business practice. TI is not responsible or liable for
such altered documentation.
Resale of TI products or services with statements different from or beyond the parameters stated by TI for that
product or service voids all express and any implied warranties for the associated TI product or service and
is an unfair and deceptive business practice. TI is not responsible or liable for any such statements.
Following are URLs where you can obtain information on other Texas Instruments products and application
solutions:
Products
Applications
Amplifiers
amplifier.ti.com
Audio
www.ti.com/audio
Data Converters
dataconverter.ti.com
Automotive
www.ti.com/automotive
DSP
dsp.ti.com
Broadband
www.ti.com/broadband
Interface
interface.ti.com
Digital Control
www.ti.com/digitalcontrol
Logic
logic.ti.com
Military
www.ti.com/military
Power Mgmt
power.ti.com
Optical Networking
www.ti.com/opticalnetwork
Microcontrollers
microcontroller.ti.com
Security
www.ti.com/security
Low Power Wireless www.ti.com/lpw
Mailing Address:
Telephony
www.ti.com/telephony
Video & Imaging
www.ti.com/video
Wireless
www.ti.com/wireless
Texas Instruments
Post Office Box 655303 Dallas, Texas 75265
Copyright 2006, Texas Instruments Incorporated