1
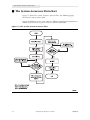
Document MR0012
9710 Library
Storage Module
System Assurance Guide
9710 Library
Storage Module
System Assurance Guide
Information contained in this publication is subject to change. In the event of changes, the
publication will be revised. Comments concerning its contents should be directed to:
Nearline Information Development
Storage Technology Corporation
One StorageTek Drive
Louisville, CO 80028-2201
USA
© 1995 through 1999, Storage Technology Corporation, Louisville, CO, USA. All rights reserved.
ii
9710 System Assurance Guide
MR0012J
List of Pages
Document Title:
9710 Library Storage Module
System Assurance Guide
Guide Part Number:
MR0012J
Initial Release Date:
July 1996
Reissue J Date:
December 1999
Total number of pages in this document is 86, consisting of the following:
Pages
Cover
Blank page
Title page
Copyright page (ii)
iii through xiv
1-1 through 1-6
2-1 through 2-4
3-1 through 3-12
4-1 through 4-30
5-1 through 5-4
A-1 through A-6
Index-1 through Index-2
Reader’s Comment Form
Business Reply Mailer
Blank Page
Back Cover
MR0012J
9710 System Assurance Guide
Disposition
Replace entire manual
iii
Summary of Changes
Date
Reissue Level
Change
Dec. 1999
J
throughout: Incorporated template 103199 and updated
boilerplate. Changed personnel references to reflect new
Customer Service organization. Indicated support of 9840
Fibre Channel drives.
Chapter 3: Removed note about AS/400 not supporting
9840 or DLT drives. Added host interface graphics (Figure 32 through 3-6). Added illustration of I/O panel that shows
Fibre Channel plate in lower left corner.
Chapter 4: Expanded power cable table with new power
cable part numbers. Corrected drawing of Centronics 50-pin
connector. Added new in-country media services telephone
numbers. Added note clarifying feature codes 1603 and
2016.
Appendix A: Updated weight specifications.
iv
9710 System Assurance Guide
MR0012J
Contents
List of Pages . . . . . . . . . . . . . . . . . . . . . . . . . . . . . . . . . . . . . . . . . . . . iii
Summary of Changes . . . . . . . . . . . . . . . . . . . . . . . . . . . . . . . . . . . . . iv
Contents . . . . . . . . . . . . . . . . . . . . . . . . . . . . . . . . . . . . . . . . . . . . . . . . v
Figures . . . . . . . . . . . . . . . . . . . . . . . . . . . . . . . . . . . . . . . . . . . . . . . viii
Tables . . . . . . . . . . . . . . . . . . . . . . . . . . . . . . . . . . . . . . . . . . . . . . . . . ix
Preface . . . . . . . . . . . . . . . . . . . . . . . . . . . . . . . . . . . . . . . . . . . . . . . . xi
How to Use This Guide . . . . . . . . . . . . .
How This Guide is Organized . . . . . . . .
Trademarks . . . . . . . . . . . . . . . . . . . . . .
Conventions . . . . . . . . . . . . . . . . . . . . .
Related Publications . . . . . . . . . . . . . . .
Obtaining Information . . . . . . . . . . . . . .
Customer Resource Center . . . . . . . .
Documents on CD . . . . . . . . . . . . . .
Electronic Document Center . . . . . . .
KnowledgeMap . . . . . . . . . . . . . . . .
Partners Page . . . . . . . . . . . . . . . . . .
StorageTek Storefront . . . . . . . . . . . .
Comments and Suggestions . . . . . . . . . .
Education . . . . . . . . . . . . . . . . . . . . . . .
.........
.........
.........
.........
.........
.........
.........
.........
.........
.........
.........
.........
.........
.........
..........
..........
..........
..........
..........
..........
..........
..........
..........
..........
..........
..........
..........
..........
..........
..........
..........
..........
..........
..........
..........
..........
..........
..........
..........
..........
..........
..........
. . . . . . xi
. . . . . . xi
. . . . . .xii
. . . . . .xii
. . . . . xiii
. . . . . xiii
. . . . . xiii
. . . . . xiv
. . . . . xiv
. . . . . xiv
. . . . . xiv
. . . . . xiv
. . . . . .xv
. . . . . .xv
1: The System Assurance Process . . . . . . . . . . . . . . . . . . . . . . . . . . 1-1
System Assurance Team Responsibilities . . . . . . . . .
The System Assurance Flowchart . . . . . . . . . . . . . .
Proposal Acceptance . . . . . . . . . . . . . . . . . . . . .
System Assurance Planning Meetings . . . . . . . . .
Order Placement . . . . . . . . . . . . . . . . . . . . . . . .
Sales Entry Form or Order Worksheet Check . . . .
System Assurance Review Meetings . . . . . . . . . .
Preinstallation Checklist Error Check . . . . . . . . . .
Installation . . . . . . . . . . . . . . . . . . . . . . . . . . . .
MR0012J
. . . . . . . . . . . . . . . . . . . . . . . . . 1-2
. . . . . . . . . . . . . . . . . . . . . . . . . 1-4
. . . . . . . . . . . . . . . . . . . . . . . . . 1-5
. . . . . . . . . . . . . . . . . . . . . . . . . 1-5
. . . . . . . . . . . . . . . . . . . . . . . . . 1-5
. . . . . . . . . . . . . . . . . . . . . . . . . 1-5
. . . . . . . . . . . . . . . . . . . . . . . . . 1-5
. . . . . . . . . . . . . . . . . . . . . . . . . 1-6
. . . . . . . . . . . . . . . . . . . . . . . . . 1-6
9710 System Assurance Guide
v
Contents
Post-installation Follow-up . . . . . . . . . . . . . . . . . . . . . . . . . . . . . . . . . . . . . . . . . 1-6
Schedule Planning . . . . . . . . . . . . . . . . . . . . . . . . . . . . . . . . . . . . . . . . . . . . . . . . . . 1-6
2: Key Personnel . . . . . . . . . . . . . . . . . . . . . . . . . . . . . . . . . . . . . . . 2-1
Customer Team . . . . . . . . . . . . . . . . . . . . . . . . . . .
CPU Hardware Contact . . . . . . . . . . . . . . . . . . .
Operating Systems Software Contact . . . . . . . . .
Communication Hardware Contact . . . . . . . . . .
Operations Contact . . . . . . . . . . . . . . . . . . . . . .
Delivery Contact . . . . . . . . . . . . . . . . . . . . . . . .
StorageTek Team . . . . . . . . . . . . . . . . . . . . . . . . . . .
Marketing Representative . . . . . . . . . . . . . . . . .
Solutions Delivery Systems Specialist . . . . . . . . .
Solutions Delivery Engineer . . . . . . . . . . . . . . .
Solutions Delivery Installation Consultant . . . . . .
StorageTek Hardware and Software Support . . . . . .
Client Processor(s) Teams . . . . . . . . . . . . . . . . . . . .
Hardware Contacts . . . . . . . . . . . . . . . . . . . . . .
Software Contacts . . . . . . . . . . . . . . . . . . . . . . .
Channel Partner Team . . . . . . . . . . . . . . . . . . . . . .
Marketing Representative . . . . . . . . . . . . . . . . .
Solutions Delivery Systems Specialist . . . . . . . . .
Solutions Delivery Engineer . . . . . . . . . . . . . . . .
Solutions Delivery Installation Consultant . . . . . .
.........................
.........................
.........................
.........................
.........................
.........................
.........................
.........................
.........................
.........................
.........................
.........................
.........................
.........................
.........................
.........................
.........................
.........................
.........................
.........................
2-1
2-1
2-1
2-1
2-1
2-1
2-2
2-2
2-2
2-2
2-2
2-3
2-3
2-3
2-3
2-4
2-4
2-4
2-4
2-4
3: Product Overview . . . . . . . . . . . . . . . . . . . . . . . . . . . . . . . . . . . . 3-1
Drive Configurations . . . . . . .
Power Distribution Unit (PDU)
Host Interfaces . . . . . . . . . . .
Data Interfaces . . . . . . . . . . .
4890 Data Buses . . . . . . .
DLT Data Buses . . . . . . . .
I/O Cabling Limits . . . . . . . . .
RS423 . . . . . . . . . . . . . . . . . .
SCSI Library Robotic Interface
. . . . . . . . . . . . . . . . . . . . . . . . . . . . . . . . . . . . . . . . . . 3-2
. . . . . . . . . . . . . . . . . . . . . . . . . . . . . . . . . . . . . . . . . . 3-2
. . . . . . . . . . . . . . . . . . . . . . . . . . . . . . . . . . . . . . . . . . 3-3
. . . . . . . . . . . . . . . . . . . . . . . . . . . . . . . . . . . . . . . . . . 3-9
. . . . . . . . . . . . . . . . . . . . . . . . . . . . . . . . . . . . . . . . . . 3-9
. . . . . . . . . . . . . . . . . . . . . . . . . . . . . . . . . . . . . . . . . . 3-9
. . . . . . . . . . . . . . . . . . . . . . . . . . . . . . . . . . . . . . . . . . 3-9
. . . . . . . . . . . . . . . . . . . . . . . . . . . . . . . . . . . . . . . . . 3-10
. . . . . . . . . . . . . . . . . . . . . . . . . . . . . . . . . . . . . . . . . 3-10
4: Ordering the Equipment . . . . . . . . . . . . . . . . . . . . . . . . . . . . . . . 4-1
The Ordering Process . . . . .
Fax Numbers and Addresses
Hardware Order Worksheets
DLT Drives . . . . . . . . . .
4890 Drives . . . . . . . . . .
vi
.
.
.
.
.
.
.
.
.
.
.
.
.
.
.
.
.
.
.
.
.
.
.
.
.
.
.
.
.
.
.
.
.
.
.
.
.
.
.
.
.
.
.
.
.
.
.
.
.
.
.
.
.
.
.
.
.
.
.
.
.
.
.
.
.
.
.
.
.
.
.
.
.
.
.
.
.
.
.
.
.
.
.
.
.
.
.
.
.
.
.
.
.
.
.
.
.
.
.
.
.
.
.
.
.
9710 System Assurance Guide
.
.
.
.
.
.
.
.
.
.
.
.
.
.
.
.
.
.
.
.
.
.
.
.
.
.
.
.
.
.
.
.
.
.
.
.
.
.
.
.
.
.
.
.
.
.
.
.
.
.
.
.
.
.
.
.
.
.
.
.
.
.
.
.
.
.
.
.
.
.
.
.
.
.
.
.
.
.
.
.
.
.
.
.
.
.
.
.
.
.
.
.
.
.
.
.
.
.
.
.
.
.
.
.
.
.
.
.
.
.
4-1
4-1
4-2
4-4
4-8
MR0012J
Contents
PDU Power Cables . . . . . . . . . . . . . . . . . . . . . . . . .
Serial Cables, 9710 to Host . . . . . . . . . . . . . . . . . . . .
SCSI Cabling . . . . . . . . . . . . . . . . . . . . . . . . . . . . . .
Cable Restriction . . . . . . . . . . . . . . . . . . . . . . . .
Cable Length Subtraction . . . . . . . . . . . . . . . . . .
9710 to Host . . . . . . . . . . . . . . . . . . . . . . . . . . .
Daisy Chain . . . . . . . . . . . . . . . . . . . . . . . . . . . .
Daisy Chain Terminators . . . . . . . . . . . . . . . . . .
PRS Card . . . . . . . . . . . . . . . . . . . . . . . . . . . . . .
Robotics Control, Internal . . . . . . . . . . . . . . . . . .
AS/400 Data Path . . . . . . . . . . . . . . . . . . . . . . . .
Sun Sparc Workstation . . . . . . . . . . . . . . . . . . .
RS/6000, Bull DPX/20 . . . . . . . . . . . . . . . . . . . .
SCSI Adapters . . . . . . . . . . . . . . . . . . . . . . . . . .
Single-Ended Narrow or Fast/Narrow to Wide . . .
High Density 68-68 Pin Standard Jackscrew . . . .
AS/400 Serial Cables . . . . . . . . . . . . . . . . . . . . .
Sequent Cables . . . . . . . . . . . . . . . . . . . . . . . . .
FIPS Cabling . . . . . . . . . . . . . . . . . . . . . . . . . . . . . .
FIPS Cables . . . . . . . . . . . . . . . . . . . . . . . . . . . .
FIPS Terminators . . . . . . . . . . . . . . . . . . . . . . . .
FIPS Drive to I/O . . . . . . . . . . . . . . . . . . . . . . . .
Modem Cables . . . . . . . . . . . . . . . . . . . . . . . . . . . .
Cartridge Tapes and Labels . . . . . . . . . . . . . . . . . . .
..........
..........
..........
..........
..........
..........
..........
..........
..........
..........
..........
..........
..........
..........
..........
..........
..........
..........
..........
..........
..........
..........
..........
..........
..........
..........
..........
..........
..........
..........
..........
..........
..........
..........
..........
..........
..........
..........
..........
..........
..........
..........
..........
..........
..........
..........
..........
..........
....
....
....
....
....
....
....
....
....
....
....
....
....
....
....
....
....
....
....
....
....
....
....
....
. 4-9
. 4-9
4-11
4-11
4-13
4-15
4-16
4-16
4-17
4-18
4-19
4-20
4-21
4-22
4-22
4-22
4-23
4-23
4-24
4-24
4-26
4-26
4-27
4-28
5: Pre-installation Checklist . . . . . . . . . . . . . . . . . . . . . . . . . . . . . . 5-1
Fire Suppression System . . . . . . . . . . . . . . . . . . . . . . . . . . . . . . . . . . . . . . . . . . . . . . 5-2
Hardware Support Services . . . . . . . . . . . . . . . . . . . . . . . . . . . . . . . . . . . . . . . . . . . . 5-2
A: Site Planning Information . . . . . . . . . . . . . . . . . . . . . . . . . . . . . A-1
Index . . . . . . . . . . . . . . . . . . . . . . . . . . . . . . . . . . . . . . . . . . . . . Index-1
Reader’s Comment Form
MR0012J
9710 System Assurance Guide
vii
Figures
Figure
Figure
Figure
Figure
Figure
Figure
Figure
Figure
Figure
Figure
Figure
Figure
Figure
Figure
Figure
Figure
Figure
Figure
viii
1-1. The System Assurance Overview . . . . . . . . . . . . . . . . . . . . . . . . . . . . . . . . . . 1-1
1-2. The System Assurance Process Flow . . . . . . . . . . . . . . . . . . . . . . . . . . . . . . . . 1-4
3-1. 9710 LSM with Expansion Door . . . . . . . . . . . . . . . . . . . . . . . . . . . . . . . . . . . 3-1
3-2. Direct Connection for AS/400 Control . . . . . . . . . . . . . . . . . . . . . . . . . . . . . . . 3-4
3-3. Client Configuration (Indirect Connection) with AS/400 . . . . . . . . . . . . . . . . . . 3-5
3-4. SCSI Direct Connection (Open Systems) with Common Bus . . . . . . . . . . . . . . . 3-6
3-5. Host-Indirect Connection . . . . . . . . . . . . . . . . . . . . . . . . . . . . . . . . . . . . . . . . 3-7
3-6. Subsystem Generic Software Types . . . . . . . . . . . . . . . . . . . . . . . . . . . . . . . . . 3-8
3-7. 9710 I/O Panel (Showing FIPS) . . . . . . . . . . . . . . . . . . . . . . . . . . . . . . . . . . . 3-11
3-8. 9710 I/O Panel (Showing Fibre Channel) . . . . . . . . . . . . . . . . . . . . . . . . . . . 3-12
4-1. 9710 Model/Feature Selections . . . . . . . . . . . . . . . . . . . . . . . . . . . . . . . . . . . . 4-3
4-2. DLT8000 Model and Feature Selections . . . . . . . . . . . . . . . . . . . . . . . . . . . . . . 4-5
4-3. DLT7000 Feature Selections . . . . . . . . . . . . . . . . . . . . . . . . . . . . . . . . . . . . . . 4-6
4-4. DLT4000 Feature Selections . . . . . . . . . . . . . . . . . . . . . . . . . . . . . . . . . . . . . . 4-7
4-5. 4890 Drive Feature Selections . . . . . . . . . . . . . . . . . . . . . . . . . . . . . . . . . . . . . 4-8
4-6. SCSI Connector Types . . . . . . . . . . . . . . . . . . . . . . . . . . . . . . . . . . . . . . . . . 4-12
4-7. FIPS AS/400 Cabling Configurations . . . . . . . . . . . . . . . . . . . . . . . . . . . . . . . 4-24
A-1. 9710 Layout and Floor Space Requirements . . . . . . . . . . . . . . . . . . . . . . . . . . A-3
9710 System Assurance Guide
MR0012J
Tables
Table 1-1. Team Member Responsibilities . . . . . . . . . . . . . . . . . . . . . . . . . . . . . . . . . . . . . 1-2
Table 4-1. PDU Cables . . . . . . . . . . . . . . . . . . . . . . . . . . . . . . . . . . . . . . . . . . . . . . . . . . 4-9
Table 4-2. Serial Cables, 9710 to Host . . . . . . . . . . . . . . . . . . . . . . . . . . . . . . . . . . . . . . . 4-10
Table 4-3. SCSI Cable Restriction . . . . . . . . . . . . . . . . . . . . . . . . . . . . . . . . . . . . . . . . . . 4-11
Table 4-4. SCSI Cable Length Subtraction . . . . . . . . . . . . . . . . . . . . . . . . . . . . . . . . . . . . 4-13
Table 4-5. SCSI Cables 9710 to Host . . . . . . . . . . . . . . . . . . . . . . . . . . . . . . . . . . . . . . . . 4-15
Table 4-6. Specialized Daisy Chain Cables . . . . . . . . . . . . . . . . . . . . . . . . . . . . . . . . . . . 4-16
Table 4-7. Daisy Chain Terminators . . . . . . . . . . . . . . . . . . . . . . . . . . . . . . . . . . . . . . . . 4-16
Table 4-8. PRS Card Cables . . . . . . . . . . . . . . . . . . . . . . . . . . . . . . . . . . . . . . . . . . . . . . 4-17
Table 4-9. Robotics Control Cables, Internal . . . . . . . . . . . . . . . . . . . . . . . . . . . . . . . . . . 4-18
Table 4-10. SCSI Cables and Adapters for AS/400 Path . . . . . . . . . . . . . . . . . . . . . . . . . . 4-19
Table 4-11. SCSI Cables and Adapters for Sun Sparc Workstation . . . . . . . . . . . . . . . . . . . 4-20
Table 4-12. SCSI Cables and Adapters for RS/6000 and Bull DPX/20 . . . . . . . . . . . . . . . . 4-21
Table 4-13. Adapters, SCSI . . . . . . . . . . . . . . . . . . . . . . . . . . . . . . . . . . . . . . . . . . . . . . . 4-22
Table 4-14. Single-Ended Narrow or Fast/Narrow to Wide SCSI . . . . . . . . . . . . . . . . . . . . 4-22
Table 4-15. High Density 68-68 Pin Jackscrew SCSI . . . . . . . . . . . . . . . . . . . . . . . . . . . . . 4-22
Table 4-16. AS/400 Serial Cables . . . . . . . . . . . . . . . . . . . . . . . . . . . . . . . . . . . . . . . . . . 4-23
Table 4-17. Sequent Cables . . . . . . . . . . . . . . . . . . . . . . . . . . . . . . . . . . . . . . . . . . . . . . 4-23
Table 4-18. FIPS Cables . . . . . . . . . . . . . . . . . . . . . . . . . . . . . . . . . . . . . . . . . . . . . . . . . 4-25
Table 4-19. FIPS Terminators . . . . . . . . . . . . . . . . . . . . . . . . . . . . . . . . . . . . . . . . . . . . . 4-26
Table 4-20. FIPS Cables . . . . . . . . . . . . . . . . . . . . . . . . . . . . . . . . . . . . . . . . . . . . . . . . . 4-26
Table 4-21. Modem Cables . . . . . . . . . . . . . . . . . . . . . . . . . . . . . . . . . . . . . . . . . . . . . . 4-27
Table 4-22. Remote Diagnostic Support for PC Use . . . . . . . . . . . . . . . . . . . . . . . . . . . . . 4-27
Table 4-23. In-Country Media Supply Services . . . . . . . . . . . . . . . . . . . . . . . . . . . . . . . . 4-28
Table 5-1. Pre-installation Checklist . . . . . . . . . . . . . . . . . . . . . . . . . . . . . . . . . . . . . . . . . 5-1
Table 5-2. Remote Support Hardware and Cables . . . . . . . . . . . . . . . . . . . . . . . . . . . . . . . 5-2
Table A-1. 9710 Dimensions and Weights . . . . . . . . . . . . . . . . . . . . . . . . . . . . . . . . . . . . A-1
Table A-2. LSM Power Specifications . . . . . . . . . . . . . . . . . . . . . . . . . . . . . . . . . . . . . . . . A-1
Table A-3. Optional Power Distribution Unit (PDU) Specifications . . . . . . . . . . . . . . . . . . A-2
Table A-4. LSM Environmental Specifications. . . . . . . . . . . . . . . . . . . . . . . . . . . . . . . . . . A-2
Table A-5. Power Characteristics . . . . . . . . . . . . . . . . . . . . . . . . . . . . . . . . . . . . . . . . . . A-4
MR0012J
9710 System Assurance Guide
ix
Tables
This page intentionally left blank.
x
9710 System Assurance Guide
MR0012J
Preface
This guide contains information about planning, ordering, installing, and
follow-up activities required during StorageTek TimberWolf 9710 Library
Storage Module sales, delivery, and installation.
The audience for this guide includes StorageTek marketing representatives,
solutions delivery systems specialists (SDSSs), ssolutions delivery installation
consultants (SDICs), solutions delivery engineers (SDEs), independent
consultants, service representatives, and customers involved with installation
planning.
■ How to Use This Guide
This guide provides a series of worksheets and checklists that, when completed
properly, ensure that no aspect of the installation process has been overlooked.
This promotes error-free installation and customer satisfaction. Use only those
checklists that are applicable to your system. However, certain worksheets
(noted below) must be completed for the product to be shipped. Refer to
Chapter 4 for more information.
Note: If the following worksheets are not completed and sent to Orders
Administration, the product will not be shipped.
•
•
•
Library Configuration Worksheet
Site Survey
Product Checklist
■ How This Guide is Organized
This guide contains the following information:
MR0012J
Chapter 1
“The System Assurance Process” provides detailed information
useful for understanding the System Assurance process.
Chapter 2
“Key Personnel” provides a worksheet for recording names and
phone numbers of the key personnel on the system assurance
teams.
Chapter 3
“Product Overview” provides an overview of the LSM, drive
configurations, and interfaces
Chapter 4
“Ordering the Equipment” contains worksheets to complete
when ordering the 9710 Library
9710 System Assurance Guide
xi
Preface
Chapter 5
“Pre-installation Checklist” provides checklists to ensure no
unresolved issues exist at installation.
Appendix A “Site Planning Information” provides LSM specifications and
floor space layout.
Index
The Index assists in locating information in this publication.
■ Trademarks
StorageTek is a trademark of Storage Technology Corporation. Other features
and terms used in this publication are for informational purposes only and
might be trademarks of Storage Technology Corporation or other companies.
■ Conventions
Typographical conventions highlight special words, phrases, and actions used
in this publication.
Item
Example
Description
Button
MENU
Physical buttons or switches, onscreen
buttons, and softkeys appear in Helvetica font
and in all capital letters.
Emphasized
text
not or must
Important or emphasized words and phrases
appear in italics.
Filenames
dictionary.txt
Filenames appear in Courier font.
Indicators/
LEDs
Open
Indicators and LEDs appear with initial
capital letters and in italics.
Keyboard keys [Y],
Keyboard keys appear within brackets, in
Helvetica font, with initial capital letters or as
the key appears on the keyboard.
[Enter] or
[Ctrl+Alt+Delete]
Screen
captures or
messages
downloading
Screen captures or messages appear in
Courier font.
Parameters or
input
Device = xx
Names of variables that require values
assigned appear in italics.
Pathnames
P:\Printshp\Pubs or
home/gandalf/litdist
Pathnames appear in Courier font.
Positions for
switches,
jumpers, and
circuit
breakers
ON
Switch, jumper, and circuit breaker positions
appear in default font and all capital letters.
xii
9710 System Assurance Guide
MR0012J
Preface
Item
Example
Description
URLs and
www.stortek.com/techpubs
hypertext links
Universal Resource Locator (URL) and
hypertext links appear in blue text and
underlined.
■ Related Publications
Additional information is contained in the following publications:
9710 Publication
Part Number
9710 Library Storage Module Installation Manual
9640
Quantum™ DLT Publications
DLT4000 Cartridge Subsystem Product Manual
Part Number
313127601
(StorageTek)
81-60043-0x
(Quantum)
DLT7000 Tape Drive Product Manual
313134501
(StorageTek)
81-60000-0x
DLT8000 Tape Drive Product Manual
81-60118-0x
(Quantum)
9840 Publications
9840 Tape Drive System Assurance Guide
9840 Tape Drive Installation Manual
Part Number
MT 5003
95879
4890 Publications
4890 Maintenance Manual
4890 Product Manual
Part Number
9512952900
9512941000
■ Obtaining Information
You may have access to the following additional sources of information.
Customer Resource Center
StorageTek’s Customer Resource Center (CRC) is an online service that provides
technical information such as software publications, user documentation,
maintenance fixes, and answers to frequently asked questions. The CRC is for
MR0012J
9710 System Assurance Guide
xiii
Preface
StorageTek employees and for contract customers and partners with a login and
password.
The location of the CRC is http://www.support.storagetek.com
Documents on CD
Documents on CD is a compact disc that contains portable document format
(PDF) files of StorageTek’s tape, library, and OPENstorage disk publications.
This CD is for StorageTek employees only. Contact the Logistics Depot to order
the CD or get onto the distribution list.
Electronic Document Center
StorageTek’s Electronic Document Center (EDC) is an online service that
provides links to technical publications about StorageTek products, pre-sales
planning, and strategic tools. The EDC is for StorageTek employees only.
The location of the EDC is http://gandalf.stortek.com/dynaweb/prod
KnowledgeMap
StorageTek’s KnowledgeMap is an online service that provides product
information, general resources, white papers, and answers to frequently asked
questions. It also contains information about networks, platforms, and sales
support. The KnowledgeMap is for StorageTek employees and distributors.
The location of the KnowledgeMap is http://wwfokm.stortek.com/
Partners Page
StorageTek’s Partners Page is an online service that provides information about
events, education, products, and connectivity. The Partners Page is for
StorageTek employees and partners with a login and password.
The location of the Partners Page is http://www.storagetek.com/Partners/
StorageTek Storefront
The Storefront is StorageTek’s external web site. The Storefront provides
information about topics such as news bulletins, products, services, integrated
solutions, customer support, and upcoming events. The storefront is accessible
to all persons with a web browser.
The location of the Storefront is http://www.storagetek.com
xiv
9710 System Assurance Guide
MR0012J
Preface
■ Comments and Suggestions
A Reader’s Comment Form at the back of this publication is for communicating
suggestions or requests for change. We encourage and appreciate reader
feedback.
■ Education
The following paragraphs describe how to locate the training available for the
9710 Library.
If you have questions about registering for courses (including tuition and
schedules), call the registrar at 303-673-6262.
Consult the current Corporate Education Course Catalog or view EDUCATION
announcements on the intranet using Netscape for the latest offerings and
schedules.
StorageTek employees should follow these steps to register:
1. Start Netscape.
2. Type the following URL: http://intwww.stortek.com
3. At the right side of the screen click on alphabetical.
4. Click on W for Workforce Development.
5. Scroll down and click on Workforce Development Home Page.
This takes you to the StorageTek Workforce Development web page. Make your
selections from here.
MR0012J
9710 System Assurance Guide
xv
Preface
This page intentionally left blank.
xvi
9710 System Assurance Guide
MR0012J
The System Assurance Process
1
Figure 1-1 shows the system assurance overview. The system assurance team
members appear across the top of the figure. The process is the exchange of
information among the team members to ensure that no aspects of the sale,
ordering, and installation are overlooked. This promotes an error-free
installation and contributes to customer satisfaction.
Figure 1-1. The System Assurance Overview
MR0012J
9710 System Assurance Guide
1-1
System Assurance Team
■ System Assurance Team Responsibilities
Table 1-1 lists the responsibilities of the system assurance team members. The
team ensures that all aspects of the process are planned carefully and carried
out efficiently. Customer and StorageTek team members jointly own and control
the process.
Table 1-1. Team Member Responsibilities
Team Member
Responsibilities
Solutions Delivery Installation
Consultant (SDIC)
(United States)
•
Leads the system assurance team in most cases.
•
Coordinates the system assurance process and
oversees the use and implementation of this guide.
•
Schedules meetings between team members.
•
Supplies or obtains all necessary support
documentation.
•
Works with the customer to complete the following
worksheets:
•
Key personnel (Chapter 2)
•
Hardware configuration (Chapter 4)
•
Site survey (Chapter 4)
•
Receiving dock information (Chapter 5)
•
Inside delivery information (Chapter 5)
•
Access and administrative issues (Chapter 5)
•
Faxes all of the required and completed work
sheets (except the sales entry form) to the
appropriate orders offices. See Chapter 4.
•
Works with the solutions delivery engineer (SDE)
and the customer to provide delivery information
as listed in “Solutions delivery engineer”
responsibilities in this table.
•
Leads the system assurance team in some cases.
•
Is responsible for the customer account.
•
Faxes the sales entry form to the Shared Services
Center.
•
Follows up with the customer to ensure customer
satisfaction.
Solutions Delivery Manager (SDM)
(international)
Marketing representative
(United States)
1-2
9710 System Assurance Guide
MR0012J
System Assurance Team
Table 1-1. Team Member Responsibilities (Continued)
Team Member
Responsibilities
Solutions Delivery Engineer (SDE)
•
Prepares customer service support procedures.
•
Explains available levels of hardware support and
criteria for problem escalation.
•
Installs the product at the customer site.
•
Works with the solutions delivery installation
consultant (SDIC) at the system assurance planning
meetings to provide the data for the worksheets
listed for the SDIC.
•
Works with the solutions delivery systems
specialist (SDSS) at the system assurance planning
meetings to provide the data for the worksheet
listed for the SE.
•
Names a contact person for any unresolved issues
in the above worksheets.
•
Discusses the schedule and names a contact per
son for all scheduling matters.
•
Explains available levels of software support and
criteria for problem escalation.
•
Works with the customer to complete the work
sheet.
•
Provides data migration information.
Customer
Solutions Delivery Systems
Specialist (SDSS)
MR0012J
9710 System Assurance Guide
1-3
The System Assurance Flowchart
■ The System Assurance Flowchart
Figure 1-2 shows the system assurance process flow. The following pages
describe the steps in more detail.
No two installations are the same; however, following this flowchart promotes a
smooth system assurance process and an error-free installation.
Figure 1-2. The System Assurance Process Flow
1-4
9710 System Assurance Guide
MR0012J
The System Assurance Flowchart
Proposal Acceptance
The system assurance process begins when the customer accepts the proposal.
At this time, the solutions delivery installation consultant (in the United States)
or the solutions delivery manager (internationally) schedules one or more
system assurance planning meetings.
System Assurance Planning Meetings
The purpose of the system assurance planning meetings is to:
•
Explain system assurance as it applies to the 9710 Library
•
Establish the system assurance team
•
Establish the responsibilities of the team members
•
Establish the schedule for the system assurance process
•
Define hardware and software requirements
•
Complete the configuration worksheets, order worksheets, and other
required worksheets (Chapter 4)
•
Set the dates and times for one or more system assurance review meetings
Order Placement
Depending on the customer, the appointed team member must now either:
•
Fax the completed worksheets to Orders Management (OM), or
•
Transfer information from the completed worksheets to the sales entry form
and fax the sales entry form to the Shared Services Center (SSC)
See Chapter 4 for which of the above options and fax numbers to use.
Sales Entry Form or Order Worksheet Check
If the sales entry form or order worksheets are complete and correct, OM or
SSC approves the order and assigns a ship date. If they are not correct, OM or
SSC contacts the system assurance team for more information.
System Assurance Review Meetings
The purpose of the system assurance review meetings is to:
•
•
MR0012J
Complete the pre-installation checklists (Chapter 5)
Identify additional requirements
9710 System Assurance Guide
1-5
Schedule Planning
Preinstallation Checklist Error Check
If the preinstallation checklists are complete and correct, the sale is approved
and the product is shipped. If they are not correct, the system assurance team
completes or corrects them.
Installation
The SDE installs the 9710 Library at the customer’s site.
Post-installation Follow-up
The following actions follow up the installation:
•
The Error-Free Delivery Team tracks any exceptions to the original
shipment.
•
The system assurance team leader completes the reader's comment form at
the back of this guide or online to submit any comments on this guide.
Refer to the end of the “How This Guide is Organized” on page xi for the
fax number, address, and URL.
•
The SDE logs installation data into the Customer Services Data Collection
(CSDC) system.
•
The SDE attends a follow-up meeting with the customer to review the
completed project.
■ Schedule Planning
When schedule planning is completed, attach a copy of the proposed schedule
to this guide, and have the system assurance team members sign below.
StorageTek Representative (date)
Customer Representative (date)
1-6
9710 System Assurance Guide
MR0012J
Key Personnel
2
This chapter enables you to record the names and phone numbers of the key
personnel on the teams. The home phone number is optional.
■ Customer Team
List names and telephone numbers of the following people:
CPU Hardware Contact
___________________________________________________________
Phone
office:________________ home:________________
Operating Systems Software Contact
___________________________________________________________
Phone
office:________________ home:________________
Communication Hardware Contact
___________________________________________________________
Phone
office:________________ home:________________
Operations Contact
___________________________________________________________
Phone
office:________________ home:________________
Delivery Contact
___________________________________________________________
Phone
MR0012J
office:________________ home:________________
9710 System Assurance Guide
2-1
StorageTek Team
■ StorageTek Team
List names and telephone numbers of the following people:
Marketing Representative
___________________________________________________________
Phone
office:________________ home:________________
Solutions Delivery Systems Specialist
___________________________________________________________
Phone
office:________________ home:________________
Solutions Delivery Engineer
___________________________________________________________
Phone
office:________________ home:________________
SDE room on site:
Solutions Delivery Installation Consultant
___________________________________________________________
Phone
2-2
office:________________ home:________________
9710 System Assurance Guide
MR0012J
StorageTek Hardware and Software
■ StorageTek Hardware and Software Support
StorageTek provides the following phone numbers for hardware and software
support:
Call Center (Hardware)
U.S.-Colorado
U.S.-Outside Colorado (Customers)
U.S.-Outside Colorado (SDEs)
Software Support
U.S.-Outside Colorado
U.S.-Colorado
1.303.673.4056
1.800.525.0369
1.800.735.2778
1.800.678.4430
1.303.673.4430
■ Client Processor(s) Teams
List names and telephone numbers of the following CPU vendor people:
Hardware Contacts
_____________________________________________________________
Phone
office:________________ home:________________
_____________________________________________________________
Phone
office:________________ home:________________
_____________________________________________________________
Phone
office:________________ home:________________
Software Contacts
_____________________________________________________________
Phone
office:________________ home:________________
_____________________________________________________________
Phone
office:________________ home:________________
_____________________________________________________________
Phone
MR0012J
office:________________ home:________________
9710 System Assurance Guide
2-3
Channel Partner Team
■ Channel Partner Team
List names and telephone numbers of the following people:
Marketing Representative
___________________________________________________________
Phone
office:________________ home:________________
Solutions Delivery Systems Specialist
___________________________________________________________
Phone
office:________________ home:________________
Solutions Delivery Engineer
___________________________________________________________
Phone
office:________________ home:________________
SDE room on site:
Solutions Delivery Installation Consultant
___________________________________________________________
Phone
2-4
office:________________ home:________________
9710 System Assurance Guide
MR0012J
Product Overview
3
This chapter provides an overview of the LSM, drive configurations, and
interfaces.
The 9710 library consists of:
•
An LSM that stores 224 to 588 tape cartridges
•
A cartridge access port (CAP) that stores up to 14 cartridges
•
9840, Digital Linear Tape (DLT), or 4890 drives installed behind the LSM
right, front door.
Figure 3-1. 9710 LSM with Expansion Door
C60485
MR0012J
9710 System Assurance Guide
3-1
Drive Configurations
■ Drive Configurations
The LSM is shipped standard with no drive plates and with two 14-pack arrays
above the drive wall (Panel 2). If fewer than four drives are ordered, two 14pack arrays are installed above the three drives. If fewer than seven drives are
ordered, one 14-pack array is installed above the six drives.
If the LSM is to contain more than six drives, you must also install the optional
power distribution unit (PDU) and the PRM logic card.
CAUTION:
You may not install 9840 drives and 4890 drives within the same LSM.
Follow these rules for the cartridge drives, their associated arrays, and the
cartridges used in the drives:
•
•
•
•
Install drives from bottom to top.
Allow no empty drive slots between installed drives.
If fewer than six drives are installed, install the optional arrays on Panel 2.
Do not use DATA D3 (helical recording) cartridges.
When mixing 4890 and DLT drives within the same LSM:
•
•
No more than six 4890 drives may be installed
The DLT drives must be installed above the 4890 drives.
When installing only DLT drives:
•
A maximum of 10 drives may be installed per LSM.
When mixing 9840 and DLT drives within the same LSM:
•
•
•
No more than six DLT drives may be installed
The DLT drives must be installed above the 9840 drives.
You may mix SCSI and Fibre Channel drives.
When installing only 9840 drives:
•
•
A maximum of 10 drives may be installed per LSM.
You may mix SCSI and Fibre Channel drives.
■ Power Distribution Unit (PDU)
The standard 9710 can support up to 10 drives, but has power connections for
only six drives. When you order the 9710 mounting hardware kits for more than
six drives, you must also order the PDU. The PDU gives you power connections
for four additional drives.
The PDU is a pass-through AC connector box with a power drop cable at one
end and receptacles for four drives at the other end. The box is mounted in the
9710, but must be connected to a separate customer power drop. The
international version comes without a cable plug, and cable leads are stripped.
3-2
9710 System Assurance Guide
MR0012J
Host Interfaces
The PRM card is shipped with the PDU, even though it is not part of the PDU.
The card is mounted in the 9710 to provide data communication paths for the
additional drives.
■ Host Interfaces
The LSM provides two host ports for AS/400 direct connections. Two internal
LSM cables are supplied for this configuration (see Figure 3-2 on page 3-4).
Other configurations with the AS/400 might include a RISC/6000 server (see
Figure 3-3 on page 3-5). Direct connections in non-AS/400 (open systems)
configurations are also supported (see Figure 3-4 on page 3-6).
For host indirect connections to the LSM, a server [Unix-based, using Automated
Cartridge Server Library (ACSLS) software or a RISC System/6000, using the
Advanced Interactive Executive (AIX) operating system] is connected between
the host and the LSM. An example of an indirect connection is an LSM hooked
to a Unix server, with the server connected to an Ethernet LAN network. A
cable is run from the Ethernet LAN to the host (see Figure 3-5 on page 3-7).
The connection from the server to the LSM is a SCSI Type-3 68-pin cable. The
server may have its own control-side path (through a connection on the
optional PRS circuit card), or may be daisy-chained to a shared data bus with
one or more drives.
Figure 3-6 on page 3-8 shows the generic software requirements for the
subsystems in either a direct connection or an indirect connection to the LSM.
MR0012J
9710 System Assurance Guide
3-3
Host Interfaces
Figure 3-2. Direct Connection for AS/400 Control
3-4
9710 System Assurance Guide
MR0012J
Host Interfaces
Figure 3-3. Client Configuration (Indirect Connection) with AS/400
MR0012J
9710 System Assurance Guide
3-5
Host Interfaces
Figure 3-4. SCSI Direct Connection (Open Systems) with Common Bus
3-6
9710 System Assurance Guide
MR0012J
Host Interfaces
Figure 3-5. Host-Indirect Connection
MR0012J
9710 System Assurance Guide
3-7
Host Interfaces
Figure 3-6. Subsystem Generic Software Types
3-8
9710 System Assurance Guide
MR0012J
Data Interfaces
■ Data Interfaces
Refer to the 9840 Tape Drive System Assurance Guide, MT 5003, for 9840 data
interface information.
The LSM has three data interfaces available:
•
•
•
Small Computer System Interface (SCSI) for all drives
Federal Information Processing Standard (FIPS) interface for 4890s
Fibre Channel for 9840s
4890 Data Buses
You may order FIPS bus drives, SCSI bus drives, or both. FIPS and SCSI are not
available on the same drive.
Two FIPS data bus terminal blocks are present on a drive. Each bus in this
definition includes the Data In, Data Out, Tag In, and Tag Out lines. You can
use the two terminals for two data buses, use only one terminal block and
terminate the other, or use the second terminal block for daisy chaining.
Note: The AS/400 I/O port does not allow daisy chaining of the 4890 Drives.
Each SCSI drive has two SCSI data bus connectors. You may use only one SCSI
data bus input per drive. The other connector must be terminated, or it can be
used for daisy chaining in a non-AS/400 environment, but it cannot be used for
a second data bus.
DLT Data Buses
Each DLT has two SCSI data bus connectors. You can use only one SCSI data
bus input per drive. The other connector must be terminated, or it can be used
for daisy chaining, but it cannot be used for a second data bus.
■ I/O Cabling Limits
Examine Figure 3-7 on page 3-11 and Figure 3-8 on page 3-12 while you read
the following discussion.
Only one SCSI control line can exist. The other SCSI port, on both the SCSI card
and the I/O tower, is reserved for daisy chaining; it should be terminated on the
SCSI control interface card.
Two RS423/RS232 control lines can exist on the I/O tower. Each control may be
connected to a separate AS/400.
Six FIPS data buses can exist on the I/O tower. Each bus in this definition
includes the Data In, Data Out, Tag In, and Tag Out lines. If you are using twobus FIPS drives, each connected at the I/O tower to two FIPS buses, then no
MR0012J
9710 System Assurance Guide
3-9
RS423
more than three FIPS drives can exist in the 9710. The remaining available drive
slots can be used by SCSI drives.
Twenty SCSI data buses can exist on the I/O tower: 10 in and 10 out.
Twenty Fibre Channel data buses can exist on the I/O tower (with 9840 drives
only): 10 in and 10 out.
The 3270 ports on the I/O tower currently are not used.
■ RS423
The 9710 uses RS423 electronics in its control interface, rather than RS232. The
RS423 and RS232 protocols are the same, but the RS423 electronics can drive a
signal to greater distances.
The maximum RS423 cable length is 60 m (200 ft).
■ SCSI Library Robotic Interface
The fast/narrow interface is single-ended or differential, and supports up to
eight devices including the host.
The fast/wide interface is differential only, and supports up to 16 devices
including the host.
Both interfaces are provided with the fast/wide 68-pin connector.
3-10
9710 System Assurance Guide
MR0012J
SCSI Library Robotic Interface
Figure 3-7. 9710 I/O Panel (Showing FIPS)
Note: The 3270 control interface ports shown in Figure 3-7 on page 3-11 are
not presently used. One of the two SCSI control interface ports is used
for the control line; the other is reserved for daisy chaining.
MR0012J
9710 System Assurance Guide
3-11
SCSI Library Robotic Interface
Figure 3-8. 9710 I/O Panel (Showing Fibre Channel)
Note: The 3270 control interface ports shown in Figure 3-8 on page 3-12 are
not presently used. One of the two SCSI control interface ports is used
for the control line; the other is reserved for daisy chaining.
3-12
9710 System Assurance Guide
MR0012J
Ordering the Equipment
4
This chapter provides the worksheets to use when ordering the 9710 LSM.
■ The Ordering Process
To order a 9710 LSM:
1. Make photocopies of the blank worksheets provided in this guide.
2. Obtain other required worksheets not provided in this guide.
3. Review the customer’s existing hardware and software.
4. Select the correct equipment and configuration for the customer’s needs.
5. Enter the information on the worksheets.
6. Review the items with the customer.
7. If necessary, transfer the appropriate information from the order worksheets
to a sales entry form.
8. Fax the order worksheets or sales entry form to the appropriate orders
department.
■ Fax Numbers and Addresses
The orders department, the fax number, and the documents to fax depend on
the customer. The department addresses and voice phone numbers are for your
information.
Domestic customers, value-added distributors (VADs), and value-added
resellers (VARs) must:
1. Transfer the information from the hardware order worksheet and the cables
order worksheet to a sales entry form.
You are encouraged to use the software tool Galileo to identify a valid
configuration, generate an accurate quote, and produce an error-free sales
entry form.
2. Fax the following forms to Atlanta Shared Services Center:
•
MR0012J
Sales entry form
9710 System Assurance Guide
4-1
Hardware Order Worksheets
•
•
•
Library configuration worksheet
Site survey
Product checklist
Atlanta Shared Services Center
Fax: 1-678-969-4015, 4016, or 4017
5390 Triangle Parkway, Suite 300
Norcross, GA 30092
Voice: 1-678-969-4000 or 1-800-903-7278 (toll-free in the U.S. only)
Original equipment manufacturers (OEMs), distributors, and
subsidiaries in Canada, Japan, Australia, South Asia, and Mexico must fax
the following forms to Orders Management:
•
•
•
Hardware order worksheet
Cables order worksheet
Site survey
Orders Management
Fax: 1-303-673-2640 for distributors or subsidiaries
Fax: 1-303-673-7654 for OEM
One StorageTek Drive
Louisville, CO 80028-4350
Voice: 1-303-673-5513
■ Hardware Order Worksheets
Use the following paragraphs and worksheets to plan your order.
For 9840 Drive information, refer to 9840 Tape Drive System Assurance Guide,
MT 5003.
CAUTION:
You may not install 9840 drives and 4890 drives within the same LSM.
4-2
9710 System Assurance Guide
MR0012J
Hardware Order Worksheets
Figure 4-1. 9710 Model/Feature Selections
Note: Both feature codes 1603 and 2016 include two serial ports and do not
include a SCSI card.
MR0012J
9710 System Assurance Guide
4-3
Hardware Order Worksheets
DLT Drives
Figure 4-2 on page 4-5 lists the DLT8000 model and feature number. Figure 4-3
on page 4-6 and Figure 4-4 on page 4-7 list the DLT7000 and DLT4000 feature
numbers. The drives will ship with either a SCSI Fast/Narrow Differential
interface or a SCSI Fast/Narrow Single-Ended interface. You will need SCSI Fast/
Wide 68-pin connectors to connect to the differential drives.
Note: The DLT8000 is only available with a differential interface.
Each kit contains one DLT drive, differential terminator, slides, drive mounting
tray, drive actuator mechanism, drive chassis, DLT power supply, cooling,
hardware to mount the drive to the tray, and the drive power cord.
Note: If more than six drives are ordered, the customer must order the PDU.
The PDU feature code includes the PDU, the appropriate power cord,
the PRM card, and an additional drive-to-LSM interface cable.
4-4
9710 System Assurance Guide
MR0012J
Hardware Order Worksheets
Figure 4-2. DLT8000 Model and Feature Selections
MR0012J
9710 System Assurance Guide
4-5
Hardware Order Worksheets
Figure 4-3. DLT7000 Feature Selections
4-6
9710 System Assurance Guide
MR0012J
Hardware Order Worksheets
Figure 4-4. DLT4000 Feature Selections
MR0012J
9710 System Assurance Guide
4-7
Hardware Order Worksheets
4890 Drives
Figure 4-5 lists the 4890 drive feature numbers.
Figure 4-5. 4890 Drive Feature Selections
CAUTION:
You may not install 9840 drives and 4890 drives within the same LSM.
4-8
9710 System Assurance Guide
MR0012J
PDU Power Cables
■ PDU Power Cables
The PDU power cables are included when you order the PDU feature code.
They are listed below in case you still want to order them separately.
Table 4-1. PDU Cables
Description
Part Number
Quantity
❑
Cable assembly, international, 200–240 V, 10 A, 3 m
(10 ft), 2-wire and ground.
For main PDU
411063801
________
❑
Cable assembly, international, 200–240 V, 10 A, 2.4 m
(8 ft), harmonized cord 1.5 mm2, EuroPlug.
For optional PDU
10083241
________
❑
Cable assembly, South Korea, 100–127 V, VCTF cord
3 x 1.25 mm2, KSC 8305 plug.
For optional PDU
10083657
________
❑
Cable assembly, domestic, twisted lock, 200–240 V,
20 A, 2.5 m (8.2 ft), 14 AWG SJT cord.
For main PDU
10083638
________
❑
Cable assembly, domestic, twisted lock 200–240 V,
15 A, 2.5 m (8.2 ft), 16 AWG SJT cord.
For optional PDU
10083639
________
❑
Cable assembly, domestic, 100–127 V, 20 A, 3 m
(10 ft), 14 AWG SJT cord, NEMA 5-20P (IEC 320 plug).
For main PDU
310287201
________
❑
Cable assembly, domestic, 100–127 V, 15 A, 2 m (7 ft),
16 AWG SJT cord, NEMA 5-15P (IEC 320 plug).
For optional PDU
10083242
________
❑
Cable assembly, domestic, twisted lock, 100–127 V,
20 A, 2.5 m (8.2 ft), 14 AWG SJT cord.
For main PDU
10083641
________
❑
Cable assembly, domestic, twisted lock, 100–127 V,
15 A, 2.5 m (8.2 ft), 16 AWG SJT cord.
For optional PDU
10083642
________
■ Serial Cables, 9710 to Host
If the robot is controlled by a serial RS423 connection, the 9710-end of the
cables requires a female DB9 connector.
MR0012J
9710 System Assurance Guide
4-9
Serial Cables, 9710 to Host
Table 4-2. Serial Cables, 9710 to Host
❑
❑
❑
❑
4-10
Description
Part Number
Quantity
Cable assembly, DB9 (F)-DB24 (F), 4 m (13 ft)
310227101
________
Cable assembly, DB9 (F)-DB24 (F), 6 m (20 ft)
310227201
________
Cable assembly, DB9 (F)-DB24 (F), 12 m (39.4 ft)
310227301
________
Cable assembly, DB9 (F)-DB24 (F), 24 m (79 ft)
310227401
________
9710 System Assurance Guide
MR0012J
SCSI Cabling
■ SCSI Cabling
The following pages contain SCSI cable and adapter information.
Cable Restriction
Maximum allowed cable lengths (including the lengths already inside the 9710)
are:
•
•
•
Single-ended: up to 6 m (20 ft) for up to 5 mega transfers per second
Single-ended: up to 3 m (9.5 ft) above 5 mega transfers per second
Differential: up to 25 m (82 ft)
Note: The LSM supports only the SCSI Type 3 connector at the LSM I/O panel
(tailgate). Customers using SCSI Type 1 or 2 cable connectors must order
a SCSI-1- or 2-to-SCSI 3 adapter for the LSM-end of their cables to
correctly mate with the LSM.
Table 4-3 lists additional restrictions for SCSI connections.
Table 4-3. SCSI Cable Restriction
Application
Length Restriction
Single-Ended
Stub length: 0.1 m (4 in.)
5–10 MHz data transfer rate: 3 m (10 ft)
1–5 MHz data transfer rate: 6 m (20 ft)
Differential
Stub length: 0.2 m (10 in.)
1–10 MHz data transfer rate: 25 m (82 ft)
MR0012J
9710 System Assurance Guide
4-11
SCSI Cabling
Figure 4-6. SCSI Connector Types
4-12
9710 System Assurance Guide
MR0012J
SCSI Cabling
Cable Length Subtraction
When considering the length of an external SCSI interface bus, you must
subtract the length of bus already inside the 9710 from the maximum allowed
cable length. The individual cable measurements inside the 9710 are:
•
From I/O tower to drive: 1.2 m (4 ft)
•
Daisy chains between drives: 0.5 m (18 in.) each
•
From I/O tower to library control: 2.4 m (8 ft)
•
From drive to library control (library control can be daisy chained from the
drive data bus):
-
0.5 m (18 in.), or
1.2 m (4 ft), or
1.8 m (6 ft)
The total length of cable that must be subtracted from each bus is shown in
Table 4-4. For the IBM AS/400 system, always subtract 1.2 m (4 ft) from the
control or data bus. The AS/400 does not allow daisy chains.
Table 4-4. SCSI Cable Length Subtraction
Number of drives on
the same data bus
Are data and control on
the same bus? (Yes/No)
Subtract this value from
maximum allowed cable length
1 (always 1 for AS/400)
no (always no for AS/400)
1.2 m (4.0 ft) from drive bus
2.4 m (8.0 ft) from control bus
2
no
1.7 m (5.5 ft) from drive bus
2.4 m (8.0 ft) from control bus
3
no
2.1 m (7.0 ft) from drive bus
2.4 m (8.0 ft) from control bus
4
no
2.6 m (8.5 ft) from drive bus
2.4 m (8.0 ft) from control bus
5
no
3 m (10.0 ft) from drive bus
2.4 m (8.0 ft) from control bus
6
no
3.5 m (11.5 ft) from drive bus
2.4 m (8.0 ft) from control bus
7
no
4 m (13.0 ft) from drive bus
2.4 m (8.0 ft) from control bus
8
no
4.4 m (14.5 ft) from drive bus
2.4 m (8.0 ft) from control bus
9
no
5 m (16.0 ft) from drive bus
2.4 m (8.0 ft) from control bus
MR0012J
9710 System Assurance Guide
4-13
SCSI Cabling
Table 4-4. SCSI Cable Length Subtraction (Continued)
Number of drives on
the same data bus
Are data and control on
the same bus? (Yes/No)
Subtract this value from
maximum allowed cable length
10
no
5.3 m (17.5 ft) from drive bus
2.4 m (8.0 ft) from control bus
1
yes
2.4 m (8.0 ft) from bus 1
2
yes
3 m (9.5 ft) from bus 1
3
yes
3.4 m (11.0 ft) from bus 1
4
yes
3.8 m (12.5 ft) from bus 1
5
yes
4.3 m (14.0 ft) from bus 1
6
yes
4.7 m (15.5 ft) from bus 1
7
yes
5.2 m (17.0 ft) from bus 1
8
yes
5.6 m (18.5 ft) from bus 1
9
yes
6 m (20.0 ft) from bus 1
10
yes
6.6 m (21.5 ft) from bus 1
Note: 1 Calculated for a control interface daisy chain cable of 0.5 m (18 in.). Add 0.8 m (2.5
ft) for a 1.2 m (4 ft) cable, and 1.1 m (4.5 ft) for a 1.8 m (6 ft) cable.
4-14
9710 System Assurance Guide
MR0012J
SCSI Cabling
9710 to Host
There are many external SCSI cables, depending on the platform. These cables
are available through StorageTek. These are “standard” and will fit most
applications for data and the control path.
Table 4-5. SCSI Cables 9710 to Host
x
Description
Part Number
Quantity
❑
❑
❑
❑
❑
❑
❑
❑
❑
❑
Type CL21 SCSI External Interface Cable 3 m (10 ft)
10083309
_____
Type CL2P2 SCSI External Interface Cable 3 m (10 ft)
10083313
_____
Type CL2 SCSI External Interface Cable 6 m (20 ft)
10083310
_____
Type CL2P SCSI External Interface Cable 6 m (20 ft)
10083314
_____
Type CL2 SCSI External Interface Cable 15 m (49 ft)
10083311
_____
Type CL2P SCSI External Interface Cable 15 m (49 ft)
10083315
_____
Type CL2 SCSI External Interface Cable 20 m (65 ft)
10083312
_____
Type CL2P SCSI External Interface Cable 20 m (65 ft)
10083316
_____
SCSI Daisy Chain Cable 250 mm (10 in.)
313109302
_____
SCSI Daisy Chain Cable 460 mm (18 in.)
310292001
_____
Notes:
1. Standard cable materials
2. Plenum-rated cable materials
MR0012J
9710 System Assurance Guide
4-15
SCSI Cabling
Daisy Chain
Table 4-6. Specialized Daisy Chain Cables
Part
Number
x
Description
❑
❑
❑
❑
SCSI cable assembly, 1,830 mm (72 in.) 1–6 control 310254001
________
SCSI cable assembly, 2,130 mm (84 in.) 1–6 control 313115701
________
SCSI cable assembly, 460 mm (18 in.)
310292001
________
SCSI cable assembly, 1,220 mm (48 in.) 7–10
control
310292101
________
❑
❑
SCSI cable assembly, 250 mm (10 in.) 9840
313109302
________
SCSI cable assembly, 460 mm (18 in.) 9840
310292001
________
Quantity
Daisy Chain Terminators
Table 4-7 lists available terminators if your configuration requires additional
terminators.
Table 4-7. Daisy Chain Terminators
x
Description
Part Number
Quantity
❑
❑
Terminator, fast/wide SCSI, 68-pin, single ended
10148002
________
Terminator, fast/wide SCSI, 68-pin, differential
10148003
________
4-16
9710 System Assurance Guide
MR0012J
SCSI Cabling
PRS Card
When installing a PRS in the 9710, the cables listed below are required from the
PRC to the drives.
Table 4-8. PRS Card Cables
Drive Location
MR0012J
Cable Length
Part Number
Quantity
9
1220 mm (48 in.)
310292101
________
8
1220 mm (48 in.)
310292101
________
7
1220 mm (48 in.)
310292101
________
6
1830 mm (72 in.)
310254001
________
5
1830 mm (72 in.)
310254001
________
4
1830 mm (72 in.)
310254001
________
3
1830 mm (72 in.)
310254001
________
2
1830 mm (72 in.)
310254001
________
1
2130 mm (84 in.)
313115701
________
0
2130 mm (84 in.)
313115701
________
9710 System Assurance Guide
4-17
SCSI Cabling
Robotics Control, Internal
The SCSI control card can be connected directly to the I/O panel or can be
daisy chained to a tape drive.
Table 4-9. Robotics Control Cables, Internal
x
Description
Part Number
Quantity
❑
SCSI cable assembly, 68 (M) pin to 68 pin (F),
2,440 mm (96 in.) PRS to I/O panel
310294201
________
❑
SCSI cable assembly, 68 (M) pin to 68 pin (M),
40 mm (18 in.) PRS to drive (daisy chain)
310292001
________
❑
SCSI cable assembly, 68 (M) pin to 68 pin (M),
1,220 mm (48 in.) PRS to drive (daisy chain)
310292101
________
❑
SCSI cable assembly, 68 (M) pin to 68 pin (M),
1,820 mm (72 in.) PRS to drive (daisy chain)
310254001
________
4-18
9710 System Assurance Guide
MR0012J
SCSI Cabling
AS/400 Data Path
The AS/400 special SCSI cables come in two models: above floor, and under
floor (plenum). They must be used with the AS/400, and any other system
which has similarly designed SCSI connectors.
Note: If you already have standard 68–68 pin SCSI cables on site, then order
only the IBM AS/400 Interposer connector, Part Number 05H3834. This
IBM adapter connects standard 68–68 pin SCSI cables to the AS/400. In
that case, do not order any additional cables.
Table 4-10. SCSI Cables and Adapters for AS/400 Path
x
Description
Part Number
Quantity
❑
IBM 68–68-pin AS/400 interposer connector is an
adapter connector to attach standard 68–68-pin
SCSI cables to the AS/400. Order this connector if
you already have standard SCSI cables on site. If
you do not, order only the cables below.
05H3834 (order
from IBM)
________
❑
AS/400 special 68–68-pin SCSI cable, 3 m (10 ft)
goes above floor
100821102
________
❑
AS/400 special 68–68-pin SCSI cable, 3m (10 ft)
goes under floor (plenum)
100821111
________
❑
AS/400 special 68–68-pin SCSI cable, 6 m (20 ft)
goes above floor
100821103
________
❑
AS/400 special 68–68-pin SCSI cable, 6 m (20 ft)
goes under floor (plenum)
100821112
________
❑
AS/400 special 68–68-pin SCSI cable, 24 m (78.7 ft)
goes above floor
100821109
________
❑
AS/400 special 68–68-pin SCSI cable, 24 m (78 ft)
goes under floor (plenum)
100821118
________
MR0012J
9710 System Assurance Guide
4-19
SCSI Cabling
Sun Sparc Workstation
Table 4-11. SCSI Cables and Adapters for Sun Sparc Workstation
x
Description
Part Number
Quantity
❑
StorageTek 3 m (10 ft) cable to attach the 9710
directly to the Sun/Sparc workstation motherboard,
or to a station with SBE/S (fast/narrow, differential)
or RSBE/S (fast/narrow, single-ended)
10083522
________
❑
Standard 68–68-pin SCSI cable. With this
workstation interface feature, standard SCSI cables
can be used without adapters: DWIS/S (fast/wide,
differential)
4-20
9710 System Assurance Guide
________
MR0012J
SCSI Cabling
RS/6000, Bull DPX/20
Table 4-12. SCSI Cables and Adapters for RS/6000 and Bull DPX/20
x
Description
Part Number
Quantity
❑
StorageTek 3 m (10 ft) cable to attach the 9710
directly to the Sun/Sparc workstation motherboard,
or to a station with IBM RISC System/6000 with
interface feature code 2420 (fast/narrow, singleended)
10083522
________
❑
StorageTek 3 m (10 ft) cable to attach the 9710
directly to the Sun/Sparc workstation motherboard,
or to a station with BULL DPX/20 with fast/narrow,
single-ended feature
10083522
________
❑
IBM 68–68-pin (RISC System/6000) Interposer
50G0460 (order
connector. This is an IBM adapter connector to
from IBM)
attach standard 68–68-pin SCSI cables to RISC
System/6000 with interface feature code 2416 (fast/
wide, differential). Use with one of the standard
68–68-pin cables.
________
❑
IBM 68–68-pin (RISC System/6000) Interposer
connector. This is an IBM adapter connector to
attach standard 68–68 pin SCSI cables to BULL
DPX/20 with fast/wide differential feature. Use
with one of the standard 68–68-pin cables.
50G0460 (order
from IBM)
________
❑
68–68-pin special SCSI cable RISC System/6000
with IBM245 differential fast/wide adapter 12 m
(40 ft). Use this cable in place of the IBM
(50G0460) interposer and standard cables above, if
a 12 m (40 ft) cable length is satisfactory.
100821105
________
MR0012J
9710 System Assurance Guide
4-21
SCSI Cabling
SCSI Adapters
Table 4-13. Adapters, SCSI
x
Description
Part Number
Quantity
❑
SCSI adapter, narrow to wide bus (50-to-68 pin)
10148010
________
Single-Ended Narrow or Fast/Narrow to Wide
Table 4-14. Single-Ended Narrow or Fast/Narrow to Wide SCSI
x
Description
Part Number
Quantity
❑
Cable assembly, 50 (M) D Squeeze Lock, 68 (M) D
Screw Lock, 3 m
10083522
________
High Density 68-68 Pin Standard Jackscrew
Table 4-15. High Density 68-68 Pin Jackscrew SCSI
x
❑
❑
❑
❑
Cable Length
Metric (English)
Above Floor Cable P/
N
Plenum (under
floor Cable P/N)
Quantity
3 m (10 ft)
10083309
10083313
______
6 m (20 ft)
10083310
10083314
______
15 m (49 ft)
10083311
10083315
______
20 m (66 ft)
10083312
10083316
______
Note: Above floor cable is UL style CL2, plenum cable is UL style CL2P
4-22
9710 System Assurance Guide
MR0012J
SCSI Cabling
AS/400 Serial Cables
Table 4-16. AS/400 Serial Cables
x
Description
Part Number
Quantity
❑
❑
❑
❑
Cable assembly, serial AS/400, 4 m (13 ft)
310227101
________
Cable assembly, serial AS/400, 6 m (20 ft)
310227201
________
Cable assembly, serial AS/400, 12 m (39 ft)
310227301
________
Cable assembly, serial AS/400, 24 m (79 ft)
310227401
________
Sequent Cables
Cables specific to Sequent are listed below.
Table 4-17. Sequent Cables
x
Description
Part Number
Quantity
❑
❑
❑
❑
❑
❑
❑
SCSI DIFF, TM 68-pin, 5 m (16.4 ft)
308398701
________
SCSI DIFF, TM 68-pin, 10 m (33 ft)
308398801
________
SCSI DIFF, TM 68-pin, 0.3 m (1 ft)
308398901
________
SCSI DIFF, TM 68-pin, 1.2 m (4 ft)
308399001
________
SCSI DIFF, TM 68-pin, 7.5 m (25 ft)
308399101
________
SCSI DIFF, TM 68-pin, 15 m (49 ft)
308399201
________
SCSI, DIFF, Terminator, 68-pin,
308399301
________
MR0012J
9710 System Assurance Guide
4-23
FIPS Cabling
■ FIPS Cabling
The following pages contain FIPS cable and adapter information.
FIPS Cables
The two types of FIPS cables are Bus and Tag, and Internal Style. The Bus and
Tag cables come in pairs. The Internal Style cable is a single cable with a
shorter length limit.
A Y (serpentine) adapter cable may have to be used, depending on the AS/400
IOP and FIPS cable types. Cabling configurations are shown in Figure 4-7. Part
numbers are listed below. The flagged 4-digit IBM part numbers must be
ordered from IBM.
Figure 4-7. FIPS AS/400 Cabling Configurations
4-24
9710 System Assurance Guide
MR0012J
FIPS Cabling
Table 4-18. FIPS Cables
Description
Part Number
Quantity
❑
Serpentine cable adapter, AS/400 IOP side
(see usage in Figure 4-7 on page 4-24).
9980 (order from IBM)
________
❑
Y cable adapter, tape side (see usage in
Figure 4-7 on page 4-24)
9927 (order from IBM)
________
❑
❑
❑
❑
❑
❑
❑
❑
❑
❑
Internal Style cable 1.7 m (5.6 ft)
9928 (order from IBM)
________
Internal Style cable 6.6 m (22 ft)
9929 (order from IBM)
________
Internal Style cable 24 m (79 ft)
9930 (order from IBM)
________
Bus and tag cable pair 3 m (10 ft)
305436010
________
Bus and tag cable pair 15.24 m (50 ft)
305436050
________
Bus and tag cable pair 23 m (75 ft)
305436075
________
Bus and tag cable pair 31 m (100 ft)
305436100
________
Bus and tag cable pair 61 m (20 ft)
305436200
________
Bus and tag cable pair 91.44 m (300 ft)
305436300
________
Bus and tag cable pair 122 m (400 ft)
305436400
________
MR0012J
9710 System Assurance Guide
4-25
FIPS Cabling
FIPS Terminators
The following table lists available terminators if your configuration requires
additional terminators.
Table 4-19. FIPS Terminators
x
Description
Part Number
Quantity
❑
❑
Terminator, FIPS, Bus
10041793
________
Terminator, FIPS, Tag
10041794
________
FIPS Drive to I/O
The FIPS cable is listed below.
Table 4-20. FIPS Cables
x
Description
Part Number
Quantity
❑
FIPS cable assembly from drive to I/O panel
310259302
________
4-26
9710 System Assurance Guide
MR0012J
Modem Cables
■ Modem Cables
If the client plans on using a modem for remote support, make sure that one of
the following modem cables is ordered.
Table 4-21. Modem Cables
x
Description
Part Number
Quantity
❑
❑
❑
❑
❑
❑
6 m (20 ft)
4108289-02
________
15 m (50 ft)
4108289-05
________
31 m (100 ft)
4108289-10
________
46 m (150 ft)
4108289-15
________
61 m (200 ft)
4108289-20
________
76 m (250 ft)
4108289-25
________
Table 4-22. Remote Diagnostic Support for PC Use
x
Description
Part Number
Quantity
❑
Cable assembly, RJ45 8 pin (M) - RJ45 8 pin (M),
6 m (20 ft)
410828902
________
❑
Cable assembly, RJ45 8 pin (M) - RJ45 8 pin (M),
15 m (50 ft)
410828905
________
❑
Cable assembly, RJ45 8 pin (M) - RJ45 8 pin (M),
76 m (250 ft)
410828925
________
❑
Adapter, RJ45 9 pin (F) - DB9 (F)
10410823
________
MR0012J
9710 System Assurance Guide
4-27
Cartridge Tapes and Labels
■ Cartridge Tapes and Labels
The Media Service Center in Atlanta handles orders for cartridge tapes and
labels. To obtain additional information about cartridge tapes and labels call the
Media Service Center at 1-800-905-8502, or fax 1-877-888-0609; from 8:00 a.m. to
8:00 p.m. United States Eastern Standard Time Monday through Friday.
Note: For the LSM to initialize properly, diagnostic and cleaning cartridges
must be in place. We recommend that you order the necessary cartridges
ahead of time.
For 9840 drives, order PN 310319401 (data cartridges used for diagnostics) and
PN 310324601 (cleaning cartridges).
Order cartridge tapes and labels by including the order on the sales entry form,
if used; the media portion of the order will be routed to the appropriate
department.
Orders for domestic customers, valued-added distributors (VADs), and
value-added resellers VARs):
5390 Triangle Parkway, Suite 300
Norcross, GA 30092
Voice: 1-800-905-8502
Media Service Center
Fax: 1-877-888-0609
Orders from distributors, original equipment manufacturers (OEMs),
and Canada, Japan, Australia, South Asia, or Mexico subsidiaries:
Orders Management
Fax: 1-303-673-2640 for distributors or subsidiaries
Fax: 1-303-673-7654 for OEM
One StorageTek Drive
Louisville, CO 80028-4350
Voice: 1-303-673-5513
Table 4-23. In-Country Media Supply Services (Sheet 1 of 2)
Region
North
America
4-28
Country
Telephone Number
United States
1-800-905-8502
Canada
1-800-668-1843 extension 605
Mexico
525 258 8000
9710 System Assurance Guide
MR0012J
Cartridge Tapes and Labels
Table 4-23. In-Country Media Supply Services (Sheet 2 of 2)
Region
EAME
World
MR0012J
Country
Telephone Number
Austria
0800 20 16 31
Belgium
0800 75 327
Denmark
8088 0744
Finland
08001 13361
France
0800 82 83 57
Germany
0800 181 6238
Holland
0800 022 8496
Ireland
1800 55 33 54
Italy
167 790 852
Norway
800 11 220
South Africa
0800 99 5820
Spain
900 99 33 66
Sweden
020 798711
Switzerland
0800 83 87 65
United Kingdom
0800 731 8852
Brazil
55 11 5185 2850
Japan
3 3746 9824
Singapore
65 774 9248
Kuala Lumpur
60 3 233 6102
China
86 10 6841 2211
Thailand
662 656 8873
Hong Kong
852 8200 0791
9710 System Assurance Guide
4-29
Cartridge Tapes and Labels
This page intentionally left blank.
4-30
9710 System Assurance Guide
MR0012J
Pre-installation Checklist
5
On the following pages, verify that all issues have been addressed and resolved.
Circle either “Yes” or “No” for each item. For unresolved issues, assign a
required action with a due date to the appropriate person.
Table 5-1. Pre-installation Checklist
Item Description
Yes/No
Action Required/Due
Date/Person Responsible
Site Preparation
Floor plans completed
Yes/No
Clearance adequate
Yes/No
Cooling adequate
Yes/No
Power requirements met
Yes/No
Cable lengths determined
Yes/No
Cable routing established
Yes/No
Future expansion considered Yes/No
Dock facilities scheduled
Yes/No
Hardware Procurement
Subsystems ordered
Yes/No
Power cables ordered
Yes/No
Options or features ordered
Yes/No
Interface cables ordered
Yes/No
Interface adapters ordered
Yes/No
Tapes and labels ordered
Yes/No
Software Procurement
Software prerequisites met
MR0012J
Yes/No
9710 System Assurance Guide
5-1
Fire Suppression System
Table 5-1. Pre-installation Checklist (Continued)
Item Description
Yes/No
Action Required/Due
Date/Person Responsible
Software Installation
Scheduled
Yes/No
Completed
Yes/No
Hardware Installation
Delivery schedule completed Yes/No
Dock hours scheduled
Yes/No
Pre-staging area set
Yes/No
Installation team identified
Yes/No
Site access arranged
Yes/No
Installation hours defined
Yes/No
■ Fire Suppression System
❑ Yes ❑ No
Ensure customer is aware that StorageTek does not supply fire suppression
systems. Any fire suppression system for the 9710 is the customers’
responsibility.
■ Hardware Support Services
❑ Yes ❑ No
StorageTek offers an exclusive remote service to customers which is available
24 hours a day 7 days a week if a problem with the equipment occurs.
Table 5-2 lists the remote support hardware and cables to provide remote
support for the customer.
Table 5-2. Remote Support Hardware and Cables
5-2
Equipment
Description
Part
Number
Modem
9600 Baud
4953
1
Modem
Switches
16 Port MARS+
32 Port MARS+
4954
4955
5
5
9710 System Assurance Guide
Ref Number
MR0012J
Hardware Support Services
Table 5-2. Remote Support Hardware and Cables (Continued)
MR0012J
Equipment
Description
Part
Number
Cable
RJ-45 to
RJ-45
20 ft MARS/UUT interconnect
50 ft MARS/UUT interconnect
100 ft MARS/UUT interconnect
150 ft MARS/UUT interconnect
200 ft MARS/UUT interconnect
250 ft MARS/UUT interconnect
410828902
410828905
410828910
410828915
410828920
410828925
7
7
7
7
7
7
Modem/
MARS
Interconnect
Cable
4 ft modem to MARS
interconnect (DB-25 to DB-9)
4895
9
9710 System Assurance Guide
Ref Number
5-3
Hardware Support Services
This page intentionally left blank.
5-4
9710 System Assurance Guide
MR0012J
Site Planning Information
A
This appendix provides specifications and floor space requirements.
The following table lists the dimensions and weight of the LSM. Refer to your
drive publications for the weight of the drives and cartridges and add the
weights to the weights in the table.
Table A-1. 9710 Dimensions and Weights
Height
1830 mm (72 in.)
Width with covers
1490 mm (59 in.)
Depth
790 mm (32 in.)
Depth with expansion door
1020 mm (40 in.)
Weight of base unit with arrays
339 kg (747 lbs)
Weight of base unit with expansion door
and arrays
375 kg (826 lbs)
Table A-2. LSM Power Specifications
Power cable
U.S./Canada:
100 VAC UL/CSA power cable
International:
200–240 VAC HAR power cable
Input voltage range
100–254 VAC
Nominal voltage
120 or 240 VAC
Power configuration
U.S./Canada:
Single phase 100 VAC, 47–63 Hz, 20 A Service, 3-wire
International:
Single phase 200–240 VAC, 47–63 Hz, 10 A Service, 3wire
MR0012J
Power consumption
200 W
Maximum heat
output
683 Btu/hr
9710 System Assurance Guide
A-1
Table A-3. Optional Power Distribution Unit (PDU) Specifications
Power cable
U.S./Canada:
120 VAC UL/CSA power cable
International:
200–240 VAC HAR power cable
Input voltage range
100–254 VAC
Nominal voltage
120 or 240 VAC
Power configuration
U.S./Canada:
Single phase 120 VAC, 47–63 Hz, 6 A Service, 3-wire
International:
Single phase 200–240 VAC, 47–63 Hz, 3 A Service, 3wire
Power consumption
38 W
Maximum heat
output
128 Btu/hr
Table A-4. LSM Environmental Specifications
A-2
Temperature
Operating
Storage
Shipping
15° to 32°C (59° to 90°F)
10° to 40°C (50° to 104°F)
10° to 40°C (50° to 104°F)
Relative Humidity
Operating
Storage
Shipping
20% to 80% (noncondensing)
10% to 95% (noncondensing)
10% to 95% (noncondensing)
Wet Bulb Maximum
Operating
Storage
Shipping
29.2°C (84.5°F)
35°C (95°F)
35°C (95°F)
Altitude
Operating
Storage
Shipping
0 to 3.05 km (0 to 10,000 ft)
0 to 3.05 km (0 to 10,000 ft)
0 to 15.24 km (0 to 50,000 ft)
9710 System Assurance Guide
MR0012J
Figure A-1. 9710 Layout and Floor Space Requirements
SEE NOTE 1
POWER
CABLE
CUTOUT
153.26
(60.34)
148.82
(58.59)
218.92
(86.19)
LSM BASIC UNIT SERVICE AREA REQUIREMENTS
218.92
(86.19)
SEE NOTE 1
15.24 (6)
60.96 (24)
FIPS CABLES CUTOUT
(SEE NOTE 2)
153.57
(60.46)
149.12
(58.71)
240.23
(94.58)
LSM EXPANDED UNIT SERVICE AREA REQUIREMENTS
NOTES:
1. 91.44 cm (3.0 ft) access required during installation. Library may then be pushed back
against a wall and stablilized.
2. Cable cutout is optional as cables may be routed above the floor. For raised floor
installation, a 15.24 x 61cm (6 X 24 in.) cutout is recommended if FIPS cables are used.
3. The dimensions in parentheses are in inches.
MR0012J
9710 System Assurance Guide
C60187
A-3
Table A-5. Power Characteristics
Description
Value / Part Identification
Power drops for 9710 and PDU 1,
each:
(47-63 Hz AC range. 3-wire cables
supplied. International cables are
supplied without cable connectors)
U.S./Canada: 120 VAC, single phase
9710 120 VAC domestic plug feature
code 70DD
NEMA 5-20P, supplied with 9710
PDU 120 VAC domestic plug
NEMA 5-15P, supplied by client
9710 120 VAC domestic wall
receptacle
NEMA 5-20R, supplied by client
PDU 120 VAC domestic wall
receptacle
NEMA 5-15R, supplied by client
Picture
International: 200-240 VAC, single
phase
International plugs and receptacles May be supplied by client according to
for 9710 and, if applicable, for PDU local electrical codes. See power
specifications below. See Table 4-1 on
page 4-9.
Current input for library without
drives 1
1.250 A at 120 VAC
0.625 A at 240 VAC
2.000 A at 120 VAC
Current input for each 4890 drive 1
1.000 A at 240 VAC
0.60 A at 120 VAC
0.30 A at 240 VAC
Power usage for library without
drives 1
Watts 150 peak / 100 Continuous
KVA 0.15 Peak / 0.10 Continuous
A-4
9710 System Assurance Guide
MR0012J
Table A-5. Power Characteristics (Continued)
Description
Value / Part Identification
Power usage for library without
drives 1
Watts 150 peak / 100 Continuous
KVA 0.15 Peak / 0.10 Continuous
Power usage for each 4890 drive 1
Watts 270 Peak / 230 Continuous
KVA 0.27 Peak / 0.23 Continuous
Power usage for each DLT drive 1
Watts 70 Peak / 60 Continuous
KVA .070 Peak / .060 Continuous
Heat output for library without
drives
680 BTU/hr
Heat output for each 4890 drive
880 BTU/hr
Heat output for each DLT drive
257 BTU/hr
Picture
Note: 1 Up to six drives take power from the 9710. Four additional drives take power from
the PDU box. Power ratings for the 9710, and (separately) for the PDU, are figured
by also adding the number of drives connected to each. The PDU box by itself has
zero load.
MR0012J
9710 System Assurance Guide
A-5
This page intentionally left blank.
A-6
9710 System Assurance Guide
MR0012J
Index
A
E
adapters
high density 68-68 pin standard jackscrew
SCSI, 4-22
SCSI, 4-22
single-ended narrow or fast/narrow to
wide SCSI, 4-22
C
cables
AS400 serial, 4-23
FIPS, 4-26
installing PRS, 4-17
modem, 4-27
robotics control, internal, 4-18
SCSI
9710 to host, 4-15
for AS/400 path, 4-19, 4-25
for RS/6000 and Bull, 4-21
for Sun, 4-20
Sequent, 4-23
serial, to host, 4-10
cabling, I/O tower limits on, 3-9
call center, 2-3
channel partner, team members, 2-4
checklists for preinstallation, 5-1
client processor team members, 2-3
communication hardware contact, 2-1
control interface, RS423, 3-10
control-side
direct connections, 3-3
indirect connections, 3-3
conventions in manual, xii
CPU hardware contact, 2-1
CPU vendor, 2-3
customer team members, 2-1
D
delivery contact, 2-1
dimensions, A-1
drives, configurations for, 3-2
MR0012J
Ethernet, 3-3
external cables
FIPS, 4-26
SCSI, 4-15
AS/400 data path, 4-19
Bull DPX/20, 4-21
RS/6000, 4-21
Sequent, 4-23
Sun Sparc workstation, 4-20
F
fax number
Atlanta Shared Services Center, 4-2
cartridge and label orders, 4-28
Orders Management, 4-2
fire suppression, 5-2
H
Hardware Support Services, 5-2
host, server indirect. See RISC System/6000,
SPARC5
K
key personnel, 2-1
L
limits
I/O tower cabling, 3-9
SCSI cable length, 4-11
M
mailing address
Atlanta Shared Services Center, 4-2
cartridge and label orders, 4-28
Orders Management, 4-2
manual, conventions in, xii
marketing representative, 2-2, 2-4
O
operating systems software contact, 2-1
operations contact, 2-1
overview, ordering process, 4-1
9710 System Assurance Guide
Index-1
Index
P
placing the order, 1-5
power distribution unit
description, 3-2
power cables, 4-9
preinstallation checklist, 5-1
PRM card, shipped with PDU, 3-3
R
registering in courses, process for, xv
remote support, 4-27
restrictions on SCSI, 4-11
RISC System/6000, library software, 3-3
RS423, 3-10
S
schedule planning, 1-6
SCSI
restrictions, 4-11
robotic control interfaces, 3-10
SDE, 2-2
site planning, power requirements, A-3
software
RISC System/6000, 3-3
server, 3-3
SPARC5, 3-3
solutions delivery installation
consultant, 2-2, 2-4
solutions delivery systems specialist, 2-2
SPARC5, library software, 3-3
specifications
LSM
environmental, A-2
PDU, A-2
power, A-1
power, A-4
SCSI cable length, 4-11
Index-2
StorageTek
call center, 2-3
hardware support, 2-3
marketing representative, 2-2, 2-4
SDE, 2-2
software support, 2-3
solutions delivery systems
specialist, 2-2, 2-4
team members, 2-2
system assurance
definition of process, 1-1
flowchart, 1-4
planning meetings, 1-5
postinstallation follow-up, 1-6
process, 1-4
responsibilities, 1-2
review meetings, 1-5
schedule planning, 1-6
team members, 1-2
teams identified, 2-1
systems engineer, 2-4
T
telephone number
Atlanta Shared Services Center, 4-2
course enrollment, xv
hardware and software support, 2-3
Orders Managerment, 4-2
terminators, FIPS, 4-26
trademarks used in this guide, xii
W
weights, A-1
worksheet
hardware order, 4-2
key personnel, 2-1
where to fax, 4-1
9710 System Assurance Guide
MR0012J
READER’S COMMENT FORM
Manual Name: ___________________________________________ Manual PN:
_______________
Please check or fill in the items; adding explanations/comments in the space provided.
Which of the following terms best describes your job?
❑
❑
❑
Manager
Mathematician
Operator
❑
❑
❑
Programmer
❑
Sales Representative ❑
Student/Trainee
❑
Reference Manual
❑
Student/Trainee
❑
Instructor text
Did you find the material easy to read and understand?
❑
Yes
❑
No (explain below)
Did you find the material organized for convenient use?
❑
Yes
❑
No (explain below)
Field Engineer
Engineer
Instructor
❑
❑
❑
Systems Analyst
Systems Engineer
Other (explain below)
How did you use this publication?
❑
❑
Introductory text
Other (explain)
❑
Specific criticisms (explain below):
Clarification on pages
Additions on pages
Deletions on pages
Errors on pages
Explanations and other comments:
Note: Staples can cause problems with automated mail sorting equipment. Please use pressure sensitive or other
gummed tape to seal this form. If you would like a reply, please supply your name and address on the reverse side of
this form.
Thank you for your cooperation. No postage stamp is required if mailed in the U.S.A.
TO COMPLY WITH POSTAL REGULATIONS, FOLD EXACTLY ON DOTTED LINES AND TAPE (DO NOT STAPLE)
NO POSTAGE
NECESSARY
IF MAILED
IN THE
UNITED STATES
BUSINESS REPLY CARD
FIRST CLASS
PERMIT NO. 2 LOUISVILLE, CO U.S.A.
POSTAGE WILL BE PAID BY ADDRESSEE
NEARLINE INFORMATION DEVELOPMENT MS 2201
STORAGE TECHNOLOGY CORPORATION
ONE STORAGETEK DRIVE
LOUISVILLE CO 80027-9984
FOLD HERE AND TAPE
DO NOT STAPLE
FOLD HERE AND TAPE
If you would like a reply, please print:
Your Name:__________________________________________________________
Company Name:______________________________ Department:_____________
Street Address:_______________________________________________________
City:________________________________________________________________
State:_______________________________________ Zip Code:_______________
STORAGE TECHNOLOGY CORPORATION
ONE STORAGETEK DRIVE
Louisville, CO 80028-2201
CSE World Wide Tech Support: 303-673-4056
OEM Tech Support 303-673-3126
World Headquarters
Storage Technology Corporation
One StorageTek Drive
Louisville, Colorado 80028 USA
Phone: 1.800.786.7835
Fax: 719.536.4053
© 1999 Storage Technology Corporation,
Louisville, CO. All rights reserved.
Printed in USA.
StorageTek, the signature, and Information
Made Powerful are trademarks of Storage
Technology Corporation. Other product
names mentioned may be trademarks of
Storage Technology Corporation or other
vendors/manufacturers.