1
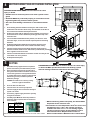
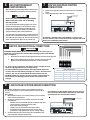
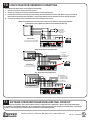
4 HEATING ELEMENT AND AIR CHANNEL INSTALLATION WARNING HAZARDOUS VOLTAGE: Risk of electric shock. Can cause injury or death. DO NOT remove electrical panel cover while system is energized. Elements MUST be positioned properly to avoid short circuiting them against any surfaces within system. Use care when making connections to avoid element damage. 1. Insert heating elements between brick layers until element ends embed into side cutouts of brick cavity. The threaded screw tabs on wire connection terminals should point forward. 2. Install air channel with air deflectors (arrow shaped pieces) facing inward and narrow ends of deflectors pointing up. Place top of air channel in first. 3. Lower insulation blankets back into position, one at a time. Tuck sides into edges, corners and around exposed portions of heating elements. 4. Install galvanized panel. Slide the top inside the upper lip of top painted panel. Bottom rests on the outside of the brick cavity. 5. Connect wiring harnesses to heating elements using screws in element screw kit. Install screws with heads up and threads pointing down. Tighten screws to 14 in·lbs. 6. Check non-insulated element connections to make sure they do not come within 1/2" of any surface. 7. Install painted front panel. 5 Element-to-Wiring Harness Connections l ne an Ch r i A nt Fro e Sid Assemble factory supplied return air plenum per the instructions provided with the plenum. 2. Once assembled, set plenum on right side of the system with air filter and indoor coil access covers facing forward. Line up predrilled holes on system with holes in flanges of plenum and attach using screws provided in plenums hardware package. Insert air filter into filter rack. 4. Connect return air duct to top of plenum. 5. Connect supply air duct in structure directly to systems air outlet. 6. If necessary, adjust supply air blower speed by using the chart below. 7. The W/E jumper MUST be in the ON position or the blower will not operate with an E call from the thermostat. Jumper ½ HP Variable Speed CFM 1000 1200 1400 1600 tt Bo om WARNING 1. 3. t IMPORTANT DUCTING NOTE: The 3100 series is factory configured for a right-to-left airflow. n Fro k Bric HAZARDOUS VOLTAGE: Risk of electric shock. Can cause injury or death. DO NOT operate the Comfort Plus heating system without ducting installed to both the air inlet and outlet. 10 18" 16" 5 3 8" 227 16" 1" 27" 1" 812" Top of System 17 8" 225 16" 167 16" 2618" 53 5 8" When interfacing with a heat pump, the A-Coil MUST be placed on the return air side. To maintain a room temperature of 85oF or less in the mechanical room, a 24" x 24" opening can be installed in the area or a 6" x 6" non-closing register can be cut into the return air duct. Refer to Placement and Clearance Requirements section of External static pressure should not exceed .75 inches water column. Owners and Installers Manual for more information. A B C D