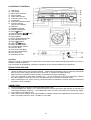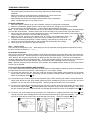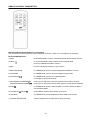
1
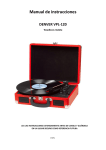
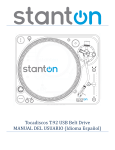
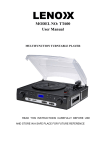
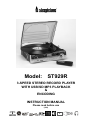
Model: ST929R 3-SPEED STEREO RECORD PLAYER WITH USB/SD MP3 PLAYBACK & ENCODING INSTRUCTION MANUAL Please read before use (VS4) AUX-I N LOCATION OF CONTROLS 1) 2) 3) 4) 5) 6) 7) 8) 9) 10) 11) 12) 13) 14) 15) 16) 17) 18) 19) 20) 21) 22) 23) 24) 25) 26) 27) Dust Cover LCD Display MP3 Folder Up Button Source Button Power LED Indicator 3.5mm dia. Aux-In Jack Left Speaker 3.5mm dia. headphone Jack Function Selector (Aux-Phono-USB/SD) USB Port SD/MMC Card Slot X-Bass On/Off Button Record Button Play/Pause/Stop Button Remote Control Sensor Right Speaker Power On/Off-Volume knob Pitch Adjustment Knob Skip Up Button Button Skip Down 45rpm Spindle Adaptor Turntable Speed Selector Tone Arm Rest Line Out Socket (RCA) Auto Stop On/Off Switch AC Power Cord Subwoofer Socket CAUTION: Usage of controls or adjustments or performance of procedures other than those specified herein may result in hazardous radiation exposure. This unit should not be adjusted, modified or repaired by anyone except qualified service personnel. PRECAUTIONS FOR USE INSTALLATION • Unpack all parts and remove protective material. Please keep all packaging until you have fully checked all parts of the unit are working correctly and for future use, in case the unit needs servicing. • Please ensure the Remote Control has been located before storing the packaging. • This unit is operated by 230V/50Hz AC Mains only. Do not connect the unit to the mains before checking the mains voltage is correct for your home and before all other connections have been made. • When positioning the unit, never cover any vents and make sure that there is a space of several centimeters around the unit for ventilation. CONNECTION 1. Connect the Power Cord (26) to a 230V AC Mains Power outlet. 2. Turn the POWER-VOL Knob (17) in a clockwise direction until the red Power LED Indicator (5) and the blue LCD Display backlight (2) light up. This indicates the unit is correctly connected to the mains power supply. 3. Your system is now ready for use. 4. Switch the Function Selector (9) to “AUX/PHONO or USB/SD” position and, depending on the position of this switch, the display will show “AUX”, “PHONO” or “NO USB”. E-1 TURNTABLE OPERATION GETTING STARTED: - Lift up the hinged cover and remove any sticky tape and any other packing materials. Remove the black tie-wrap and lift off the hold-down clip, which secure the Tone Arm to the Tone Arm Rest (23) during transportation. Slide forward and remove the white protective needle cover to expose the Stylus. The Record Player is now ready for use. PLAYING A RECORD 1. Slide the Function Selector (9) to select “PHONO” function to activate the record player. 2. Move the 33/45/78rpm Speed Selector Switch (22) to the correct setting for the record to be played. 3. Place a record on the turntable platter. Use the 45rpm Spindle Adaptor if required. Note: To play a 45rpm record, which has the centre clip missing, first place the supplied 45rpm Spindle Adaptor (21) onto the centre spindle. Please note this will not be necessary if the record centre clip is still in place. 4. Lift the Tone Arm and move it slowly towards the record - the turntable will start rotating - then gently lower it onto the edge of the record - the record will start playing. 5. Adjust the sound volume to the desired level by turning the Power/Volume Knob (17), aligning the dot on the bevelled rim with one of the 3 markers at the side of the knob. 6. To adjust the spinning speed while a record is playing, rotate the Pitch Control Knob* (18). 7. When the record has stopped playing, the turntable will automatically stop rotating. 8. Lift the Tone Arm and return it to the Arm Rest (23). Note: *Pitch Control This unit has Pitch Adjustment (18). While playing a record, adjust the spinning speed as required by turning the knob in small increments to “ – “ or “ + “. AUTO-STOP FUNCTION Some longer records will stop playing before the last track has finished, as the Auto-Stop area is set outside the area pre-set for the unit. If that is the case, move the Auto-Stop On/Off Switch (25) on the rear of the unit to the “OFF“ position, the Tone Arm will then carry on playing to the end of the record. However, the turntable will continue rotating and will not stop automatically. To stop the turntable rotating, turn the unit off (17) or switch the Auto-Stop Switch back to the “ON“ position, then return the Tone Arm manually to the Arm Rest (23). Note: With the Auto-Stop Switch set at the “OFF” position, the turntable will start rotating as soon as the Phono Function (9) is selected. STYLUS and STYLUS ASSEMBLY REPLACEMENT If you need to replace the factory fitted Stylus, a replacement universal sapphire needle (or stylus) is available for purchase direct from the manufacturer – this will play 331/3, 45 & 78rpm records. (1) To remove the Stylus from the Tone Arm, hold the Tone Arm Head steady, while grabbing the red plastic stylus holder with two fingers - then gently pull the complete red stylus holder towards you and down, as shown in the diagram below .1. (2). (2) To fit another Stylus, hold the sides of the red plastic stylus holder, ensuring the needle is facing downwards. Gently push the back of the stylus holder against the black cartridge at the end of the tone arm and clip it upwards, until you are sure it is securely fitted. Refit the protective needle cover, if so required. (3) To remove the whole Stylus assembly from the Tone Arm, hold the Tone Arm Head steady, lift up the black tab above the stylus holder .1. (1) whilst grabbing the red plastic stylus holder with two fingers - then gently pull the complete red stylus holder and tone arm cartridge downwards, as shown in the diagram below .1. (2). (4) To remove the whole Stylus/pick-up assembly, use small pliers to carefully disconnect the wires .2., then change to another stylus cartridge and connect the wires to the new stylus again with the pliers. (Do not pull the pick-up wires directly as this may cause damage to the wires). Refit as in Diagram .3. (1) (2). E-2 NOTE: Always handle the Stylus with care as the needle tip is easily damaged. When transporting the turntable it is advisable to refit the protective needle cover until the unit is going to be used again. When removing or re-fitting the stylus, always be careful not to put too much pressure on the Stylus Holder and the Tone Arm Cartridge, to avoid causing any possible damage to them. PLAYBACK OF MP3/WMA SONGS VIA USB STORAGE MEDIA OR SD/MMC MEMORY CARDS CONNECTING The system is able to decode and play back MP3/WMA music files stored in the memory of a device with a USB connecting plug or on an SD/MMC memory card (size up to 2GB max. – not supplied). Slide the Function Selector (9) to USB/SD Mode and then press the Source Button (4) to select either “USB” or “SD” Mode. If nothing is connected, “NO USB” or “NO CARD” will show on the display. 2. Plug-in the USB device face side up and make sure it goes in completely or, if using a Memory Card, insert this in the direction of the arrow as shown on the marking underneath the memory card Slot. Insert it straight without bending it. z Connecting the USB/SD card upside-down or back-to-front could damage the audio system or the storage device (USB Flash Drive/SD/MMC card). Before connecting, double check to make sure the direction of insertion is correct. 3. The system will start reading a storage device automatically after connection and the LCD Display will show the total number of MP3/WMA files and the total number of folders detected. 1. Important Notes: • It is not possible to connect an MP3 Player or Flash Drive to the USB Port via a USB Extension Cable. • The USB Port is not designed for connection to a Computer. z PLAY / PAUSE / STOP MODE 1. Press the “Play/Pause/Stop” button (14) to start playback, the first track will start playing. 2. To interrupt the music, press the “Play/Pause/Stop button (14) once, the playing time will freeze & flash on the LCD Display (2) and the music will pause temporarily. 3. Press the button again to resume normal playback. 4. Press and hold the “Play/Pause/Stop button (14) for 2 seconds during Playback Mode – playback will stop. z SKIP/SEARCH MODE (SKIP/SEARCH UP / SKIP/SEARCH DOWN ) 1. During either Play or Pause Mode, press the “Skip Up” Button (19) to skip to the next track - the track number will be displayed – it will either play that track or remain in Pause Mode. 2. During Play or Pause Mode, press the “Skip Down” Button (20) once to go back to the beginning of the track, the original track number is displayed – it will either play that track or remain in Pause Mode. 3. After Step 2, press the “Skip Down” Button (20) again to go to the previous track – it will either play that track or remain in Pause Mode. 4. If you press and hold the “Skip Up/Down” button (19/20) during playback, the playing track will fast forward or backward until the button is released – then carry on playing that track. z 1. 2. 3. FOLDER UP CONTROL Press the “Folder Up” Button (3), the folder number will go up. Press the “Skip Up” Button (19) or “Skip Down” button (20), the track number will change (up or down). When the desired track has been selected, press the “Play/Pause/Stop” Button to start playback. NOTES: - The system can detect and read files in MP3 or WMA format only through the USB Port or SD Card Slot. - Due to variances in MP3 encoding format, you may find some MP3 Players will not work when connected to the USB socket. Please note this is not a malfunction of the system. - Only MP3 Players/Flash Drives/SD/MMC Cards up to 2GB size can be read by the system. ID3 (TRACK/ALBUM TITLE) FUNCTION (BY REMOTE HANDSET) 1. Press the “INFO” Button during playback of an MP3/WMA track, the song title will be displayed. 2. Press the “INFO” button again to disable this function. E-3 SONG TITLE/FOLDER NAME SEARCH FUNCTION (BY REMOTE HANDSET) You can search for a track on a USB Device or Memory Card by the title/folder name while it is playing: 1. Press the “FIND” Button on the Remote once, then press the “Skip/Search Up ” or “Skip/Search Down Button, you can search for the Title of each song one by one in alphabetical order on the LCD Display (2), then press the “Play/Pause/Stop” Button to start playback of the selected track. 2. Press the “FIND” Button again, the Folder Name will be being displayed. Then press the “Skip/Search Button to select the desired folder, then press the Play/Pause/Stop” Button Up ” or “Skip/Search Down (14) to start playback of all tracks inside the selected Folder. NOTES: - In case no name has been assigned for the Track, “NO FILE” will be displayed on the LCD Display (2). - If no Folder has been found on the USB device/SD Card, it will show “ROOT” on the LCD Display (2). - The LCD Display supports the English alphabet and numbers only. MP3 Track Format requirement: - MP3 bit rate: 32 KBPS~256 KBPS and WMA bit rate: 32 KBPS ~ 320 KBPS z REPEAT/INTRO/RANDOM MODE (BY REMOTE HANDSET) Press the Repeat/Intro/Random Button before or during playback, a single track, single folder or all the tracks can be played in different Modes, as follows: (1) REPEAT 1 (2) REPEAT ALL TRACKS (6) OFF MODE PLAY MODE REPEAT A SINGLE TRACK REPEAT ALL TRACKS REPEAT A SINGLE FOLDER INTRO PLAY MODE RANDOM MODE OFF MODE (3) REPEAT ONE FOLDER (5) RANDOM (4) INTRO PLAY INDICATOR ON LCD DISPLAY ALL INTRO RANDOM ----------------- z REPEAT PLAY This function allows you to listen repeatedly to the desired track or folder. z INTRO PLAY This function allows you to listen to the first 10 seconds of each track & saves time when searching for a particular song. z RANDOM PLAY This function allows you to listen to all tracks or a folder in random order. TRACKS PROGRAMMING (BY REMOTE CONTROL) Up to 32 tracks can be programmed to play MP3/WMA music files in any order. Before using this function, be sure a USB device or SD Card is connected, and the system is in STOP Mode. 1. Select the USB/SD Function and set it at Stop Mode. 2. Press the “Program” Button , “PROG” will appear on the LCD Display (2). The Program Number and digits of the track numbers to be programmed will also be shown. 3. Select a track by pressing the “Skip/Search Up ” or “Skip/Search Down Buttons. 4. Press the “PROGRAM” Button to store the track number into memory. 5. Repeat steps 3 and 4 to enter additional tracks into memory, as required. 6. When all the desired tracks have been programmed, press the “Play/Pause/Stop ” Button to play the tracks in the programmed order. 7. To cancel the programmed files, press the “Stop” Button on the Remote Handset until “PROG” disappears from the LCD Display (2). PHONO ENCODING INTO MP3 FORMAT This system is able to encode 45/331/3 & 78rpm records into MP3 format and record these into memory media with a USB connection plug or onto an SD/MMC card (maximum up to 2GB memory size - none supplied). Before encoding, make sure one of these is connected to the relevant Port/Slot and that it has enough free memory space. Please note the system does not allow connection via a USB Extension Cord. E-4 A) ENCODING FROM PHONO (Turntable) 1) 2) 3) 4) 5) Switch the Function Button (9) to “PHONO” and then press the “ Rec” Button (13) on the front of the unit or ‘REC’ on the remote control (RC). The word ”USB CARD” will flash on the LCD Display(2), then press the “Skip/Search Up ” or Buttons (19/20) to select the desired Source (USB or SD) for encoding. “Skip/Search Down Then press the “ Rec “ Button (13) (or REC on the RC), “ “&“ “ will flash on the LCD Display (2), and the system will start the encoding Mode after a few seconds. Start playback of the first track on the record you wish to record to USB or SD. After the recording has finished, press and hold the “ Rec “ Button (13). NOTES: - The recording speed is 1:1 and according to the actual playing time of the record. The system will create an “AUDIO” folder and then store the encoding track in it. The recording format is preset at – MP3 bit rate: 128 KBPS, sampling rate: 44.1kHz. To interrupt the recording, press the “ Rec “ Button (13) again during recording Mode. B) COPYING OF MP3/WMA FILE The system allows copying of music files from a USB source to SD/MMC Card (or vice versa) by a “one touch” press of the “REC” button. Select the source which you wish to copy the music file from (for example: if you want to copy the file from USB to SD Card, press the “Source” Button (4) to select USB Mode). I) COPYING A SINGLE TRACK 1. 2. 3. 4. Select the music file you wish to copy and start playback. Press the “ Rec “ Button (13) during playback of the track. “ “&“ “ will flash on the LCD Display (2). The music track will be copied from USB to SD Card (or vice versa). After copying has finished, the unit will stop automatically. II) COPYING ALL TRACKS 1. 2. 3. 4. Make sure the storage device you wish to copy from is connected to the unit. Insert the USB storage device or SD/MMC Card to copy the files to (max. up to 2GB). The contents will be read, but do not play it back. After the contents of the device/card has been read, press the “ Rec“ Button (13) – the unit will display “ “&“ “ and flash. All tracks will be copied now. After copying has finished, the unit will stop automatically. NOTES: - If you press the “ Rec “ Button during playback of USB or SD source, the file will be copied from USB to SD or SD to USB. - The system will create an “FCOPY” folder store for copied tracks. C) ENCODING BITRATE (BY REMOTE HANDSET) You can select the desired bit rate during encoding from Phono to USB/SD, the selectable range is from 32/64/96/128/192/256 KBPS. 1) 2) 3) 4) Select the “Phono” function (9) but remain in Stop Mode. Press the “Info” Button and the LCD Display will show the default bit rate (128KBPS). or “Down” buttons to select the desired bit rate for encoding. Press the “Up” Press the “Info” again to confirm the setting and the LCD Display(2) will show “Phono” Mode again. D) TRACK SEPARATION (BY REMOTE HANDSET) While recording vinyl records, the music tracks would normally be recorded as one long track. If you wish to separate the tracks while encoding/recording from Phono to USB/SD, press the “ “ (Track Separation) Button once on the remote control handset after each track, the system will generate a new track and continue the recording – the word “PHONO” flashes up once on the LCD Display (2) to indicate the unit is successfully creating a new track. E-5 DELETING FILES ON USB / SD CARD (BY REMOTE CONTROL) The system is able to erase the music files stored on a USB Flash Drive or SD Card. This function is performed with the USB/SD Card connected, but in Stop Mode. The procedure is as follows: Slide the Function Selector (9) to USB/SD Mode and then press the Source Button (4) to select either “USB” or “SD” Mode. A) DELETING A SINGLE FILE With the USB device/SD Card, you wish to delete a track from, connected: 1. Press and hold the “INFO/ “ Button on the Remote Control for 3 seconds and the LCD Display (2) will show (DEL---001). or Backward Button to select the file to be deleted. 2. Press the Skip Forward or Backward to select 3. Press the “REC“ Button to enter “YES/NO” Mode and then press Skip Forward “YES” or “NO”. 4. Press the “REC“ Button to confirm the setting. B) DELETING ALL FILES To delete all the files/tracks on the USB device/SD Card connected: 1. Press and hold the “INFO” Button on the Remote for 3 seconds and the LCD Display (2) will show (DEL---001). 2. Press the “INFO“ Button again to enter “YES/NO” Mode and then press skip forward or backward to select “YES” or “NO”. 3. Press the “REC” Button to confirm the setting. 4. Press the “STOP“ Button once on the Remote handset to exit the Delete Mode. NOTE: All files on the USB storage device or SD/MMC Card will be fully and permanently deleted after “YES” has been selected and confirmed. REMOVAL OF A USB DEVICE / MEMORY CARD It is not safe to remove the USB device / Memory Card until the main Power Knob is switched to OFF (17) or the Function is switched to either “AUX” or “PHONO” mode. • • USB PORT – Unplug the device from the USB Socket by pulling it out straight. MEMORY CARD – Press the Memory Card in gently and then release it, the card will be partially ejected and can then be removed by hand. LINE OUT CONNECTION You can connect the system to another Hi-Fi System by connecting the Line-Out Socket (24) to the Auxiliary Input socket of the other Audio Unit/Amp/PC, etc. with an RCA cable (L + R – cable not included). AUX-IN CONNECTION You can connect another audio device (e.g. a Cassette Player/iPOD/CD Player) via its Headphone Output Jack and a cable with 3.5mm dia. plug to this system. Plug it into the Aux-in Socket (6) on the front of this unit for either playback or encoding/recording to MP3 (USB/SD). X-BASS OPTION To add extra Bass sound, press this button, press it again to switch this function off. SUBWOOFER JACK Connect a powered Subwoofer to the Subwoofer Jack (27) on the rear of this unit to add extra BASS sound. E-6 REMOTE CONTROL TRANSMITTER BATTERY INSTALLATION (Batteries not supplied) The Infra-Red Transmitter (Remote Control Handset) requires 2 x “AAA”/1.5V size batteries for operation. BUTTON DESCRIPTION 1) FIND In MP3/WMA Mode, press to activate File/Folder Name Search Function 2) INFO / In Phono Stop Mode, press to select the Encoding Bit Rate Press for USB/SD File deletion function 3) REC Press to activate Recording or Copy Function 4) REP/INTRO/RAN In USB/SD Mode, press to activate Repeat/Intro/Random Function 5) PROGRAM In USB/SD Mode, press to activate Programming Function 6) PLAY/PAUSE In USB/SD Mode, press once to Start Playback. Press again to enter Pause Mode 7) SKIP/SEARCH FORWARD SKIP/SEARCH BACKWARD Press once to skip to the next track, press & hold to search forward Press once to skip to the previous track, press & hold to search backward 8) STOP In USB/SD Mode, press to Stop Playback or cancel a stored program or exit the Delete Mode 9) FOLDER UP /DOWN In MP3 Mode, press to select Folder Up or Down 10) SOURCE In USB/SD Mode, press repeatedly to select USB or SD function 11) TRACK SEPARATION Press to separate the turntable tracks during recording E-7 SPECIFICATIONS Speaker Max Output Output Wattage Speaker Ohms Subwoofer Jack USB 2.0 Port/SD Card Slot Power Source Accessory supplied Batteries for Remote Transmitter : : : : : : : : : : : 14 Watts RMS 2 x 1.5W 4Ω Output to an active Subwoofer (not supplied) Please contact your supplier to purchase a suitable Subwoofer (e.g. Steepletone Subwoofer Model “T-008”) Supports up to 2GB Flash Memory of MP3 Player/Flash Drive-SD/MMC Card (None supplied) 230V AC Mains ~ 50Hz Infra-red Remote Control Handset 2 x 'AAA’ /1.5V required (not supplied) INSTRUCTIONS ON ENVIRONMENT PROTECTION DO NOT DISPOSE OF THIS PRODUCT IN THE USUAL HOUSEHOLD WASTE AT THE END OF ITS LIFECYCLE, HAND IT OVER AT A COLLECTION POINT FOR THE RECYCLING OF ELECTRICAL AND ELECTRONIC APPLIANCES. THE SYMBOL ON THE PRODUCT, THE INSTRUCTIONS FOR USE OR THE PACKING WILL INFORM THEM ABOUT THE METHODS FOR DISPOSAL. THE MATERIALS ARE RECYCLABLE AS INDICATED BY THE SYMBOL ON THE LEFT. BY RECYCLING, MATERIAL RECYCLING OR OTHER FORMS OF RE-UTILIZATION OF OLD APPLIANCES, YOU ARE MAKING AN IMPORTANT CONTRIBUTION TO PROTECT THE ENVIRONMENT. PLEASE CONTACT YOUR LOCAL COUNCIL FOR INFORMATION ON THE AUTHORIZED DISPOSAL LOCATION AND RECYCLING FACILITIES. E-8