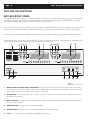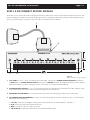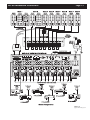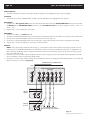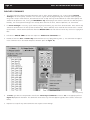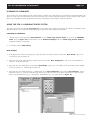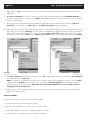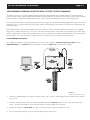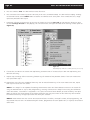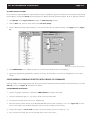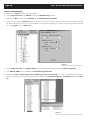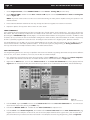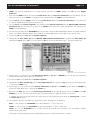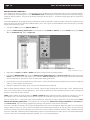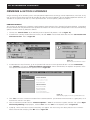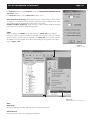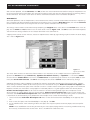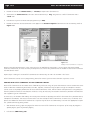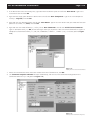
1
INSTALLATION INSTRUCTIONS
MZC-88
Multi-Zone A/V Amplifier Controller
with EZ-Pad System
MZC-88 Installation Instructions
Page MZC-88 Installation Instructions
Page Contents
INTRODUCTION............................................................................................................... 6
PRODUCT FEATURES........................................................................................................ 6
SYSTEM OVERVIEW.......................................................................................................... 7
EZ-PAD GANG CONFIGURATIONS..................................................................................... 7
EZ-PAD FEATURE DESCRIPTIONS...................................................................................... 8
MZC-88 FRONT PANEL................................................................................................... 10
MZC-88 REAR PANEL...................................................................................................... 12
KCM-1.0 EZ-CONNECT KEYPAD MODULE........................................................................ 15
EPR-1.0 EZ-PAD RELAY MUTING MODULE....................................................................... 16
HED-1.0 MASTHEAD AMPLIFIER..................................................................................... 17
LTM-1.0 LEARN/TEST MODULE AND TRANSFER/ADAPTER CABLES.................................. 18
SYSTEM PLANNING AND INSTALLATION......................................................................... 22
SYSTEM PLANNING........................................................................................................ 22
SYSTEM INSTALLATION................................................................................................... 24
WIRING......................................................................................................................... 24
KEYPADS..............................................................................................................................................24
VIDEO..................................................................................................................................................25
SPEAKERS............................................................................................................................................25
CONTACT CLOSURES............................................................................................................................25
EXPANSION PORT/LOOP......................................................................................................................25
RS232..................................................................................................................................................25
CONTROL PORT...................................................................................................................................25
PHONE PAGE IN...................................................................................................................................25
VIDEO PAGE IN....................................................................................................................................26
DOORBELL/STATUS IN..........................................................................................................................26
COMMON IR OUT.................................................................................................................................26
COMMON STATUS OUT........................................................................................................................26
STATUS IN............................................................................................................................................26
FM/AM/75Ω.........................................................................................................................................27
SOURCE IR OUT...................................................................................................................................27
SOURCE IR LOOP.................................................................................................................................27
SOURCE AUDIO/VIDEO INPUT..............................................................................................................27
SOURCE AUDIO/VIDEO LOOP..............................................................................................................27
ZONE PRE-OUT....................................................................................................................................27
ZONE IR OUT.......................................................................................................................................27
EZ-PAD CONFIGURATION............................................................................................... 28
INSTALLATION............................................................................................................... 30
HEAD-END...........................................................................................................................................30
CONNECTIONS - HEAD END.................................................................................................................30
Keypads............................................................................................................................................................30
External Source Components.............................................................................................................................30
Emitters (Source)................................................................................................................................................30
Speakers............................................................................................................................................................31
Video Output....................................................................................................................................................31
Fm/am/75Ω......................................................................................................................................................31
Paging..............................................................................................................................................................31
Contact Closures...............................................................................................................................................32
Expansion.........................................................................................................................................................32
Rs232 Data I/o..................................................................................................................................................32
Control Port.......................................................................................................................................................32
Common Ir Out.................................................................................................................................................32
Common Status Out..........................................................................................................................................33
MZC-88 Installation Instructions
Page Status In............................................................................................................................................................33
Zone Pre-out.....................................................................................................................................................33
High-power, Two Channel Amplifier - Vc, Variable Output..................................................................................33
Sub-zone Expansion, Multi-channel Amplifier - Nvc, Fixed Output.......................................................................33
Zone Ir Out.......................................................................................................................................................33
120v 60hz 3a....................................................................................................................................................33
ZONES.................................................................................................................................................34
CONNECTIONS - ZONES.......................................................................................................................34
Keypads............................................................................................................................................................34
Speakers............................................................................................................................................................34
Direct Speaker Connection To Mzc-88 Or Amplifier.............................................................................................34
SPEAKER CONNECTION TO EPR-1.0 EZ-PAD RELAY MUTING MODULE ..............................................................34
Video................................................................................................................................................................34
Other Zone Connections...................................................................................................................................34
EXTERNAL AMPLIFIERS................................................................................................... 36
ADDING A HIGH-POWER TWO-CHANNEL AMPLIFIER TO A ZONE.........................................................36
Installation.........................................................................................................................................................36
Connections And Configuration.........................................................................................................................36
ADDING A 12-CHANNEL AMPLIFIER TO A ZONE...................................................................................38
Installation.........................................................................................................................................................38
Connections And Configuration.........................................................................................................................38
EXPANDED SYSTEMS...................................................................................................... 40
Installation.........................................................................................................................................................40
Connections And Configuration.........................................................................................................................40
COMMON STATUS OUT.....................................................................................................................................44
MZC-88 INTERNAL TUNER SETUP................................................................................... 44
Programming Tuner Presets...............................................................................................................................45
PROGRAMMING WITH EZ-TOOLS................................................................................... 46
DOWNLOAD EZ-TOOLS........................................................................................................................46
Assigning Ir Commands To Button Keys.............................................................................................................47
POWER MANAGEMENT/EVENTS PROGRAMMING.................................................................................48
Power On.........................................................................................................................................................48
Power Off.........................................................................................................................................................49
Cloning and Programming the Remaining Zones.....................................................................50
ADVANCED PROGRAMMING.......................................................................................... 51
Delays................................................................................................................................................51
Punched Commands........................................................................................................................52
Priority..............................................................................................................................................53
Priority – Equal..................................................................................................................................................53
Priority – First Come, First Served.......................................................................................................................53
Zone Priority......................................................................................................................................................54
Source Priority ..................................................................................................................................................54
Individual Key Priority .......................................................................................................................................55
Zone/Whole House Muting...........................................................................................................55
EPR-1.0 Muting Relay.........................................................................................................................................55
Designated Relay Mute Key...............................................................................................................................55
Insert Mute Commands.....................................................................................................................................57
Keypad – Mute On, Off or Toggle......................................................................................................................57
Zone – Mute On, Off or Toggle.........................................................................................................................58
Global – Mute On, Off or Toggle.......................................................................................................................58
Learning IR Commands....................................................................................................................59
Using the LTM-1.0 Learning Sensor System...................................................................................59
Learning IR Commands.....................................................................................................................................59
New Brands......................................................................................................................................................59
Existing Brands..................................................................................................................................................60
Programming Learning Remotes with EZ-Code System Commands.........................................61
MZC-88 Installation Instructions
Page Programming Procedure....................................................................................................................................61
EZ-Code Group Settings....................................................................................................................................63
Programming Learning Remotes with Library IR Commands...................................................63
Programming Procedure....................................................................................................................................63
Templates..........................................................................................................................................................64
Exporting Source BANKS as Template Files..........................................................................................................65
Importing Source BANK Template Files...............................................................................................................65
Icon Templates..................................................................................................................................................66
Exporting Icons as Template Files.......................................................................................................................66
Importing Icon Template Files............................................................................................................................67
Doorbell/Page Programming.............................................................................................................................67
Timeout and Momentary Page Control..............................................................................................................67
Timeout Programming.......................................................................................................................................68
Momentary Page Programming.........................................................................................................................69
Direct Door Viewing/Listening . ........................................................................................................................70
Programming MZC-88 Internal Commands........................................................................................................70
Tone Commands...............................................................................................................................................72
Tier Programming..............................................................................................................................................72
Audio Routing Commands................................................................................................................................74
Video Routing Commands.................................................................................................................................75
Contact Closure Commands..............................................................................................................................75
MZC-88 Setup Menus.........................................................................................................................76
Source Assignments...........................................................................................................................................76
Misc..................................................................................................................................................................76
EZ-Code Group.................................................................................................................................................76
MZC-88 System Configuration for Zone Expansion...................................................................77
ZONE SETUP Menus..........................................................................................................................................77
Name/Sources...................................................................................................................................................77
Name/Description ............................................................................................................................................77
Available Sources: (Check to Enable In This Zone)...............................................................................................78
Whole House/Mute...........................................................................................................................................79
Whole House/Party Mode ................................................................................................................................79
EVENTS SETUP.....................................................................................................................................80
System Turning ON (1st Zone ON)......................................................................................................................80
System Turning OFF (Last Zone OFF).................................................................................................................81
Zone Turning ON & Zone Turning OFF Events...................................................................................................82
Doorbell Triggers #1 and #2..............................................................................................................................83
Party Mode Start-Up..........................................................................................................................................83
ZONE EXPANSION......................................................................................................... 84
Programming for Zone Expansion...............................................................................................84
Downloading to Master & Slave Units................................................................................................................85
PRINTING PROJECTS...................................................................................................... 86
Printing the Project............................................................................................................................................86
SAVING AND BACKING UP EZ-TOOLS FILES.................................................................... 88
AutoSave...........................................................................................................................................................88
Back Ups...........................................................................................................................................................88
FIRMWARE & EZ-TOOLS UPGRADES............................................................................... 89
Firmware Updates.............................................................................................................................................89
EZ-Tools Upgrades.............................................................................................................................................91
Command Library Merges.................................................................................................................................92
APPENDIX...................................................................................................................... 93
EZ-Tools Menu Items..........................................................................................................................................93
File....................................................................................................................................................................93
Edit...................................................................................................................................................................93
Project...............................................................................................................................................................93
MZC-88................................................................................................................................................94
MZC-88 Installation Instructions
Page Tools.................................................................................................................................................................94
View.................................................................................................................................................................95
Help..................................................................................................................................................................95
Importing Pronto Hex Code...............................................................................................................................96
Importing Xantech Palette (“.pal”) Files...............................................................................................................98
Command Properties (IR)...................................................................................................................................99
Command Protocol & Data................................................................................................................................99
Wide Bursts.....................................................................................................................................................101
Min. Output Time (Sec.)...................................................................................................................................102
Frequency (25k-470k)......................................................................................................................................102
Capture...........................................................................................................................................................102
Repeating Data...............................................................................................................................................102
Custom Code & Data Code Fields....................................................................................................................103
rs232 commands............................................................................................................................103
Programming RS232 Commands To Ez-pads....................................................................................................103
Adding New RS232 Commands To The Command Library...............................................................................104
TROUBLESHOOTING.................................................................................................... 107
MZC-88 Specifications.............................................................................................. 109
Page MZC-88 Installation Instructions
INTRODUCTION
Thank you for purchasing the SpeakerCraft MZC-88 Multi-Zone A/V Amplifier Controller. The MZC-88 contains the excellent
performance and reliability that SpeakerCraft products have been recognized for. The MZC-88 features the flexibility
needed for the most demanding custom installation applications. It is ideal for use in residential and commercial multi-zone
applications. For best performance, please carefully read the instructions in this manual.
MZC-88 Is The Most Powerful One-stop Multi-Zone Audio/Video/Control Solution Available Today.
• Power In Amplification ... 16 channels of 50 watt state-of-the-art digital amplification for maximum efficiency in a small
chassis.
• Power In Tuning Flexibility... Two AM/FM tuners with a total of 80 presets allows each zone to have 10 tuner presets.
• Power In Control...Complex control made simple with EZ-Pad’s ability to execute single IR commands or complex macros
with the press of a button. EZ-Pad Keypads are the ONLY keypads available today that give the installer the ability to
change the number of Source buttons based on the user’s needs.
• Power In Programming...The flexibility of EZ-Tools Programming Software allows system design for any number of
sources from one to eight and the option to convert unused Source buttons to function buttons as needed. EZ-Tools
programming is the most powerful and flexible multi-zone A/V system programming software available today.
PRODUCT FEATURES
•
•
•
•
•
•
•
•
•
•
•
•
•
•
•
•
•
•
•
•
•
•
•
•
•
8 Independent Zones (Expandable to 32)
2 Built-in AM/FM Tuners with 10 Presets PER ZONE
6 External Audio/Video Source Inputs
16 Channel Audio Amplifier @ 50 watts per channel
8 MKP8.1 Master Keypads INCLUDED
Single, Double, Triple Gang Keypad Configurations
Source Power Management
Whole-House Party and Control Modes
Telephone and Video Paging
Doorbell Mute
2 Programmable 12V Inputs for Doorbell/Page Trigger
2 Dry Contact Closures
RS232 Control I/O
RS485 Control I/O
8 Configurable Preamp Outputs (One per Zone)
1 Common IR Output
8 Zone IR Outputs (One per Zone) for Dedicated Zone Source Control
6 Programmable 12V Status Inputs for External Source Power Management
6 Audio/Video Loop-Throughs for easy Connections in Expanded Systems
6 IR Loop-Throughs for Source Control in Expanded Systems
Front and Rear Panel Programming Ports
Front Panel IR Learning Eye
Upgradable Firmware
Programmed With EZ-Tools Programming Software
2 Year Warranty
MZC-88 Installation Instructions
Page SYSTEM OVERVIEW
The SpeakerCraft MZC-88 System consists of four subsystems. First, the EZ-Pad Keypads can be configured in a variety of button arrangements and mounted in one, two, or three gang configurations to meet virtually any client requirement. They are
connected via convenient CAT-5 cable with home run lengths of up to 1000’ (305m), to the centrally located MZC-88 MultiZone A/V Amplifier Controller and source components. The MZC-88 contains the “brains” of the system, taking key location
data (button presses) from the keypads to trigger IR, RS232 and RS485 commands to control system functions and source
components. Programming is accomplished using EZ-Tools, a SpeakerCraft developed Windows® software system. A fourth
item, the LTM-1.0 Learning Test Module, is an installer’s tool (not included) for learning and teaching special IR commands
that are not included in the EZ-Tools internal library.
EZ-PAD GANG CONFIGURATIONS
The MZC-88 System comes with eight, pre-configured, single-gang MKP-8.1 EZ-Pads, as shown in Figure 1. (Decorator style
cover plates are not included. Screw-less “Snap-On” type cover plates can also be used. Double and triple-gang keypad configurations are optional.)
Each keypad comes with a set of factory installed “default buttons” plus a good variety of additional buttons for changes
to the default configuration. The default buttons can be easily changed to meet the needs of any installation. Additional
buttons are available separately for purchase. See the SpeakerCraft catalog and price sheets for the latest availabilities or call
SpeakerCraft Customer Service.
TNR1
TNR2
SAT
CD
SAT
CD
VCR
DVD
VCR
DVD
CBL
AUX
1
2
3
TNR1
TNR2
4
5
6
SAT
CD
7
8
9
VCR
DVD
CBL
AUX
TRK
0
DSC
1
2
3
4
5
6
7
8
9
TRK
0
DSC
MUTE
MUTE
RDM
MUTE
RDM
PWR
PWR
GRP
PWR
GRP
MKP-8.1
(Eight included with MZC-88)
Single Gang
MKP-1.0
NKP-1.0
(optional)
Two Gang
MKP-8.1
NKP-1.0
(optional)
Three Gang
GUIDE
MENU
SEL
ESC
INFO
PLAY
FKP-1.0
Figure 1
EZ-Pad Gang Configurations
Page MZC-88 Installation Instructions
EZ-PAD FEATURE DESCRIPTIONS
EZ-Pads come in four basic modules as shown. The MKP-1.0, MKP-8.1 and MKP-1.1 are Master Keypads and one must be
used in each MZC-88 Zone using a keypad. The MZC-88 comes with eight pre-configured MKP-8.1’s. For convenience, it is
usable right “out of the box” in conjunction with a default project that is factory programmed into the MZC-88. The MKP-8.1
and MKP-1.1 feature a built-in IR receiver and have one less function button than the MKP-1.0, but are otherwise identical.
The NKP-1.0 Numeric and FKP-1.0 Function key modules may be thought of as “slaves” to the Master Keypad (they will not
work alone), providing more buttons for additional numeric and function commands.
3 4
MUTE
MUTE
PWR
PWR
8
4
Rear View
MKP-1.0 Master
(Not included with MZC-88)
9
3
4
5
6
7
8
9
TRK
0
DSC
485 B
485 A
GND
MENU
SEL
4.07"
ESC
INFO
NKP-1.0
FKP-1.0
RDM
J-Box EZ-Pad
- Numeric -
GRP
SpeakerCraft
PLAY
®
Rear View
®
2
GUIDE
NKP-1.0 Numeric
(Not included with MZC-88)
SpeakerCraft
Rear View
9
KEYPAD EXPANSION
2
MKP-8.1
J-Box EZ-Pad
w/IRC
- Master -
MKP-8.1 Master
(Included with the MZC-88 and has an IR Receiver)
1.77"
1
89
67
AUX
ADDRESS
DVD
CBL
KEYPAD EXPANSION
VCR
- RELAY
CD
IR/IO
6
7
SAT
CD
AB
+RELAY
485 B
485 A
GND
®
TNR2
+12V
SpeakerCraft
TNR1
KEYPAD EXPANSION
89
67
ADDRESS
KEYPAD EXPANSION
- RELAY
MKP-1.0
J-Box EZ-Pad
- Master -
+12V
+RELAY
DVD
2345
VCR
5
EF 01
CD
EF 01
CD
AB
SAT
IR/IO
2
2345
1
J-Box EZ-Pad
- Function -
SpeakerCraft
®
Rear View
FKP-1.0 Function
(Not included with MZC-88)
Figure 2
EZ-Pad Features
1. MKP-1.0/MKP-8.1 SOURCE/FUNCTION BUTTONS – Any of this set of eight buttons can be programmed as a
Source Select or transport/function button for the MZC-88. One of the eight must always be designated as a Source
Button. When the system is off, all buttons have a background green color. When a source button is pressed, it turns to
a low-level red color to show the active source and the system is on in that zone.
2. KEYPAD EXPANSION TERMINAL – This 16-pin header terminal is used to inter-connect EZ-Pad modules for expansion
as needed. A 3-connector ribbon cable is packed with each NKP-1.0 and FKP-1.0 module for making these connections.
3. ADDRESS SWITCH – An unique hex address must be set for each Master Keypad when connected on a common bus
within a single zone. Unique addresses are not required zone-to-zone. It provides up to 16 addresses (0 to F).
4. SNAP TABS – These tabs hold the decorator style insert panel to the metal mounting plate and are easily released for
changing buttons.
MZC-88 Installation Instructions
Page 5. MOUNTING PLATE – Standard plate allows the keypad module to be attached to standard in-wall J-Boxes using the 2
screws provided. Also allows attachment of standard and screw-less, snap-on decorator type cover plates.
6. IR RECEIVER LENS – The MKP-8.1 includes SpeakerCraft’s exclusive ANS (Ambient Noise Suppressor) IR Receiver, built-in.
The IR Receiver allows use of a handheld remote for control of the system and IR controlled source components.
7. EZ-CONNECT TERMINALS – These seven spring-loaded terminals accept wire sizes 14 to 28 AWG for connection of
the following:
•+RELAY/–RELAY – For connection of the external EPR-1.0 EZ-Pad Relay Speaker Muting Module. (Refer to Designated Relay Mute Key section and Figures 6 & 19).
•+12V DC – Powers the Keypad, including the internal IR Receiver on models MKP-8.1 and MKP-1.1. Includes reverse voltage protection.
•IR/IO – Sends IR control signals for control of system components.
•GND – Return for Power, IR signal and Data.
•485 A/485 B – Balanced, bi-directional system communications data.
8. FUNCTION BUTTONS – These lower 5 buttons (4 buttons on the MKP-8.1) are primarily used for volume, mute and
power, but can also be programmed for any function except source select. These buttons glow a low-level background
green and do not change color when pressed. Button background lighting can be programmed to go off after a set
time of inaction, or stay on continuously as programmed in EZ-Tools.
9. NUMERIC AND FUNCTION BUTTONS – These buttons are used for direct numeric access of discs and tracks, selection of tuner presets, transport functions and menu navigation. All numeric and function buttons, including those on
the Master Keypads, glow a low-level background green and do not change color when pressed. This background
lighting can be programmed to go off after a set time of inaction, or stay on continuously as programmed in EZ-Tools.
Page 10
MZC-88 Installation Instructions
FEATURE DESCRIPTIONS
MZC-88 FRONT PANEL
The MZC-88 is an 8-Zone, 8-Source A/V Amplifier Controller. It serves as the “brains” of the entire keypad system and provides
audio/video switching and control for six external sources and two on-board AM/FM Tuners. Sixteen 50W/channel digital
audio power amplifiers provide clean, powerful audio for up to eight zones.
The Front Panel features two large displays, one for each of the on-board AM/FM Tuners. All tuner programming is done with
the front panel tuner function buttons. Zone ON/OFF Status is also displayed on the front panel to show system activity.
The Rear Panel is neatly laid out to provide clear access for all system control, audio, video, paging and trigger connections.
System Programming can be done from connections on either the Front or Rear Panels. An IR Capture Eye is provided on the
Front Panel for on-site learning of IR codes not included in the IR Code Library.
1
16
2
3 4 6
5
7
8
9
10 11 13
12
17
14
18
19
15
20
21
Figure 3
MZC-88 Front Panel Features
1. ZONE STATUS LED INDICATORS AND LABELS – Eight, green LEDs, illuminate to show active zones and turn off
when zones are off. Indented spaces accept adhesive backed labels for zone/room identification. A sheet of descriptive
labels, typical of room or area names used in homes, is included.
2. RDS BUTTON — Enables/disables Tuner 1 Radio Data System information. RDS displays station frequency, call letters,
broadcast genre and time.
3. MN/ST BUTTON — Toggles Tuner 1 FM stereo/mono modes. Mono can be useful for cleaning up background noise
on hard to tune channels.
4. AM/FM BUTTON — Toggles Tuner 1 AM and FM bands.
5. ZONE BUTTON — Selects Tuner 1 Zone for programming and selecting Presets.
6. TUN +/- — Changes Tuner 1 frequency UP/DOWN when pressed.
MZC-88 Installation Instructions
Page 11
7. TUNER 1 DISPLAY — LCD shows Tuner 1 status by: Zone, Band, Frequency, Preset, Mode and Frequency Lock.
8. PRESETS — Tuner 1 Presets 1-10. Press to select preset for programming or channel preset select by zone.
9. RDS BUTTON — Enables/disables Tuner 2 Radio Data System information. RDS displays station frequency, call letters,
broadcast genre and time.
10.MN/ST BUTTON — Toggles Tuner 2 FM stereo/mono modes. Mono can be useful for cleaning up background noise
on hard to tune channels.
11.AM/FM BUTTON — Toggles Tuner 2 AM and FM bands.
12.ZONE BUTTON — Selects Tuner 2 Zone for programming and selecting Presets.
13.TUN +/- — Changes Tuner 2 frequency UP/DOWN when pressed.
14.TUNER 2 DISPLAY — LCD shows Tuner 2 status by: Zone, Band, Frequency, Preset, Mode and Frequency Lock.
15.PRESETS — Tuner 2 Presets 1-10. Press to select preset for programming or channel preset select by zone.
16.MASTER POWER SWITCH — When pressed to the in position, the MZC-88 is placed in the power ON standby condition, permitting individual zones to be turned ON and OFF by keypad, IR remote or touch panel commands. In the
OFF (out) position, power from the AC mains is completely turned off.
17.MASTER POWER LED — Indicates when the Master Power switch is in the depressed position and that power has
been applied from the AC mains.
18.CONTROL PORT — One, 4 circuit 3.5mm mini jack connects to a PC running EZ-Tools for system programming and
Firmware upgrades.
19.FIRMWARE UPGRADE — One, two position switch enables the MZC-88 Control Port for Firmware Upgrades instead
of normal system program.
20.IR CAPTURE — IR learning eye used with EZ-Tools to learn IR Codes not found in the embedded IR Code Library.
21.ACTIVITY INDICATOR — Flashes when the system is learning IR commands or executing system functions.
Page 12
MZC-88 Installation Instructions
MZC-88 REAR PANEL
1
2
3
4
5
6 7
8
9
10 11
12 13
10
15
14 16
19
17 18 20 21 22
23
Figure 4
MZC-88 Rear Panel Features
1. 8-ZONE KEYPAD INPUTS — One, SCSI terminal connects to a SpeakerCraft KCM-1.0 EZ-Connect Keypad Module
for connection of zone keypads and IR sensors.
2. CONTACT CLOSURE — Two, single pole dry relay contacts used to activate any device that can be controlled or triggered by a switch closure. These closures can be programmed within EZ-Tools to be activated by keypad presses, EZCode IR, or within macro commands for Momentary, Toggle and Open/Close Paired operations. Spring loaded terminals
accept wire sizes from 28 to 14 AWG. Internal relay contacts are rated at 2A/30V AC or DC.
3. EXPANSION PORT/LOOP — Two, RJ45 jacks primarily used for looping system data to multiple MZC-88’s in expanded
systems. These jacks can also be used for connection of specialized RS485 controlled products.
4. RS232 DATA I/O — One, DB9F terminal allows the MZC-88 to control certain RS232 compatible devices such as
source components and lighting systems.
5. CONTROL PORT — One, 3.5mm 4-circuit mini jack allows several control functions. All Controller and keypad programming is accomplished via this port when connected to a PC running EZ-Tools with the optional 3.5MM PLUG
TRANSFER CABLE. It also accommodates factory firmware upgrades in conjunction with the FIRMWARE UPGRADE
OFF/ON SWITCH on the Front Panel of the MZC-88. The Firmware Upgrade Switch should be in the OFF position at all
times, except, as instructed within EZ-Tools, when performing a firmware upgrade. Such upgrades ensure that the MZC88 has the latest functionality improvements without having to be shipped back to the factory. Another function of this
port is to control installed system components with bi-directional data via touch panels or computers using RS232 protocol.
NOTE: The 3.5mm Plug Transfer Cable would typically be connected to the DB9 COM Port on a PC. For computers
that do not have a DB9 COM Port, use the optional USB/SERIAL ADAPTER CABLE. When using a USB port, connect
the USB/Serial Adapter and the 3.5mm Transfer Cable together. Connect one end to a USB port on the PC and the
other end of the assembled cable to the Control Port on the MZC-88.
6. PHONE PAGE IN — One, RCA jack provides input for line level audio source such as telephone systems, door mics
or other audio paging sources. This jack is programmable in EZ-Tools, to turn on as an event, when triggered by the
DOORBELL/STATUS IN Jacks, item 8.
MZC-88 Installation Instructions
Page 13
7. VIDEO PAGE IN — One, RCA jack provides input for composite video from doorbell paging systems, cameras or
other composite video sources. This jack is programmable in EZ-Tools, to turn on as an event, when triggered by the
DOORBELL/STATUS IN Jacks, item 8.
8. DOORBELL/STATUS IN 1 & 2 — Two, 3.5mm mini jack trigger inputs work in conjunction with the PHONE/VIDEO
PAGE IN jacks, items 6 & 7. When triggered, the Phone and/or Video inputs can be turned on in selected zones as
programmed in EZ-Tools. If Audio or Video paging is not required, these jacks can also be programmed as STATUS
INPUTS for power management of Source or Zone components. POLARITY: TIP= +V; SLEEVE=GND. INPUT VOLTAGE:
3-30V AC or DC to trigger the ON condition. Voltage must drop below 1V AC or DC for OFF.
9. COMMON IR OUTPUT — One, 3.5mm mini jack outputs all IR commands from IR sensors and Keypads regardless of
zone origin. POLARITY: TIP=SIGNAL; SLEEVE=GND.
10.HI/LO SWITCH — One, two position switch, sets high or low IR power output to the Common IR Output jack. Set to
the LO setting when driving standard low power emitters (SpeakerCraft IRE-1.0, 2.0, 3.0 and 4.0). Set to HI when driving a high power emitter (SpeakerCraft IRE-5.0 Blaster) for teaching IR commands into learning remotes. HI OUTPUT:
110mA; LO OUTPUT: 13mA. CAUTION: The HI position will smoke low power emitters!
11.COMMON STATUS OUT — One, 3.5mm mini jack will go high (+12V DC) when any zone is turned ON and will go
LOW (under 1V DC) when the last zone is turned OFF. POLARITY: TIP=+12V DC; SLEEVE=GND. MAX OUTPUT: 100
mA at 9.5V DC.
12.STATUS IN — Six, 3.5mm mini jack trigger inputs primarily used for power management of common source components that do not have discreet IR ON/OFF codes. These jacks sense constant voltage to determine the ON/OFF state
of the sensed component. Typically, a current sensing device with a 12V DC output would be used to let the MZC-88
know when a component is ON or OFF. The MZC-88 will then appropriately send or not send an IR ON/OFF toggle
command to that component when that source is selected or when the system is being shut down. ON/OFF conditions are programmed in EZ-Tools as Keypad macros or system events. When not used for power management, these
jacks can be used to trigger events such as IR macros, switch closures and initiate RS232 commands. POLARITY:
TIP=+V; SLEEVE=GND. INPUT VOLTAGE: 3-30V AC or DC to trigger the ON condition. Voltage must drop below 1V
AC or DC for OFF.
13.FM/AM/75Ω — One, F-type terminal, connects to a SpeakerCraft HED-1.0 Masthead Amplifier. The HED-1.0 should be
located away from the system components to reduce RF interference and improve reception. FM Dipole and AM Loop
antennas connect to the HED-1.0. The HED-1.0 connects to the MZC-88 via RG6 coaxial cable terminated with F-type
connectors on runs up to 100’. CAUTION: Do not connect an antenna directly to this terminal. There is DC voltage
present to power the HED-1.0. This voltage will interfere with antenna performance and possibly cause electrical short if
not terminated properly.
14.IR OUT (Source) — Six, 3.5mm mini jacks, one per Source, output IR commands to external common source components. When a source is selected, from a keypad or remote control, IR commands are routed directly to that source.
This allows selective control of multiple same-brand, same-model source components (multiple Satellite Receivers, DVD
Players etc). POLARITY: TIP=SIGNAL; SLEEVE=GND.
15.IR LOOP — Six, 3.5mm mini jacks, one per Source, provide connections for an IR signal path for external common
source components, when using multiple MZC-88s in expanded systems. i.e. If using two MZC-88s, the SOURCE IR
OUTS on the MZC Slave unit would connect to the appropriate SOURCE IR LOOPS on the MZC Master unit to pass
Source IR commands between controllers from expanded zones. The IR OUTS on the Master connect to IR EMITTERS
attached to the source components for source IR control from all zones. POLARITY: TIP=SIGNAL; SLEEVE=GND.
16.L, R & V INPUT (Source Left/Right Audio & Video Input) — Eighteen RCA jacks, three for each Source, provide
left and right line-level audio and composite video signal inputs for up to six external common source components.
17.L,R & V LOOP (Source Left/Right Audio & Video Loop) — Eighteen, RCA jacks, three per Source, provide buffered
left and right line-level audio and composite video outputs that are typically used to loop Source A/V signals to additional zone inputs on Slave MZC-88’s in expanded systems. i.e. The L, R, V LOOP on the MZC Master would connect to
the appropriate L,R,V INPUT on MZC Slave 1. Slave 1 would then loop to Slave 2, etc. These outputs can also be used
to drive local components, such as a local surround receiver, when not used for expansion.
Page 14
MZC-88 Installation Instructions
18.L & R PRE-OUT — Two, RCA jacks, one pair per Zone, provide left and right line-level audio outputs for driving external high-power/audiophile two-channel amplifiers in large or outdoor zones or a critical listening zone, or driving a
multi-channel amplifier for additional rooms, (sub-zone expansion) where needed.
19.IR OUT (Zone) — One, 3.5mm mini jack, one per zone, provides dedicated Zone IR output for exclusive control of a
specific zone component. (i.e., a dedicated satellite receiver or DVD player, that cannot be controlled from any other
zones). POLARITY: TIP=SIGNAL; SLEEVE=GND.
20.L & R SPEAKERS — Eight, removable screw-down connectors, one terminal per zone, provide quick connection of the
internal amplifiers to Zone stereo speaker pairs. WIRE GAUGE: 14 to 28 AWG.
WARNING: The power amplifiers in the MZC-88 use Bridged (BTL) outputs. Speaker connections must be completely
separate for each channel and have NO common ground connections through any connected Speaker Selectors, VCs,
Test Equipment, etc. Failure to observe this may cause damage and void the warranty.
21.VIDEO OUTPUT — Eight, F-type terminals, one per zone, provide a dedicated composite video output for each zone.
75 ohm outputs provide matched line impedance for high quality video over RG6 cable for lengths up to 500 feet.
22.VC/NVC — Eight, two-position switches, one per zone, switch the PRE-OUT jacks to VC - internal Volume Control (variable, zone volume controlled by keypads or IR remote) or NVC - No Volume Control (fixed, zone volume controlled by
in-wall volume control or volume control on an external device such as an A/V Receiver). In either case, the tone control
action remains available for room “EQ” settings.
23.IEC TYPE AC MAINS RECEPTACLE AND FUSE — One, Standard IEC 3-conductor AC line cord receptacle, connects to
included AC power cord. Also houses the rear panel replaceable AC mains fuse (T6.3AL 250V).
MZC-88 Installation Instructions
Page 15
KCM-1.0 EZ-CONNECT KEYPAD MODULE
The KCM-1.0 is an 8-Zone connection interface for EZ-Pads and IR receivers when used to control a MZC-88. Given the connection flexibility of the MZC-88, the KCM-1.0 provides EZ access to Keypad and IR receiver wiring without interfering with
other system connections. The KCM-1.0 and SCSI cable are included with the MZC-88
1
2
3
4
3
Figure 5.
KCM-1.0 EZ-Connect Keypad Module
1. SCSI CABLE — One, 1 meter SCSI latching connector cable. Connects the 8-ZONE KEYPAD OUTPUTS Terminal on
a KCM-1.0 to the 8-ZONE KEYPAD INPUTS Terminal on a MZC-88 Controller for Keypad connection. When multiple
MZC-88 Controllers are used in expanded systems, one KCM-1.0 is required for EACH MZC-88.
2. 8-ZONE KEYPAD OUTPUTS — One, SCSI Terminal connects to a MZC-88 via the included SCSI Cable. Provides a twoway interface for system control and status between Keypads and the MZC-88.
3. MOUNTING SCREW HOLES — Two, countersunk screw holes for mounting the KCM-1.0 to a wall or shelf.
4. EZ-CONNECT KEYPAD TERMINALS — Eight sets of five spring-loaded terminals, accept wire sizes 14 to 28 AWG for
connection of the following:
•
•
•
•
+12V DC — Powers the Keypad, including the internal IR Receiver on models MKP-8.1 and MKP-1.1.
IR IN — IR signal input from keypad’s IR receiver.
GND — Return for Power, IR signal and Data
485 A/485 B — Balanced, bi-directional system communications data.
Page 16
MZC-88 Installation Instructions
EPR-1.0 EZ-PAD RELAY MUTING MODULE
The EPR-1.0 EZ-Pad Speaker Muting Relay Module allows local speaker muting in any room with an EZ-Pad. Example: An
MZC-88 Zone PRE-OUT feeding a multi-channel amplifier for sub-zone expansion. Each of the additional ‘rooms’ would utilize
one stereo pair speaker-level output from the multi-channel amp, have an EZ-Pad for system and source control and each
keypad would have an EPR-1.0 to mute the local speakers. All rooms in the zone would have the same ON/OFF status and
play the same source. Individual room mute could then be controlled either from a keypad or an appropriately programmed
IR Remote.
1
2
3
1
4
Figure 6.
EPR-1.0 EZ-Pad Relay Features
1. MOUNTING HOLES — Two, keyholes, use these holes to mount the EPR-1.0 to any flat surface (usually to the studding
in the wall behind the EZ-Pad or the in-wall speakers).
2. “AMPLIFIER” EZ-CONNECT TERMINALS — Four, spring-loaded terminals connect to the amplifier L & R speaker level output terminals. WIRE GAUGE: 14 to 28 AWG.
3. “SPEAKERS” EZ-CONNECT TERMINALS — Four, spring-loaded terminals connect to the L & R terminals on the room
speakers. WIRE GAUGE: 14 to 28 AWG.
4. RELAY COIL LEADS — This 12" (305mm) 2-conductor lead connects to the +Relay and –Relay terminals on the back
of the EZ-Pad. It can be extended to any length required (2000’ with 24 AWG wire). Maintain proper polarity. When the
designated MUTE key on the EZ-Pad is pressed, the EPR-1.0 relay opens, thus muting the audio. The selected source button on the EZ-Pad will blink at a slow rate to indicate the muted condition.
MZC-88 Installation Instructions
Page 17
HED-1.0 MASTHEAD AMPLIFIER
The HED-1.0 Masthead Amplifier provides remote connection for the AM and FM antennas used with the MZC-88. The HED1.0 can be located up to 100’ away from the MZC and other system components, reducing RF interference therby improving
reception and reducing noise. Lenghts longer than 100’ can be used, but expect reduction in tuner sensitivity in proportion
to cable length.
1
2
2
3
4
Figure 7
HED-1.0 Masthead Amplifier
1. FM/AM — One, F-type terminal connects to the FM/AM/75Ω terminal on a MZC-88 Rear Panel via RG6 coaxial cable.
FM and AM broadcast reception is output from this terminal and fed to the appropriate tuner section (AM or FM) inside
the MZC-88. Tuner 1 and Tuner 2 are both fed from this connection.
NOTE: The HED-1.0 is phantom powered via this terminal from the MZC, so the run of RG6 must be an unbroken run
with no splits or RF amplifiers.
2. FLANGE SCREW HOLES — Two, screw holes for mounting the HED-1.0 to a stud or wall surface.
3. AM ANTENNA TERMINAL — Two, spring clip terminals for connecting the included AM Loop Antenna. POLARITY:
non-critical.
4. FM ANTENNA TERMINAL — One, F-type terminal for connecting the included FM Dipole Antenna.
Page 18
MZC-88 Installation Instructions
LTM-1.0 LEARN/TEST MODULE AND TRANSFER/ADAPTER CABLES
The LTM-1.0 Kit (optional) come packaged together and include the items illustrated in Figure 8.
Figure 8
EZ-Tools, LTM-1.0 and Cables Package
SpeakerCraft EZ-TOOLS is a Windows®-based software program. It is available as a free download from www.speakercraft.
com. EZ-Tools provides for the complete configuring and programming of MZC Series Multi-Zone Controllers and EZ-Pad
control systems.
Some of its many features include: Key button choice and placement, single and multiple zone assignments, Command
Library, IR learning and testing capability in conjunction with the LTM-1.0, single and macro command programming, status/power management, priority commands management, code length timing, delay settings, events programming, etc.
The LTM-1.0 LEARN/TEST MODULE is primarily an installer’s tool and serves as an IR learning, IR teaching and IR command test module. (Refer to Figure 9) It includes blaster emitters so that learning remotes, used in conjunction with EZPads, can be programmed with system IR commands. Also, special SpeakerCraft EZ-Codes are similarly taught so that keypad sources track automatically with sources selected by the remote.
NOTE: See item 5 on page 8 for details regarding use of the 3.5MM PLUG TRANSFER CABLE and the USB/SERIAL
ADAPTER CABLE.
MZC-88 Installation Instructions
1
2
3
Page 19
4
5
6
11 10
9
8
7
12
Figure 9
LTM-1.0 Learn/Test Module Features
1. RS232 PORT — One, DB9M jack outputs RS232 commands for testing control of RS232 controlled system components.
2. EXPANSION PORTS — Two, RJ45 jacks provide connections for testing control of future RS485 controlled products.
3. CONTROL PORT — One, 3.5mm 4-circuit mini jack is a serial port that provides several control functions. All command
learning and testing functions are accomplished via this port, using EZ-Tools, in conjunction with the 3.5MM PLUG
TRANSFER CABLE. Firmware upgrades for the LTM-1.0 are also accomplished via this port.
NOTE: The 3.5mm Plug Transfer Cable would typically be connected to the DB9 COM Port on a PC. For computers
that do not have a DB9 COM Port, use the USB/SERIAL ADAPTER CABLE (Refer to Figure 8). When using a USB port,
connect the USB/Serial Adapter and the 3.5mm Transfer Cable together. Connect one end to a USB port on the PC
running EZ-Tools and the other end of the assembled cable to the Control Port on the MZC-88.
4. +12V DC REGULATED — One, 2.1mm coaxial jack provides connection for a SpeakerCraft PS-1.0 12V DC 200mA
power supply (included). POLARITY: PIN=+12V DC; SLEEVE=GND.
5. PROGRAMMING SWITCH — One, (upper) DIP switch DISables or ENables LTM-1.0 firmware upgrades. Leave this
switch in the DIS position at all times, unless performing a LTM-1.0 firmware upgrade. Such upgrades are accomplished
via EZ-Tools with the CONTROL PORT (item #3) connected to a PC running EZ-Tools. (This switch setting is for firmware
upgrades to the LTM-1.0 only.)
6. SENSE SWITCH — One, (lower) DIP switch sets the sensitivity of the internal IR Learning Sensor. This switch should
normally be set in the LO position. If the teaching remote has weak output, it should be switched to the HI position.
Page 20
MZC-88 Installation Instructions
7. POWER — Red LED indicates power supply is connected and the LTM-1.0 is active.
NOTE: If the Firmware Switch is set to ON the red power LED will not light.
8. LEARNING SENSOR — Internal IR sensor receives IR command data from external handheld remotes for learning IR
commands that are not available in the EZ-Tools IR command library. Point the “teaching” remote at this lens from a distance of about 1 to 4 inches when “learning” IR commands.
9. BLASTER EMITTERS — These high power emitters output IR commands for testing and “teaching” purposes. When
testing commands, the Blaster Emitters should be pointing toward the device(s) to be controlled. The devices being
tested can be 30 feet or more away, with no obstructions. When “teaching” IR commands to a learning remote, point
the “learning” remote toward these emitters at a distance of about 1 to 4 inches.
NOTE: These Blaster Emitters are automatically disabled whenever an emitter or any 3.5mm mini plug is inserted into
the IR OUT jack (item #11).
10.ACTIVITY INDICATOR — Green LED, indicates IR learning mode activities. Also flashes during activation of internal
command data.
11.IR OUT — 3.5mm 2-circuit mini jack will drive any SpeakerCraft or other compatible emitters at medium power levels
for operational tests of IR commands. It will also drive one AT-1.0 Terminator block for connecting additional to test multiple devices.
NOTE: The Blaster Emitters (item #9) are automatically disabled whenever a 3.5mm mini phone plug is inserted into
this jack.
12.NON-SKID FOOT PADS
MZC-88 Installation Instructions
(Optional)
(Optional)
Page 21
(Optional)
14AWG
Earth
Ground
(See Text)
Figure 10
Typical MZC-88 System
Page 22
MZC-88 Installation Instructions
SYSTEM PLANNING AND INSTALLATION
SYSTEM PLANNING
With all of the flexibility and options of a MZC-88 System, careful planning can save time and money for both the installer
and homeowner. A few EZ steps can help in managing this process.
1. KNOW THE PRODUCT AND ALL OF ITS CAPABILITIES — This will help in making suggestions to the homeowner
for incorporating features they may want. It will also help in being able to combat feature capabilities, or inadequacies,
of a competitive product that another Installation Company may be proposing.
2. KNOW THE HOMEOWNER — Spend some time in the home if possible, and get a feel for how the prospective client
is going to want to use the system. If the home is in the planning stage, be sure to get involved with the architect to assure proper allocation of space for system components, ventilation and access to the system for service (a closet with rear
access to the system connections is ideal whenever possible).
3. DOCUMENT EVERYTHING — When discussing the system with the prospective client, write down all of their ‘wants’
in terms of how they want the system to work. Do they want front doorbell paging with a camera? Do they have lots of
parties and want to ‘group’ zones in common areas? Will they need an external high-powered amplifier for the patio/
pool area?
Write everything down and review it with the homeowner to define specific system features and functions. Suggest
options for future upgrading or expansion of the system, such as additional wire infrastructure, for adding rooms to the
system long after the walls have been sealed. Use the results of the review to create a formal proposal.
4. LEAVE PRODUCT INFORMATION — Leave the client with Brochures for the MZC-88, SpeakerCraft Speakers, Amplifiers and Accessories that will be specified in the proposal. (Packaging it all in a nice folder or binder is a nice touch.)
Confirm a date to review the formal proposal.
5. CONTRACT THE JOB — Get back to the prospective client with a professional, formal proposal. (There are some good
system planning and proposal software packages that can really help manage this whole process.) Review their ‘wants’
and show how they have been implemented in the overall system design. Inform the homeowner as to how the installation will be done. Phase 1, pull wire. Phase 2, install speakers and components. Phase 3, system programming and
tweaking. (Tying payments to the different installation phases is also something to consider. Spreading the payments can
help defuse potential sticker shock for the homeowner and also help manage cash flow for the Installation Company.)
If all is acceptable to the homeowner, have them sign the proposal as a formal contract and set a start date for work to
begin. (Having the homeowner sign the proposal as a contract can help avoid problems during installation in that the
system and work to be done is defined. Anything not defined in the contract is extra.)
6. DOCUMENT THE SYSTEM FOR INSTALLATION — If using one of the planning and proposal software packages
available from third parties, this part of the process will already be done. If not, carefully document the system for wholehouse wiring. Show all runs of CAT-5 for control, coax for video, two-pair 18-14AWG stranded for speakers and additional wires for doorbell/paging, and anything else in the system that needs to have wire pulled through the walls. Don’t
leave anything out. The person pulling the wire isn’t necessarily the same person that sold the system, so if the system
hasn’t been properly documented, critical feature wire components could be left out.
Detail what components will be installed in each room, and where they will be installed, including the control system,
speakers, TV/Video Display and any other sub-system interfaces by room, by component, by brand and by model. Be
sure the person pulling the wire has this information to cross reference the wires pulled and to where.
7. DOCUMENT SYSTEM FUNCTIONALITY — Document all system functions by system, by zone, by source and any
special features that have been included. Be sure to include functions such as how the system turns on when the first
source is selected, and how it turns off when the last zone shuts down. Include all special functions such as switch
closures for lifts and screens and EPR-1.0 mute commands for zones with multi-channel amps for sub-zone expansion.
MZC-88 Installation Instructions
Page 23
Include Tuner preset preferences by zone. Include Paging functions. All system functions should be detailed. The person
doing the system programming isn’t necessarily the same person who sold the system or pulled the wire. Be sure everyone involved in the installation and setup knows what the system is and how it is supposed to work.
8. ACQUIRE ALL SYSTEM COMPONENTS — Set up the system, and program and test all functions before taking the
electronics to the job site. This can save valuable time in assuring that all system components work and the system is
functioning as designed. Connecting and testing the system prior to installation will also help assure that all parts and
pieces that will go into the system are in hand, so time is spent on the job site and not running around town shopping
for parts or not being able to finish the installation while waiting for an air shipment of a ten dollar part.
9. HEAD-END CONSIDERATIONS — The system head-end should be in a convenient, central location that provides
easy access for the user, to be able to load discs, video tapes etc. The location should also be accessible for service and
ideally would have either have rear access to the system connections or a pull-out rack that allows access to system
connections. All system wire runs should terminate at the head-end. There should be sufficient mounting space for all
system components and the wires and cables that connect them. Leave plenty of room for airflow for proper ventilation
or system components could be damaged. Too tight of a space that does not leave room for system wiring or a poorly
dressed system can cause thermal problems. Wires jumbled in around system components can act as an insulator or
block free airflow which can damage the components from overheating. Incorporate a proper ventilation system using
cooling fans for systems with external amplifiers or other components that generate excess heat. When possible, leave
extra space for future expansion of the system for additional zone and source components.
10.ZONE CONSIDERATIONS — Identify all room components and their locations. Typically, a keypad would be mounted
near the entry to a room. If the room orientation of where the TV/Monitor and speakers are located leaves the keypad
behind the user, an additional IR receiver on the same wall as the TV and speakers will help make controlling the system
more user friendly. Be sure to include an appropriate wire run for the IR receiver. Additional wire runs for controlling lifts,
screens and drapes should also be considered. Try to avoid mounting keypads and IR receivers in locations that will be
exposed to direct sunlight. Leave extra wire at keypad and in-wall speaker locations so these components can be easily
removed without pulling on wires and possibly have them fall down inside the wall, should service be necessary.
Page 24
MZC-88 Installation Instructions
SYSTEM INSTALLATION
WIRING
Once the system has been defined and the contract signed, work can begin. The first part of the system to be installed is the
wiring infrastructure. With all of the flexibility and options of a MZC-88 System, maintaining clear, accurate documentation of
the location (the house) and the system will help in managing a smooth installation. Always be sure to pull and test the wires
needed for the system as specified, and always consider pulling extra wire for fall-back in the event something gets damaged
during drywall installation. Beyond that, pulling additional wire to rooms not specified in the system can help down the road,
should the homeowner decide to add rooms to the system at a later date, or increase flexibility within already active rooms.
There are certain types of wire that are default requirements and there are others that are used for the system optional features.
KEYPADS
SpeakerCraft EZ-Pads have seven-position spring clip terminals for wire connections. Five of these terminals are used for
connection to the KCM-1.0 EZ-CONNECT KEYPAD MODULE. CAT-5 can be used with or without RJ45 connectors. Standard wire can also be used for retro-fit installations provided there are at least 5 conductors available. Use of SpeakerCraft
RJA-1.1 RJ45 to Wire Pin Adaptors is recommended for both EZ Pad and KCM-1.0 CAT-5 connections.
CAT-5 WITH RJ45 CONNECTORS
Requirement - Pull home-runs of CAT-5 from each EZ-Pad location to the System Head-End.
MAXIMUM LENGTH: 1000' (305m).
Installation - Terminate the CAT-5 with RJ45 connectors on both ends. Be sure the terminations are identical on both
ends, creating a pass-through configuration. Connect the CAT-5 cable to the keypads using SpeakerCraft RJA-1.1 RJ45TO-WIRE PIN ADAPTERS. Insert the RJA-1.1 pins into the keypad’s EZ-Connect Terminals and snap the levers in place.
RJA1.1’s can be used at both the keypad and KCM-1.0 ends, if desired. Be sure RJA1.1 pin orientation is correct on both
ends prior to powering up the system. CAT-5 WITHOUT RJ45 CONNECTORS
Requirement - Pull home-runs of CAT-5 from each EZ-Pad location to the System Head-End.
MAXIMUM LENGTH: 1000' (305m).
Installation - Strip away approximately 2” of the CAT-5 jacket and separate the individual conductors. Strip approximately
⁄4 inch on both ends of the individual conductors to be used for connection to the KCM-1.0. Twist the stripped ends so
there are no loose strands that can cause shorts. Secure the ends to the EZ-Pad and KCM-1.0 terminals. Maintain proper
polarity. The 3 unused leads of the CAT-5 cable can be connected in parallel, one, with each of the +12V, GND and IR/IO
leads, for better IR performance when running long lengths of cable .
1
STANDARD WIRE
Requirement - Pull home-runs of 28-14AWG stranded, non-sheilded wire with at least 5 conductors to the System
Head-End.
MAXIMUM LENGTH: 1000’ (305m).
Installation - Strip away approximately 2” of the wire jacket and separate the individual conductors. Strip approximately
1
⁄4 inch on both ends of the individual conductors to be used for connection to the EZ-Pads and KCM-1.0. Twist the
stripped ends so there are no loose strands that can cause shorts. Secure the ends to the EZ-Pad and KCM-1.0 terminals.
Maintain proper polarity. Unused leads can be connected in parallel, one, with each of the +12V, GND and IR/IO leads,
for better IR performance when using lighter gauge wire on long runs.
MZC-88 Installation Instructions
Page 25
VIDEO
Requirement - Pull home runs of RG6 quad-shield coaxial cable from every TV/Video Display location to the System
Head-End.
MAXIMUM LENGTH: 500’.
Installation - Terminate the head-end side with a male F-type connector to connect to the appropriate ZONE VIDEO
OUT on the MZC-88.
NOTE: The ZONE VIDEO OUT terminals on the MZC-88 are F-type connectors that output COMPOSITE VIDEO. These
should not be confused with F terminals that output RF signals. The zone end of the RG6 can be terminated with an RCA
connector and connected directly to the TV/video display composite video IN or terminated with a male F-type connector and adapted to the RCA jack on the TV/video display.
SPEAKERS
Requirement - Pull home runs of 18-14AWG two-conductor quality stranded speaker wire from all speaker locations to
the System Head-End.
MAXIMUM LENGTH: 18AWG up to 50’; 16AWG up to 200’; 14AWG up to 1000’.
Installation - Strip approximately 1⁄4” off each end of each conductor and twist the stripped ends so there are no loose
strands that can cause shorts. On the Head-End side, carefully slide the individual conductors into the appropriate L+,L-/
R-,R+ speaker terminals on the removable screw down connectors that plug into the MZC-88 Zone Speaker OUT Terminals. Terminate the speaker ends as appropriate for the given speakers. Maintain proper polarity.
WARNING: The power amplifiers in the MZC-88 use Bridged (BTL) outputs. Speaker connections must be completely
separate for each channel and have NO common ground connections through any connected Speaker Selectors, VCs,
Test Equipment, etc. Failure to observe this may cause damage and void the warranty.
CONTACT CLOSURES
Requirement - Pull 28-14AWG two-conductor stranded wire from any location utilizing a contact closure from the MZC88 to the System Head -End.
MAXIMUM LENGTH: Will vary with application.
Installation - On the Head-End side, strip approximately 1⁄4” off each end of each conductor and twist the stripped ends
so there are no loose strands that can cause shorts. Carefully slide the individual conductors into the appropriate Contact
Closure Terminal pair on the MZC-88 Rear Panel. Terminate the device end as appropriate. POLARITY: Head-End not
critical.
EXPANSION PORT/LOOP
Requirement - CAT-5 cable terminated with RJ45 connectors, pass-through configuration (pin to pin).
MAXIMUM LENGTH: 4000’
Installation - Connect CAT-5 cables terminated with RJ45 connectors to MZC-88 Port/Loop terminals in expanded systems. See section: Expanded Systems for additional information.
RS232
Requirement - Use a quality, pre-made Serial Cable terminated with DB9 connectors, pass-through configuration.
MAXIMUM LENGTH: 50’
Installation - Connect one end of the Serial cable to the RS232 DATA I/O Port on the MZC-88 Rear panel and the other
end to the device being controlled via RS232. NOTE: This connection requires configuration in EZ-Tools.
CONTROL PORT
Used for system programming and firmware updates. See section: Programming for additional information.
Page 26
MZC-88 Installation Instructions
PHONE PAGE IN
Requirement - Use a quality, pre-made audio cable terminated with RCA connectors for runs under 15’. Pull quality,
shielded audio cable from the paging device to the System Head-End for runs up to 200’.
MAXIMUM LENGTH: 200’
NOTE: Some Telephone Control Panels can produce sufficient levels of RF radiation to interefre with MZC-88 perfomance.
It is recommended that Telephone Panels be located at least 15-20 feet from an MZC-88 to avoid interference.
Installation - Connect one end of the pre-made wire to the paging device line level audio out and the other to the
PHONE PAGE IN jack on the MZC-88 Rear Panel. Terminate the sheilded audio cable with an RCA connector at the
System Head-End. Terminate the paging device end as appropriate. Maintain proper polarity. RCA CONNECTOR
POLARITY: PIN=SIG; SLEEVE=GND.
VIDEO PAGE IN
Requirement - Use a quality, pre-made video cable terminated with RCA connectors for runs under 15’. Pull RG6 quadsheild coaxial cable from the camera/video device to the System Head-End for runs over 15’.
MAXIMUM LENGTH: Will vary by device. See the specification of the device being used or call the equipment
manufacturer. 40-50’ typical, up to 500’ on RG6 coaxial cable with some devices.
Installation - Connect one end of the pre-made video cable to the camera/video device composite video out and the
other to the VIDEO PAGE IN jack on the MZC-88 Rear Panel. Terminate the RG6 with an RCA connector at the System
Head-End. Terminate the camera/video device end as appropriate. Maintain proper polarity. RCA CONNECTOR
POLARITY: PIN=SIG; SLEEVE=GND.
DOORBELL/STATUS IN
equirement - Pull 28-22AWG two-conductor stranded wire from the doorbell or sensed device location to the System
R
Head-End.
MAXIMUM LENGTH: Will vary. 500’ typical, up to 2000’ with some devices.
Installation - Terminate the 28-22AWG two-conductor wire with a 3.5mm mini plug at the System Head-End for
connection to one of the two Doorbell/Status IN jacks on the MZC-88 Rear Panel. Terminate the Doorbell/sensed device
end as appropriate. MINI PLUG POLARITY: TIP=+12V; SLEEVE=GND.
COMMON IR OUT
Requirement - Use a SpeakerCraft standard emitter (IRE-1.0, 2.0, 3.0, 4.0) when the Common IR OUT Switch is set in
the LO position. Use a SpeakerCraft high power emitter (IRE-5.0 Blaster) when the Common IR OUT Switch is set in the
HI position. Pull 28-18AWG two-conductor stranded wire from the location requiring System Common IR Control to the
System Head-End to extend the emitter wire as required.
MAXIMUM LENGTH: 1000’
Installation - Connect an emitter to the Common IR OUT on MZC-88 Rear Panel and set the HI/LO switch as
appropriate. Attach the emitter over the IR eye on the device to be controlled. When extending the emitter wire,
terminate the 28-18AWG two-conductor wire with a 3.5mm mini plug at the System Head-End. Terminate the other end
for System Common IR Control as appropriate. MINI PLUG POLARITY: TIP=SIG; SLEEVE=GND.
COMMON STATUS OUT
Requirement - Pull 28-18AWG two-conductor stranded wire from the device to be controlled to the System Head-End.
MAXIMUM LENGTH: 1000’
Installation - Terminate the 28-18AWG two-conductor wire with a 3.5mm mini plug at the System Head-End for
connection to the Common Status OUT jack on the MZC-88 Rear Panel. Terminate the controlled device end as
appropriate. MINI PLUG POLARITY: TIP=+12V; SLEEVE=GND.
STATUS IN
Requirement - Pull 28-18AWG two-conductor stranded wire from the sensed device(s) to the System Head-End.
MAXIMUM LENGTH: 1000’
MZC-88 Installation Instructions
Page 27
Installation - Terminate the 28-18AWG two-conductor wire with a 3.5mm mini plug at the System Head-End for
connection to the STATUS IN jacks on the MZC-88 Rear Panel. Terminate the sensed device(s) end(s) as appropriate. MINI
PLUG POLARITY: TIP=+12V; SLEEVE=GND.
FM/AM/75Ω
equirement - Pull RG6 quad-shield coaxial cable from where the HED-1.0 MASTHEAD AMPLIFIER will be mounted to
R
the System Head-End.
MAXIMUM LENGTH: 100’. Lenghts longer than 100’ can be used, but expect reduction in tuner sensitivity in
proportion to cable length.
Installation - Terminate both ends with male F-type connectors for connection to the HED-1.0 and MZC-88.
SOURCE IR OUT
Requirement - Use SpeakerCraft standard IR emitters (IRE-1.0, 2.0, 3.0, 4.0).
Installation - Attach emitter to Source Component. Connect emitter mini plug to the appropriate Source IR OUT.
SOURCE IR LOOP
Requirement - Use pre-made 3.5mm mini to mini plug cables.
Installation - Connect SOURCE IR OUT on one MZC-88 to the same source number SOURCE IR LOOP on the next MZC88 when using multiple MZC-88s in expanded systems. i.e. MZC Slave 2 SOURCE 1 IR OUT to MZC Slave 1 SOURCE 1
LOOP, MZC Slave 1 SOURCE 1 IR OUT to MZC Master SOURCE 1 LOOP, MZC Master SOURCE 1 IR OUT to an emitter for
Source 1 IR control. See section: Expanded Systems for additional information.
SOURCE AUDIO/VIDEO INPUT
Requirement - Use quality, RCA to RCA Audio/Video cables with gold ends.
Installation - Connect one end to Source L & R line-level AUDIO OUT and COMPOSITE VIDEO OUT, and connect the
other end to the appropriate Source L & R line-level AUDIO INPUT and COMPOSITE VIDEO INPUT on the MZC-88 Rear
Panel.
SOURCE AUDIO/VIDEO LOOP
Requirement - Use quality, RCA to RCA Audio/Video cables with gold ends.
Installation - Connect SOURCE L & R line-level AUDIO LOOP and COMPOSITE VIDEO LOOP on one MZC-88 to the
same source number SOURCE L & R line-level AUDIO INPUT and COMPOSITE VIDEO INPUT on the next MZC-88 when
using multiple MZC-88s in expanded systems. i.e. MZC-88 MASTER SOURCE 1 L & R line-level AUDIO LOOP and
COMPOSITE VIDEO LOOP to MZC-88 SLAVE 1, SOURCE 1, L & R line-level AUDIO INPUT and COMPOSITE VIDEO
INPUT, MZC SLAVE 1, SOURCE 1, L & R line-level AUDIO LOOP and COMPOSITE VIDEO LOOP to MZC-88 SLAVE 2,
SOURCE 1, L & R line-level AUDIO INPUT and COMPOSITE VIDEO INPUT. See Section: Expanded Systems.
ZONE PRE-OUT
Requirement - Use quality, RCA to RCA Audio cables with gold ends.
Installation - Connect one end to Zone L & R line-level PRE-OUT and connect the other end to the appropriate L &
R line-level AUDIO INPUTS on an external amplifier. (Set VC/NVC Switch for Volume Control/No Volume Control as
appropriate.) See Section: External Amplifiers for additional information.
ZONE IR OUT
Requirement - Use SpeakerCraft standard IR emitters (IRE-1.0, 2.0, 3.0, 4.0).
Installation - Attach emitter to Zone Source Component. Connect emitter mini plug to the appropriate Zone IR OUT.
Page 28
MZC-88 Installation Instructions
EZ-PAD CONFIGURATION
1. As received from the factory, the version MKP-8.1 EZ-Pads have a preinstalled set of buttons that match the default
system that is pre-programmed into the MZC-88 (“MZC88DEF1.etp” in EZ-Tools). The default configuration may not
match the system being installed. To change the source and function button arrangement, release the tabs, Figure
11, and remove the decorator insert panel, exposing the key buttons, Figure 12.
Figure 11
Release Tab
Figure 12
Remove Decorator Insert Panel
2. Starting with the Zone 1 MKP-8.1 (Master Keypad), and using
the extra buttons supplied, if needed, move and place the
source and function buttons in an arrangement matching the
system being installed. (Refer to Figure 13) When finished,
replace the decorator insert panel over the buttons, being careful to see that the buttons align correctly with the panel openings. Press the panel down until the tabs “snap” into place.
3. Repeat these steps for each of the other zone Master Keypads.
Note that each zone can have its own unique configuration,
however, it is best to keep them as similar as possible to simplify
system programming and operation.
4. Repeat steps 1-3 to configure the buttons on the Numeric and
Function keypads (not included) as needed.
Figure 13
Moving and Placing Buttons
NOTE: The Numeric and Function keypads will not work on their own. They must be connected to a Master Keypad
using the 3-Connector Ribbon Cable included with each NKP-1.0 and FKP-1.0. The cable is symmetrical so it can be
connected with the red striped side up or down, to best fit the configuration. Figure 14 shows it connected so that
the MKP Master Keypad will be to the right of the NPK Numeric and FKP Function keypads when mounted, whereas
Figure 15 places the MKP to the left.
Figure 14
Ribbon Cable – MKP Right
Figure 15
Ribbon Cable – MKP Left
MZC-88 Installation Instructions
Page 29
5. When connecting keypads to the KCM-1.0 as shown in Figure 16, be sure to connect the various colored CAT-5 leads
to the correct Terminals on each end. Use the same colors scheme for all zones to help reduce errors.
KCM-1.0
Zone Input
485 B
485 A
GND
Rear View
Orange
Wht-Brown
Brown
Use Twisted Pair
for IR/IO & GND
Blue
Wht-Blue
+12V
EZ PAD
ZONE 2
IR IN
GND
485 A
485 B
+12V
IR IN
EZ PAD
ZONE 1
Blue
Wht-Blue
GND
®
485 A
SpeakerCraft
Choice of colors used is
not important.
However, colors
MUST match to
terminations at each
end as shown!
(see text)
485 B
ADDRESS
89
67
MKP-8.1
IR/IO
KEYPAD EXPANSION
CAUTION:
J-Box EZ-Pad
w/IRC
- Master -
+12V
- RELAY
2345
+RELAY
EF 01
CD
AB
Orange
Wht-Brown
Brown
Inter-room
Twisted Pair
Cat. 5 Cable
1000' (305m) Max.
Use Twisted Pair
for 485A & 485B
Figure 16
Using CAT-5 Cable to Connect MKP Keypads to MZC-88
CAT-5 WITHOUT RJ45 CONNECTORS — Maximum recommended lead length with CAT-5 cable is 1000' (305m). The 3
unused leads of the CAT-5 cable can be connected in parallel, one, with each of the +12V, GND and IR/IO leads, for better
performance when using long cable lengths.
CAT-5 WITH RJ45 CONNECTORS — When using RJ45 connectors, connect the CAT-5 cable to the keypads using
SpeakerCraft model RJA-1.1 RJ45-TO-WIRE PIN ADAPTERS. (Refer to Figures 17 and 18) Insert the RJA-1.1 pins into the
keypad’s EZ-Connect Terminals and snap the levers in place. RJA1.1’s can be used at both the keypad and KCM-1.0 ends, if
desired. Be sure RJA-1.1 pin orientation is correct prior to powering up the system.
Figure 17
RJA-1.1 Adapter
Figure 18
RJA-1.1 attached to Keypad and CAT-5
Page 30
MZC-88 Installation Instructions
INSTALLATION
HEAD-END
The MZC-88, external source components, and additional amplifiers will typically be installed at the System Head-End. They
can be mounted on shelves in a wall unit, entertainment center or closet, or rack mounted in a standard 19” rack mount
system. Source components such as DVD/CD players and VCR’s should be installed so the user has easy access for loading
discs and tapes.
Though heavy, the MZC-88 (and additional amplifiers if used) should be mounted at the top of the equipment rack so heat
generated by the controller will not affect the other system components. This will also allow cooler air to rise up through
the equipment rack with the hottest devices exhausting out the top. Use cooling fans such as the SpeakerCraft ESC-1.0 rack
cooling sysetm, to push/pull air through the equipment rack if temperatures exceed the specifications of any of the system or
source components. Properly exhaust hot air into an attic space or outside the structure. (Be aware of and comply with any
building codes that may apply to ventilation.)
Always leave adequate space between system and source components for airflow. Failure to do so can cause damage to the
components from overheating. Never block the vent holes on the top or bottom of the MZC-88. Blocking the vent holes will
cause the controller to overheat. Never remove the MZC-88 Controller’s feet when shelf mounting. This will block the vent
holes on the bottom of the unit and will cause the controller to overheat. When using multiple MZC-88s in a system DO NOT
stack the MZC-88 Controllers directly on top of each other. Leave at least 3-4” between controllers, and if rack mounting, use
at least one, double rack-space vent panel between controllers to assure proper airflow.
The KCM-1.0 can be mounted on the shelf behind the controller, or on a cabinet or closet side wall as space allows. Mounting the KCM-1.0 behind the controller can help maintain ‘bundled’ zone control, video and speaker wires for neat wire
management, given sufficient shelf space behind the MZC-88, (approximately 4-6”). Be sure to leave enough space for the
MZC-88 to be removed for service if needed.
CONNECTIONS - HEAD END
This section provides information for connections to a single MZC-88 Controller. See Section: EXPANDED SYSTEMS for
information on connections to multiple MZC-88’s in expanded systems. All system and source components should be installed
before making any connections. To prevent electrical shock and possible damage, be sure all components are disconnected
from AC power while making connections.
Keypads
1. Connect each keypad run to the appropriate EZ-PAD Zone on the KCM-1.0. When not using RJ45 connectors, be sure
to maintain consistent color code when making connections . When using RJ45 connectors, be sure the recommended
RJA-1.1 adaptor pins are oriented properly. See Sections: WIRING and EZ-PAD CONFIGURATION for additional information.
2. Connect the SCSI cable to the 8-ZONE KEYPAD OUTPUTS terminal on the KCM-1.0 and 8-ZONE KEYPAD INPUTS terminal
on the MZC-88 Rear Panel.
External Source Components
AUDIO/VIDEO
1. Connect the L & R line-level audio and COMPOSITE video OUT of each external source component to the appropriate
L & R line-level audio and composite video SOURCE IN on the MZC-88 Rear Panel. Use quality A/V RCA-RCA cables with
gold connectors.
Emitters (Source)
1. Carefully attach a SpeakerCraft IR Emitter (Models: IRE-0.5, 1.0, 2.0, 3.0, 4.0) over the IR eye on the front panel of each
external source component to be controlled via infrared.
2. Carefully pull the emitter wire to the back of the MZC-88. Do not block accesses for discs and tapes. Do not pinch emitter
wires between components.
MZC-88 Installation Instructions
Page 31
3. Connect the 3.5mm mini plug to the appropriate Source IR OUT.
Speakers
1. Connect each Zone speaker run to the appropriate Zone SPEAKER terminal using the included removable screw down
connectors.
2. Strip approximately 1⁄4 inch of each lead and twist the stripped ends so there are no loose strands that can cause shorts.
3. Carefully slide the individual conductors into the appropriate L+,L-/R-,R+ speaker terminals on the removable screw down
connector.
4. Visually check for loose ends. Lightly pull the wire to confirm connection.
5. Plug connector into the appropriate Zone SPEAKER Terminal.
Video Output
1. Connect each zone coax run to the appropriate Zone VIDEO OUTPUT.
NOTE: The Zone Video Outputs are F-type terminals that output COMPOSITE Video. They should not be confused with
similar connectors that may provide a RF signal.
Fm/am/75Ω
1. Connect the FM/AM/75Ω TO HED AMP Terminal on the MZC-88 to the FM/AM Terminal on the HED-1.0. Use RG6 quadshield coaxial cable up to 100’ in length, terminated with male F-type connectors.
2. Connect included AM Loop antenna to the G and AM spring clip terminals on the HED-1.0. (Polarity non-critical.)
3. Connect the spade ends on the included FM Dipole antenna to the included balun.
4. Connect the balun and FM Dipole antenna assembly to the FM F-type terminal on the HED-1.0.
NOTE 1: The HED-1.0 should be located away from the MZC-88 to reduce RF interference from system components.
NOTE 2: The connection between the MZC-88 and HED-1.0 provides phantom power to the HED-1.0. This should be
an unbroken run with no splits or RF amplifiers.
NOTE 3: The HED-1.0, and included AM loop and FM Dipole antennas are not weatherproof and should not be
mounted outdoors.
NOTE 4: For best reception, particularly in fringe areas, connect an outside FM multi-element antenna to the FM ‘F’
terminal on the HED-1.0.
NOTE 5: For best AM reception, especially in fringe areas and in locations with high RFI (radio frequency interference),
it may be necessary to connect an earth ground to the HED-1.0 as illustrated in Figure 10. Use 14 AWG wire (or both
conductors of 16 AWG AC zip cord). Length should be kept short, preferably under 50 feet. Refer to NEC ART 250, Part H
for earth grounding electrodes.
Paging
PHONE
1. Connect the audio line-level OUT of an appropriately featured telephone system, doorbell mic or other audio source to
the PAGE IN PHONE jack on the MZC-88 Rear Panel. If the telephone system main unit is in close proximity to the MZC88, use a quality RCA to RCA video cable for connections up to 50’. For longer runs pull quality 16AWG two-conductor
audio cable and terminate appropriately.
NOTE: The Phone Paging input requires a trigger voltage to one of the Doorbell/Status IN jacks to be activated.
VIDEO
1. Connect the COMPOSITE video OUT of an appropriately featured front door panel, camera or other video source to the
PAGE IN VIDEO jack on the MZC-88 Rear Panel. If the camera or video source is in close proximity to the MZC-88, use a
quality RCA-RCA cable for connections up to 15’. For longer runs pull RG6 and terminate appropriately.
NOTE: The Video Paging input requires a trigger voltage to one of the Doorbell/Status IN jacks to be activated.
DOORBELL/STATUS IN (1&2)
1. Connect a 3-30V AC or DC trigger voltage from a telephone system, sensing device or other controlled voltage output
Page 32
MZC-88 Installation Instructions
device to either Doorbell/Status Input 1 or 2 using a 3.5mm mini plug to activate either or both of the phone and video
page inputs. These inputs can also be used for sensing the ON/OFF condition of external devices or trigger other system
events.
NOTE: The Doorbell/Status Inputs will not function without proper configuration in EZ-Tools.
Contact Closures
1. Connect two stripped wires from a device such as a screen, lift, drapes, switched outlet etc, that requires a switch closure
to activate.
2. Strip approximately 1⁄4 inch of each lead and twist the stripped ends so there are no loose strands that can cause shorts.
3. Carefully slide each of the individual conductors into one of the spring clip terminals.
4. Visually check for loose ends. Lightly pull the wire to confirm connection.
NOTE 1: Some devices may provide voltage on one terminal and only require a switch closure for activation, while
others may require adding an appropriately rated power supply. If external voltage is required, connect an appropriately
rated power supply in series with one of the contact closure terminal pairs. Check the device being activated to determine if it requires AC or DC voltage and if polarity is critical for operation. Polarity is not critical at the MZC-88 Contact
Closure end.
NOTE 2: The Contact Closures will not function without proper configuration in EZ-Tools.
NOTE 3: Be sure controlled device does not excede the 30V 2A rating of the contact closures.
Expansion
1. Connect to PORT and LOOP terminals on additional MZC-88 Controllers in expanded systems, using CAT-5 cables terminated with RJ45 connectors. See Section: Expanded Systems for additional information.
Rs232 Data I/o
1. Connect one end of the Serial cable to the RS232 DATA I/O Port on the MZC-88 Rear panel and the other end to the
device being controlled via RS232. NOTE: This connection requires configuration in EZ-Tools.
Control Port
1. Connect the Serial Port on a PC running EZ-Tools to the MZC-88 Control Port using a SpeakerCraft 3.5MM PLUG TRANSFER CABLE when programming the system or incorporating Firmware Upgrades.
NOTE 1: If a Serial Port is not available on the PC, connect the 3.5mm Plug Transfer Cable to the USB/SERIAL ADAPTOR
CABLE included with EZ-Tools. Connect one end to a USB port on the PC and the other end of the assembled cable to
the Control Port on the MZC-88.
NOTE 2: Use of the USB/Serial Adaptor Cable requires loading the USB/Serial driver to the PC running EZ-Tools. The
driver can be downloaded from the EZ-Tools Program Disc or from www.speakercraft.com.
Common Ir Out
1. Connect to a SpeakerCraft Terminator Block, IR emitter or IR Blaster for control of common system devices other than the
common external source components.
TERMINATOR BLOCK
1. Connect the IR IN and GND terminals on a SpeakerCraft AT-1.0 TERMINATOR to the MZC-88 Common IR OUT jack using
a 3.5mm mini plug. POLARITY: TIP=SIG; SLEEVE=GND.
2. Set the Common IR Out HI/LO switch on the MZC-88 to LO.
3. Connect a SpeakerCraft PS 2.0 power supply to the AT-1.0. (Connect to AC only after all system connections have been
made and system is ready for use.)
4. Connect SpeakerCraft Emitters (IRE 0.5, 1.0, 2.0, 3.0, 4.0) and properly attach to the devices to be controlled.
IR EMITTER
1. Carefully attach a SpeakerCraft IR Emitter (Models: IRE- 0.5, 1.0, 2.0, 3.0, 4.0) over the IR eye on the front panel of common source component to be controlled via infrared.
2. Carefully pull the emitter wire to the back of the MZC-88. Do not block accesses for discs and tapes.
3. Connect the 3.5mm mini plug to the COMMON IR OUT jack.
MZC-88 Installation Instructions
Page 33
4. Set the HI/LO switch to LO.
IR BLASTER
1. Appropriately position a SpeakerCraft IR BLASTER (Model: IRE-5.0) to saturate an area of common source components to
be controlled via infrared.
NOTE: This application is not recommended if there is any duplication of source components (multiple same-brand,
same-model DVD players or Satellite Receivers, etc) or zone-specific devices that could be affected by Blaster output.
2. Carefully pull the Blaster wire to the back of the MZC-88. Do not block accesses for discs and tapes.
3. Connect the 3.5mm mini plug to the COMMON IR OUT jack.
4. Set the HI/LO switch to HI.
Common Status Out
1. Connect to the 12V or CONTROL IN terminal on a device such as a switched power strip, that is to be activated when
any zone in the system is ON.
2. Terminate and connect to the controlled device as appropriate.
3. Connect to the COMMON STATUS OUT using a 3.5mm mini plug. POLARITY: TIP=+12VDC; SLEEVE=GND.
Status In
1. Connect the 3-30V control voltage OUT from a sensing device or other component control out to any of the STATUS IN
jacks to trigger an event for source power management or other system function.
2. Terminate and connect the device end as appropriate.
3. Connect to one of the STATUS IN jacks with a 3.5mm mini plug. When using the Status In jacks for power management
of external common source components, it is suggested that the Status In jack number match the source input number
to help simplify connections and programming. POLARITY: TIP=+12V; SLEEVE=GND.
4. Repeat steps 2-3 for all external common source components that require power management (i.e. they do not have
discrete IR ON/OFF codes.)
NOTE: The Status In jacks will not function without proper configuration in EZ-Tools.
Zone Pre-out
1. Connect to the L&R line-level audio IN on an external high-power or multi-channel amplifier as needed for large rooms or
sub-zone expansion. Different applications require proper setting of the associated VC/NVC SWITCH. Some applications
will utilize the on-board zone pre-amp volume control (VC-variable, zone volume controlled by keypads or IR remote)
while others will use in-wall volume controls (NVC-fixed, zone volume controlled by in-wall volume control or the volume
control on an external device such as an A/V Receiver). See Section: External Amplifiers for additional information.
High-power, Two Channel Amplifier - Vc, Variable Output
1. Connect the MZC-88 L&R ZONE PRE-OUT to the L&R line-level audio IN on the two-channel amplifier to be used
(SpeakerCraft BB2125). Use a quality stereo RCA-RCA audio cable with gold connectors.
2. Set VC/NVC SWITCH to VC (Variable output. Zone volume will be controlled with a keypad or IR remote.)
Sub-zone Expansion, Multi-channel Amplifier - Nvc, Fixed Output
1. Connect the MZC-88 L&R ZONE PRE-OUT to the L&R line-level Main Bus IN on the multi-channel amplifier to be used
(SpeakerCraft BB1235). Use a quality stereo RCA-RCA audio cable with gold connectors.
2. Set VC/NVC SWITCH to NVC (Fixed output. Sub-zone volume will be controlled with in-wall volume controls.)
Zone Ir Out
1. Carefully attach a SpeakerCraft IR Emitter (Models: IRE- 0.5,1.0, 2.0, 3.0, 4.0) over the IR eye on the front panel of a dedicated zone source component to be controlled via infrared.
2. Carefully pull the emitter wire to the back of the MZC-88. Do not block accesses for discs and tapes. Do not pinch the
emitter wire between components.
3. Connect the 3.5mm mini plug to the appropriate ZONE IR OUT jack.
120v 60hz 3a
1. Use the included IEC three-conductor power cord to connect the MZC-88 to an UNSWITCHED 110V AC outlet.
CAUTION: Do not connect AC power until all system connections have been made and confirmed and the system is
ready for operation.
Page 34
MZC-88 Installation Instructions
ZONES
Keypads should typically be located near a door or entry point to a room. Avoid mounting keypads, IR receivers, volume
controls or any other control devices in areas of high moisture such as sinks, showers, bathtubs etc. Care should be taken to
avoid mounting Keypads and IR receivers in locations subject to direct sunlight. Sunlight can interfere with system operation
and, in time, cause deterioration to the keypad and trim plate materials.
WARNING: Never mount a keypad, IR receiver or volume control in the same j-box as high voltage devices. This can affect system performance and is a violation of electrical codes in some areas. (Be aware of local electrical and building codes.
These codes can affect the type of j-boxes permitted, mandate wire specifications and regulate other aspects of the installation that may not pass inspection if necessary.)
CONNECTIONS - ZONES
Keypads
1. Connect each EZ-Pad cable run to the appropriate Zone EZ-PAD. When not using RJ45 connectors, be sure to maintain
consistent color code when making connections . When using RJ45 connectors, be sure the RJA-1.1 adaptor pins are
oriented properly. See Sections: WIRING and EZ-PAD CONFIGURATION for additional information.
2. Install each EZ-Pad into a proper low-voltage J-box and finish with an appropriate trim plate (not included).
Speakers
Direct Speaker Connection To Mzc-88 Or Amplifier
1. Connect ZONE SPEAKERS L+,L-/R-,R+ OUTPUTS from the MZC-88, or an external amplifier, to the appropriate Zone
Speaker pair.
2. Strip approximately 1⁄4 inch of each lead and twist the stripped ends so there are no loose strands that can cause shorts.
3. Connect as appropriate to the L+,L-/R-,R+ terminals on each speaker.
4. Visually check for loose ends. Lightly pull the wire to confirm connection.
5. Install speakers into dry-wall cut-outs or SpeakerCraft InstaLLock™ New Construction Brackets (if used) as appropriate.
SPEAKER CONNECTION TO EPR-1.0 EZ-PAD RELAY MUTING MODULE
1. Connect ZONE SPEAKERS L+,L-/R-,R+ OUTPUTS from the MZC-88 or an external amplifier to the EPR-1.0 AMPLIFIER Terminal L+,L-/R-,R+ INPUTS. (Refer to Figure 19)
2. Strip approximately 1⁄4 inch of each lead and twist the stripped ends so there are no loose strands that can cause shorts.
3. Connect the EPR-1.0 SPEAKERS L+,L-/R-,R+ OUTPUTS to the L+,L-/R-,R+ terminals on each speaker pair as appropriate.
4. Connect the WHITE STRIPE LEAD from the EPR-1.0 to the +RELAY Terminal on the MKP-8.1.
5. Connect the BLACK LEAD from the EPR-1.0 to the -RELAY Terminal on the MKP-8.1
6. Visually check for loose ends. Lightly pull the wire to confirm connection.
7. Install speakers into dry-wall cut-outs or SpeakerCraft InstaLLock™ New Construction Brackets (if used) as appropriate.
NOTE: EPR-1.0 Relay mute will not function without proper configuration in EZ-Tools.
Video
1. Connect each video run to the appropriate Zone TV/Video Display. Terminate at zone end of RG6 as appropriate. The
zone end can be terminated with a male F-type connector and adapted to the RCA composite input or terminated with
a male RCA plug and connected directly to the appropriate input.
Other Zone Connections
Given the wide range of possibilities of MZC-88 system configurations, only keypad, speaker and video connections have
been detailed. Make all other zone connections as needed. See Sections: WIRING and CONNECTIONS - HEAD END for additional information.
MZC-88 Installation Instructions
Page 35
KCM-1.0
Zone Input
485 B
485 A
GND
IR/IO
+12V
EZ PAD
ZONE 2
IR IN
GND
Orange
Wht-Brown
Brown
Blue
Wht-Blue
Striped side
is Positive (+)
485 A
485 B
+12V
EZ PAD
ZONE 1
Rear View
IR IN
®
GND
SpeakerCraft
485 B
MKP-8.1
485 A
ADDRESS
89
67
KEYPAD EXPANSION
CAUTION:
Choice of colors used is
not important.
However, colors
MUST match to
terminations at each
end as shown!
(see text)
J-Box EZ-Pad
w/IRC
- Master -
+12V
- RELAY
2345
+RELAY
EF 01
CD
AB
Inter-room
Twisted Pair
Cat. 5 Cable
1000' (305m) Max.
Speaker Leads
From Amplifier
Relay Coil Lead
12" (305mm).
Can be spliced
for lengths up
to 2000' (610m)
using 24 AWG.
+
-- -+
L
R
Amplifier
EPR-1.0
EPR-1.0
EZ-Pad
Speaker Muting Relay
Eazy Pad
Speaker Muting Relay
SpeakerCraft
®
+
+
Speakers
L
R
-- -+
--
--
+
Wall Speakers
in Room
L
R
Figure 19
System Connections for the EPR-1.0 Muting Relay
Page 36
MZC-88 Installation Instructions
EXTERNAL AMPLIFIERS
ADDING A HIGH-POWER TWO-CHANNEL AMPLIFIER TO A ZONE
Even though the MZC-88 delivers a stout 50 Watts per Channel of audio power, good enough for most applications, there
may be certain situations when adding a high-power, two-channel amplifier to a zone will be required. Driving a high power
amplifier such as the SpeakerCraft BB2125 from a MZC-88 Zone Pre-Out will fill a particularly large room with large sound or
provide music power poolside for an outdoor zone.
Adding an external zone amp does not require any changes to the ‘house’ wiring or configuration or programming of the
zone keypad. The only differences are, the zone speakers get connected to the external amplifier instead of the MZC-88 and
one stereo RCA-RCA patch cable needs to be connected between the MZC-88 Zone Pre-Out and the Amplifier Main IN.
When using a SpeakerCraft BB2125, or other SpeakerCraft amplifier, power management of the external amplifier is automatic using the on-board audio sensing circuitry. When the amplifier receives an audio signal from the MZC-88 Zone Pre-Out,
the external amplifier will turn on automatically. A BB2125, or other SpeakerCraft amplifier, will shut off after three minutes of
no audio signal. Other makes will vary in their specifications and performance. Please refer to appropriate documentation for
additional information.
Some amplifiers use a 12 volt trigger input to turn on in this type of application (also an option on SpeakerCraft amplifiers).
There are two methods of 12V control from a MZC-88. One method utilizes one of the Contact Closure pairs as an ‘event’
to turn the amplifier on and off with a specific zone. The other allows use of the MZC-88 Common Status Out. This second
option will have the amplifier turn on when any zone is on and off when the last zone shuts off. In most cases, turning the
external amplifier on and off with a specific zone is recommended.
Installation
Additional space should be allocated for installation of an external high-power amplifier. Leave at least 3-4 inches above
and below the amp for proper air flow for cooling. Mounting amplifiers at the top of an equipment cabinet is recommended to reduce source components exposure to excess heat. Use cooling fans when necessary.
Connections And Configuration
AUDIO
1. Connect one, quality, RCA-RCA stereo patch cable from the appropriate MZC-88 ZONE L&R PRE-OUT to the L&R MAIN
INPUT on the external amplifier.
2. Set the VC/NVC SWITCH to VC (variable). The Zone volume will be controlled via the MZC-88 Zone Preamp using the
Zone Keypad or IR Remote.
SPEAKERS
1. Connect the L+,L-/R-R+ SPEAKER-LEVEL OUTPUTS of the external amplifier to the appropriate zone speakers.
AUDIO SENSING
1. No additional connections required.
2. If using a SpeakerCraft BB2125, switch the ‘Audio Sense/Trigger/Constant’ Switch to AUDIO SENSE.
3. If using another brand of amplifier with audio sensing, please refer to appropriate documentation for additional information.
12V TRIGGER (ZONE SPECIFIC)
1. Connect an unregulated 12V DC power supply in series with one of the MZC-88 Contact Closure pairs as shown in
Figure 20.
2. If using a SpeakerCraft BB2125, terminate the control wire with a 3.5mm mini plug and plug it into the Trigger Input
jack. POLARITY: TIP=+12V; SLEEVE=GND. Switch the ‘Audio Sense/Trigger/Constant’ Switch to TRIGGER INPUT.
3. If using another brand of amplifier, terminate the control wire as appropriate. Be sure to maintain proper polarity.
4. Configure the Contact Closures as an ‘event’ for that zone in EZ-Tools. Set the Contact Closure to ‘Close’ when turning
the zone ON and ‘Open’ when turning the zone OFF.
MZC-88 Installation Instructions
Page 37
PS-1.0 200mA Power Supply
To Unswitched Outlet
Black Wire (GND)
White Striped
Wire (+12V)
Contact Closure Pair 1
MZC-88
10
Zone VC/NVC Switch
Zone Amplifier
L&R Speaker Level
Output
RCA-RCA Stereo Patch Cable
Zone L&R Line-Level
Audio Pre-Out
SpeakerCraft
®
BB2125
Model BB2125 Stereo Amplifier
Riverside, California, USA
SERIAL NUMBER
SPEAKERS A
+ LEFT --
MAIN
INPUT
12V
CONTROL
OUTPUT
3-30V A/C D/C
TRIGGER
AU DIO SENSE
INPUT
3-30V A/C D/C
TRIGGER
INPUT
CASCADE
OUTPUT
LEFT
RIGHT
LEFT
-- RIGHT +
FUSE 6 AMP
SPEAKERS B
+ LEFT --
-- RIGHT +
AC 120V 60HZ
RIGHT
CO NST ANT
28-12AWG
Two-Conductor
Stranded Wire
12 Volt
Trigger Input
Zone Amplifier
L&R Line-Level
Audio Input
18-14AWG
Two-Conductor
Speaker Wire
Zone Speakers
SpeakerCraft
MT8 Four
Figure 20
Adding an External High-Power Amplifier
12V TRIGGER (SYSTEM ACTIVITY)
1. Connect a 3.5mm mini-mini plug wire to the MZC-88 COMMON STATUS OUT.
2. If using a SpeakerCraft BB2125, plug the other end into the Trigger Input jack. Switch the ‘Audio Sense/Trigger/Constant’
Switch to TRIGGER INPUT.
3. If using another brand of amplifier, terminate the external amplifier end as appropriate. Be sure to maintain proper polarity.
Page 38
MZC-88 Installation Instructions
ADDING A 12-CHANNEL AMPLIFIER TO A ZONE
In certain applications it may be desirable to expand a zone into multiple listening areas or ‘sub-zones’ that all play the same
source material for background music. This type of application might include an entry, hallways, guest bathrooms, etc. or a
mutiple-room suite such as a guest bedroom, bathroom and small patio. For this type of application, adding a twelve-channel amplifier such as the SpeakerCraft BB1235 is a simple way to distribute music to up to six additional rooms.
Adding a twelve-channel amp requires home runs of speaker wire from each sub-zone back to the head-end and one stereo
RCA-RCA patch cable needs to be connected between the MZC-88 Zone Pre-Out and the Amplifier Main IN.
When using a SpeakerCraft BB1235, power management of the external amplifier is automatic using the on-board audio
sensing circuitry. When the amplifier receives an audio signal from the MZC-88 Zone Pre-Out, the external amplifier will turn
on. The BB1235 will shut off after three minutes of no audio signal. Other makes will vary in their specifications and performance. Please refer to appropriate documentation for additional information.
Some amplifiers use a 12 volt trigger input to turn on in this type of application (also an option on SpeakerCraft amplifiers).
There are two methods of 12V control from a MZC-88. One method utilizes one of the Contact Closure pairs as an ‘event’
to turn the amplifier on and off with a specific zone. The other allows use of the MZC-88 Common Status Out. This second
option will have the amplifier turn on when any zone is on and off when the last zone shuts off. In most cases turning the
external amplifier on and off with a specific zone is recommended.
Installation
Additional space should be allocated for installation of a 12-Channel amplifier. Leave at least 3-4 inches above and below
the amp for proper air flow for cooling. If rack mounting, use cooling vents above and below the amp for increased air flow.
Mounting amplifiers at the top of an equipment cabinet is recommended to reduce source components exposure to excess
heat. Use cooling fans when necessary.
Connections And Configuration
AUDIO
1. Connect one, quality, RCA-RCA stereo patch cable from the appropriate MZC-88 ZONE L&R PRE-OUT to the L&R MAIN
INPUT on the 12-channel amplifier.
2. Set the VC/NVC SWITCH to NVC (fixed). The Zone volume will be controlled via the sub-zone volume controls.
SPEAKERS
1. Connect the L+,L-/R-R+ SPEAKER-LEVEL OUTPUTS of the 12-channel amplifier to the appropriate sub-zone volume controls and speakers. Maintain proper polarity.
AUDIO SENSING
1. No additional connections required.
2. If using a SpeakerCraft BB1235, switch the ‘Audio Sense/Trigger/Constant’ Switch to AUDIO SENSE.
3. If using another brand of amplifier with audio sensing, please refer to appropriate documentation for additional information.
12V TRIGGER (ZONE SPECIFIC)
1. Connect an unregulated 12V DC power supply in series with one of the MZC-88 Contact Closure pairs as shown in
Figure 21.
2. If using a SpeakerCraft BB1235, terminate the control wire with a 3.5mm mini plug and plug it into the Trigger Input
jack. POLARITY: TIP=+12V; SLEEVE=GND. Switch the ‘Audio Sense/Trigger/Constant’ Switch to TRIGGER INPUT.
3. If using another brand of amplifier, terminate the control wire as appropriate. Be sure to maintain proper polarity.
4. Configure the Contact Closures as an ‘event’ for that zone in EZ-Tools. Set the Contact Closure to ‘Close’ when turning
the zone ON and ‘Open’ when turning the zone OFF.
12V TRIGGER (SYSTEM ACTIVITY)
1. Connect a 3.5mm mini-mini plug wire to the MZC-88 COMMON STATUS OUT.
2. If using a SpeakerCraft BB1235, plug the other end into the Trigger Input jack. Switch the ‘Audio Sense/Trigger/Constant’
Switch to TRIGGER INPUT.
3. If using another brand of amplifier, terminate the 12-channel amplifier end as appropriate. Be sure to maintain proper
polarity.
MZC-88 Installation Instructions
Page 39
PS-1.0 200mA Power Supply
To Unswitched Outlet
Black Wire (GND)
White Striped
Wire (+12V)
Contact Closure Pair 1
MZC-88
Zone VC/NVC Switch
RCA-RCA
Stereo
Patch Cable
SpeakerCraft
L
R
28-12AWG
Two-Conductor
Stranded Wire
R
AU X
INPUT
CHANNEL 3
CHANNEL 4
CHANNEL 5
CHANNEL 6
LEVEL
LEVEL
LEVEL
LEVEL
LEVEL
OFF ON
LINE
IN
3-30VAC/DC
TRIGGER
INPUT
12V
CONTROL
OUTPUT
LINE
IN
R R+L L
OFF ON
LINE
IN
LINE
IN
BUS•AUX•LINE
BUS•AUX•LINE
R R+L L
R R+L L
R R+L L
BRIDGE
CHANNEL 7
LEVEL
OFF ON
LINE
IN
LINE
IN
BUS•AUX•LINE
BUS•AUX•LINE
R R+L L
R R+L L
CHANNEL 8
LINE
IN
LEVEL
LINE
IN
BUS•AUX•LINE
R R+L L
CHANNEL 9
LEVEL
BRIDGE
OFF ON
BUS•AUX•LINE
R R+L L
CHANNEL 10
LEVEL
OFF ON
LINE
IN
LINE
IN
BUS•AUX•LINE
BUS•AUX•LINE
R R+L L
CHANNEL 11
LEVEL
BRIDGE
R R+L L
CHANNEL 12
LEVEL
BRIDGE
OFF ON
LINE
IN
LINE
IN
BUS•AUX•LINE
R R+L L
BUS•AUX•LINE
FUSE 10 AMP
R R+L L
InstaLLock™ Plugs
CHANNELS 1- 8
8Ω
+
+
8Ω
4Ω
BRIDGED
--
+
--
8Ω
--
+
--
+
CHANNEL 4
BRIDGED
+ +
-- -CHANNEL 3
AC 120V 60HZ
CHANNELS 9 - 12
8Ω 4Ω
4Ω
BRIDGED
+ +
-- -CHANNEL 2
4Ω
BRIDGED
+ +
CHANNEL 1
Sub-Zone
Volume Control
SpeakerCraft
VST60
BUS•AUX•LINE
BRIDGE
SPEAKER OUTPUT S
3-30V
AC/DC
TRIGGER
INPUT
CONSTANT
BRIDGE
BUS•AUX•LINE
AU X
OUTPUT
AUDIO
SENSE
12 Volt
Control Input
CHANNEL 2
LEVEL
BRIDGED
L
SERIAL NUMBER
BRIDGED
R
CHANNEL 1
BRIDGED
R
Model BB1235 12-Channel Amplifier
Riverside, California, USA
BRIDGED
L
BRIDGED
L
®
BB1235
LINE INPUT S
BU S
BU S
INPUT OUTPUT
BRIDGED
12 Channel Amplifier
L&R Line-Level
Audio Bus Input
Zone L&R Line-Level
Audio Pre-Out
CHANNEL 6
8Ω
+
CHANNEL 8
8Ω
--
+
CHANNEL 10
-+
-- -CHANNEL 9
4Ω
BRIDGED
+ +
-- -CHANNEL 7
4Ω
BRIDGED
+ +
-- -CHANNEL 5
--
Sub-Zone
L&R Speaker Level
Output
-CHANNEL 11
CHANNEL 12
Power
Consumption
830 Wa tts
18-14AWG
Two-Conductor
Speaker Wire
Sub-Zone
Speakers
SpeakerCraft
AIM8 Four
Figure 21
Adding a 12-Channel Amplifier
HIGH-POWER ALL ZONES
Another option for adding external amplification, is to connect each of the MZC-88 Zone Pre-Outs directly to the individual
line-level inputs on the SpeakerCraft DBB 12100, 100 Watts by twelve channel amplifier. This option maintains individual
zone control via EZ-Pads, as in a normal MZC-88 system, but now cranks up the audio power to a massive 100 Watts per
channel in up to six zones!
1. Using a quality stereo RCA to RCA cable, connect the Zone L & R Pre-Outs to the individual line level inputs on the
DBB12100. (The DBB12100 inputs are labeled 1-12, so Zone 1 would use inputs 1&2, Zone 2 would use 3&4, etc.)
2. Set the VC/NVC switch on the MZC-88 Rear Panel to VC (variable) so the zone keypad can be used to adjust volume.
3. Connect zone speakers to the DBB 12100 Speaker Terminals in the same pairings as the Pre-amp connections.
4. Switch the BUS/AUX/LINE Input select switch on the DBB12100 to LINE for all channels connected to MZC-88 Pre-outs.
5. Connect a Trigger Input to the DBB 12100 for Power ON/OFF as shown in Figure 21.
Page 40
MZC-88 Installation Instructions
EXPANDED SYSTEMS
Up to four MZC-88s can be “daisy-chained” together to create systems with up to 32 Zones. The first MZC-88 in the chain is
referred to as the Master and the subsequent MZC-88’s are referred to as Slaves. System Zone numbers correspond to the
MZC-88 Master and Slaves as follows:
MZC-88 Master
Zones 1-8
MZC-88 Slave 1
Zones 9-16
MZC-88 Slave 2
Zones 17-24
MZC-88 Slave 3
Zones 25-32
A CAT-5/RJ45 cable must be used to loop system function data between the MZC-88 Master and Slaves.
Each MZC-88 requires a dedicated KCM-1.0 for associated zone keypad and IR receiver connections.
MZC-88’S AND MZC-66’S CANNOT BE DAISYCHAINED TOGETHER IN THE SAME SYSTEM!
All External Common Source Components get connected to the Source Inputs on the Master. The external source audio and
video signals are then looped from the Master to the Slave MZC-88’s for A/V distribution to expanded zones. External Source
IR control is looped in a reverse direction from the highest numbered Slave back to the Master and output from the Master to
the external sources via IR emitters.
Each MZC-88 requires a dedicated HED-1.0 Antenna Head Amp for the dual internal tuners. All MZC-88 Zone Tuner Presets
must be configured individually. Programming the Master does not set the Slave presets. This increases the overall flexibility of
the system by allowing each zone to have up to 10 different preset stations per tuner.
Phone/Video Paging A/V signals require an audio/video distribution amp to feed the telephone audio and/or camera video
signals to each of the MZC-88 Master and Slaves. The Doorbell/Status Trigger Inputs must be looped to trigger all MZC Master
and Slave Page Inputs.
The Common IR Out and Common Status Out jacks must be looped for control of common IR or voltage controlled devices.
Installation
Additional space should be allocated for installation of each additional MZC-88. Leave at least 3-4 inches above and below
each Controller for proper air flow for cooling. Mounting MZC-88s at the top of an equipment cabinet is recommended to
reduce source components exposure to excess heat. Use cooling fans when necessary.
Connections And Configuration
KEYPADS
1. Connect a KCM-1.0 to each MZC-88.
2. Connect Keypads and IR receivers to the appropriate KCM-1.0 EZ-Pad Zone terminals. Maintain proper polarity and check
all connections prior to powering up the system.
AUDIO/VIDEO-External Common Source Components
1. Connect one, quality, RCA-RCA A/V patch cable from each external source component to the appropriate Source Input
on the MZC-88 MASTER.
2. Connect one, quality, RCA-RCA A/V patch cable from the LOOP A/V OUT on the MZC-88 MASTER to the same source
number A/V Input on the next MZC-88 Slave in the chain. (Master to Slave 1, Slave 1 to Slave 2, etc.)
3. Repeat steps 1-2 for all external common source components.
IR-External Common Source Components
1. Connect one 3.5mm mini-mini patch cable from the IR OUT of the last Slave, (Slave 3 if using 4 MZC-88s) to the same
source number IR LOOP jack on the next MZC-88 in the chain (Slave 3 to Slave 2, Slave 2 to Slave 1, Slave 1 to Master) for each external common source component to be controlled via IR.
2. Connect an IR emitter to the IR OUT on the Master and attach to the appropriate source component over the IR eye
of that component.
MZC-88 Installation Instructions
SCSI Cable
Page 41
KCM-1.0
EZ-CONNECT
KEYPAD MODULE
ZONES 1-8
FM Antenna
AM Loop
Antenna
HED-1.0
FM/AM HEAD
AMP ADAPTOR
MZC-88 MASTER
14AWG
From Keypads - Zones 1-8
A/V In, IR Out - Sources 3-8
IR Emitters
RG6 Coax
Source A/V
Earth
Ground
(See Text)
MZC-88 MASTER
FM Antenna
Speaker And Video Feeds - Zones 1-8
FROM KCM-1.0
ZONES 9-16
AM Loop
Antenna
HED-1.0
CAT-5/RJ45
Patch
Cables
PTP-1
Mini-Mini
Patch
Cables
RCA-RCA
A/V
Patch
Cables
MZC-88 SLAVE 1
FM/AM HEAD
AMP ADAPTOR
MZC-88 SLAVE 1
14AWG
RG6 Coax
Earth
Ground
(See Text)
Speaker And Video Feeds - Zones 9-16
A/V, IR, Data Loop to Additional MZC-88’s as Needed
3 Slaves, 32 Zones Max
Figure 22
MZC-88 Expanded System
Page 42
MZC-88 Installation Instructions
VIDEO OUTPUT
1. Connect the VIDEO OUTPUT of each MZC-88 Zone Output to the appropriate zone TV/Video Display.
SPEAKERS
1. Connect the L+,L-/R-R+ SPEAKER-LEVEL OUTPUTS of each MZC-88 to the appropriate zone speakers.
EXPANSION
1. Connect one, CAT-5 patch cable terminated with RJ45 connectors from the EXPANSION LOOP Terminal on the MZC88 MASTER to the EXPANSION PORT Terminal on the next MZC-88 Slave in the chain. (Master to Slave 1, Slave 1 to
Slave 2, etc.)
3. Repeat steps 1-2 for all MZC-88s in the chain.
ANTENNAS
1. Connect one HED-1.0 to EACH MZC-88.
2. Connect the FM/AM/75Ω Terminal on the MZC-88 to the FM/AM terminal on the HED-1.0 using up to 100’ of RG6 coax.
3. Connect the included FM dipole antenna to the FM terminal on the HED-1.0
4. Connect the included AM loop antenna to the AM and G spring clip terminals on the HED-1.0 (polarity non-critical).
5. Repeat steps 1-4 for each MZC-88 in the chain. (4 MZC-88’s Max.)
PAGE IN
NOTE: If only connecting audio for Phone Paging, ‘Y’ connectors can be used to connect the paging source line-level
audio feed to the PAGE IN/PHONE jacks on all MZC-88s. When connecting a composite video feed, an appropriate 75
ohm matching distribution amp is required. If connecting audio and video, both signals can be fed to the Page In jacks
from the distribution amp.
1. Connect the line-level audio and/or composite video out of the paging source to the audio and/or composite video IN
on the distribution amp, using RCA-RCA patch cables.
2. Connect the audio and/or video OUTPUTS of the distribution amp to the PAGE IN PHONO/VIDEO Inputs on the MZC-88
Master and Slaves as shown in Figure 23.
FROM DOOR A/V CAMERA, ETC.
VIDEO
AUDIO
1
MZC-88
Master
AUDIO VIDEO DISTRIBUTION AMPLIFIER
OUTPUTS
2
3
4
5
6
V
V
V
L
L
L
R
R
R
PHONE VIDEO
PAGE
IN
MZC-88
Slave #1
PHONE VIDEO
PAGE
IN
To Additional MZC-88's
(slaves #2 and #3) if needed
Figure 23
Page Phone/Video IN Expansion
MZC-88 Installation Instructions
Page 43
DOORBELL/STATUS
Loop the Doorbell/Status Trigger Inputs using standard 3.5mm (1⁄8”) Y adaptors to simultaneously trigger the Page Inputs on
multiple MZC-88’s.
NOTE 1: This application requires standard Y adaptors. DO NOT use the SpeakerCraft SAC-1.0 Y adaptor. The SAC1.0 has
‘steering’ diodes that will interfere with the signal path in this application.
NOTE 2: These inputs will not function without proper configuration in EZ-Tools.
1. Terminate the Trigger Source wire with a 3.5mm mini plug. POLARITY: TIP=+V, SLEEVE=GND.
2. Connect Trigger Source to a Y adaptor as shown in Figure 24.
3. Daisy-chain the Y adaptors to all MZC-88’s in the chain as shown in Figure 24.
FROM DOORBELL OR STATUS
TRIGGER SOURCE (3~30V AC OR DC)
MZC-88
Master
3.5mm "Y" Cable Adapters
2
1
DOORBELL/STATUS IN
MZC-88
Slave #1
1
2
DOORBELL/STATUS IN
To Additional "Y" Connectors and
MZC-88's (Slaves #2 and #3) if needed
Figure 24
Doorbell/Status IN Expansion
COMMON IR OUT
The Common IR Out jacks from multiple MZC-88’s can be paralleled and looped using standard 3.5mm (1⁄8”) Y adaptors for IR
control of a common device (not connected to one of the Source Inputs) from any MZC-88 in the chain.
NOTE: This application requires standard Y adaptors. DO NOT use the SpeakerCraft SAC-1.0 Y adaptor. The SAC1.0 has
‘steering’ diodes that will interfere with the signal path in this application.
1. Daisy-chain the Y adaptors to the Common IR OUTS on all MZC-88s in the chain as shown in Figure 25.
2. Connect an IR emitter to the Y adaptor assembly as shown in Figure 25. Set the LO/HI Common IR Out switch to LO.
(Refer to Common IR Out, page 32.)
3. Attach the IR emitter to the device to be controlled over the IR eye on that device.
TO AN EXTERNAL COMMON
EMITTER OR THE IR INPUT OF
A CONTROLLED DEVICE.
MZC-88
Master
3.5mm "Y" Cable Adapters
COMMON
LO
HI
IR OUT
Controlled
Component
IRE-3.0
Visible Emitter
MZC-88
Slave #1
COMMON
LO
IR OUT
HI
To Additional "Y" Connectors and
MZC-88's (Slaves #2 and #3) if needed
Figure 25
Common IR Out Expansion
Page 44
MZC-88 Installation Instructions
COMMON STATUS OUT
The Status Out jacks from multiple MZC-88s can be paralleled and looped using standard 3.5mm (1⁄8”) Y adaptors for 12 Volt
DC control of a common device when any zone in the system is turned on.
NOTE: This application requires standard Y adaptors. DO NOT use the SpeakerCraft SAC-1.0 Y adaptor. The SAC1.0 has
‘steering’ diodes that will interfere with the signal path in this application.
1. Daisy-chain the Y adaptors to the Common IR OUTS on all MZC-88’s in the chain as shown in Figure 26.
2. Connect a trigger wire to the Y adaptor assembly as shown in Figure 26.
3. Terminate the trigger wire as appropriate. Maintain proper polarity. Check connections prior to powering up the system
- Improper connection of a voltage trigger can damage system components.
4. Connect the trigger wire to the device to be triggered.
TO THE TRIGGER INPUT OF
A CONTROLLED DEVICE.
MZC-88
Master
3.5mm "Y" Cable Adapters
SpeakerCraft
®
To Trigger
Input
MZC-88
Slave #1
To Additional "Y" Connectors and
MZC-88's (Slaves #2 and #3) if needed
Figure 26
Common Status Out Expansion
MZC-88 INTERNAL TUNER SETUP
The MZC-88 has two built-in AM/FM Tuners that allow programming of up to 10 AM or FM Stations per Tuner per Zone. Each
Zone’s presets require programming by Tuner and by preset. That is, all presets in all zones are individually set. This ultimately
allows tremendous flexibility in that different users can have different favorite stations programmed in different zones. One
zone may be all rock stations, while another is a mix of jazz and classical while another might be a mix of news, talk, sports
and a variety of music stations. Tuner Presets can only be programmed from the MZC-88 Front Panel controls. Programming
the keypads for control of the tuners must be done in EZ-Tools.
With two tuners, up to two different stations can be playing in two different zones at the same time. The tuners can be
setup for priority lockout so that the first zone to select a tuner has exclusive control until that zone selects another source or
is turned off. In priority lockout, other zones can select and monitor a ‘locked’ tuner, but cannot control it until it is released.
With no priority configuration to the tuners, any zone can select and control either tuner at any time.
Figure 27
MZC-88 Tuner Controls
MZC-88 Installation Instructions
Page 45
Programming Tuner Presets
This section assumes that the MZC-88 and all system components, including antennas, have been properly installed and are
functioning properly. The programming instructions are the same for Tuner 1 and Tuner 2. Use the appropriate associated
buttons to program each tuner.
Z1
FM 1 0 6 . 0 MH z
> <
Figure 28
Tuner Display Tuning Off Center
Z1
FM 1 0 6 . 1 MH z
St
Figure 29
Tuner Display FM Stereo Mode
Z1
FM 1 0 6 . 1 MH z
MEM P 0 1
St
Figure 30
Tuner Display Preset Memory
1. Press the ZONE button to select the specific zone’s presets to be programmed. Repeated presses of the Zone Button will
scroll through the zones, 1-8, and the tuner display will indicate the zone selected. (Z1 as shown in Figure 28.) Zones
can also be selected by pressing the ZONE button followed by TUN+/- or by pressing the ZONE button followed by one
of the Preset 1-8 buttons. “ZONE CHANGE” will appear in the tuner display to indicate a change of zone selection.
2. Press the AM/FM button to select AM or FM. The tuner display will indicate the band selected.
3. Press the TUN+/- buttons to tune the station to be programmed.
a) A short press of under 1⁄2 second will change tuning by one increment (0.2 MHz for FM and 10 kHz for AM).
b) A longer press, over 1/2 second but less than 2 seconds, will place tuner in Auto Seek Mode. That is, the tuner will
automatically advance and stop on the next usable station.
c) A Press & Hold of more than 2 seconds will cause Rapid Manual Tuning. Release button when tuning frequency is
close to the desired station and then use short presses to fine tune the desired station.
Left and right arrow icons will appear when a station is not properly tuned as shown in Figure 28. A solid bar will appear when the station is properly tuned as shown in Figure 29.
4. If a station is noisy, press the MN/ST (mono/stereo) button to force Mono reception. The letters ‘MO’ will appear in the
display. To return to stereo reception, press the MN/ST button again. The “St” icon will appear as shown in Figure 29.
When tuned to a stereo station, the letters ‘Mo’ (lower case ‘o’) will appear for mono stations when the MN/ST button is
switched to ST.
5. Press and hold the Preset Button that the currently tuned station is to be programmed to for three seconds. The tuner
display will indicate “MEM” indicating a station is being set and “P01-P10” to indicate which preset button, 1-10, has
been programmed as shown in Figure 30.
6. Repeat steps 1-5 for all presets for all zones for Tuners 1 and 2. It may be desirable to program the same presets for both
tuners in a zone. In the case that one tuner is “busy”, the other can be used and easily tuned with the same preset configuration. In some applications it may be desirable to have a completely different set of presets for variety. (Client preference will typically determine preset configuration.)
Page 46
MZC-88 Installation Instructions
PROGRAMMING WITH EZ-TOOLS
With the system installed at the job site or set up for test at the shop, the system is ready for programming. Connect the
“3.5mm Plug Transfer Cable” between the COM port on a PC running EZ-Tools (or the USB port with the USB/Serial Adapter)
and the CONTROL PORT on the MZC-88. Power up the MZC-88 and proceed as follows:
DOWNLOAD EZ-TOOLS
1. Download EZ-Tools from www.speakercraft.com/faq/software.htm.
2. To Download, under SOFTWARE DOWNLOADS, click ‘EZ-TOOLS (all models)’. This will start the download.
3. When the ‘FILE DOWNLOAD’ Window opens, click ‘SAVE’. A ‘SAVE AS’ Window will open. Browse the hard drive and
select a convenient location such as Desktop, or create a SpeakerCraft Folder in Program Files, etc. The ‘EZ-TOOLS Setup.
EXE’ will download to that location. This will take a few minutes depending upon connection speed.
4. When the download is complete, left click ‘RUN’. EZ-Tools will open.
5. When the ‘Do You Want to Download the USB Driver’ window opens, Click YES if the computer being used does not
have a DB9 Serial port. This will load a driver for use with the USB to Serial Adpator. When the driver download has
completed, click ‘NEXT’. If the driver is not required, click NO.
6. The EZ-Tools Setup window wil open. Click ‘NEXT’. Use the directory shown in the window or browse the hard drive to
choose a location to save EZ-Tools. Click NEXT. The program will save to the designated location.
7. If a previous version of EZ-Tools has been saved, a window, ‘EXISTING LIBRARY’ will appear. This will merge existing IR
Code libraries into the new EZ-Tools for convenience. Click YES to merge libraries. When Setup is complete, Click FINISH.
8. Restart computer and click on the EZ-Tools icon. EZ-Tools will open.
9. SERIAL PORT SELECTION — At this point, EZ-Tools will search for a device (in this case the MZC-88) on default
Serial Port 1. If the message “No Device was found on Port 1” appears, click OK. Click “Tools” in the EZ-Tools menu,
then “Settings”. In the “EZ-Tools Settings”, click “Auto-Detect” or manually select a known Serial Port for the computer
connection to the Transfer Cable and MZC-88. When device is found, click OK.
PROGRAMMING WITH EZ-TOOLS
There are two ways to start a new project in EZ-Tools. If the system being installed is similar to the default configuration of
the MZC-88 and included EZ-Pads, the better choice may be to start with the default MZC-88 project and make changes as
necessary. If the system being installed is completely different from the default configuration, starting a new project is the
other option.
Menu Bar
New Project
Icon
Toolbar
Figure 31
Opening the Default Project
MZC-88 Installation Instructions
Page 47
DEFAULT PROJECT - Begin programming by opening the default “MZC88DEF1.etp” project (Refer to Figure 31) or by
creating a new project. It is highly recommended to start with the default project that comes factory installed on the MZC88 and with EZ-Tools. The default project matches the layout of the included MKP-8.1 Keypads and has a good amount of
the source switching and volume commands already in place. The default project can be modified to suit the requirements
of a given installation for additional keypad modules and changes in source components.
NEW PROJECT - To start an entirely new project, left click “New … MZ-88 Project” from the File menu or click the dual
Green MZC-88 Icon. Type in a New Project Filename for the project, such as “JonesHome” and click “Save”. This places
the filename in the “Projects” folder in the EZ-Tools directory. A typical path to the Projects folder would be “C:\Program
Files\SpeakerCraft\EZ Tools\Projects”.
Assigning Ir Commands To Button Keys
If the default project keypad button layout will be used as is, IR commands to control the source components can now be
assigned. IR commands are obtained from the embedded EZ-Tools Command Library. IR commands can also be learned into
the Library for use in any EZ-Tools project. This example will use the existing commands from the library.
10. With the “MZC88DEF1.etp” default project open, save it with a new file name, such as “JonesHome”, by using “Save
As…” in the File menu. This will retain the default project “as is” for future use.
11. Start with the Source buttons in Zone 1. Zone 1 will be cloned to the other zones, after it has been configured. The
default program already has non-IR commands (MZC-88 internal commands indicated with a red asterisk *) programmed
for source/zone routing, so only the source IR function commands need to be added. The source IR commands will
typically create an IR macro (sequence) of commands to turn on a source component, place it in Play, and turn on any
other devices that may need to come on with the single press of a Source button. Left click on the CMD LIBRARY tab. A
Brands window appears with device folders just below. (Refer to Figure 32)
Figure 32
Assigning IR Commands to Button Keys
12. Left click a Source button (i.e. SAT) on the virtual keypad. Then left click and scroll the Brands list for the component
brand being used for SAT (i.e. RCA).
13. Double left click the SAT/DSS folder. A list of Code Sets appears. At this point it may be necessary to test the commands
in more than one code set to find commands that work with a specific component.
14. To TEST the commands, open a Code Set folder and left click a POWER command to highlight it. Press F9 to test the
command. (When a command is sent by F9, the Source keys on all connected keypads will flash. The power command
will be sent to the selected Source and Zone IR Outputs as well as the Common IR OUT). Once a power command is
found to work, usually all the others for that device will work as well. If not, try other code sets.
NOTE: This test assumes the Transfer Cable is connected between the computer running EZ-Tools and the MZC-88, all
source and system components are connected, all IR emitters are attached and plugged in and all devices are powered
up.
Page 48
MZC-88 Installation Instructions
15. When a Power ON command is found to work, double left click it. The command will appear at bottom of the
Command List in Button Properties Window for the selected Source key. (Refer to Figure 32)
16. Once a command is in the Command List, it can be tested by clicking TEST in the Button Properties Window and then
clicking the selected (Source) button on the virtual keypad. It should act just like pressing a button on the real keypad.
Click Test a second time to turn the Test mode off.
17. If the command is a Discrete Power ON command, no additional Power Management setup is required. However, if a
component only operates with a toggle power command, see the Power Management/Events Programming section, beginning at Step 19 following.
18. Repeat steps 12 - 17 for each of the remaining Source keys. If adding a play command so that a CD, DVD, etc. starts
playing when a source key is pressed, be sure to add it after the Power ON command, as in Figure 33.
POWER MANAGEMENT/EVENTS PROGRAMMING
Power On
19. A component that only has a Toggle Power command (same command ON/OFF) available, will require Power
Management from the MZC-88. The VCR in the example system will use the Source key to turn the VCR ON. Left click the
VCR source button on the virtual keypad. Scroll through the CMD Library Brands for the VCR brand being used, (JVC in
this example).
20. At JVC brand, double left click the VCR Folder icon to open the folder. Open Code Set 1. Left click the POWER ON/OFF
command (a Toggle Power command) and test with F9. If the command works, double click the command to place it
in the Command List.
21. Right click the POWER ON/OFF command in the Command List and left click “Toggle Power Management”. On the popup, click “Allow component to power ‘ON’“. (Refer to Figure 33)
Figure 33
Programming Toggle ON Power Management
MZC-88 Installation Instructions
Page 49
22. Next, select the STATUS INPUT number to which a sense voltage is connected (see Notes 1 and 2 below) that represents
the VCR’s ON or OFF condition. (Using the same number Status In as Source Input number will help keep track of devices, connections and programming. In the example system, VCR is Source 5, therefor Status IN 5 is being used for VCR
power management.) The command summary is now shown on the Command List as “(TogON-5) POWER ON/OFF
Code Set 1 (JVC-VCR)”. This means that if the VCR is OFF, the sense voltage will be low and therefore the power command will be allowed to pass to turn the VCR ON when the VCR button is pressed. Conversely, if the VCR were already
ON, the sense voltage would be high, thus prohibiting the power command from being sent when the VCR button is
pressed.
NOTE 1: The sense voltage would be connected to the one of the STATUS IN jacks on the rear of the MZC-88. It needs
to be in the range of 3 to 30 V AC or DC. This could be derived from a Current or Video sensing module which has an
output voltage that goes high (greater than 3 V) when the component is ON or low (less than 1 V) when the component is OFF.
NOTE 2: The DOORBELL/STATUS IN jacks should be used for doorbell and page input triggering.
23. Repeat steps 19 - 22 for all other sources that need to operate with Toggle Power commands. When possible, try to use
components that have discrete power ON and OFF commands to simplify system design, hookup and programming.
Many discrete commands are available at “www.remotecentral.com”.
Power Off
24. When a power button is programmed with a zone power off command, pressing the PWR button will turn a Zone
OFF, but not necessarily any of the Sources until the last Zone is turned OFF, either through turning off the last zone
manually or through a whole-house power off (pressing & holding PWR for longer than 2 seconds). To program Source
OFF Commands, proceed as follows:
25. To program power OFF management, power commands for sources will not be placed under the PWR key, but rather
within the EVENTS SETUP. (This keeps the Off events in one location, managed by system status, rather than under
every power key in each zone, possibly creating control and power management conflicts.)
26. Left click the PROJECT CONTENT Tab. Left click EVENTS SETUP. Under “System Turning OFF (Last Zone OFF)”
left click “Source Output 5” which corresponds to the VCR as Source 5. Left click the CMD Library Tab. Double left click
the same JVC VCR POWER ON/OFF command that was used for power ON under the VCR Source Button. The command will appear in the Command List. Right click the POWER ON/OFF command in the Command List and left click
“Toggle Power Management”. In the pop-up, left click “Allow component to power ‘OFF’“ and click OK. (Refer to
Figure 34)
Figure 34
Programming Toggle Power OFF Under Events Setup
System Turning OFF is now programmed so that the VCR will turn OFF when the last zone is powered OFF or when
Whole House OFF is executed by pressing and holding any PWR key for more than 2 seconds.
Page 50
MZC-88 Installation Instructions
27. Repeat steps 19-26 to place a Toggle Power OFF command under all other Source Outputs, as needed, for source
components using power toggle commands.
28. Place the discrete Power OFF commands under each of the remaining Source Outputs in the System Turning OFF
list for sources using discrete ON/OFF commands.
NOTE 1: When done, all Source power OFF events will occur without the need to place them under the PWR keys in
each zone. This results in easier programming and a much shorter Power OFF macro.
NOTE 2: A Zone component, such as an IR controlled amplifier, will need to have its power OFF command placed
under the PWR key of the Zone that controls it, OR under the applicable “Zone – Turning OFF” section in Events Setup.
Cloning and Programming the Remaining Zones
29. In the example system, all zones share most of the same basic programming. With Zone 1 programmed, it can be easily
cloned to each of the remaining 7 zones and save a great deal of programming time. The unique programming functions
for each zone can then be added, if needed. To Clone Zone 1 to the other 7 zones, proceed as follows:
30. Left click Zone 1 under Project Content and drag and drop it onto Zone 2. Left click “Clone” on the pop-up. (Refer
to Figure 35) Zone 2 is now an exact replica of Zone 1. Repeat this procedure for all zones.
Figure 35
Cloning Zone 1 to Zone 2
NOTE: “Move” also shows on the pop-up. This allows a given zone configuration to be moved to a different zone,
without cloning. Be cautious with Move. Example: If Zone 1’s program is MOVED to another zone, Zone 1 will be left
completely un-programmed! (Not Setup) and will need to be re-programmed to function.
31. When done, all 8 zones will be identical. At this point, individual zone-by-zone changes, such as different zone commands for zone specific devices can be programmed, if needed.
32. When the above steps are fully implemented, the example system will include the functionality stated under “Factory
Default System“ plus the following:
a. Source and Zone components will power ON with the press of any Source button.
b. Source Power ON Management for all Sources.
c. Source Play at turn ON, if programmed.
d. Zone components power OFF with the press of individual Zone PWR buttons.
e. All Source components stay ON until last Zone powers OFF.
f. All Source and Zone components power OFF when the last Zone on turns OFF, or when the “Whole House power OFF” (press and hold any Zone’s PWR button for more than 2 seconds) command is sent. See Section: “MZC-88 Setup Menus” for adding Source Description and the Section “Zone Setup Menus” for assigning Zone Names and Available Sources. For other types of programming, see “Advanced Programming” section.
MZC-88 Installation Instructions
Page 51
ADVANCED PROGRAMMING
EZ-Tools, in conjunction with the MZC-88 components and EZPads, is a very flexible and extensive programming and control
system. Advanced options are as follows:
Delays
1. In some cases, DVDs, VCRs and particularly Video Projectors, a component may require 1-4 seconds to fully execute
power ON, OFF, or some other function. This is usually not a problem unless the user presses the component’s Source
button very quickly after a power OFF command, or commands execute so quickly in a “Whole House On” macro that
Status is not established before the next Power command arrives. The Keypad could then show an ON condition when
in reality the component would be OFF.
2. To prevent this, place a delay just after the Power command for the related Source Output under “System Turning
OFF” in Events Setup (and under the Source button, if needed at turn ON). To do so, left click the clock symbol
just above the Command List. A Delay line with a clock symbol will appear in the Command List. (Refer to Figure 36)
Figure 36
Programming Delays
3. Double left click the Delay line and adjust the Delay Time as necessary. Click OK.
NOTE: Keep delays to the shortest times possible to avoid long executions of the resulting macros.
4. When adding a Delay, it will appear at the bottom of the Command List. If there are several commands in a list, select
the Delay line and drag and drop it into position, before or after the command requiring the delay, within the list as
necessary.
Page 52
MZC-88 Installation Instructions
Punched Commands
1. The Punch command allows common commands such as Tone, Volume Up/Down, etc., to be instantly Punched
Through to all Source (bank) selections. This will saves a great deal of programming time and helps reduce programming errors. Keep in mind however, that commands such as Stop and Play will be different for each Source (bank) and
should not be punched. Also, if using the MZC88DEF1.etp default project that comes installed on the MZC-88 (and in
EZ-Tools), the needed punch throughs have already been done for the Tone, Volume Up/Down, etc. commands.
2. If a Punch Through is necessary, say for volume, begin by left clicking any one of the Source buttons. Place Volume Up
and Down commands on the Vol Up and Vol Down keys. For the MZC-88, these would be the internal Zone 1 Volume
Up and Zone 1 Volume Down commands from the MZC-88 CMDs Tab. Left click the Vol UP key so that it is highlighted
blue.
3. Left click the MZC-88 CMDs tab and then open the “Audio Level Commands” List.
4. Double left click the Zone 1 Volume Up command from the list (if programming Zone 1). The command will appear
in the Command List in the Button Properties Window. (Refer to Figure 37)
Figure 37
Punch Programming
5. To Punch, right click the Vol Up button and left click “Punch Key’s Commands” and then “Yes” in the pop-up. (Refer to
Figure 37) Repeat for Vol Down. The commands under these keys will now appear regardless of the Source selected (all
banks).
6. Repeat these steps for any other commands that require Punch Through.
MZC-88 Installation Instructions
Page 53
Priority
There are times when it will be desirable for the user to select a source, such as CD, and have it play without interruption
in a given zone, such as when dining. Other zones could monitor that same source, but not change discs, tracks, or stop
the CD, etc. In EZ-Tools, such priority can be given either on a “first come first served” basis or on an “equal access” basis.
Priority can be assigned on a Global, Zone, Source or Individual Key basis. The options are as follows:
Priority – Equal
This is the default setting in EZ-Tools, before any priority programming changes are made. It means that all keys in all zones
have the same priority (Priority On) and all programmed keys work in all zones. It will likely be the most often used in
installed systems.
Priority can be verified by right clicking any key. A check mark will appear next to “Priority ON” in the pop-up. (Refer to
Figure 38)
Figure 38
Priority ON (Initial Default Setting)
Priority – First Come, First Served
This type of priority gives exclusive controlling access (priority) to the first zone that selects a given source. For instance, the
first zone to select CD would be the only zone able to control the CD. Other zones could monitor (listen to) the CD, but
would not be able to control it until the zone with priority released it by selecting another source or turning off. The next
zone to select CD would then have priority control to the exclusion of all others. To program this type of priority, proceed as
follows:
1. Right click MZC-88 under Project Content. Left click “Force Global Priority OFF” and click “Yes” in the pop-up.
(Refer to Figure 39) This will force “Priority Off” on all function and numeric keys in all zones with the exception of
keys checked as “Mute (Relay) Key” and “Zone Power Off” keys. This can be verified by right clicking any function key.
“Priority OFF” will be checked instead of “Priority ON”.
2. Restoring Priority to Common Commands. The “Force Global Priority OFF” removes all priority control including
common commands like zone Bass/Treble and Volume. These will need to be restored as follows:
3. Right click a Volume button in any Zone and left click “Priority ON” in the pop-up. Next, click “Punch Priority
Setting” and “Yes” in the pop-ups. This “punches through” “Priority ON” for that key for every Source (bank) in the
Zone.
4. Repeat steps 2 and 3 for the remaining volume and other common keys in the zone.
5. Now repeat steps 2, 3, and 4 for each of the remaining zones. This completes this type of programming.
Page 54
MZC-88 Installation Instructions
Figure 39
Forcing Global Priority OFF
Zone Priority
To have full priority in any given zone (that is, to always be able to override other zone’s “First Come, First Served” selections
for all Sources within a Zone), proceed as follows:
1. Perform steps 1 through 5 in “Priority - First Come First Served”.
2. Right click the desired Zone (i.e. Zone 2 under Project Content) and left click “Force Zone Priority ON” and “Yes”
in the pop-ups. (Refer to Figure 40) All function and numeric keys for all Sources in that Zone, where applicable, will
now have all their “Priority ON” options checked.
3. Repeat previous step for any other Zones that should have this action.
Figure 40
Forcing Zone Priority OFF
Source Priority
To have one or more single Sources have full priority in any given zone (that is, to have specific sources always override
another zone’s “First Come, First Served” selection for one or some, but not all Sources), proceed as follows:
1. In a specific Zone, right click the Source key that is to have Priority override (i.e. CD) and left click “Force Source
Priority ON” and “Yes” in the pop-ups. (Refer to Figure 41) All programmed function and numeric keys for that
Source, in that zone, will now have all their “Priority ON” options checked.
2. Repeat the previous step for any other Source(s) in any other Zone(s) that should have this action.
Figure 41
Forcing Source Priority ON
MZC-88 Installation Instructions
Page 55
Individual Key Priority
To have just one or more function or numeric keys have full priority for any given Source in any given zone [that is, to
always be able to override another zone’s “First Come, First Served” selection on an Individual Key basis (i.e. Play, Stop, etc.
on DVD)], proceed as follows:
1. In a specific Zone, select a specific Source and right click the desired function or numeric key (i.e. Pause) and then left
click “Priority ON” in the pop-up. (Refer to Figure 41) The key will then have “Priority ON” checked.
2. Repeat the previous step on any other function or numeric key for any Source in any other Zone that should have this
action.
Figure 42
Forcing Individual Key Priority ON
Zone/Whole House Muting
Muting can be accomplished two ways: 1) by using Preamp Muting which mutes/unmutes MZC-88 Zone speaker and
preamp level audio outputs; or 2) by using EPR-1.0 Muting Relays when there are two or more rooms, with keypads,
connected within the same Zone. Adding the Muting Relays allows individual rooms, within the zone, to be muted from the
individual room keypads or properly programmed IR remotes. (Preamp Muting would mute all rooms in the Zone.) To use
the relays, proceed as follows:
EPR-1.0 Muting Relay
See Pages 12, 30 and 31 for information regarding performance, specifications and connections of the EPR-1.0.
Designated Relay Mute Key
This will designate one function key for dedicated Toggle Relay Mute action. When programmed in a Zone, the MUTE key
will mute individual keypads within a Zone when pressed for a short time (under 2 seconds). As a system default, the MZC88 will also provide Whole House Muting (all zones, Preamp and Relay Muting) when the key is pressed for more than
2 seconds. When muted, the selected Source key will blink about once per second. Whole House Muting will un-mute (all
zones, Preamp and Relay Muting) when the Mute key is re-pressed for more than 2 seconds. Also, all Muting Relays are
released (un-muted) when the Whole House or last Zone is powered down.
1. First, be sure the room being controlled, with the zone keypad being programmed, has the amplifier connected to
the room speakers via the EPR-1.0 Relay as described in “Speaker Connection To EPR-1.0 EZ-Pad Relay Muting
Module” on page 30. (See also Figure 19, page 31.)
2. In EZ-Tools, left click the Zone under Project Content, that is to have Relay Mute programmed (in this case Zone 4,
refer to Figure 43) and then left click the Whole House/Mute tab to the right.
Page 56
MZC-88 Installation Instructions
Figure 43
Selecting Mute Relay Key Functionality
3. Under Mute Key Functionality, left click “EZ-Pad Relay Speaker Muting”, then left click Apply.
4. Under “Project Content” left click the EZ-Pad in the selected Zone.
5. Right click the MUTE key and left click the pop-up to select and check “Mute (Relay) Key”. (Refer to Figure 44)
Figure 44
Selecting a Mute (Relay) Key
NOTE: The Mute key will now have a green outline when other keys are selected, indicating that it is a designated
Mute key. Also, when a key is selected to be a designated Mute (Relay) Key, IR commands cannot be
placed under it. The muting action is driven internally by an embedded command. NO command will appear in the
Command List for this key.
6. Repeat steps 2 through 5 for each additional Zone that requires Relay Muting.
MZC-88 Installation Instructions
Page 57
Insert Mute Commands
Mute commands can be embedded on other keys (NOT designated as Mute Keys) to improve functionality, as follows:
Keypad – Mute On, Off or Toggle
These actions, when programmed, provide either discrete ON, discrete OFF or Mute Toggle actions that will work on any
keypad within a Zone. Other keypads set to different addresses within that same Zone will not be affected.
A typical Mute action would be to place a Keypad - Mute Off command on the Volume Up key so that Mute will be released
immediately when Volume Up is pressed, to avoid blasting. To do so, proceed as follows:
1. Right click the Volume Up key (it turns dark blue) and go to “Insert EZ-Pad Mute Relay Command” on the pop-up.
Left click on “Keypad - Mute Off (De-Energized)”. (Refer to Figure 45)
Figure 45
Placing a Keypad Mute “OFF” on a Volume Key
2. “Keypad - Mute Off (De-Energized)“ now appears in the Command List. Select the “Keypad - Mute Off (DeEnergized)“ command line and drag and drop it to be ahead of the Volume Up command.
NOTE: If the “Keypad - Mute Off (De-Energized)“ command line follows the Volume Up command, it will work, but it
will cause the ramping of the MZC-88 volume command to be very slow. In addition, if an IR volume command for an
external amplifier is used for some reason, then the “Keypad - Mute Off (De-Energized)“ command line must be placed
ahead of the Volume Up command line, otherwise the volume command will not ramp when the Volume Up key is
held down.
3. Right click the Volume Up key and left click “Punch Key’s Commands” and “Yes” on the pop-ups. This will make the
mute action and the volume apply to all Source selections.
4. DOWNLOAD the project and test the mute actions.
NOTE: The embedded Relay Mute commands cannot be tested from the virtual keypad in EZ-Tools.
5. Steps 1 to 4 can be implemented on any of the three EZ-Pad Keypad Modules - to provide special muting actions on
any Function key. They may also be used on Source keys, but in this case, omit step 3 and place them on each Source
key individually. Programming of these muting selections may be repeated for keypads in other zones as desired.
Page 58
MZC-88 Installation Instructions
Zone – Mute On, Off or Toggle
These actions, when programmed, provide either discrete ON, discrete OFF or Mute Toggle actions that will apply to all keypads within a given Zone. Other keypads set to different addresses within the same Zone will be affected, but will not affect
keypads in other zones. A typical Mute action would be to place a Zone - Mute Off command on the Volume Up key so that
Mute will be released immediately when Volume Up is pressed, to avoid blasting. To do so, proceed as follows:
1. Right click the Volume Up key (it turns dark blue) and go to “Insert EZ-Pad Mute Relay Command” on the pop-up.
Left click on “Zone - Mute Off (De-Energized)” using the same method as illustrated in Figure 45.
2. “Zone - Mute Off (De-Energized)“ now appears on the Command List. Select the “Zone - Mute Off (DeEnergized)“ command line and drag and drop it to be ahead of the Volume Up command.
NOTE: It actually doesn’t matter if the “Zone - Mute Off (De-Energized)“ command line is ahead of the Volume Up command when using the MZC-88 internal volume commands. However, if an IR volume command for an external
amplifier is used for some reason, then the “Zone - Mute Off (De-Energized)“ command line must be placed ahead of
the Volume Up command line, otherwise the volume command will not ramp when the Volume Up key is held down.
3. Right click the Volume Up key and left click “Punch Key’s Commands” and “Yes” on the pop-ups. This will make the
mute action and the volume apply to all Source selections.
4. DOWNLOAD the project and test the mute actions. NOTE: The embedded Relay Mute commands cannot be tested
from the virtual keypad in EZ-Tools.
5. Repeat steps 1 to 4 to implement any of these three Zone-Mute actions to provide special muting actions on any
Function key. They can also be used on Source keys, but in this case, omit step 3 and place them on each Source key
individually. Programming of these muting selections may be repeated for keypads in other zones as desired.
Global – Mute On, Off or Toggle
These actions, when programmed, provide either discrete ON, discrete OFF or Mute Toggle actions that will apply (globally)
to all keypads in all Zones. A typical Mute action would be to place a Global - Mute Off command on the Volume Up key so
that Mute will be released immediately when Volume Up is pressed, to avoid blasting. To do so, proceed as follows:
1. Right click the Volume Up key (it turns dark blue) and go to “Insert EZ-Pad Mute Relay Command” on the pop-up.
Left click on “Global - Mute Off (De-Energized)” using the same method as illustrated in Figure 45.
2. “Global - Mute Off (De-Energized)“ now appears on the Command List. Select the “Global - Mute Off (DeEnergized)“ command line and drag and drop it to be ahead of the Volume Up command.
NOTE: It actually doesn’t matter if the “Global - Mute Off (De-Energized)“ command line is ahead of the Volume Up command when using the MZC-88 internal volume commands. However, if an IR volume command for an external
amplifier is used for some reason, then the “Global - Mute Off (De-Energized)“ command line must be placed ahead of
the Volume Up command line, otherwise the volume command will not ramp when the Volume Up key is held down.
3. Right click the Volume Up key and left click “Punch Key’s Commands” and “Yes” on the pop-ups. This will make the
mute action and the volume apply to all Source selections.
4. DOWNLOAD the project and test the mute actions. NOTE: The embedded Relay Mute commands cannot be tested
from the virtual keypad in EZ-Tools.
5. Repeat steps 1 to 4 to implement any of these three Global-Mute actions to provide special muting actions on any
Function key. They can also be used on Source keys, but in this case omit step 3 and place them on each Source key
individually.
6. Programming of these muting selections may be repeated for keypads in other zones as desired or the user may wish to
have Global Mute actions work only from the Master Bedroom keypad, for example.
MZC-88 Installation Instructions
Page 59
Learning IR Commands
There will be times when commands for certain brands or models will not be found in the EZ-Tools IR Command Library. EZTools can easily learn such commands and make them part of the internal Command Library. The IR Learning Sensor system
of the LTM-1.0 (optional) allows IR command learning in conjunction with EZ-Tools. Proceed as follows:.
Using the LTM-1.0 Learning Sensor System
The LTM-1.0 Learning Test Module (See Figure 9), as an Installer’s tool, permits the learning of IR codes and performs other
special functions in the shop, before programming the MZC-88 or other SpeakerCraft models.
Learning IR Commands
1. Connect the PC running EZ-Tools DB9 COM Port, via the 3.5mm Plug Transfer Cable, to the LTM-1.0’s CONTROL
PORT. (Refer to Figure 49 for connections. Use the USB/Serial Adapter with the 3.5mm Plug Transfer Cable for
USB port interface, if necessary).
2. In EZ-Tools, click on CMD Library.
New Brands
3. If the Brand name does not already exist, right click within the Brands space and left click “New Brand”. Type in the
new brand name and click OK.
4. Right click the empty space below the brand name and left click “New Component”. Type in the new component
name (i.e. DVD) and click OK.
5. Right click the new (DVD) folder and left click “New Model”. Type in the new model name (the model # of the component or it’s remote, i.e., RM-DVD40) and click OK.
6. Right click the new model # folder (i.e., RM-DVD40). Go to “New Commands” and left click “IR Commands”. Type in command name (i.e., PLAY) and left click right arrows (>>) to put the name in the New Command List. Type in a complete list of command names (i.e., STOP, PAUSE, TITLE, MENU, etc.) as needed. (Refer to Figure 49)
Figure 46
Adding New Command Names
Page 60
MZC-88 Installation Instructions
7. When done, click OK and the New Commands will all be placed in and appear below the New Model Folder in the
CMD Library.
8. To Learn a Command: First have the “teaching” remote ready and pointed directly at the LEARNING SENSOR on
the LTM-1.0 (spaced about 1” away). Set the SENSE switch to LO. (This switch may need to be set to HI if the teaching
remote has weak output.)
9. Next, left click the desired command and press F12 (or right click the desired command and left click “Capture IR
Command” in the pop up). (See Figure 34) An “IR Command Capture” pop-up will appear.
10. At this point, press and hold the corresponding key on the “teaching” remote until the green ACTIVITY INDICATOR on the
LTM-1.0 turns off. The word “Capturing…” and two bars in the pop-up show progress. About 5 seconds are allowed to
capture the command. If the command is learned, the words “Capture Successful” appear momentarily and the command name in the list will turn RED. If not, “Capture Unsuccessful” appears and the command name remains BLACK.
Figure 47
Capture IR (or Press F12)
Figure 48
Test IR (or Press F9)
11. To test the command, left click the command and press F9 (or right click the command and left click “Test Command”
in the pop up). (Refer to Figure 47)
NOTE: The ability to test commands assumes there is an emitter attached to the component under test and the emitter
is plugged into the IR OUT jack on the LTM-1.0. Or simply aim the BLASTER EMITTERS on the LTM-1.0 at the component under test (up to 30 feet away). Remember, for the BLASTER EMITTERS to work, the emitter must be
unplugged from the IR OUT jack!
12. Repeat steps 8-11 for all remaining IR commands as needed. Once learned commands can be used in any EZ-Tools
project in the normal manner.
Existing Brands
To add a new model to an existing brand, proceed as follows:
13. Select the brand in the CMD Library (i.e., Carver).
14. To add a new Component (i.e., DVD), do so as in step 4 above.
15. Add a Model Name as in step 5 and Command Names as in step 6.
16. Repeat steps 8-11, as necessary, to learn all desired commands.
MZC-88 Installation Instructions
Page 61
Programming Learning Remotes with EZ-Code System Commands
The EZ-Pad system has a unique capability whereby commands programmed into a keypad project can be executed by a
learning remote control. Special SpeakerCraft EZ-Code key commands can be taught to such remotes, which, when executed
from the remote, will control the Audio/Video system as if the keys on the EZ-Pads themselves were being pressed.
These EZ-Code commands are actually single commands that trigger the actual IR command(s) programmed under the related
EZ-Pad key. This is a decided advantage in that long macros under EZ-Pad keys do not have to be stored and executed by the
handheld remote.
When programmed, the EZ-Code commands from the remote, in IR form, are picked up by the IR Receiver in the MKP-8.1
Keypad, or a separate IR Receiver (i.e., IRC-4.0) in the room connected to the same IR bus as the keypad (+12V, IR IN, GND).
Sources selected by the remote with EZ-Code commands will be tracked and indicated automatically on the keypad’s lighted
Source buttons. (i.e. select CD with the remote, and the CD Source key on the EZ-Pad will illuminate Red.)
Programming Procedure
First, complete all MZC-88 system programming. Once that is done, plug the 3.5mm Plug Transfer Cable into the
CONTROL PORT of the LTM-1.0 Learn/Test Module as shown in Figure 49. Then proceed as follows:
Figure 49
Programming Learning Remotes
1. Launch the MZC-88 project in EZ-Tools. Left click a Zone, such as Zone 2 under Project Content and left click a Source
key (i.e. SAT).
2. Point the learning remote directly at the BLASTER EMITTERS on the LTM-1.0 (spaced 2” to 3") and activate the learn
mode. A SpeakerCraft EazyR-2 Learning Remote will be used for example in this exercise.
3. To place the EazyR-2 in learn mode, first press the desired Source key on the EazyR-2 (i.e. SAT).
4. Press and hold the SETUP key until the red LED flashes twice, then release.
Page 62
MZC-88 Installation Instructions
5. Press the numbers 9-7-5. The LED will flash twice after the 5.
6. Press and release the remote key to be learned to (in this case, the INPUT button). The LED will flash rapidly, awaiting
the command to be stored. NOTE: About 5 seconds are allowed to act at this point. If the remote times out, simply
repeat the procedure from Step 4.
7. In EZ-Tools, left click the desired key (in this case the Source key SAT) and press F8 (or right click the Source key then
left click “TX Key’s IR Code” in the pop-up). This will transmit the SAT key’s IR EZ-Code to the learning remote. (Refer to
Figure 50)
Figure 50
Transmitting Key’s EZ-Code to learning Remote (or Press F8)
8. If successful, the LED on the remote will stop flashing and blink twice. If unsuccessful, the LED will stop flashing and
blink one time long.
9. Repeat steps 6 through 8 for all remaining function keys for control of that particular Source. If the learn mode times
out, repeat from step 4.
10. Repeat from step 6 for each additional Source key and all related function keys. If the Learn mode times out, repeat
from step 4 to select the new Source.
NOTE 1: The EazyR-2 is not capable of recording IR commands under the Source buttons and that is the reason for
using the INPUT button in step 6. After programming, selecting a Source on the EazyR-2 and issuing the commands
under that Source, is therefore a 2-step process. First, press the desired Source button (to select the bank), then press
INPUT to execute the Source power-up and other commands that may exist under the like Source key of the EZ-Pad.
The EZ-Pad Source key will light up to track and show your selection.
NOTE 2: Each EZ-Pad zone has its own zone-related EZ-Codes. Therefore, an EazyR-2 remote, after programming, will
only control that one zone. An additional EazyR-2 remote, programmed for each specific zone, is required, for control in
other zones.
MZC-88 Installation Instructions
Page 63
EZ-Code Group Settings
In rare instances, other components might respond to (or be “stepped on” by) one or more of these EZ-Code key commands.
If this happens, the EZ-Code Group can be changed to a different EZ-Code Command Group. To do so, proceed as follows:
1. Click MZC-88 under Project Content to open the MZC-88 Setup window.
2. Click the Misc. tab, then the down arrow under EZ-Code Group.
3. Select a different EZ-Code Group number (i.e., 02 instead of 00. 00 is the default selection). Click Apply. (Refer to Figure
51)
Figure 51
Changing the EZ-Code Group Number
4. Click DOWNLOAD on the Toolbar to make the new EZ-Code Group effective in the MZC-88.
5. Repeat the programming procedures, previous, for all keys on all Remotes in all zones to incorporate the new Code
Group.
Programming Learning Remotes with Library IR Commands
Learning remotes can be programmed with any of the normal IR commands from the EZ-Tools Command Library. Set up the
LTM-1.0 system as in Figure 49 and proceed as follows:
Programming Procedure
1. Launch any project in EZ-Tools. Left click the CMD LIBRARY and choose the Brand.
2. Select the component type (i.e., TV) and the Code Set to learn code from.
3. Left click the first code to be learned (i.e., POWER ON).
4. Point the learning remote directly at the BLASTER EMITTERS on the LTM-1.0 (spaced 2" to 3" as in Figure 49) and activate its learn mode. (The SpeakerCraft EazyR-2 will be used for example in this exercise.)
5. To place the EazyR-2 in learn mode, first press the desired Source key on the EazyR-2 (i.e. TV).
6. Press and hold the SETUP key until the red LED flashes twice, then release.
Page 64
MZC-88 Installation Instructions
7. Press the numbers 9-7-5. The LED will flash twice after the 5.
8. Press and release the remote key to learn be learned to (i.e., the INPUT button for the POWER ON code). The LED will
flash rapidly, awaiting the command to be stored.
NOTE: About 5 seconds are allowed to act at this point. If the remote times out, repeat the procedure from Step 6.
9. In EZ-Tools, left click the desired code (in this case POWER ON) and press F9 (or right click the command then left click
“Test Command” in the pop-up). (Refer to Figure 52) This will transmit the IR Code to the learning remote.
Figure 52
Using Test Command (F9) to “Teach” Learning Remotes
10. If successful, the LED on the remote will stop flashing and blink twice. If unsuccessful, the LED will stop flashing and
blink one time long.
11. Repeat steps 6 or 8 through 10, as needed, for all remaining keys to be programmed.
Templates
To save time on new projects, use “Save As” in the EZ-Tools File Menu to save existing projects under different file names.
Doing so allows existing files to be used as “Templates” for new projects that have similar programming.
In addition, EZ-Tools provides for the use of specific Templates to shorten individual Source and Icon Layout programming
times within any given project.
Source Templates
The Source programming that has been done for any MZC-88 project saved in EZ-Tools, can be exported for use in other
MZC-88 projects. When doing this, every command, macro, etc., that has been programmed under a Source bank for all
Numeric and Function keys, will be saved as a Template, including any commands under the Source key itself.
When Imported into a new project, the programming can be used as is, or small changes can be made, as necessary, to fit
the particular needs of the new project. Proceed as follows:
MZC-88 Installation Instructions
Page 65
Exporting Source BANKS as Template Files
1. Open the project from which Source programming will be exported. Click on the EZ-Pad icon in the desired zone (i.e.,
Zone 2) under Project Content.
2. Right click the desired Source button and click “Export Source to Template…” from the pop-up. (See Figure 53)
Figure 53
Exporting a Source To a Template
3. At this point, type a File name to identify that particular Source Template (i.e., “CD Player”) and click Save. This will add
the file to the Source Folder in the Templates subdirectory. (Refer to Figure 54)
Figure 54
Saving a Source Template File
4. Repeat this for each Source bank to be saved as a Source Template.
Importing Source BANK Template Files
1. Start a new project by creating a new project file name and assign the basic keypad configurations with SOURCE
SETUP and ZONE SETUP. (Open a New Project and setup the zones and keypads.)
2. Once the zone keypads are configured with the desired Source names, right click one (i.e., SAT) and click “Import
Source From Template…”. (See Figure 55)
Page 66
MZC-88 Installation Instructions
Figure 55
Importing a Source Template
3. Left click on the file to be imported (i.e., SAT Receiver), and then Open. A prompt will appear that notes the import assumes
identical locations for all function buttons as they existed in the previous project from which the template was created, and
that every button under this source will be overwritten (with the template commands). Click Yes.
4. The new Source bank has all the programming loaded with all data that exists in the template file.
5. Repeat this for each Source Bank Template to be imported.
CAUTION: If a new project has different Source assignments for the SOURCE INPUTS and the DOORBELL/STATUS INPUTS,
those changes will need be made manually, to have correct selection and IR control of Sources and correct synchronization
for Power Management if the Doorbell/Status Inputs are used for Power Management.
Icon Templates
EZ-Pad Icon files can be made into templates. In addition, EZ-Tools comes with an EZ-Pad Default Layout template that
matches the buttons that are factory pre-installed on the actual MKP-8.1 Keypads included with the MZC-88.
NOTE: These Icon Templates import and export Icon sets only, not command sets. Also, icon templates apply to
Function and Numeric buttons only, not to Source buttons.
To save time, these can be used, perhaps with a few changes, to match the keypad button layout both in EZ-Tools and on
the actual EZ-Pads.
Exporting Icons as Template Files
1. Open the project from which an Icon Template is to be exported. Click on the desired zone (i.e., Zone 2) under Project
Content.
2. Click the “---> ICONS” (Export) symbol in the Toolbar. At this point, type a File name in the Save As pop up by which to
identify that particular Icon Template File (i.e., “JonesHmZone2”) and click Save. (Refer to Figure 56)
Figure 56
Exporting and Saving an Icon Layout Template File
MZC-88 Installation Instructions
Page 67
3. This will add the file to the Icon folder in the Templates subdirectory.
4. Repeat this for each Zone to be saved as an Icon Template.
Importing Icon Template Files
1. Start a new project by creating a new project file name and assign the basic configurations with SOURCE SETUP and
ZONE SETUP. (Open a New Project and setup the zones and keypads.)
2. Once a zone has been configured with one or more keypad gangs (without icons on the numeric or function buttons),
click the “<--- ICONS” (Import) symbol in the Toolbar. (Refer to Figure 57)
Figure 57
Importing an Icon Layout Template File
3. Left click on the Icon Template File to be Imported (i.e., “JonesHmZone2” or the “EZ-Pad Default Layout”), and then
Open.
4. All icons will appear on the virtual EZ-Pad(s) that exist in the Icon template file for that Zone.
5. Repeat these steps for each remaining Zone with the Icon Templates to be imported.
Doorbell/Page Programming
The PHONE & VIDEO PAGE IN jacks can be programmed to receive audio and video signals in response to a doorbell page
or other triggering event received at the DOORBELL/STATUS IN jacks.
PHONE PAGE IN (line level audio input ) can be a ringer signal from a doorbell or chime device, sound from a door entrance
mounted microphone, voice from a page microphone, ringer and/or voice audio from a phone system, etc.
VIDEO PAGE IN (composite video input) can be from a door entrance mounted video camera, an exterior or interior surveillance camera, etc.
Timeout and Momentary Page Control
Specific audio and/or video signals can be programmed in EZ-Tools to interrupt current listening or viewing for a desired
Timeout interval or for a Momentary Page controlled interval.
The Timeout action would be best for doorbell use, since doorbell button presses are unpredictable.
The Momentary controlled action causes the Page signal to be heard (and seen if Video is programmed) only while the trigger
voltage is high, (3-30 V AC or DC) then ceases immediately after the trigger goes low (less than 3V). This would be best for
predictable phone or microphone “press-to-talk” paging.
Page 68
MZC-88 Installation Instructions
Timeout Programming
To program for a Timeout action, proceed as follows:
1. Under Project Content, click MZC-88 to open the MZC-88 Setup window.
2. Left click the Misc. tab and select Doorbell under Doorbell/Status In Jack #1.
3. Just to the right, adjust Timeout (Sec.) to the preferred time value. A value of 8 to 10 seconds may be considered typical,
to allow enough time to hear or see the doorbell event without interrupting the viewed or listened-to program for too
long. Click Apply. Refer to Figure 58.
Figure 58
Selecting and Adjusting Doorbell Timeout
4. Under Project Content, click EVENTS SETUP, then scroll down and click to highlight Doorbell Trigger #1.
5. Click MZC-88 CMDs tab and double click Audio Routing Commands.
6. Double click Zone 1 Audio Page, Zone 2 Audio Page, Zone 3 Audio Page, etc., until the commands for the zones
to receive a paging signal triggered by Doorbell #1 appear in the Doorbell Trigger #1 Command list. Refer to Figure
59.
Figure 59
Applying Audio Page Commands to Doorbell Triggers
MZC-88 Installation Instructions
Page 69
7. To have Video paging occur simultaneously with Audio Paging, minimize Audio Routing Commands and double click
Video Routing Commands to open the video list.
8. Double click Zone 1 Video Page, Zone 2 Video Page, Zone 3 Video Page, etc., so the same zones selected in Step
6, appear in the Command List.
NOTE: To exclude some Zones from Doorbell or other forms of Paging, do not select them while performing Steps 6, and
8. Also, some zones may only receive audio paging while others only monitor video paging.
9. Repeat steps 2 - 8 for Doorbell/Status In Jack #2 to have the system respond to a second (i.e., back door) doorbell trigger event.
This completes the programming for Doorbell/Status.
In summary, when a trigger is received at the Doorbell/Status In jack #1 (or #2 if programmed) the following will now
occur:
a) The Video and Audio program material currently in progress (Source) will be interrupted.
b) The doorbell or paging signals will play for 10 seconds, then return to the previous program (Source).
c) Subsequent triggers will initiate the page action again.
Momentary Page Programming
Use this type of programming to have the page interrupt the viewed or listened-to program for only as long as the paging
trigger voltage remains high at the DOORBELL/STATUS IN jacks, such as for telephone or microphone “push-to-talk” paging.
To do so proceed as follows:
1. Under Project Content, click MZC-88 to open the MZC-88 Setup window.
2. Click the Misc. tab and select Doorbell under Doorbell/Status In Jack #1.
3. Just to the right, select 0 (zero Sec.) in the Timeout (Sec.) list. Click Apply. Refer to Figure 60.
Figure 60
Selecting and Adjusting Time 0 for Momentary Page Action
4. Repeat steps 2 and 3 for Doorbell/Status In Jack #2 to have the system respond to a 2nd paging input as well.
5. Refer to Steps 5 - 8 under Timeout Programming above, to apply the Audio and Video Page commands to the
Doorbell Triggers.
Page 70
MZC-88 Installation Instructions
This completes Momentary Page Programming. The MZC-88 will now interrupt normal program (Source) with the Page signal
when the trigger voltage goes high and remains high. It then reverts back to the original program immediately after the Page
is over (trigger goes low).
Direct Door Viewing/Listening
The Video and Audio Page commands can also be placed under Source or Function keys. This allows direct viewing or listening
to a door camera/mic. with one button press. Apply the Audio & Video Page commands to the keys to be used for Door
Viewing/Listening in the same manner as steps 5 - 8 under Timeout Programming above.
Programming MZC-88 Internal Commands
Each MZC-88 Zone has a preamp, A/V input switching, a stereo digital power amplifier and a full set of internal commands to
perform all of the functions related thereto. These commands are internal logic code, not IR commands and are located under
the CMD MZC-88 CMDs tab in EZ-Tools. Since the MZC-88 and EZ-Tools come with a factory installed default project, most of
these commands are already in place. When using the “MZC88DEF1.etp” default project as a base, commands can be added
or altered as needed, to customize it to a specific application and thus greatly reduce programming time.
The MZC-88 Internal Commands are divided into the following groups:
• Audio Level Commands
• Tone Commands
• Tier Programming
• Audio Routing Commands
• Video Routing Commands
• Contact Closure Commands
Refer to Figure 48.
Figure 61
MZC-88 Internal (non IR) Commands
When MZC-88 Internal Commands are placed on a key’s Command list, they are prefixed by a large red asterisk (*) symbol as
in Figure 62. A description for programming these commands follows:
Audio Level Commands
These consist of Mute, Volume and Preset Audio Level commands for each Zone. Refer to Figure 62.
MZC-88 Installation Instructions
Page 71
Figure 62
Placing MZC-88 Internal Commands on Key a Command List
Internal Commands are placed in the Command List for a given key in the same way as IR commands.
1. Select the desired Zone, Source and Key for the command, such as Volume Up. 2. Double left click Zone 1 Volume Up to place it in the Command List. See Figure 62.
3. Repeat this procedure for other commands for Zones, Sources and Keys, as required.
NOTE: Zone Preset Level Commands can be placed on any key where a specified fixed Volume level is to occur. For
instance, instead of programming the MUTE key as a designated Mute key, a Zone Preset level of –30dB could be placed
on it instead (or some other desired level). In this case the volume would be reduced to a low background level, rather
than a full-off mute.
Another application for a Zone Preset would be a Zone Volume Turn-ON level. It could be placed under Zone_Turning
ON in the EVENTS SETUP so that it would apply to all Sources within a Zone with minimum programming. This is particularly
useful to drive a constant audio level into 2 or more rooms within a Zone using Wall Volume Controls for individual room
volume. Removing the Volume commands from the keypads in these rooms will help avoid multiple volume actions (i.e.
volume adjustments from the keypad and volume control). To do this, proceed as follows:
Figure 63
Placing Zone Preset Levels
Page 72
MZC-88 Installation Instructions
1. Under Project Content, left click EVENTS SETUP and then Zone 1 Turning ON (or other Zone).
2. Under MZC-88 CMDs, double left click Zone 1 Preset –6dB to place it on the Command List for Zone 1 Turning ON.
Refer to Figure 63.
NOTE: Any Preset value can be used. Be sure to avoid overdriving the Zone power amplifier driving the speakers in the
individual rooms.
3. Delete Volume UP/Down commands that may already exist from the keypads in the rooms in this Zone.
4. Repeat this process for any other Zone to have this same action.
Tone Commands
These commands permit programming of Bass and Treble Tone Control actions under specific keys. They consist of Bass Up,
Bass Down, Bass Flat, Treble Up, Treble Down and Treble Flat for each zone. There are no tone controls programmed in the
pre-configured “MZC88DEF1.etp” default project, as all Source/Function Buttons are designated as Sources. An MKP-8.1 with
six Sources or less, can have the two unused buttons configured as Treble and Bass, otherwise buttons on an NKP-1.0 (numeric)
or FKP-1.0 (function) keypad will need to be used. To configure tone controls in the keypad system, proceed as follows:
The UP/DOWN keys on the NKP-1.0, the Cursor UP/DOWN keys on the FKP-1.0 or the Volume keys on the MKP-8.1 can be
used to control the Bass and Treble up/down actions. To do so will require the programming of Tiering Commands on
the keys that handle the multiple functions of Bass and Treble control actions.
Tier Programming
Tier Programming permits the same keys to perform more than one function, by placing commands on up to three different
levels or tiers, and is done as follows, in this case, for the Bass and Treble example:
1. First, left click any given Source key within the desired Zone. Click the BASS button, then Tier 1 under Button Properties.
(The buttons that CAN be used for bass and treble control show as illuminated buttons in Figure 64.)
2. Right click the BASS button, then left click Switch to Tier 2 on the Insert Tier Command line of the pop-up. Refer to
Figure 64. This will cause the first press of the BASS key to point to Tier 2 commands on the BASS and UP/DOWN keys.
Figure 64
Placing Tier Commands
3. Left click Tier 3, right click BASS and then select Switch to Tier 2 from the Insert Tier Command line. This will cause a
return to BASS action after pressing the TREBLE key.
4. Left click the MZC-88 CMDs tab. Double left click Tone Commands to expose the list.
5. Left click Tier 2 under Button Properties, then double left click Zone 8 Bass Flat from the Tone Commands List. (The
keypad shown in the example is in Zone 8. Be sure to select the proper commands for a given zone.) This will cause the 2nd
press of the BASS key to execute the Bass Flat function. This completes the BASS key programming. Refer to Figure 65.
MZC-88 Installation Instructions
Page 73
6. TREBLE can now be programmed in a similar manner. Left click the TREBLE button, then Tier 1 under Button
Properties.
7. Right click the TREBLE button, then left click Switch to Tier 3 on the Insert Tier Command line of the pop-up. This will
cause the first press of the TREBLE key to point to Tier 3 commands on the TREBLE and UP/DOWN keys.
8. Left click Tier 2, right click TREBLE and then select Switch to Tier 3 from the Insert Tier Command line. This will cause
a return to TREBLE action after pressing the BASS key.
9. Left click Tier 3 under Button Properties, then double left click Zone 8 Treble Flat from the MZC-88 CMDs Tab/Tone
Commands list. This will cause the 2nd press of the TREBLE key to execute the Treble Flat function. This completes the
TREBLE key programming.
10. The next step is to program the UP/DOWN keys using the FKP-1.0 cursor UP/DOWN buttons for Bass and Treble up/down
action. (The Volume UP/Down buttons on the MKP-8.1 or UP/DOWN buttons on the NKP-1.0 can also be used.)
11. Left click the UP key then Tier 2 under Button Properties.
12. Double left click Zone 8 Bass Up from the MZC-88 CMDs Tab/Tone Commands list. This places the Zone 8 Bass Up
command on Tier 2 of the UP key. This will allow the UP key to increase Bass Boost after 1st pressing the BASS key.
Figure 65
Placing Zone 1 Bass Flat Command
13. Repeat steps 11 & 12, but this time place Zone 8 Bass Down on Tier 2 of the DOWN key. This will allow the DOWN key
to decrease Bass Boost after 1st pressing the BASS key.
14. Left click the UP key then Tier 3 under Button Properties.
15. Double left click Zone 8 Treble Up from the Tone Commands list. This allows the UP key to increase Treble Boost after
1st pressing the TREBLE key.
16. Repeat steps 15 & 16, but this time place Zone 8 Treble Down on Tier 3 of the DOWN key. This allows the DOWN key
to decrease Treble Boost after 1st pressing the TREBLE key.
17. Right click the BASS key and left click Punch Key’s Commands on the pop-up. Repeat this for the TREBLE and UP/
DOWN keys as well. This will ensure that the Bass and Treble actions will apply to all sources in the Zone. In addition, this Zone can be cloned to all the other Zones to save programming time. Refer to “Cloning and…” section
and Figure 35 for details.
18. This completes the Bass and Treble keys programming and it accomplishes the following:
BASS: 1st press changes the UP/DOWN keys to Bass Up/Down. 2nd press = Bass Flat.
TREBLE: 1st press changes the UP/DOWN keys to Treble Up/Down. 2nd press = Treble Flat.
NOTE: Tier 1 on the UP/DOWN keys is still open and can be used for other functions, such as Random or Repeat
commands for a CD source.
Other types of Tier programming can be accomplished using the same basic procedures as above.
Page 74
MZC-88 Installation Instructions
Audio Routing Commands
These commands route the Source 1 - 8 Audio Inputs signals according to the programming of the Source Selection buttons. These commands are pre-configured in the “MZC88DEF1.etp” default project and would normally not need to be changed,
except for special situations. They consist of routing commands for the Source 1 - 8 audio and Page inputs plus an Audio Clear
command.
A common application for this type of routing would be to watch the Network, Cable or Satellite video feed of a sporting event
while listening to the home team’s local radio broadcast. (This is also a great use of the MZC-88’s dual internal tuners.) To watch
Satellite while listening to radio:
1. Left click the SAT key then the MZC-88 CMDs tab.
2. Open the Audio Routing Commands list and double left click ZONE 1 Audio 2. This puts Audio 2 along with Video
3 in the Command List. Refer to Figure 66.
Figure 66
Audio 2 Routing to Source 3
3. Right click and delete the Zone 1 Audio 3 command (existing from the default project).
4. Left click the MZC-88 CMDs tab. Open the Built-In Tuner Commands List and Tuner Presets List. Double left click the
Preset tuned to the desired radio station, in this example, Tuner 2, Preset 10. Select and Drag the Tuner Preset command
up the Command List and place it under the Zone Video Routing command.
5. If not already in the SAT key Command List, add a Zone 1, Mute OFF command to the bottom of the list from the MZC-88
CMDs list, under Audio Level Commands.
6. Repeat this procedure for other Zones if desired and Download to the MZC-88.
With this programming complete, when SAT is pressed, Video will play through from Source Input 3 (SAT), MZC-88 Internal
Tuner 2 will switch to Preset 10 (local broadcast) , zone audio will route to the tuner AFTER the preset has been selected and
finally, the audio will un-mute, if muted.
HINT: Another option would be to place the ZONE 1 Audio 3 routing command under a function or numeric key, such as
the number 3 key. This would allow instant return to regular SAT audio after using the disassociated Tuner temporarily.
To set or restore Zone 1 Audio (and Video) routing commands, right click the zone number then select and left click “Place
Default A/V Routing Commands” in the pop-up. This will restore the default A/V routing commands for all sources in
the selected zone. Any A/V routing programming changes that had been made will be overwritten.
There are a number of variations for this type of programming that can be configured depending upon user requirement.
Using a different Source key, such as AUX, would allow normal audio/video routing to the SAT key, while using the AUX key
to route the Satellite video with audio from the internal tuner, with the above command sequence. With a dedicated Satellite
receiver or Cable box, additional macros could be built under the numeric buttons for custom ‘presets’ that would automatically
‘mix’ the various local team football, basketball, baseball, etc., TV and radio broadcasts.
MZC-88 Installation Instructions
Page 75
Audio Page Commands
Refer to the Doorbell/Page Programming section.
Audio Clear Commands
Use the Audio Clear Command when using a Source Key to monitor a video only source such as surveillance camera. If a
zone switches sources, and the last source selected was an A/V source, if a video only source is selected, the previous source’s
audio will continue to play. Audio Clear will “clear” the previous audio routing command so only the new video signal will be
active.
Video Routing Commands
These commands have the same flexibility for Video routing as the previous Audio Routing Commands have for Audio. They
allow assigning any Source video signal to any Zone Source key. They are included in the default “MZC-88DEF.etp” project and
would normally not need to be changed. Programming Video Routing Commands is done with the same procedure as Audio
Routing. The Video Routing Commands can be found under the MZC-88 CMDs tab, Video Routing Commands.
Contact Closure Commands
These commands operate the two Contact Closure Relays. See Item 2 Figure 4 for location and other details. Refer also to
Figure 67. Definition of the 4 commands are as follows:
Figure 67
Contact Closure Commands
Contact Closure #1/2 – Open. When one of these commands is sent, the associated relay contacts will open and stay open
until an appropriate Close command is sent.
NOTE: This command would be used for power management (OFF) of an external amplifier as explained in the Section:
External Amplifiers.
Contact Closure #1/2 – Close. When one of these commands is sent, the associated relay contacts will close and stay closed
until an Open command is sent. These types of commands (Open/Close) are often referred to as “Paired” commands and are
useful to ensure an absolute open or closed condition when the related controlled action is not readily observable.
NOTE: This command would be used for power management (ON) of an external amplifier as explained in the Section:
External Amplifiers.
Contact Closure #1/2 – Toggle. When one of these commands is sent, the associated relay will change state and remain
so until another Toggle command is sent. Useful for simple ON/OFF control of a lamp, for example, and uses only one key
button.
Contact Closure #1/2 – Momentary. These commands will cause a contact closure only while the command is present.
Useful for triggering of devices that will execute an action with a momentary closure, such as lifts, screen drops, etc.
These commands can be programmed under any desired key or placed in macros in the normal way.
Page 76
MZC-88 Installation Instructions
MZC-88 Setup Menus
These menus may be used for initial Source Setup and system configuration, or to modify them after the project is in progress. The Menus consist of 2 tabs: Source Assignments and Misc.
Source Assignments
The default project that comes with EZ-Tools, “MZC88DEF1.etp”, will have Source assignments already made. To change
them to suit individual installation needs, or set them up from scratch without using the default project, proceed as follows:
1. Under Project Content, left click MZC-88 or SOURCE SETUP.
2. In the pop-up, left click the Source Assignments tab. A list of 8 sources appears that correspond to the 6 sets of SOURCE
input jacks (Sources 3-8) on the MZC-88 rear panel. The Source Assignments for internal Tuners 1 and 2 are shown and
would typically be used as Tuner inputs. There are no dedicated inputs for Sources 1 and 2 however, the other sources (3-8)
can be reassigned as Inputs 1 and 2 using the audio and video routing commands, if the internal tuners are not going to
be used. Selecting sources in this list automatically places icons on the virtual EZ-Pad Source buttons displayed when zone
keypads are selected under Project Content. (There are no Source icons in the Button Bucket.)
3. Left click the pull down to change any of the 8 Inputs under “Source Name”. A drop list of 26 choices will appear. Refer
to Figure 68.
Figure 68
MZC-88 Source Assignments
4. Left click the desired Source Name from the drop list and then Apply. Repeat this for each Source, as required.
Source Names will now show under SOURCE SETUP under the Project Content tab. Be sure to make similar changes
on the actual keypad buttons. Refer to “Configure the EZ-Pad Buttons” section. In some cases additional buttons that
are not included in the default set that come with the keypads may need to be ordered.
5. When finished making selections, add identifying information for each source component in the fields under Description,
such as make, model, etc., for future reference. Refer to Figure 68.
Misc.
The settings under this tab include; EZ-Code Group, MZC-88 System Configuration and Doorbell/Status … .
EZ-Code Group
In rare instances, other components might respond to (or be “stepped on” by) one or more EZ-Code key commands when
taught to and used with learning remotes. If this happens, the EZ-Code Group can be changed to a different one. To do so,
refer to EZ-Code Group Settings under the “Programming Learning Remotes With EZ-Code System Commands”
section.
In addition, when using multiple MZC-88’s for Zone Expansion that also use EZ-Code key commands in learning remotes,
each MZC-88 should use a different EZ-Code Group Setting. This is necessary to prevent commands from learning remotes
in one MZC-88 group from controlling the same zones in the other MZC-88 groups.
MZC-88 Installation Instructions
Page 77
MZC-88 System Configuration for Zone Expansion
These settings consist of:
1 MZC-88 (Standalone), 2 MZC-88s (M,S1), 3 MZC-88s (M,S1,S2), 4 MZC-88s (M,S1,S2,S3), Refer to Figure 69.
Figure 69
EZ-Codes & MZC-88 System Configuration (Zone Expansion) Settings
These System settings are necessary when using multiple MZC-88’s for Zone Expansion. 1 MZC-88(Standalone) is the default setting for use of a single MZC-88 (8 Zones). For multiple MZC-88’s use the following
selections, depending on the total number of desired zones, as follows:
2 MZC-88s (M,S1) (setting for 16 Zones total)
3 MZC-88s (M,S1,S2) (setting for 24 Zones total)
4 MZC-88s (M,S1,S2, S3) (setting for 32 Zones total)
NOTE: Refer to Section: ZONE EXPANSION for information regarding installation and connection of expanded systems.
Doorbell/Status In Jack #1 & #2
Settings here allow doorbell or status selections and doorbell timing adjustments.
Refer to the “Doorbell/Page Programming” section for details.
ZONE SETUP Menus
These menus may be used for initial Zone Setup and zone functionality with some whole-house control functions, or to modify
these settings after the project is in progress. The Menus consists of 2 tabs: Name/Sources, and Whole House/Mute. Open
the menus by left clicking on any of the individual ZONE #’s under Project Content. Settings made here can be different for
every Zone or Cloned from one Zone to the next to make them the same.
Name/Sources
Left click this tab to name the zone and/or enable/disable sources within a zone.
Name/Description
1. Place the cursor in the text block with a left click and type a name or description for the zone (ex. Kitchen).
Page 78
MZC-88 Installation Instructions
Figure 70
Zone Naming
2. Click Apply. The name will now appear next to the Zone number under ZONE SETUP within Project Content. Refer
to Figure 70.
3. Repeat steps 1 & 2 for each zone and name them as desired.
Available Sources: (Check to Enable In This Zone)
The list of Sources shown under this heading are those that have been assigned under SOURCE SETUP.
1. If programming from scratch, click to check each Source that is to be available in a given zone.
2. If working from a default project and a particular Source is not to be available in a given Zone, or to change Source keys
to Function keys, un-check them here. Refer to Figure 71.
Figure 71
Unchecked Sources for use as Functions
3. Click Apply.
4. To use the two empty keys as Function keys, click each one in turn and place the desired function symbol on the keys from
the Button Bucket tab. Refer to Figure 72.
MZC-88 Installation Instructions
Page 79
Figure 72
Changing Source Keys to Function Keys
1. Finish by adding the appropriate command(s) from the CMD Library and/or MZC-88 CMD Lists to the Button Properties
Command List for the function key(s) just added.
Whole House/Mute
This tab of Zone # Setup includes Whole House/Party Mode and Mute Key Functionality settings. Refer to Figure 73.
Figure 73
Whole House Party and Mute Key Settings
Whole House/Party Mode
These settings determine whether a Zone is allowed to initiate and/or ignore Whole House/Party Mode key presses. See
“Whole House/Party Mode” under “SYSTEM CONNECTIONS AND CONFIGURATION” and “Factory Default System”
section, for more information on Whole House/Party Mode functions.
1. Check “This Zone Initiates” to have the selected zone capable of initiating a whole house/party mode key press (i.e.,
pressing and holding a Source button for more than 2 seconds forces all Zones to that same Source. Subsequent
presses of Source, Volume and Mute actions will be effective in all other Zones, except as noted in Step 2 below).
Page 80
MZC-88 Installation Instructions
1. Check “This Zone Ignores Other Zone Initiations” to have the selected zone NOT respond to whole house/party mode
key presses of other zones (i.e., a room such as a baby’s room to be kept quiet during a whole-house party).
2. Checking both of these will allow the selected zone to send party mode commands, but not accept party mode commands
from other Zones.
3. Click Apply.
Mute Key Functionality
1. These selections allow either the MZC-88 Internal Preamp Muting or the external EZ-Pad Relay Speaker Muting to be
controlled by the designated Mute key in a Zone.
2. Click Apply.
For more information on this functionality, refer to the “Muting Relays” section.
EVENTS SETUP
This feature permits the programming of System and Zone functions that occur with ON/OFF and other specialized events.
It allows functions such as Power OFF macros to be programmed in one place, rather than having to place such commands
under many keypad key locations. It can also result in much shorter macros to reduce execution times of Power OFF events.
Some Events programming has been covered in previous sections, however an explanation of each follows:
System Turning ON (1st Zone ON)
1. To access, click EVENTS SETUP under the Project Content tab. Refer to Figure 74.
Figure 74
Accessing Events Setup
2. Double click System Turning ON (1st Zone ON) in the Events Setup pop-up. A list of Source Outputs 1 through 8
appears.
Commands placed here will be sent from the Source IR OUT jacks on the MZC-88 to turn ON or otherwise control the
respective Source(s) when the system is first turned ON (1st Zone ON).
3. For instance, a Power ON command for each could be placed here. As an example, click Source Output 3. (The Internal
Tuners do not require power management, so for this example Sources 1 and 2 will be skipped.)
4. Double click an IR command from the CMD Library for a typical source, such as Power ON for the SAT/DSS receiver,
placing it on the Command List. Refer to Figure 74.
MZC-88 Installation Instructions
Page 81
Figure 75
Placing Commands on Source Outputs For System ON
5. Other commands could also be placed here such as channel numbers to tune the SAT or a tuner to a specific channel every
time it turns ON.
6. Repeat steps 3, 4 and 5 for each Source as required.
NOTE: If preferable, place Power ON commands under each Source key of the keypad rather than under Events as just
illustrated. Programming under the Source keys would turn Source components ON only as needed rather than all at once
(saving power, for example, if only the tuner is played all day, and will assure that components that turn off after a certain
amount of time of inactivity, will be activated when selected).
System Turning OFF (Last Zone OFF)
In a similar manner, all Source IR Outputs can be programmed to execute OFF or other related commands when the last Zone
is turned OFF. This would occur when a designated Zone PWR button is pressed on the keypad of the last Zone to go OFF, or
is pressed and held for more than 2 seconds even when other Zones are still ON (Whole House OFF). 1. To access, click EVENTS SETUP under the Project Content tab.
2. Double click System Turning OFF (Last Zone OFF) in the Events Setup pop-up. A list of Source Outputs 1 through 8
appears.
Commands placed here will be sent from the Source IR OUT jacks on the MZC-88 to turn OFF or otherwise control the
respective Source(s) when the system is turned OFF (Last Zone OFF or Whole House OFF).
3. For instance, a Power OFF command for each Source could be placed here. As an example, click Source Output 3. (The
Internal Tuners do not require power management, so for this example Sources 1 and 2 will be skipped.)
4. Double click an IR command from the CMD Library for a typical source, such as Power OFF for the SAT receiver, placing
it in the Command List. Refer to Figure 76.
Page 82
MZC-88 Installation Instructions
Figure 76
Placing Commands on Source Outputs For System OFF
5. Other commands could also be placed here.
6. Repeat steps 3, 4 and 5 for each Source as desired.
For more information on Power Management, refer to Section: Power Management/Events Programming.
Zone Turning ON & Zone Turning OFF Events
This part of Events programming relates to zones, such as the powering ON or OFF of external IR controlled power
amplifiers or other devices dedicated to specific zones. It is also the place to program audio preset levels to have zones come
on at a specific volume level. For more information in this regard, see Audio Level Commands under the Programming
MZC-88 Internal Commands section. 1. To access, click EVENTS SETUP under the Project Content tab.
2. Click Zone 1 Turning ON in the Events Setup pop-up.
IR Commands placed on the Command List will be sent from the respective ZONE IR OUT jacks on the MZC-88 back
panel. An emitter connected here would turn ON or otherwise control the respective device (amplifier) when the zone
is turned ON. Internal (non IR) commands, such as a Preset level, will be directed to and set the volume of the MZC-88
preamp for that zone. 3. For instance, place a Zone 1 Preset –6dB command on the Command List by double left clicking it from the Audio
Level Commands under the MZC-88 CMDs tab.
4. Double left click a POWER ON IR command from the CMD Library for a typical IR controlled amplifier, placing it on the
Command List. Refer to Figure 77.
Figure 77
Placing Commands on Zone 1 Turning ON and OFF
MZC-88 Installation Instructions
Page 83
5. Double left click a POWER OFF IR command from the CMD Library for the same IR controlled amplifier, placing it on
the Command List under Zone 1 Turning OFF. Now, when Zone 1 is turned ON (by pressing any Source key), the external amplifier will turn ON and play at the –6dB level
specified. When Zone 1 is turned OFF, the external amplifier will turn OFF.
Repeat these steps for other zones as necessary.
Doorbell Triggers #1 and #2
Refer to Doorbell/Page Programming section for details.
Party Mode Start-Up
Internal MZC-88 commands (IR Commands not permitted) placed here will be executed only when a Source button is pressed
and held for longer than 2 seconds for Whole House Party Mode. This is useful, for instance, to have all of the Zones in
Party Mode to come up to the same volume level or to different levels, if desired. Other MZC-88 internal commands could be
placed here too, such as a CONTACT CLOSURE for a lift, projection screen, drapes, lights, etc. To program preset levels, proceed
as follows:
1. To access, click EVENTS SETUP under the Project Content tab.
2. Click Party Mode Start-Up in the Events Setup pop-up.
3. From the Audio Level Commands under the MZC-88 CMDs tab, double click Zone 1 Preset +2dB (or any other Preset
value) to place it on the Command list. Refer to Figure 78.
Figure 78
Placing Zone Preset Level Commands for Party Mode Start-Up
1. Repeat step 3 for each of the other Zone Presets as desired.
Now, when pressing a Source Button for longer than 2 seconds to initiate Party Mode, all zones will come on at the audio
volume levels just programmed.
NOTE: It may be necessary to download, test and repeat the above steps several times to set the “just right” volume levels in
all zones.
Page 84
MZC-88 Installation Instructions
ZONE EXPANSION
Multiple MZC-88’s can be linked together to provide up to 32 zones (4 MZC-88’s) for large installations. Refer to Section:
Expanded Systems for information regarding installation considerations, connections and configuration.
Programming for Zone Expansion
The programming for the MZC-88 Master and Slave units is done in EZ-Tools as follows:
1. Before programming, be sure to have the latest version of EZTools, which can be found at www.speakercraft.com
2. Launch EZ-Tools and create a Filename for a project in the normal manner (i.e., JonesHomeExpansion.etp). This could be
a project file previously programmed for just 8 Zones and the Jones’ have decided to add more zones in an expanded
system.
3. Under Project Content, click MZC-88, then Misc. in the MZC-88 Setup pop up. Refer to Figure 79.
Figure 79
Select MZC-88 Standalone
4. Under MZC-88 System Configuration, select 1 MZC-88 (Standalone). Click Apply.
5. At this point, program all 8 Zones of this “Standalone” MZC-88 in the normal manner. It will become the “Master” MZC-88
later.
6. When satisfied with all programming, under Project Content, click MZC-88 - Standalone, then Misc. in the pop up. Refer to Figure 80.
Figure 80
Select Master/Slave Configuration
MZC-88 Installation Instructions
Page 85
7. Under MZC-88 System Configuration, there are 3 Master/Slave choices. For systems with 9-16 Zones, select 2 MZC88s (M,S1). For systems with17-24 Zones, select 3 MZC-88s (M,S1,S2). For systems with 24-32 Zones, select 4 MZC88s (M,S1,S2,S3). Click Apply.
8. After clicking Apply, three actions will occur. First, MZC88 - Master will appear just under Project Content.
Second, icons with MZC-88 - Slave 1, Slave 2, etc., will
appear near the bottom of the list. Refer to Figure 81.
Third, all programming already done is cloned instantly
from the Master to the Slave units within EZ-Tools, saving
a great deal of programming time.
9. At this point, make customized changes (Zone Names,
Keypad configurations etc.) to any of the Zones in the
Master or Slave units. Such changes will NOT be cloned to
the others.
10. For example, to customize zones within Slave 1, click MZC88 - Slave 1. This highlights it and places it just under
the Master near the top of the Project Content List. In this
position, all changes made will apply to Slave 1 only. Refer
to Figure 81.
11. Repeat Step 10 for each of the remaining Slave units, if
used.
12. To make massive programming changes that should
apply to all zones, do so by repeating all steps from Step 4
above.
CAUTION: Remember, when doing this, all customized
changes that have previously been made to zones within
the Slave units will be eliminated.
Figure 81
Customizing Slave Zones
Downloading to Master & Slave Units
When programming is complete, the separate Master and Slave sections of the project must be downloaded to the specific
Master and Slave units individually. Turn Power ON to each MZC-88 and proceed as follows:
1. Connect the Transfer Cable from the computer running EZ-Tools into the Control Port of the MZC-88 Master unit.
2. Click to highlight MZC-88 – Master under Project Content in EZ-Tools, then click DOWNLOAD.
3. When complete, connect the Transfer Cable from the computer into the Control Port of the MZC-88 Slave 1 unit.
4. Click to highlight MZC-88 – Slave 1 under Project Content in EZ-Tools, then click DOWNLOAD again.
5. Repeat steps 3 and 4 for Slaves 2 and 3, if used in a specific system.
NOTE: In operational mode, when using multiple MZC-88s in Master/Slave configurations, they must all turn on within 4
seconds of each other to communicate and function properly.
This completes programming for basic Zone Expansion.
Page 86
MZC-88 Installation Instructions
PRINTING PROJECTS
Projects can be printed after completion of a system installation to keep with a client’s files, or a project can be printed at any
time during development to more easily review where commands are placed. For efficient record keeping, enter the client’s
and installation company’s information so that it prints out with the project. Proceed as follows:
Installation Information
In the Menu Bar, left click the Project menu, and then select and left click “Installation Information” in the drop-down. Type in the relevant information and click OK. Refer to Figure 82.
Figure 82
Entering Project Installation Information
Printing the Project
From the File menu in EZ-Tools, select Print. Set up printer properties in the usual manner and click OK. The project will print
out showing information in the following sequence:
1. Installation Information, including the Filename of the project.
2. MZC-88 Properties; a list of Source assignments and the EZ-Code Group number.
Next are the Zone Properties, followed by Zone Keypad Layout displays. Zone 1 is shown first with it’s Properties, followed
by illustrations of each keypad button and the command descriptions next to them. See Figure 83 for a typical printout of
the first page.
MZC-88 Installation Instructions
Page 87
Figure 83
Project Printout 1st Page
In the printout, two keypads are illustrated. The left one shows the actual icons as placed on the keys. The right one is a numeric
position reference for each key and is listed next to the key icons in the printout. Key assignments can now be reviewed on each page for possible errors or extraneous commands, or simply to be used as a
hard copy record in a client’s information file. NOTE: Using Acrobat Distiller or other .pdf creator, a .pdf document of the project can be generated. In this way, the entire
project can be viewed on screen, without physically printing it out. To do so, select “Acrobat Distiller” in the Print menu.
Click OK and follow the prompts. Add a filename for the .pdf file as would be done in saving any new file.
Page 88
MZC-88 Installation Instructions
SAVING AND BACKING UP EZ-TOOLS FILES
There are a number of folders in the EZ-Tools subdirectory that contain Projects, IR Command Codes and Template data. Such
data can be automatically stored to these folders on the computer’s hard drive as work is done in EZ-Tools. In addition, to guard
against the possible loss of hard earned data in the event of a hard drive failure, making frequent back-ups to a CD-ROM, a
backup hard drive, or other external storage media is highly recommended.
AutoSave
This feature saves EZ-Tools project data automatically to the computer hard drive. The save interval is adjustable as follows:
1. In the Tools menu, left click Options.
2. Adjust AutoSave Interval as desired (from 1 to 10 minutes). Refer to Figure 84.
Figure 84
Adjusting AutoSave Interval
Since AutoSave on a fast computer is virtually transparent in use, adjusting it to the fastest setting (1 minute) is recommended
for best data security.
CAUTION: The 0 interval disables AutoSave and therefore makes frequent file saving a manual process. In any case, when
closing EZ-Tools, the Save prompt will appear to save new work (Ctrl+S) if the file had not been saved.
Back Ups
With the following folders backed up, work can be restored in the event of a hard drive failure. Proceed as follows:
1. Close EZ-Tools (if open).
2. From “My Computer” double left click C: drive, then “Program Files”.
3. From the folder list, double left click “SpeakerCraft”, then “EZ-Tools”.
4. Copy and Paste or Drag and Drop the MZC-88, Library and Projects folders to a CD-ROM or other storage media.
Refer to Figure 85.
Figure 85
Selecting Files for Backup
5. To use these folders later, simply Copy and Paste or Drag and Drop them back into the EZ-Tools folder. They will overwrite the basic folders that already exist if a new EZ-Tools installation becomes necessary.
MZC-88 Installation Instructions
Page 89
FIRMWARE & EZ-TOOLS UPGRADES
A major advantage of the EZ-Tools system is that operational improvements or changes can be implemented, in the field, at any
time. The latest versions of the Firmware for the MZC-88, LTM-1.0 Learn/Test Module, plus the EZ-Tools Application software, are
available on the SpeakerCraft web site, www.speakercraft.com. To install updates, proceed as follows:
Firmware Updates
The first thing to do before the installation, configuration or programming of any SpeakerCraft control product, is download
the latest firmware for that product from the SpeakerCraft website. This will ensure that each product has the latest functionality
updates and fixes. To do so, proceed as follows:
1. Connect the “Transfer Cable” to the MZC-88 (or other SpeakerCraft product - refer to Figure 49).
2. To confirm the currently installed firmware version, left click “Tools” in the EZ-Tools Menu Bar and then “Get Product and
Firmware Version”. Refer to Figure 86.
Figure 86
Observing Current Firmware Version
3. To download the latest firmware, go to the SpeakerCraft web site at www.speakercraft.com. Left click “Downloads”,
then “Software”. Left click on “Firmware Updater (all models)”. When downloaded, the Updater will provide all current SpeakerCraft Product firmware updates. Refer to Figure 87.
Figure 87
Downloading Updates From the SpeakerCraft Web site
4. Click “Save” and select a hard drive location for the downloaded file. (The EZ-Tools Firmware Folder is a good place, so all
firmware files will be in one place.
5. After the download, double click the “Firmware Updater… .exe” file to launch the update and click “OK”. (If the “Open
File-Security Warning” Pop-up opens, left click “Run” and then “OK” on the Updater.) Refer to Figure 88.
6. A pop-up, “All files have been installed successfully” will appear. This means they have been placed in the “Firmware”
folder of the EZ-Tools directory. Click OK. Refer to Figure 89.
Page 90
Figure 88
Firmware Updater
MZC-88 Installation Instructions
Figure 89
Firmware Updater File Install Confirm
7. To install the updated firmware in a device (MZC-88, etc.), left click “Tools” in the EZ-Tools Menu Bar then select and left
click “Update Product’s Firmware…”. Refer to Figure 90.
Figure 90
Updating Product’s Firmware
8. The “Firmware Upgrade Wizard” appears. Refer to Figure 91. Read the text and left click Next.
Figure 91
Firmware Upgrade Wizard
A page showing the Product Model Number and the new Firmware Version automatically appears for the connected device.
Also, Product, Firmware and Date information are shown, with a list of Issues and Solutions that pertain to the new firmware
version. Refer to Figure 92. NOTE: Both the Model Number and Firmware versions are selectable at this point. Normally, unless reverting to an older
firmware version, changes from these selections would not be made.
MZC-88 Installation Instructions
Page 91
Figure 92
Model, Firmware and Update Information
9. To proceed with the update, click Next and follow the prompts.
10. Be sure to set the FIRMWARE UPGRADE switch back to OFF on the MZC-88 (or other device) after being prompted
that the firmware upgrade was successful.
EZ-Tools Upgrades
As with firmware upgrades, check frequently to see that the version of EZ-Tools being used is the latest available before
programming and installing any SpeakerCraft control products programmed with EZ-Tools. To do so, download the latest
version from the SpeakerCraft web site. This will ensure availability of the latest updates and functionality. To do so, proceed
as follows:
1. To confirm the EZ-Tools version being used, click “Help” in the EZ-Tools Menu Bar then select and left click “About EZTools…”
2. To download the latest version, go to the SpeakerCraft web site at www.speakercraft.com. Left click “Downloads”, then
“Software”. Refer to Figure 87.
3. Left click the EZ-Tools software line and proceed to download it to a location on the computer’s hard drive.
4. From the hard drive location, double left click “EZ-Tools xxx Setup.exe” to launch the installation. Follow the prompts
of the Installation Wizard.
5. The new version installation will replace just those files necessary for the upgrade and will leave all Projects, Templates
and custom learned IR codes intact.
Page 92
MZC-88 Installation Instructions
Command Library Merges
There may be times when some commands have been learned on one computer (such as the laptop used on the job site) that
need to be merged into the Command Library on a 2nd computer (such as the desktop computer used in the office or shop)
without overwriting existing custom learned commands on the 2nd computer. In addition, updated Command Libraries will
be made available, from time to time, on the SpeakerCraft web site. These can also be merged into an existing library without
loosing custom learned commands. To perform these merge actions, proceed as follows:
1. On the 1st computer, open the EZ-Tools Library folder in the EZ-Tools directory Typically: “C:/Program Files/SpeakerCraft/EZTools/Library”.
2. Copy or drag and drop the EZ Library.lib file to a removable storage media (i.e. USB “Mobile Drive”, “Jumpdrive”, CDR, etc). Refer to Figure 92.
Figure 93
Copying EZ Library.lib File to/from Removable Storage Media
3. Plug or insert the removable storage media into the 2nd computer.
4. Open the EZ-Tools Library folder in the EZ-Tools directory on the 2nd computer.
5. Copy or drag and drop the EZ Library.lib file from the external storage media into the Library Merge folder within the
Library folder.
6. Launch EZ-Tools on the 2nd computer (do NOT open a Project). Left click Command Library Merge under Tools. See
Figure 94. Click Yes on the pop up. A prompt will appear when the Library files are successfully merged. Click OK.
Figure 94
Command Library Merge
7. When downloading a Command Library update from the SpeakerCraft web site, it will be in the form of a Setup file. When
running the Setup file after the download, it will place the new EZ Library.lib file automatically in the Library Merge
folder.
8. After that, follow the prompts to automatically perform the merge.
NOTE: An open project must be Closed before library merges are allowed.
MZC-88 Installation Instructions
Page 93
APPENDIX
EZ-Tools Menu Items
The following are basic descriptions of the Menu and Toolbar Items.
“New MZC-88
Project” icon
Menu Bar
Toolbar
Figure 95
Menu and Toolbar Items
File
New > MZC-88 Project
For creation of a new MZC-88 Project File (and for other models as listed). Same as “New MZC-88 Project” Icon on the
Toolbar.
Other items under “File” follow normal Windows convention.
Edit
Undo – Reverses up to 4 of the last changes or actions made.
Redo – Restores up to 4 Undos.
Project
Figure 96
Project Menu Items
Installation Information
A place to record basic client and installer information for any given project. Refer to Printing Projects section, Installation
Information and Figure 82 for details.
Page 94
MZC-88 Installation Instructions
Check Project’s Memory Usage
Gives Project size, Total Commands, Unique Commands and percentage of MZC-88’s Memory Usage, if connected. This advises
how close a project is to using the device’s maximum memory capacity.
MZC-88
Figure 97
MZC-88 Menu Items
Download Ctrl+D
Launches download of EZ-Tools project to the MZC-88 and is the same command as DOWNLOAD on the Toolbar.
Verify to Current Project
Tests whether the currently loaded project in EZ-Tools matches that already existing in the MZC-88.
Tools
Figure 98
Tools Menu Items
Get Product & Firmware Version
Shows which SpeakerCraft product is connected (i.e., MZC-88, MZC-66, EZC-1.0, LTM-1.0, etc.) and the existing Firmware
version installed on that connected product.
Update Product’s Firmware…
Launches a Firmware Upgrade Wizard so that factory improvements and changes in the functionality of the product can be
accomplished in the field at any time. Refer to Firmware and EZ-Tools Upgrades section for details.
Command Library Merge
Permits user commands created on one computer to be merged into the CMD Library of another computer. Refer to Command
Library Merges section.
NOTE: An open project must be Closed before library merges are allowed.
Settings
Permits AutoSave and Serial Port assignments and Miscellaneous Program Options. Refer to Figure 99.
MZC-88 Installation Instructions
Page 95
For AutoSave details, refer to AutoSave under the SAVING AND BACKING UP EZPad FILES section.
For Serial Port details, refer to Quick Start section, item 7.
Auto-Protocol (IR Learning). When checked, causes certain IR codes, when learned,
to conform to a recognized code protocol. Particularly useful to obtain “clean code”
and enable toggle bit operation for learned RC5 & RC6 codes.
Audible Feedback (Beeping). When checked, enables audible beeping during IR
learning and other EZ-Tools programming actions.
View
Hides or displays the Toolbar at the top and/or the Status Bar at the bottom.
Hiding these bars will give more room for EZ-Tools when working with low monitor
screen resolution settings (such as 800x600). The Status Bar gives context sensitive
descriptions of many Tool Bar and Pop Up Menu programming actions in EZ-Tools.
Refer to Figure 100.
Figure 99
EZ-Tools Settings
Toolbar
Status Bar
Pop Up Menu
Figure 100
Status Bar Descriptions of Menu Items
Help
Help Topics
Gives Instructional help when working with the total EZ-Pad system.
About EZ-Tools
Provides EZ-Tools Version and Copyright information.
Page 96
MZC-88 Installation Instructions
Importing Pronto Hex Code
There may be times when special IR commands will be needed to perform certain functions, such as discrete power ON/OFF
codes, for AC Power management. The “Remote Central” web site is a good source for such IR commands in Hex Code. Once imported, EZ-Tools converts the Hex Code to IR commands, stores them in the Library and from that point, these codes
can be used on any projects subsequently programmed with EZ-Tools. To access and use these commands in EZ-Tools IR command lists, proceed as follows:
1. Under CMD Library, select the Brand, Model and Code Set of the component for which such commands will be added
(i.e., JVC, VCR, Code Set 2).
2. Right click the Code Set 2 folder, select New Commands in the drop down, then left click IR Commands. Refer to
Figure 101.
Figure 101
Accessing the New IR Commands Fields
3. The New IR Commands window appears. In the New Command Name field, type the name for the command to be
added (i.e., PWR ON (discrete).
4. Click the >> arrows to place the new command name in the New Command List. Refer to Figure 102.
Figure 102
Adding New Command Names to a Command List
5. Repeat this for any other commands required (i.e., PWR OFF (discrete). When finished, click OK. The new command
names will appear at the end of the Code Set 2 Command List (in black print).
6. At this point, retrieve the Hex Code for these commands from Remote Central.
7. Via the Internet log on to the Remote Central.com web site (www.remotecentral.com) and left click FILES.
MZC-88 Installation Instructions
Page 97
8. Left click on Philips Pronto & ProntoPro and then scroll down and left click on the folder that says “Discrete Infrared
Hex Codes…”.
9. Under the Discrete Infrared Hex Code listings, left click on the manufacturer to be imported (in this case JVC…), then on
VCRs … .
10. At this point, there may be several binary code sets to choose from for each of the commands required. (It may be necessary to try more than one set to find one that works, since many are not model specific.)
11. Drag across the entire Hex code data to highlight it and copy it to the Windows clipboard with Ctrl C, or left click
“Copy to Clipboard”. Refer to Figure 103.
Figure 103
Highlighting and Copying Hex Code From Remote Central
12. Go back to EZ-Tools and right click the PWR OFF (DISCRETE) command in the CMD Library List.
13. Left click Import Pronto Hex Code… and place cursor in the Enter/Paste Pronto Hex Code field of the Import
Pronto Hex Code pop-up. Refer to Figure 104.
Figure 104
Importing/Pasting Pronto Hex Code for Special IR Commands
14. Press Ctrl V to paste the code into the field, then click OK. The command name in the list [PWR OFF (DISCRETE)] will turn
red, indicating the code is saved and ready for use.
15. Repeat steps 7 through 14 for any additional codes to be downloaded from Remote Central.
Page 98
MZC-88 Installation Instructions
Importing Xantech Palette (“.pal”) Files
This feature allows the import and use of any IR codes contained in Xantech palette files. These include any palettes that may
have been created in the Dragon Drop-IR™ software system for Xantech projects or other specially created code palettes placed
on the Xantech web site. To import and use these IR commands in SpeakerCraft EZ-Tools projects, proceed as follows:
1. Locate the Xantech palette (.pal extension) to be imported on the computer’s hard drive, or, download it to a known location on the computer running EZ-Tools hard drive from the Xantech web site (www.xantech.com).
2. Under CMD Library in EZ-Tools, select the Brand name that is the same as the .pal file being imported (i.e., JVC). Refer
to Figure 105.
3. Right click in the white space under the last component name in the
list (i.e. VCR) and left click Import Xantech “.pal” file(s)… in the
pop-up. Refer to Figure 105.
4. In the OPEN window, locate the desired .pal file (i.e. JVC-VCR.pal) in
a location on the computer’s hard drive. Left click it once to place it
in the File name field, then click OPEN.
5. At this point, an EZ Tools caution note regarding file name overwrites
appears. Read this, then click Yes.
6. An IR Command Import Information pop-up occurs, listing basic
naming information derived from the .pal file. Typically the fields
for Steps 1 and 2 would be left unchanged (although they can be
changed), but it is necessary to type in a Model name of the component in the Step 3 field. Refer to Figure 106. Click OK.
Figure 105
Selecting Import Xantech “.pal file(s)”
Figure 106
Brand, Component, and Model Fields for .pal Command Sets
7. A new blue folder with the chosen Model name will appear in the
list, containing the complete IR command set from the .pal file. Refer to Figure 107. These commands are then ready for use in
any EZ-Tools project.
8. Repeat the above process, steps 1 through 7, to import of other .pal
files as needed.
Note: To save time, several .pal files can be selected in step 4. They
will be placed in the correct brand locations automatically after
completing step 6.
Figure 107
Imported IR Command Set From a Xantech .pal File
MZC-88 Installation Instructions
Page 99
Command Properties (IR)
This Properties Menu allows observation and adjustments to the parameters of learned or imported IR codes as follows:
•
•
•
•
•
•
•
•
Command Protocol Name & Data Displays
Burst Width Adjustments
Min. Output Time (Sec.)
Frequency (25k-470kHz, IR Carrier) Display & Adjustment
Graphical IR Code Displays - Original & Preview
Capturing and Testing of IR Codes
Repeating Data Frames
Entry of Custom Data Codes, in Hex or Decimal
Note: All of the above functions apply to learned or imported IR code (code that has the blue letters CPY just to the left of
the code name in the command list. Refer to Figure 108). Code in the existing EZ-Tools Command Library (sans CPY letters)
can be adjusted and tested for Min. Output Time (Sec.) only!
To access the Command Properties Menu, right click the desired command in the CMD Library under Brands in the
command list. Refer to Figure 108. Then left click Command Properties in the pop-up.
Figure 108
Selecting Command Properties
A discussion of each of these command functions follows:
Command Protocol & Data
When Command Properties is opened, it will immediately compare the code data of the selected learned or imported IR
command against several known IR command protocols within EZ-Tools. The result will be displayed in the Protocol and
Data fields. If the code does not conform to any of the known protocols, “Unknown/Not Recognized” will be displayed.
Refer to Figure 109.
In the case of unrecognized code, the only modifications that can be made are adjustments to the Min. Output Time,
Carrier Frequency, and in some cases, Burst Widths.
Page 100
MZC-88 Installation Instructions
Figure 109
Command Properties Display - Unknown/Not Recognized Protocol
If the protocol is recognized, it will be displayed in the Protocol field as shown in Figure 110.
Figure 110
Command Properties are a Recognized Protocol
MZC-88 Installation Instructions
Page 101
With a known protocol, left click Generate, then OK, to force the selected command to conform exactly to that protocol. This
means that certain timing, burst/space sizes and carrier frequency errors that may have occurred during the learning process,
will be eliminated. This creates “clean code” for flawless command executions on the controlled component.
Wide Bursts
Some code protocols, such as Sharp/Denon, have short burst times. When used with certain IR Plasma receivers in repeater systems, intermittent or poor execution of commands will sometimes result. Check the Wide Bursts box, then left click Generate
to add sufficient burst width to the original code to result in perfect execution of the command.
The change in burst widths can be observed by comparing the Original bursts in the code to the Preview bursts in the display. Use the Zoom and Pan controls to see the code details. Refer to Figure 110. Click OK to leave Command Properties
and to make the change effective on the selected command in the command list.
A pop-up menu can be used to increase, decease or optimize burst widths by right clicking anywhere within the code display
area. Refer to Figure 111.
Figure 111
Adjusting Burst Widths
This menu allows increases or decreases of burst widths in 5% increments, or to a 400µS value that is optimized for
SpeakerCraft Plasma Block type IR Receivers, (Optimize for IRC-2P2 receiver). If “Optimize...” is left clicked, 400uS
will show for the Smallest Burst in the menu and Wide Bursts will automatically be checked. At this point, Test the command, but do not click Generate. Click OK for the change to take effect or Cancel to leave without any change.
Additional Code burst editing capability is available for removing undesirable characteristics from learned codes. Typically
these editing instructions would not be necessary but in the rare occasion they are: Make Last Frame The Repeater will
allow a learned command to repeat when a button is held on a remote. When viewing the wave graphs in the Command
Properties window, the wave forms usually appear in noticeable patterns. If a glitch appears before the normal pattern,
Remove First Burst/Space Pair can be used to remove the unwanted data (perhaps light noise interpreted as data
when learning). If a glitch appears after the normal pattern, Remove Last Burst/Space Pair can be used to remove that
unwanted data. Prefix New Burst/Space Pair allows modification of the first burst and space timing when a learned code
is intermittent or non-functioning in it’s performance when output via an emitter for controlling a device.
1. Select and left click Prefix New Burst/Space Pair. Enter a value for first burst from 80-50000µS in the pop up. Click
OK
2. Enter a value for Space Time from 80-50000µS in the pop up. Click OK.
3. Try the modified code. Some tweaking of burst and space time may be required to achieve proper, consistent performance.
NOTE: These modifications should only be made by the most expert of programmers. Re-learning modified codes may
be necessary if Code Burst Edits do not work. There is no UNDO for Code burst edits.
Page 102
MZC-88 Installation Instructions
Min. Output Time (Sec.)
Sometimes a code will not contain sufficient frames for the component to respond properly, or, it may have been learned
with too many frames, causing excessive execution times in a macro. To correct this, use the up/down arrows to set a
longer or shorter time. Use the Test button to verify correct operation. Usually, a time setting of 0.2 to 0.3 Sec. will give
the right amount of time for robust execution and still have a quick response time. When done, click OK. When adjusting
imported or learned commands, refer to Figure 109 or 110. When adjusting internal Library commands (without the
blue CPY symbol), a different pop-up menu appears, but works the same. Refer to Figure 112.
Figure 112
Adjusting Minimum Output Time (Sec)
Frequency (25k-470k)
This field displays the carrier frequency of the selected IR command code. Refer to Figure 110 or 113. A different frequency
can be typed in for special applications, if desired. Click OK after a change to make it effective.
Capture
This permits learning new code from within Command Properties. For additional information, refer to Section: Learning IR
Commands.
Repeating Data
Some code protocols only transmit one data frame followed by repeater bursts when the command is issued for ramping
purposes. This is usually OK when working in noise free environments. However, if noise or other environmental factors cause
the IR signal to be interrupted momentarily, the controlled component’s processor will lose the command instruction and the
action stops. This is particularly true for volume up/down actions, which depend on ramping. Only repeated pressing of the
keypad or remote key, for instance, will restart the command, but in an undesirable stepping action.
This condition may be alleviated by repeating the full frame each time, instead of just repeating the repeater burst. In this
way, the data instruction, if interrupted, is repeated immediately without the need of continuous represses of the command
key(s).
To change the code to do this, check the box next to Repeating Data and left click the Generate button. The repeated
frame can be observed in the Preview section of the code display. Refer to Figure 113. Test the code, then click OK to
make the change effective.
MZC-88 Installation Instructions
Page 103
Figure 113
Repeating the Data Frame For Better Ramping
Custom Code & Data Code Fields
Data can be entered into these fields for advanced use. Refer to Figure 113. With access to a manufacturer’s Code Data, such
data can be entered in either Decimal or Hex form. With advanced programming knowledge, trial codes can be entered to
“discover” desired control actions.
These capabilities are useful to create custom codes for special functions that are not included on the set of buttons of a handheld remote control, such as discrete power ON/OFF commands, direct source selection commands, etc.
rs232 commands
In addition to IR Commands and the internal MZC-88 Commands, RS232 Commands can be programmed to EZ-Pad keys
as well. RS232 commands can be output from the MZC-88 via the RS232 Data I/O Port on the MZC-88 Rear Panel. RS232
commands can be programmed as individual commands under a key or can be included as part of a macro (sequence) from
a single key press. There are some RS232 commands already programmed into the CMD Library and are designated with a
“1010” icon. Refer to Figure 114.
Programming RS232 Commands To Ez-pads
RS232 Commands can be programmed to EZ-Pad Keys using a similar process to adding IR
Commands or MZC-88 Internal Commands. To program a key with a RS232 Command:
1. With EZ-Tools running and the current project open, left click the Project Content Tab.
2. Left click the EZ-Pad icon for the zone keypad to be programmed. (i.e. Zone 1)
3. Left click the CMD Library Tab.
4. Select the Brand from the pull-down. (i.e. Escient)
Figure 114
Command Library RS232 Icon
5. Double left click on the Component Folder (i.e. Music Server) to expand the Model
List.
Page 104
MZC-88 Installation Instructions
6. Double left click on the Model Folder (i.e. FireBall) to expand the Command List.
7. Scroll down the Command List to find the desired command (i.e. Play) designated as a RS232 Command with a
“1010” icon.
8. Left click the key on the EZ-Pad to be programmed (i.e. AUX).
9. Double left click the desired command. It will appear in the Button Properties Command List for the AUX Key. Refer to
Figure 115.
Figure 115
Adding a RS232 Command to a Sequence
With the AUX Key programmed as such, when pressed, the MZC-88 will switch Zone 1 to the Source 8 (Escient FireBall)
audio and video feeds, un-mute the zone pre-amp and issue a RS232 Play command to the FireBall via the RS232 I/O Port on
the MZC-88 Rear Panel.
Repeat Steps 7 through 9 to add RS232 commands to individual keys on FKP-1.0’s and NKP-1.0’s if used.
RS232 Commands can be used in programming Events for various System or Zone ON/OFF sequences as well.
Adding New RS232 Commands To The Command Library
New RS232 Commands can be added to the CMD Library. ASCII text strings of up to 100 characters can be added with either ASCII or HEX code. Additionally, Baud Rate, Data Bits, Stop Bits, Character Delay, Response Length and Response Timeout
can be set to assure proper performance of these control commands. ASCII, HEX and other code parameters can typically be
found in product manuals or manufacturers web sites. It may be necessary on occasion to contact a particular manufacturer’s
tech support to get this information.
In some cases, the EZ-Tools CMD Library will already have IR codes or possibly some RS232 Commands for a particular Brand,
Component and Model, and all that need be done is to add a couple of RS232 commands. In other cases, the Brand, Component and Model for which RS232 commands is required may not be in the CMD Library. Start with the appropriate step for
the specific command(s) being added.
1. With EZ-Tools running, open the project for which the new RS232 Commands are required. (If not ready to program a
specific project, open any EZ-Tools project.)
2. Left click the CMD Library Tab.
MZC-88 Installation Instructions
Page 105
3. If the Brand name does not already exist, right click within the Brands space and left click “New Brand”. Type in the
new brand name and click OK.
4. Right click the empty space below the brand name and left click “New Component”. Type in the new component
name (i.e. Projector) and click OK.
5. Right click the new (Projector) folder and left click “New Model”. Type in the new model name (the model # of the component or it’s remote, i.e., VX-2c) and click OK.
6. Right click the new model # folder (i.e., VX-2c). Go to “New Commands” and left click “RS232 Serial Commands”.
Type in command name (i.e., ON) and left click right arrows (>>) to put the name in the New Command List. Type in a
complete list of command names (i.e., ON, OFF, COMPOSITE, S VIDEO 1, S VIDEO 2, etc.) as needed. (Refer to Figure
116)
Figure 116
Adding New RS232 Command Names
7. When all new command names have been added to the New Command List, click OK.
8. The Command Properties Window will open automatically, with the first new command already placed in the
Command Name field. (i.e. ON) (Refer to Figure 117)
Figure 117
Entering RS232 Command Properties
Page 106
MZC-88 Installation Instructions
9. Left click Modify in the Com Port Settings box, to make any changes necessary to: Baud Rate, Data Bits and Stop
bits, per the manufacturer’s protocol. The Serial Port Settings pop-up will appear. Make necessary changes and click
OK. (Refer to Figure 117)
10. In the Command/Data Editor box, left click either the ASCII or HEX field under “01” depending upon which data,
ASCII or HEX will be used to create the new command. Type in the command string, one character per box, up to 100
characters.
11. In the Advanced Settings box select a Character Delay, from 0 (no delay) to 50 µS (milliseconds) if needed, to be
inserted between characters when command strings are being sent.
12. In the Response Settings box, select the appropriate Response Length from 0 to 100 Characters to confirm that the
command string has been properly sent, received and executed.
13. In the Response Settings box, select the appropriate Response Timeout from 0.0 to 10.0 seconds. This will determine the
amount of time the RS232I/O Port will stay ‘open’ waiting for a response from the controlled device.
14. When all Command Properties for the specific command being edited have been made, click OK. The command will be
added to the CMD Library and will be designated with a “1010” icon. The next New Command will automatically come
up in the Command Properties Window. Typically, a manufacturer will use the same settings for baud, Data Bits, etc., so
all that need be done is to type in the ASCII or HEX code for the individual commands. When all New Commands have
been formatted, the Command Properties Window will close and all commands will be listed in the appropriate CMD
Library List. (Refer to Figure 118.)
Figure 118
New RS232 Commands in Command Library
Once RS232 Commands have been added to the CMD Library, they are available for use in any EZ-Tools project when
programming RS232 codes is required.
MZC-88 Installation Instructions
Page 107
TROUBLESHOOTING
PROBLEM
SOLUTION
Audio
No Audio From External Source
a) Confirm source is turned on and playing.
b) Check connection between external source and MZC-88.
No Audio In Zone
a) Confirm zone is turned on.
b) Confirm volume is turned up and un-mute.
c) Confirm speaker connections.
d) Confirm zone audio routing command programming.
e) In expanded systems, confirm source loop connections
between MZC-88’s.
No Paging Audio
a) Confirm paging source is turned on.
b) Confirm paging source connection to “Phone Page In”.
c) Confirm trigger voltage and polarity to Doorbell/Status
In.
d) Confirm zone audio paging routing command
programming.
d) Confirm Doorbell/Status In programming in EZ-Tools.
Video
No Video From External Source
a) Confirm source is turned on and playing.
b) Check connection between external source and MZC-88.
No Video In Zone
a) Confirm zone is turned on.
b) Confirm zone TV/monitor is turned on and switched to
the correct input.
c) Confirm TV/monitor connections.
d) Confirm zone video routing command programming.
e) In expanded systems, confirm source loop connections
between MZC-88’s.
No Paging Video
a) Confirm paging source is turned on.
b) Confirm paging source connection to “Video Page In”.
c) Confirm trigger voltage and polarity to Doorbell/Status
In.
d) Confirm zone video paging routing command
programming.
d) Confirm Doorbell/Status In programming in EZ-Tools.
Tuner
Reception
a) Confirm AM/FM antenna connections to HED-1.0.
b) Confirm HED-1.0 connection to MZC-88.
c) In expanded systems, confirm each MZC-88 has a
dedicated HED-1.0 and AM/FM antennas.
d) Confirm zone audio routing command programming.
Stations/Presets
a) Confirm preset programming for Tuner 1 and Tuner 2.
b) In expanded systems, confirm preset programming for
Tuner 1 and Tuner 2 in all MZC-88’s.
c) Confirm zone keypad preset select command
programming.
Page 108
PROBLEM
MZC-88 Installation Instructions
SOLUTION
Control
From Keypads
a) Confirm MZC-88 has AC power and is turned on.
a) Confirm keypad connection to MZC-88.
c) Confirm polarity of keypad connections.
d) Confirm zone keypad programming in EZ-Tools.
e) Confirm connection and placement of IR emitters.
f) In expanded systems, confirm, IR loop connections.
Control
From Remote Controls
a) Confirm EZ-Code programming (EZ-Codes are zonespecific.)
RS232
a) Confirm power connection to controlled device.
b) Confirm connection to RS232 I/O Port.
c) Confirm command properties.
Power
System Power
a) Confirm connection to an unswitched AC outlet
MZC-88 Installation Instructions
MZC-88 Specifications
Audio Sections
Power Output/Channel (RMS, two channels driven into 8 Ohms)
THD (at rated power)
Power/Channel (RMS, 2 channels driven into 4 Ohms)
Input Sensitivity (For rated power @ max VC)
Input Impedance (Source Inputs)
Input Overload (Source Inputs)
Output Voltage @ Pre-Outs (w/300 µV @ Source Inputs)
Output Impedance (Pre-Outs)
Frequency Response (@ 1 Watt @ 8 Ohms)
Channel Separation
Cross Talk Between Sources
S/N Ratio (Re: Rated Output, IEC A, Source Inputs 1k Ohm)
Bass Control Range
Treble Control Range
50 Watts, 20Hz to 20kHz
<0.5%
70 Watts @ 1kHz
300 µV
>22 K Ohms
2.5 V
1.7V, VC Setting, VC Max.
810 µV, NVC Setting
<300 Ohms
20 Hz to 20 kHz +⁄- 1.5 dB
> 50 dB @ 10 kHz
> 65 dB @ 10 kHz
> 95 dB (VC 20 dB below FCW)
+
⁄- 10 dB @ 100 Hz
+
⁄- 10 dB @ 10 kHz
Video Section
Bandwidth (Outputs 75 Ohms Terminated)
Input/Output Levels (Outputs 75 Ohms Terminated)
10 Hz to 6 MHz +⁄- 1dB
1.0V p-p +⁄- 5%
FM Tuner Sections
Tuning Range
Usable Sensitivity (IHF, 98.1 MHz)
Sensitivity (50 dB quieting, 98.1 MHz)
S/N Ratio (65 dBf, 98.1 MHz)
Freq. Response (Mono or Stereo)
Separation (@ 1 kHz, 65 dBf)
THD (1 kHz, 65 dBf, 98.1 MHz)
Capture Ratio (45 dBf)
Alternate Channel Selectivity
87.5 to 108.0 MHz
12 dBf Mono
18 dBf Mono, 45 dBf Stereo
75 dB Mono, 65 dB Stereo
30 Hz to 15 kHz +⁄- 3 dB
> 40 dB
0.15% Mono, 0.2% Stereo
2.0 dB
65 dB
AM Tuner Sections
Tuning Range
Sensitivity (20 dB Quieting, 1000kHz loop antenna)
Selectivity (@ S/N 20dB, +/- 10 kHz)
S/N Ratio (400kHz, 10 µV/m Input @ 1000 kHz, 30% Mod.)
THD (400kHz, 10 µV/m Input @ 1000 kHz, 30% Mod.)
Image Rejection (1400 kHz)
520 to 1710 kHz
750 µV/m
30dB
46 dB
0.7%
38 dB
Page 109
Page 110
MZC-88 Installation Instructions
Control Sections
Contact Closures (Dry)
Phone Page In - Voltage/Impedance
Video Page In
Common IR Out- HI (High Power)
- LO (Emitter Power)
Zone IR Outs - Voltage/Impedance
Source IR Outs (and Loop) - Voltage/Impedance
Common Status Out (0 to 12 V DC)
Status IN (3-8) 4.5 to 30 V DC
2A, 30 VAC/DC max
Audio Line Level, > 22k Ohm
1.0 V p-p, 75 Ohm
9 V Active High, 82 Ohms
9 V Active High, 670 Ohms
9.2 V Active High, 620 Ohms
11.5 V Active High, 390 Ohms
9.5 V @ 100 mA
2 mA @ 12 V
General
Power Consumption
No signal (idle)
At 1⁄8 Rated Power (6.25 Watts/Channel)
Line Ratings
Rear Panel Fuse
Dimensions
17” (432mm) W x *5-1⁄4” (133mm) x 14-3⁄4” (375mm)D
*5-3⁄4” (146mm) H, including feet
Weight
31.5 lbs (14.3 kg)
75 Watts
275 Watts
120 VAC, 3A
T6.3AL 250V
940 Columbia Avenue, Riverside, CA 92507
(800) 448-0976 Fax (951) 787-8747
www.speakercraft.com
MZC-88 Installation Instructions
LIT13088