1
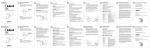
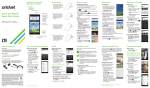
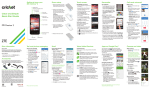
Sound Bar Operating Instructions GB Manual de instrucciones ES HT-ST3 Table of contents / Índice Setup / Procedimientos iniciales What’s in the box / Contenido de la caja 3 Installation / Instalación 4 Connecting the Bar Speaker and the Subwoofer / Conexión del altavoz de barra y el altavoz potenciador de graves 5 Connection / Conexión 6 Turning on the system / Encendido del sistema 8 Basic Operations / Operaciones básicas Listening to the audio / Escuchar el audio 9 Enjoying the sound effects / Disfrutar de los efectos de sonido 10 Listening to the audio from BLUETOOTH devices / Escuchar el audio de dispositivos BLUETOOTH 12 Others / Otros 2 Parts and controls / Componentes y controles 14 Adjusting the settings / Ajuste de la configuración 16 Troubleshooting / Solución de problemas 20 What’s in the box / Contenido de la caja Bar Speaker (1) Altavoz de barra (1) Subwoofer (1) Altavoz potenciador de graves (1) Remote control (1) Mando a distancia (1) Stands (2) Soportes (2) Speaker pads (4) Almohadillas para altavoz (4) Speaker cushions* (2) Cojines para altavoz* (2) R03 (size AAA) batteries (2) Pilas R03 (tamaño AAA) (2) *For installing the Bar Speaker on a wall *Para instalar el altavoz de barra en una pared Sound Bar Sound Bar HT-ST3 Digital optical cable for a TV (1) Cable digital óptico para TV (1) Operating Instructions (this book) (1) Manual de instrucciones (este libro) (1) Reference Guide (1) Guía de referencia (1) 3 Installation / Instalación Do you want to install the Bar Speaker on a wall? See the instructions in the Reference Guide. If you prefer… / Si prefiere... Installing the subwoofer vertically Instalar el altavoz potenciador de graves en sentido vertical Installing the Bar Speaker facing front Instalar el altavoz de barra orientado hacia el frente 1 •Stick the speaker pads supplied to each corner on the left or right side. •Pegue las almohadillas para altavoz suministradas en cada esquina del lado izquierdo o derecho. 4 •Attach the stands supplied over the cushions on the bottom. •Acople los soportes suministrados sobre los cojines situados en la parte inferior. 2 ¿Desea instalar el altavoz de barra en una pared? Consulte las instrucciones de la Guía de referencia. Connecting the Bar Speaker and the Subwoofer / Conexión del altavoz de barra y el altavoz potenciador de graves 5 Connection / Conexión Connecting a TV only / Conexión de un TV únicamente OPTICAL OUT (Supplied) (Suministrado) 6 When connecting a TV and other devices / Cuando se conectan un TV y otros dispositivos OUT Blu-ray (ARC) OPTICAL OUT TV Use HDMI cables (not supplied). If your TV supports the ARC function, you do not need to connect the digital optical cable (supplied). Refer to the Reference Guide for notes on HDMI connections. Utilice cables HDMI (no suministrados). Si su TV es compatible con la función ARC, no es necesario conectar el cable digital óptico (suministrado). Consulte la Guía de referencia para obtener más información sobre las conexiones HDMI. Notes Notas •To output multi-channel digital audio, check the digital audio output setting on the device connected to the system. •You can connect other audio devices to the ANALOG IN jacks. •Para emitir audio digital multicanal, compruebe el ajuste de salida del audio digital en el dispositivo conectado al sistema. •Puede conectar otros dispositivos de audio en las tomas ANALOG IN. 7 Turning on the system / Encendido del sistema 2 1 Connect the AC power cord (mains lead). 2 Press the button. 1 Insert the batteries (supplied). Inserte las pilas (suministradas). 1 Conecte los cables de alimentación de CA. 2 Pulse el botón . Slide down the cover. Raise the battery lid. Deslice la cubierta hacia abajo. Levante la tapa de las pilas. 8 Listening to the audio / Escuchar el audio INPUT Input device selected Dispositivo de entrada seleccionado Press the INPUT button repeatedly until the input device appears on the display. TV HDMI 1 HDMI 2 HDMI 3 BT AU ANALOG OPT Pulse repetidamente el botón INPUT hasta que el dispositivo de entrada aparezca en el visor. TV HDMI 1 HDMI 2 HDMI 3 BT AU ANALOG OPT 9 Enjoying the sound effects / Disfrutar de los efectos de sonido SOUND MODE: Allows you to enjoy sound effects. VOICE: Helps make dialogs clearer. SOUND MODE VOICE SW TONE 10 SW TONE (subwoofer tone): Selects the bass tone. MOVIE Sound effects suitable for movies MUSIC Sound effects suitable for music FOOTBALL (virtual football mode) Sound effects for enjoying the feeling of being present in a football stadium (when watching the football match broadcast) Note: This feature does not support monaural sound. STD (standard) Sound effects suitable for TV programs LEVEL 1 – 3 TONE 1 A more crisp bass tone TONE 2 A bass tone suitable for various sources (default) TONE 3 A more dynamic bass tone SOUND MODE: Permite disfrutar de los efectos de sonido. VOICE: Permite oír los diálogos con mayor claridad. SW TONE (tono de altavoz potenciador de graves): Permite seleccionar el tono de graves. MOVIE Efectos de sonido adecuados para películas MUSIC Efectos de sonido adecuados para música FOOTBALL (modo de football virtual) Efectos de sonido que permiten sentir la sensación de estar presente en un estadio de fútbol (cuando se ven emisiones de partidos de fútbol) Nota: Esta función no es compatible con el sonido monoaural. STD (estándar) Efectos de sonido adecuados para programas de TV LEVEL 1 – 3 TONE 1 Tono de graves más nítido TONE 2 Tono de graves adecuado para diversas fuentes (predeterminado) TONE 3 Tono de graves más dinámico 11 Listening to the audio from BLUETOOTH devices / Escuchar el audio de dispositivos BLUETOOTH When registering BLUETOOTH devices (pairing) / Cuando se registran dispositivos BLUETOOTH (emparejamiento) BLUETOOTH PAIRING button / Botón BLUETOOTH PAIRING BLUETOOTH indicator / Indicador BLUETOOTH To pair with a device and listen to it for the first time 1 Press the BLUETOOTH PAIRING button. The BLUETOOTH indicator flashes fast (during pairing). 2 Set your BLUETOOTH device to pairing mode and select “HT-ST3.” If a Passkey is requested, enter “0000.” 3 Confirm the BLUETOOTH indicator is lit (connected). To listen to a paired device 1 Press the INPUT button repeatedly to display “BT AU.” (attempting pairing). The BLUETOOTH indicator flashes 2 Select “HT-ST3” on the BLUETOOTH device. 3 Confirm the BLUETOOTH indicator is lit (connected). 12 Para emparejar con un dispositivo y escucharlo por primera vez 1 Pulse el botón BLUETOOTH PAIRING. El indicador BLUETOOTH parpadea rápidamente (durante el emparejamiento). 2 Ajuste su dispositivo BLUETOOTH en el modo de emparejamiento y seleccione “HT-ST3”. Si se le solicita una clave de paso, introduzca “0000”. 3 Confirme que el indicador BLUETOOTH esté iluminado (conectado). Para escuchar un dispositivo emparejado 1 Pulse el botón INPUT repetidamente para visualizar “BT AU”. (intentando establecer el El indicador BLUETOOTH parpadea emparejamiento). 2 Seleccione “HT-ST3” en el dispositivo BLUETOOTH. 3 Confirme que el indicador BLUETOOTH esté iluminado (conectado). When using one-touch connection (NFC) / Cuando se utiliza el sistema Conéctate con un solo toque (NFC) BLUETOOTH indicator / Indicador BLUETOOTH 1 Download, install, and start the “NFC Easy Connect” app on your smartphone. 1 Descargue, instale e inicie la aplicación “Conexión fácil NFC” en su smartphone. 2 Touch the subwoofer with the smartphone. 3 Confirm the BLUETOOTH indicator is lit in blue, indicating that the connection has been established. 2 Toque el altavoz potenciador de graves con el smartphone. 3 Confirme que el indicador BLUETOOTH esté iluminado en azul, lo cual indica que la conexión se ha establecido. •Compatible smartphones Smartphones with the NFC function built-in (OS: Android 2.3.3 or later, excluding Android 3.x) •Smartphones compatibles Smartphones con la función NFC integrada (SO: Android 2.3.3 o posterior, excepto Android 3.x) 13 Parts and controls / Componentes y controles (on/standby) button Botón (encendido/espera) NFC sensor (page 13) Sensor de NFC (página 13) Pairs/connects an NFC device when an NFC device is located nearby. (remote control sensor) Display off/BLUETOOTH indicator Lights up in white when the system is on, not in BLUETOOTH mode, and the front panel display is off. Lights up in blue in BLUETOOTH mode (page 12). Empareja/conecta un dispositivo NFC cuando éste se encuentra cerca. (sensor del mando a distancia) Indicador visor apagado/BLUETOOTH Se ilumina en blanco cuando el sistema está encendido, no en modo BLUETOOTH, y el visor del panel frontal está apagado. Se ilumina en azul en el modo BLUETOOTH (página 12). Front panel display Visor del panel frontal INPUT button (page 9) Botón INPUT (página 9) BLUETOOTH PAIRING button (page 12) Botón BLUETOOTH PAIRING (página 12) VOL (volume) +/– buttons Botones VOL (volumen) +/– 14 (on/standby) (encendido/espera) INPUT (page 9) INPUT (página 9) MUTING MUTING VOL (volume) +/– VOL (volumen) +/– SOUND MODE (page 10) SOUND MODE (página 10) VOICE (page 10) VOICE (página 10) DISPLAY DISPLAY Adjusts the display brightness: On Dark Off. *When the display is turned from Off to On, audio format information appears on the display. SW TONE (page 10) SW VOL (subwoofer volume) +/– MENU/RETURN///ENTER (page 16) Ajusta el brillo del visor: Encendido Oscuro Apagado. *Cuando el visor pasa de Apagado a Encendido, aparece en él la información del formato de audio. SW TONE (página 10) SW VOL (volumen del altavoz potenciador de graves) +/– MENU/RETURN///ENTER (página 16) 15 Adjusting the settings / Ajuste de la configuración Press MENU on the remote control, then select the desired setting using //ENTER/RETURN. Menu LEVEL AUDIO MENU / ENTER RETURN HDMI Default DRC (DYNAMIC RANGE CONTROL) SYNC (AV SYNC) You can adjust the sound when the image and the sound are not in sync. (1 – 4/ OFF) OFF DUAL (DUAL MONO) You can enjoy multiplex broadcast sound of Dolby Digital audio. (M/S (main and sub channels)/MAIN (main channel)/SUB (sub channel)) MAIN S. OPT (SOUND OPTIMIZER) Adjusts the sound so that it is reproduced dynamically and more clearly even at low sound volumes. (ON/OFF) OFF HEQ (HARMONICS EQUALIZER) Reproduces the very low volume sounds that tend to be eliminated by audio compression. (ON/OFF) Note: HEQ functions only when “ANALOG/BT AU” is selected. This does not function with any other inputs, even though the item is displayed on the front panel. ON AAV (ADVANCED AUTO VOLUME) Reduces the volume discrepancies between different programs or between programs and commercials. (ON/OFF) OFF CTRL (CONTROL FOR HDMI) Switches the Control for HDMI function on or off. (ON/OFF) For details, refer to the Reference Guide. ON P. THRU (PASS THROUGH) Sets the power saving mode of the pass-through function of HDMI signals. (AUTO/ON) AUTO: Outputs signals from the HDMI OUT ARC (TV) jack of the system in standby mode when the TV is turned on. This setting saves power in standby mode compared with the “ON” setting. ON: Always outputs signals from the HDMI OUT ARC (TV) jack in standby mode. Note: This item appears only when “CTRL (CONTROL FOR HDMI)” is set to “ON.” AUTO ARC (AUDIO RETURN CHANNEL) Allows you to listen to digital sound from a TV compatible with the Audio Return Channel (ARC) technology is connected using an HDMI cable. (ON/OFF) Note: This item appears only when “CTRL (CONTROL FOR HDMI)” is set to “ON.” ON BT.STBY (BLUETOOTH STANDBY) When the system has pairing information, the system is in BLUETOOTH standby mode even when it is turned off. (ON/OFF) Note: During BLUETOOTH standby mode, the BLUETOOTH indicator flashes in blue slowly. OFF AAC (ADVANCED AUDIO CODING) Sets whether or not the system will use AAC via BLUETOOTH. (ON/OFF) Note: If you change the setting when the system is connected with a BLUETOOTH device, the system will be disconnected from the device. OFF SET BT 16 Function You can enjoy Dolby Digital sound at low sound volumes. (ON/AUTO/OFF) ON: Compresses sound in accordance with the compression information contained in the content. AUTO: Automatically compresses sound encoded in Dolby TrueHD. AUTO Menu SYSTEM Function Default A. STBY (AUTO STANDBY) Switches the AUTO POWER OFF function on or off. (ON/OFF) If you do not operate the system for a certain time (about 20 minutes) when the system is not receiving an input signal, the system turns off automatically. ON VER (VERSION) Displays the current firmware version. – MENU / ENTER RETURN 17 Pulse MENU en el mando a distancia y, a continuación, seleccione la opción deseada mediante //ENTER/RETURN. Menú LEVEL Función Predeterminado DRC (DYNAMIC RANGE CONTROL) Permite disfrutar del sonido Dolby Digital con volúmenes de sonido bajos. (ON/ AUTO/OFF) ON: Comprime el sonido de acuerdo con la información de compresión incluida en el contenido. AUTO: Comprime automáticamente el sonido codificado en Dolby TrueHD. AUTO SYNC (AV SYNC) Permite ajustar el sonido cuando la imagen y el sonido no están sincronizados. (1 – 4/OFF) OFF DUAL (DUAL MONO) Permite disfrutar de un sonido de emisión múltiplex de audio Dolby Digital. (M/S (canales principal y secundario)/MAIN (canal principal)/SUB (canal secundario)) S. OPT (SOUND OPTIMIZER) Ajusta el sonido de forma que se reproduce dinámicamente y con mayor claridad incluso con volúmenes de sonido bajos. (ON/OFF) OFF HEQ (HARMONICS EQUALIZER) Reproduce los sonidos que tienen un volumen muy bajo y que tienden a eliminarse tras la compresión del audio. (ON/OFF) Nota: La opción HEQ solamente funciona cuando se selecciona “ANALOG/BT AU”. No funciona con ninguna otra entrada, incluso aunque el elemento se visualice en el panel frontal. ON AAV (ADVANCED AUTO VOLUME) Reduce las discrepancias de volumen entre diferentes programas o entre programas y anuncios. (ON/OFF) OFF CTRL (CONTROL FOR HDMI) Activa o desactiva la función Control por HDMI. (ON/OFF) Para obtener más información, consulte la Guía de referencia. ON P. THRU (PASS THROUGH) Ajusta el modo de ahorro de energía de la función pass-through de las señales HDMI. (AUTO/ON) AUTO: Emite señales de la toma HDMI OUT ARC (TV) del sistema en el modo de espera cuando el TV está encendido. Este ajuste ahorra energía en modo de espera, comparado con el ajuste “ON”. ON: Emite señales siempre de la toma HDMI OUT ARC (TV) en el modo de espera. Nota: Este elemento solamente aparece cuando “CTRL (CONTROL FOR HDMI)” está ajustado en “ON”. ARC (AUDIO RETURN CHANNEL) Permite escuchar sonido digital de un TV compatible con la tecnología Audio Return Channel (ARC) conectado mediante un cable HDMI. (ON/OFF) Nota: Este elemento solamente aparece cuando “CTRL (CONTROL FOR HDMI)” está ajustado en “ON”. AUDIO MENU / ENTER RETURN HDMI 18 MAIN AUTO ON Menú Predeterminado BT.STBY (BLUETOOTH STANDBY) OFF AAC (ADVANCED AUDIO CODING) Permite ajustar si el sistema utilizará o no el formato AAC a través de BLUETOOTH. (ON/OFF) Nota: Si el ajuste se modifica cuando el sistema está conectado con un dispositivo BLUETOOTH, el sistema se desconectará del dispositivo. OFF A. STBY (AUTO STANDBY) Activa o desactiva la función AUTO POWER OFF. (ON/OFF) Si el sistema no se utiliza durante un tiempo determinado (unos 20 minutos) cuando no está recibiendo una señal de entrada, se apaga automáticamente. ON VER (VERSION) Indica la versión actual del firmware. SET BT SYSTEM Función Cuando el sistema tiene información de emparejamiento, el sistema se encuentra en el modo de espera de BLUETOOTH incluso cuando está apagado. (ON/OFF) Nota: Durante el modo de espera de BLUETOOTH, el indicador BLUETOOTH parpadea lentamente en azul. – MENU / ENTER RETURN 19 Troubleshooting / Solución de problemas See the Reference Guide for more FAQs. No TV sound is output from the system. •Make sure the input source is selected correctly. You should try other input sources by pressing the INPUT button several times (page 9). •Check the connection of the HDMI cable, digital optical cable, or audio cable that is connected to the system and the TV (page 6, 7). •Check the sound output of the TV. No sound from the connected BLUETOOTH device is output from the system. •Make sure the BLUETOOTH indicator is lit in blue (page 12). •Make sure this system is located not too far from the BLUETOOTH device, or the system is not subject to interference from a Wi‐Fi network, other 2.4 GHz wireless device, or a microwave oven. BLUETOOTH connection cannot be completed. •Pair this system and the BLUETOOTH device again. –You may need to cancel the pairing with this system using your BLUETOOTH device first. No sound or only a very low-level sound of the connected equipment is heard from the system. •Press VOL + and check the volume level. •Press MUTING or VOL + to cancel the muting function. •Check that the input source is correctly selected. •Check that all the cables and cords of the system and the connected equipment are fully inserted. •Check that the speaker cords of the bar speaker are inserted to the subwoofer securely (page 5). The system is turned off automatically. •The A. STBY function is set (page 17). Consulte la Guía de referencia para ver más preguntas frecuentes. No se reproduce ningún sonido de TV en el sistema. •Verifique que la fuente de entrada esté correctamente seleccionada. Pruebe a seleccionar otras fuentes de entrada pulsando el botón INPUT varias veces (página 9). •Compruebe la conexión del cable HDMI, del cable digital óptico o del cable de audio que está conectado al sistema y al TV (página 6, 7). •Compruebe la salida de audio del TV. No se reproduce ningún sonido del dispositivo BLUETOOTH conectado en el sistema. •Verifique que el indicador BLUETOOTH esté iluminado en azul (página 12). •Verifique que el sistema no esté demasiado alejado del dispositivo BLUETOOTH o que no esté sujeto a interferencias de una red Wi-Fi, otro dispositivo inalámbrico a 2,4 GHz o un horno microondas. No se puede completar la conexión BLUETOOTH. •Vuelva a emparejar el sistema y el dispositivo BLUETOOTH. –Es posible que deba cancelar previamente el emparejamiento con el sistema utilizando su dispositivo BLUETOOTH. El sonido del equipo conectado no se oye o se oye con un nivel muy bajo a través del sistema. •Pulse VOL + y compruebe el nivel del volumen. •Pulse MUTING o VOL + para cancelar la función de desactivación del sonido. •Compruebe que la fuente de entrada esté correctamente seleccionada. •Compruebe que todos los cables del sistema y de los equipos conectados estén totalmente insertados en las tomas. •Compruebe que los cables del altavoz de barra estén insertados en el altavoz potenciador de graves de forma segura (página 5). El sistema se apaga automáticamente. •La función A. STBY está ajustada (página 19). 20 21 22 23 © 2013 Sony Corporation Printed in Malaysia 4-467-146-11(1)