1
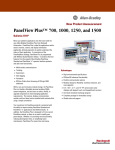
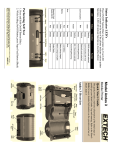
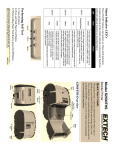
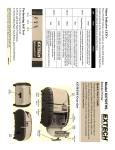
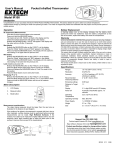
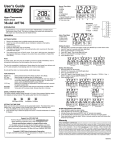
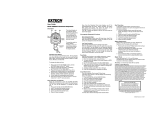
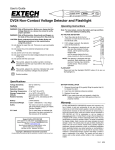
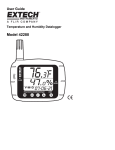
Steady
Red
Communication
Steady
Green
Battery
Steady
Red
On/Off
Button
Paper Feed
Button
Extech Instruments Corporation 285 Bear Hill Rd., Waltham, MA 02451-1064
Phone: 1-781-890-7440 Fax: (781) 890-7864 WEB: www.extech.com/printers
Rev. 120507-R2
Copyright © 2007 Extech Instruments Corporation. All rights reserved including the right of reproduction in whole or in part in any form.
Communication: All printers ship in IrDA, Bluetooth or 802.11 b/g mode
(if Bluetooth or 802.11 b/g option is ordered). To switch to Serial mode,
please check the User Guide for set-up instructions.
1. Turn off printer
2. Press and hold Paper Feed Button
3. While holding Paper Feed Button,
press On/Off Button
Swipe error
Ready for MCR swipe
Low battery
Battery being charged
Transmitting/Receiving
Steady
Steady
Transmitting/Receiving
802.11b RF mode selected
Steady
Bluetooth mode selected
Flashing
Flashing
Communicating with host
RS232 serial mode selected
Description
Steady
Yellow
Orange
State
Flashing
Performing Self Test
MCR
Magnetic Card
Reader
Battery
Green
Blue
Color
LED
Press ON/OFF button to turn printer on. Three LED indicators located on
the top of the printer indicate various printer functions. LED will indicate
function as described below:
Status Indicator LEDs
Communication
On/Off
Button
Status
Indicator LEDs
Serial
Port
Paper Feed
Button
MCR Slot
S4000T Overview
AC Adaptor
Port
Print Head
Paper Door
Release Button
IrDA
Window
Paper
Compartment
Platen
Roller
This guide provides a reference illustration of the initial steps to quickly
get your Model S4000T up and running. Refer to the User’s Guide for
more detailed information on the operation and use of the Model S4000T.
A copy of the User’s Guide can be downloaded from www.extech.com/
printers.
Quick Start Guide
Mobile Printer
Model S4000T
1. Plug battery charger adaptor output cable in the battery charger connector
2. Plug battery charger adaptor into the appropriate AC line voltage socket
3. LED will illuminate indicating that the battery is being charged
4. The battery will be fast charged and after 180 minutes the LED will turn off.
Charging the Battery
*If paper door does not open easily, tap the printer against the palm of
your hand near the paper door hinge.
2. Open the battery door to an angle of about 90 degrees (Do not force open)
3. Insert battery as shown above (non-contact end first and let contact end
drop into place)
4. Close the battery door and lock battery door by sliding the battery door
locking tab down.
Li-Ion
Battery
Note: Make sure some supply
(2 – 3 inches) extends
beyond the top of the
paper supply well.
To tear paper: The printer’s
paper door acts as a tear
bar. Pull one edge of the
paper against the tear bar
as indicated, then tear down
and across against the tear
bar to tear the paper.
Tearing Paper
Note: Pulling up and/or sideways without using the
tear bar can cause a paper jam due to paper
misalignment in the printhead mechanism.
3. While pressing Paper Door Release button, close paper door.
4. Press paper door down and let go of the Paper Door Release button
5. Turn on the printer by pressing Power button and test the paper advance function by pressing the Paper Feed button. Verify that paper advances correctly.
Note: Pull Paper roll leader out of
printer. Note direction of
paper travel
2. Install paper roll
1. Press paper door release button. The door will open slightly; open rest of
the way as shown.
1. Unlock the battery door by sliding the battery door locking tab up*
Battery
Door Tab
Installing the Paper Roll
Installing the Battery