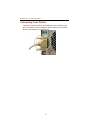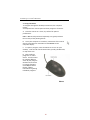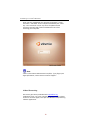
1
gpc3 user manual COPYRIGHT & SAFETY STATEMENT Copyright Copyright © 2008 Everex. All rights reserved. Disclaimer: Everex shall not be liable for technical or editorial errors or omissions contained herein; or for incidental or consequential damages resulting from furnishing this material, or the performance or use of this product. Everex reserves the right to change product specification without prior notice; therefore, information in this document may change without notice. No part of this document may be copied, reproduced, or transmitted by any means or for any purpose without prior written permission from FIC Incorporated. Liability INFORMATION WITHIN THIS DOCUMENT IS PROVIDED "AS IS" WITHOUT WARRANTY OF ANY KIND, EITHER EXPRESS OR IMPLIED, INCLUDING BUT NOT LIMITED TO, THE IMPLIED WARRANTIES OF MERCHANTABILITY, FITNESS FOR A PARTICULAR PURPOSE, OF NONINFRINGEMENT. Information, data and specifications may contain technical inaccuracies or typographical errors and may be changed or updated without notice. Everex may also improve and/or change products and/or programs described in this information at any time, without notice. Disclaimer Published materials may contain inaccuracies and typographical errors. Everex does not warrant the accuracy or completeness of the materials or the reliability of any advice, opinion, statement or other information displayed or distributed through Everex. Reliance on any such opinion, advice, statement, memorandum, or information shall be at the sole discretion of the user. Everex reserves the right to correct any errors or omissions in any portion of these materials at any time without notice. The information and materials presented and the references made available, are provided "As Is" without any representation or warranty, express or implied, of any kind, including, but not limited to, warranties of merchantability, non infringement, or fitness for any particular purpose, some jurisdictions do not allow for the exclusion of implied warranties, so the above exclusions may not apply. II COPYRIGHT & SAFETY STATEMENT Safety Instructions This computer has been tested for conformance to international safety regulations. Like any electronic device, however, the computer should be used with care. To protect yourself from possible injury and to minimize the risk of damage to the computer, read and follow all the safety instructions mentioned in this manual. ♦ ♦ Read all of these instructions. Save these instructions for future use. WARNING: Do not attempt to service the computer yourself. Opening or removing covers might expose you to dangerous voltage points or other risk, have a qualified person repair it. WARNING: Keep hair, loose clothing, fingers, and all parts of body away from openings, moving parts and fan WARNING: Do not operate the computer with the cover removed. WARNING: Always disconnect all telephone lines & all power cords from the wall outlet before servicing or disassembling this product. To reduce the risk of personal injury from electrical shock or hot surfaces, disconnect the power cord from the wall outlet, and allow the internal system components to cool before touching. WARNING: This equipment is designed for connection to a grounded (earthed) outlet. The grounded type plug is an important safety feature. To reduce the risk of electrical shock, damage to your equipment, or loss of data, do not disable this feature. Installation Restrictions 1. Unplug this product from the wall outlet before cleaning. Do not use liquid cleaners or aerosol cleaners. Use a damp cloth for cleaning. Ensure that no liquid enters the system. 2. Do not use this product near water, in a wet basement or near a swimming pool. 3. Do not connect or disconnect cables during a thunderstorm. 4. Slots and openings in the cabinet and the back or bottom are provided for ventilation; to ensure reliable operation of the product and to protect it from overheating, these openings must not be blocked or covered. The product should never be placed near or over a radiator or heat register, or in a built-in installation unless proper ventilation is provided. 5. This product should be operated from the type of power indicated on the marking label. If you are not sure of the type of power available, consult your dealer or local power company. III gPC3 PC USER’S MANUAL 6. Do not allow anything to rest on the power cord. Do not locate this product where persons will tread on the cord. 7. If an extension cord is used with this product, make sure that the total ampere rating of the equipment plugged into the extension cord does not exceed the extension cord ampere rating. Also, make sure that the total rating of all products plugged into the wall outlet does not exceed the fuse rating. 8. Never push objects of any kind into this product through cabinet slots as they may touch dangerous voltage points or short out parts that could result in a fire or electronic shock. Never spill liquid of any kind on the product. 9. If this product was not provided with a telephone line cord, use only No.26 AWG or larger telecommunication line cord in order to reduce the risk of fire. 10. Refer your system for servicing to qualified service personal under the following conditions: • • • • • • When the power cord or plug is damaged or frayed. If liquid has been spilled into the product. If the product has been exposed to rain or water. If the product does not operate normally when the operating instructions are followed. Adjust only those controls that are covered by the operating instructions, since improper adjustment of other controls may result in damage and will often require extensive work by a qualified technician to restore the product to normal condition. If the product has been dropped or the cabinet has been damaged. If the product displays a distinct change in performance, it indicates a need for service. Power Cord Set Requirements • • The power cord set (appliance coupler, flexible cord, and wall plug) you received with the computer meets the requirements for use in the country where you purchased the equipment. Power cord sets for use in other counties must meet the requirements of the country where you use the computer. For more information on power cord set requirement, contact your local authorized dealer, reseller, or service provider. Laser Compliance Statement The CD-ROM / DVD-ROM / CD-RW / DVD-RW drive in this computer is a laser product. The CD-ROM / DVD-ROM / CD-RW / DVD-RW drive’s classification label (shown below) is location on the drive. IV COPYRIGHT & SAFETY STATEMENT CLASS 1 LASER PRODUCT Caution: Use of any controls or adjustments or procedures other than those specified herein may result in hazardous radiation exposure. To prevent exposure to laser emanations (Harmful to Human eyes), do not attempt to disassemble this unit. Battery (Lithium) NOTE: The following caution statement is located in the service and operating manual or on the label adjacent to the battery. 1. English CAUTION: DANGER OF EXPLOSION IF BATTERY IS INCORRECTLY REPLACED. REPLACE ONLY WITH SAME OR EQUIVALENT TYPE RECOMMENDED BY THE MANUFACTURER. DISCARD USED BATTERIES ACCORDING TO THE MANUFACTURER'S INSTRUCTIONS. 2. French IL Y A DANGER D'EXPLOSION S'IL Y A REMPLACEMENT INCORRECT DE LA BATTERIE. REMPLACER UNIQUEMENT AVEC UNE BATTERIE DU MÊME TYPE OU D'UN TYPE RECOMMANDÉ PAR LE CONSTRUCTEUR. METTER AU RÉBUT LES BATTERIES USAGÉES CONFORMÉMENT AUX INSTRUCTIONS DU FABRICANT. 3. German VORSICHT ! Explisionsgefahr bei unsachgemäßen Austausch der Batterie. Ersatz nur durch denselben oder einem vom Hersteller empfohlenem ähnlichen Typ. Entsorgung gebrauchter Batterien nach Angaben des Herstellers. 4. Swedish Explosionsfara vid felaktigt batteribyte. Använd samma batterityp eller en ekvivalent typ som rekommenderas av apparattillverkaren. Kassera använt batteri enligt fabrikantens instruktion. 5. Danish Lithiumbatteri- Eksplosionsfare ved fejlagtig håndtering. Udskiftning må kum ske med batteri af samme fabrikat og type. Lever det brugte batteri tilbage til leverandoren. 6. Norwegian Ekspolsjonsafe ved feilaktig skifte av batteri. Benytt samme batteritype eller en tilsvarende type anbefalt av apparatfabriknten. Brukte batterier kasseres i henhold til fabrikantens instruksjoner. 7. Finnish Paristo voi räjähtää, jos se on virheellisesti asennettu. Vaihda paristo ainostaan laitevalmistajan suosittelemaan tyyppiin. Hävitä käyteet paristo valmistajan ohjeiden mukaisesti. V gPC3 PC USER’S MANUAL FCC Information This equipment has been tested and found to comply with the limits for a Class B digital device, pursuant to part 15 of FCC Regulations. These limits are designed to provide reasonable protection against harmful interference in a residential installation. This equipment generates, uses, and can radiate radio frequency energy, and if not installed and used in accordance with the instructions, may case harmful interference to radio communications. However, there is no guarantee that interference will not occur in a particular installation. If this equipment does cause harmful interference to radio or television reception, which can be determined by turning the equipment off and on, the user is encouraged to try to correct the interference by one or more of the following measures: • • • • Reorient or relocate the receiving antenna. Increase the separation between the equipment and receiver. Connect the equipment into an outlet on a circuit different from that to which the receiver is connected. Consult the dealer or an experienced radio/TV technician for help. Laser Safety Requirement Laser Drive (CD-ROM, CD-RW, DVD) Safety Warnings CLASS 1 LASER PRODUCT • CAUTION: INVISIBLE LASER RADIATION WHEN OPEN. DO NOT STARE INTO BEAM. • CAUTION: USE OF ANY CONTROLS OR ADJUSTMENTS OR PROCEDURES OTHER THAN THOSE SPECIFIED HEREIN MAY RESULT IN HAZARDOUS RADIATION EXPOSURE. TO PREVENT EXPOSURE TO LASER EMINATIONS (HARMFUL TO HUMAN EYES), DO NOT ATTEMPT TO DISASSEMBLE THIS UNIT. VI COPYRIGHT & SAFETY STATEMENT Television antenna connectors protection (for system TV tuner card) External television antenna grounding If an outside antenna or cable system is to be connected to the product, make sure that the antenna or cable system is electrically grounded to provide some provide some protection against voltage surges and static charges. Article 810 of the National Electrical Code. ANSI/NFPSA 70, provide information with regard to proper grounding of the mask and supporting structure, grounding of the lead-in wire to an antenna discharge unit, size of grounding conductors, location of antenna discharge unit, connection to grounding electrodes, and requirements for the grounding electrode. Lightning protection For added protection of any product during a lightning storm or when it is left unattended or unused for long periods of time, unplug the product from the wall outlet and disconnect the antenna or cable system. CATV Cable Safety Make sure that your CATV system installer has connected the coaxial cable shield to the grounding system of the building, as close to the point of cable entry as practical. TV Antenna The TV antenna supplied with any TV Tuner module is intended for indoor use only. Please do not use your TV Tuner module outdoors. VII gPC3 PC USER’S MANUAL Power Lines Do not locate the antenna near overhead light or power circuits, or where it could fall into such power or circuits. WARNING: When installing or realigning an outside antenna system, extreme care should be taken to keep from touching such power lines or circuits. Contact with them could be fatal. VIII Table of Contents Contents Chapter 1: The Everex gPC Desktop Computer 1 Placement Tips ............................................................. 1 Chapter 2: Unpacking 3 Selecting a Site ............................................................. 3 Check List .................................................................... 3 Chapter 3: System Overview 4 Front Panel ................................................................... 4 Rear Panel .................................................................... 6 Chapter 4: Computer Setup 9 Setting up the AC Input voltage selection...................... 9 Connecting the Power Cord ........................................ 10 Connecting the Mouse and Keyboard.......................... 10 Connecting the Monitor .............................................. 11 Connecting the Ethernet ............................................. 11 Connecting a Printer................................................... 12 Chapter 5: Computer Basics 13 Turning on the Computer ........................................ …13 Using the Mouse...................................................... …14 Establishing a User Name and Password .................. …15 Word Processing.............................................................. …16 Creating a Spreadsheet............................................ …18 Accessing the Internet ............................................. …21 The World Wide Web................................................ …23 Establishing Email ................................................... …24 Installing Additional Software (Adobe Flash) .............. …25 Appendix 13 System Specifications………………………………………... 29 Service and Support............................................................ 31 IX EVEREX gPC3 USER’S MANUAL CHAPTER 1 The Everex gPC Desktop Computer Congratulations on the purchase of your new Everex PC! You will find that the gPC3 has the following advantages: • Efficient Cooling: The gPC3’s efficient cooling system and heat vents provide for better airflow, allowing the system to maintain a low temperature. • State-of-the-art Design: The unique design of the gPC3 combines state-of-the-art electronics with a sophisticated, standard form factor that provides you with a personal computer, which is both powerful and economical. • The Perfect System: Whether gaming at home or making presentations at the office, the gPC3 is the perfect system for all of your computing needs. Please read this USER MANUAL carefully before unpacking and setting up your gPC3. You can use this USER MANUAL as a comprehensive library for your computer. Please refer to this USER MANUAL first if you encounter any problems. Note: In order to set up the gPC3 efficiently, the BIOS setup menu has been modified slightly. Please refer to the system’s BIOS setup menu on the screen. Placement Tips Your gPC3 computer should be set up according to this user manual, and your own comfort and ergonomic needs. Please refer to the 1 EVEREX gPC3 USER’S MANUAL following tips to create a comfortable and healthy working environment for you: 1. Adjustable Seat: If you plan to use your gPC3 for extended periods of time, select a highly adjustable office chair with a five-pronged base. The seat and chair back should be adjustable, while you’re sitting in the chair, for height and tilt, and forward/backward positioning. In addition, the lumbar area of your back should be supported by chair adjustments or a cushion. Arm rests should conform to your elbow height and shoulder width and should be used for support. For maximum comfort, vary positions frequently throughout the day, observe good posture when seated, and keep your head centered over your shoulders. 2. Suitable monitor level: Position your computer so that it is at arm's length away and the top third of the monitor viewing area is at eye level. This helps prevent eye and neck strain. To further reduce eye strain, close your eyes and/or refocus on something other than your computer screen at least twice an hour. Most monitors come standard with a detachable tilt-and-swivel base and an adjustable, rear-mounted foot, which will allow you to position the monitor exactly where you want it. 3. Anti-glare coating: Some monitor screens are constructed with a special anti-glare coating, which minimizes reflections that cause eyestrain and discomfort. To further reduce eyestrain, close your eyes and/or refocus on something other than your computer screen at least twice an hour. 4. Adjustable task lighting: When room lighting is dimmed, there may be insufficient light on documents or reference materials for comfortable reading. A well-lit room or a few adjustable, directional task lights will allow you to see your monitor screen and other materials clearly, causing the least amount of strain on your eyes. 5. Appropriate position for wrist rest: Keep your wrists straight and your forearms parallel to the floor while you are typing. If you use a wrist rest, use it only briefly while resting. Do not rest your hands on the table or on the wrist rest as you are typing. During long periods of typing, taking frequent breaks is recommended. 2 SYSTEM OVERVIEW CHAPTER 2 Unpacking the Box Selecting a Site Before unpacking the gPC3, prepare a suitable workspace for your computer. Choose a steady, level and clean surface near an electrical outlet. Also ensure that the computer has enough space around it to allow for proper airflow, especially at the rear of the computer near the fan. If the computer does not have enough ventilation, internal components can become overheated and may become damaged. When opening the box, make sure not to damage it or the packing material, as you may need them for future shipping needs. As you unpack the box, make sure the following components are included in the box and are in good condition. If you find that any of these components are missing or appear damaged, please contact the system dealer immediately. Check List ; gPC3 System Unit ; Keyboard ; AC Power Cord ; Mouse ; User Manual ; Speakers ; Quick Start Guide 3 EVEREX gPC3 USER’S MANUAL CHAPTER 3 System Overview Front Panel Features are shown in Figure 3.1, and are described as follows: Figure 3.1 Note: Depending on the model, your computer’s components may vary and appear slightly different than those pictured. 1. Optical Disc Drive Eject Button: Press this button to eject a 5.25-inch optical disc. 4 SYSTEM OVERVIEW 2. USB Ports (2): Up to two USB devices can be connected via these ports; there are four additional ports at the rear – see below 3. Microphone-In Jack: Plug the microphone into this jack for recording or to use voicecontrol functions. 4. Headphone/Speaker Jack: Connect audio devices, such as headphones or speakers, to this jack. 5. Power Button (On/Off): Use this button to turn the gPC3 on and off. If the button is held down for one second, the system will enter Suspend mode. If held down for four seconds, system power will switch off. 6. Power Indicator Light: When lit, the Power indicator illuminates to indicate that system power is on. 7. Hard Disk Drive Indictor Light: This LED lights up to indicate that the hard drive is being accessed 8. Reset Switch: Press to reboot/reset the computer. Use with caution. 5 EVEREX gPC3 USER’S MANUAL Rear Panel Features are shown in Figure 3.2, and are described as follows: Figure 3.2 1. Power Socket: Use the supplied Power Cable to plug into the power socket and appropriate wall outlet or power strip. Ensure that it is connected to a stable AC power source. 6 SYSTEM OVERVIEW ! CAUTION: Before you plug in the AC power cord, you must first check to ensure the voltage toggle switch setting is appropriate for your geographical area. 2. Power Socket Voltage Toggle Switch This toggle switch allows you to select the system voltage (115 / 230 V) appropriate to your area. The “115” setting is preconfigured for US operation. 3. PS/2 Keyboard Connector Plug your PS/2 keyboard into this connector. 4. VGA Port Connect your display monitor to this port. (not supplied) 5. USB Port (4) Connect USB peripheral devices to these ports to take advantage of the universal functionality and flexibility of Plug and Play (PnP) technology. 6. Microphone-In Jack Plug the microphone into this jack for recording or voice-control functions. 7. Line-Out/Side Speakers (optional) Can be connected to the side surrounding speakers. 8. Line-Out Rear Speakers (optional) Can be connected to the rear speaker. 9. PS/2 Mouse Connector: Plug your PS/2 mouse into this connector. 10. Parallel Port Parallel devices, such as a printer or scanner, can be connected to this port. 11. RJ45 LAN Connector For connecting your LAN, allowing you to access network services or the Internet. 12. Line-Out Jack Connect audio devices such as headphones or speakers to this jack. 7 EVEREX gPC3 USER’S MANUAL 13. Line-In Jack Connect audio sources, such as external CD, players to this jack for recording on your computer or playback through the Line-Out device. 14. CES/Subwoofer-Out (optional) Can be connected to the center/subwoofer speaker. 15. Expansion Slot Covers: These covers can be removed to install add-on cards, as described later. 16. Phone Port (optional) Connect to telephone. 17. Line Port (optional) Connect to Central office line 8 EVEREX gPC3 USER’S MANUAL CHAPTER 4 Computer Setup The gPC3 is easy to setup and configure. After removing the system from its shipping box, please follow the steps below. Setting up the AC Input voltage selection The AC Input Voltage Selection can be found at the back of your computer. There are two settings (115V or 230V) for the system to operate. Please set the AC input voltage to 115V (The default is 115V. for the USA) Warning: 1. Turn off your computer before setting up your computer. 2. Do not remove the protective label to change AC Input Voltage. 9 EVEREX gPC3 USER’S MANUAL Connect the Power Cord Connect the power cable to the computer and then plug into a power supply. Connecting your PS/2 Mouse and PS/2 Keyboard The PS/2 Mouse and P/S2 keyboard ports can be found at the back of your computer. They can be identified by their colors. Plug the mouse and keyboard to their respective ports. 10 COMPUTER SETUP Connecting your monitor (not supplied) The Monitor port can be found at the back of your computer. It can be identified easily by its blue color. Connecting the Ethernet Connect the RJ45 cable (not supplied) to the LAN port for connecting to a LAN or broadband modem. 11 EVEREX gPC3 USER’S MANUAL Connecting Your Printer Connect the printer cable (not supplied) to the parallel printer port at the back of your computer. Please make sure that both printer and computer are turned off. 12 TECHNICAL SUPPORT CHAPTER 5 Computer Basics I. Turning on the Computer Once your computer is set up (Chapter 4), turn on the system by holding down the Power, On/Off button for 1 second, then releasing. The computer should automatically detect your monitor. The first time you start or “boot”, the PC, it will require of short series of questions be answered to properly configure itself. 13 EVEREX gPC3 USER’S MANUAL 2. Using the Mouse To navigate through the desktop environment, the computer mouse and keyboard are used to open and close programs of interest. A. Place the mouse on a clean, dry surface for optimal performance. Hint: A Mouse Pad (purchased separately) can greatly enhance the accuracy of the pointing device. B. Once your computer is turned on, movements of the mouse directly correspond to movements of the Pointer on the computer display. C. To open a program, move the Pointer to an icon on your desktop. Click the left mouse button twice, quickly (double-click) on top of the icon. D. Most software programs are menu driven. Use the mouse to navigate different areas of your program window and to invoke its unique functions. Click Help to obtain further support information regarding individual programs. Mouse 14 COMPUTER SETUP 3. Establishing a User Name and Password When prompted, use the keyboard to input a “UserName” for the computer, followed by the “enter” key. The “User Name” may be any series of alphanumerical characters and will be used to log into your computer in the future. Examples “homepc”, “charlenescomputer”, “everex123”. UserName Screen 15 EVEREX gPC3 USER’S MANUAL Once you have established your personal “User Name”, create and enter a “Password” for the computer followed by the “enter” key. The “Password” may be any series of alphanumerical characters and will help prevent unauthorized users from accessing your computer. Password Screen Note: Choose a User Name and Password carefully! If you forget your login information, contact Everex technical support.” 4. Word Processing The Everex gPC comes preloaded with OpenOffice.org productivity suite. To create a written document such as a letter, resume or research paper, first open the WRITER word processing software application. 16 COMPUTER SETUP Using your mouse, position the cursor (arrow) over the word “Applications” on the top left menu. Click the left mouse button once then click “Office”, then “OpenOffice.org Word Processor”. Opening the Word Processor software “WRITER” To begin writing, use your mouse to place the cursor inside the blank document and click the left mouse button once. To save your file, click “File” from the top left menu, followed by “Save”. The software will prompt you for a “File name”. Enter an appropriate name (example, resume1), then click the “Save” button with the mouse. Popular features of word processors include the automatic spell check and the ability to customize the appearance of text and graphics. To have WRITER automatically spell check your document, click “Tools” from the top menu, followed by “SpellCheck”. As the word processor checks each word, it will provide choices for words not found in the dictionary. Click the appropriate buttons as needed. To customize the size, color and font (text style), first highlight the text you wish to change by clicking the left mouse button at the beginning of the text, then while holding the button down, move the cursor to the end of the text you wish to change and release the button. The text should now be highlighted with a dark background (if you make a mistake with the highlight region, simply click the left mouse button again). With your mouse, now click “Format” from the menu, followed by “Character”. Choose a Font, Typeface and Size as desired. Click the “Okay” button 17 EVEREX gPC3 USER’S MANUAL when finished. If the results are not satisfactory, click “Edit” from the menu followed by “Undo…”. For a complete tutorial on how to use WRITER, visit the OpenOffice.org website: http://www.tutorialsforopenoffice.org/category_index/wordprocessing.html 5. Creating a Spreadsheet A spreadsheet is a computer application that simulates a paper worksheet often used in accounting. It consists of rows and columns creating a grid of cells. Each cell contains alphanumeric text or numeric values and can quickly calculate, sort and organize inputted data. The CALC spreadsheet program can be opened by using your mouse to first click the word “Accessories” on the top left menu, followed by clicking “Office” and “OpenOffice.org Spreadsheet’. Opening the Spreadsheet Software “CALC” The basic spreadsheet consists of individual pieces of data stored in cells. Each cell has a unique address that is identified by the column letter and the row number of its location (the column letter is always listed first followed by the row number). 18 COMPUTER SETUP Spreadsheet The cell address of the example below is A5. To enter data in a cell, use the mouse to point and click into the desired cell, or use the arrow keys (Ï, Ð, Í, Î) on your keyboard. Enter your data then press the “enter” key. 19 EVEREX gPC3 USER’S MANUAL In the following example, the number “5” was entered in cells A1 through A5. To automatically calculate the total, type the formula “=SUM(A1:A5)” into cell A6 (do not type quotation marks). Once the formula has been entered, changing any part of original data will automatically generate a new total. There are many formulas and calculations that can be done with a spreadsheet. To learn more about CALC and spreadsheets, visit the OpenOffice.org website: http://www.tutorialsforopenoffice.org/category_index/spreadsheet.html 6. Accessing the Internet The Everex gPC come equipped with a 10/100 Ethernet LAN port for simplified connection to an external broadband modem. 20 COMPUTER SETUP Connecting to the Internet involves 2 separate steps. A. Physically connect your hardware and communication devices. To establish a broadband Internet connection, connect an external broadband modem (not supplied) to the 10/100 Ethernet port on the back of the gPC. B. Subscribing to an Internet Service Provider (ISP) allows communication from your computer to the Internet (additional charges may apply). There are numerous third party Internet Service Providers such as AOL, AT&T and Comcast (rates and installation charges will vary, depending on your area). Your ISP will help you configure the proper settings needed to connect to your computer. To learn more about the Internet, visit www.hearthunder.com * Everex does not endorse and is not affiliated with the aforementioned Internet Service Providers. 7. The World Wide Web To access a particular Internet webpage (aka a website or home page), first double-click the FireFox icon on the top of the screen. 21 EVEREX gPC3 USER’S MANUAL FireFox Icon The FireFox browser window will then open. Firefox Browser Window 22 COMPUTER SETUP To search the Internet for websites of interest, use the mouse to click inside the “search” box. 1.) Type the name of the subject you wish to find with your keyboard (example. Elvis), then 2.) Click the “Search” button located to the right of the “search” box. Internet Search Box 23 EVEREX gPC3 USER’S MANUAL The FireFox browser will change to reflect a list of websites or search results, on the topic you choose. Use your mouse to point and click on the site (marked in blue text) you wish to visit. Internet Search Results Page There are millions of free webpages, photos and videos available for you to visit on the Internet. ! CAUTION: Never divulge personal information such as a credit card or social security number on the Internet unless you are 100% certain of the vendor you are contacting. 8 Email Email (Electronic Mail) is one of the most popular services available on the Internet and allows individual to send messages to anyone around the world, for free. 24 COMPUTER SETUP Visit a free email provider to sign-up. Gmail (Google) = http://www.gmail.com Yahoo = https://login.yahoo.com/ Windows Live = http://www.windowslive.com/Explore/Hotmail 9 Additional Software Installation Additional software users may wish to install (regulations prohibit pre-installation to your gPC) include RealPlayer®, video and music player and Adobe Flash Player for playing online content with video, graphics and animation. For one click installation of many popular software applications, or to download drivers for Microsoft Windows® XP or Microsoft® Vista, visit Everex online support: http://www.everex.com/support/downloads/downloads.htm#gpc3 To install Adobe Flash Player separately, use your mouse to click on “System” from the top menu, followed by “Administration” and “Synaptic Package Manager”. Installing Adobe Flash 25 EVEREX gPC3 USER’S MANUAL Use your mouse to click on “Search” Type “flashplugin” in the Search box, then click the “Search” button. 26 COMPUTER SETUP Position the mouse cursor over the blank “S” square then right click with the mouse. When the dropdown menu appears, click “Mark for Installation” with the left mouse button. Left click the “Apply” icon. 27 EVEREX gPC3 USER’S MANUAL Click the “Apply” button to begin installation of the software. After the software in downloaded and installed, you may close all windows (click the “x” from the top right corner or click the “close” button”). Flash Player should now be functional. 28 COMPUTER SETUP APPENDIX System Specifications Everex gPC3 Processor 2.0GHz AMD Sempron™ LE-1150 Processor (256KB L2 Cache, 2.0GHz, 1600MHz) Socket AM2+ supports AMD Phenom™, AMD Athlon™ 64 FX / Athlon™ 64 X2 Dual Core, AMD Athlon™ 64 and AMD Sempron™ processors System Memory 1GB DDR2 533MHz SDRAM (512MB x 2) Supports DDR2 800/667/533/400 (2) Dual-channel DIMM sockets Maximum Capacity (tested): 4GB Maximum Capacity (theoretical): 16GB Storage Size: 80GB Bus: PATA Rotation: 7200RPM Optical Disk Drive DVD-ROM/CD-RW Combo Drive (Maximum speed and compatibility: 16X DVDROM, 24X CD-RW, 48X CD-R, 48X CD-ROM) Video Graphics NVIDIA® GeForce® Go 6100 Up to 256MB shared memory Windows Vista™ Premium support DirectX 9.0 support Chipset NVIDIA MCP61P Audio Realtek ALC662 Audio Codec (5.1 channel) (Analog: 24-Bits Max Resolution, 192kHz Max Sampling; Digital: 24-Bits Max Resolution, 96kHz Max Sampling) I/O Ports External (6) USB 2.0 ports (2 front, 4 rear) (1) RJ-45 port (1) Parallel port (1) Serial port (1) PS/2 keyboard port (1) PS/2 mouse (1) VGA output port (1) Audio Line-out (2) Microphone input (1 front, 1 rear) Internal (1) 24-pin ATX power supply connector (1) 4-pin ATX 12V power supply connector (3) USB 2.0 headers (supports additional 6 USB ports) 29 EVEREX gPC3 USER’S MANUAL Everex gPC3 (4) SATA II connectors (supports RAID 0, 1, 0+1, 5) (1) Front panel switch/LED header (1) Front panel audio header (1) CPU/SYS fan header (1) IRDA for SIR Header (1) Speaker header (1) CD header (1) Floppy connector (supports 360 – 2.88MB, 3 Mode FDD or LS120) Drive Bays (2) 5.25” (1 open) (2) 3.5” (1 open) Expansion Slots (1) PCI Express x 16 Slot (1) PCI Express x 1 Slot (2) PCI Slots BIOS AWARD BIOS with 8Mb SPI Flash ROM Supports Plug and Ply 1.0A, APM, 1.2, MultiBoot, DMI Support for ACPI revision 1.0 Power Supply 200W Total peak power (switched, 90132V~6A, 180-264V~3A, 50-60Hz) Accessories 104-Key PS/2 Keyboard 2-Button PS/2 Mouse with Scroll Function Powered 2-Speaker Audio System Operating System Ubuntu 8.04 Operating System Additional Software OpenOffice.org 2.4.1 (includes WRITER, IMPRESS, MATH, DRAW) Mozilla Firefox 3 Driver support for Microsoft Windows® XP and Microsoft Windows® Vista Warranty 1 Year Limited Warranty 30 COMPUTER SETUP Service and Support For the latest Drivers and Support Documents visit http://www.everex.com To contact Technical Support via email, send your User Name, Model, Serial Number and a brief Description of the issue at hand to [email protected] To register your product visit www.everex.com or simply email your User Name (first and last), Model (Everex gPC3) and Serial Number to [email protected]. Please use “Product Registration – gPC3” as your email subject. To purchase authorized accessories, upgrades or replacement parts, visit http://www.everexstore.com To speak with an Everex Technical Support Representative call our 24-Hour response team at 1-866-850-8835 (toll-free) Everex, 5020 Brandin Court, Fremont, CA, 94538 * All Specifications subject to change. Not responsible or typographical errors. © Everex 1983 2007. All Rights Reserved. All trademarks and tradenames are the sole property of their respective owners. AMD, the AMD arrow logo, AMD Turion, and combinations thereof are trademarks of Advanced Micro Device., Inc. Windows Vista is either a registered trademark or trademark of Microsoft Corporation in the United States and/or other countries. NVIDIA, the NVIDIA logo, GeForce, and NVIDIA nForce are trademarks and/or registered trademarks of NVIDIA Corporation in the United States and other countries. Celeron, Celeron Inside, Centrino, Centrino Logo, Core Inside, Intel, Intel Logo, Intel Core, Intel Inside, Intel Inside Logo, Intel Viiv, Intel vPro, Itanium, Itanium Inside, Pentium, Pentium Inside, Xeon, and Xeon Inside are trademarks or registered trademarks of Intel Corporation or its subsidiaries in the United States and other countries. gOS is licensed under a Creative Commons Attribution Noncommercial Share Alike 3.0 Unported license. Google, the Google logo, and Google Maps, Gmail, Google Docs and Spreadsheets, Google Calendar, Google News, Google Product Search, Blogger, YouTube, are trademarks of Google Inc. MTFBWY! 31 everex • 5020 brandin court, fremont, ca 94538 • www.everex.com