1
Installation Overview (Continued)
60 through 79
15
Display calibration: adjust the following for each Dimension Digital Controller input and display
mode (resolution/frame rate); save settings when finished:
• Aspect ratio
• Color level
• Brightness
• Tint
• Contrast
• Input position
• Color temperature and white balance
16
Prepare Runco Active 3D Glasses for use and test with 3D source material
94
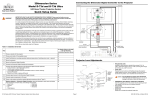
High Brightness, Active 3D Home Theater Projection System
Quick Setup Guide
IMPORTANT HEALTH AND SAFETY INFORMATION FOR 3D VIEWING: Please read and make sure you
understand the following safety information before using the product for viewing 3D content. Provide this
information to the end users of this product and ensure that they understand it.
Connecting the Projector and 3D Emitter to the Dimension Digital Controller
Dimension Digital Controller
The quality and appropriateness of the 3D screen materials onto which the image is projected and the quality of the 3D
content being displayed both have a significant and noticeable impact on the overall 3D experience. A properly-calibrated
projection system, including glasses and an optimized third-party screen, displaying high-quality 3D content is the best
formula for immersive and comfortable 3D experiences. Please refer to the LightStyle™ LS-12HBd Installation/
Operation Manual for proper projector installation and usage instructions.
R
1
Y
3
Mount the projector
33
4
Mount the Dimension Digital Controller
35
5
Connect the Dimension Digital Controller to the projector (see diagram at right)
36
38
6
Connect other external equipment to Dimension Digital Controller (optional):
• Audio processor or secondary display device
• Control system interface (RS-232)
• 12-volt trigger-activated equipment (retractable screens or screen masking)
• External IR repeater
• Network hub, router or gateway (Ethernet)
7
Connect signal sources to the Dimension Digital Controller
43
8
Connect the Active 3D Emitter to the Dimension Digital Controller (see diagram at right)
49
9
Connect system components to AC power
49
10
Apply power to the projector
50
11
Adjust primary lens: projected image size (zoom), position (shift) and focus
24, 51
12
For rear-screen and/or ceiling-mount installations, select the proper picture orientation
51
13
Use Image Alignment controls to fine-tune image geometry
52
14
Install and adjust secondary anamorphic lens (optional)
54
LS-12HBd Projection System Quick Setup Guide
IR
A
HDMI Out
To Sec. Display
Pb
Video 3
HDMI 2
HDMI 4
HDMI 6
HDMI 8
Ethernet
HDMI Out
Audio Only
HDMI Out
To Pri. Display
IM
Pr
EL
28, 40
Sec. Display Control
PR
IM
Install anamorphic lens mounting assembly (optional)
PR
2
3D SYNC IN
HD2
RS232
RS232
21
Video 2
PRIMARY
PRIMARY
EL
For Details, Refer to This Page
in the LightStyle™ LS-12HBd
Installation/Operation Manual
Choose a location for the projector
Video 1
IN
A
IN
DisplayPort
r
Active 3D Emitter
1
3
SECONDARY
3D Sync Out
SECONDARY
Procedure
2
Component / SCART
Do not tilt your head while using the 3D glasses.
Step
Pri. Display Control
TRIGGERS
3D SYNC
The glasses that accompany this product are not safe to use as sunglasses, protective eyewear or any use outdoors or
other than only in conjunction with the proper operation of the Runco product with which they are sold. It is common to dim
the lights in a home theater. Using 3D glasses and the immersive imagery of stereoscopic imagery can increase the risk of
tripping or falling the dark. Special care should be taken.
Installation Overview
Y
Y
It is widely recognized that stereographic display devices can cause discomfort, including, without limitation, dizziness,
nausea, headaches, eye fatigue and eye-strain, in some individuals. The 3D effect and experience will vary by individual,
depending on a variety of factors, including his or her health and vision. Runco recommends that users take regular breaks
when watching 3D video or playing games using stereoscopic displays. Discontinue use if any discomfort occurs. Parents
of young children should ensure their children avoid extensive exposure to electronic stereographic entertainment.
3D Sync Out
WARNING
R
LightStyle™ Series Model LS-12HBd
Note: Runco recommends using the RS-232 communication link between the LS-12HBd projector and the Dimension Digital Controller.
However, display control using HDMI CEC control messages is also possible. For more information on this capability, please contact Runco
Technical Support.
Page 1
020-1252-00 Rev. A (September 2013)
Connecting Sources to the Dimension Digital Controller
Connecting Other Equipment to the Dimension Digital Controller (optional)
HDMI
DisplayPort
Component Video
Anamorphic Lens Transport
(Rear View)
TRIGGERS
3D SYNC
1
RS-232
USB
2
USB
3
DisplayPort
HD2
Y
Video 1
Video 2
Pb
Pr
Video 3
Sec. Display Control
RS-232
IR
TRIGGERS
3D SYNC
1
HDMI 1
3
To Accessory Box
To Accessory Bo
HDMI 3
Video 2
HDMI 2
RS-232
USB
2
PC / Contro
To Accessory
Component / SCART
HD1
Pri. Display Control
RS-232
3
Video 3
HDMI 4
HDMI 1
HDMI 3
HDMI 5
Component / SCART
HDMI Out
To Sec. Display
HDMI 7
HD1
Y
Video 1
HDMI 1
Video 2
HDMI 3
IR Sensor
DisplayPor
HDMI 2
HDMI 4
HDMI 6
HDMI 8
HDMI Out
Audio Only
Ethernet
Pb
HD2
Pr
Video 3
HDMI 2
Remote Control
HDMI 4
HDMI
To Pri. D
IR Repeater
(3.5-mm, mini
phono plug)
Y
Retractable Screen or other
12-volt trigger-activated
device
DisplayPor
HD2
Video 1
Video 2
Pb
Pr
Video 3
HD1
DisplayPor
HD2
Video 1
Video 2
Pb
Pr
Video 3
HDMI 1
HDMI 2
Power On
Aspect
Ratio
Selection
Camcorder
Green
or
DVD/DTV STB
Image
Memory
Preset
Buttons
Composite
Composite
Blue
Red
Gaming Console
Video 3
Composite
Sync
Gaming Console
HDMI 5
HDMI 2
HDMI 4
HDMI 6
HDMI 7
HDMI Out
To Sec. Display
HDMI 8
Ethernet
HDMI Out
Audio Only
Video
Source
Selection
Menu Navigation
Buttons
Press to
illuminate
the remote
control
buttons
Page 2
Secondary Display
Audio Processor/
Switcher
or
Dimension Digital Controller Front-Panel Keypad
UP BUTTON
Used to direct-select an aspect ratio
or move the OSD menu cursor up.
When no menus are present on-screen,
this button toggles through
aspect ratios in the following order:
Native - Virtual Cinema - Cinema VirtualWide - Letterbox - 4:3 - 16:9
Power Off
3D Mode
Selection
LS-12HBd Projection System Quick Setup Guide
HDMI 3
R
Pr
HDMI 1
A
Pb
Number
Buttons
Composite
VCR
VCR
SCART-to-RGBS
adapter
R
IM
Y
RGB Camcorder
Computer
IR
PR
Video 3
Y
Composite
Pr
Remote Control
3
Component / SCART
Component / SCART
HD1
USB
2
Composite
Pb
1
3
Sync
Video 2
Green
HD2
Video 1
PR
DisplayPor
Y
Sec. Display Control
to Ethernet
Hub, Router
or Gateway
TRIGGERS
3D SYNC
2
Video 2
DTV-Set-Top Box
(DTV-STB)
TRIGGERS
1
Video 1
PR
Composite Video
Red
Component / SCART
HD1
SCART
3D SYNC
Pri. Display Control
IN
PB
Y
EL
A
Y
BD/DVD
Blue
3
RS-232
To Accessory Box
COMPONENT
VIDEO OUT
IN
2
USB
3
Component / SCART
IM
1
EL
TRIGGERS
3D SYNC
2
PC
HDMI source
(BD, DVD, DTV Set-Top Box etc.)
RGB Video
1
Tip = +12V
R
HDMI
AV OUT
Notebook Computer
or Other DisplayPort Source
TRIGGERS
Sleeve = Ground
Y
(3.5-mm, mini
phono plug)
STANDBY LED
Lights amber when
the controller is in
standby mode.
ON/STANDBY BUTTON
Press to go from standby
mode to on mode
or vice versa.
LEFT BUTTON
Used to direct-select an
input or move the OSD
menu cursor to the left.
When no menus are
present on-screen,
this button cycles
through the different
sources in this order:
DisplayPort - HDMI 8 HDMI 7 - HDMI 6 - HDMI 5 HDMI 4 - HDMI 3 - HDMI 2 HDMI 1 - SCART - HD 2 HD 1 - Component Composite 3 - Composite 2 Composite 1
ratio
standby
i
n
p
u
t
enter
i
n
p
u
t
ratio
DOWN BUTTON
Used to direct-select an aspect ratio
or move the OSD menu cursor down.
When no menus are present on-screen,
this button toggles through
aspect ratios in the following order:
16:9 - 4:3 - Letterbox - VirtualWide Cinema - Virtual Cinema - Native
m
e
n
u
RIGHT BUTTON
Used to direct-select an
input or move the OSD
menu cursor to the right.
When no menus are
present on-screen,
this button cycles
through the different
sources in this order:
Composite 1 - Composite 2 Composite 3 - Component HD 1 - HD 2 - SCART HDMI 1 - HDMI 2 - HDMI 3 HDMI 4 - HDMI 5 - HDMI 6 HDMI 7 - HDMI 8 - DisplayPort
MENU BUTTON
Press MENU to bring up the
main menu, or to exit the
current menu and return
to the previous one.
ENTER BUTTON
When an item is highlighted
on the OSD, press ENTER
to select that item.
020-1252-00 Rev. A (September 2013)
OSD Menu Tree
Note: Default settings appear in bold type. Settings marked with an asterisk (*) apply to 2D content only.
HD 1
HDMI 5
HD 2
HDMI 6
SCART
HDMI 7
DisplayPort
HDMI 8
Mode
(Simple / Advanced)
Gamma
Display Color Common Settings
Y
Letterbox
VirtualWide
R
Aspect Ratio
Cinema
Virtual Cinema
A
Native
Screen 1 / Screen 2
IN
Screen
Brightness
Contrast
Color
Tint
Sharpness
Noise Filter
Width
Height
Overscan
Overscan Mode
(Zoom/Crop)
PR
Input Position
EL
Left/Right
Up/Down
Phase
(RGB/Component/SCART signals only)
Tracking
(RGB/Component/SCART signals only)
Input Image
3D Processing
Sleep Timer
PCE*
Power (230W or 260W)
Color
Offset
Input Color
Calibration
Save ISF Night
Save ISF Day
Chroma Delay
0, 1, 2 ... 7
(Composite inputs only)
Noise Filter
0, 1, 2 ... 63
Copy/Paste
Aspect Ratio
Left/Right
Up/Down
Width
Height
Copy Settings
Paste Settings
Copy Settings
Off, 30 Minutes, 60 Minutes, 90
Minutes, 2 Hours or 4 Hours
Corner Alignment
Top Left / Top Right / Bottom Left /
Bottom Right / Test Pattern Enable
Image Alignment
Midpoint Alignment
Network
Adjustment Mode
Manufacturing
Triggers
Center / Top Middle / Left Middle /
Right Middle / Bottom Middle /
Test Pattern Enable
Miscellaneous
HDMI
OSD Position
Front Panel Brightness
ISF Other
Splash Timer
5, 6, 7 ... 15 ... 59, 60
Splash Enable
On/Off
Hor. / Ver.
0, 1, 2 ... 100
Page 3
E-Mail Notification
Remote Network Control
Auto, REC601, REC709,
RGB-PC or RGB-Video
1/2/3
OSD Timer
OSD Messages
Blank Screen Color
Sidebar Color
Film Mode
(SD sources only)
CUE
(Chroma Upsampling Error)
HDMI EDID Extension
Owner Name
Splash Configure
Auto Firmware Upgrade
Sync Threshold
Both, Primary or Secondary
ISF Calibrated
IP Configuration
Language
-50, -49 ... 0 ... 49, 50
Reverse Eyes (On/Off)
System
Color Space
Paste Settings
-50, -49, 48 ... 0
Display Info.
(read-only)
Lamp Hours Reset
Diagnostics
Altitude
Display 3D Settings
Internal 3D Settings
24Hz 3D Mode
Network
Service
Back / Confirm
Memory Preset
Output Shift
-32, -31... 0 ... 31, 32
(HD 1, HD 2 and Component inputs only)
0, 1, 2 ... 100
(Top / Bottom / Left / Right /
Test Pattern Enable)
LS-12HBd Projection System Quick Setup Guide
Display Device Configure
-50, -49 ... 0 ... 49, 50
Screen Masking
Field Service
Lens
Yellow x, y / Cyan x, y / Magenta x, y
Brightness
Gain
Reset Custom 1 and Custom 2 to
Factory Default
3D Mode
(Auto, Off, Side-by-Side, Top-andBottom or Frame Packing)
Red x, y / Green x, y / Blue x, y / White x, y
Sharpness
Recall/Save Custom 1 or Custom 2
Signal
Information
Color Gamut*
Remote Control
Tint
Recall ISF Night or ISF Day
Memory
Presets
Simple (5500K, 6500K, 7500K or 9300K)
Auto, REC709, SMPTE-C, EBU, Native or
PCE
Input Names
Contrast
IM
Picture
Color Temp
Display Color - Projector
Lamp
Settings
Auto Cinema
Simple
(1.8, 2.0, 2.2, 2.35, 2.5)
Advanced
(0 (2.2 gamma curve),
1, 2, 3 ... 20 (custom gamma tables))
16:9
4:3
Test Video
00000 ... 08209 ... 65535 or 88999
(select a key, then choose a source to assign to it)
Y
HDMI 4
R
Component
Offset
A
HDMI 3
IN
HDMI 2
Composite 3
Color Bars 1
Color Bars 2
Focus
Grey Bars
Full White
Primary / Secondary / Dual
Alignment
3D
Rename/Restore
Remote Code
SRC 1-7 Keys
SRC 8-14 Keys
Installation Picture Orientation
-100, -99... 0 ... 99, 100 (Red, Green, Blue)
IM
Composite 2
Gain
EL
Input Source
HDMI 1
PR
Composite 1
Auto Power Off
Standby Mode
System Reset
Audio Format
CEC
HPD Toggle Rejection
Logo LED
Standby LED
LCD
Enable
Hours
Low Power / Fast Startup
Auto, Floor Front, Ceiling Front, Floor Rear or
Ceiling Rear
Focus
Zoom
Shift
Projector Serial Number
Lamp Hours
Yes / No
White, Red, Green, Blue, Yellow, Cyan, Magenta
Auto / High
(n/a)
Sync Delay, Test Pattern Enable
120 Hz 6:4 or 120 Hz 5:5
DHCP (On / Off), IP Address, Subnet Mask,
Default Gateway, Communication Test
Auto Check for New Firmware, Auto Perform
Upgrade, Check for New Firmware
E-Mail Address, Error Notification, Error
Notification to Runco, Periodic Service Notification,
Lamp Life Notification, Customer Information, EMail Calibration Data
On / Off
(Not available on Composite 1, Composite 2 or
Composite 3 inputs)
English, Français, Deutsch, Italiano, Español,
Svenska,
(Simplified Chinese),
(Traditional Chinese), Português,
(Russian),
(Japanese) or
(Korean)
0 (no timeout) or 5, 6, 7 ... 30 ... 60 sec.
On / Off
Red/Green/Blue = 0, 1, 2, 3 ... 255
On / Off
On / Off
0, 1, 2 ... 15
(HD 1, HD 2 and Component inputs only)
On / Off (per HDMI and DisplayPort input)
Combined / HDMI Out (Pri. Display) /
HDMI Out (Sec. Display) / HDMI Out (Audio Only)
On / Off
Auto / On / Off
0 (off), 1, 2 ... 31
On / Off
0 (off), 1, 2, 3 or 4
On / Off / No Signal
1, 2, 3, 4, ... 23, 24
020-1252-00 Rev. A (September 2013)
Serial Communications
Command
Description
Picture Adjust Commands (Calibration -> Input Image menu)
(CLR=[-50...+50])
Sets a value for color
PC / Control
(CON=[-50...+50])
Sets a value for contrast
(SHP=[-50...+50])
Sets a value for sharpness
(TNT=[-50...+50])
Sets a value for tint
HDMI Out
To Sec. Display
HDMI 7
5
HDMI 6
HDMI 8
HDMI Out
Audio Only
Ethernet
HDMI Out
To Pri. Display
4
9
3
8
1
2
7
Image Preset Commands
6
2 Receive Data
(to ctrl. system)
to Automation/
Control System
or PC
3 Transmit Data
(from ctrl. system)
5 Ground
(none of the other pins are used)
R
All commands must be followed by a carriage return character.
Description
A
Command
(MMP=2) or (KEY=50)
Loads “Custom 1” image preset
(MMP=3) or (KEY=51)
Loads “Custom 2” image preset
(MMP=1) or (KEY=49)
Loads “ISF Day” image preset
(MMP=0) or (KEY=48)
Loads “ISF Night” image preset
(TDM?)
Returns the 3D mode setting
(TDM=[0...4])
Sets the 3D mode setting
(0 = Auto, 1 = Off (2D), 2 = Side-by-Side, 3 = Top-and-Bottom, 4 = Frame Packing)
3D Mode Commands
Turns projector off
(PWR=1) or (KEY=1)
Turns projector on
IN
Power On/Off Commands
(PWR=0) or (KEY=2)
Screen Commands
(SCN?)
Returns the screen setting
(SCN=0) or (KEY=38)
Sets the screen to Screen 1
(SCN=1) or (KEY=39)
Sets the screen to Screen 2
(INS=0) or (KEY=13)
Selects the Composite 1 video input
(IDN?)
Returns display device name
(INS=1) or (KEY=24)
Selects the Composite 2 video input
(IIR?)
Returns input resolution
(INS=2) or (KEY=25)
Selects the Composite 3 video input
(MDL?)
Returns product model name
(INS=7) or (KEY=19)
Selects the HDMI 1 input
(IOR?)
Returns output resolution
(INS=8) or (KEY=20)
Selects the HDMI 2 input
(RMN=[0...65535])
Sets the remote code
(INS=9) or (KEY=21)
Selects the HDMI 3 input
(RMN?)
Returns the remote code
(INS=10) or (KEY=22)
Selects the HDMI 4 input
(ISN?)
(INS=11) or (KEY=81)
Selects the HDMI 5 input
(IFV?)
(INS=12) or (KEY=82)
Selects the HDMI 6 input
(INS=13) or (KEY=83)
Selects the HDMI 7 input
(INS=14) or (KEY=84)
Selects the HDMI 8 input
(INS=15) or (KEY=85)
Selects the DisplayPort input
(INS=4) or (KEY=17)
Selects the RGB HD 1 input
(INS=5) or (KEY=18)
Selects the RGB HD 2 input
(INS=6) or (KEY=23)
Selects the SCART input
(ASP=1) or (KEY=9)
Selects the 16:9 aspect ratio
(KEY=6)
Down-Arrow (
(ASP=0) or (KEY=10)
Selects the 4:3 aspect ratio
(KEY=4)
ENTER key
(ASP=4) or (KEY=44)
Selects the Cinema aspect ratio
(KEY=52)
EXIT key
(ASP=2) or (KEY=11)
Selects the Letterbox aspect ratio
(KEY=7)
Left-Arrow (
(ASP=6) or (KEY=46)
Selects the Native aspect ratio
(KEY=3)
MENU
(ASP=3) or (KEY=12)
Selects the VirtualWide aspect ratio
(KEY=8)
Right-Arrow (
(ASP=5) or (KEY=45)
Selects the Virtual Cinema aspect ratio
(KEY=5)
Up-Arrow (
(ASP=7) or (KEY=86)
Selects the Auto Cinema aspect ratio
EL
Miscellaneous Commands
PR
PR
Aspect Ratio Commands
IM
Selects the Component input
IM
(INS=3) or (KEY=14)
EL
Input Selection Commands
Y
The following is a partial list of
supported serial commands. For a
complete list, refer to the LightStyle™
LS-12HBd Installation/Operation
Manual.
RS-232
R
IR
HDMI 5
Configure the RS-232 controller or PC
serial port as follows: no parity, 8 data
bits, 1 stop bit and no flow control. Set
the baud rate to 19200.
Sec. Display Control
Sets a value for brightness
A
Pri. Display Control
(BRT=[-50...+50])
IN
Connect your control system or PC to
the RS-232 input of the Dimension
Digital Controller as shown in the
diagram at right.
Y
Note
(T[1...3][1...7]=[0...1])
Returns Dimension Digital Controller serial number
Returns firmware version number
12-volt trigger configuration:
[1...3] = Trigger number
[1...7] = Aspect ratio (1 = 16:9, 2 = 4:3, 3 = Letterbox, 4 = VirtualWide, 5 = Cinema,
6 = Virtual Cinema, 7 = Native)
[0...1] = On/off (0 = Cancel previous assignment, 1 = assign)
Example: (T15=1)[CR] assigns Trigger 1 to Cinema aspect ratio.
The following serial commands are used to emulate buttons on the remote control or Dimension Digital Controller front panel.
Each button has its own serial command, so effectively it is as if you were using the IR remote.
These commands provide active OSD responses just like IR remote commands.
) key
) key
) key
) key
© Copyright 2013 Runco International. All rights are reserved.
Trademarks and registered trademarks used in this document are the property of their respective owners.
LS-12HBd Projection System Quick Setup Guide
Page 4
020-1252-00 Rev. A (September 2013)