1
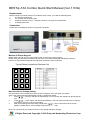
BESTip ATA Combo Quick Start Manual (Ver.1.53G)
Requirements:
Before making any Internet call from your BESTip ATA Combo, you need the following items:
1.
An Touch-tone phone set.
2.
An 110/220V AC electrical outlet.
3.
An dial-up Internet account – ISP phone number, user login ID and password.
4.
An analog phone line
Connection:
Please refer to the diagram below for the typical connection.
Buttons & Phone Keypad
Before making phone call, you must configure and connect ATA Combo properly.
Please enter your Internet information with your touch-tone telephone keypad and BESTip’s buttons.
Refer to the Typical Phone Keypad and Character Set below to enter characters.
Typical Phone Keypad and Character Set
ABC
DEF
1
2
3
GHI
JKL
MNO
4
5
6
PQRS
TUV
WXYZ
7
8
9
*
0
#
How to enter or change setting
Use the buttons in the front panel for menu function navigation. Go to the option you want to
setup. Then follow steps described below to enter or change the setting,
1.
Press
one time, the title will start flashing. You may enter new setting from phone keypad
now.
2.
Press
button again. The title will stop flashing. The new value has been store in memory
temporarily. You may go to the next setting.
3.
After all the settings has been setup, please press
one or two times until the screen
displays “Update Setup”. All the setting will be saved permanently.
Note: It is a good practice to restart the device if any setting had been changed.
All Rights Reserved Copyright © 2009 Projectek Networking Electronics Corp.
Switch between Broadband and Dial-Up mode
Press
button
at standby state to enter
setup mode.
Press
button until
you see System Setting
option. Press
to
enter System Setting menu.
The first option is “Network Port”, it is setup to “Ethernet” for broadband by default.
It can be changed to “modem” for dial-up connection.
If the mode display in the screen is already the mode you want, then press
and
go to next page for following setup. Otherwise press
button to modify it.
Press
or
button
to switch network port selection
between “Ethernet” and “modem”
(for broadband)
(for dial-up)
When decision made, Press
button. Then, press
two times to save the new setting.
Then please restart the device by unplug power jack at rear panel and plug it again.
After the device boot up, please do follow up setting by referring to procedures at next pages.
Note: It is a good practice to restart the device if any setting had been changed.
All Rights Reserved Copyright © 2009 Projectek Networking Electronics Corp.
Dial-up Mode - Setup Quick Configuration
Press
button to
enter Quick Setting.
Press
button to
enter PBX Dial Prefix. Enter
The # to access trunk if the
device is connect with PBX.
Press
button to
enter ISP Phone. Enter
ISP phone number.
Press
button to
enter ISP Login Name.
Enter ISP Login Name.
Press
button to
enter ISP Password.
Enter ISP Password.
Press
button to
enter ISP PPP Type.
Choose ISP PPP Type by
using
or
.
Use “Type 1” normally.
Press
button to
enter Primary DNS.
Enter DNS IP address.
You may leave it blank.
Press
button to
enter Secondary DNS.
Enter DNS IP address.
You may leave it blank.
Press
button to
enter ISP Idle Timeout.
Choose ISP Idle Timeout by
using
or
.
“0” is no idle timeout.
Press
button to
enter Area Code. Enter
telephone area code, “2” for
example.
Press
button to
enter Country Code.
Enter telephone country
code, “886” for example.
Press
button to
enter DDD Prefix. Enter
DDD prefix code when dial
domestic and local call, “0”
for example.
Press
button to
save configuration data
in memory.
Press
button to
back to the beginning of
Quick Setting.
Press
button to
enter IDD Prefix. Enter IDD
prefix code when dial
international call, “00” for
example.
It will display the standby
screen again after the
configuration data has
been saved.
Start Making VoIP Call
By pressing
button,
the device will automatically
dial ISP.
The device is connecting to
Internet and ready to use in
standby state. The blue ON
LINE led will be on. You can
pick up phone and dial Internet
phone call now.
The LCD will show balance
left in your account. You can
also start making international
phone call now.
Remark:
Each BESTip device is equipped with one unique device ID number, please find this number at bottom
side of the device. Please dial the device ID number at the other side from your device to enjoy free
Internet phone call. Each BESTip device is eligible to call international phone number if it has ITSP credit.
All Rights Reserved Copyright © 2009 Projectek Networking Electronics Corp.
Dial-up Mode - System Setting
Press
button at
standby state to enter
setup mode.
Press
button until
you see System Setting
option. Press
to
enter System Setting menu.
Press
button to
enter Country Code.
Enter telephone country
code, “886” for example.
Press
button to
enter Area Code. Enter
telephone area code, “2”
for example.
Press
button to
enter IDD Prefix. Enter IDD
prefix code when dialing
international call, “00” for
example.
Press
to enter 2nd
IDD Prefix. Leave it blank
unless you are in USA.
Press
button to
enter DDD Prefix. Enter
DDD prefix code when
dial domestic and local
call, “0” for example.
Press
button to
enter Play Volume. It is
used for adjusting sound
loudness from phone set
ear piece. The range is ±30dB
Press
button to
enter Record Volume.
It is used for adjusting
sound loudness from phone
set microphone. The range
is ±30dB
Press
to see
Gatekeeper Type the
device registered.
Press
button to
enter Modem Commands.
Press
button to
enter Modem Country.
“Taiwan” for example
Press
button to
enter PPP Echo CTRL.
Press
button to
enter Show CDR.
Press
button to
enter Polarity Reverse.
Press
button
to enter LCD Contrast.
The range is from +5~-10.
All Rights Reserved Copyright © 2009 Projectek Networking Electronics Corp.
Recharge Credit
Press
then
button at standby state to
enter Recharge Credit menu.
Press
to start
recharging credits for device.
The device will connect
to Internet automatically.
Then Enter Card # will
show. Press
one time, the title will start
flashing and enter the card #. Press
button again. The title will stop flashing and save
the card #.
Press
one time, the
title will start flashing and enter
the Pincode #. Press
button again. The title will stop
flashing. The new value will be
stored temporarily.
Press
button to
confirm. Start Recharge
will shows. The process
will take a few minutes.
When recharge finished,
the total amount will be
shown on the display.
System Information
Press
button at
standby state to enter
setup mode.
Press
until you
see System Info option.
Press
to enter
System Info menu.
Press
to see
Device ID# or you can see
it on the back side of device.
Press
to see
Software Version of the
device.
User Profile
Press
then
button at standby state to
enter User Profile menu
There are 4 options under User Profile menu:
1. New – To create a new user’s profile
2. Modify – To make change of existing user’s profile
3. Select – To see the existing user’s profile
4. Erase – To erase user’s profile
Press
button to
enter new User Name.
Press
button to
enter ISP Login Name.
Enter ISP Login Name.
Press
button to
enter ISP PPP Type.
Choose ISP PPP Type by
using
or
.
Use “Type 1” normally.
Press
button to
enter Secondary DNS.
Enter DNS IP address.
You may leave it blank.
Press
button to
enter ISP Phone.
Enter ISP phone number.
Press
button to
enter ISP Password.
Enter ISP Password.
Press
button to
enter Primary DNS.
Enter DNS IP address.
You may leave it blank.
All Rights Reserved Copyright © 2009 Projectek Networking Electronics Corp.
Broadband Mode - System Information
Press
button
at standby state to
enter setup mode.
Press
button until
you see System Info
option. Press
to
enter System Info menu.
Press
to see
Device ID# or you can
see it on the back side
of device.
Press
to see
ITSP Credit in the device
Press
to see
Software Version of
the device.
Press
to see
LAN MAC Address
of the device.
Press
IP Address.
Press
to see
Netmask IP Address.
to see
Press
to see
Router IP Address.
Press
to see
Primary DNS.
Press
to see
Secondary DNS.
Press
to see
Gatekeeper Type
the device registered.
All Rights Reserved Copyright © 2009 Projectek Networking Electronics Corp.
Broadband Mode - Setup Quick Configuration
Press
button until
you see System Setting
option. Press
to
enter System Setting menu.
Subject to your broadband environment there are three options up to your choice in IP Policy: Static IP,
DHCP, and ADSL PPPoE. Please make sure the one you choose meet your requirement. Press
or
to navigate between these three options, Press
to make your choice.
Press
button
at standby state to
enter setup mode.
Normally set to 1
Skip to option
“Station ID”
Skip to option
“Station ID”
Idle time to shut
down Internet
connection. “0”
means always
online.
Enter 2nd DNS
IP address or
Skip to option Leave it blank
“Station ID”
Enter Station ID. Normally
set to 1
Press
to enter
Gatekeeper. AUTO is
applicable most of the time.
Press
to enter Country
Code. Enter your telephone
country code
Press
to enter Area
Code. Enter local telephone
domestic area code
Press
to enter IDD
Prefix. It is used for dialing
international call. “00” in most
cases
Press
button to enter
DDD Prefix. It is used for
dialing domestic and local
call. “0” in most cases
Press
button to enter
Play Volume. It is used for
adjusting sound loudness from
phone set ear piece. The range
is ±30dB
Press
button to enter
Show CDR.
Press
to enter 2nd
IDD Prefix. Leave it blank
unless you are in USA.
Press
button to enter
LCD Contrast. The range is
from +5~-10.
You may skip the rest of
options. Press
to
return to top of System
Setting menu.
It will return to standby state
again after updated. Please
restart the device to make
setup changes effective.
Press
button to save
configuration data in memory
Press
button to enter
Direct City Call. Normally set
to “OFF”.
Press
button to enter
Record Volume. It is used for
adjusting sound loudness from
phone set microphone. The range
is ±30dB
Press
button to enter
Polarity Reverse.
All Rights Reserved Copyright © 2009 Projectek Networking Electronics Corp.
Factory Setting
Press
button
at standby state to
enter setup mode.
Press
button until
you see Factory Setting
option. Press
to
enter Clear System Setup
menu.
Press
to enable
Clear System Setup.
Press
to
confirm again.
System Upgrade
Press
button
at standby state to
enter setup mode.
Press
button until
you see System upgrade
option. Press
to
enter System Upgrade
menu.
Press
button
to enter Software
upgrade option.
Press
button
and then
button
to Upgrade Software.
The device will
download and upgrade
software automatically.
After software
upgrading finished, the
device will restart
automatically.
Start Making VoIP Call
The device is ready to use in
standby state when the blue
ON LINE led on. You can pick up
phone and dial Internet phone call
now.
You may check up your credit by
pressing
at standby
state. It will show balance left in
your account. You can make
phone call in this state, too.
Remark:
Each BESTip device is equipped with one unique device ID number, please find this number at bottom
side of the device. Please dial the device ID number at the other side from your device to enjoy free
Internet phone call. Each BESTip device is eligible to call international phone number if it has ITSP credit.
All Rights Reserved Copyright © 2009 Projectek Networking Electronics Corp.