1
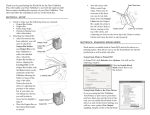
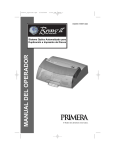
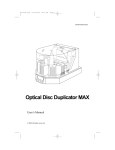
Welcome to PrimoDVD
Congratulations and thank you for acquiring PrimoDVD.
What is PrimoDVD?
PrimoDVD is a state of the art DVD Mastering and Duplication software package. With this software,
you can copy your existing DVD’s, or create your own DVD-ROMs and DVD-Video discs. The built
in robotics support allows you to prepare several recordings, start the recording, and leave the system
unattended while the recording takes place. If your robotics system is equipped with a printer, this
application takes care of handling the disc printing as well. This software also provides many
advanced features, such as an Activity Log for viewing previous recordings, Error Code Reporting for
troubleshooting, and a sophisticated Verify Tool which allows you to compare your burnt disc to the
original. The ease of use of this application, coupled with its advanced feature set, make this
application the ideal tool for everyone from the beginner to the professional in disc mastering and
replication.
Getting Started
PrimoDVD is a fully compliant WIN32 application, therefore it works equally well on Microsoft
Windows 95, Windows 98, Windows Millennium, Windows NT and Windows 2000.
System Requirements
PrimoDVD requires a minimum configuration including a 300 MHz or faster processor, with 32 MB of
RAM. The video should be also capable of displaying 1024x768 pixels to allow a better view of more
simultaneous jobs and the log panel.
DVD-ROM
It is possible to use your DVD-R drive to read data from source DVDs. However, the use of a separate,
high-quality DVD-ROM drive as your source drive offers several advantages. First, it is usually
possible to obtain DVD-ROM drives that will read much faster than the reader/writer drives used for
recording, saving time when copying full DVDs.
Getting Started
To Install
PrimoDVD is delivered in a single setup executable file, named “PrimoDVD Setup.exe”, that embeds
the installation program, the PrimoDVD files, and the uninstaller.
If you received PrimoDVD on a CD, insert the disc in your drive and wait for the “autostart” to display
the Setup window. If the autostart is not active on your computer (e.g. the Auto Insert Notification is
turned off on the drive), click on My Computer, double-click on the CD-ROM drive you inserted the
CD into, and look in the root for the “ PrimoDVD Setup.exe” file. Once you have found it, doubleclick on the file to launch it.
To Uninstall
Go to the Start button, and select Settings. Double-Click on the Control Panel icon, and select
Add/Remove Programs. Select the PrimoDVD software, and click the Remove button. When it is
uninstalled, PrimoDVD does not leave anything behind in the system.
User Guide
The following offers instruction on the design and layout of PrimoDVD. Of course, being a
professional mastering application, there are many parts of program to understand. This guide will
focus on the general concepts of the PrimoDVD application.
The Application Window
The main screen of PrimoDVD will initially be displayed with three adjustable-size windows: the
Drive Status Window, the Job Status Window, and the Job Setup Window. The Activity Log Panel
will also be displayed if it was open when the application was last closed. It can be hidden by selecting
View: Activity Log Panel: Hide.. The size of each window can be adjusted by positioning the cursor
on the border and dragging the windows edges. These adjustments will be saved when you close the
application so that when you re-open the application, it will appear as you left it previously.
Drive Status Window
The Drive Status Window lists all of the CD-ROM, CD-R/RW, DVD-ROM and DVD-R/RW drives
installed in the system. The default display in the Drive Status Window is a list of the drives available
for reading and recording with a small icon to the left of the drive description and drive status
displayed next to the drive title. The columns can be moved and re-sized in this window by dragging
and dropping the column headings, or by sliding the column dividers.
During various operations, such as recording or testing, a message is displayed in this window showing
what each drive is currently doing (loading, unloading, rejecting, recording, testing, reading, etc). In
addition to this, right clicking on any of the drive icons will open a control panel that allows the drive
to be loaded and unloaded, its tray opened/closed, etc.
Job Setup Window
The Job Setup Window is the space where the Job Setup Panel for each job is displayed. The Job
Setup Window is the area which contains all of the recording jobs you currently have open. When you
start a new job, such as a Disc Copy or Data Disc Creation, it will open a Job Window contained in the
Job Setup Window. Clicking on the appropriate “new” job type from the File pull-down menu opens
the new Job Setup Window. Each time a new job is opened, a new panel appears in the Job Setup
Window. Up to 64 job panels may be opened in Windows NT or 2000 and up to 16 using Windows 95
or 98.
The Jobs
There are several types of jobs, and each has its own unique type of window. The term Job is used to
describe what you action you are performing. For example, you could set up one Job to make 5 copies
of an existing DVD, and set up another Job to make 1 DVD-ROM from files on your hard drive.
There are several different types of Jobs that PrimoDVD can perform, each of which will be discussed
in detail later in this manual.
Each Job Setup Panel contains all of the information necessary to run that job, such as which DVD
Recorder to use, which drive to read the source from, the number of copies to be made, etc. In addition,
the Job Setup Panels report status information about the recording, such as percent of the recording
completed, how many discs has been recorded in this job, etc. This information is displayed while the
recording is taking place.
Job Status Window
When you create a new Job, an new entry in the Job Status Window is made. The Job Status Window
can be found at the lower left portion of the main window. When jobs are started, this list displays the
status of each job, including the number of discs finished and the number remaining to be done. This
window may be hidden by selecting the View option on the menu bar, and clicking on the Show Job
List Panel.
The Activity Log Panel
The Activity Log is an important tool included in the PrimoDVD application. This log records all user
actions, such as opening the PrimoDVD application or starting a Copy Job, as well as system responses
during the recording process. This information is structured in the order the action took place. If you
experience a problem with a recording while you are away from the computer, browsing the log will
provide details that may no longer be visible on the screen.
You may control the Activity Log by selecting File: Activity Log
Control of the Activity Log is available by right-clicking in the Activity Log window. From this
window, you can save the log (this happens automatically every time the program is exited), clear the
log, or place a note in the log.
Recording
Three basic recording operations are available: actual recording, test recording and verifying. Testing
performs all of the operations of recording with the drive's laser turned to reading power. Performing a
test will run the drive through the job, but will not record to the DVD-R disc. A test run will help
determine if the data source (your DVD-ROM drive or Hard Drive) will be fast enough to keep up with
the DVD Recorder. Normally, a single test run is sufficient to determine whether the Job will be able
to be completed successfully.
After the jobs have been set up, each one may be started by clicking the red "Record" button at the top
of the Job Setup Panel.
While jobs are running, they may be paused or stopped by clicking on the buttons on the Job Setup
Panel. The pause button will allow the current disc to be completed, then suspends operations on that
job. Recording is resumed by clicking the pause button again. The stop button will abort any recording
in progress, and will place the current disc into the reject stack and terminate the job.
Quick-Start Recording Guide
The following section will briefly guide you through the steps required for each type of job available to
you through PrimoDVD. More detailed information regarding the jobs and their individual functions
can be found in the help files included with the PrimoDVD application.
Setting up a Disc Copy Job
The following procedure is for copying a disc directly from another drive, either a DVD-ROM or an
unused recorder. If you do not want to copy directly because a reliable and fast source DVD drive is
not available, or if you prefer to go via file image, please follow "Setting up a Disc Image Job" later in
this section.
1. Open the PrimoDVD Application
2. From the Menu bar, select File, New Job, Disc to Disc Copy. A Job window will now open in the
right side of the application.
3.
On the left portion of the screen is the drive list. In this window, select the source that contains the
disc to copy by right-clicking on the drive icon, and select the "Select/Deselect as Reader" option.
4.
Check that the correct characteristics of the source disc appear in the lower side of the Job window
(the source disc is detected and analyzed). If the disc is not yet in the drive and you put it there
after you selected the reader drive, you may need to push the Refresh button in the Job window.
This button resembles the recycle symbol.
5. Now, in the drive list, highlight the recorder where you wish to copy. Right-click on the
highlighted recorder and select "Select/Deselect as Recorder".
6. In the Copy Job dialog box, set the number of copies, the speed (if you select a speed that the
recorder does not support, it will default to the immediate lower one), and the action: Test, Test and
Record, etc.
7. Press the red button to activate the action.
Setting Up and Recording a Disc Image
This procedure is useful when you need to make several copies of the same disc and you do not want
to read from the source drive every time. Also, by having the Global-Image file stored on the hard disk
allows you to immediately return the source disc if necessary.
1. Open the PrimoDVD Application
2. Insert the master disc into a drive. In the drive list, highlight that drive, right-click and select "Disc
Explorer and Drive Properties".
3.
Check in the Disc Explorer window that the source disc is correctly read (push the "Refresh"
button if "Auto Refresh" checkbox is not checked).
4.
Press the "Global-Image Panel" button and in the panel that appears at the bottom of the Disc
Explorer dialog enter the name of the file that will contain the disc image (.GI extension) and then
press "Build".
5. Wait until the image is completely built and then close the Disc Explorer dialog.
6. From the Menu bar, select File, New Job, Global-Image or Other Image. A Job window will now
open in the right side of the application.
7.
In the Image Job dialog box, enter the name of the .GI file you created into the Image field name.
8.
Now, in the drive list, highlight the recorder where you wish to copy. Right-click on the
highlighted recorder and select "Select/Deselect as Recorder".
9. In the Image Job dialog box, set the number of copies, the speed (if you select a speed that the
recorder does not support, it will default to the immediate lower one), and the action: Test, Test and
Record, etc.
10.Press the red button to activate the action.
Setting Up a Data Disc Job
1. Open the PrimoDVD Application
2. From the Menu bar, select File, New Job, Data Job. A Job window will now open in the right side
of the application.
3.
In the Data Disc dialog box, drag and drop the folder(s) and the file(s) you need to record into the
Job window. You may also right-click in this window and select the Add File or Add Folder
options.
To create a DVD-Video discs, simply add the Video_TS and Audio_TS directories which were created by
your DVD Authoring Title. The PrimoDVD Application will automatically record the files in the
appropriate structure, creating a valid DVD-Video disc.
4.
5.
6.
To adjust the destination folder on the disc, highlighting the proper entry in the list, right-click on
the highlighted area and select "Modify Folder on Disc". This will allow you to adjust what
directory the files are placed in on the DVD.
Now, in the drive list, highlight the recorder where you wish to copy. Right-click on the
highlighted recorder and select "Select/Deselect as Recorder".
In the Data Disc Job dialog box, set the number of copies, the speed (if you select a speed that the
recorder does not support, it will default to the immediate lower one), and the action: Test, Test
and Record, etc.
7. Press the red button to activate the action.
Disc Printing
This application contains several tools for creating and printing onto printable CD-R and DVD-R
discs. PrimoDVD includes a Disc Face Editor, which allows you to create and layout your own CD
and DVD artwork. In this section, we will discuss the use of the Disc Face Editor, and the various
printing options available in PrimoDVD.
Disc Face Editor
The Disc Face Editor provides an easy means to layout your DVD artwork. You may also put text on
the disc, or use the predefined fields to include information such as the date, disc number, round
number, and time. To open the Disc Face Editor, click on the Tools Menu, and select Disc Face
Editor. This will bring up the following window:
This utility allows you to layout your disc in a variety of ways. All options available in the Disc Face
Editor are available from both the main screen, as well as the File Menu.
To use a solid background color for your disc, simply select the “Filling Color” button, and select the
color you wish to use. You will notice that the image of the disc changes colors to show your current
layout:
You may also insert a graphic into the disc layout. Do this by selecting the picture frame on the
toolbar, or by clicking Edit, and choosing “Select Image…”. You may then select a valid .BMP, .JPG,
or .GIF file to insert onto the disc:
Once you have inserted your graphic, the image can be moved simply by dragging and dropping it to
the appropriate location. You can also move the graphic by selecting the X,Y position for the graphic.
This can be done by going to the Image Position and Zoom window. From there, you may use the
Up/Down/Left/Right arrows to move the graphic, or you may enter an X and Y value manually.
This window also provides the option to zoom your graphic. You may use the slider control, or
manually enter a value to zoom the graphic. Using the zoom tool, you may blow up a smaller image to
cover the whole disc.
The Disc Face Editor also features two automated controls for zooming the image. The first will resize
the graphic so that the picture will cover the disc from left to right. This is best used for images that
are taller than they are wide. This option can be used by clicking on the image on the toolbar
displaying a disc with arrows pointing left and right. The second will resize the graphic so that the
picture will cover the disc from top to bottom. This is best used for images that are wider than they are
tall. This option can be used by clicking on the image on the toolbar displaying a disc with arrows
pointing up and down.
The last option of the Disc Face Editor is the ability to insert Text into the display. You may insert text
by clicking on the Variable Text box, and typing your text. Once your text is typed in this display, you
may move it by clicking on the text, and dragging and dropping it to the appropriate location.
The Variable Text box also allows you to insert variables, which, when used during the recording
process, will be replaced by the correct information. For example, you can insert a variable which will
insert the Date of the recording. You may do this by clicking on the “Field >” button, and selecting the
variable you would like added.
You can also mix your fixed text with variable text. For example, you could type in: “Created on: ”
and then click on “Field >” and select “Date”. When used in a recording, the disc would be printed
with the text field showing this information. For example, if the recording takes place on July 4th,
2000, the disc would show “Created on: 7/4/2000”.
By default, the display will show the variable information in the Disc Face Editor. The actual values
can be displayed by clicking on and holding down the box showing a green checkmark.
From the Disc Face Editor, you can print the discs, or you can save them for later use. To save a job,
select File, and click the Save button. Enter the file name you wish to save the job as. Be sure to note
the location you saved the file in, so that you will be able to find it for later use.
Printing in PrimoDVD
When PrimoDVD detects the presence of a robotics unit, the features for utilizing your CD Printer will
be activated. Each of the Job windows will now contain an area where you may input the name of the
Disc Layout you created using the Disc Face Editor. They will also contain a checkbox labeled
“Print”. Checking this box will cause PrimoDVD to print the disc after the recording.
The Copy Job Window:
The Image File Job Window:
The Data Job Window:
The Audio Job Window:
Tools and Options
This section describes the various Tools and Options available through the PrimoDVD application.
Many of these tools are useful for speeding up the job creation process, as well as for tuning the
application for your specific configuration.
The Global Image Finder
To utilize the Global Image finder on the menu, select Tools, Global Image, Finder. The Global Image
Finder will find all Global Image files on your hard disk. You may also launch the Global Image
Finder by selecting the Magnifying Glass icon on the Global-Image or Other Image Job window. For
added convenience, a delete button is available to assist in cleaning the no longer used Global Image
files from your machine.
Disc Explorer
The Disc Explorer is a major component of the PrimoDVD application. To access this window, right
click on the drive you wish to explore, and select Disc Explorer. From the Disc Explorer, you may
also select to print the layout of the DVD by clicking on the Print Layout Button. This will print a
detailed list of all the sessions and tracks of the DVD, including start, stopping and length information
for each.
File Verify
The File Verify is a very special feature present in PrimoDVD. When setting up a recording job, you
may select to verify the disc after recording which will verify the integrity of the copy from a disc copy
level. The File Verify goes a step further by allowing you to verify the files recorded onto a disc
against the source files, to be sure the file system is intact.
To do a File Verify, once your Data Disc Job has completed, right-click in the Data Disc Window,
select Tools, and click on File Verify. Select the DVD-R/RW or DVD-ROM containing the copied
disc, and press the Verify button. It will then verify the files on this drive with the files selected in
your Data Disc Window.
Drive Tuning
The Drive Tuning option under the Tools menu provides you with a means of easily modifying the
settings of all of your CD-ROM, CD-R/RW, DVD-ROM and DVD-R/RW drives simultaneously. As it
is very important that your settings are the same for each drive, this menu provides a way to see the
current settings of each device in relation to the others, and options to modify the settings on all
devices.
This screen is arranged into 4 columns. The first column indicates the drive by its name, SCSI Host ID,
SCSI Drive ID, and Drive Letter. The second column lists the status of the Disconnection Option for
each drive. The third column lists the status of the Synchronous Data Transfer Option for each drive.
The final column lists whether Auto-Insert Notification is enabled or disabled. You may handle each
drive individually in this screen by clicking on the drive and selecting the ON or OFF button for each
option, or you may select multiple drives by holding down the CTRL key and clicking on each drive.
While the drives are selected, if the ON or OFF key is clicked for any option, it will be applied to all
selected drives.
Program Options
The Options menu can be reached by selecting Tools, Options from the menu bar, or by pressing F3 at
any time. The options menu gives you the ability to modify settings for the following categories:
General, View, Data Job, Temporary, Job/Round, Blank Size, and Advanced. Information regarding
the individual settings in this panel can be found in the PrimoDVD Help Files.