1
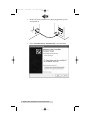
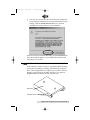
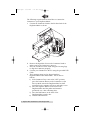
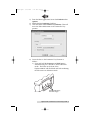
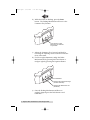
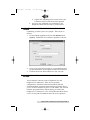
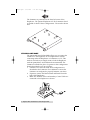
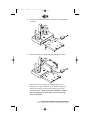
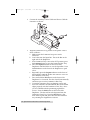
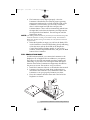
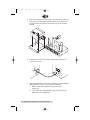
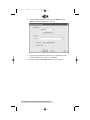
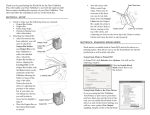
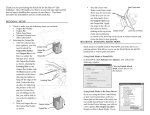
510887.qxd
1/21/2004
7:35 PM
Page i
012004-510887-(01)
MAX
XL/Pro
Optical Disc Laminator
Connectivity Guide
© 2004 All rights reserved.
510887.qxd
1/21/2004
7:35 PM
Page ii
Notices: The information in this document is subject to change without notice. NO WARRANTY OF
ANY KIND IS MADE WITH REGARD TO THIS MATERIAL, INCLUDING, BUT NOT LIMITED TO,
THE IMPLIED WARRANTIES OF MERCHANTABILITY AND FITNESS FOR A PARTICULAR
PURPOSE. No liability is assumed for errors contained herein or for incidental or consequential
damages in connection with the furnishing, performance, or use of this material. This document
contains proprietary information, which is protected by copyright. All rights are reserved. No part of
this document may be photocopied, reproduced, or translated into another language without prior
written consent.
Trademark Acknowledgments: Windows is a registered trademark of Microsoft Corporation. All
other trademarks are the property of their respective owners.
Printing History
Edition 1.0, #510887, © Copyright 2004, All rights reserved.
ii
510887.qxd
1/21/2004
7:35 PM
Page iii
Table of Contents
Optical Disc Laminator Guide .....................................................................................1
A. Unpacking and Inspection ...............................................................................1
B. Installing the Laminator Software Driver......................................................1
C. Connecting the Laminator to Your Duplicator .............................................3
D. Creating Discs with Your Duplicator MAX in Primo ..................................7
E. Connecting the Laminator to Your Duplicator XL/Pro ..............................7
Stand-Alone Mode.............................................................................................8
Full Production Mode .....................................................................................11
F. Troubleshooting ...............................................................................................15
G. Technical Support ............................................................................................15
iii
510119pdf.qxd
5/29/2002
11:14 AM
Page iv
Interactive Feature in this
PDF Document
There are interactive features that will allow you to
jump to different locations within the document. Each
listing in the Table of Contents is interactive. Place the
cursor on either the words or the page number. A
small hand with a pointing finger icon appears. Click
on the line with the icon and the document will jump to
that page. If you want to return to the Table of
Contents, move the icon to the top of the page and
click on the arrow marked TOC.
iv
510887.qxd
1/21/2004
7:35 PM
Page 1
TOC
Optical Disc Laminator Connection Guide
THANK YOU…
Thank you for purchasing the Optical Disc Laminator
Connectivity Kit. This kit will allow you to use your Optical
Disc Laminator in conjunction with the Pro, XL and MAX
versions of Optical Disc Duplicators. This guide will explain
the connection of the Laminator to these systems, the
installation of software and the running of disc jobs.
A. UNPACKING AND INSPECTION
While unpacking your Laminator Connectivity Kit make sure
that all supplied accessories are included with your kit. The
following items are included:
• Laminator Stand
• Software Installer Disc
• USB Cable
• 6-Pin Mini Circular Cable (Pro/XL Stand only)
• Warranty Statement, Manual and other documentation.
B. INSTALLING THE LAMINATOR SOFTWARE DRIVER
When using the Laminator with a Primera Technology Disc
Duplicator it will be necessary to install a driver. This driver
will allow the PC to control the functions of your Laminator.
Because your Disc Laminator is a plug-and-play device, do not
connect the Laminator's USB cable to the PC until instructed to
do so by the installer. The driver is installed as follows:
a. This installer will reboot your system so make sure all
applications are closed. Insert the Software Driver Install
disc into your PC's CD-ROM drive
b. The Installer Quick Start program should launch. If it does,
proceed to step c. If not, please follow these steps:
• Click the Start button in the lower left hand side of the
screen, and then select My Computer from the menu.
• Double-click the Disc Laminator Installer Icon.
c. Choose the Duplicator you are using, either Duplicator
XL/Pro or Duplicator MAX.
d. You will now be prompted to install and update to Primo
DVD that will allow you to print, record and laminate
unnatended. Click Next to install the update.
Optical Disc Laminator Connectivity Guide 1
510887.qxd
1/21/2004
7:35 PM
Page 2
TOC
e.
Make certain the Laminator has been plugged into power
and turned on.
f.
Select "Install Software Automatically" and click Next.
2 Optical Disc Laminator Connectivity Guide
510887.qxd
1/21/2004
7:35 PM
Page 3
TOC
g. You may see a notice like the one shown here stating that
the Accent Disc Laminator has not passed Windows Logo
Testing. Click the Install Anyway button to continue
installing the printer driver for your Laminator.
Once the driver has finished installing, click the Finish button.
This will install an update to your PrimoDVD software and
will reboot your system.
C. CONNECTING THE LAMINATOR TO YOUR DUPLICATOR
MAX
Your Laminator connects easily to a DuplicatorMAX allowing
for hands-free printing, recording and laminating of Optical
Discs. This configuration does require you to remove one bin
bringing total capacity from 400 to 300 discs. The optional
DuplicatorMAX Laminator Stand is shown here:
MAX Stand
Adjustable Screws
Optical Disc Laminator Connectivity Guide 3
510887.qxd
1/21/2004
7:35 PM
Page 4
TOC
The following steps describe in detail how to connect the
Laminator to your DuplicatorMAX:
a. Connect the Laminator Stand to the left hand side of the
DuplicatorMAX as shown:
b. Remove the Input Bin closest to the Laminator Stand to
make room for the Laminator's disc tray.
c. Place the Laminator on the stand using the Locating Pegs
to align the Laminator properly.
d. Connect your Laminator to the PC using the provided USB
Cable.
e. The Laminator must now be aligned with the
DuplicatorMAX Picker Mechanism. This is done as
follows:
1) If the Laminator Tray is not in the "OUT" position,
press the Laminate Button on the Laminator to eject
the tray. Make certain the DuplicatorMax has been
connected to the computer and is on and ready to use.
2) Press the Sequence Button on the front of the
DuplicatorMax until the picker mechanism is
positioned over a bin containing discs.
3) Press the Pick Button on the front of the
DuplicatorMax to pick a disc.
4) Launch PrimoDVD Pro .
4 Optical Disc Laminator Connectivity Guide
510887.qxd
1/21/2004
7:35 PM
Page 5
TOC
5) From the Main Application Screen click Robotics then
Options.
6) Enable the Use Laminator checkbox.
7) Click the button labeled Move to (Calibrate). This will
move the Picker Mechanism to the Laminator Tray
position.
8) Lower the disc to the Laminator Tray Position as
follows:
a) Press and hold the Sequence and Pick buttons
simultaneously for 5 seconds to enter calibration
mode. The LEDs on the front of the
DuplicatorMAX will flash back and forth indicating
that the unit is in calibration mode.
Press Simultaneously
Until LEDs Toggle
Optical Disc Laminator Connectivity Guide 5
510887.qxd
1/21/2004
7:35 PM
Page 6
TOC
b) While the LEDs are flashing, press the Pause
button. The Picking Mechanism will lower to the
Laminator Tray Position.
Press Pause to Lower
Mechanism to Laminator
Tray Position
c)
Adjust the Laminator Tray forward and back by
loosening the adjusting screws located towards the
front of the stand.
d). For left-to-right adjustment, nudge the Picker
Mechanism left by pressing the Pause Button or
nudge it right by pressing the Sequence Button.
End Calibration
Nudge Picking Mechanism Right
(Counter Clockwise)
Nudge Picker Mechanism Left
(Clockwise)
e) Once the Picking Mechanism and Disc are
perfectly aligned press the Pick Button to end
calibration
6 Optical Disc Laminator Connectivity Guide
510887.qxd
1/21/2004
7:35 PM
Page 7
TOC
f)
9.
Tighten the Adjusting Screws on the front of the
Laminator Stand to lock the stand in position.
You have now calibrated your Laminator to the
Duplicator MAX and are ready to produce discs!
D. CREATING DISCS WITH YOUR DUPLICATOR MAX IN
PRIMO
Laminating your disc jobs is very simple. This is done as
follows:
1. From the Main Application Screen click Robotics then
Options. Enable the Use Laminator checkbox as shown:
2.
3.
Set up your print and record job as you normally would
per the instructions in the Duplicator MAX User Manual.
Click the Red Circle Record button to start your job!
E. CONNECTING THE LAMINATOR TO YOUR DUPLICATOR
XL/PRO
Your Laminator connects easily to Duplicator Pro and
Duplicator XL duplicators. There are two possible
configurations, Automated Stand-Alone Mode and Full
Production Mode. Automated Stand-Alone Operation allows
you to use the Laminator in place of a CD Printer. You can then
laminate pre-printed discs without having to connect the
Duplicator or Laminator to a PC. Full Production Mode allows
you to record, print and laminate discs all in one operation.
Optical Disc Laminator Connectivity Guide 7
510887.qxd
1/21/2004
7:35 PM
Page 8
TOC
The Laminator is positioned at the front left corner of the
Duplicator. The optional Duplicator XL/Pro Laminator Stand
is needed for both of these configurations. The stand is shown
here:
STAND-ALONE MODE
The Automated Stand-Alone Mode allows you to connect the
Laminator to the Duplicator XL or DuplicatorPro without
connecting either the Duplicator or Laminator to a PC. This
mode is used when you simply want to load the Duplicator
with 100 printed discs and laminate them unattended. The
Laminator will take the place of a printer in this configuration.
Stand-Alone Mode is set up as follows:
1. Laminate a few discs in Stand-Alone configuration as
described in the Laminator User's Manual to ensure the
Laminator is configured to properly laminate your discs.
2. If present, remove the Printer Stand and Printer from the
back of the Duplicator.
3. Make sure both the Power and Auxiliary Control Cable are
connected to the Duplicator as shown:
8 Optical Disc Laminator Connectivity Guide
510887.qxd
1/21/2004
7:35 PM
Page 9
TOC
4.
Connect the Laminator Stand to the back of the Laminator
as shown:
2
1
5.
Place the Laminator on the Laminator Stand as shown:
There are two sets of holes on the underside of your
Laminator. Set the Laminator on the stand locating the
smaller set of holes on the metal locating pegs on the
Laminator Stand. Make certain the Laminator's rubber
feet are resting on the stand and not in the four large
holes in the stand.
Optical Disc Laminator Connectivity Guide 9
510887.qxd
1/21/2004
7:35 PM
Page 10
TOC
6.
Connect the Auxiliary Control Cable and Power Cable the
Laminator as shown:
7.
Align the Laminator's tray position to the picker. This is
done as follows:
a. Make certain the Laminator has power and is
turned on.
b. Load a disc into the Input Bin. This is the Bin on the
right side of the Duplicator.
c. If the Laminator Tray is not in the OUT position, press
the Laminate button to eject the Laminator Disc Tray.
d. Press the Sequence button on the front of the
Duplicator until the Picker is over the Input Bin. Press
the Pick button on the front of the Duplicator to pick
a disc.
e. Repeatedly press the Sequence button on the front of
the Duplicator until the Picker Arm comes to rest over
the Laminator's Disc Tray.
f. Press and hold the Pick button on the front of the
Duplicator for 5 seconds. The disc should automatically
and hover just over the Laminator's Disc Tray.
g. Loosen the Laminator Tray's 4 adjusting screws and
move the Laminator around until the disc in the Picker
aligns properly with the Laminator's Disc Tray. Once
you are satisfied with the positioning, tighten the
screws. Press the Pick button on the front of the
Duplicator. The disc will now be deposited into the
Laminator's Disc Tray. Press the Pick button a few
more times to pick and place discs into the laminator
tray ensuring the alignment is accurate.
10 Optical Disc Laminator Connectivity Guide
510887.qxd
1/21/2004
7:35 PM
Page 11
TOC
8.
The Laminator is now aligned properly. Once the
Laminator's Heat Roller has achieved proper operating
temperature (indicated by a solidly lit Ready LED on the
Laminator's Control Panel), you are ready to laminate
discs. Load the input bin with discs and press the
Laminate button. Discs will be automatically picked from
the input bin, loaded into the laminator, and deposited in
the output bin when finished. This will repeat until the
Input Bin is empty.
NOTE: If the Picking Mechanism will not pick a disc from the Laminator Tray, make
certain the Laminator is sitting on the Stand correctly. The Laminator's
Rubber Feet should be resting on the stand, not in the four holes located on
top of the stand.
9.
When the Input Bin is empty, you will see the Ready LED
on the Laminators Control Panel flashing slowly indicating
a Disc Out error and the Pick LED on the Duplicator
Control Panel will be flashing quickly. If you wish to
continue, load the Input Bin with discs, and press the Pick
button on the Laminator.
FULL PRODUCTION MODE
In Full Production Mode, you connect the Laminator to the
Duplicator XL or DuplicatorPro in addition to your printer.
This allows for the fully automated recording, printing and
laminating of your discs. This will require more desk space
than the Stand-Alone Lamination configuration described in
the previous section. This mode is set up as follows:
1. Install the Laminator Software as described in this manual.
2. Laminate a few discs in Stand-Alone configuration as
described in the Laminator User's Manual to ensure the
Laminator is set up to properly laminate your discs.
3. Place the Laminator Stand in front and to the left of the
Duplicator as shown:
Optical Disc Laminator Connectivity Guide 11
510887.qxd
1/21/2004
7:35 PM
Page 12
TOC
4.
Place the Laminator on the stand. The Laminator will need
to be placed on the stand with the Laminator's rubber feet
resting in the four holes located on the top of the Stand as
shown:
5.
Using the provided USB Cable, connect the Laminator to
your PC as shown:
6.
Align the Laminator's Disc Tray position for proper picking
and placement of discs. This is done as follows:
a. Make certain the Laminator has power and is
turned on.
b. Load a disc into the Input Bin. This is the Bin on the
right side of the Duplicator.
12 Optical Disc Laminator Connectivity Guide
510887.qxd
1/21/2004
7:35 PM
Page 13
TOC
c.
If the Laminator Tray is not in the OUT position, press
the Laminate button to eject the Laminator Disc Tray.
d. From the Main Application Screen click Robotics then
Options.
e. Enable the Use Laminator checkbox.
f. Click the button labeled Move to (Calibrate). This will
move the Picker Mechanism to the Laminator Tray
position.
g. Press and hold the Pick button on the front of the
Duplicator for 5 seconds. The disc should
automatically and hover just over the Laminator's
Disc Tray.
h. Manually move the Laminator on its stand until the
Laminator Disc Tray is aligned perfectly with the disc
in the Picker Mechanism.
i. Press the Pick button a few times to pick and place the
disc in the Laminator Tray to be sure it is aligned
properly.
NOTE: If the Picking Mechanism will not pick a disc from the Laminator Tray, make
certain the Laminator is sitting on the Stand correctly. The Laminator's
Rubber Feet should not rest on the stand but in the four holes located on the
top of the stand. 7. The Laminator is now aligned properly. Once the
Laminator's Heat Roller has achieved proper operating temperature
(indicated by a solidly illuminated Ready LED on the Laminator's Control
Panel), you are ready to laminate discs. Load the input bin with discs.
Optical Disc Laminator Connectivity Guide 13
510887.qxd
1/21/2004
7:35 PM
Page 14
TOC
8.
From the Main Application Screen click Robotics then
Options. Select Lamination as shown:
9.
Set up your print and record job as you normally would
per the Duplicator XL/Pro User's Manual.
10. Click the red circle Record button to start your job!
14 Optical Disc Laminator Connectivity Guide
510887.qxd
1/21/2004
7:35 PM
Page 15
TOC
F. TROUBLESHOOTING
Problem
Resolution
Will not Laminate
•
Check Power to the Laminator
•
Make sure that the Ready LED is
on and steady indicating the
Laminator's Heat Roller has
achieved normal operating
Temperature
•
In PrimoDVD, click Robotics then
Options. You should see a
Laminate check box.·
•
If you do not see this option in the
Robotic Options dialog box, install
the software on the install disc
provided with your Laminator
Stand. There is an updater on this
disc that will add this functional.
The Overlaminate Film
is not adhering properly
to my discs; there are
patchy areas where the
film is not sticking to the
disc label.
•
Increase the heat setting with the
Heat Slide Bar on the Laminator's
Control Panel. Slide the Heat
Setting one or two hash marks
toward the front of the Laminator
to increase the heat setting.
The Overlaminate Film
appears to be wrinkling,
with scratch-like marks
appearing across the
surface of the disc
•
Decrease the heat setting with
the Heat Slide Bar on the
Laminator's Control Panel. Slide
the Heat Setting one or two hash
marks toward the rear of the
Laminator to decrease the heat
setting.
I do not see an option
in PrimoDVD to
laminate discs
G. TECHNICAL SUPPORT
If you have difficulties in operating your Laminator, the
procedures in this manual should, in most cases, solve the
problem. If you still have difficulty, call Technical Support at
the number listed on the insert in your Laminator suppy pack.
S
Optical Disc Laminator Connectivity Guide 15
510887.qxd
1/21/2004
7:35 PM
Page 16
Printed in the United States of America
P/N 510887