1
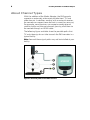
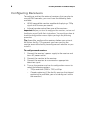
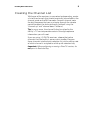
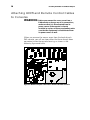
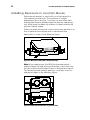
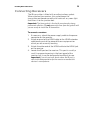
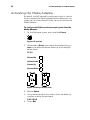
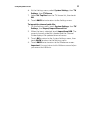
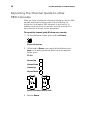
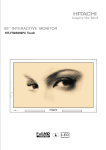
Installing the P80 Console Media Adapter Precor Incorporated 20031 142nd Avenue NE P.O. Box 7202 Woodinville, WA USA 98072-4002 P80 Media Adapter Installation Guide 303072-101 rev A October 2013 Edition Information INSTALLING THE P80 CONSOLE MEDIA ADAPTER P/N 303072-101 rev A Copyright © October 2013 Precor Incorporated. All rights reserved. Specifications subject to change without notice. This document applies to Preva version 3.3 and P80 console software version 3.3. Trademark Note Precor, AMT, EFX, and Preva are registered trademarks of Precor Incorporated. Other names in this document may be the trademarks or registered trademarks of their respective owners. Intellectual Property Notice All rights, title, and interests in and to the software of the Preva Business Suite, the accompanying printed materials, any copies of such software, and all data collected via the Preva Business Suite, are exclusively owned by Precor or its suppliers, as the case may be. Precor is widely recognized for its innovative, award-winning designs of exercise equipment. Precor aggressively seeks U.S. and foreign patents for both the mechanical construction and the visual aspects of its product design. Any party contemplating the use of Precor product designs is hereby forewarned that Precor considers the unauthorized appropriation of its proprietary rights to be a very serious matter. Precor will vigorously pursue all unauthorized appropriation of its proprietary rights. Precor Incorporated 20031 142nd Ave NE, P.O. Box 7202 Woodinville, WA 98072-4002 1-800-347-4404 http://www.precor.com Table of Contents Installing External Receivers ...................................................... 5 About Channel Types .......................................................................... 6 Configuring Receivers .......................................................................... 8 Creating the Channel List ................................................................... 9 Attaching HDMI and Remote Control Cables to Consoles ..... 10 Installing Receivers in Junction Boxes............................................ 12 Connecting Receivers ......................................................................... 13 Configuring P80 Consoles .........................................................15 Editing the Channel Guide ................................................................. 15 Activating the Media Adapter.......................................................... 16 Exporting the Channel Guide to other P80 Consoles ................18 Servicing the Media Adapter .....................................................21 Troubleshooting .................................................................................. 22 Removing and Replacing the IR Transmitter ............................... 23 Obtaining Service................................................................................ 24 4 Installing the P80 Console Media Adapter Chapter 1 Installing External Receivers The P80 Media Adapter option allows a P80 console to display content provided by external receivers instead of the console's internal tuner. For those facilities that use such receivers to process incoming TV signals, the Media Adapter provides the exercisers with exactly the same user experience. They select television channels from the same channel guide and switch between television and other information (such as Preva Net or the Goal Compass) in the same way. The Media Adapter accepts 720p x 60 fps video signals through an HDMI connection from one of several different external receivers. (Refer to the receiver list accompanying this manual for the receiver brands and models we support.) The only control mechanism that these receivers have in common is an infrared (IR) remote control. Because of this, the P80 Media Adapter acts as the remote control for each receiver that is certified to work with it. Caution: Be sure to install, configure, and test the external receiver and channel guide for the first P80 console before you perform the procedures in this chapter for the other consoles. Once an IR transmitter is attached to each receiver, it cannot be removed easily. 6 Installing the P80 Console Media Adapter About Channel Types With the addition of the Media Adapter, the P80 console supports an extremely wide variety of television (TV) and video formats. In addition, working with an external receiver, the console can support some formats in more than one way. For example, some receivers can accept a combination of satellite, cable, and Internet channels, passing all of them to the console through an HDMI cable. The following figure and table show the possible paths that TV and video signals can take to reach the P80 consoles in a typical facility. Note: Some of these signal paths may not be installed at your facility. Figure 1: Channel paths to the P80 console 7 Installing External Receivers Table 1. Signal path comments Element Comments Various incoming types of TV and video signals reach your facility from a combination of cable, satellite, broadcast, and Internet sources. The local head end equipment at the facility receives cable, terrestrial broadcast, and satellite TV channels and reassigns them to other channel numbers if necessary. External receivers installed next to each P80 console receive cable TV, satellite TV, and Internet Protocol (IP)-based video signals and reassigns them to other channel numbers if necessary. Note: The specific types of signals available through the external receiver may vary depending on its brand and model. Refer to the documentation accompanying your receivers for more information. TV signals from the head end reach the console through a coaxial cable. The cable is connected to the console's internal tuner through an F-type connector. Internet-based (IP) video segments and playlists reach the console through its Ethernet connection. Video signals from the external adapter reach the console through its HDMI connector. To avoid confusion, this manual describes incoming channels in terms of how they reach the consoles. If a channel arrives at the console through ... This manual refers to it as ... A coaxial cable A cable channel An HDMI cable An HDMI channel An Ethernet cable An IP channel 8 Installing the P80 Console Media Adapter Configuring Receivers To configure and test the external receivers that you plan to use with P80 consoles, you must have the following tools available: HDMI-compatible monitor capable of displaying a 720p signal at 60 frames per second Infrared remote control from one of the receivers Important: Before you start to configure the receivers, review and familiarize yourself with their instructions. You must know how to reach the configuration menus before you begin the following procedure. Tip: If possible, configure the receivers before you arrive at the fitness facility. This prevents you from carrying the monitor around the facility to configure each receiver as you install it. To configure each receiver: 1. Connect the receiver’s power supply to the receiver and to an AC power outlet. 2. Connect the monitor to the receiver. 3. Connect the receiver to a source of an appropriate television signal. 4. Turn on the receiver and use its configuration menus to select the following options: – 720p resolution (1280 x 720) x 60 fps – Closed captioning (if the facility requires that closed captioning be available, you must configure it within the receivers) Installing External Receivers 9 Creating the Channel List While one of the receivers is connected and operating, create a list of the channels that should eventually be available in the channel guide on the P80 consoles. For each channel, note the digit sequence that you must enter through the remote control to select the channel directly (without using the "channel up" and "channel down" buttons). Tip: In many cases, the channel listing furnished by the facility's TV service provider contains the digit sequence information you will need. If you are using I-O DATA receivers, choose the twelve channels that the facility’s owner wants to offer. Program these channels into the quick selection list, while making note of which channel is assigned to which quick selection key. Important: When configuring or moving a DirecTV receiver, do not press its Resolution key. 10 Installing the P80 Console Media Adapter Attaching HDMI and Remote Control Cables to Consoles WARNING Before you remove the access cover from a P80 console or change any of its connections, make sure that it is disconnected from its power source. If the console is already installed on a piece of fitness equipment, make sure that the equipment is disconnected from its power source as well. When you remove the access cover from the back of each P80 console, you will see two cables that have already been connected inside the console housing, as shown in the following figure and table. Figure 2: Media Adapter connectors within the P80 console 11 Installing External Receivers Table 2. Media Adapter connector identification Connector Function HDMI Connector Type HDMI socket Remote control Three-connector locking interconnect After you have routed the HDMI extender cable and the remote control cable through the framework of the fitness equipment and the console mount, attach them to these connectors. Note: For specific information about routing cables through the fitness equipment, refer to the assembly guide for the specific equipment model you are working with (AMT, EFX, treadmill, or bike). 12 Installing the P80 Console Media Adapter Installing Receivers in Junction Boxes Each external receiver in your facility must be housed in a high-capacity junction box. This enclosure is a direct replacement for an existing T-junction; its ventilation slots and elevated receiver platform keep the receiver cool during use, while space has been set aside on its lower level for the receiver’s power supply. When you place the receiver in the junction box, position it so that its controls face upward and its connectors face downward, as shown in the following figure. Figure 3: Receiver and cable slot positioning Note: If you need to pass the HDMI and remote control cables through the back of the junction box, insert them into the slot in the base of the box (shown in the previous figure). To close off unused raceway openings in the box, insert an end cap as shown in the following figure. Figure 4: End cap installation in junction box Installing External Receivers 13 Connecting Receivers The IR transmitter is fitted with an adhesive foam gasket. When attached to a receiver, this gasket keeps the transmitter positioned correctly and seals out any room light that filters in to the junction box. Important: The foam gasket is lined with an extremely strong, permanent adhesive. Do not remove the liner from the gasket until you are ready to install the IR transmitter. To connect a receiver: 1. If necessary, attach the power supply cable to the power connector on the receiver. 2. Attach one end of the HDMI cable to the HDMI extender cable leading out of the piece of fitness equipment on which you are currently working. 3. Attach the other end of the HDMI cable to the HDMI jack on the receiver. 4. Locate the IR port on the receiver. This port is usually a small, transparent opening in the front panel of the receiver, but it may be designed to be difficult to see. Important: If you are not sure about where the IR port is, refer to the documentation for the receiver or contact the receiver's manufacturer. 14 Installing the P80 Console Media Adapter 5. Position the IR transmitter so that the gasket can surround the IR port without placing any strain on the remote control cable. 6. Remove the liner from the gasket. 7. Make sure the gasket does not block any part of the IR port, then press the IR transmitter into place as shown in the following figure. Figure 5: IR transmitter placement Chapter 2 Configuring P80 Consoles After the external receivers have been installed and configured, configuring P80 consoles to recognize them involves the following tasks: Activating the Media Adapter on each P80 console Building the channel list on the first console Exporting the finished channel list from the first console to the others This chapter discusses how to perform these tasks. Editing the Channel Guide Each P80 console contains a formatted text file, called channel-guide.json, that describes the channel guide on that console. Precor provides a software utility called the Precor Channel Editor that makes creating or modifying this file easy. Precor Customer Support will send you an email message containing a hypertext link. Clicking the link downloads a .zip archive file, which contains the installer and the user guide for the utility. Refer to the user guide for instructions on how to create and edit the channel guide file. 16 Installing the P80 Console Media Adapter Activating the Media Adapter By default, the P80 console is configured to use its internal tuner instead of the Media Adapter option. Before you can import your finished channel list file, you must activate the Media Adapter. To configure the P80 console to accept signals from the Media Adapter: 1. On the Welcome screen, press and hold Pause. Figure 6: Pause key 2. While holding Pause, press each of the following keys once in the order presented. Referring to the diagram below, press: 1234 Channel Up Volume Down Volume Up Channel Down Figure 7: Settings security code 3. Release Pause. 4. Using the keyboard on the screen, touch the following numbers to enter the password: 5651565 5. Touch OK. Configuring P80 Consoles 6. At the Settings menu, select System Settings, then TV Settings, then TV Source. 7. Select Set Top Box from the TV Source list, then touch OK. 8. Touch BACK twice to return to the Settings menu. To import the channel guide file: 1. On the Settings menu, touch System Settings, then TV Settings, then Export/Import Channel List. 2. When the box is selected, touch Import from USB. The current channel guide file is loaded and the Channel Guide displays the updated channel names. 3. Touch OK to return to the System Settings menu, then touch BACK to return to the Settings menu. 4. Touch BACK twice to return to the Welcome screen. Important: You must return to the Welcome screen before you remove the USB drive. 17 18 Installing the P80 Console Media Adapter Exporting the Channel Guide to other P80 Consoles After you have installed the channel guide file on the first P80 console and tested it there, export it to a USB drive to distribute it to the other P80 consoles in your facility. In addition to saving time, this ensures that the channel list is consistent on all of your fitness equipment. To export the channel guide file from your console: 1. On the Welcome screen, press and hold Pause. Figure 8: Pause key 2. While holding Pause, press each of the following keys once in the order presented. Referring to the diagram below, press: 1234 Channel Up Volume Down Volume Up Channel Down Figure 9: Settings security code 3. Release Pause. Configuring P80 Consoles 19 4. Using the keyboard on the screen, touch the following numbers to enter the password: 5651565 5. Touch OK. 6. Insert a USB drive into the console. 7. On the Settings menu, touch System Settings. 8. On the System Settings menu, touch TV Settings, then Export/Import Channel List. 9. When the box is lit, touch Export to USB. The channel guide file is saved on your USB drive. 10. Touch OK to return to the System Settings menu. 11. Touch BACK twice to return to the Welcome screen. Important: You must return to the Welcome screen before you remove the USB drive. 12. Remove the USB drive from the console. Note: Before you can import the channel guide to the other P80 consoles, you must make sure that the Media Adapters on those consoles are activated (refer to Activating the Media Adapter). 20 Installing the P80 Console Media Adapter Chapter 3 Servicing the Media Adapter The sections in this chapter contain information about how to correct problems with the Media Adapter and how to obtain service. 22 Installing the P80 Console Media Adapter Troubleshooting If you encounter problems with the Media Adapter, please check the common solutions in the following table before contacting Precor Customer Support or your Precor dealer. Problem Possible Solutions No picture or sound is played on one or more channels. • Verify that all cables are in place and fully connected. • Verify that the dialing sequences set in the channel guide are correct. • If you are using I-O DATA receivers, check that the quick selection list on the receiver has been set up correctly. • Check that the receiver is still set to 720p. If not, use a remote control to reconfigure the receiver. The cable channels (or the HDMI channels) on the channel guide are not displayed correctly. • The P80 console cannot receive both HDMI channels and cable channels at the same time. After the user changes the channel, the text messages describing the new channel remain on the screen for seven seconds or more. • If you are using I-O DATA receivers, check that the quick selection list on the receiver has been set up correctly and that the channel guide on the P80 console is using it. • Some receiver manufacturers design this behavior into their software, and there is no way to deactivate it. Servicing the Media Adapter 23 Removing and Replacing the IR Transmitter Under most circumstances, Precor does not recommend removing the IR transmitter once it has been mounted on the external receiver. However, you may need to remove a transmitter for one of the following reasons: The transmitter is not operating correctly. The transmitter's programming has been lost or corrupted, requiring you to reconfigure it using a remote control. Before you remove the transmitter, make sure you have the following items available: A short piece of black thread, slightly longer than the transmitter is wide A replacement for the transmitter (if it is defective) or the adhesive gasket (if the transmitter can be reused) To remove the IR transmitter: 1. Pull the thread tight and position it against the surface of the external receiver. 2. While keeping the thread tight, move it across the surface of the receiver so that it cuts through the adhesive gasket as close to the receiver as possible. 3. Lift the IR transmitter off of the receiver. 4. Remove as much gasket material from the receiver and the IR transmitter as possible. 5. If you can reuse the same IR transmitter, remove the backing from one side of the new adhesive gasket. Apply the new gasket to the transmitter in place of the old gasket. Once the surface of the receiver has been cleaned, you can replace the IR transmitter using the same steps as you used to mount it originally (refer to Connecting Receivers). 24 Installing the P80 Console Media Adapter Obtaining Service Do not attempt to service the equipment except for maintenance tasks. If any items are missing, contact your dealer. For more information regarding customer support numbers or a list of Precor authorized service centers, visit the Precor web site at http://www.precor.com. Installing the P80 Console Media Adapter Precor Incorporated 20031 142nd Avenue NE P.O. Box 7202 Woodinville, WA USA 98072-4002 P80 Media Adapter Installation Guide 303072-101 rev A October 2013 Receiver Brands and Models Supported by the P80 Media Adapter DirecTV H25 Enseo® HD3000 I-O DATA HVTR-BCTL Precor Incorporated 20031 142nd Ave NE, P.O. Box 7202, Woodinville, WA 98072-4002 1-800-347-4404 • www.precor.com 303097-111 rev A, en-us October 2013 © 2013 Precor Incorporated