1
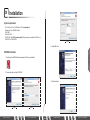
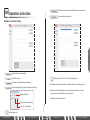
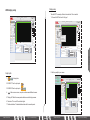
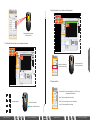
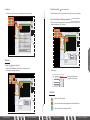
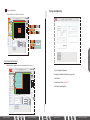
Control System
User Manual
01
Installation
System reqiurement
CPU: Intel Core 2 Duo / AMD Athlon 64 X2, (recommended)
Graphic card: Inter HD3000 or better
RAM: 2GB
Hard Disk: 120G
Win XP, Win Vista, Win7(recommended), Win8(processors produced after 2014Jan 1st,
EVISION T7 or EVISION Q7).
Image3
3. Install USB driver.
Installation
EVISION Installation
1. Double click the EVISION software package with “Run as administrator”.
2. Choose the folder and install “EVISION”.
4. Finish Installation.
Image1
www.roevisual.com
Image2
R
O
E
~Fly your creative thinking~
The
First
Page
www.roevisual.com
R
O
E
~Fly your creative thinking~
02 Operation Instruction
5:
Detect receiving cards which are controlled by the chosen processor.
6:
Cancel detecting receiving cards.
Operation
Hardware connection setting
1:
English and Chinese are available.
2:
EVISION instruction.
3:
Processor or sending card hardware detecting.
4:
Display Area setting and Processor Output resolution setting.
7:
Display area switch. Click “Esc” to close the displaying area.
8: Sending card information dialogue box: including processor version, firmware version.
9: Receiving card information dialogue box: including receiving card version, firmware
version and any other information about receiving cards.
Display Area setting.
10: Operation information dialogue box.
Video output resolution setting.
Click “set” to finish setting.
5:
For black background.
www.roevisual.com
R
O
E
~Fly your creative thinking~
The
Second
Page
www.roevisual.com
R
O
E
~Fly your creative thinking~
Display setup
LED display setup
Take 4x3 MC7 for example, 4tiles in horizontal and 3 tiles in vertical.
Hardware Connection
100
4
200
300
400
500
600
700
800
900
1. Choose the MC7 tile from the “tile type”
1000
1100
1200
0.00
00
0.00
Power(W)
LINX
LINX
V Position 0
MC
MC
V Size 0
0.00
Individual Type Positioning
Preview
Preview
Display Off
Export(port1)
Import(port1)
Width(cm)
0.00
Tile Address
Height(cm)
0.00
Empty Card Edit Mode
PixelWidth
0
Forbid Moving All Cards
PixelHeight
0
NONE
H Position 0
V Position
0
H Size
0
V Size
Card Index
Link
Cabinet Information
Enable Calibration
Current Gain Adjustment
800
900
1000
1100
1200
13
200%
Sort Normal
MC-12H.rcvp
MC-18H.rcvp
MC-7H-9269.rcvp
MC-9H-9269.rcvp
Custom Connection
Current Level 1
50
R
100
0
G
100
0
B
100
%
Gamma 2.8
Reset All Tile
Hotkey List
Display Off
Weight(Kg)
0.00
Power(W)
0.00
Voltage(V)
0.00
Individual Type Positioning
Width(cm)
0.00
Tile Address
Height(cm)
0.00
PixelWidth
0
PixelHeight
0
Indicator Off
Enable Calibration
Current Gain Adjustment
H Position 0
NONE
Empty Card Edit Mode
V Position
0
H Size
0
V Size
Card Index
Forbid Moving All Cards
Link
Current Level 1
50
R
100
0
G
100
0
B
100
Gamma 2.8
%
2. Set the quantity for your screen.
2
3
4
2
3
4
6
7
8
10
11
12
Hardware Connection
1
2
MC-7H-9269
H Count 0
2
3
H Position 0
200
300
1
LED Display Setup
400
500
600
Testing and Adjusting
700
800
900
1000
1100
1200
13
200%
2
3
4
6
7
8
10
11
12
Sort Normal
400
V Position 0
H Size 0
Add or remove screen, one port can drive several different screens.
5
9
V Count 0
4
1
300
1
100
4
1
Tile Type
3: EVISION Q7 has 4 output ports
3
100
9
1
1
200
5
V Size 0
Manual(port1)
Preview
Preview
Export(port1)
Import(port1)
5: “Display off”: Black the screen panels which are controlled by processor.
Cabinet Information
500
4 output ports.
Custom Connection
600
4
2: EVISION T7 has 2 output ports
4:
700
Indicator Off
Voltage(V)
3
Testing and Adjusting
600
Reset All Tile
Hotkey List
700
2
Manual(port1)
Hotkey List
1
1
500
200
H Size 0
Output ports
1:
400
100
H Position 0
Reset All Tile
700
Cabinet Information
DOT
DOT
HYBRID
HYBRID
V Count 0
Custom Connection
LED Display Setup
300
Operation
Preview
200
300
Manual(port1)
Import(port1)
500
V Size 0
100
4
Select TileType
H Count 0
600
H Size 0
Preview
Export(port1)
Weight(Kg)
Tile Type
400
V Position 0
3
400
H Position 0
2
1
300
V Count 0
1
500
H Count 0
Hardware Connection
200%
Sort Normal
600
Select TileType
200
1
Tile Type
13
700
3
00
2
Testing and Adjusting
100
1
LED Display Setup
Display Off
0.00
Power(W)
0.00
6: “Indicator off”: turn on/off the indicator lights.
Voltage(V)
0.00
Individual Type Positioning
Width(cm)
0.00
Tile Address
Height(cm)
0.00
Empty Card Edit Mode
7: “Enable calibration”: Enable calibration data which is saved in panels.
PixelWidth
0
Forbid Moving All Cards
PixelHeight
0
00
Weight(Kg)
Indicator Off
NONE
Enable Calibration
Current Gain Adjustment
H Position 0
Link
Current Level 1
50
V Position
0
H Size
0
R
100
V Size
0
G
100
Card Index
0
B
100
%
Gamma 2.8
2: Parameters loaded successfully!
3: Parameters loaded successfully!
4: Parameters loaded successfully!
5: Parameters loaded successfully!
6: Parameters loaded successfully!
7: Parameters loaded successfully!
8: Parameters loaded successfully!
www.roevisual.com
R
O
E
~Fly your creative thinking~
The
Third
Page
www.roevisual.com
R
O
E
~Fly your creative thinking~
4. Adjust the position of your display on displaying area.
2
3
V Count 0
H Position 0
6
7
12
5
8
11
4
9
10
Tile Type
MC-7H-9269
H Size 0
Save
Export(port1)
Import(port1)
V Size 0
Fast change the parameters
with mouse wheel.
12
11
4
9
10
12
2
5
8
11
3
4
9
10
500
600
Testing and Adjusting
700
800
900
1000
1100
1200
13
200%
Sort Normal
Save
Import(port1)
Custom Connection
Reset All Tile
Hotkey List
Display Off
Weight(Kg)
0.00
Power(W)
0.00
Voltage(V)
0.00
Individual Type Positioning
Width(cm)
0.00
Tile Address
Height(cm)
0.00
PixelWidth
0
PixelHeight
0
Indicator Off
NONE
Empty Card Edit Mode
Forbid Moving All Cards
Enable Calibration
Current Gain Adjustment
H Position 0
Link
Current Level 1
50
V Position
0
H Size
0
R
100
V Size
0
G
100
Card Index
0
B
100
%
Gamma 2.8
Hardware Connection
2
3
100
4
100
1
1
MC-7H-9269
200
Tile Type
H Count 4
300
6
7
12
2
5
8
11
3
4
9
10
LED Display Setup
400
500
600
Testing and Adjusting
700
800
900
1000
1100
1200
13
1
200%
Sort Normal
H Position 0
Tile Type
H Size 0
V Size 0
Cabinet Information
0.00
Voltage(V)
0.00
Individual Type Positioning
Width(cm)
0.00
Tile Address
Height(cm)
0.00
0
0
00
0.00
Power(W)
PixelHeight
H Position 80
Reset All Tile
V Position 60
V Size 0
Indicator Off
Enable Calibration
Current Gain Adjustment
H Position 0
NONE
V Position
0
H Size
0
V Size
Card Index
Empty Card Edit Mode
Forbid Moving All Cards
Link
Current Level 1
50
R
100
0
G
100
0
B
100
%
Gamma 2.8
Keep pressing left key
then drag your display.
Keyboard in numbers for
accurate position setting.
H Size 0
Display Off
Weight(Kg)
PixelWidth
4
V Count 3
Custom Connection
Hotkey List
700
Save
Import(port1)
600
Manual(port1)
Preview
Export(port1)
3
MC-7H-9269
H Count 4
400
V Position 0
2
1
300
V Count 3
200
1
Manual(port1)
Preview
Save
Export(port1)
Import(port1)
5. Preview and Save
4: Parameters loaded successfully!
5: Parameters loaded successfully!
6: Parameters loaded successfully!
7: Parameters loaded successfully!
8: Parameters loaded successfully!
9: Parameters loaded successfully!
10: Parameters loaded successfully!
1
2
3
4
1
Tile Type
MC-7H-9269
“Preview Position”: Send the configuration to your LED screen
and preview the performance.
H Count 4
V Count 3
“Save”: Save the configuration after setting.
H Position 80
V Position 60
Fast mapping button
H Size 0
Left key: number tiles
V Size 0
Right key: cancel tiels’ number
www.roevisual.com
R
O
E
~Fly your creative thinking~
The
Fourth
Page
Manual(port1)
Preview
Save
Export(port1)
Import(port1)
“Export”: Save your setting as a file for future setting.
“Import”: Load a setting file for fast setting.
www.roevisual.com
R
O
E
~Fly your creative thinking~
Operation
7
8
1
400
7
4: Parameters loaded successfully!
5: Parameters loaded successfully!
6: Parameters loaded successfully!
7: Parameters loaded successfully!
8: Parameters loaded successfully!
9: Parameters loaded successfully!
10: Parameters loaded successfully!
500
1
6
5
Manual(port1)
Preview
Export(port1)
Cabinet Information
3. Number the tiels according to your hardware connection.
LED Display Setup
300
6
400
V Position 60
Preview
200
1
300
V Count 3
Manual(port1)
100
4
H Count 4
V Size 0
3
3
H Position 80
H Size 0
1
2
1
V Position 0
2
Hardware Connection
1
100
1
1
MC-7H-9269
H Count 0
200
1
Tile Type
500
4
600
3
700
2
00
1
6. Hotkey list
2. Forbid Moving Cards:
200
300
6
7
12
2
5
8
11
3
4
9
10
400
500
600
700
800
900
1000
1100
1200
13
200%
Sort Normal
1
300
V Count 3
200
1
H Position 0
Hotkey List
400
V Position 0
H Size 0
V Size 0
Manual(port1)
Preview
Save
Export(port1)
Import(port1)
Weight(Kg)
0.00
Power(W)
0.00
Voltage(V)
0.00
Width(cm)
0.00
Height(cm)
0.00
PixelWidth
0
PixelHeight
0
00
700
Cabinet Information
key
Left Mouse
Right Mouse
Mouse Wheel
Ctrl + Mouse Wheel
Shift + Mouse Wheel
Ctrl + Lefe Mouse
Ctrl + Lefe Mouse double clicked
Ctrl + A
Ctrl + Up(Left,Right,Down)
Shift + Type
Up(Left,Right,Down)
Individual
Positioning
Empty Card Edit Mode: Ctrl
+ Left Mouse
H Position 0
Tile Address NONE
Ctrl + Z
V Position 0
Page
EmptyUp
Card Edit Mode
H Size 0
Page Down
Forbid Moving All Cards
V Size 0
Keyboard: up
Keyboard: Down
Card Index 0
Keyboard: Left
Keyboard: Right
4: Parameters loaded successfully!
5: Parameters loaded successfully!
6: Parameters loaded successfully!
7: Parameters loaded successfully!
8: Parameters loaded successfully!
9: Parameters loaded successfully!
10: Parameters loaded successfully!
2
Description
Numbered tile by clicked, select tile by double click
Press and move, numbered tile consecutively, clicke
Zoom
Move vertical scroll bar
Move Horizontal scroll bar
Select some Recieving Cards
Select tile consecutively
Select all tiles of current screen
Cancel tiles
NumberedCurrent
tile Gain Adjustment
Select or disselect empty cards
Link
Current Level 1
%
50
Undo
Zoom In R
100
Zoom Out
G
100 or m
Move up selected
screen when screen is select
Move downBselected screen when screen is100
selecte
Move left selected screen when screen is selected o
Move right selected screen when screen is selectd
Custom Connection
3
Reset All Tile
Hotkey List
1
6
7
12
5
8
11
4
9
10
Hardware Connection
1
2
3
1
Tile Type
Display Off
MC-7H-9269
H Count 4
Indicator Off
V Count 3
Enable Calibration
H Position 80
Gamma 2.8
100
4
200
LED Display Setup
300
1
400
1
6
7
12
2
5
8
11
3
4
9
10
500
Testing and Adjusting
600
700
800
900
1000
1100
1200
13
200%
Sort Normal
V Position 60
H Size 0
V Size 0
Manual(port1)
Preview
Save
Export(port1)
Import(port1)
Cabinet Information
Custom Connection
Reset All Tile
Hotkey List
Display Off
Weight(Kg)
0.00
Power(W)
0.00
Voltage(V)
0.00
Individual Type Positioning
Width(cm)
0.00
Tile Address
Height(cm)
0.00
PixelWidth
0
PixelHeight
0
Indicator Off
H Position 0
NONE
Empty Card Edit Mode
Link
Current Level 1
50
V Position
0
H Size
0
R
74
V Size
0
G
74
Card Index
0
B
74
Forbid Moving All Cards
Advanced
Enable Calibration
Current Gain Adjustment
%
Gamma 2.8
Operation
100
4
100
3
MC-7H-9269
200
2
1
H Count 4
300
1
Tile Type
Choose one screen, then move the slider to adjust the current for R G B. Enable “Link”,
and adjust the brightness for R G B together.
Testing and Adjusting
400
10
100
9
500
4
LED Display Setup
600
3
Current Gain Adjustment
3. Current Gain Adjustment (Brightness adjustment)
Hardware Connection
500
12
11
600
7
8
700
6
5
00
1
2
Forbid Moving All Cards
Enable “Forbid Moving All Cards” to prevent from moving LED screen by mouse operation.
Click the “Hotkey List” to learn how to easy operate with mouse and keyboard.
4: Parameters loaded successfully!
5: Parameters loaded successfully!
6: Parameters loaded successfully!
7: Parameters loaded successfully!
8: Parameters loaded successfully!
9: Parameters loaded successfully!
10: Parameters loaded successfully!
1. Empty tile:
Empty Card Edit Mode
Enable “Empty Card Edit Mode”, then left click your mouse to empty tile,
left click again to cancel the empty mode.
Save the setting
Current Gain Adjustment
10
Link
Hardware Connection
7
100
4
100
3
1
Tile Type
MC-7H-9269
H Count 4
200
9
2
200
1
5
6
2
4
7
3
8
400
500
600
700
800
900
1000
1100
1200
13
200%
10
Sort Normal
H Position 80
50
100
G
100
B
100
%
You can save 3 different kinds of
setting for future fast setting.
9
400
V Position 60
H Size 0
V Size 0
Manual(port1)
Preview
Save
Export(port1)
Import(port1)
Cabinet Information
Tile Status
Custom Connection
Reset All Tile
Hotkey List
Display Off
Weight(Kg)
0.00
Power(W)
0.00
Voltage(V)
0.00
Individual Type Positioning
Width(cm)
0.00
Tile Address
Height(cm)
0.00
Empty Card Edit Mode
PixelWidth
0
Forbid Moving All Cards
PixelHeight
0
Indicator Off
NONE
Link
Inactive, can’t receive config file.
Enable Calibration
Current Gain Adjustment
H Position 0
Current Level 1
50
V Position
0
H Size
0
R
100
V Size
0
G
100
Card Index
0
B
100
%
Gamma 2.8
Active, can receive corresponding config file when click “preview and Save”.
4: Parameters loaded successfully!
5: Parameters loaded successfully!
6: Parameters loaded successfully!
7: Parameters loaded successfully!
8: Parameters loaded successfully!
9: Parameters loaded successfully!
10: Parameters loaded successfully!
www.roevisual.com
Current Level 1
R
300
V Count 3
300
Testing and Adjusting
500
8
1
LED Display Setup
600
3
4
6
700
2
5
00
1
R
O
E
Chosen, Individual Type Positioning is available.
~Fly your creative thinking~
The
Fifth
Page
www.roevisual.com
R
O
E
~Fly your creative thinking~
Empty, for special shape.
Testing and Adjusting
“Custom Connection” and “Reset All Tile” function.
Hardware Connection
3
100
4
1
200
LED Display Setup
300
400
500
Testing and Adjusting
600
Tile Type
700
800
900
1000
1100
13
1200
200%
Sort Normal
200
MC-7H-9269
H Count 4
300
V Count 3
H Position 500
400
V Position 300
H Size 0
V Size 0
1
6
7
12
2
5
8
11
3
4
9
10
1
5
3
6
2
2
8
5
7
9
3
6 Connection
7
8
Custom
12
Reset All Tile
Hotkey List
700
Cabinet Information
4
Custom Connection
600
Save
Import(port1)
500
Manual(port1)
Preview
Export(port1)
1
Display Off
0.00
Power(W)
0.00
Voltage(V)
0.00
Individual Type Positioning
Width(cm)
0.00
Tile Address
Height(cm)
0.00
Empty Card Edit Mode
PixelWidth
0
Forbid Moving All Cards
PixelHeight
0
00
Weight(Kg)
Indicator Off
Enable Calibration
Current Gain Adjustment
H Position 0
NONE
V Position
0
H Size
0
V Size
Card Index
Link
Current Level 1
74
0
G
74
0
B
74
Gamma 2.8
%
50
R
1
4
5
3
6
2
4: Parameters loaded successfully!
5: Parameters loaded successfully!
6: Parameters loaded successfully!
7: Parameters loaded successfully!
8: Parameters loaded successfully!
9: Parameters loaded successfully!
10: Parameters loaded successfully!
1
8
5
7
9
2
3
6
Reset
All7Tile
10
11
4
8
12
Operation
2
100
1
Step forward and backward
If the frame turns red, the total resolution is over the resolution limit of one port.
Hardware Connection
100
4
1
V Count 12
H Position 0
V Position 0
H Size 0
V Size 0
Manual(port1)
Preview
Preview
Export(port1)
Import(port1)
Cabinet Information
LED Display Setup
300
6
7
8
500
12 13 14 15 16 17
18 19 20
21 22
23 24 25 26 27 28
29 30 31
32 33
34 35 36 37 38 39
40 41 42
43 44
45 46 47 48 49 50
51 52 53
54 55
56 57 58 59 60 61
62 63 64
65 66
67 68 69 70 71 72
73 74 75
76 77
78 79 80 81 82 83
84 85 86
87 88
89 90 91 92 93 94
95 96 97
98 99
200
5
400
10 11
500
MC-7H-9269
H Count 11
4
Testing and Adjusting
600
700
800
900
1000
1100
1200
1. Color Temperature Adjustment
13
2. Brightness Adjustment (Adjustment by grey level)
200%
3. Test Patterns
Sort Normal
4. Video source switch (Only for Q7)
100 101 102 103 104 105 106 107 108 109 110
5. Multi-cards operate together.
111 112 113 114 115 116 117 118 119 120 121
122 123 124 125 126 127 128 129 130 131 132
Custom Connection
600
Tile Type
3
Reset All Tile
Hotkey List
700
1
2
200
9
100
3
300
2
400
1
Display Off
0.00
Power(W)
0.00
Voltage(V)
0.00
Individual Type Positioning
Width(cm)
0.00
Tile Address
Height(cm)
0.00
PixelWidth
0
PixelHeight
0
00
Weight(Kg)
Indicator Off
NONE
Empty Card Edit Mode
Enable Calibration
Current Gain Adjustment
H Position 0
V Position
0
H Size
0
V Size
Card Index
Forbid Moving All Cards
Link
Current Level 1
50
R
100
0
G
100
0
B
100
%
Gamma 2.8
2: Parameters loaded successfully!
3: Parameters loaded successfully!
4: Parameters loaded successfully!
5: Parameters loaded successfully!
6: Parameters loaded successfully!
7: Parameters loaded successfully!
8: Parameters loaded successfully!
www.roevisual.com
R
O
E
~Fly your creative thinking~
The
Sixth
Page
www.roevisual.com
R
O
E
~Fly your creative thinking~
ROE Visual Co., Ltd
Bldg 7, Zhong Yuntai Technology Industrial Park, Songbai Road,
Shiyan Street, Baoan, Shenzhen, China.
Tel: +86-755-83924892
Fax: +86-755-83924891
E-mail: [email protected]
Website: www.roevisual.com