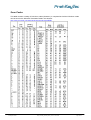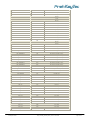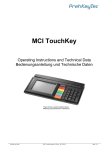
1
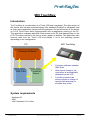
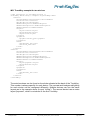
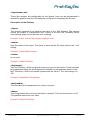
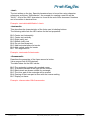
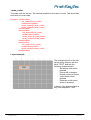
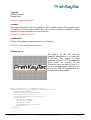
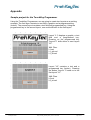
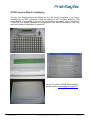
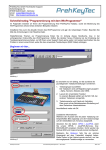
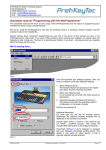
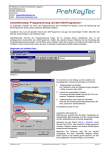
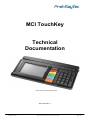
MCI TouchKey Technical Documentation Figure shows a specific keyboard layout Document Rev. C PrehKeyTec GmbH MCI_TouchKey_TechDoc_RevC_en.doc - 2011-02-09 Page 1/40 Introduction............................................................................................................... 3 System requirements ............................................................................................... 3 Structure of the MCI TouchKey ............................................................................... 4 Keyboard and module........................................................................................................4 Touch-LCD ................................................................................................................ 4 LCD ......................................................................................................................................4 TouchKey Server................................................................................................................4 Loading graphics ...............................................................................................................5 TouchKey Programmer ............................................................................................ 6 General information ...........................................................................................................6 Requirements .....................................................................................................................6 Adding graphics into the TouchKey Programmer ..........................................................7 XML Files................................................................................................................... 8 General information ...........................................................................................................8 Why XML? ...........................................................................................................................8 XSD Schema-Files..............................................................................................................8 Types of XML files..............................................................................................................9 TouchKey.xml ................................................................................................................................. 9 <Layername>.xml ......................................................................................................................... 13 <Text>.xml .................................................................................................................................... 20 <Graphic>.xml............................................................................................................................... 24 Startlayout.xml .............................................................................................................................. 26 Sample project for the TouchKey Programmer.............................................................27 OPOS Service Object LineDisplay ..................................................................................31 Configuring the flash memory using iLCD Setup .........................................................32 ASCII Character Table......................................................................................................33 Scan Codes.......................................................................................................................35 Virtual Key Codes.............................................................................................................36 Technical Data ..................................................................................................................39 Additional help .................................................................................................................40 PrehKeyTec GmbH MCI_TouchKey_TechDoc_RevC_en.doc - 2011-02-09 Page 2/40 MCI TouchKey Introduction The TouchKey is a combination of a Touch LCD and a keyboard. The right section of the device and included modules behave like standard PrehKeyTec keyboards and as such are programmed using the WinProgrammer. On the left section of the device is a LCD Touch Panel which communicates with an application running on the PC. This application evaluates data XML Data stored on the PC and displays them on the LCD. This data could be in the form of a text, graphic or buttons. The application also receives data from the Touch LCD and passes it on to the operating system depending on the configuration. PC MCI TouchKey Customer Software XML-Files TouchKey Server • Customer software updates XML Data • After layout changes, the new layout is automatically displayed on the LCD • TouchKey buttons can either provoke a change of layouts (drill down/up) or simulate key codes System requirements - Windows XP - USB - .Net Framework 2.0 or later PrehKeyTec GmbH MCI_TouchKey_TechDoc_RevC_en.doc - 2011-02-09 Page 3/40 Structure of the MCI TouchKey Keyboard and module The keyboard section and other modules (MSR, Keylock) if available are programmed using the WinProgrammer software. This software can be downloaded from the support section of our Website at: http://support.PrehKeyTec.com. For more information on how to use the WinProgrammer, please refer to our Quick Start manual of the WinProgrammer. Touch-LCD LCD The left section of the TouchKey device is made of a LCD Touch Panel. These LCD has the following characteristics: - Tactile Feedback (Similar to pressing a keyboard key) Monochrome display Resolution of 320 x 240 Pixel LED Background lighting Layouts are controlled using XML data Displays text, Graphics and buttons TouchKey Server In order to be able to display information on the TouchKey LCD the TouchKey Server and an interface DLL need to be on the system and running The TouchKey Server is a little application, which after a start is displayed in the Windows task bar. The TouchKey server communicates with the XML Data stored in the PC and sends this data through the TKInterface.dll to the MCI TouchKey. Changes in the XML Data are recognized by the TouchKey Server after the data is stored and the new data is displayed on the screen. PrehKeyTec GmbH MCI_TouchKey_TechDoc_RevC_en.doc - 2011-02-09 Page 4/40 The XML files can be created using the TouchKey Programmer. The XML data structure created using the TouchKey Programmer can then be used by an application to change content of the XML files. These changes will then be transmitted over the TouchKey Server to the screen of the TouchKey. In order to transmit the TouchKey configuration to the system, one simply has to copy the XML folder, and the TouchKey Server executables (TouchKeySvr.exe / TKInterface.dll) into a folder on the target PC. Info-Dialog: A mouse click on the TouchKey Server icon found in the task bar opens up the image on the left. This image shows the version of the TouchKey Programmer and also contains two buttons: "Hide Window" -> This hides the window and only shows the icon in the task bar. "Shut Down Server" -> This shuts down the application and all communications with the TouchKey. Loading graphics Graphics can be displayed on the LCD panel of the MCI TouchKey. The maximum size of a graphic that can be displayed is 320x240. Acceptable formats are *.bmp, *.jpg or *.gif. The graphics are stored in the internal memory of the LCD controller. This can be accessed using the index-number which was assigned to them during download into the flash memory. This index is necessary in the XML files in order for a graphic to be uploaded on the LCD. The configuration of the flash memory is done using the tool "iLCD Setup". A detail description on how this works is documented at the end of this manual. PrehKeyTec GmbH MCI_TouchKey_TechDoc_RevC_en.doc - 2011-02-09 Page 5/40 TouchKey Programmer General information The TouchKey Programmer is a software used to create the XML files for the MCI TouchKey. This software primarily creates and test layouts using simple drag and drop methods. The most recent version of the TouchKey Programmer can be downloaded from our website at: http://support.PrehKeyTec.com. For getting started a flash animation shows the first steps and explains the basic usage of the MCI TouchKey. Requirements The TouchKey Programmer requires .NET Framework 2.0 or later to be installed on the system. The start window of the application is shown in the image below: The language of the Programmer window is displayed on the drop down box situated at the top right corner of the window. A click on "help" in the menu bar displays a complete online reference on how to use the TouchKey Programmer. PrehKeyTec GmbH MCI_TouchKey_TechDoc_RevC_en.doc - 2011-02-09 Page 6/40 After creating a project and its layouts, this can be exported to the LCD using "Test Projects". However before the layouts can be viewed on the screen, the TouchKey Server has to be started. This TouchKey Server has to be installed one level above the XML folder which contains the XML files. Clicking on the menu "Test Project" creates all the necessary XML files. The structure of these files is as follows: - A XML file is created for every layout using the Layout data. If the name of the layout is for example "L1", then a file named "L1.xml" will be created and automatically stored in the folder \xml, situated in the export path of the project’s configuration. - Additional, if this layout "L1" contains text fields, an extra file called "L1_txt.xml" will be created. - Also if this layout contains graphics, a corresponding file called "L1_gfx.xml" will also be created and stored. Adding graphics into the TouchKey Programmer In order to be able to work with user created images in the TouchKey Programmer, they must first of all be copied into a folder of the Programmer. This is done using the tool "GraphicsLoader" which is part of the TouchKey Programmer package. New graphics is loaded into the TouchKey Programmer using the "Add" button. The "Del" button deletes a graphics from the TouchKey Programmer. It is important to note that the index of the graphic has to exactly match that in the flash memory of the TouchKey. The index of the graphic in the flash memory is written using another tool called "iLCD Setup". We will be taking a look at this tool later in this document. In case the indexes don’t match, that can be corrected using the "arrow" buttons of the GraphicsLoader. PrehKeyTec GmbH MCI_TouchKey_TechDoc_RevC_en.doc - 2011-02-09 Page 7/40 The menu "Save & Exit" saves the configuration and exits the tool. Simply click the "Exit" button to end the program without saving the configuration. XML Files General information The simplest way to create XML files is using the TouchKey Programmer. The program has the ability to check the created files for any mistakes. Wrongly configured XML files cannot be displayed on the LCD. The XML files can also be manually created and configured using simple text editor programs like notepad or any other XML editor programs. A third method of configuration is letting the application do it. The application opens up the appropriate XML file and configures the content, after which the file is saved. The TouchKey Server will recognize this saving of the file and sends the updated file to the display of the MCI TouchKey. Why XML? XML offers the following advantages: - Programming language independence Simple structuring of data No software API necessary Remote configuration and updating of XML files XML files can be easily updated manually or by an application XML is a standardized protocol XSD Schema-Files The TouchKey Server uses XSD-Schema-Files to validate the syntax and value range of the created XML files. As such the following files must always be present in the XML-Folder: - Graphic.xsd - Layer.xsd - Text.xsd - TouchKey.xsd PrehKeyTec GmbH MCI_TouchKey_TechDoc_RevC_en.doc - 2011-02-09 Page 8/40 Types of XML files TouchKey.xml Every MCI TouchKey has a basic configuration. This configuration is stored in "Touchkey.xml". This file can also contain information and configurations for more than one TouchKey. Differentiating the layouts for the different TouchKeys is done using the TouchKey’s serial number. Description of the elements <Device> Start element for a TouchKey device. <Serialnumber> This is the TouchKey’s serial number usually found on the sticker at the back of the device. An example of how the number is written is : 8047-8000012). This number can be ignored if only one TouchKey is connected to the host PC. Example: <Serialnumber>8071-8000012</Serialnumber> <Contrast> The contrast values range from 0-255. This value can be separately configured for each MCI TouchKey device on the system. Example: <Contrast>160</Contrast> <Backlight> The brightness of the back ground lighting ranges from 0-15. Reducing the brightness increases the life cycle of the back ground lighting. This can also be configured for each separate MCI TouchKey. Example: <Backlight>15</Backlight> <NumberOfLayers> This is the number of layouts programmed for the TouchKey. Example: <NumberOfLayers>3</NumberOfLayers> PrehKeyTec GmbH MCI_TouchKey_TechDoc_RevC_en.doc - 2011-02-09 Page 9/40 <NumberOfGraphics> The number of graphics available for the TouchKey. A graphic file can contain many different graphics. Example: <NumberOfGraphics>1</NumberOfGraphics> <NumberOfText> The number of text files which are available for this TouchKey. A text file can contain multiple text fields Example: <NumberOfText>2</NumberOfText> <Layer> This is the name of the layout. This name must be the same as the name of the XML file. For example if the of the layer is "Main", then the corresponding XML file is called "Main.xml". Example: <NumberOfLayers>3</NumberOfLayers> <Layers> <Layer>tables</Layer> <Layer>drinks</Layer> <Layer>food</Layer> </Layers> <graphic>. Name of the graphic. Same principle applies here as in layers above. Example: < NumberOfGraphics >1</ NumberOfGraphics > <graphics> <graphic>tables_gfx</graphic> </graphics> <txt> Name of text. Same principle as in layer but for text. Example: <NumberOfText>2</NumberOfText> <text> <txt>drinks_txt</txt> <txt>food_txt</txt> </text> PrehKeyTec GmbH MCI_TouchKey_TechDoc_RevC_en.doc - 2011-02-09 Page 10/40 MCI TouchKey example for a single device <?xml version="1.0" encoding="utf-8" ?> <TouchKey xmlns="http://tempuri.org/TouchKey.xsd"> <Device> <Serialnumber>0000-0000000</Serialnumber> <Contrast>160</Contrast> <Backlight>15</Backlight> <NumberOfLayers>3</NumberOfLayers> <NumberOfGraphics>1</NumberOfGraphics> <NumberOfText>2</NumberOfText> <Layers> <Layer>tables</Layer> <Layer>drinks</Layer> <Layer>food</Layer> </Layers> <graphics> <graphic>tables_gfx</graphic> </graphics> <text> <txt>drinks_txt</txt> <txt>food_txt</txt> </text> </Device> </TouchKey> The above example describes an MCI TouchKey. The above example shows no serial number since there is just one device involved. The device displays 3 layouts. Additional, the layout "tables" contains one or more graphics and text fields. The layout "food" contains one or more text fields. PrehKeyTec GmbH MCI_TouchKey_TechDoc_RevC_en.doc - 2011-02-09 Page 11/40 MCI TouchKey example for two devices <?xml version="1.0" encoding="utf-8" ?> <TouchKey xmlns="http://tempuri.org/TouchKey.xsd"> <Device> <Serialnumber>1234-1234567</Serialnumber> <Contrast>160</Contrast> <Backlight>15</Backlight> <NumberOfLayers>3</NumberOfLayers> <NumberOfGraphics>1</NumberOfGraphics> <NumberOfText>2</NumberOfText> <Layers> <Layer>tables</Layer> <Layer>drinks</Layer> <Layer>food</Layer> </Layers> <graphics> <graphic>tables_gfx</graphic> </graphics> <text> <txt>drinks_txt</txt> <txt>food_txt</txt> </text> </Device> <Device> <Serialnumber>1234-1234568</Serialnumber> <Contrast>160</Contrast> <Backlight>13</Backlight> <NumberOfLayers>2</NumberOfLayers> <NumberOfGraphics>0</NumberOfGraphics> <NumberOfText>1</NumberOfText> <Layers> <Layer>payment</Layer> <Layer>drinks</Layer> </Layers> <graphics> </graphics> <text> <txt>drinks_txt</txt> </text> </Device> </TouchKey> The serial numbers can be found on the sticker situated at the back of the TouchKey. This number is always specific for each device. The contrast and background lighting for each device can be configured differently. Multiple devices can use the same layouts as in the example above (Layout "drinks"). The second device has an extra layout "payment", which is not shown in the first TouchKey. PrehKeyTec GmbH MCI_TouchKey_TechDoc_RevC_en.doc - 2011-02-09 Page 12/40 <Layername>.xml These files contains the configuration for the layouts. Keys can be programmed in layouts but graphics and text will always be configured in a separate file for each. Description of the Element <Layer> This element contains as an attribute the name of the XML-Schema. The schema checks the validity of <Layername>.xml. If there is an error, the TouchKey Server automatically stops and out puts an error message. Example: <Layer xmlns="http://tempuri.org/layer.xsd"> <name> Sets the name of the layout. The name is same as the file name without the ".xml" ending. Example: <name>tables</name> <index> Is not used. Example: <index>0</index> <keytostart> This is a POS-Key, which can directly bring up a layer on the screen. These keys can be programmed using the WinProgrammer software on the keyboard section of the MCI TouchKey. If this is not needed, please enter the value 0. The value range is 0128 Example: <keytostart>1</keytostart> <buttondata> This describes all the parameters for a key on a layout. <beep> This configuration sets a click for the button in a layout. This can be turned on or off. The possible values are: true, false. Example: <beep>true</beep> PrehKeyTec GmbH MCI_TouchKey_TechDoc_RevC_en.doc - 2011-02-09 Page 13/40 <beepfreq> Frequency of the key click. Range 0-255. 0 - 15 = ca 4800Hz 16 - 31 = ca 2400Hz 32 - 63 = ca 1200Hz from 64 = ca 600Hz Example: <beepfreq>16</beepfreq> <beepduration> Length of key click. Rane 0-255. Length = Value * 8,3ms Example: <beepduration>10</beepduration> <inverse> Inverts the key when it is pressed. Possible values: true, false Example: <inverse>true</inverse> <keyboardoutput> Out puts a key when the button (key) is pressed. Example: <keyboardoutput>true</keyboardoutput> <xpixel> Position Horizontal. Range 0-320. Example: <xpixel>1</xpixel> <ypixel> Position Vertical. Range 0-240. Example: <ypixel>6</ypixel> <wpixel> Width in pixels. Value 0-320. Example: <wpixel>89</wpixel> <hpixel> Height in pixels. Range 0-240. Example: <hpixel>61</hpixel> PrehKeyTec GmbH MCI_TouchKey_TechDoc_RevC_en.doc - 2011-02-09 Page 14/40 <text> The text written on the key. Special characters have to be written using character references as follows: "&#character;" An example for creating a new line will be " ". A list of the ASCI characters is found at the end of this document. Numbers are to be written in decimal form. Example: <text>drinks
table 1</text> <textmode> This describes the characteristics of the fonts used in labeling buttons. The following table lists the HEX values for the font properties: Bit 0 Center text horizontally Bit 1 Center text vertically Bit 2 Right justify text Bit 3 Bottom justify text Bit 4 Do not word wrap text Bit 5 Add horizontal space for border Bit 6 Add vertical space for border Bit 7 Turn alignment on Example: <textmode>0</textmode> <framemode> Describes the properties of the frame around a button. Value ranges from 0-255(dezimal). The table below list the HEX values: Bit 0 The rectangle is drawn with rounded corner Bit 1 A shadow is drawn at the right and the bottom Bit 2 Blank pixels are drawn outside the rectangle Bit 3 The inner part of the rectangle will be erased Bit 4 Erasing of the inner part is done with the inverse setting Bit 7 Display no frame Example: <framemode>128</framemode> PrehKeyTec GmbH MCI_TouchKey_TechDoc_RevC_en.doc - 2011-02-09 Page 15/40 <font> Describes index of the font being used. The fonts have to be loaded on the flash memory of the TouchKey before they can be used. The a user defined. The list below shows the default font found in each MCI TouchKey: 0 Verdana 8 pt fat 1 Verdana 8 pt 2 Verdana 20 pt fat 3 Verdana 12 pt fat 4 MS Sans Serif 18 pt fat 5 MS Sans Serif 12 pt 6 Verdana 10 pt fat 7 Verdana 14 pt fat 8 Verdana 16 pt fat Example: <font>0</font> <touchindex> This defines the of the touch field. Multiple buttons (keys) with different text descriptions have to have specific indexes in order to be used. The value range is: 0-63 A value of 255 automatically takes the next free index. Example: <touchindex>1</touchindex> <press> Sends key codes when pressed (True) or released (false). Example: <press>true</press> <startlayer> The name of the layout that is started when the button is pressed. Example: <startlayer>drinks</startlayer> <buttonvalue> This section defines virtual key codes and scan codes. A 0 is always required at the end of each block. Please see the description of "Scan codes" and "virtual keys" at the end of this document. <vk_code> Virtual key code of the key. The decimal number is used for entering the value. Example: <vk_code>49</vk_code> <make> Indicates if a make- (true) or break- (false) gets sent. Example: <make>true</make> PrehKeyTec GmbH MCI_TouchKey_TechDoc_RevC_en.doc - 2011-02-09 Page 16/40 <scan_code> The scan code for the key. The decimal number for the value is used. This block also ends with a 0 scan code. Example: <buttonvalue> <vk_code>49</vk_code> <make>true</make> <scan_code>2</scan_code> <scan_code>0</scan_code> </buttonvalue> <buttonvalue> <vk_code>49</vk_code> <make>false</make> <scan_code>2</scan_code> <scan_code>0</scan_code> </buttonvalue> <buttonvalue> <vk_code>0</vk_code> <make>false</make> <scan_code>0</scan_code> </buttonvalue> Layout example The example layout on the left shows a key (button) with the label "TEST" and has the following characteristics: - Sends key code when pressed - Frame with a shadow - Round corners of frame - Invert button when pressed - Generate a click when button is pressed A press of the button outputs a key code sequence "Test". PrehKeyTec GmbH MCI_TouchKey_TechDoc_RevC_en.doc - 2011-02-09 Page 17/40 The XML file for the above example has the following structure <?xml version="1.0" encoding="utf-8" ?> <Layer xmlns="http://tempuri.org/layer.xsd"> <name>L1</name> <index>0</index> <keytostart>0</keytostart> <buttons> <buttondata> <beep>true</beep> <beepfreq>16</beepfreq> <beepduration>10</beepduration> <inverse>true</inverse> <keyboardoutput>true</keyboardoutput> <xpixel>45</xpixel> <ypixel>40</ypixel> <wpixel>92</wpixel> <hpixel>40</hpixel> <text>TEST</text> <textmode>131</textmode> <framemode>3</framemode> <font>6</font> <touchindex>1</touchindex> <press>true</press> <startlayer/> <buttonvalue> <vk_code>16</vk_code> <make>true</make> <scan_code>42</scan_code> <scan_code>0</scan_code> </buttonvalue> <buttonvalue> <vk_code>84</vk_code> <make>true</make> <scan_code>20</scan_code> <scan_code>0</scan_code> </buttonvalue> <buttonvalue> <vk_code>84</vk_code> <make>false</make> <scan_code>20</scan_code> <scan_code>0</scan_code> </buttonvalue> <buttonvalue> <vk_code>16</vk_code> <make>false</make> <scan_code>42</scan_code> <scan_code>0</scan_code> </buttonvalue> <buttonvalue> <vk_code>69</vk_code> <make>true</make> <scan_code>18</scan_code> <scan_code>0</scan_code> </buttonvalue> <buttonvalue> <vk_code>69</vk_code> <make>false</make> <scan_code>18</scan_code> <scan_code>0</scan_code> </buttonvalue> <buttonvalue> PrehKeyTec GmbH MCI_TouchKey_TechDoc_RevC_en.doc - 2011-02-09 Page 18/40 <vk_code>83</vk_code> <make>true</make> <scan_code>31</scan_code> <scan_code>0</scan_code> </buttonvalue> <buttonvalue> <vk_code>83</vk_code> <make>false</make> <scan_code>31</scan_code> <scan_code>0</scan_code> </buttonvalue> <buttonvalue> <vk_code>84</vk_code> <make>true</make> <scan_code>20</scan_code> <scan_code>0</scan_code> </buttonvalue> <buttonvalue> <vk_code>84</vk_code> <make>false</make> <scan_code>20</scan_code> <scan_code>0</scan_code> </buttonvalue> <buttonvalue> <vk_code>0</vk_code> <make>false</make> <scan_code>0</scan_code> </buttonvalue> </buttondata> </buttons> </Layer> The key code sequence for this example "Test" is as follows: make SHIFT ->make ‘t’ ->break ‘t’ ->break SHIFT -> make ‘e’ -> break ‘e’ ->make ‘s’ -> break ‘s’ -> make ‘t’ -> break ‘t’ PrehKeyTec GmbH MCI_TouchKey_TechDoc_RevC_en.doc - 2011-02-09 Page 19/40 <Text>.xml The configuration of the text fields is made in this section. One or multiple text fields can be defined here. Description of the elements <name> Name of the text file without the additional ".xml". Example: <name>food_txt</name> <showinlayer> The created text is shown in the layout defined in <showinlayer>. When the layout is displayed on the LCD, it automatically out puts all text files <Text>.xml defined within this layout. Example: <showinlayer>food</showinlayer> <keytostart> This is a POS Key that starts the Text automatically. POS keys can be programmed using the WinProgrammer on the keyboard section of the device. If this is not required, the default value 0 is used. Value range: 0-128. Example: <keytostart>1</keytostart> <erasedisplay> This function erases the complete LCD display before displaying a text or text field. Possible values are: true, false. Example: <erasedisplay>false</erasedisplay> <textfield> Contains all the entries and characteristics of the text field. Example: <textfield> <xpixel>0</xpixel> <ypixel>0</ypixel> <wpixel>138</wpixel> <hpixel>200</hpixel> <font>0</font> <inverse>false</inverse> <setunderline>false</setunderline> <textstring>label1</textstring> <textmode>0</textmode> </textfield> PrehKeyTec GmbH MCI_TouchKey_TechDoc_RevC_en.doc - 2011-02-09 Page 20/40 <xpixel> Position Horizontal. Range 0-320. Example: <xpixel>0</xpixel> <ypixel> Position Vertical. Range 0-240. Example: <ypixel>0</ypixel> <wpixel> Width of text field in pixels. Range 0-320. Example: <wpixel>138</wpixel> <hpixel> Height of text field in Pixel. Range 0-240. Example: <hpixel>200</hpixel> <font> This describes the index of the font that is being used. These fonts have to be loaded in the memory of the TouchKey before they can be used and they are user defined. Factory default configuration: 0 Verdana 8 pt fat 1 Verdana 8 pt 2 Verdana 20 pt fat 3 Verdana 12 pt fat 4 MS Sans Serif 18 pt fat 5 MS Sans Serif 12 pt 6 Verdana 10 pt fat 7 Verdana 14 pt fat 8 Verdana 16 pt fat Example: <font>0</font> <inverse> Inverts the text field Possible values: true, false Example: <inverse>false</inverse> PrehKeyTec GmbH MCI_TouchKey_TechDoc_RevC_en.doc - 2011-02-09 Page 21/40 <setunderline> Underlines the text. Possible values: true, false Example: <setunderline>false</setunderline> <textstring> This section holds the content of the text field. Special characters are written with character references. This is structure is as follows:"&#character reference;". For example a new line will be written as " ". A list of the ASCII character is found at the end of this document. Decimal numbers are to be used. Example: <textstring>label1</textstring> <textmode> The mode of the text. The table below shows the hexadecimal values used for configuration. Value range : 0-255 Bit 0 Center text horizontally Bit 1 Center text vertically Bit 2 Right justify text Bit 3 Bottom justify text Bit 4 Do not word wrap text Bit 5 Add horizontal space for border Bit 6 Add vertical space for border Bit 7 Turn alignment on Example: <textmode>0</textmode> PrehKeyTec GmbH MCI_TouchKey_TechDoc_RevC_en.doc - 2011-02-09 Page 22/40 A layout sample The name for the XML file is "L1_txt.xml". This Layout contains a text field with the text "This is a test". This text field is displayed in layout "L1". <?xml version="1.0" encoding="utf-8" ?> <text xmlns="http://tempuri.org/Text.xsd"> <name>L1_txt</name> <showinlayer>L1</showinlayer> <keytostart>0</keytostart> <erasedisplay>false</erasedisplay> <textfield> <xpixel>45</xpixel> <ypixel>80</ypixel> <wpixel>230</wpixel> <hpixel>40</hpixel> <font>3</font> <inverse>false</inverse> <setunderline>false</setunderline> <textstring>This is a test</textstring> <textmode>131</textmode> </textfield> </text> PrehKeyTec GmbH MCI_TouchKey_TechDoc_RevC_en.doc - 2011-02-09 Page 23/40 <Graphic>.xml This section handles the configuration of graphics. One or multiple graphics can be defined and configured here. Description of the elements <name> This is the name of the graphic file without the ".xml" ending. Example: <name>tables_gfx</name> <showinlayer> The graphic will be displayed in this Layout. Example: <showinlayer>food</showinlayer> <keytostart> This is a POS key that can be programmed on the keyboard section of the WinProgrammer to start a graphic when pressed. This function can be turned off if not desired by entering the number 0 in the provided field. Value range 0-128 Example: <keytostart>1</keytostart> <erasedisplay> Erases the complete display of the LCD. Possible values: true, false Example: <erasedisplay>false</erasedisplay> <graphicfield> Contains all the configuration for the graphics. Example: <graphicfield> <xpixel>1</xpixel> <ypixel>6</ypixel> <index>17</index> <animated>false</animated> </graphicfield> <xpixel> Position horizontal. Range 0-320. Example: <xpixel>1</xpixel> PrehKeyTec GmbH MCI_TouchKey_TechDoc_RevC_en.doc - 2011-02-09 Page 24/40 <ypixel> Position vertical. Range 0-240. Example: <ypixel>6</ypixel> <index> This index represents that of the graphic in the TouchKey device. The graphics must be loaded into the TouchKey before they can be used. Consult the section Loading graphics for more information on how to do this. Example: <index>17</index> <animated> Defines if the graphic is animated (true) or not (false). Example: <animated>false</animated> Sample layout The graphic on the left has the following configuration: It is saved as "L1_gfx.xml". The graphic is then displayed in layout "L1". This graphic is stored within the memory of the TouchKey using the index 0 and it is not an animated graphic. Below is the text for the XML file representing the configuration of the graphic. <?xml version="1.0" encoding="utf-8" ?> <graphic xmlns="http://tempuri.org/Graphic.xsd"> <name>L1_gfx</name> <showinlayer>L1</showinlayer> <keytostart>0</keytostart> <erasedisplay>false</erasedisplay> <graphicfield> <xpixel>7</xpixel> <ypixel>94</ypixel> <index>0</index> <animated>false</animated> </graphicfield> </graphic> PrehKeyTec GmbH MCI_TouchKey_TechDoc_RevC_en.doc - 2011-02-09 Page 25/40 Startlayout.xml When the TouchKey Server is started, the layout at the top of the file "TouchKey.xml" is the first to be displayed on the screen. Each time the TouchKey Server is initiated, "Startlayout.xml" is loaded with a new layout. The client’s application can be used here to write the layout that is to be displayed in "Startlayout.xml". This causes the TouchKey device to change the displayed layout to the actual one in "Startlayout.xml". It is also important to note that the "Startlayout" can also be used by multiple TouchKeys at the same time. Example: <?xml version="1.0" encoding="utf-8"?> <startlayout> <device serialnumber="987654321"> <layout>Layout</layout> </device> <device serialnumber="ID-PREH-00131154028-EA27"> <layout>Zettel</layout> </device> </startlayout> For each device that is defined in "TouchKey.xml", there is a corresponding <device> entry. Using the attribut "serial number", the serial number of the device is entered for identification purposes. The Layout is stored under <layout>. This can also be changed by a client’s application. Der Touchkey Server automatically detects if a new layout is called up by the application. When the file "Startlayout.xml" is saved, this new layout is displayed on the screen. PrehKeyTec GmbH MCI_TouchKey_TechDoc_RevC_en.doc - 2011-02-09 Page 26/40 Appendix Sample project for the TouchKey Programmer Using the TouchKey Programmer, we are going to create two layouts as a working example. The first layout contains a text field, a graphic and a programmed key (button). The second layout contains a text field and programmed key. Using the programmed key in the second layout, one could drill back to the first layout. Layout "L1" displays a graphic, a text field and a programmed key. Pressing on the programmed key "Layout 2" drills down to next layout "L2". XML Files: L1.xml L1_gfx.xml L1_txt.xml Layout "L2" contains a text and a programmed key (button). Pressing the button "Layout 1" leads us to the first layout "L1". XML Files: L2.xml L2_txt.xml PrehKeyTec GmbH MCI_TouchKey_TechDoc_RevC_en.doc - 2011-02-09 Page 27/40 Data for L1.xml <?xml version="1.0" encoding="utf-8" ?> <Layer xmlns="http://tempuri.org/layer.xsd"> <name>L1</name> <index>0</index> <keytostart>0</keytostart> <buttons> <buttondata> <beep>true</beep> <beepfreq>16</beepfreq> <beepduration>10</beepduration> <inverse>true</inverse> <keyboardoutput>false</keyboardoutput> <xpixel>91</xpixel> <ypixel>160</ypixel> <wpixel>138</wpixel> <hpixel>40</hpixel> <text>Layout 2</text> <textmode>131</textmode> <framemode>3</framemode> <font>0</font> <touchindex>1</touchindex> <press>true</press> <startlayer>L2</startlayer> <buttonvalue> <vk_code>0</vk_code> <make>false</make> <scan_code>0</scan_code> </buttonvalue> </buttondata> </buttons> </Layer> Data for L1_gfx <?xml version="1.0" encoding="utf-8" ?> <graphic xmlns="http://tempuri.org/Graphic.xsd"> <name>L1_gfx</name> <showinlayer>L1</showinlayer> <keytostart>0</keytostart> <erasedisplay>false</erasedisplay> <graphicfield> <xpixel>4</xpixel> <ypixel>13</ypixel> <index>0</index> <animated>false</animated> </graphicfield> </graphic> PrehKeyTec GmbH MCI_TouchKey_TechDoc_RevC_en.doc - 2011-02-09 Page 28/40 Data for L1_txt <?xml version="1.0" encoding="utf-8" ?> <text xmlns="http://tempuri.org/Text.xsd"> <name>L1_txt</name> <showinlayer>L1</showinlayer> <keytostart>0</keytostart> <erasedisplay>false</erasedisplay> <textfield> <xpixel>0</xpixel> <ypixel>80</ypixel> <wpixel>319</wpixel> <hpixel>40</hpixel> <font>3</font> <inverse>false</inverse> <setunderline>false</setunderline> <textstring>Scheinbergweg 10 D-97638 Mellrichstadt</textstring> <textmode>131</textmode> </textfield> </text> Data for L2.xml <?xml version="1.0" encoding="utf-8" ?> <Layer xmlns="http://tempuri.org/layer.xsd"> <name>L2</name> <index>1</index> <keytostart>0</keytostart> <buttons> <buttondata> <beep>true</beep> <beepfreq>16</beepfreq> <beepduration>10</beepduration> <inverse>true</inverse> <keyboardoutput>false</keyboardoutput> <xpixel>91</xpixel> <ypixel>160</ypixel> <wpixel>138</wpixel> <hpixel>40</hpixel> <text>Layout 1</text> <textmode>131</textmode> <framemode>3</framemode> <font>0</font> <touchindex>1</touchindex> <press>true</press> <startlayer>L1</startlayer> <buttonvalue> <vk_code>0</vk_code> <make>false</make> <scan_code>0</scan_code> </buttonvalue> </buttondata> </buttons> </Layer> PrehKeyTec GmbH MCI_TouchKey_TechDoc_RevC_en.doc - 2011-02-09 Page 29/40 Data for L2_txt.xml <?xml version="1.0" encoding="utf-8" ?> <text xmlns="http://tempuri.org/Text.xsd"> <name>L2_txt</name> <showinlayer>L2</showinlayer> <keytostart>0</keytostart> <erasedisplay>false</erasedisplay> <textfield> <xpixel>45</xpixel> <ypixel>40</ypixel> <wpixel>230</wpixel> <hpixel>40</hpixel> <font>7</font> <inverse>false</inverse> <setunderline>false</setunderline> <textstring>Layout 2</textstring> <textmode>131</textmode> </textfield> </text> PrehKeyTec GmbH MCI_TouchKey_TechDoc_RevC_en.doc - 2011-02-09 Page 30/40 OPOS Service Object LineDisplay The two line display previously offered for the MC family keyboards is no longer available for our MCI keyboards. Using the display of the TouchKey however, and using OPOS, it is possible to out put the two lines on the display of the TouchKey. The OPOS tool makes it possible to configure the fonts and the number of lines, and also the number of characters in each line. For the TouchKey OPOS Service object please contact [email protected] PrehKeyTec GmbH MCI_TouchKey_TechDoc_RevC_en.doc - 2011-02-09 Page 31/40 Configuring the flash memory using iLCD Setup The most recent version of this software (iLCD Setup) can be downloaded from this location: http://www.demmel.com/ilcd/english/software.htm How it works This program is used to load graphics into the flash memory of the TouchKey. In order to load graphics, start by selecting "setup" as shown in the image on the right. One can read out the actual graphics that are stored in the TouchKey using "Read Flash". Selecting "Edit->Graphics" brings up the image below. An existing graphic is selected using "Image Index". "New" creates a new graphic. If this is selected a new dialogue windows opens up from which the user can select the graphic to be used. Using "Remove" graphic. deletes the selected "Close" ends the configuration process. Afterwards the new configuration is written in the TouchKey’s memory with "Write Flash". One could "Save" this configuration for usage in another TouchKey. The saved file can be edited again by going through the first steps once more. PrehKeyTec GmbH MCI_TouchKey_TechDoc_RevC_en.doc - 2011-02-09 Page 32/40 ASCII Character Table PrehKeyTec GmbH MCI_TouchKey_TechDoc_RevC_en.doc - 2011-02-09 Page 33/40 PrehKeyTec GmbH MCI_TouchKey_TechDoc_RevC_en.doc - 2011-02-09 Page 34/40 Scan Codes This table contains a variety of PS2-Scan codes (Scanset1). A complete list of all the PS2-Scan codes can be found in the Microsoft Translation Table in this location: http://www.microsoft.com/whdc/archive/scancode.mspx#ENB PrehKeyTec GmbH MCI_TouchKey_TechDoc_RevC_en.doc - 2011-02-09 Page 35/40 Virtual Key Codes These key codes are based on a key board with the US layout. There will be slight differences to other country specific layouts. Symbolic constant name Value (decimal) Keyboard (or mouse) equivalent VK_CANCEL 3 Control-break processing VK_BACK 8 BACKSPACE key VK_TAB 9 TAB key VK_CLEAR 12 CLEAR key VK_RETURN 13 ENTER key VK_SHIFT 16 SHIFT key VK_CONTROL 17 CTRL key VK_MENU 18 ALT key VK_PAUSE 19 PAUSE key VK_CAPITAL 20 CAPS LOCK key VK_ESCAPE 27 ESC key VK_SPACE 32 SPACEBAR VK_PRIOR 33 PAGE UP key VK_NEXT 34 PAGE DOWN key VK_END 35 END key VK_HOME 36 HOME key VK_LEFT 37 LEFT ARROW key VK_UP 38 UP ARROW key VK_RIGHT 39 RIGHT ARROW key VK_DOWN 40 DOWN ARROW key VK_SELECT 41 SELECT key VK_PRINT 42 PRINT key VK_EXECUTE 43 EXECUTE key VK_SNAPSHOT 44 PRINT SCREEN key VK_INSERT 45 INS key VK_DELETE 46 DEL key VK_HELP 47 HELP key 48 0 key 49 1 key 50 2 key 51 3 key 52 4 key 53 5 key 54 6 key 55 7 key 56 8 key 57 9 key 65 A key PrehKeyTec GmbH 66 B key 67 C key 68 D key 69 E key 70 F key 71 G key MCI_TouchKey_TechDoc_RevC_en.doc - 2011-02-09 Page 36/40 72 H key 73 I key 74 J key 75 K key 76 L key 77 M key 78 N key 79 O key 80 P key 81 Q key 82 R key 83 S key 84 T key 85 U key 86 V key 87 W key 88 X key 89 Y key 90 Z key VK_NUMPAD0 96 Numeric keypad 0 key VK_NUMPAD1 97 Numeric keypad 1 key VK_NUMPAD2 98 Numeric keypad 2 key VK_NUMPAD3 99 Numeric keypad 3 key VK_NUMPAD4 100 Numeric keypad 4 key VK_NUMPAD5 101 Numeric keypad 5 key VK_NUMPAD6 102 Numeric keypad 6 key VK_NUMPAD7 103 Numeric keypad 7 key VK_NUMPAD8 104 Numeric keypad 8 key VK_NUMPAD9 105 Numeric keypad 9 key VK_SEPARATOR 108 Separator key VK_SUBTRACT 109 Subtract key VK_DECIMAL 110 Decimal key VK_DIVIDE 111 Divide key VK_F1 112 F1 key VK_F2 113 F2 key VK_F3 114 F3 key VK_F4 115 F4 key VK_F5 116 F5 key VK_F6 117 F6 key VK_F7 118 F7 key VK_F8 119 F8 key VK_F9 120 F9 key VK_F10 121 F10 key VK_F11 122 F11 key VK_F12 123 F12 key VK_F13 124 F13 key VK_F14 125 F14 key VK_F15 126 F15 key VK_F16 127 F16 key VK_F17 128 F17 key VK_F18 129 F18 key VK_F19 130 F19 key PrehKeyTec GmbH MCI_TouchKey_TechDoc_RevC_en.doc - 2011-02-09 Page 37/40 VK_F20 131 F20 key VK_F21 132 F21 key VK_F22 133 F22 key VK_F23 134 F23 key VK_F24 135 F24 key VK_NUMLOCK 144 NUM LOCK key VK_SCROLL 145 SCROLL LOCK key VK_LSHIFT 160 Left SHIFT key VK_RSHIFT 161 Right SHIFT key VK_LCONTROL 162 Left CONTROL key VK_RCONTROL 163 Right CONTROL key PrehKeyTec GmbH VK_LMENU 164 Left MENU key VK_RMENU 165 Right MENU key VK_PLAY 250 Play key VK_ZOOM 251 Zoom key MCI_TouchKey_TechDoc_RevC_en.doc - 2011-02-09 Page 38/40 Technical Data Electronics: Supply voltage: Current consumption: Interface: LCD TouchKey: Backlight: Touch panel: +5 V ± 5% < 500 mA USB 5.7 inch monochrome with 320 x 240 pixel LED 4-wire resistive Temperature and Environment Ratings: Operational temperature: Air pressure: Storage & transportation: Climatic class: Protection class: 0°C to 50°C 700 hPa to 1060 hPa -30°C to 60°C DIN-IEC 68, part 1, appendix A IP 54 from top Materials: Housing: Guide frame: Switching membrane: Spring elements: Textile filter: Keys and keycaps: TouchKey: ABS Polystrol Polyester Elastomer Trevira PBT / POM / PC / PMMA ABS / PBT-GF30 / PS Certifications: ESD/EMC/EMV: Emissions: Interface Immunity: PrehKeyTec GmbH CE Approval EN55022, FCC Subpart 15, Class B Electrostatic discharge immunity according to EN 61000-4-2, resistance limit 8 kV (contact discharge), 13 kV (air discharge) against high frequency electromagnetic fields; penetration test value = 10 V/m MCI_TouchKey_TechDoc_RevC_en.doc - 2011-02-09 Page 39/40 Additional help Recent versions of our programming software and more information can be downloaded from the support section on our website at: http://www.prehkeytec.com. Our customer support contacts are as follows: Email: [email protected] or [email protected] for North and Latin America Copyright © Copyright PrehKeyTec GmbH 2011 Published by PrehKeyTec GmbH. PrehKeyTec GmbH reserves the right to update or change the products described in this manual as well as the contents of the present document without prior notice. No part of this user manual may be reproduced, edited or translated into different languages in any form or by any means or mechanical, for any purpose, without the expressly written permission of PrehKeyTec GmbH. Trademarks The brand and product names mentioned in this operating instructions are trademarks/registered trademarks of the corresponding owner. Examples: Microsoft, MS-DOS, Windows, Windows XP, Windows Vista are registered trademarks of Microsoft Corporation PrehKeyTec GmbH MCI_TouchKey_TechDoc_RevC_en.doc - 2011-02-09 Page 40/40