1
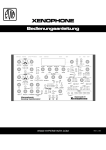
XENOPHONE Quick-Start WWW.HYPERSYNTH.COM Rev 1.2 XENOPHONE QUICK START - - - - - - - - - - - - - - - - - - - - - - - - - - - - - - - - - - - - - - - - - - - - - - - - - - - HYPERSYNTH Connection Diagram Connecting AC Power Before making any power connections, make sure the Xenophone’s power switch is turned off. 1. Plug the AC Adaptor into a power outlet 2. Plug the female end of the adaptor cable into the Xenophone’s power socket. Making Audio Connections • Stereo. Connect two cables from the Xenophone’s left and right outputs to two inputs of an active speaker/amp or mixer. • Headphones. Plug a set of headphones into the headphone jack on the rear panel. Turning On the Power Before turning on the Xenophone’s power, consider these two questions: • Are all peripheral devices connected correctly? • Have the volume controls of the Xenophone and all connected audio devices been turned to their lowest settings? 1. Turn on the POWER switch located on the rear panel of the Xenophone. 2. Turn on the power for any connected amplifiers or speakers. 3. Wait for the Xenophone to start up. When it has started up normally, The home page will appear (next page). 4. Set the volume for your connected amplifier and speakers. While playing the Xenophone preview keys or external keyboard, gradually raise the Xenophone’s main volume in the rear panel to the desired listening level. 2 XENOPHONE QUICK START - - - - - - - - - - - - - - - - - - - - - - - - - - - - - - - - - - - - - - - - - - - - - - - - - - - HYPERSYNTH Home Page The following picture shows the home page format. Selecting the programs and banks is only available in this menu. 1-Program number 2-Program name (16 character) 3-Bank number 4-CC#1/Mod wheel 5-Aftertouch/Channel pressure Selecting Programs and Playing Sounds 1. Make sure the Home page is displayed. If the Home Page is not displayed, press [EXIT] once or twice until the Home page appears and the Home LED lights up. 2. Press the preview buttons to hear what the selected patch sounds like. 3. To change to a different patch, turn the Data dial. 4. To change to a different Bank, turn the E4/Bank knob. Remember: E1, E2, E3 and E4 are multi-purpose knobs. In every screen they function differently. When you tweak one of these knobs, it usually changes the parameter in the screen that is located on the top of the tweaked knob. In Home page E1 acts like Mod wheel, E2 like Aftertouch, E3 increases/decreases program number 10 steps and E4 changes bank number. In most of the factory sounds Mod wheel and Aftertouch are linked to parameters that add color, variations and vibrato to the sound. So do not forget to tweak them. 3 XENOPHONE QUICK START - - - - - - - - - - - - - - - - - - - - - - - - - - - - - - - - - - - - - - - - - - - - - - - - - - - HYPERSYNTH Using Knobs to Modify the Sound By turning each knob, you can control the parameter that has been written on its label. When you turn a knob the screen automatically jumps to the related edit page. If the Jump function is not suitable for you, it can be disabled in Global menu. For example: 1-Turn the filter frequency knob. 2-The following Edit-page will be displayed that also shows the values for envelope depth, resonance and keytrack. The indicator LED switches from home to edit. 3-If you want to get back on Home page press [Exit] once. Remember: In every edit page you may find some parameters that do not have dedicated knob on the Xenophone panel. You must use E1-E4 to change these parameters. In this edit page E4 is linked to Ktrk. Using Compare Mode When you select a new Program, it is placed in a temporary workspace known as an “edit buffer.” This allows you to edit the Programs without affecting the original stored version of the item. If at any time you want to compare the edits you have made to the original Program, press the [compare] button. When you press the [compare] button its LED will light, to return to the edited version, press the [compare] button again. Its LED will turn off and your edits will be restored. While in Compare mode, you will be unable to make any edits to the Program. If you change to a different Program using Data dial the edit buffer will be cleared and you will lose your patch so be careful to store your patch before changing preset. 4 XENOPHONE QUICK START - - - - - - - - - - - - - - - - - - - - - - - - - - - - - - - - - - - - - - - - - - - - - - - - - - - HYPERSYNTH User Interface Global, Home, Submenu and Edit are the four basic screen types. Using [Enter], [Exit] and Data dial you can browse between these screens: Pressing [Exit] always makes a jump to Home page. Pressing [Enter] in Home page will show up the Submenu, in a Submenu show up the related Edit page. Turing Data dial in Home page increases or decreases program number and in other screens (Global, Submenu, Edit) it will show the next or previous page. Submenu Submenus consist of 18 pages which include Rename menu and 17 parts of the synth-engine: [SEQ-Welcome ! ] > <STUVWYXZ[\]^_`ab> < Noise/Osc3 [Osc2] < [Mix1] < [ENVA] < < > > [LFO3] Arpeggiator [Main] > [ENVM] LFO2 [LFO1] > [FLTR] Filter ENV Oscillator 1 [Name] [Voic] Mixer Ch:5-8 < > [SEQ ] < [Osc2] Voice [osc3] < Filter MOD ENV < > [Main] Sequencer [ARP ] > [LFO1] LFO3 [LFO2] > [ENVA] [ENVF] < > [Mix1] [Mix5] < > > [MODM] < Oscillator 2 [Osc1] < [Osc3] Mixer Ch:1-4 [Voic] < > [Mix5] Amp ENV [FLTR] < > [ENVF] LFO1 [ENVM] < > [LFO2] Main [LFO3] < > > [ARP ] MOD Matrix [SEQ ] > 5 XENOPHONE QUICK START - - - - - - - - - - - - - - - - - - - - - - - - - - - - - - - - - - - - - - - - - - - - - - - - - - - HYPERSYNTH Global Menu Global parameters affect all programs globally like MIDI channel and transpose. Since they are universal, Global parameters are not stored with programs. To edit the Global parameters, press [Global/Exit] while you are in home page. E1 or E3 knobs change the global values and Data dial show up the next page. Fine: Master Fine Tune control. (Steps in cents: -50…+50, 0: centered) Trans: Master Transpose control. (Steps in semitones: -36…+36, 0: centered) MIDI Channel: Selects which MIDI channel to send and receive data: 1 to 16. Clock: see table—Sets the clock status. Display MIDI Clock Setting Internal MIDI Clock is neither sent nor received Ext-Sync MIDI Clock is received Gen-MIDI MIDI Clock is sent Display Mode: (Jump, Fixed, Locked) A setting of Jump means the Xenophone will respond immediately when you turn a knob and put that parameter’s page on the display. A setting of Fixed means the Xenophone will not update the display when you turn a knob, In Fixed mode you should select the submenu>>edit page manually. A setting of Locked will disable all the knobs, it can be used in live performance to prevent changing presets/parameters by accidentally touching encoders. LED Mode: (On/Off, PWM) A setting of PWM enables brightness control for some LEDs. Every parameter is linked to a specified LED and brightness amount shows the related rotary encoder position. This feature is only implemented for the parameters that are listed below: Linked Parameter Oscillator 1 Level Oscillator 1 Sub Level Oscillator 2 Level Oscillator 2 Sub Level Filter Frequency LED Group Oscillator 1 Waveform Sub 1 Type Oscillator 2 Waveform Sub 2 Type Filter Slope 6 XENOPHONE QUICK START - - - - - - - - - - - - - - - - - - - - - - - - - - - - - - - - - - - - - - - - - - - - - - - - - - - HYPERSYNTH Note: If the oscillator’s waveform is set to OFF, all the LEDs in waveform group will be turned off and you will no longer see the effect of brightness control for oscillator level, the same for sub type and sub level. A setting of On/Off disables this feature. Freq Enc Ratio: (0.92-42.6, Default: 1.0) Determines how many rotations the filter frequency encoder needs to perform a full sweep over the frequency range (0-4096). A setting of 1.0 means if you rotate frequency encoder a full turn it will change the frequency value from 0 to 4095. Higher settings means you need to rotate the encoder more times in order to get a full sweep however it will provide more resolution in this case. Semi Enc Accuracy: (--/On, Default: On) Determines the accuracy of semitone 1/2/3 encoders. A setting of On provides more preciseness in editing the values. Enc Response: (Fast/Normal/Slow/Slower, Default: Normal) Determines how encoders response to movement. Fast means it captures quickest move (in real-time) however in this case it may also capture unwanted data due to contacts bounce/Noise. Normal is system managed setting which makes a balance between “Response to Move” and “Noise Rejection”. Slow and Slower increase noise-rejection strength while decrease response to fast movement. (Enc response affects all encoders) Panel TX MIDI: (Off, On) A setting of on means, Xenophone transmits MIDI messages (CC, NRPN) when you tweak a knob or button on the front panel. Every parameter has a dedicated CC or NRPN number. According to the settings Preview keys also transmit “Note on/off” or “Stop/Start/Continue” messages. Arp/Seq TX MIDI: (Off, On) A setting of on will enable the Arpeggiator and Sequencer to send the generated notes to an external device (other synthesizers). Preview Keys: (3Notes, StrtStp) A setting of 3Notes means the preview keys act like C3, C4 and C5 keys of a MIDI keyboard. A setting of StrStp means preview keys acts like Stop, Play and Continue button of a standard sequencer. MIDI Over USB: (Off, On) A setting of on means you can transmit/receive MIDI messages via Xenophone USB port. A specific driver/software must be run on your PC in order to use these feature. While MIDI over USB is set to on, hardware MIDI ports will be disabled. . . 7 XENOPHONE QUICK START - - - - - - - - - - - - - - - - - - - - - - - - - - - - - - - - - - - - - - - - - - - - - - - - - - - HYPERSYNTH CV/Gate: Determines the CV/Gate connector signal direction. Note that before connecting any device to this connector you must select the proper function of it. CV/GATE Setting CV Direction CV Range Gate Direction Gate Range OUT/--- OUTPUT 0…10V Disabled Grounded OUT/OUT-VTRG OUT/OUT-STRG OUTPUT OUTPUT 0…10V 0…10V OUTPUT OUTPUT 0/5 V 5/0 V IN/--- INPUT -5…+5V Disabled Grounded IN/IN-VTRG INPUT -5…+5V INPUT 0…12 V IN/IN-STRG INPUT -5…+5V INPUT 12…0 V CV Type: defines the desired CV-OUT mode: • Linear: CV-Out must be modulated by a modulator in MOD matrix. • V/OCT-OSCx: selects 1 Volt per Octave (exponential scale) in this mode CV follows OSCx pitch. CV-OUT supports both formats linear and Exp. While CV-IN is only linear. CV-In must be set as a modulation source in Mod Matrix in order to modulate other parameters. Write Protect: (Off, On) When set to on, it won’t be possible to overwrite programs in the memory. BLED Brightness: (0…96%) Sets the brightness amount of the three blue LEDs which are dedicated to LFOs Rates and Arp Tempo. MIDI A-Touch: (On, Off) When [on] Xenophone receives MIDI after touch, When [off] it ignores the incoming after touch data. Calibrate VCF: If the filter sounds strange or out of tune you must run calibration routine. It is not necessary to run the calibration routine on a regular basis, as the VCF is calibrated at the factory. You should only run it if you are experiencing problems in filter section. Before doing calibration you must load the default program, mute all oscillators, change filter slope to -24dB and put the filter in selfoscillation. Then wait 10 minutes for internal circuits warm up. After 10 minutes rotate E1 knob in this menu and the calibration routine will be started. Calibration takes several minutes. DO NOT turn off your device during this time. (Note: Oscillators, Ring Modulator and VCAs are calibrated at the factory. because they will not drift in any circumstances there is no option for user to calibrate them) Factory Reset: Rotate E1 to reset the global parameters to their factory defaults. 8 XENOPHONE QUICK START - - - - - - - - - - - - - - - - - - - - - - - - - - - - - - - - - - - - - - - - - - - - - - - - - - - HYPERSYNTH Renaming Programs Enter the submenu: Homepage > Press [Enter]. Turn Data dial to the left until the rename menu is displayed. E1 selects the character position, E2 inserts ‘space’, E3 selects the character from the list and E4 jumps from uppercase letters to lowercase and vise versa. < Oscillator 1 [Name] > [Osc2] [SEQ-Welcome ! ] > <STUVWYXZ[\]^_`ab> Press [Exit] to return to homepage. Storing Programs For storing a program, Press [Store] button. Use E2-3 knobs to change the program number and E4 knob to change the bank number of the destination. E1 knob also calls the prg/bank number of the source preset. Press [Enter] to save the program or [Exit] to cancel. Sending SYSEX Dump Xenophone has the ability to send out its patches in sysex format via MIDI for storing in your computer. Before sending a sysex dump the receiver device or software must wait for receive a sysex packet. For sending a program dump: First select your program in home page. Press [Store] button, turn Data dial one step to the right to show up the next page. Press [Enter] to send the program or [Exit] to cancel. For sending a bank dump: Press [Store] button, turn Data dial two steps to the right to show up the next pages. Use E4 knob to change the bank number/part then Press [Enter] to send or [Exit] to cancel. Xenophone has 7 banks, each bank contains 128 programs. The sysex bank format contains 64 programs so for sending a bank you must first send the part A (program 1-64) and then send the part B (program 65-128). If you encounter any problems, or you have suggestions for future revisions, don’t hesitate to contact our technical support at: [email protected] Copyright © 2008-2014 HyperSynth www.HyperSynth.com 9