1
Removing a Module
4 For the BlackDiamond 6816, ensure that the module is horizontal with the module name to
the left and that the ejector/injector handles are extended.
For the BlackDiamond 6808, ensure that the module is vertical with the module name at the
top and that the ejector/injector handles are extended.
5 Slide the module into the appropriate slot of the chassis until it makes contact with the
backplane.
Caution: Ensure that the sheet metal of the module, and not the PCB board, engages
the card cage runners.
As the module begins to seat in the chassis, the ejector/injector levers begin to close.
6 Use one hand to hold the module in place and your other hand to close the ejector/injector
levers by pushing them toward the center of the module.
7 To secure the module, tighten the two captive screws using a #2 Phillips screwdriver.
Note: Tighten the screws of this module before you insert additional modules. Otherwise,
you might unseat modules that you have not secured.
8 Store the module packaging for future use.
9 Repeat this procedure for additional modules, if applicable.
10 Leave the ESD strap permanently connected to the chassis, so that it is always available
when you need to handle ESD-sensitive components.
Removing a Module
To remove a a module:
1 Attach the ESD strap that is provided to your wrist and connect the metal end to the ground
receptacle that is located on the top-left corner of the switch front panel.
2 Use a #1 Phillips screwdriver to unscrew the two captive screws.
PCMCIA
LINK /
ACTIVITY
MGMT
MODEM
CONSOLE
50015
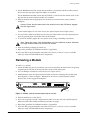
3 Simultaneously rotate the ejector/injector handles outward to disengage the module from
the backplane as shown in Figure 1. Blank panels do not have ejector/injector handles,
because they do not engage the backplane.
EW_clips2
Figure 1: MSM64i showing extended ejector/injector handles
4 Slide the module out of the chassis.
5 If you are not going to install a replacement module, cover the slot with a blank faceplate.
Otherwise, follow the module installation procedure on page 1.
6 Repeat this procedure for additional modules, if applicable.
7 Leave the ESD strap permanently connected to the chassis, so that it is always available
when you need to handle ESD-sensitive components.
BlackDiamond Module Installation Note
2