1
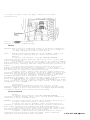
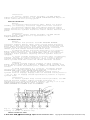
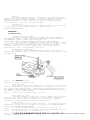
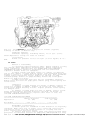
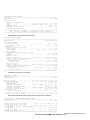
Fig. 5: Camshaft Bearing Cap Bolt Tightening Sequence
Courtesy of Suzuki of America Corp.
/
6/ $
Removal
For camshaft removal, see ROCKER ARM & VALVE LASH ADJUSTER.
CAUTION: Hydraulic valve lash adjusters cannot be disassembled or
repaired. DO NOT apply force to adjuster body. If removed,
keep immersed in container of clean engine oil.
Inspection
1) Check cam lobes and journals for wear and damage. Use
Plastigage to check bearing clearance. If wear exceeds specification,
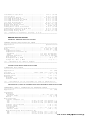
repair or replace as necessary. See CAMSHAFT table under ENGINE
SPECIFICATIONS.
2) Use dial indicator and "V" blocks to measure camshaft
runout at center of shaft. If wear exceeds specification, repair or
replace as necessary. See CAMSHAFT table.
Installation
Lubricate camshaft lobes and camshaft bearing journals.
Install camshaft and NEW oil seal in cylinder head. Install camshaft
sprocket. Ensure camshaft sprocket timing marks align with timing
marks on cylinder head. See Fig. 4. To complete installation, reverse
removal procedure.
/
/04 6/ $ 5 #
/#
Removal
Remove engine or engine and transmission. See ENGINE.
Separate transmission from engine. Remove flywheel. Remove oil seal
housing. Remove seal. Inspect oil seal housing for wear or damage.
Repair or replace as necessary.
Installation
Install oil seal in housing. Apply oil to seal lip. Install
oil seal housing with NEW gasket. Tighten housing bolts to
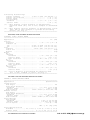
specification. See TORQUE SPECIFICATIONS table. Oil seal housing
gasket will bulge after mounting bolts have been tightened. Trim
excess gasket material even with oil pan gasket surface.
:/$
-2 -
Removal
1) Drain cooling system. Disconnect negative battery cable.
Remove drive belts. Remove A/C compressor (if equipped), leaving hoses
connected.
2) Remove pump pulley. Ensure No. 1 piston is at TDC of
compression stroke. Remove crankshaft pulley bolts and crankshaft
pulley. Remove timing belt cover, tensioner and timing belt. See
TIMING BELT. Remove dipstick and tube. Remove generator mounting
bracket. Remove water pump.
() +
Installation
To install, reverse removal procedure. Ensure all mating
surfaces are clean. Use NEW water pump gasket and NEW dipstick tube
"O" ring.
NOTE:
For further information on cooling systems, see
COOLING SYSTEM SPECIFICATIONS & ENGINE COOLING FANS article
in ENGINE COOLING section.
5 # -/0
!
" ##