1
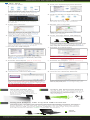
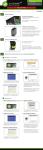
? Need Help? Give us a call.
Phone: 888-573-8820
Email: [email protected]
Web: www.ampedwireless.com/support
SETUP GUIDE
—
R E A D
F I R S T
—
UA2000
High Power Wireless-N Directional Dual Band USB Adapter
IMPORTANT:
1
DO NOT INSERT THE USB ADAPTER
UNTIL THE DRIVER HAS BEEN INSTALLED
Insert the Setup CD
2
Install Software
The menu page should appear.
Follow the instructions for your operating system
below and install the driver for the USB Adapter.
Windows Instructions: This Side
Mac Instructions: Back Side
Do not insert the USB Adapter until after the
software/driver has been fully installed.
3
Follow the Instructions for your Operating System:
Windows 7 and Vista
A. From the menu page, select Install Software
If the menu page does not appear, browse the
CD drive and double-click the Autoload.exe file.
C. Continue the Driver/Utility Installation
Follow the instructions that appear and click
Install to continue the installation.
E. Insert the High Power USB Adapter
B. Start the Driver/Utility Installation
If prompted, click Yes to begin the installation.
D. Complete the Driver/Utility Installation
Once the installation has completed, click Finish.
If prompted to restart, please do so at this time.
F. Position the Directional Antenna
Wireless
Router
Locate two available USB ports and insert the
USB Adapter. Windows should automatically
begin installing the driver for use with the
USB Adapter. If only one USB port is available,
insert the USB connector labeled Primary.
G. Connect to a Wireless Network
Locate the Amped Wireless Utility icon in the
Windows System tray (bottom right hand corner)
and click it to open the Utility. Click Scan to
view available networks.
For optimal performance, position the face
of the adapter towards the direction of your
wireless network.
H. Connect to a Wireless Network
Select your network from the list and click
Connect, or Add to Profile, to have your PC
automatically connect to this network when
it is available. If your network has security
enabled, you will be prompted to enter it.
Windows XP and 2000
A. From the Menu page, select Install Software
If the Menu page does not appear, browse the
CD drive and double-click the Autoload.exe file.
C. Complete the Driver/Utility Installation
Once the installation has completed, click Finish.
E. Found New Hardware / Restart your PC
B. Start the Driver/Utility Installation
Click Next to begin the installation. Follow the
instructions that appear and click Install to
continue.
D. Insert the High Power USB Adapter
Locate two available USB ports and insert the
USB Adapter. Windows should automatically
begin installing the driver for use with the
USB Adapter. If only one USB port is available,
insert the USB connector labeled Primary.
F. Position the Directional Antenna
Wireless
Router
Windows will automatically find the High Power
USB Adapter and begin installing the software.
After the installation has completed, a prompt
will appear asking you to restart your PC.
Select Yes to restart now.
G. Connect to a Wireless Network
After your computer has fully rebooted, locate
the Amped Wireless Utility icon in the Windows
System tray (bottom right hand corner) and
click it to open the Utility. Click Scan to view
available networks.
For optimal performance, position the face
of the adapter towards the direction of your
wireless network.
H. Connect to a Wireless Network
Select your network from the list and click
Connect, or Add to Profile, to have your PC
automatically connect to this network when
it is available. If your network has security
enabled, you will be prompted to enter it.
Adjust the direction of the USB adapter to
find the optimal position.
Installation for Mac Operating Systems
Mac OS X
A. Access the Menu
B. Find your Operating System Version
From the autoload page, click on Start Here
to open the Menu. If the menu does not load
browse the CD to find the Start Here file.
C. Select your Operating System
From the Menu, select the software version
that your Mac is using to begin installing
the software.
E. Install the Software
D. Find the Folder on the Setup CD
Open your OS X version folder and then click
the install file to begin the installation.
F. Restart your Computer
Follow the instructions and click Continue to
install the software. If prompted, select a
destination for the driver software. This is
typically the Macintosh HD. Click Continue.
G. Turn Off Your AirPort Card
After the computer reboots, disable any AirPort
cards by selecting the wireless icon (upper rightcorner) and select Turn AirPort Off. If you do not
have an Airport Card continue to Step H.
I. Activate the USB Adapter
You may be prompted to activate your USB
Adapter in Network Preferences. If not, select
the Apple Button (upper left corner), and then
select System Preferences from the menu. From
there, select Network.
K. Activate the Adapter
Click on the Apple Icon (upper-left corner).
Select About This Mac and note the Mac OS X
Version.
(OSX 10.4/10.5 Only)
In the Advanced menu, check that the adapter
is Using DHCP and then click OK.
M. Connect to a Wireless Network
When the software has installed, you will be
asked to restart your Mac. Click Restart to
reboot your computer.
H. Insert the High Power USB Adapter
Once all Airport cards are disabled, insert the High
Power USB Adapter into your USB port. Locate two
available USB ports and connect the adapter to
your computer. If only one USB port is available,
only insert the USB connecter labeled Primary.
J. Activate the USB Adapter
For OS X 10.4 Tiger and 10.5 Leopard:
Select Ethernet Adapter (en#) and click Advanced.
Continue to Step K
For OS X 10.6 Snow Leopard and 10.7 Lion:
Select Amped Adapter and click Apply.
Continue to Step M
L. Activate the Adapter
(OSX 10.4/10.5 Only)
Click Apply to activate your USB Adapter.
N. Connect to a Wireless Network
Amped Wireless Utility
Located on your
OS X toolbar
The Amped Wireless Utility should automatically
load. If it does not load, click the Amped Wireless
Utility icon to load the utility. Select the Site Survey
tab to view nearby wireless networks. Highlight your
desired network and click Connect.
If your network has security enabled, enter the
security key here. Click OK to begin using your
new wireless adapter.
Note:
Click Add to Profile after highlighting your network to save it
and have the Utility connect automatically when in range.
Using the Laptop Clip
Position the Directional Antenna
Locate the laptop clip and fasten
it to the back of the USB Adapter.
The USB Adapter has a directional antenna to
provide more Wi-Fi range. Position the face of
the USB adapter towards the source of your
Wi-Fi network to maximize range
and performance.
Mount the USB Adapter onto your
laptop screen for added convenience
and portability.
Wireless
Router
Using the Adapter with only One USB Connector
The High Power Wireless-N Directional Dual Band USB Adapter features two USB
connectors for providing the maximum performance through the power of two USB
ports. However, in the case that you wish to only use one USB connection, simply
insert only the USB connector labeled “PRIMARY.” For full range and performance
the USB connector labeled “AMPED” must also be inserted.
AMPED
PRIMARY
Amped Wireless
A Division of Newo Corporation
Copyright © 2012 Amped Wireless / Newo Corporation. All rights reserved.
Amped Wireless, Newo Corporation, the Amped Wireless Logo are registered trademarks or trademarks of Newo Corporation.