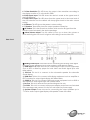
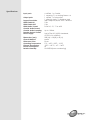
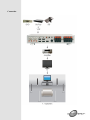
1
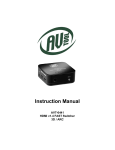
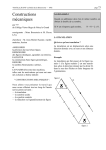
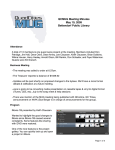
Multichannel AV Amplifier - ID# 878 Operation Manual Introduction The traditionally bulk and large amplifier is transforming into a new era with the newly formed light and full functions design. Instead of taking over a size of small TV’s space this new amplifier only needs the space of a lunch box. Also, the installation & operation steps are becoming much user friendly with the OSD and remote control. The Multichannel AV amplifier is made with high efficiency design and is compliant with HDMI 1.4’s specification of ARC function and supports 3D display, these allows users to enjoy high quality true sound with no delay and real 3D display with true colors. Features HDMI 1.4, HDCP 1.4 and CEC1.4 compliant HDMI 1.4 support: Audio Return Channel (ARC) Fast switching on all HDMI input ports in less than 1 second Deep Color support 36/30/24-bit, 1080p@60Hz Built-in HDMI EDID simulator and HDCP keyset allows each output to work independently in connecting to a HDMI display Support CEC bypass Supports HDCP repeater HDMI output with xvYCC to RGB color space design Audio support: HDMI 1.4 compatible audio interface Dedicated, flexible audio input/output port Full audio input and output support Audio sampling rate up to 192kHz PCM 2.0, 5.1 & 7.1 Dolby Digital 2.0 & 5.1, Dolby Pro Logic II (Option) Supports different audio sound mode (Jazz/music/Speech/Concert/ Movie) Supports Speaker Setting (Speaker Size, Speaker Level +/- 10dB, Speaker Distance 0~10M). Easy to install and simple to operate. Elegant compact design and streamline shape, excellent performance and decoration Supports thermal dispensation. User friendly and user operating OSD menu overlay with TV Big size Graphic LCD display Applications Home Theater Movie Theater Concern Room Dancing Room Opera Houser System Requirements Input source equipments such as DVD/Blue-Ray player, Set-Top-Box, VCR, or PS3 with connection cables and output display HD TV/monitor with all side of speakers up to 7.1 Channels. Operation Controls and Functions Front Panel ① Power: Press this button to turn on or set the device to standby mode. ② Video: Press this button to select HDMI input from 1~4 ③ Audio: Press this button to select audio input from analog RCA or digital coaxial input. ④ Info: Press this button to bring up the OSD ⑤ Mute: Press this button to mute the audio sound. ⑥ LED monitor: This monitor will display the setting status. 6.1 Audio Type: This LED will show output audio format setting from LPCM 2.0/ 5.1./7.1/DB(Dolby Digital) 2.0/5.1 or DTS. 6.2 Sound Mode: This LED will show output sound format setting from Default/Concert/Speech/Movie/Music or Jazz. 6.3 DRC: This LED shows the output audio setting includes DRC function that can under control gun shoot sound and avoid sudden pop sound. 6.4 PL-II: This LED shows the output audio setting includes Dolby Pro Logic II’s function that allows LPCM 2CH sound to output like multi-channel sound. 6.5 Audio Input: This LED shows the audio input format setting from Digital HDMI 1~4/Digital Coaxial/analog 7.1CH or Analog Stereo. 6.6 Video Input: This LED shows the video input format setting from HDM 1~4. 6.7 Video Resolution This LED shows the output video resolution according to the display monitor or TV or the built-in EDID. 6.8 OSD Upper Layer: This LED shows the device’s mode or the upper level of the OSD selection. 6.9 OSD Lower Layer: This LED shows from the upper level to the lower level of the OSD selection but the default will always goes back to the main volume setting. 6.10 Volume: This LED shows the present volume setting. 6.11 Speaker: These LEDs shows the output speaker connection. ⑦ IR window: This is the IR receiver window which receive IR signal from the remote control included in the device package. ⑧ Menu/Volume wheel: Turn this wheel to turn up or down the volume or when selecting the OSD turn it to right or left to bring in and out the OSD Rear Panel ① Analog Audio Input: These slots are for connecting the analog audio signal from input source equipment such as Set-top-Box or VCR with RCA cables. ② HDMI Input 1~4: These slots are for connecting the input source equipments such as DVD or Blue-Ray player for both video and audio signal input with HDMI cables. ③ SUB Out: This slot is to connect to the subwoofer speaker for subwoofer sound display. ④ HDMI Out: This slot is to connect with display equipment such as amplifier or HD TV/monitor for output signal display with HDMI cable. ⑤ COAX In: This slot is to connect with input source equipment such as DVD or Set-Top-Box for audio signal input with coaxial cable. ⑥ Service: This slot is reserved for manufacturing service only. ⑦ DC 24V: This slot is to connect with power adaptor and power cord included in the package and connect it to the AC wall outlet for power supply. ⑧ Speaker Output: These slots are for connecting the output speakers up to 7.1CH for audio output signal display with speaker’s bare wire cable. Remote Control ① Power: Press this key to turn on or set the device to standby mode. ② Mute: Press this key to mute the audio output sound, press it again to turn back the audio sound. ③ HDMI 1~4: Press these keys to select HDMI input source equipments from 1~4. ④ Vol +/-: Press these Keys to set the audio output volume up or down. ⑤ HDMI: Press this key to set the audio output volume from HDMI Input signal. ⑥ Coaxial: Press this key to set the audio output volume from COAX In signal. ⑦ LCM *: Press this key to light up/down the LCM screen. ⑧ Analog 7.1: Press this key to set the audio output volume from analog Audio Input signal. ⑨ Stereo: Press this key to set the audio output to be 2Ch only from analog Audio Input signal. ⑩ Sound Mode: Press this key to select the sound mode from Jazz/Music/ Speech/Concert or Movie. ⑪ DRC: Press this key to turn on the Dynamic Ratio Compression function allowing gun shoot sound to be under controlled and avoid sudden pop sound. ⑫ PL-II: Press this key to turn on the Dolby Pro Logic II’s function to allow 2CH sound to output like multi-channel sound. ⑬ pqtu & Menu/Enter: Press the Menu key to bring up the OSD menu and press the up/down/right/left keys to select the OSD selection and once confirm the selection press Enter key. ⑭ Exit: Press this key to exit the OSD selection. ⑮ Info: Press this key to bring up the present setting. OSD Chart Note: The value is the default setting System Config EDID Setting: The device has built-in EDID allowing source to output signal for display or users may set the EDID to TV to allow the source to read display’s EDID and send the output signal accordingly. Lip Sync: This function allows all output speakers with the same delay. Speaker Setting Speaker Size: This function allows users to set each and every speaker’s output sound from OFF/ON/Small to Large base on the main volume setting. This setting favor user when in setting the speaker position and the desire favor sound part. Speaker Level: This function allows users with add or less each and every speaker’s output level base on main volume sound. Speaker Distance: This function allows users to set each and every speaker’s distance starting from the audience’s position and each meter is about 3ms delay. Audio Performance Power Amplifier Performance: • 7 X 60 W @4Ohm < 10% THD+N @ 1Khz • 7 X 40W @8Ohm < 10% THD+N @ 1Khz • 7 X 50W @4Ohm < 0.05% THD+N @ 1Khz • 7 X 30W @8Ohm < 0.05% THD+N @ 1Khz • Frequency Response <+-1dB 20Hz-20Khz • THD+N @1W <0.05% @ 1KHz • THD+N @1W <0.05% @ 20Hz-20KHz • SNR > 80dB Amplifier Section: Specifications Input ports Output ports Support Resolution HDMI Cable IN HDMI Cable OUT HDMI Audio Format Coaxial Audio Format Coaxial Audio Sampling Speaker Output Format Power Supply Dimensions (mm) Chassis Material Silkscreen Color Operating Temperature Storage Temperature Power Consumption Relative Humidity 4 x HDMI, 1 x Coaxial, 1 x analog 7.1 or Analog Stereo x 4 1 x HDMI, 1 x Subwoofer, 1 x Service Jack, 7 x Speaker Jack 480i~1080p 50/60/24, VGA ~WUXGA 15M 15M PCM 2.0, 5.1, 7.1 & AC3 Up to 192kHz 24V/6.75A DC (US/EU standards, CE/FCC/UL certified) 280 (W) x 162(D) x 49 (H) Metal Silver 0˚C ~ 40˚C / 32˚F ~ 104˚F -20˚C ~ 60˚C / -4˚F ~ 140˚F W 20~90% RH(non-condensing) Connection