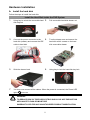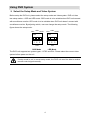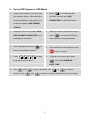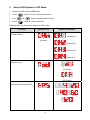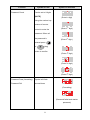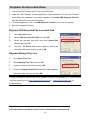
1
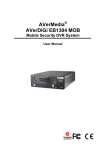
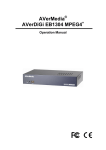
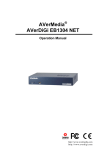
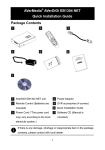
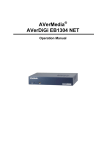
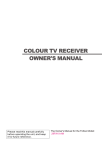
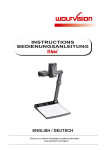
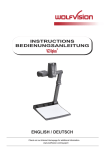
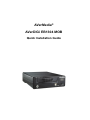
AVerMedia®
AVerDiGi EB1304 MOB
Quick Installation Guide
P/N: 300AC2A4-CVG
M A D E I N TAWA I N
Package Contents
(2)
(1)
(3)
FN
1
EB
2
4
DV
R
3
5
7
6
8
9
0
▼
▼
A-B
▲
▼
▼
REC
SELE
CT
LEFT
▼
MEN
U
FOC
US+
UP
▲
DO
US-
SPEE
D-
▼
PTZ
SPE
ED+
RM
ZOO
M+
ZOO
M-
-H6
(6)
(5)
(4)
RIGH
T
WN
▼
FOC
(7)
AVer
EB 13 Media
04 M
OB
Quick
User
Guide
(8)
(9)
(1) AVerDiGi EB1304 MOB unit
(10)
(6) Removable hard disk drawer accessories
(2) Remote Control (Batteries are included)
(4 screws and key)
(3) Software CD (Manual is included)
(7) Power cable
(4) Quick Installation Guide
(8) Camera Power cable
(5) Z-bracket x 2 (4 screws included)
(9 ) Extended IR Sensor cable
(10) USB Cable
i
If there is any damage, shortage or inappropriate item in the package contents, please
contact with local dealer
1
Hardware Installation
A. Install the hard disk
Follow the steps to install the hard disk:
Install the Hard Disk Inside the DVR System
1.
Using key to unlock the removable hard
2.
Pull removable hard disk drawer out
4.
Turn the drawer over and secure the
disk keylock
3.
Connect the power connector to the
hard disk (master) and connect the IDE
hard disk with 4 screws on the hard
cable to hard disk
disk removable drawer
5.
Slide the drawer back
7.
You may now connect all the cables. When the power is connected, the Power LED
light
6.
Using key to lock the hard disk key lock
turns on
WARNING
TO REDUCE RISK OF FIRE OR ELECTRIC SHOCK. DO NOT EXPOSE THIS
APPLIANCE TO RAIN OR MOISTURE
WARRANTY VOID FOR ANY UNAUTHORIZED PRODUCT MODIFICATION
2
B. After the hard disk installation, please connect the cables and power as
the illustration showed
Connect to Camera
Power cable
Red
Black
Black
Connect to Camera Power cable
Red
Camera 2
Camera 4
Sensor
Alarm
Speaker
IR Sensor Extend Cable
Power cord
Microphone
USB Cable
DVR
3
FN
2
1
▼
▼
A -B
▼
▼
U
CT
S ELE
RIG
L EFT
▼
+S
FOCU
Red
Surveillance Monitor
+
PTZ S PEED
DSPEE
DVR Remote Controller
DC DC
Camera 1
HT
+
UP
ZOOM
▲
MD OWN
ZOO
▼
SFOCU
Red
Black
▼
MEN
REC
Camera 3
-
0
▲
Connect to Camera
Power cable
Red
9
8
7
Black
6
5
4
Black
Connect to Camera
Power cable
Red
Black
Camera Power cable
Notebook
Desktop PC
CRT/LCD Monitor
It is recommended that DVR unit is connected to the vehicle ignition. The
vehicle battery power will be used only when the vehicle is running and can
be avoided to run out the vehicle battery power.
-
When the MOB DVR unit power supply is connected to vehicle battery,
remember to stop recording and shutdown the MOB DVR unit to avoid
running out of vehicle battery when the vehicle engine is off.
-
Each time you change the video display output, the power must be turned
OFF and ON to reset the DVR unit.
3
Using DVR System
~ Select the Setup Mode and Video System
Before setup the DVR unit, please select the setup mode and video system. DVR unit has
two setup modes – OSD and LED mode. OSD mode is to be suitable when DVR unit connect
with surveillance monitor. LED mode is to be suitable when DVR unit doesn’t connect with
surveillance monitor. By adjusting switch, user can change the setup mode. The following
figure shows the setup mode:
VGA
OSD
VGA
NTSC
ON
LED
NTSC
ON
1 2 3
TV
OSD
1 2 3
PAL
TV
OSD Mode
LED
PAL
LED Mode
The DVR unit supports two system types – NTSC and PAL. Please select the correct video
system before power on the unit.
If setup mode is not in correct setup mode, the DVR unit won’t be able to receive
remote control signal correctly.
4
~
1.
Using DVR System in OSD Mode
Power on the system. DVR will check
2.
Press
to format hard disk.
the hard disk status. If the hard disk is
And then, user will see “HDD
first time installed on the system, the
FORMATTING” on the DVR screen
screen will appear “HDD FORMAT
YES/NO”.
3.
5.
When the DVR screen shows “NEW
4.
HDD FORMATE COMPLETED”, the
press
formatting is completed
menu screen to setup parameters.
After finishing setup, press
to
6.
return to surveillance screens.
7.
When you see the surveillance screen,
Press
1
3
7
9
As surveillance screens appear, press
REC
buttons
8.
to enter the OSD main
button to record.
To adjust the time and date, press
to switch to each channel.
and select SUBMENU →
Use
▲
and
▼
selection. Use
▼
to go up and down. Use
and
▼
9.
or
▼
DATE / TIME
to make a
buttons to move the selection to the left and right
5
~
Setup DVR System in LED Mode
1.
Adjust the OSD mode to LED mode
2.
Press
3.
Use
4.
Press
button to enter or exit setup function
▲
and
▼
button to select setup function
button to confirm selection.
Following table list the symbols display in LED mode:
Function
Symbol of Title
Symbol of Selection
Camera Select
(Channel 1)
(Channel)
(Channel 2)
(Channel 3)
(Channel 4)
Record mode
(D1 mode)
(CIF mode)
Record Frame Rate(NTSC)
6
Function
Symbol of Title
Video Quality
Symbol of Selection
(Best)
(High)
Good)
(Medium)
(Normal)
( Low)
Hard Disk Overwrite
(Yes)
(No)
Hard Disk
Format/Password Check
(Password)
(To enter password)
7
Function
Password Check
Symbol of Title
Symbol of Selection
Can be set to 6 digits
[NOTE]
st
(Enter1 digit)
Using the number key
buttons of remote
control to enter the
nd
(Enter 2 digit)
password. When all
the password is
rd
(Enter 3 digit )
entered press
▲
or
(play)
button to confirm.
th
(Enter 4 digit)
th
(Enter 5 digit)
th
(Enter 6 digit)
Password Pass (formatting)
Symbol will flash
Password Fail
several times
(Formatting)
(Password failed and reenter
password)
8
Function
Symbol of Title
Symbol of Selection
Jack Setup
(IR)
(LED)
Hard disk plug out
Hard disk is full
Hard disk shutdown
LED display current temperature
(higher than limited
and flash
temperature)
Warning indication
Hard disk stop (lower
LED display current temperature
than limited
and flash
temperature)
FAN stop abnormally
9
Playback the Recorded Video
1. Connect the DVR system with PC by using USB cable.
2. Install the USB Playback Console application. Place Installation CD into the CD-ROM
drive. When the installation main screen appears, click Install USB Playback Console
and then follow the on screen instructions.
3. To run the application, click the USB Playback Console icon on the PC desktop
4. Select the playback file type.
Playback DVR Recorded File from Hard Disk
1.
2.
3.
Click Open File button
4.
And then, the Event List window appears. Select the
Select DVR Recorded File (HD) and click OK.
Select the recorded hard disk drive from Select Disk
window and click OK.
event that user wants to play and click OK.
Playback Backup File(*.dvr)
1.
Click Open File button.
2.
Select Backup File(*.dvr) and click OK.
3.
Locate the backup file folder and click OK.
4.
And then, Playback Date/Time Selection window appears.
Select the date and time and click OK.
For more information, please refer to the operation manual in the software CD. If you still have
inquiries, please log on to http://www.avermedia.com or
http://www.averdigi.com for
troubleshooting
ÃSpecifications are subject to change without prior notice.
ÃThe information contained herein is to be considered for reference only.
10
SAFETY PRECAUTION
Refer all work related to the installation of this product to qualified service personnel or
system installers.
Do not block the ventilation opening or slots on the cover.
Do not drop metallic parts through slots. This could permanently damage the appliance.
Turn the power off immediately and contact qualified service personnel for service.
Do not attempt to disassemble the appliance. To prevent electric shock, do not remove
screws or covers. There are no user-serviceable parts inside. Contact qualified service
personnel for maintenance. Handle the appliance with care. Do not strike or shake, as this
may damage the appliance.
Do not expose the appliance to water or moisture, nor try to operate it in wet areas. Do take
immediate action if the appliance becomes wet. Turn the power off and refer servicing to
qualified service personnel. Moisture may damage the appliance and also cause electric
shock.
Do not use strong or abrasive detergents when cleaning the appliance body. Use a dry
cloth to clean the appliance when it is dirty. When the dirt is hard to remove, use a mild
detergent and wipe gently.
Do not overload outlets and extension cords as this may result in a risk of fire or electric
shock.
Do not operate the appliance beyond its specified temperature, humidity or power source
ratings. Do not use the appliance in an extreme environment where high temperature or
high humidity exists. Use the appliance at temperature within indoor type DVR for 45°C and
5°C and humidity below 90%.
Read Instruction : All the safety and operating instructions should be read before the
unit is operated.
Retain Instructions : The safety and operating instructions should be retained for future
reference.
Heed Warnings: All warnings on the unit and in the operating instructions should be
adhered to.
Follow Instructions: All operating and use instructions should be followed.
Cleaning: Unplug the unit from the outlet before cleaning. Do not use liquid cleaners or
aerosol cleaners. Use a damp cloth for cleaning
Attachments:Do not use attachment not recommended by the product manufacturer as
they may cause hazards.
Water and Moisture:Do not use this unit near water-for example, near a bath tub, wash
bowl, kitchen sink, or laundry tub, in a wet basement, near a swimming pool, in an
unprotected outdoor installation, or any area which is classified as a wet location.
Servicing:Do not attempt to service this unit by yourself as opening or removing covers
may expose you to dangerous voltage or other hazards. Refer all servicing to qualified
service personnel.
11
Copyright © 2008
AVerMedia INFORMATION, Inc
All rights reserved.
Reproduction without permission is prohibited