1
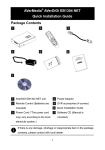
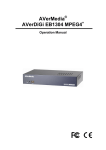
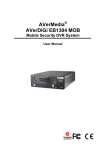
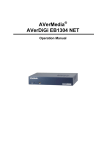
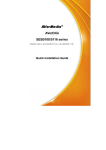
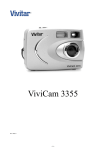
AVerMedia® AVerDiGi EB1304 NET
Quick Installation Guide
Package Contents
(1)
(3)
(2)
EB
FN
D
VR
3
2
1
6
5
4
9
8
A-B
0
▼
▼
7
▲
CT
LE
SE
FT
LE
U
MEN
HT
RIG
▼
▼
▼
C
RE
O+M
ZO
UP
▲ N
W
DO
▼
C+US
FO
CS-U
FO
MO
ZO
▼
+D
Z
PT SPEE
DEE
SP
-H
RM
(4)
(5)
6
(6)
Media
AVer 1304 NET
EB Guide
DiGi
n
AVer Installatio
Quick
(7)
(8)
(1) AVerDiGi EB1304 NET unit
(2) Remote Control (Batteries are
included)
(3) Power Cord (*The power cord
may vary according to the local
electricity system.)
(4) Power Adaptor
i
(5) Accessories (screws for HDD
installation)
(6) Quick Installation Guide
(7) Software CD (Manual is included)
(8) HDD holder(4 screws are
included)
If there is any damage, shortage or inappropriate item in the package
contents, please contact with local dealer
1
Hardware Installation
A. Install the hard disk
Follow the steps to install the hard disk:
Install the Hard Disk Inside the DVR System
Loosen screws
Remove the case cover
backward and upward
Tighten screws at sides of the
hard disk
Connect the IDE cable
connector to the hard disk, and
then connect the power connect
to the hard disk power slot
Tighten the screws to fix the
hard disk.
Close the case cover
Tighten screws
WARNING
TO REDUCE RISK OF FIRE OR ELECTRIC SHOCK. DO NOT
EXPOSE THIS APPLIANCE TO RAIN OR MOISTURE
ARRANTY VOID FOR ANY UNAUTHORIZED PRODUCT
MODIFICATIONW
2
B. After the hard disk installation, please connect the cables
and power as the illustration showed
Camera 4
Camera 2
Sensor
Alarm
Speaker
Web Viewer
Inte rnet
PDA Viewer
Center
Emap
M onitor
Power adapter
Playback
Microphone
CMS
Cmaera 1
Power cord
CRT/LCD Monitor
Camera 3
Remote Console
Television
Pen drive/ External hard disk
3
Power outlet
Using DVR System
1.
2.
Power on the system. DVR
Press
to format hard
will check the hard disk status.
disk. And then, user will see
If the hard disk is new to the
“HDD FORMATTING” on the
system, the screen will appear
DVR screen
“HDD FORMAT YES/NO”.
3.
When the DVR screen shows
4.
When you see the screen,
“NEW HDD FORMAT
press
to enter the OSD
COMPLETED”, the formatting
main menu screen to setup
is completed
parameters. After finishing
setup, press
to return
to surveillance screens.
5.
As surveillance screens
6.
appear, press REC button to
Press 1
3
7
9
buttons to switch to each
record.
channel.
P/N: 300AC2A3-CS3
M A D E I N TA I WA N
4
Setup Time and Date
For the first time using, please adjust the system date and time in order
to have correct recording time.
Press
and select Submenu →
Date / Time
1.
Use
and
▲
to go up
▼
and down
or
Use
to make a
▼
2.
SUBMENU
PASSWORD CHANGE
VIDEO ADJUSTMENT
DATE
TIME
AUTO RECORD
AUTO SCAN
PASSWORD SETUP
AUDIO RECORD
AUDIO MUTE
VIDEO SYSTEM
MUTIPLE REMOTE
REMOTE ID
2006 / 04 / 20
17 : 54 : 50
ON
ON
NO
ON
OFF
NTSC
OFF
1
selection
and
buttons to move the selection to the left and
▼
Use
▼
3.
right
Network Setup
Configuring network parameter for remote accessing.
- Use
▲
and
▼
to go up and
down
or
to make a
▼
- Use
NETWORK SETUP
IP MODE
NW ENABLE
VIDEO PORT
UPGARDE PORT
STATIC
1
2
80
5005
3
▼
- Use
and
▼
selection
buttons to go
left and right
1.
Press
and select
NETWORK SETUP.
2.
3.
Select IP MODE
- STATIC: Assigns a constant IP address to DVR system.
- DHCP: Assign an IP address by local DHCP server.
- PPPOE: Point-to-Point Protocol over Ethernet is a network
protocol for encapsulating PPP frames in Ethernet frames. It is
used mainly with ADSL services. If your network is using ADSL
service to connect to internet, and then, select PPPOE mode.
SUBNET: Enter the subnet mask of the IP address ( Only STATIC
IP mode need to enter)
5
4
4.
5.
6.
7.
GATEWAY: Enter the network gateway IP address from your local
network (Only STATIC IP mode need to enter)
DNS: Domain Name Server translates domain names (such as
www.abb.com.tw) to IP addresses. Enter the IP address of DNS if it
is available. (Only STATIC IP mode need to enter)
MAC ADDRESS: Only for user information. Don’t need to enter the
MAC address in any IP mode.
When all parameters are set, select the CHANGE and press
to save the configuration.
i
To register a domain name for the DVR system, please go to
http://ddns.avers.com.tw or refer to the user manual on 8.1.14
Network Setup and Appendix A Registering Domain Names.
Backup Recorded Video to Pen Drive or Hard Disk
Backup by Time Search
User can backup recorded video to pen drive or external hard disk, and then,
USB BAKCUP
playback on the PC.
TIME SET
- Use
▲
and
▼
to go up and
down.
or
to make a
▼
- Use
START TIME : 2006 / 05 / 04
END TIME
: 2006 / 05 / 05
10 : 00 : 01
13 : 08 : 13
BACKUP CHANNEL
BACKUP SIZE
BACKUP EXECUTE
3
89MB
1
73GB
2
4
▼
- Use
and
▼
selection.
buttons to go left
or right.
1. Plug in pen drive or external hard disk to the USB port on the DVR
system.
2. Press
and select USB BACKUP.
3. Select the START TIME and END TIME.
4. Select the channels which want to backup.
5. The DVR system will display the system hard disk space and backup
file size.
6. And then, select BACKUP EXECUTE to start backup video to the USB
device.
6
Backup AB Repeat File
▲
In playback mode, user also can backup the A B repeat video file which user
has set by using the AB repeat function.
1.
Press
(play button) to call out the SEARCH MODE menu to find
the period of recorded video that user wants to backup.
2.
Select TIME SEARCH or EVENT LIST.
- TIME SEARCH (search by date and time): select the date and time
from where you want to begin the video playback.
- EVENT LIST (search by condition): select from the list.
3.
During the playback, press A-B to set the A point of video segment.
And then, press A-B again to set the B point of video segment. On
the surveillance screen will repeat playing the AB point video segment
which user has set. To cancel AB repeat, press A-B again.
4.
To backup the AB point video
segment, press
. A confirmation
window appears, and then, presses
to start backup file.
7
USB BAKCUP
YES(SELECT) / NO(MENU)
Playback and Edit Backup File on PC
To install the USB Playback Application:
1. Place Installation CD into the CD-ROM drive. When the installation
main screen appears, click Install USB Playback Application and
then follow the on screen instructions
2. Select the language you prefer
3. Click OK to install the application
4. Click Exit to close the installation main screen. You may now
connect the USB device to your PC.
5.
To run the application, click the USB Player icon
on the PC
desktop
6.
To playback the backup file, plug in pen drive or external hard disk
which user has backup the files to it. And then, click OPEN FILE
button and select the file source.
For more information, please refer to the operation manual in the software
CD. If you still have inquiries, please log on to http://www.avermedia.com
http://www.averdigi.com for troubleshooting
Copyright © 2008
AVerMedia INFORMATION, Inc
All rights reserved.
Reproduction without permission is prohibited
8