1
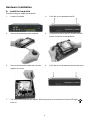
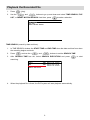
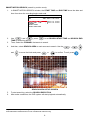
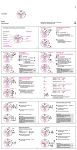
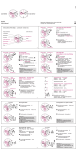
AVerMedia®
AVerDiGi EB3004 NET/EB3004 NET+
Quick Installation Guide
Package Contents
(1)
(2)
a
b
(5)
(4)
(3)
(6)
AV
AVer erMedia ®
Di
Quick Gi EB30
04
User
Guid NET
e
(7)
i
If there is any damage, shortage or inappropriate item in the package
contents, please contact with local dealer
(5) Power Cord (*The power cord may vary according
(1) DVR unit
a.
EB3004 NET
b.
EB3004 NET+
to the local electricity system.)
(2) Remote Control (Batteries are included)
(6) Software CD (Manual is included)
(3) Quick Installation Guide
(7) HDD holder (including 8 screws)
(4) Power Adaptor
WARNING
TO REDUCE RISK OF FIRE OR ELECTRIC SHOCK. DO NOT EXPOSE THIS
APPLIANCE TO RAIN OR MOISTURE
WARRANTY VOID FOR ANY UNAUTHORIZED PRODUCT MODIFICATION
P/N: 300AC2SB3-DCD
Nov.2009
AVerMedia INFORMATION Inc. © 2009
1
Hardware Installation
A. Install the hard disk
Follow the steps to install the hard disk:
1.
Loosen all screws
2.
3.
Secure the brackets on the hard disk
4.
Push the cover backward and lift
Connect the end of the SATA cable and the
power connector to the hard disk
5.
Secure the hard disk inside the unit then
6.
Push the cover forward and secure the cover
replace unit cover
7.
You may now connect all the cables. When the power is connected, the Power LED light
turns on
2
B. Connecting Devices
Each time you change the video display output or video system (NTSC/PAL), the power
must be turned off and on to reset the DVR unit.
3
First Time to Use the DVR System
1.
Make sure all devices and power cables are well connected.
2.
Turn on the DVR unit by connecting the power cable into the power plug.
3.
User should see the SYSTEM INITIALIZE windows appear on the surveillance screen. The
system will do hard disk detection automatically.
4.
For the first time use hard disk, please format the hard disk. Select HDD FORMAT and press
(YES) to format hard disk. If hard disk is not need to format, press
5.
When is done, HDD FORMAT will show COMPLETE.
FW VERSION
HDD STATUS
HDD SIZE
HDD FORMAT
6.
(NO).
SYSTEM INITIALIZE
B3. 01. 01. 00. 01
WAIT . . . .
476 , 918MB
YES(SELECT)/NO(MENU)
FW VERSION
HDD STATUS
HDD SIZE
HDD FORMAT
SYSTEM INITIALIZE
B3. 01. 01. 00. 01
WAIT . . . .
476 , 918MB
COMPLETE
When hard disk format is done, please adjust the system date and time in order to have the
correct recording date and time.
7.
Press
to call up the OSD menu, and then, use
→ DATE/TIME and press
Press
9.
And then, adjust the DATE and TIME by using
and
and
to select the DATE FORMAT.
to make a selection and using
to adjust the date and time.
DATE / TIME SETUP
DATE FORMAT
YYYY/MM/DD
DATE
2009 / 11 / 03
TIME
15 : 19 : 09
TIME SYNC
FORCE SYNC
TIME ZONE
GMT +08 : 00
LAST SYNC TIME
2009 / 01 / 01 00 : 00 : 00
DAYLIGHT SAVING
2009 / 01 / 01 00 : 00 : 00
START
2009 / 01 / 01 00 : 00 : 00
END
00 : 00
OFFSET
10. When is done, the DVR system is ready to record.
11. Press
to select SYSTEM
to make a selection.
8.
and use
and
to start recording.
4
Network Setup
Configuring network parameter for internet connection and remote accessing.
IP MODE
VIDEO PORT
UPGRADE PORT
STREAM SETUP
-
Use
-
Use
-
Use
1.
2.
and
NETWORK SETUP
STATIC
0080
5005
to go up and down
to make a selection
and
Press
buttons to go left and right
and select NETWORK
Select IP MODE.
The system provides 3 types of IP setup mode – STATIC, DHCP, and PPPOE.
-
STATIC: Assigns a constant IP address for the DVR system.
-
DHCP: Assign the IP address by local DHCP server to DVR system.
-
PPPOE: Point-to-Point Protocol over Ethernet is a network protocol for encapsulating PPP
frames in Ethernet frames. It is used mainly with ADSL services. If your network is using
3.
ADSL service connecting to internet, and then, select PPPOE mode.
Setup the VIDEO PORT.
A port for the remote connection. Any port can be assigned as a video port, except the ports
already used by the network services. The default video port is 80.
4.
Setup the UPGRADE PORT.
A port for the remote update DVR system firmware. Any port can be assigned as an upgrade
port, except the ports are already used by the network services. The default upgrade port is
5005.
5
Playback the Recorded File
1.
Press
2.
Use the
(play).
and
buttons to go up and down and select TIME SEARCH, FILE
LIST, or SMART MOTION SEARCH. And then, press
to make a selection.
SEARCH METHOD
TIME SEARCH
FILE LIST
SMART MOTION SEARCH
TIME SEARCH (search by date and time):
1.
In TIME SEARCH window, the START TIME and END TIME show the date and time from when
the recording begins and ends.
2.
Press
3.
and use the
and
buttons to set the SEARCH TIME.
After SEARCH TIME has set, select SEARCH EXECUTIION and press
searching.
TIME SEARCH
START
TIME: 2009 / 01 / 09 11:36:21
END
TIME: 2009 / 01 / 09 11:36:21
SEARCH TIME
: 2009 / 01 / 09 11:36:21
SEARCH EXECUTION
4.
When the playback file is found, the DVR system will start playback automatically.
6
to start
FILE LIST (search by condition):
1.
and use
In FILE LIST window, press
and
buttons to set the date
and time for searching. And then, select the EXECUTION to start searching.
2.
and
The searching result will be list out. Using
and press
buttons to go up and down
to make a selection.
FILE LIST
MULTITIME SEARCH : 2009/01/09 11:36:21 EXECUTION
2009/05/09
2009/05/09
2009/05/09
2009/05/09
2009/05/09
2009/05/09
2009/05/09
2009/05/09
2009/05/09
2009/05/09
3.
10:10:00 10:09:10 10:08:21 10:07:26 09:50:30 09:45:07 09:00:00 09:00:00 08:00:00 07:30:31 -
10:37:06
10:09:45
10:08:27
10:08:03
09:59:59
10:45:49
09:43:48
08:37:06
08:59:59
07:59:59
1/7
After make a selection, the FILE LIST of each channel will list out. Use
buttons to the selection and press
CH1
CH2
CH3
CH4
NORMAL
NORMAL
NORMAL
NORMAL
to make a selection.
EVENT LIST
14:23:25 - 14:23:33
14:23:25 - 14:23:33
14:23:25 - 14:23:33
14:23:25 - 14:23:33
1/1
2009/11/02
4.
The selected event will start to playback.
7
and
SMART MOTION SEARCH (search by motion event):
1.
In SMART MOTION SEARCH window, the START TIME and END TIME show the date and
time from when the recording begins and ends.
START
END
SMART MOTION SEARCH
TIME: 2009 / 11 / 01 11:36:21
TIME: 2009 / 11 / 02 11:36:21
SEARCH START TIME
SEARCH END
TIME
CHANNEL
SEARCH AREA
SEARCH EXECUTION
2.
Use
3.
TIME for searching period.
Then, Select the CHANNEL that wants to search.
4.
And then, select SEARCH AREA to mark an area to search. Use the
and
and
press
: 2009 / 11 / 01 11:36:21
: 2009 / 11 / 02 11:36:21
: 01
to set SEARCH START TIME and SEARCH END
to move the block and press
or
to confirm. To exit, press
SEARCH AREA SETUP SCREEN
5.
6.
To start searching, select the SEARCH EXECUTION.
After make a selection, the DVR system will start playback automatically.
ÃSpecifications are subject to change without prior notice.
ÃThe information contained herein is to be considered for reference only
8
,
,
.
,