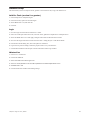
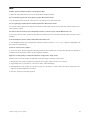
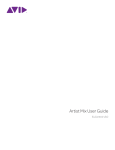
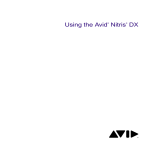
1
Pro Tools | Quartet User Guide
®
Legal Notices
© 2014 Avid Technology, Inc., (“Avid”), all rights reserved. This guide may not
be duplicated in whole or in part without the written consent of Avid.
003, 192 Digital I/O, 192 I/O, 96 I/O, 96i I/O, Adrenaline, AirSpeed, ALEX,
Alienbrain, AME, AniMatte, Archive, Archive II, Assistant Station, AudioPages,
AudioStation, AutoLoop, AutoSync, Avid, Avid Active, Avid Advanced
Response, Avid DNA, Avid DNxcel, Avid DNxHD, Avid DS Assist Station,
Avid Ignite, Avid Liquid, Avid Media Engine, Avid Media Processor,
Avid MEDIArray, Avid Mojo, Avid Remote Response, Avid Unity, Avid Unity
ISIS, Avid VideoRAID, AvidRAID, AvidShare, AVIDstripe, AVX, Beat Detective,
Beauty Without The Bandwidth, Beyond Reality, BF Essentials, Bomb Factory,
Bruno, C|24, CaptureManager, ChromaCurve, ChromaWheel,
Cineractive Engine, Cineractive Player, Cineractive Viewer, Color Conductor,
Command|8, Control|24, Cosmonaut Voice, CountDown, d2, d3, DAE,
D-Command, D-Control, Deko, DekoCast, D-Fi, D-fx, Digi 002, Digi 003,
DigiBase, Digidesign, Digidesign Audio Engine, Digidesign Development
Partners, Digidesign Intelligent Noise Reduction, Digidesign TDM Bus,
DigiLink, DigiMeter, DigiPanner, DigiProNet, DigiRack, DigiSerial, DigiSnake,
DigiSystem, Digital Choreography, Digital Nonlinear Accelerator, DigiTest,
DigiTranslator, DigiWear, DINR, DNxchange, Do More, DPP-1, D-Show,
DSP Manager, DS-StorageCalc, DV Toolkit, DVD Complete, D-Verb, Eleven,
EM, Euphonix, EUCON, EveryPhase, Expander, ExpertRender, Fairchild,
FastBreak, Fast Track, Film Cutter, FilmScribe, Flexevent, FluidMotion,
Frame Chase, FXDeko, HD Core, HD Process, HDpack, Home-to-Hollywood,
HyperSPACE, HyperSPACE HDCAM, iKnowledge, Impact, Improv, iNEWS,
iNEWS Assign, iNEWS ControlAir, InGame, Instantwrite, Instinct,
Intelligent Content Management, Intelligent Digital Actor Technology,
IntelliRender, Intelli-Sat, Intelli-Sat Broadcasting Recording Manager, InterFX,
Interplay, inTONE, Intraframe, iS Expander, iS9, iS18, iS23, iS36, ISIS,
IsoSync, LaunchPad, LeaderPlus, LFX, Lightning, Link & Sync, ListSync,
LKT-200, Lo-Fi, MachineControl, Magic Mask, Make Anything Hollywood,
make manage move|media, Marquee, MassivePack, MassivePack Pro, Maxim,
Mbox, Media Composer, MediaFlow, MediaLog, MediaMix, Media Reader,
Media Recorder, MEDIArray, MediaServer, MediaShare, MetaFuze, MetaSync,
MIDI I/O, Mix Rack, Moviestar, MultiShell, NaturalMatch, NewsCutter,
NewsView, NewsVision, Nitris, NL3D, NLP, NSDOS, NSWIN, OMF,
OMF Interchange, OMM, OnDVD, Open Media Framework,
Open Media Management, Painterly Effects, Palladium, Personal Q, PET,
Podcast Factory, PowerSwap, PRE, ProControl, ProEncode, Profiler,
Pro Tools, Pro Tools|HD, Pro Tools LE, Pro Tools M-Powered, Pro Transfer,
QuickPunch, QuietDrive, Realtime Motion Synthesis, Recti-Fi,
Reel Tape Delay, Reel Tape Flanger, Reel Tape Saturation, Reprise,
Res Rocket Surfer, Reso, RetroLoop, Reverb One, ReVibe, Revolution, rS9,
rS18, RTAS, Salesview, Sci-Fi, Scorch, ScriptSync,
SecureProductionEnvironment, Shape-to-Shape, ShuttleCase, Sibelius,
SimulPlay, SimulRecord, Slightly Rude Compressor, Smack!, Soft SampleCell,
Soft-Clip Limiter, SoundReplacer, SPACE, SPACEShift, SpectraGraph,
SpectraMatte, SteadyGlide, Streamfactory, Streamgenie, StreamRAID,
SubCap, Sundance, Sundance Digital, SurroundScope, Symphony, SYNC HD,
SYNC I/O, Synchronic, SynchroScope, Syntax, TDM FlexCable, TechFlix,
Tel-Ray, Thunder, TimeLiner, Titansync, Titan, TL Aggro, TL AutoPan,
TL Drum Rehab, TL Everyphase, TL Fauxlder, TL In Tune, TL MasterMeter,
TL Metro, TL Space, TL Utilities, tools for storytellers, Transit, TransJammer,
Trillium Lane Labs, TruTouch, UnityRAID, Vari-Fi, Video the Web Way,
VideoRAID, VideoSPACE, VTEM, Work-N-Play, Xdeck, X-Form, and XMON
are either registered trademarks or trademarks of Avid Technology, Inc. in the
United States and/or other countries.
Bonjour, the Bonjour logo, and the Bonjour symbol are trademarks of Apple
Computer, Inc.
Thunderbolt and the Thunderbolt logo are trademarks of Intel Corporation in the
U.S. and/or other countries.
This product may be protected by one or more U.S. and non-U.S. patents.
Details are available at www.avid.com/patents.
Product features, specifications, system requirements, and availability are
subject to change without notice.
Guide Part Number 9329-65462-00 REV A 09/14
Contents
Chapter 1. Introduction . . . . . . . . . . . . . . . . . . . . . . . . . . . . . . . . . . . . . . . . . . . . . . . . . . . . . . . . . . . . . . . . . . . . . . . . . . . . . . 4
Package Contents . . . . . . . . . . . . . . . . . . . . . . . . . . . . . . . . . . . . . . . . . . . . . . . . . . . . . . . . . . . . . . . . . . . . . . . . . . . . . 4
System Requirements and Compatibility . . . . . . . . . . . . . . . . . . . . . . . . . . . . . . . . . . . . . . . . . . . . . . . . . . . . . . . . . . . . . 5
About This Guide. . . . . . . . . . . . . . . . . . . . . . . . . . . . . . . . . . . . . . . . . . . . . . . . . . . . . . . . . . . . . . . . . . . . . . . . . . . . . . 5
About www.avid.com . . . . . . . . . . . . . . . . . . . . . . . . . . . . . . . . . . . . . . . . . . . . . . . . . . . . . . . . . . . . . . . . . . . . . . . . . . . 6
Chapter 2. Pro Tools | Quartet Tour . . . . . . . . . . . . . . . . . . . . . . . . . . . . . . . . . . . . . . . . . . . . . . . . . . . . . . . . . . . . . . . . . . . . 7
Top Panel . . . . . . . . . . . . . . . . . . . . . . . . . . . . . . . . . . . . . . . . . . . . . . . . . . . . . . . . . . . . . . . . . . . . . . . . . . . . . . . . . . . 7
Rear Panel . . . . . . . . . . . . . . . . . . . . . . . . . . . . . . . . . . . . . . . . . . . . . . . . . . . . . . . . . . . . . . . . . . . . . . . . . . . . . . . . . . 7
Side Panel . . . . . . . . . . . . . . . . . . . . . . . . . . . . . . . . . . . . . . . . . . . . . . . . . . . . . . . . . . . . . . . . . . . . . . . . . . . . . . . . . . 8
Displays and Touchpads . . . . . . . . . . . . . . . . . . . . . . . . . . . . . . . . . . . . . . . . . . . . . . . . . . . . . . . . . . . . . . . . . . . . . . . . 8
Chapter 3. Installation . . . . . . . . . . . . . . . . . . . . . . . . . . . . . . . . . . . . . . . . . . . . . . . . . . . . . . . . . . . . . . . . . . . . . . . . . . . . . . . 9
Chapter 4. Pro Tools IO Control Software . . . . . . . . . . . . . . . . . . . . . . . . . . . . . . . . . . . . . . . . . . . . . . . . . . . . . . . . . . . . . . 10
Input Tab . . . . . . . . . . . . . . . . . . . . . . . . . . . . . . . . . . . . . . . . . . . . . . . . . . . . . . . . . . . . . . . . . . . . . . . . . . . . . . . . . . 10
Output Tab . . . . . . . . . . . . . . . . . . . . . . . . . . . . . . . . . . . . . . . . . . . . . . . . . . . . . . . . . . . . . . . . . . . . . . . . . . . . . . . . . 11
Mixer Tab . . . . . . . . . . . . . . . . . . . . . . . . . . . . . . . . . . . . . . . . . . . . . . . . . . . . . . . . . . . . . . . . . . . . . . . . . . . . . . . . . . 12
Device Settings . . . . . . . . . . . . . . . . . . . . . . . . . . . . . . . . . . . . . . . . . . . . . . . . . . . . . . . . . . . . . . . . . . . . . . . . . . . . . . 13
Output Routing . . . . . . . . . . . . . . . . . . . . . . . . . . . . . . . . . . . . . . . . . . . . . . . . . . . . . . . . . . . . . . . . . . . . . . . . . . . . . . 14
System Setup . . . . . . . . . . . . . . . . . . . . . . . . . . . . . . . . . . . . . . . . . . . . . . . . . . . . . . . . . . . . . . . . . . . . . . . . . . . . . . . 15
Pro Tools IO Control Menu Bar . . . . . . . . . . . . . . . . . . . . . . . . . . . . . . . . . . . . . . . . . . . . . . . . . . . . . . . . . . . . . . . . . . 15
Chapter 5. Using Pro Tools | Quartet . . . . . . . . . . . . . . . . . . . . . . . . . . . . . . . . . . . . . . . . . . . . . . . . . . . . . . . . . . . . . . . . . . 17
Controller Knob . . . . . . . . . . . . . . . . . . . . . . . . . . . . . . . . . . . . . . . . . . . . . . . . . . . . . . . . . . . . . . . . . . . . . . . . . . . . . . 17
OLED Displays . . . . . . . . . . . . . . . . . . . . . . . . . . . . . . . . . . . . . . . . . . . . . . . . . . . . . . . . . . . . . . . . . . . . . . . . . . . . . . 17
Input Configuration . . . . . . . . . . . . . . . . . . . . . . . . . . . . . . . . . . . . . . . . . . . . . . . . . . . . . . . . . . . . . . . . . . . . . . . . . . . 18
Connecting Headphones or Speakers. . . . . . . . . . . . . . . . . . . . . . . . . . . . . . . . . . . . . . . . . . . . . . . . . . . . . . . . . . . . . . 19
Output Configuration . . . . . . . . . . . . . . . . . . . . . . . . . . . . . . . . . . . . . . . . . . . . . . . . . . . . . . . . . . . . . . . . . . . . . . . . . . 20
Setting Input and Output Levels . . . . . . . . . . . . . . . . . . . . . . . . . . . . . . . . . . . . . . . . . . . . . . . . . . . . . . . . . . . . . . . . . . 21
Connecting Multiple Speaker Sets . . . . . . . . . . . . . . . . . . . . . . . . . . . . . . . . . . . . . . . . . . . . . . . . . . . . . . . . . . . . . . . . 23
Pro Tools | Quartet Touchpads . . . . . . . . . . . . . . . . . . . . . . . . . . . . . . . . . . . . . . . . . . . . . . . . . . . . . . . . . . . . . . . . . . . 25
Recording Software Settings . . . . . . . . . . . . . . . . . . . . . . . . . . . . . . . . . . . . . . . . . . . . . . . . . . . . . . . . . . . . . . . . . . . . 28
Pro Tools IO Control Output Routing Tab . . . . . . . . . . . . . . . . . . . . . . . . . . . . . . . . . . . . . . . . . . . . . . . . . . . . . . . . . . . 29
Software Setup . . . . . . . . . . . . . . . . . . . . . . . . . . . . . . . . . . . . . . . . . . . . . . . . . . . . . . . . . . . . . . . . . . . . . . . . . . . . . . 32
FAQs . . . . . . . . . . . . . . . . . . . . . . . . . . . . . . . . . . . . . . . . . . . . . . . . . . . . . . . . . . . . . . . . . . . . . . . . . . . . . . . . . . . . . 33
Pro Tools | Quartet User Guide
iii
Chapter 1: Introduction
Thank you for purchasing Pro Tools® | Quartet, a professional audio interface with studio control center for your Mac OS X and
Windows. Pro Tools | Quartet I/O features Apogee’s industry-leading AD/DA conversion technology and world-class mic preamps.
Pro Tools | Quartet lets you perform the following audio functions:
• Record up to four analog inputs simultaneously (microphone, line-level or instrument).
• Connect up to eight additional inputs digitally via ADAT/SMUX optical for a total of 12 inputs.
• Connect and power any compatible MIDI USB device.
• Connect up to three sets of powered monitors.
• Mix and monitor in 5.1 surround.
• Record with most audio software programs that run on Mac and PC:
Pro Tools, Logic, Final Cut, GarageBand, Ableton Live, as well as Core Audio and ASIO compatible applications.
This guide describes how to:
• Set up Pro Tools | Quartet with your selected device.
• Connect speakers or headphones to play back music.
• Connect mics and instruments to record your own creations.
Package Contents
The following items are included in the Pro Tools | Quartet box:
• Pro Tools | Quartet
• USB cable
• Universal Power Supply with standard 3 pin-IEC cable
• Pro Tools | Quartet QuickStart Guide
Software, firmware and the Pro Tools | Quartet User Guide are available online only. Please register your product and download
the latest installer here: http://www.avid.com/quartethelp
Chapter 1: Introduction
4
System Requirements and Compatibility
Avid can only assure compatibility and provide support for hardware and software it has tested and approved.
The following are required to connect Pro Tools | Quartet to a computer:
• Connection: An available USB port on the computer
• Power: DC power supply included
Mac
• Computer: Avid-qualified Apple computers running OS 10.8.5 or 10.9
• Total System RAM: 4 GB minimum, 8 GB required for video playback
PC
• Computer: Avid-qualified Windows computers
• Total System RAM: 4 GB minimum, 8 GB (or more) recommended
• Windows Versions supported: Windows 8 Standard and Pro editions; Windows 7 Home Premium, Professional, and Ultimate editions (Service Pack 1 only)
For complete system requirements and a list of qualified computers, operating systems, hard drives, and third-party devices, visit:
http://avid.com/compatibility
About This Guide
This guide provides a basic overview of Pro Tools | Quartet’s features and functionality.
Conventions Used in This Guide
All of our guides use the following conventions to indicate menu choices and key commands:
:
Convention
Action
File > Save
Choose Save from the File menu
Control+N
Hold down the Control key and press the N key
Control-click
Hold down the Control key and click the mouse button
Right-click
Click with the right mouse button
The names of Commands, Options, and Settings that appear on-screen are in a different font.
The following symbols are used to highlight important information:
User Tips are helpful hints for getting the most from your system.
Important Notices include information that could affect your data or the performance of your system.
Shortcuts show you useful keyboard or mouse shortcuts.
Cross References point to related sections in this guide and other Avid guides.
Chapter 1: Introduction
5
About www.avid.com
The Avid website is your best online source for information to help you get the most out of your system. The following are just a
few of the services and features available.
Product Registration Register your purchase online.
Support and Downloads Contact Avid Customer Success (http://www.avid.com/US/support); download software updates and the
latest online manuals (http://www.avid.com/quartethelp); browse the Compatibility documents for system requirements
(http://avid.com/compatibility); search the online Knowledge Base or join the worldwide Avid user community on the User
Conference.
Training and Education Study on your own using courses available online or find out how you can learn in a classroom setting at
a certified Avid training center.
Products and Developers Learn about Avid products; download demo software or learn about our Development Partners and their
plug-ins, applications, and hardware.
News and Events Get the latest news from Avid or sign up for a demo.
Chapter 1: Introduction
6
Chapter 2: Pro Tools | Quartet Tour
Your Pro Tools | Quartet consists of the Top, Rear, and Side panels.
Top Panel
Input Display
Output Display
Input Selection
Touchpads
Output Selection
Touchpads
Assignable Touchpads
Controller Knob
Top Panel
Rear Panel
Analog Inputs
Combination Mic/Inst/Line
Analog Outputs
USB 2.0
Digital Inputs
ADAT/SMUX
Word Clock Output
MIDI (USB)
DC Power
Rear Panel
Chapter 2: Pro Tools | Quartet Tour
7
Side Panel
Headphone output
Side Panel
Displays and Touchpads
The Input and Output each have displays and Touchpads to monitor and control their functions.
Input Display (left); Output Display (right)
Chapter 2: Pro Tools | Quartet Tour
8
Chapter 3: Installation
To install Pro Tools | Quartet Software:
1
Connect Pro Tools | Quartet’s Power Supply to the DC power input on its rear panel and the appropriate IEC cable to a wall outlet.
2
Connect Pro Tools | Quartet’s USB port to a USB port on your Mac using the supplied USB 2.0 cable.
3
Download the latest Pro Tools | Quartet software installer from: http://www.avid.com/quartethelp.
4
When the download completes, double-click the installer icon to run the firmware updater.
5
When the firmware update completes, double-click the open-box icon to run the software installer.
6
When the installation completes, restart your computer.
When your computer restarts, a dialog box appears.
7
Choose Pro Tools | Quartet for sound input and output, and click Yes to exit the dialog.
You are now ready to use Pro Tools | Quartet with your computer.
Chapter 3: Installation
9
Chapter 4: Pro Tools IO Control Software
Pro Tools IO Control is an interface control application made for Mac and Windows. Featuring a single window design, and multiple tab interface for quick access to all device and system settings, Pro Tools IO Control makes software control of Pro Tools |
Quartet easy. The software works the same on Mac and Windows; this section shows Mac screens.
Input Tab
Input Tab
• Device Icon & ID Button - A device icon and ID button is placed adjacent to each row of parameters to identify the hardware
unit to which the row belongs. By clicking on the ID button, the front panel of the corresponding hardware unit illuminates. Each
hardware unit is assigned a Peripheral Prefix (A–Z, found in Pro Tools IO Controlʼs Device Settings tab window) which is displayed on the ID button.
• Analog Level - Use this menu to select microphone, instrument, or line input.
• Soft Limit - Use this menu to engage Soft Limit. Soft Limit is Apogee’s proprietary analog process for taming transients before
A/D conversion. By gently rounding transients in a transparent manner, it’s possible to maximize level BEFORE the A/D conversion stage. Soft Limit is most effective with signals with large transients such as drums, percussion and plucked instruments.
Soft Limit may not be the appropriate choice for signals such as bass or organ.
• Input Level - The gain of each input is controlled with these software knobs. The gain level is indicated in the value box below
the knob.
• Analog Input Meter - This meter displays the level of the analog input after A/D conversion.
• Group On/Off - Use this to group the gain setting of inputs so that the controller knob on Pro Tools | Quartet or one software
gain knob controls both input gains simultaneously. If a gain offset is present between inputs when Group is set to On, this offset
is preserved.
• Phase - Check this box to reverse the polarity of the input signal. Under certain circumstances, when two mics are used on one
source, reversing the polarity of one mic may result in a fuller sound. For example, when miking the top and bottom of a snare
drum, a fuller sound is obtained when the polarity of the bottom mic is reversed.
• 48 V/Phantom Power - Engage this button for 48 volts phantom power on the XLR connections. Condenser mics require phantom power to operate.
Chapter 4: Pro Tools IO Control Software
10
Output Tab
Output Tab
• Device Icon & ID Button - See the description in “Input Tab” on page 10.
• Analog Output Meter - This meter displays the level of the analog output before D/A conversion, in the range -48 to 0 dBFS.
• Analog Out Format - This menu sets the format of the analog outputs:
Line: all six analog outputs are configured as line outputs; monitor functions such as level control, Mute, Dim and Sum to Mono
are disengaged.
Stereo: Outputs 1–2 are configured as speaker outputs (with all monitor functions available) while outputs 3–6 are configured
as line outputs.
2 Speaker Sets: Outputs 1–4 are configured as two pairs of stereo outputs. Switch between the stereo pairs with the Speaker
Select buttons (or using the top panel Touchpads).
3 Speaker Sets: All six outputs are configured as three pairs of stereo outputs. Switch between the stereo pairs with the Speaker
Select buttons (or using the top panel Touchpads).
5.1: All six outputs are configured as speakers outputs, suitable for connection to a 5.1 speaker system.
• Speaker Out Level - When Analog Out Format is set to Stereo, 2 or 3 Speaker Sets or 5.1, this knob controls the speaker output
level.
• Headphone Level - This knob controls the output level of the right side headphone output.
• Mute - Click M to mute the speaker (or headphone) output. Pro Tools | Quartet’s top panel Touchpads may be set to engage Mute
on the Speaker outputs, the headphone outputs or both at the same time. See “Device Settings” on page 13.
• Dim - Click D (for Dim) to lower the speaker (or headphone) output level by 15 dB. This function is a convenient way to briefly
lower the playback volume in the speakers or headphones in order to hold a conversation without completely muting the output.
Pro Tools | Quartet’s top panel Touchpads may be set to engage Dim on the Speaker outputs, the headphone outputs or both at
the same time. See “Device Settings” on page 13.
• Sum to Mono - Click Σ to sum the left and right channels of the speaker (or headphone) outputs to mono. At many points of the
production process, this function is useful to check mono compatibility. For example, when recording with a stereo pair of mics,
it’s always a good idea to sum both channels to mono and check for unevenness in the frequency range caused by phase cancellation and reinforcement of particular frequencies. If the sound changes significantly or sounds hollow when summed to mono,
this may indicate phase issues caused by a less than optimal mic placement.
When mixing, it’s also a good idea to check mono compatibility. Beyond questions of phase, any masking caused by overlapping
frequencies is most easily heard when listening in mono. Try starting a mix with Sum to Mono engaged – once you have something that sounds good, then disengage Sum to Mono and revel at the beautiful stereo mix you’ve created!
Pro Tools | Quartet’s top panel Touchpads may be set to engage Sum to Mono on the Speaker outputs, the headphone outputs or
both at the same time. See “Device Settings” on page 13.
Chapter 4: Pro Tools IO Control Software
11
Mixer Tab
Mixer Tab
• Device Icon & ID Button - See the description in “Input Tab” on page 10.
• Pan - This rotary knob pans the input signal between the left and right sides of the Pro Tools IO Control mixer’s stereo output.
• Input Level Fader - This slider sets the level of the input signal in the Pro Tools IO Control mixer’s stereo output.
• Meter - This bar graph style meter displays the pre-fader input level.
• Input Level Value Window - The Input Level fader value is displayed in this window. Fader values between 6 and -48 may be
directly entered.
• Solo - This button mutes all other channels whose Solo buttons are not engaged.
• Mute - This button mutes the input channel.
• Software Return Fader - This stereo input channel provides level control, metering, and mute/solo functions for the signal from
the software application containing playback. Match your recording software application’s mixer output and the Software Return
menu selection. In most cases, the recording software mixer output and Pro Tools IO Control’s Software Return will be set to 1–2.
• Mixer Master - This is the level control and meter for the mixer’s output.
Chapter 4: Pro Tools IO Control Software
12
Device Settings
Device Settings
• Device Icon & ID Button - See the description in “Input Tab” on page 10.
• Peripheral Prefix - Use this menu to assign a letter prefix (A–Z) to each peripheral device displayed in the Devices Sidebar. The
letter prefix is included in all graphic representations of the peripheral as well as I/O labels in Pro Tools IO Control and Core Audio compatible applications.
• Touchpad Assignment - Use these menus to select the parameter controlled by the user assignable Touchpads:
Mute Outputs - To mute the speaker and headphone outputs, assign one of the user assignable Touchpads in Pro Tools IO
Control to the desired mute function.
Dim Outputs - The Dim function lowers the output volume by 15 dB.
This function is convenient when you want to briefly lower the playback volume in the speakers or headphones in order to hold
a conversation without completely muting the output.
Sum to Mono - The Sum to Mono function is used to examine phase relationships on stereo tracks. When it is engaged, phase
errors become more noticeable.
• Toggle Headphone Source - Used to switch the Headphone output between Out 1–2, Out 3–4 and Mixer.
This function is especially useful for digital DJs to switch the headphone output between the House output (sent to Out 1–2) and
a cue output (sent to Out 3–4).
• Clear Meters - The Clear Meters function will remove held peak and over indicators on software and OLED meters when Peak
Hold or Over Hold (in the System Setup tab window) is set to Infinite.
• Lock Home View - When Lock Home view is checked, the OLED display doesn’t jump to the Detail view when the Controller
knob is turned. If Lock Home view is not checked, the OLED display shows details for the selected input or output when the Controller knob is turned.
• Encoder Push Assignment - Use this menu to select the action when clicking the top panel Controller Knob.
Chapter 4: Pro Tools IO Control Software
13
Output Routing
Output Routing tab
In the Pro Tools IO Control Output Routing tab, route Mixer 1 (or Mixer 2) to Line 1/2. If Analog Out Format is set to 2 or 3
Speaker Sets, route Mixer to all the analog outputs in use, as shown below.
Mixer routing to analog outputs
Chapter 4: Pro Tools IO Control Software
14
System Setup
System setup
• Device Icon & ID Button - See the description in “Input Tab” on page 10.
• Sample Rate - This menu selects the sample rate. Under certain circumstances, (for example, when a DAW session is open) this
setting will be overridden by software sample rate settings.
• Peak Hold - This menu sets the time that peak indications are held on software and front panel meters.
• Over Hold - This menu sets the time that over indications are held on software and front panel meters.
• Keyboard Volume Control - The Audio Output menu sets the hardware output that’s controlled by the computer keyboard volume control.
Pro Tools IO Control Menu Bar
Pro Tools IO Control Menu Bar
Pro Tools IO Control Panel Menu
• About Pro Tools IO Control - Choose this menu item to display version information.
• Preferences - Choose this menu item to display Pro Tools IO Controlʼs Preference panel. Check Launch Pro Tools IO Control
automatically when connecting a device to launch Pro Tools IO Control when the computer is started. Check Display Pop-ups
to show top panel encoder adjustments.
• Hide Pro Tools IO Control - Choose this menu item to hide the Pro Tools IO Control application.
• Hide Others - Choose this menu item to hide all other open applications.
• Show All - If any open applications have been hidden, choose this menu item to reveal all open applications.
• Quit Pro Tools IO Control - Choose this menu item to quit Pro Tools IO Control.
File Menu
Pro Tools IO Control Menu Bar
• File>Rescan - Choose this menu item to re-initialize the link between Pro Tools IO Control software and the hardware connected
to the computer, in the case where the hardware is correctly connected and powered on but not detected in Pro Tools IO Control.
Chapter 4: Pro Tools IO Control Software
15
Window Menu
Pro Tools IO Control Window Menu
• Window>Minimize - Choose this menu item to minimize the Pro Tools IO Control window to the OS X Dock.
• Window>Zoom - Choose this menu item to maximize the size of the Pro Tools IO Control window.
• Open any currently active tab by typing Command + number.
Help Menu
• Help - Choose a Help menu item to get information on Pro Tools | Quartet or Pro Tools IO Control.
Pro Tools IO Control Help Menu
Chapter 4: Pro Tools IO Control Software
16
Chapter 5: Using Pro Tools | Quartet
Controller Knob
Pro Tools | Quartet’s Controller Knob allows you to easily adjust the levels of all inputs and outputs and also provides a quick and
easy way to mute the outputs. By default, the Knob Push Button is assigned to mute all outputs. Alternatively, you can assign it in
Avid’s Pro Tools IO Control software to mute only the speaker or only the headphone outputs.
Controller Knob
Pro Tools | Quartet Controller Knob
OLED Displays
Pro Tools | Quartet’s input and output OLED display provide full color metering and visual feedback.
Home View of Input Display (left) and Output Display (right)
Chapter 5: Using Pro Tools | Quartet
17
Input Configuration
1
Connect a microphone or instrument to one of the XLR-¼-in combination jacks on Pro Tools | Quartet’s rear panel.
Analog Inputs
Combination Mic/Inst/Line
Pro Tools | Quartet rear panel
2
Open Pro Tools IO Control software (found in your Mac’s Applications folder), and select the Input tab.
3
Select the Analog Level setting that corresponds to the device you have connected to Pro Tools | Quartet’s input(s). For example:
if you have an XLR microphone connected to input 1, select Mic from the Analog Level menu on channel 1.
If you have a ¼-in instrument connected to the input, select Inst.
If you use a condenser microphone that requires phantom power, select the 48V box on the Input tab of the appropriate channel
in Pro Tools IO Control. Phantom power is indicated on Pro Tools | Quartet’s display by a red dot above the microphone icon (see
“Input Tab” on page 10).
Chapter 5: Using Pro Tools | Quartet
18
Connecting Headphones or Speakers
1
Connect headphones to the headphone output on the right side of Pro Tools | Quartet.
Headphone output
Pro Tools | Quartet headphone jack on side panel
2
Connect Pro Tools | Quartet’s ¼-in analog speaker outputs 1-2 to the inputs (balanced or unbalanced) of your studio monitors
or amplifier.
Analog Outputs
Analog outputs on the Pro Tools | Quartet rear panel
Chapter 5: Using Pro Tools | Quartet
19
Output Configuration
To set Pro Tools | Quartet’s speaker output level:
1
Connect Pro Tools | Quartet to the computer:
2
Open the Pro Tools IO Control software (found in your Mac’s Applications folder), and select the Output tab.
Setting speaker output level
3
Select your Output source from the Speaker Output menu for desired playback (Line, Stereo, 2 Speaker Set, 3 Speaker Set or 5.1).
Stereo is typically the default Output source on most recording software.
To change Pro Tools | Quartet’s headphone output level:
1
Connect Pro Tools | Quartet to the computer.
2
Open Pro Tools IO Control software (found in your Mac’s Applications folder), and select the Output tab.
3
Select your Output source from the Speaker Output menu for desired playback (Line, Stereo, 2 Speaker Set, 3 Speaker Set or 5.1).
Stereo is typically the default Output source on most recording software.
Chapter 5: Using Pro Tools | Quartet
20
Setting Input and Output Levels
To set Pro Tools | Quartet’s input level (i.e, the preamp gain of microphones and instruments):
1
Press the Touchpad corresponding to the desired input.
The ring around the selected icon will be brighter than the others after you select it.
Selecting the Input Touchpad (left); setting the Input Level (right)
2
Turn the Controller Knob until the desired recording level is obtained.
The controller knob operates in parallel with Pro Tools IO Control’s input controls.
To change Pro Tools | Quartet’s speaker output level:
1
Press the speaker output Touchpad.
The ring around the selected icon will be brighter than the others after you select it.
Selecting the Speaker Output Touchpad (left); setting the Speaker Output Level (right)
2
Turn the controller knob to the desired listening level.
The controller knob operates in parallel with any software output controls on the computer.
Chapter 5: Using Pro Tools | Quartet
21
To change Pro Tools | Quartet’s headphone output level (i.e., the listening level of connected headphones):
1
Press the headphone output Touchpad.
Selecting the headphone Touchpad( left), and setting its level (right)
2
Turn the controller knob to the desired listening level.
The controller knob operates in parallel with Pro Tools IO Control’s headphone control.
Chapter 5: Using Pro Tools | Quartet
22
Connecting Multiple Speaker Sets
Pro Tools | Quartet’s Speaker Set functionality allows you to connect up to three stereo speaker sets, each of which can be individually selected for playback output.
To set up multiple speaker sets:
1
Connect your primary pair of speakers to Pro Tools | Quartet’s ANALOG OUT 1-2.
2
Connect your second and third pairs (if equipped) to Pro Tools | Quartet’s ANALOG OUT 3-4 and 5-6, respectively.
Analog Outputs
Pro Tools | Quartet rear panel with analog outputs
3
On the Output Tab of Pro Tools IO Control (found in the applications folder on your Mac), select either 2 Speaker Sets or 3
Speaker Sets in the Output Format menu.
Selecting multiple speaker sets
Chapter 5: Using Pro Tools | Quartet
23
2 Speaker Sets
When the 2 Speaker Sets option is selected, Software Outputs 1–2 are routed to Hardware Outputs 1–2 and 3–4.
Multiple speaker output routing
3 Speaker Sets
When the 3 Speaker Sets option is selected, Software Outputs 1–2 are routed to Hardware Outputs 1–2, 3–4, and 5–6.
Selecting 3 Speaker Sets
Custom Output Routing
The Output Routing can be freely changed if you have a unique setup. For instance, if you wish to listen to your DAW’s Software
Outputs 3–4 and toggle between 3 different speaker sets, you can manually route Software Output 3–4 to Hardware Outputs 1–2,
3–4, and 5–6.
Chapter 5: Using Pro Tools | Quartet
24
Pro Tools | Quartet Touchpads
Pro Tools | Quartet’s three assignable Touchpads can be setup for quick access to Output functions. Use them to mute or dim the
outputs, sum to mono, clear meters or switch between multiple speaker sets with a single touch.
Assignable Touchpads
Pro Tools | Quartet Touchpads
Assigning Touchpad Functions
Assigning functions to the Touchpads is easily done in the Device Settings tab of Pro Tools IO Control.
Touchpad function assignment
To assign Touchpad functions:
1
Connect Pro Tools | Quartet to the computer.
2
Open Pro Tools IO Control software (found in your Mac’s Applications folder), and select the Device Settings tab.
3
Select Touchpad A, B, or C.
Chapter 5: Using Pro Tools | Quartet
25
Mute Outputs
You can assign one of the three Touchpads to mute the Speaker, Headphone, or All Outputs.
Touchpad assignment
Dim Outputs
The Dim function lowers the output volume by 15 dB. This function is convenient when you want to briefly lower the playback volume without completely muting the output.
Dim outputs
Sum to Mono
The Sum to Mono function is used to examine phase relationships on stereo tracks. When engaged, the left and right output signals
are combined and phase errors between the two become exponentially more noticeable.
Sum to Mono
Chapter 5: Using Pro Tools | Quartet
26
Engage Speaker Set
When the output format (found in Pro Tools IO Control’s Output Tab) is set to either 2 Speaker Sets or 3 Speaker Sets, you can
assign the Touchpads to engage a specific speaker set.
Engage Speaker Set
Clear Meters
The Clear Meters function will remove any peak and over indicators in Pro Tools IO Control and OLED meters on Pro Tools |
Quartet’s front panel. If Peak Hold or Over Hold (in the System Setup tab) is set to Infinite, all indicators will remain illuminated
until Clear Meters is engaged.
Clear Meters
Chapter 5: Using Pro Tools | Quartet
27
MIDI Input/Output
Mac
Pro Tools | Quartet’s USB MIDI input/output provides a MIDI connection between class compliant Core MIDI devices such as
keyboards and other controllers and Apple’s Mac OS X.
A class-compliant MIDI device works with Core MIDI without the need to install drivers or other additional software.
To confirm that your MIDI device is class-compliant:
1
Using a standard USB cable, connect the device directly to a Mac.
2
On the Mac, open Audio MIDI Setup, found in the Applications > Utilities folder.
3
In Audio MIDI Setup, choose Window > Show MIDI Window.
4
Verify that the MIDI device is detected in the MIDI window.
5
If the device is not detected, click Rescan MIDI.
If the device is detected, it’s class-compliant and will be available to MIDI software.
Windows
MIDI I/O is configured automatically when the Pro Tools | Quartet device driver is installed.
Recording Software Settings
Before using the Pro Tools IO Control mixer, it’s necessary to change a few settings in your recording software.
Software Monitoring
Because the signal to be recorded is monitored through the Pro Tools IO Control mixer, the outputs of software tracks actively recording should be muted – after all, that’s the source of the latency. Most software applications provide an option to turn off software monitoring of recording tracks.
Playback Mix
In your recording software, set up a mix of all playback tracks and route it to the first pair of outputs. If a master fader controls the
global output of the mix, we suggest setting the fader to 0 dB.
Chapter 5: Using Pro Tools | Quartet
28
Pro Tools IO Control Output Routing Tab
Pro Tools IO Control Output routing tab
1
In the Pro Tools IO Control Output Routing tab, route Mixer 1 (or Mixer 2) to Line 1/2.
2
If Analog Out Format is set to 2 or 3 Speaker Sets, route Mixer to all the analog outputs in use (see “Connecting Multiple
Speaker Sets” on page 23).
Pro Tools IO Control Mixer Settings
1
Select the desired input (Line, Mic or Instrument) and set the Input Level on the Input tab.
The signal should be displayed on both the Mixer Input and Mixer Master meters.
2
If the Mixer Input’s Over LED lights, reduce the input gain in Pro Tools IO Control Input tab.
3
If the Mixer Master’s Over LEDs light, reduce the Input fader.
Pro Tools IO Control Mixer tab
4
Now start playback in your recording software.
The playback signal should be displayed on the Software Return and Mixer Master’s meters.
5
Use the Software Return and Input faders to balance between the input and playback signals.
6
If you’ve found a good balance but the Mixer Master’s Over LEDs light, reduce the Mixer Master fader.
Chapter 5: Using Pro Tools | Quartet
29
Pro Tools IO Control Low Latency Mixing
A bit of background information concerning latency and computer-based digital recording setups will help you better understand
these functions.
When recording with most computer-based digital audio applications, the delay between the input and output of the recording system often disturbs the timing of the musicians performing. This delay, known as latency, means that the musician hears the notes
played a few milliseconds after having actually played them. As anyone who has spoken on a phone call with echo knows, relatively short delays can confuse the timing of any conversation, spoken or musical.
Do I need the Pro Tools IO Control Mixer?
The Pro Tools IO Control mixer serves to provide a low latency monitoring mix while recording. Therefore if you’re using Pro
Tools | Quartet to listen to iTunes or audio from another program, there’s no need to use the mixer. It’s possible that the latency of
your particular recording system is low enough to be unnoticed. The system latency is determined by the recording software’s buffer setting; if your computer is powerful enough, it’s possible to set the buffer to a lower value (shorter latency) without encountering clicks and pops in the audio output. If the latency doesn’t pose a problem while recording, there’s no need to employ the low
latency mixer.
Figure 1. Calculating latency
To illustrate the effect of latency, Figure 1 depicts the typical signal path of a vocal overdub session. A vocalist sings into a microphone, which is routed to an analog to digital converter, then to the audio software application for recording. In the software application, the vocalist’s live signal is mixed with the playback of previously recorded tracks, routed to a digital to analog converter, and finally to the vocalist’s headphones. A slight delay accumulates at each conversion stage, while a much greater amount of delay occurs
through the software application, resulting in the vocalist hearing his performance in headphones delayed by several milliseconds.
Figure 2. Lowering the latency
By routing the hardware input directly to the hardware output and mixing in playback as shown in Figure 2, it’s possible to provide
the vocalist a headphone monitoring signal with a much shorter delay.
Chapter 5: Using Pro Tools | Quartet
30
First, the signal being recorded (in this case, a vocal mic) is split just after the A/D stage and routed to both the software application
for recording and directly back to the hardware outputs without going through the latency-inducing software. This creates a low latency path from mic to headphones. Next, a stereo mix of playback tracks is routed to the low latency mixer and combined with the
hardware input(s). This allows the performer to hear while listening to playback tracks without a confusing delay to comfortably
record overdubs.
Note that the software application’s mixer sets a stereo mix of playback tracks while the low latency mixer sets the balance between
the stereo playback mix and the hardware inputs.
Lowering the Latency
While recording, if you notice a delay between the moment you play or sing a note and when you hear it in your headphones you
are experiencing latency.
To configure the Low Latency Mixer:
1
Once all inputs are set up, disable software monitoring in DAW.
2
Go to Output Tab in Pro Tools IO Control and choose Mixer under Speaker or Headphone Out selection.
Input signal should be heard in Speakers or Headphones.
3
Go to Mixer Tab to control volume, mute and solo of input.
Setting Sample Rate
Pro Tools | Quartet operates at all standard sample rates between 44.1 kHz and 192 kHz. In most cases, the sample rate is set by
the audio application with which Pro Tools | Quartet is communicating. For those audio applications that don’t include a sample
rate setting, such as iTunes, Pro Tools | Quartet’s sample rate may be set in Audio MIDI Setup or on the System Setup tab of Pro
Tools IO Control.
Chapter 5: Using Pro Tools | Quartet
31
Software Setup
This section tells you how to setup Pro Tools | Quartet to use Avid Pro Tools, Logic, and Ableton Live.
Avid Pro Tools (version 9 or greater)
1
Choose Setup menu > Playback Engine.
2
Choose Pro Tools | Quartet for Current Engine.
3
Set the Buffer Size to 64, and click OK.
4
Click Yes.
Logic
1
Go to the Logic menu and choose Preferences > Audio.
2
In the Core Audio pane of the Device tab, select Pro Tools | Quartet for Output Device and Input Device.
3
Set the I/O Buffer Size to 64. Click Apply Changes at the bottom of the Preferences window.
4
Now close the Logic Preferences window and select New > Empty Project > from the File Menu.
5
From the New Tracks dialog box, select microphone or instrument.
6
Logic will now present a dialog to name the project and save it on your hard drive.
7
Click the Record button in the transport control at the bottom of the Logic window.
Ableton Live
1
Choose Live > Preferences.
2
Click on the Audio tab.
3
Select Core Audio in the Driver Type menu.
4
Select Pro Tools | Quartet in both the Audio Input Device and Audio Output Device menus.
5
Set Buffer Size to 128.
6
Close the Preferences window after making settings.
Chapter 5: Using Pro Tools | Quartet
32
FAQs
Q: When I press the Speaker Touchpad, nothing happens. Why?
A: When the Analog Out Format is set to Line, the Speaker Touchpad is disabled.
Q: I’ve connected my guitar, but I’m not getting any input. What should I check?
A: On the Input tab of Pro Tools IO Control, be sure to set Analog Level to Instrument (Inst).
Q: I’m not getting any output from audio software applications. What should I check?
A: If you have chosen Mixer for the output then the Software Return fader must be raised to send audio software outputs to Pro
Tools | Quartet’s outputs.
Q: I want Pro Tools IO Control to open automatically each time I connect Pro Tools | Quartet. What should I set?
A: Open Pro Tools IO Control > Preferences and check the Launch Pro Tools IO Control automatically when connecting a device
checkbox.
Q: Are the headphone and line outputs independent from the Main outs?
A: Yes! Headphone outputs may be independently routed from software outputs 1–2, 3–4, 5–6 or 7–8. Speaker and headphone output levels are set independently.
Q: How do I reset Pro Tools | Quartet?
A: To reset Pro Tools | Quartet unplug the USB cable, hold down the Controller knob, reconnect the USB cable and maintain the
controller in the down position until the unit has completely initialized.
Symptom: The audio quality is compromised (distortion, choppy audio, “buzzy” audio).
Solution: There are several remedies for audio that is distorted, choppy or otherwise compromised:
1
Hot-plug Pro Tools | Quartet (unplug and re-plug Pro Tools | Quartet while your Mac or PC is still on)
2
Toggle sample rate (in your DAW or, in the case of iTunes, Audio MIDI Setup)
3
Reload DAW driver (for example, in Logic choose Logic Pro > Preferences > Audio. Click on the Devices tab, then the Core
Audio tab. Uncheck Enabled, then re-check it.
4
In iTunes, stop then re-start audio playback.
Chapter 5: Using Pro Tools | Quartet
33
Symptom: Pro Tools | Quartet isn’t recognized in System Preferences, Pro Tools IO Control or my DAW application.
Solution: Here are the steps to check if Pro Tools | Quartet isn’t recognized on a Mac:
1
Open System Profiler by choosing About This Mac from the Apple menu and clicking More Info...
2
In the System Profilers Contents column, open the Hardware disclosure triangle and click USB.
3
Find Pro Tools | Quartet USB in the USB Device Tree and click on it to display the device’s properties.
4
Verify that the properties are the same as shown below:
USB Device Tree
If Pro Tools | Quartet doesn’t appear in the USB Device Tree:
1
Hot-plug Pro Tools | Quartet.
2
Try a different USB cable or a different USB port on your computer.
Additional Support
You can obtain additional support for Pro Tools | Quartet from: http://www.avid.com/quartethelp
Chapter 5: Using Pro Tools | Quartet
34
Avid
Technical Support (USA)
Product Information
280 N Bernardo Avenue
Mountain View, CA 94043 USA
Visit the Online Support Center at
www.avid.com/support
For company and product information,
visit us on the web at www.avid.com