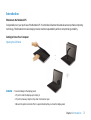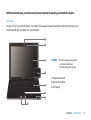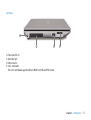
1
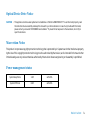
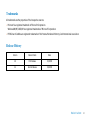
N3400 Series User’s Guide
Space Saving Contemporary Design
Regulations Information
FCC-B Radio Frequency Interference Statement
This equipment has been tested and found to comply with the limits for a Class B digital device, pursuant to part 15 of the
FCC rules. These limits are designed to provide reasonable protection against harmful interference in a residential
installation. This equipment generates, uses and can radiate radio frequency energy and, if not installed and used in
accordance with the instructions, may cause harmful interference to radio communications. However, there is no
guarantee that interference will not occur in a particular installation. If this equipment does cause harmful interference to
radio or television reception, which can be determined by turning the equipment off and on, the user is encouraged to try
to correct the interference by one or more of the following measures :
• Reorient or relocate the receiving antenna.
• Increase the separation between the equipment and receiver.
• Connect the equipment into an outlet on a circuit different from that to which the receiver is connected.
• Consult the dealer or an experienced radio TV technician for help.
Note ✓ The changes or modifications not expressly approved by the party responsible for compliance could void the user’s authority
to operate the equipment.
✓ Shield interface cables and AC power cord, if any must be used in order to comply with the emission limits.
Before You Start
i
FCC Conditions
This device complies with part 15 of the FCC Rules. Operation is subject to the following two conditions :
1. This device may not cause harmful interference.
2. This device must accept any interference received, including interference that may cause undesired operation.
FCC Radlo Frequency Interference Requlrements
1. This device has no Ad-hoc capability for 5250 ~ 5350 and 5470 ~ 5725 MHz.
2. This device is restricted to INDOOR USE due to its opration in the 5.15 to 5.25GHz frequency range. FCC requires this
product to be used indoors for the frequency range 5.15 to 5.25GHz to reduce the potential for harmful interference to
co-channel of the Mobile Satellite Systems.
High power radars are allocated as primary user of the 5.25 to 5.35GHz and 5.65 to 5.85GHz bands. These radar stations
can cause interference with and / or damage this device.
RF exposure warning
The equipment complies with FCC RF exposure limits set forth for an uncontrolled environment.
The equipment must not be co-located or operating in conjunction with any other antenna or transmitter.
SAR Value : 0.561 W/Kg
Before You Start
ii
Safety Guideline for Using Lithium Battery
(Danish) ADVARSEL! Lithiumbatteri --- Eksplosionsfare ved fejlagtig håndtering.
Udskiftning må kun ske med batteri af same fabrikat og type. Levé det brugte batteri tilbage til leverandøren.
(Deutsch) VORSICHT: Explosionsgefahr bei unsachgemäßem Austausch der Batterie. Ersatz nur durch denselben
oder einen vom Hersteller empfohlenen gleich-wertigen Typ. Entsorgung gebrauchter Batterien nach Angaben
des Herstellers.
(English) CAUTION: Danger of explosion if battery is incorrectly replaced.
Replace only with the same or equivalent type recommended by the equipment manufacturer. Discard used
batteries according to manufacturers instructions.
(Finnish) VAROITUS: Paristo voi räjähtää, jos se on virheellisesti asennettu.
Vaihda paristo ainoastaan valmistajan suosittelemaan tyyppiin. Hävitä käytetty paristo valmistajan ohjeiden
mukaisesti.
(French) ATTENTION: II y a danger dex;losion sil y a remplacement incorrect de la batterie. Remplacer uniquement
avec une batterie du meme type ou dun type équivalent recommandé par le constructeur. Mettre au rebut les
batteries usages conformément aux instructions du fabricant.
(Norwegian) ADVARSEL: Eksplosjonsfare ved feilaktig skifte av batteri. Benytt same batteritype eller en tilsvarende
type anbefalt av apparatfabrikanten.
Brukte batterier kasseres I henhold til fabrikantens instruksjoner.
(Swedish) VARNING: Explosionsfara vid felaktigt batteribyte. Använd samma batterityp eller en ekvivalent typ som
rekommenderas av apparattillverkaren. Kassera använt batteri enligt fabrikantens instruction.
Before You Start
iii
Optical Device Drive Notice
CAUTION ✓ This appliance contains a laser system and is classified as a “CLASS 1 LASER PRODUCT.” To use this model properly, read
the instruction manual carefully and keep this manual for your future reference. In case of any trouble with this model,
please contact your nearest “AUTHORIZED service station.” To prevent direct exposure to the laser beam, do not try to
open the enclosure.
Macrovision Notice
This product incorporates copyright protection technology that is protected by U.S. patents and other intellectual property
rights. Use of this copyright protection technology must be authorized by Macrovision, and is intended for home and other
limited viewing uses only unless otherwise authorized by Macrovision. Reverse engineering or disassembly is prohibited.
Power management status
System Sleep Mode
1.3W
with WOL
System Off Mode
0.6W
with WOL
Before You Start
iv
Safety Instructions
1. Read the safety instructions carefully and thoroughly.
2. Save this User Guide for possible use later.
3. Keep this equipment away from humidity and high temperature.
4. Lay this equipment on a stable surface before setting it up.
5. The openings on the enclosure are used for air convection and to prevent the equipment from overheating. Do not
cover the openings.
6. Make sure that the power voltage is within its safety range and has been adjusted properly to the value of 100~240V
before connecting the equipment to the power inlet.
7. Place the power cord in a way that people are unlikely to step on it. Do not place anything on the power cord.
8. Always unplug the power cord before inserting any add-on card or module.
9. All cautions and warnings on the equipment should be noted.
10. If any of the following situations arises, get the equipment checked by a service personnel:
✓ The power cord or plug is damaged.
✓ Liquid has penetrated into the equipment.
✓ The equipment has been exposed to moisture.
✓ The equipment has not worked well or you can not get it work according to Users Manual.
✓ The equipment was dropped and damaged.
✓ The equipment has obvious signs of breakage.
Before You Start
v
11. Never pour any liquid into the opening that could damage the equipment or cause an electrical shock.
12. Do not leave the equipment in an unconditioned environment with a storage temperature of 60°C (140°F) or above,
which may damage the equipment.
13. To prevent explosion caused by improper battery replacement, use the same or equivalent type of battery
recommended by the manufacturer only.
Before You Start
vi
Information about ENERGY STAR
Trigem computers marked with the ENERGY STAR Logo are compliant with the applicable U.S.
Environmental Protection Agency ENERGY STAR specifications for computers. The EPA ENERGY STAR Logo
does not imply endorsement by the EPA. As an ENERGY STAR Partner, Trigem Computer (AVERATEC) has
determined the products marked with the ENERGY STAR Logo are ENERGY STAR qualified as per the
applicable ENERGY STAR guidelines for energy efficiency.
- The ENERGY STAR Computers Program was created by the EPA to promote energy efficiency and reduce air pollution
through more energy-efficient equipment in homes, offices, and factories.
- One way products achieve this is by reducing power consumption when not being used through the Microsoft Windows®
Power Management feature.
- The Power Management feature allows the computer to enter into a low-power or “sleep” mode after a period of user
inactivity.
When used with an external ENERGY STAR compliant monitor, this feature will also support similar power management
features of the monitor. To take advantage of this energy savings:
• The Power Management feature has been preset to power down the computer after 20 minutes of user inactivity.
• The Power Management feature has been preset to power down the monitor after 10 minutes of user inactivity.
• Power Management Status of Product
System Idle Mode
About 10 W
System Sleep Mode
1.3 W
System Off mode
0.6 W
with WOL
Before You Start
vii
- Both the computer and monitor can be woken from “sleep” mode through user interaction with any of the computer’s
input devices (ex: mouse, keyboard, etc).
- When configured with Wake On LAN (WOL) enabled, the computer can also be awoken by a network signal.
More information on the energy and financial savings potential of the Power Management Feature can be found at the
EPA’s ENERGY STAR Power Management Web site :
www.energystar.gov/powermanagement<http://www.energystar.gov/powermanagement>
More information on the ENERGY STAR program and its environmental benefits are available by visiting the EPA’s ENERGY
STAR Web site address : www.energystar.gov
Before You Start
viii
WEEE Statement
Before You Start
ix
Trademarks
All trademarks are the properties of their respective owners.
✓ Microsoft is a registered trademark of Microsoft Corporation.
Windows98/ME, 2000/XP are registered trademarks of Microsoft Corporation.
✓ PCMCIA and CardBus are registered trademarks of the Personal Notebook Memory Card International Association.
Release History
Version
Revision Note
Date
1.0
First Release
03, 2009
1.1
Second Release
06, 2009
Before You Start
x
Before You Read
The information in this user’s guide is subject to change without notice.
TriGem Computer, Inc. shall not be liable for technical or editorial errors or omissions contained herein; nor for incidental
or consequential damages resulting from the furnishing, performance, or use of this material.
AVERATEC is a trademark or registered trademark of TriGem Computer, Inc. in the United States and/or other countries.
All other product and brand names are trademarks of their respective owners.
©2009 TriGem Computer, Inc. All rights reserved.
Note ✓ Depending on the model, your computer’s components may vary and look slightly different than those pictured.
Before You Start
xi
Table of Content
Before You Start
Operating on Battery Power
11
Regulations Information
Charging the Battery Pack
12
i
Safety Guideline for Using Lithium Battery
iii
Optical Device Drive Notice
iv
Chapter 3 Using the Notebook Computer
Macrovision Notice
iv
Adjusting the LCD Screen Display
14
Power management status
iv
The Notebook’s Hot Key Controls
16
v
The TouchPad
17
Information about ENERGY START
vii
Gesture Applications
20
WEEE Statement
ix
Dual Pad function
24
Trademarks
x
Power Saving Modes
28
Release History
x
Adjusting the Brightness
32
Before You Read
xi
Using the Windows
33
Using the Bluetooth
37
Safety Instructions
Chapter 1 Introduction
Unpacking
2
Introduction
3
Chapter 4 Desktop Operation
Audio
39
Chapter 5 Internet Connection
Chapter 2 Getting Started
Connecting to a Power Source
10
Turning On Your Notebook Computer
11
Using a Wired LAN for Connection to the Internet 42
Using Wireless LAN Network for Connection to
Before You Start
xii
the Internet
43
Chapter 6 Running BIOS Setup
USB2.0 Problems
64
Recovering Your Original Software
65
Chapter 9 Specification
Entering the BIOS Setup Screen
45
CPU
Leaving the BIOS Setup Screen
45
Memory
68
BIOS Action Keys
46
Core Logic
68
Modifying the BIOS Settings
47
VGA
69
Audio Codec
69
Card reader (4 in 1)
69
70
Chapter 7 VGA Utilities
68
Display Devices
52
LAN Controller
Display Settings
52
Wireless LAN (Optional)
70
Color Correction
53
Keyboard
70
Hot Keys
53
Pointing Device
70
LCD
71
HDD
71
Chapter 8 Troubleshooting
Audio Problems
57
Battery Pack
71
Hard Disk Problems
58
AC-Adapter
71
Display Problems
59
BIOS
72
Keyboard and Mouse Problems
60
Physical Dimensions
72
CMOS Battery Problem
61
Camera module
72
Memory Problems
61
PC Card Problems
62
Performance Problems
63
Before You Start
xiii
1
Chapter
Introduction
Chapter 1 Introduction
1
Unpacking
First, unpack the notebook from the shipping carton and check all items carefully. If any item is damaged or missing,
please contact your local dealer immediately. Keep the box and packing materials in case you need to ship the unit in for
service in the future.
The package should contain the following items:
✓ Notebook Computer
✓ Quick Start Guide
✓ Carry Pouch
✓ External CD drive(optional)
✓ AC adapter and power cord
These accessories listed above may change without notice.
Chapter 1 Introduction
2
Introduction
Welcome to the Notebook PC
Congratulations on your purchase of the Notebook PC. Your Notebook features the latest advances in portable computing
technology. The Notebook’s modular design provides maximum expandability without compromising portability.
Getting to Know Your Computer
Opening the LCD Panel
WARNING ✓ To avoid damage to the display panel:
1. Try not to slam the display upon closing it.
2. Try not to place any object on top when it is closed or open.
3. Be sure the system is turned off or in suspend mode before you close the display panel.
Chapter 1 Introduction
3
With the LCD screen open, you will see several features important for operating your Notebook computer.
Front View
To open, lift the top cover (LCD Panel). The image of the top-open view and descriptions below will help you to get
familiarized with the main features of your notebook.
1
2
3
WARNING ✓ Do not place any heavy objects
on the top of notebook.
This may damage the display.
4
1. Integrated webcam
5
2. Built-in microphone
3. LCD display
6
7
8
Chapter 1 Introduction
4
4. Power button / Power Indicator
• Press momentarily to turn on the system.
• Press and hold for at least 4 seconds to turn off the system.
• Persistent green light indicates the Power is ON
5. Keyboard
6. Touchpad
7. LED Status Indicator
LED Graphic Symbol
Indication
Blue light indicates the WLAN module is active.
Set the Bluetooth ON to use the Bluetooth function.
If the <Caps Lock> key is pressed, the <Caps Lock> control will be lighted.
In this state, you can enter capital letters without pressing the <Shift> key.
If the <Num Lock> function is active, the <Num Lock> control will be lighted.
Press the <Num Lock> key to use the numeric pad.
Green light indicates the hard drive and/or optical drive is being accessed.
Blinking orange light indicates the battery is being charged.
Blinking red light indicates the battery power is low when the system is turned ON.
Persistent green light indicates the Power is ON.
8. Touchpad left / Right buttons
Chapter 1 Introduction
5
Left Views
1
2
3
4
1. Power jack (DC-in)
2. Ventilation grill
3. USB connector
4. 4-in-1 card reader
The 4-in-1 Card Reader supports SD Card, MMC Card, MS and MS-Pro Card.
Chapter 1 Introduction
6
Right View
1
2
3
4
5
6
1. Headphone/Speaker/SPDIF jack
2. Microphone jack
3. USB connectors
4. Network connector (LAN)
Note ✓ When using a LAN, please use an EMI Shielding Cable to minimize an inteference when transmitting.
5. VGA port
6. Kensington lock
Chapter 1 Introduction
7
Bottom View
3
2
1
1. Ventilation grill
2. CPU/Hard disk drive / Battery pack / Main memory cover
3. Integrated speakers
Chapter 1 Introduction
8
Chapter
2
Getting Started
Chapter 2 Getting Started
9
Connecting to a Power Source
Connecting the AC Adapter
A universal AC adapter is provided to supply your computer with power and also charge the computer’s battery pack. The
adapter’s AC input voltage can range anywhere from 100 to 240 volts, covering the standard voltages available in almost
every country.
To connect the computer to an external power source:
WARNING ✓ Do not use inferior extension cords as this may result in damage to your Notebook. The Notebook comes with its own AC
adapter. Do not use a different adapter to power the computer and other electrical devices.
Whenever possible, keep the AC adapter plugged into the Notebook and an electrical outlet to recharge the battery.
WARNING ✓ Never turn off or reset your Notebook while the hard disk is in use and the CD-ROM status icon is lit; doing so can result in
loss or destruction of your data. Always wait at least 5 seconds after turning off your Notebook before turning it back on;
turning the power on and off in rapid succession can damage the Notebook’s electrical circuitry.
Chapter 2 Getting Started
10
Turning On Your Notebook Computer
Turn on your Notebook by pressing the power button. Hold the button down for a second or two and release. The PowerOn Self Test (POST) runs automatically.
After the POST is completed, the computer reads the operating system from the hard disk drive into computer memory
(this is commonly referred to as “booting” a computer). If your OS (Operating System such as Windows Vista.... etc) is
installed, it should start automatically.
To turn the Notebook off, save your work and close all open applications, click on Start, then Shut Down and select Shut
down the computer and click "Yes" or press the power button for 4-6 seconds.
Operating on Battery Power
Your computer comes with a rechargeable battery pack that lets you operate the computer without an external power
source. When the battery pack is the charged, you can operate the computer under the following conditions:
• The battery pack is installed and no AC adapter is plugged in
WARNING ✓ Only use batteries that are approved by an authorized dealer. All batteries are not the same and therefore should not be
treated as such. Using the wrong battery could cause serious damage to your computer and yourself through toxic
emissions.
CAUTION ✓ Danger of explosion if battery is incorrectly replaced. Replace only with same or equivalent type recommended by the
manufacturer. Discard used batteries according to the manufacturer’s instructions or local laws.
Chapter 2 Getting Started
11
Charging the Battery Pack
The installed battery pack charges automatically any time the computer is connected to the AC adapter and an external
power source. It is a good idea to occasionally discharge the battery pack fully to preserve its operating performance.
Chapter 2 Getting Started
12
Chapter
3
Using the Notebook Computer
Chapter 3 Using the Notebook Computer
13
Adjusting the LCD Screen Display
The LCD screen display can be adjusted by the following key combinations.
KEYS
FUNCTIONS
Fn + F5
LCD Panel Off
Fn + F6
Changes Display Mode: LCD-only, CRT-only and LCD & CRT.
Fn + F7
Increases the brightness level.
Fn + F8
Decreases the brightness level.
LCD Care
LCD screens are delicate devices that need careful handling.
Please pay attention to the following precautions:
• When you are not using the computer, keep the LCD screen closed to protect it from dust.
• If you need to clean your LCD screen, use a soft tissue to gently wipe the LCD surface.
• Do not put your fingers or sharp objects directly on the surface and never spray cleaner directly onto the display.
• Do not press on, or store any objects on the cover when it is closed. Doing so may cause the LCD to break.
Chapter 3 Using the Notebook Computer
14
External CRT Display
You can hook up an external monitor through the 15-pin CRT connector. Three configurations are available:
• LCD only
• CRT only
• Simultaneous display of the LCD screen and CRT monitor
You can switch between these display configurations by pressing the key combination [Fn] + [F6].
Chapter 3 Using the Notebook Computer
15
The Notebook’s Hot Key Controls
Function Keys (Quick Keys)
Graphic Symbol
Action
System Control
Fn + F1
Enters Suspend Mode.
Fn + F2
Bluetooth function On/Off.
Fn + F3
Wireless LAN function On/Off.
Fn + F4
Eable/Disable the Touchpad
Fn + F5
LCD Panel Screen On/Off.
Fn + F6
Changes Display Mode: LCD-only, CRTonly and LCD & CRT.
Fn + F7
Increases the brightness level.
Fn + F8
Decreases the brightness level.
Fn + F9
Mute/Unmute Audio
Fn + F10
Increases the speaker volume.
Fn + F11
Decreases the speaker volume.
Chapter 3 Using the Notebook Computer
16
The TouchPad
The touchpad is a rectangular electronic panel located just below your keyboard. You can use the static-sensitive panel of
the touchpad and slit it to move the cursor. You can use the buttons below the touchpad as left and right mouse buttons.
TouchPad Precautions
The TouchPad is a pressure sensitive device. Please take note of the following precautions.
• Make sure the TouchPad does not come into contact with dirt, liquids or grease.
• Do not touch the TouchPad if your fingers are dirty.
• Do not rest heavy objects on the TouchPad or the TouchPad buttons.
You can use the TouchPad with Microsoft Windows as well as non-Windows applications.
How to improve the sensitivity of the touch pad
If you want to improve the sensitivity or adjust the speed of your touch pad, please refer to the following sections.
Adjusting the mouse pointer speed
If you want to adjust the mouse pointer speed, please follow these steps.
Chapter 3 Using the Notebook Computer
17
1 Double click the Finger-sensing Pad icon in the task bar.
2 After selecting the Pointer Options tab, set the point speed option in the Motion menu. Then select the Enhance
pointer precision option and press the OK button.
Chapter 3 Using the Notebook Computer
18
Adjusting the Finger-sensing Pad
1 Double click the Finger-sensing Pad icon in the task bar.
2 Select the Finger-sensing Pad tab, and see if the touch pad program is
selected in the Available information and configuration items menu.
Then press the OK button.
Chapter 3 Using the Notebook Computer
19
Gesture Applications
Page Up / Down
Features
Simulate the page up / page down command.
Applications
• Microsoft Office : Word, Excel, PowerPoint, Outlook, …, etc.
• Adobe Acrobat Reader/ Editor.
• Windows Photo Gallery.
• Windows File Explorer.
Page Up
• Browsers : IE, Firefox
• Editor : Notepad, Wordpad and common text editors.
• Any applications which support regular scrolling functions.
Usage
1. Activate the window you want.
2. Put two fingers on pad at the same time.
3. Move both fingers to up / down direction.
4. When moving fingers, you can see the window moving toward previous / next page.
Page Down
5. Remove fingers from pad to stop scrolling.
Chapter 3 Using the Notebook Computer
20
Flick / Sweep
Features
Simulate the forward and backward operation.
Applications
• Windows Photo Gallery
• Windows File Exploer.
• Browsers : IE, Firefox
• Any application which support next page and previous page.
Forward
Usage
1. Activate the window you want.
2. Put two fingers on pad at the same time.
3. Move both fingers to left or right in a short distance, then remove fingers.
Backward
Chapter 3 Using the Notebook Computer
21
Pinch
Features
• Simulate the zoom in / out operation with ctrl + scroll command.
• Zoom in/ out operation in an intuitive way.
• Continuously zooming until fingers removed from pad.
• Support any application which supports ctrl + scroll command.
Applications
• Microsoft Office (Word, Excel, PowerPoint, Outlook, Excel, …, etc.)
Zoom In
• Windows Photo Gallery
• Adobe Acrobat Reader / Editor
• Browsers : IE, Firefox.
• Any application that supports ctrl + scroll command.
Usage
1. Activate the window you want.
2. Put two fingers on pad at the same time.
Zoom Out
3. Make a pinch gesture with both fingers.
4. Hold two fingers on pad after the pinch gesture, the zoom in / out operation will keep
applying to the window.
5. Remove fingers until the object zoom in / out to the desired size.
Chapter 3 Using the Notebook Computer
22
Rotate
Features
• Simulate rotating functions.
• User can use rotating function in an intuitive way.
• Support any application with has rotation command.
Applications
• Windows Photo Gallery
• Adobe Acrobat Reader / Editor
Clock-wise rotation
• Any application which supports rotation command.
Usage
1. Activate the window you want.
2. Put two fingers on pad at the same time.
3. Draw a circle with both fingers and then remove them from pad.
Counter Clock-wise
rotation
Chapter 3 Using the Notebook Computer
23
Dual Pad function
If you wish to use the Dual Pad function while the Touch Pad is active, follow the instructions below.
When the Dual Pad function is active, the Touch Pad backlight will blink once.
4
3
5
2
1
6
1. Dual Pad switch key
If the <Dual Pad> key is pressed, the Touch Button icon will change. (Press the <Dual Pad> key to use the Dual Pad function.)
Chapter 3 Using the Notebook Computer
24
2. Windows Media Player key
If the Windows Media Player key is pressed while the Dual Pad is active, the Windows Media
Player will be launched.
3. Internet key
If the Internet key is pressed while the Dual Pad is active, the Internet Explorer will be launched.
4. Email key
If the email key is pressed while the Dual Pad is active, the Windows Media will be launched.
5. Hotkeys (User-defined buttons)
If the Dual Pad is active, you can define hotkeys to your own application or to a pre-defined
application. After that, you can start the program by simply pressing the number key on the
touch pad which you have assigned a program to. To add user-defined buttons, please follow
the steps below.
1 Double click the Finger-sensing Pad icon in the task bar.
Chapter 3 Using the Notebook Computer
25
2 Select the Finger-sensing Pad tab, select the User-Defined
Function #1 in the Available on-pad icons menu.
3 Select the Open in the Enable icon function menu.
Chapter 3 Using the Notebook Computer
26
4 Select a pre-defined application or select your
own application by selecting Open... then
choosing your application.
5 Once you have selected your pre-defined
application, click the OK button to finish.
6. Volume key
If the Dual Pad is active, you can control the volume with the Volume key.
Chapter 3 Using the Notebook Computer
27
Power Saving Modes
This section contains information on the Notebook’s power system, including the AC Adapter, the battery system,
recharging the battery, and tips for conserving battery power.
The power system is comprised of two parts, the AC Adapter and the battery system. The AC Adapter converts AC power
from a wall outlet to the DC power required by the computer.
The Battery Power System
Before using the computer on battery power for the first time, check the battery status icon on the Windows Toolbar to
make sure the battery is fully charged.
See Battery Status later in this section for a description and explanation of the Windows Battery icon.
Charging the battery takes about 4~6 hours to charge when the system is in off state.
If possible, always charge the battery completely.
Note ✓ If you use typically go through 20 or more charge cycles (full charge to complete discharge), it is highly recommended you
perform the Battery Calibration every 3 months to maintain the battery life.
✓ Please refer to the topic on “Battery Calibration” describing how to calibrate your system battery .
✓ If you discover the battery life is getting shorter, please perform the “Battery Calibration” process immediately.
Chapter 3 Using the Notebook Computer
28
Preparing the Battery Pack for Use (Battery Calibration)
Before using the battery pack for the first time, the Smart Battery IC within the battery pack should be calibrated in order to
get accurate reporting of remaining battery life status.
To calibrate the battery pack follows the instructions below:
1. Turn on the Notebook. If the battery is completely drained go to the next step. Otherwise, let the battery run down until
the low battery warning beeps are heard. The system will automatically enter into Suspend mode.
2. Turn the Notebook off. Connect the AC adapter and let the battery fully recharge. When the battery charge indicator
turns off, the battery is fully charged.
3. Turn On the notebook, let the battery run down until the low-battery state is achieved and you hear the warning beeps.
The system will automatically enter the Suspend mode. You can now connect the AC adapter.
4. The battery pack is now calibrated properly.
In general, using the battery until the low battery-warning indicator appears and then fully recharging the battery each
time (full discharge/charge cycle) will ensure accurate reporting of the battery gauge status.
Chapter 3 Using the Notebook Computer
29
Automatic Battery Pack Charging Function
To charge the battery, while the battery pack is in the notebook, plug the AC adapter into the notebook and an electrical outlet.
The charging time is approximately 4-6 hours when the notebook is turned off and approximately 6-10 hours when the
notebook is turned on.
When the battery is fully charged, the battery charge indicator turns off.
Note ✓ Under heavy use or when exposed to high temperatures, the battery may take longer to charge than normal. You need to
continue to charge it with the AC adapter plugged in until the charging LED turns off.
Battery Status
Windows Vista has an applet in the Control Panel that will display an icon in the Windows taskbar indicating when the
Notebook is running on battery power or is attached to the AC adapter.
This applet also displays a meter that indicates how much charge is remaining in the battery.
Chapter 3 Using the Notebook Computer
30
Battery Low Warning
When the pack initially reaches the “Battery Low” state approximately 7 ~ 10 minutes of the usable battery life is left.
You will hear an audible beep signal every 15 seconds alerting you to the “Battery Low” status. When the battery power
reaches the “Battery Low Low” status the beeping sound will accelerate.
Your battery now has 1 ~ 2 minutes of battery charge remaining. You must save your data or connect AC power
immediately; otherwise, you may lose your data.
Sound
Meaning
Continuous beeping
every 5 seconds
Battery Low: Indicates that there is 7 to 10 minutes charge remaining.
Beeping accelerates
Battery Low Low: Indicates that there is 1 to 2 minutes of battery charge remaining. Save your work and turn off
the Notebook, or connect the AC adapter.
When there is only one minute of battery charge remaining, the Notebook will suspend to the HDD and power off. You
should connect AC power and resume to save your work.
Small Battery for the Real Time Clock
There is a small built-in battery pack that supplies power to the system in order to maintain certain system information
while the power is off.
If the Notebook is left without a power source for long period of time, this battery will be exhausted and system
information will be lost.
Chapter 3 Using the Notebook Computer
31
WARNING ✓ Danger of explosion if battery is incorrectly replaced. Replace only with the same or equivalent type recommended by the
manufacturer. Dispose of used batteries according to the manufacturer's instructions. Never remove the battery pack
while the power is on as this may result in data loss when the system loses power.
Adjusting the Brightness
To adjust the brightness on the LCD screen, press and hold down the [Fn] key in the lower left hand corner of the keyboard
and press the [F8] key to reduce the brightness or [F7] to increase the brightness.
Chapter 3 Using the Notebook Computer
32
Using the Windows
Help Windows
For Windows Vista help, click Start Help and Support icon
will open the dialog box.
Desktop
Desktop may vary differently on the software installed in your notebook with different or additional shortcuts.
Recycle Bin
Taskbar
Start Button
Notification
Chapter 3 Using the Notebook Computer
33
Recycle Bin
Used for storing deleted files in case you want to recover and save it in your system. The files will only be deleted from the
Recycle Bin permanently only if you empty it by right clicking your mouse and select the “Empty Recycle Bin”.
Start Button
Allows easy access to all Windows programs.
The Start menu allows you to adapt and show the programs used most frequently.
If you wish to keep an item, right click the item and click Pin to Start menu.
Log Off will enable the current user to log off and allows a new user to log on.
Turn Off Computer allows you to shut down, restart, and Stand by modes for power saving purposes.
Chapter 3 Using the Notebook Computer
34
Taskbar
When you open a program, its icon is displayed at the taskbar for you to conveniently move between programs by clicking
the relevant button.
To add or remove toolbars from the taskbar: right click an empty spot on the taskbar, select Toolbars choose the
toolbar you want to add.
Notification
The icons that appear here are for quick access to some programs and computer functions that you frequently used. To
prevent Windows Vista from hiding icons:
From an empty spot on the Taskbar, right click your mouse and select the Properties, remove the checked mark on the
Auto-hide the taskbar.
Chapter 3 Using the Notebook Computer
35
Control Panel
It is in this area that you can change how Windows looks and works. Click Start
There are two interfaces - Classic View.
Control Panel dialog box.
Chapter 3 Using the Notebook Computer
36
Using the Bluetooth Capabilities of Your Notebook PC
Your system has a built-in Bluetooth module, so you can use any Bluetooth device after pairing it with your system.
To use a Bluetooth device, refer to the next steps:
1. Pair your Bluetooth device with your system.
To pair your Bluetooth device with your system, refer to the manual that came with your device.
2. Double click the Bluetooth Devices icon on the task bar.
3. If your Bluetooth device is paired correctly, you can see the icon of
your device in the device list box.
Note ✓ If you want to set Bluetooth, use Bluetooth Settings. To set Bluetooth:
Select the settings for Bluetooth in each tab and click OK when you
finished the settings.
Chapter 3 Using the Notebook Computer
37
4
Chapter
Desktop Operation
Chapter 4 Desktop Operation
38
Your notebook is capable of providing you with efficient and productive mobile computing, it also has the speed and
capacity to service as a desktop system.
This chapter discusses those functions of your notebook that are typical of desktop systems.
Audio
The Multimedia Sound System
The Notebook’s built-in audio capabilities allow you to take advantage of a wide range of education and entertainment
multimedia software. The Notebook is equipped with two internal stereo speakers, a microphone, and input audio ports
for external audio units.
An external microphone can be connected to the microphone jack.
External speakers or headphones can be connected to the Notebook’s audio-out jack.
External audio devices can be connected to the Line in jack. All audio features are software controlled. The Notebook’s
multimedia sound system includes the following features:
• Supports Windows Sound System compatibility
• Full Duplex operation
• Dynamic filtering reduces noise and distortion rate
• 16-bit digitized audio playback
• Bulit-in stereo speakers
• Digitized audio recording through the Notebook’s built-in microphone or any external source
Chapter 4 Desktop Operation
39
Audio Volume Control
The Notebook is equipped with hot-key volume controls: Pressing the [Fn]+[F11] hot-key combination decreases the
audio output volume, press the [Fn]+[F10] hot-key combination increases the audio output volume.
Audio Software
Your notebook comes equipped with an integrated sound system capable of providing you with quality audio sound
through the builtin speakers or through external speakers connected via the system ports.
Sound Recording
Your system allows you to record sounds and store them as files using the microphone via the microphone jack on the
right side of the notebook computer. Check the Windows Help and Support Center in Windows for information on using
the various elements in sound recording.
Note ✓ For a high-quality sound, click on the "Volume Control" at the lower right end of your screen. From the Volume Control
windows, click on the "Advanced" tab, click and select the "Microphone Boost" item.
Playing Sound Files
Your notebook can play audio files stored in MIDI, WAVE or MP3 file format. Check the Help and Support Center in
Windows for information on the functions of the Media Player.
External Speakers and Microphone
The sound system is capable in providing high-quality sound to external speakers and receiving and processing sounds
from an external microphone or external sound source.
Connecting Peripheral Devices
To expand your computing capabilities, you can add a variety of external devices to your computer.
Chapter 4 Desktop Operation
40
Chapter
5
Internet Connection
Chapter 5 Internet Connection
41
There are numerous ways to connect to the Internet. This may vary from the user’s working environment as well as system
specifications.
• Using a wired LAN
• Using a wireless LAN
Using a Wired LAN for Connection to the Internet
For you connect to the Internet, a wired LAN environment normally uses the company’s LAN or a broadband modem.
Chapter 5 Internet Connection
42
Using Wireless LAN Network for Connection to the Internet
Chapter 5 Internet Connection
43
Chapter
6
Running BIOS Setup
Chapter 6 Running BIOS Setup
44
The Setup Utility is a hardware configuration program built into your computer’s BIOS (Basic Input/Output System). It runs
and maintains a variety of hardware functions. It is menu-driven software, which allows you to easily configure and change
the settings.
The BIOS contains manufacture’s default settings for the computer’s standard operations. However, there are occasions
when you may be required to modify the default settings in the BIOS.
The BIOS allows you to set up passwords to limit access to users. This is an important feature because a great deal of vital
information is carried within the computer nowadays. Unauthorized access can be prevented. Later in this chapter, you will
learn how to use this security feature.
Entering the BIOS Setup Screen
First turn on the power. When the BIOS performs the POST (Power-On Self Test), press F2 key quickly to activate the
Phoenix BIOS Setup Utility.
Note ✓ You may need to press F2 key fairly quickly. Once the system begins to load Windows, you may have to retry by cycle-power on
again
Leaving the BIOS Setup Screen
When you have finished modifying the BIOS settings, exit the BIOS. It takes a few seconds to record changes in the CMOS.
Chapter 6 Running BIOS Setup
45
BIOS Action Keys
Function Key
ESC
Enter
Command
Exit
Go to Sub Screen
Description
Leaves a sub-menu to return to the previous menu
OR exits the BIOS setup while saving changes.
Shows the Sub Menu
F1
General Help
Shows the Help Screen
F10
Save and Exit
Saves changes and reboots the computer.
<Tab>
Select a field
Selects the next field.
Select an item
Selects the next upper item.
Select an item
Selects the next lower item.
-
Lower value
Selects the next value within a field.
+
Higher value
Selects the next value within a field.
Chapter 6 Running BIOS Setup
46
Modifying the BIOS Settings
The AMI BIOS setup main menu is subdivided into sub-menus. Each menu item is described in this section.
Main
Under this menu, you may change time/date and view basic processor
and system memory information.
Advanced
Chapter 6 Running BIOS Setup
47
Security
Boot
Exit
Chapter 6 Running BIOS Setup
48
Chapter
7
VGA Utilities
Chapter 7 VGA Utilities
49
After you have restarted Windows, click on the Intel® Graphics Media Accelerator Driver for Mobile icon on the lower
right corner of the screen. Click on the Graphics Properties to enter the Intel® Graphics Media Accelerator Driver for
Mobile display window.
You can also click the touchpad or mouse right button and select the Personalize item. Select the Display Settings option
to enter its window display.
Chapter 7 VGA Utilities
50
Click on the Advanced Settings tab to enter Generic PnP Monitor and Mobile Intel® 4 Series Express Chipset Family
window display. Select the Intel ® Graphics Media Accelerator Driver for Mobile and click on the Graphics Properties
tab.
or
Chapter 7 VGA Utilities
51
Display Devices
This feature allows you to connect external display devices.
Display Settings
This feature allows you to adjust the color scheme, resolution,
refresh rate for your display.
Chapter 7 VGA Utilities
52
Color Correction
This feature allows you to adjust the color rate of your display.
Hot Keys
This feature allows you to set the corresponding hot keys in executing
the program you frequently use.
Chapter 7 VGA Utilities
53
Chapter
8
Troubleshooting
Chapter 8 Troubleshooting
54
Your computer has been fully tested and complies with the system specifications before shipping. However, incorrect
operations and/or mishandling may cause problems.
This chapter provides a reference for identifying and correcting common hardware and software problems that you may
encounter.
When you encounter a problem, you should first try to go through the recommendations in this chapter. Instead of
returning the computer and waiting for repair, you may easily solve the problems by considering the following scenarios
and possible solutions. If the error continues, contact your reseller for service information. Before taking further actions,
consider the following suggestions:
• Check to see if the problem persists when all the external devices are removed.
• Check to see that the white light indicator on the AC adapter is it.
• Check to see the power cord is properly plugged to the wall outlet and to the computer.
• Check to see the power indicator of the computer is on.
• Check to see if your keyboard is operational by pressing and holding any key.
• Check for any incorrect or loose cable connections. Make sure the latches on the connectors latch securely on to the
receptor end.
• Be sure you have not performed an incorrect setting on the hardware devices in the BIOS Setup utility. A faulty setting
may cause the system to misbehave. If you are not sure of the changes you made, try to restore all the settings to factory
defaults.
• Be sure all the device drivers are installed properly. For example, without the audio driver properly installed, the speakers
and microphone will not work.
Chapter 8 Troubleshooting
55
• If external devices such as USB cameras, scanners, printers do not function correctly when connected to the system, it is
usually a problem with the device driver or the device itself. Consult the device’s manufacturer first before contacting
TriGem USA support center.
• Some software programs, which have not gone through rigorous coding and testing, may cause problems during your
routine use. Consult the software vendor for problem solving.
• Legacy peripheral are not plug-and-play capable. You need to restart the system with these devices powered up and
connected first.
• Be sure to go to BIOS SETUP and load DEFAULT SETTING after BIOS re-flash.
Chapter 8 Troubleshooting
56
Audio Problems
No speaker output
• Software volume control is turned down in Microsoft Sound System or is muted. Double-click the speaker icon on the
lower right corner of the taskbar to see if the speaker has been muted or turned down all the way.
• Most audio problems are software-related. If your computer worked before, chances are software may have been set
incorrectly.
• Go to [Start > Settings > Control Panel] and double-click the Sounds and Audio Devices icon. In the Audio page, make
sure that the audio codec mentioned in the spec is the default playback device.
Sound cannot be recorded
• You will need to plug-in an external microphone to the microphone connector to record sound.
• Double-click the speaker icon on the lower right corner of the taskbar to see if the microphone has been muted.
- Click Options and select Properties.
- Select Recording and click the OK button.
- After Click OK button, the recording volume control panel will appear.
• Go to [Start > Settings > Control Panel] and double-click the Multimedia icon (or Sounds and Audio Devices icon). In the
Volume or Audio page, make sure that the audio codec mentioned in the spec is the default recording device.
Chapter 8 Troubleshooting
57
Hard Disk Problems
The hard disk drive does not work or is not recognizable
• If you had just performed a hard disk upgrade, make sure the hard drive connector is not loose and the hard disk drive is
also correctly seated. Remove it and reinsert it firmly, and restart your PC.
• The new HDD may need to be partitioned and reformatted. O/S and drivers will need to be re-installed as well.
• Check the hard disk indicator LED. When you access a file, the LED lamp should light up momentarily.
• The new HDD may be defective or is not compatible.
• If your computer has been subjected to static electricity or physical shock, you may have damaged the disk drive.
The hard drive is making abnormal whining noises
• should back up your files as soon as possible.
• Make sure the source of noise is indeed from the hard drive and not the fan or other devices.
The hard disk drive has reached its capacity
• Run Disk Cleanup utility in Windows. [Start > All Programs > Accessories > System Tools > Disk Cleanup] The system will
prompt you for what to do.
• Many browsers store files in the hard drive as a cache to speed up the performance. Check the program’s Online Help for
instructions on decreasing the cache size or on removing temporary Internet files.
• Empty the Recycle Bin to create more disk space. When you delete files, Windows saves them to the Recycle Bin.
Chapter 8 Troubleshooting
58
The hard disk takes longer to read a file
• If you have been using the drive for a period, the files may be fragmented. Go to [Start > Programs > Accessories > System
Tools > Disk Defragmenter] to perform a disk defragmentation. This operation may take a while.
• Interrupt requests or problems with other hardware devices may have occupied the CPU and therefore slows down the
system performance.
The files are corrupted
• Run the Error-checking utility in Windows to check the HDD. Double-click My Computer. Right-click C: and select
Properties. Click Check Now in Error-checking in Tools.
Display Problems
The display panel is blank when the system is turned on
• Make sure the computer is not in the Standby or Hibernate suspend modes. The display is turned off to conserve energy
in these modes.
The screen is difficult to read
• The display resolution should at least be set to at least 1280x800 for optimal viewing.
- Go to [Start > Settings > Control Panel] and double-click the Display icon.
- Under the Settings page, set screen resolution to at least 1280x800 and choose at least high(65536) colors.
The screen flickers
• It is normal if the display flickers a few times during shutting down or powering up.
Chapter 8 Troubleshooting
59
Keyboard and Mouse Problems
The built-in touch pad performs erratically
• Make sure there is no excess perspiration or humidity on your hand when using the touch pad. Keep the surface of the
touch pad clean and dry.
• Do not rest your palm or wrist on the surface of the touch pad while typing or using the touch pad.
The built-in keyboard accepts no input
• Please try to make sure the system doesn’t hang up and is still working.
The characters on the screen repeat while I type.
• You may be holding the keys down too long while you’re typing.
• Keep the keyboard clean. Dust and dirt under the keys could cause them to stick.
• Configure the keyboard to wait longer before the auto repeat feature starts. To adjust this feature, Go to [Start > Settings
> Control Panel], and double-click the Keyboard icon.
A dialogue box shows up with the adjustable settings for the keyboard.
Chapter 8 Troubleshooting
60
CMOS Battery Problem
A message “CMOS Checksum Failure” displays during the booting process or the time (clock) resets
when booting
• Try to reboot the system.
• If the message “CMOS Checksum Failure” appears during the booting procedure even after rebooting, it may indicate
failure of the CMOS battery. If so, you need to replace the battery.
This battery normally lasts two to five years. The battery is of type CR2032 (3V). Send the battery to the dealer for
replacement.
Memory Problems
The POST does not show an increased memory capacity when you have already installed additional memory
• Certain brands of memory module may not be compatible with your system. You should ask your vendor for a list of
compatible DIMM.
• The memory module may be defective.
The O/S issues an insufficient memory error message during operation
• This is often a software or Windows-related problem. A program is draining the memory resources.
• Close the application programs you’re not using and restart the system.
Chapter 8 Troubleshooting
61
PC Card Problems
Note ✓ Some system may not have the PC Card Slot option.
PC Cards do not function
• Make sure you have properly installed the driver for the card.
• Consult the card’s manual or contact the vendor for troubleshooting.
The PC card cannot be recognized
• Make sure the card is fully inserted; the outer end of the card should be even with the edge of the computer.
• Remove and insert the PC card again.
• Make sure there is no IRQ conflict with the card. See Windows on-line help for solving IRQ conflicts.
• Reboot the computer and see if the problem persists.
• The card may be defective. Try the card on another system, if possible.
Windows crashes or freezes when you remove the PC card
• Make sure you have <Stop> the PC card before removing it. Double-click the Safely Remove Hardware icon at the lower
right corner of the task bar and select the card you wish to stop.
When you click <Close>, in few seconds Windows will prompt you to remove the card.
Chapter 8 Troubleshooting
62
Performance Problems
The computer becomes hot
• In a 60°F environment, the certain areas of the computer’s back case are expected to reach 50 degrees.
• Make sure the air vents are not blocked.
• If the fan does not seem to be working at high temperature (50 degrees Celsius and up), contact the service center.
• Certain programs that are processor-intensive may increase the computer temperature to a degree where the computer
automatically slows down its CPU clock to protect itself from thermal damage.
The program appears stopped or runs very slowly
• Press CTRL+ALT+DEL to see if an application is still responding.
• Restart the computer.
• This may be normal for Windows when it is processing other CPU-intensive programs in the background or when the
system is accessing slow-speed devices such the floppy disk drive.
• You may be running too many applications. Try to close some applications or increase system memory for higher
performance.
• The processor may have been overheated due to the system’s inability to regulate its internal heat. Make sure the
computer’s ventilation grills are not blocked.
Chapter 8 Troubleshooting
63
USB2.0 Problems
The USB device does not work
• Check the settings in the Windows Control Panel.
• Make sure you have installed the necessary device drivers.
• Contact the device vendor for additional support.
Chapter 8 Troubleshooting
64
Recovering Your Original Software
WARNING
- If you recover your hard disk, you will lose all the data and programs on your hard disk. After recovering, you must
reinstall any software not originally installed from the factory. Be sure to backup your own data before running the
recovery process.
- Please run the recovery process after connecting the power adapter to your system. During the recovery process, if
the battery is drained, the system will be turned off and it may cause damage to your hard disk.
To recover the hard disk drive as the factory setting, refer to the follow steps:
1 Connect the power adapter to your system.
2 Press the power button.
3 When the “[F5] key for HDD Recovery” message appears on the screen, press [F5] on the upper side of the keyboard.
4 When the “Windows Setup [EMS Enabled]” message appears, press Enter.
5 Restoration procedures will be started, follow the on-screen instructions to recover your hard disk drive.
6 Select the menu that you want. (We will show the steps after selecting the “Recovery of the Entire Hard Disk” menu for
example.)
7 If you select the "Recovery of the Entire Hard Disk” menu, you can see the caution window.
Click OK after checking. (To cancel the recovery, click Cancel.)
Chapter 8 Troubleshooting
65
8 Windows Vista starts and the registration program runs.
9 To set up and register with Microsoft for using your computer, follow the displayed messages.
(For more information, refer to “Getting Started with Windows Vista.”)
Note ✓ Do not delete the Recovery partition on the Computer Management window for recovery.
(This partition takes about 2GB hard disk space.)
Chapter 8 Troubleshooting
66
Chapter
9
Specification
Chapter 9 Specification
67
CPU
• Intel CPU : Core 2 Duo / Pentium Dual core up to 1066Mhz, up to 6M L2 Cache
• Package : uFPGA 478
Memory
• DDRII 667/800
• DDRII RAM socket * 2
• DDR2 up to 4GB total
Core Logic
Intel GM45 + ICH9M
Support DDRII 667/800 SO-DIMM module per channel
Chapter 9 Specification
68
VGA
Intel GM45 integrated Graphics(X4500HD)
• Supports DX9 & DX10
• Dynamic Video Memory Technology (DVMT) 4.0 support
• WMV9(VC-1) and H.264(AVC)support
• Spread spectrum clocking (SSC) support.
• Analog CRT DAC interface support.
Audio Codec
Realtek ALC269
• Support 5.1 multi-channels
• Azalia standard support
• Windows Vista Premium support
Card reader (4 in 1)
• Support SD/MMC/MS/MS-Pro card
• USB I/F
Chapter 9 Specification
69
LAN Controller
Realtek 8102E
• Supports 10 and 100 Mb/sec. Full/Half Duplex operation
• RTL8111
Wireless LAN (Optional)
Intel Wireless WiFi Link 5100 Series
• PCIe Mini card
• 2 antenna supported
• IEEE 802.11 b/g/n/Draft-N compliant
Keyboard
• 86 Keys K/B
Pointing Device
• PS2 Touch Pad with 2 buttons w/o scroll up/down
Chapter 9 Specification
70
LCD
• LCD is 13.3’’ WXGA, resolution 1280X800 or 1366X768
• Glare & non Clare panel/Wide view type
HDD
• Support SATA II HDD, 1 x 2.5’’( 9.5mm)
• 5400rpm support.
Battery Pack
2cell pack, 7.3V/5000mAh
AC-Adapter
• Auto Voltage adjustment between 100 and 240VAC 50/60Hz
• 65 Watts, 3pin
Chapter 9 Specification
71
BIOS
• Support AMD BIOS
Physical Dimensions
• 327(W) x 227.5(D) x 10 - 25(H) mm (w/o rubber foot)
• 1.75Kg(+0.5 Kg) w/ 2 cells battery
Camera module
• 1.3M module
• USB interface Fixed LENs.
Chapter 9 Specification
72