1
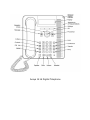
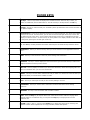
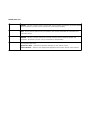
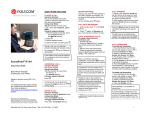
Use of Phones
And
Description of Features
Installation and Training
Provided by
Just Results, Inc.
603-624-0090
[email protected]
Avaya 1416 Digital Telephone
PHONE KEYS
Soft Keys - These 3 keys below the display have variable functions. When the key is active, its
function is indicated by the text label above it. The left hand key is usually linked to the OK key.
Message - This key is used to access your voicemail system. By default this uses a series of menus on
your phone's display.
Navigation Keys - Press the up and down arrow keys to scroll through lists. The arrow icons indicate
where you are in a list. In some menus, you can also use the left and right arrow keys to enter and
exit different levels of the menu. A menu option that accesses a sub-menu is indicated by the dots
(ellipsis) icon after its name. In some menus, the and symbols in the display indicate a value that can
be changed by pressing the left and right arrow keys.
OK - The OK key normally matches the function offered by the left hand soft key below the screen.
PHONE/EXIT - This key is used to exit any menu you are in and return to the appearance buttons
menu.
MENU - This key is used to access a menu for phone settings and information.
CONTACTS - This key is used to display the various directories (personal and shared) of names and
telephone numbers to which you have access.
CALL LOG - This key displays a record of you most recent answered, missed and outgoing calls. The
button is illuminated when you have new missed calls.
REDIAL - This key is used to either redial the last call you made or to show a list of the last calls you
made from which you can select the number to redial.
HOLD - This key is used to put the call you are currently talking to on hold.
CONFERENCE - This key is used to start a conference call and to add callers to an existing
conference.
TRANSFER - This key is used to transfer calls to another number.
DROP - Press the Drop key to drop the active call. It can also be used to redirect a ringing call to
voicemail. While on a conference call, you can press the Drop key to drop a person from the
conference call.
VOLUME - Press + plus or – minus on the Volume key to adjust the volume of the incoming call.
Separate volumes can be adjusted for the ringer, handset, headset and speaker.
Key Description
PHONE KEYS cont…
HEADSET - This key is used to answer and end calls using a headset connected to the phones headset
socket. The button is lit when you are connected to a call using the headset.
MUTE - This key can be used to mute your speech to the currently connected call. The button is lit
while mute is active.
SPEAKER - This key is used to answer and end calls using the phone's handsfree speaker and
microphone. The button is lit when you are connected to a call handsfree.
These keys have two roles:
• Appearance Keys - These button represent calls that you can make or receive.
• Feature Buttons - Those key not configured as appearance keys can be used for other functions.
USING YOUR AVAYA 1400 SERIES TELEPHONE
Using Call Appearance When Answering an Incoming Call:
• If you are not active on another call, answer the call using your
handset, headset, or speakerphone (see “Speakerphone”).
• If you are active on a call already, place the active call on hold (see
“hold”), and then answer the incoming call.
• If the call appearance for the ringing call is not displayed on the
current Home screen page, use the arrow keys to cycle through the
pages. When you locate the call appearance for the ringing call, press
the corresponding call appearance button.
Using Call Appearance When Placing Calls:
• Pick up the handset or press the
to use the speakerphone.
• The system will acquire one of the Call Appearance lines. Begin
dialing the outside number including any outside digits and/or area
code.
• NOTE: When placing a call outside the office, the phone number must
be preceded by a “9” in order to access an outside line on the system.
Transfer: Transfer allows you to transfer a call from your telephone to another
extension.
To Transfer the current call to another extension:
1. While on a call, press
Transfer.
2. When you hear dial tone, dial the extension to which the call is to be
transferred.
3. Do one of the following:
o To transfer the call without announcing it, press
Transfer again.
o To announce the call before transferring it, wait for the called party to
answer.
4. When the called party answers, announce the call. If the line is busy or if
there is no answer press
Drop. Then return to the held call by pressing
its call appearance button.
5. Press
Transfer again to complete the transfer.
To transfer the current call directly to another extension’s mailbox
1. While on a call, press
Transfer.
2. When you hear dial tone, dial “#” plus the extension number where the call
is to be transferred.
3. Press
Transfer again to complete the transfer.
Conference:
To add another party to a call:
1. Press
Conference.
2. When you hear dial tone, dial the number of the person you want to add to
the call.
3. Wait for an answer.
4. To add that person to the conference, press
Conference again.
5. Note, if the called party does not answer or does not want to join the
conference, press
Drop and by using the keys, locate call to be dropped
and press drop key from the display.
6. Repeat steps 1 through 4 for additional conference connections.
Call Log: Calling a person from the call log:
1. Press the CALL LOG button.
2. Scroll to the left or right to view a separate list of all, missed, answered, or
outgoing calls.
3. Scroll up or down to select the person or number you want to call.
4. Press the OK button or the CALL soft key.
Call Log: Adding an Entry from the Call Log to Your Contacts List
1. Press the CALL LOG button.
2. Scroll to the number that you want to add to your contacts list.
3. Press the DETAILS soft key.
4. Press the +CONTACT soft key.
5. To edit the name or number, scroll up or down and edit as appropriate.
6. Press the SAVE soft key or the OK button.
Contacts: Calling a person from the contacts list
1. Press the CONTACTS button.
2. Scroll up or down to select the person or number you want to call.
3. Press the OK button or the call soft key.
Contacts:
1. Press
2. Press
3. Press
Adding a New Contact
the CONTACTS button.
the MORE soft key.
the NEW soft key.
4. Enter the name using the dial pad. To enter characters using the dial pad:
a. Repeatedly press the number key that corresponds to the letter or
number you want to enter until the letter or number is displayed.
b. Pause before entering the next characters if the characters are on the
same key.
c. To enter a space, press 0.
5. Press the OK button or the OK soft key.
6. Enter the telephone number.
7. Press the SAVE soft key or the OK button.
Contacts: Editing a Contact
1. Press the CONTACTS button.
2. Scroll to the contact you want to edit.
3. Press the DETAILS soft key.
4. Press the EDIT soft key.
5. Scroll up or down to choose the field you want to edit.
6. Use the dial pad and soft keys to make changes to the contact information.
7. Press the SAVE soft key or the OK button to save your changes.
Avaya Menu
You can use the Avaya Menu to adjust and customize phone settings, select the
display language, view network settings, and log out. The Avaya Menu has six
sub-menus:
• Screen/Sound – lets yu adjust the display brightness and contrast,
select your ringing pattern, turn button click sounds on and off, and
turn error tones on and off.
• Call Settings – Lets you turn the call timer display, visual alerting,
and show incoming calls on or off; set the redial option; and set the
audio path to speakerphone or headset.
• Applications – Lets you turn call logging on an doff as well as turn
logging of bridged calls, line calls, and line calls answered by others
on and off.
• Advanced Options – lets you select the display language, set
automatic gain control on the handset and speaker, or initiate a
manual backup/restore if you have a back/restore file server. See
your system administrator for more information.
Custom Features
CALL PARK: Use to put a call on a special type of hold that allows you or
another user to pick up the call at another phone. If the call is not picked up
within the se time, it will return (ring back) at the phone that parked it.
•
•
•
TO SET: While active on the call, press one of the available PARK buttons; a
marker appears.
TO RETREIVE: Press the marked PARK button announced to you twice;
you are connected to the call.
Note: you may need to press additional buttons to retrieve a call parked to
a particular location. See administrator for details.
DIRECT VOICEMAIL TRANSFER: To transfer a call directly to someone’s
voicemail, press the TRNSFR button, then press # followed by the extension
number, and press TRNSFR again.
DO NOT DISTURB: When pressed and activated, all calls immediately direct to
your voicemail.
•
•
TO ACTIVATE: Press the “DND” button and a marker appears next to the
feature
TO DE-ACTIVATE: Press the “DND” button again and the marker disappears
*While DND is set, you will hear a reminder tone when you lift the handset.
CALL FORWARDING: When pressed and activated, all calls will be forwarded to
the selected destination.
TO ACTIVATE:
1. Press the FEATURES button on your display.
2. Scroll to FORWARD and press SELECT or OK
3. Scroll to FORWARD UNCONDITONAL and press SELECT or OK
4. Choose one of the following options:
a.If no number has been previously stored, enter the number to where
you would like calls to be forwarded. Be sure to include a “9” preceding
the number.
b.If using a number that has previously been stored, simply select ON
and call forwarding will be active.
c.If changing an existing forwarding number, scroll to the stored number
and select EDIT.
5. Press SAVE.
TO DE-ACTIVATE:
There are two methods to de-activate Call Forwarding. Choose one of the
following methods.
Method 1
1. Press STATUS from the home screen.
2. It will indicate that Call Forwarding is active and show the number to
where calls are being forwarded.
3. Select OFF and Call Forwarding is no longer active.
Method 2
1. Press the FEATURES button on your display.
2. Scroll to FORWARD and press SELECT or OK.
3. Scroll to FORWARD UNCONDITONAL and press SELECT or OK.
4. Press OFF and Call Forwarding is no longer active.
VOICEMAIL
FIRST TIME LOG IN TO VOICE MAIL
1. Press the Messages button on your telephone
2. Enter you extension number followed by the # key
3. Press the # key when prompted for your password (for first time log in
only)
4. Enter your new password followed by the # key (passwords must be
1-15 digits)
5. Re-enter your new password followed by the # key
6. You will be prompted to record your name
a. Press 1 and speak your name
b. Press 1 after recording
c. System will playback recording
d. Press # to approve
TO RECORD PERSONAL GREETING (Outgoing Message)
1.
2.
3.
4.
Log in to voicemail if not already connected.
Press 3 to administer your greetings
Press 1 to create a greeting
Press 1 to indicate the greeting number (e.g., 1 for your regular
everyday greeting)
5. Press 1 after recording
6. Press # to approve
7. AFTER APPROVAL FOLLOW INSTRUCTIONS TO ACTIVATE GREETING!
REMOTE VOICEMAIL ACCESS: To access voicemail remotely, dial your direct
number and press *7 when you hear your greeting. You will then be prompted
for your extension number followed by the # sign, then your password and #
sign.